Overview
The API Specification snippet helps you create standardized API (application programming interface) modules. The API Specification snippet acts as an outline for your API module. The snippet ensures you are building API modules following Unqork best practices.
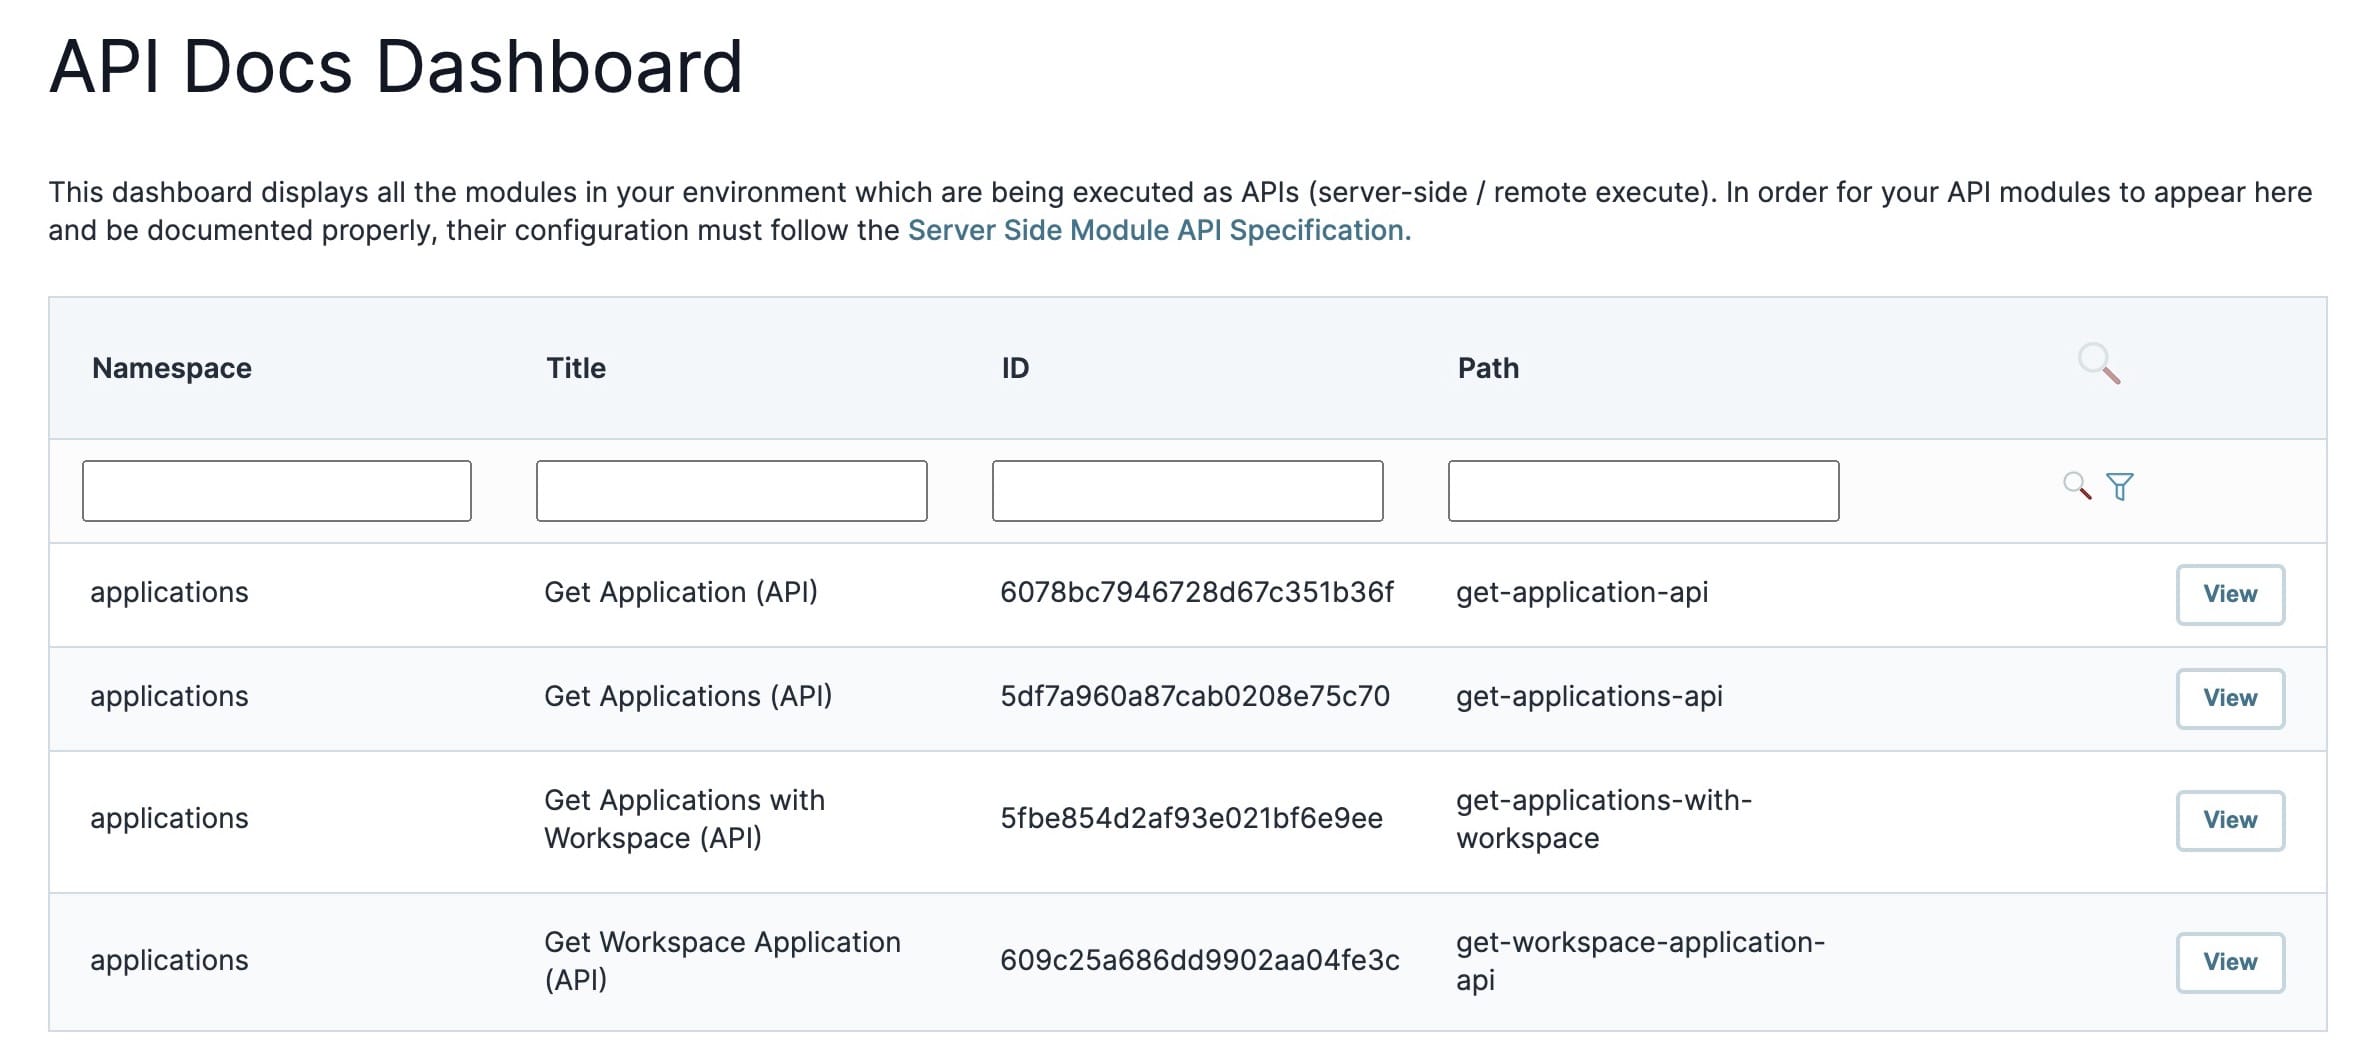
Setting up your API modules using the API Specification snippet also populates the API Docs Dashboard in your environment. The API Docs Dashboard is a part of the Unqork Development Life Cycle Toolkit. It lists all API modules in your current environment. The dashboard also contains documentation for each API module. This includes a description and the request and response parameters.
Here's how the dashboard looks when you created various API modules using the API Specification snippet:
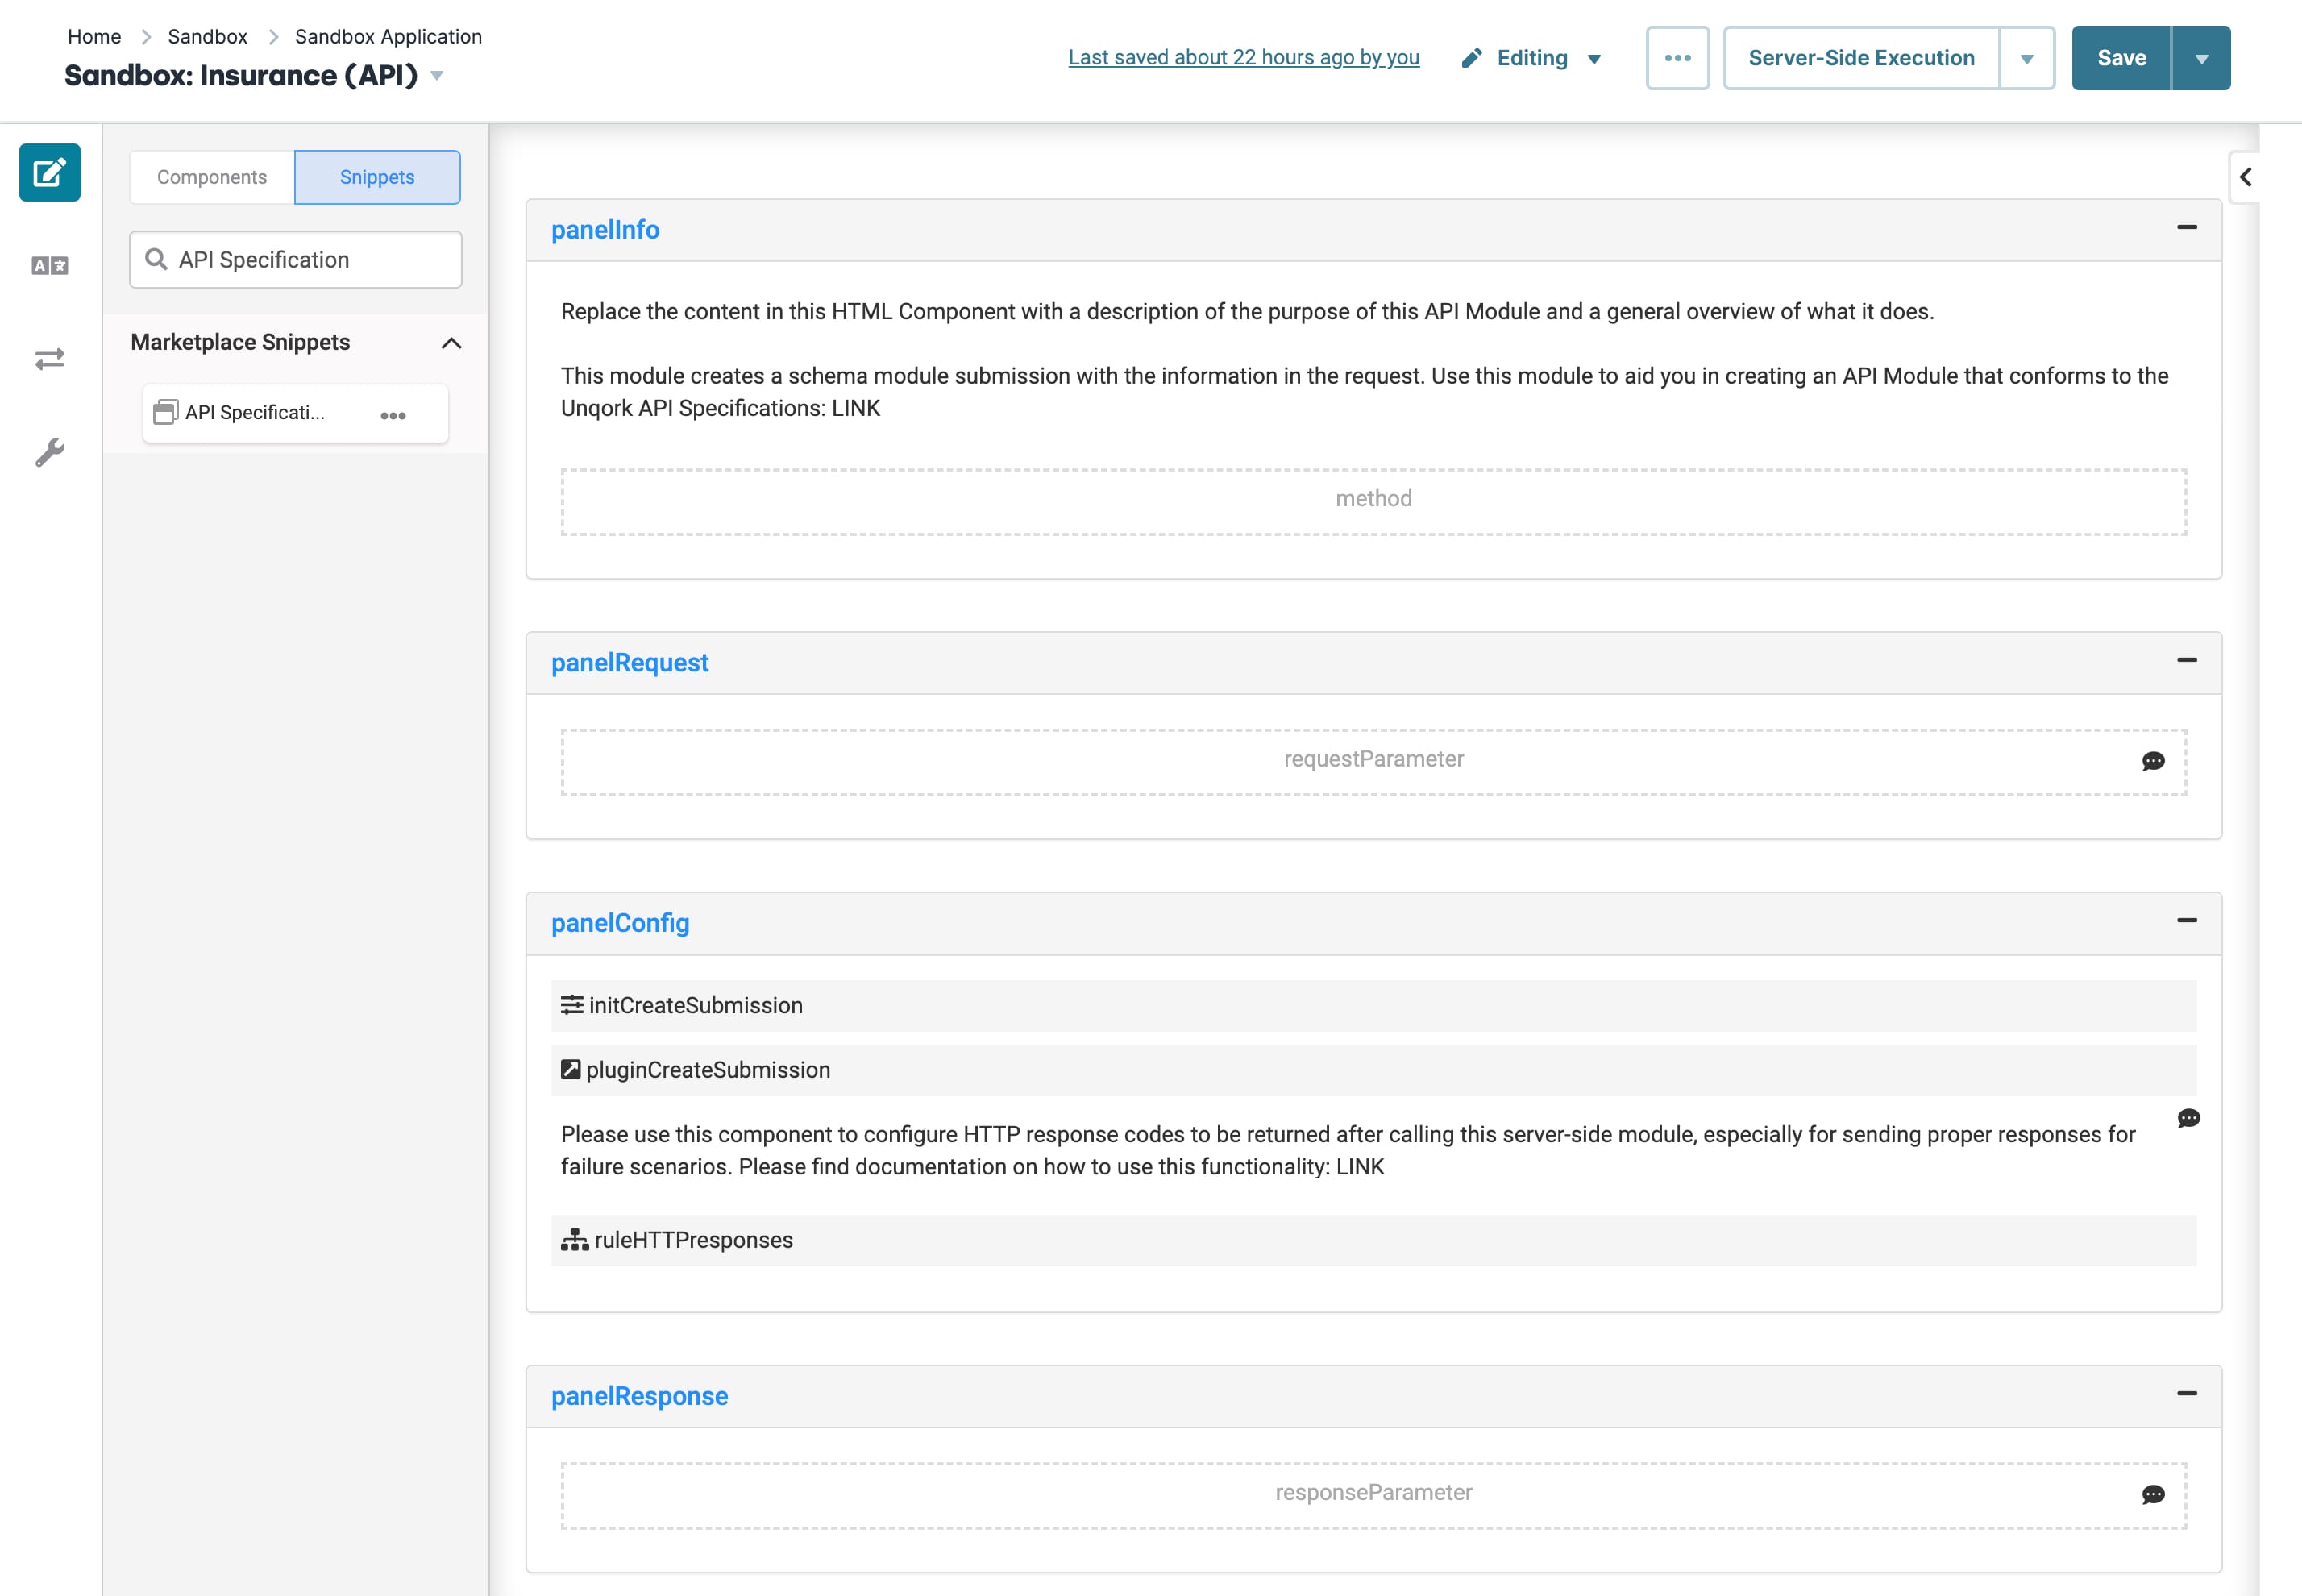
Because you only use this snippet in server-side modules, there's nothing to see in Express View. Here's how the snippet looks in the Module Builder:
How the Snippet Works
The API Specification snippet includes various Panel and Hidden components. On their own, they have no function. But, once you add and configure components, the module becomes an API module.
There are a couple of steps to making an API module:
Create a module tag of api. This is how the API Docs Dashboard tool knows this is an API module.
Open the Module Settings and set the Server Side Execution Only setting to ON.
Now you can configure the contents of each Panel component for your specific function. Each Panel in the snippet serves a different purpose. Below is a brief description of each of the snippet's Panel components.
panelInfo Panel
The panelInfo Panel component contains the description of your API module. This information displays in the API Docs Dashboard tool, identifying the API module's purpose.
Use the HTML Element component to write a brief description of your API module. For example, if your API module calls a weather API, you can enter: This module connects to a weather API to retrieve the current weather for a given zip code and country.
This section also includes the method Hidden component. Use this Hidden component to enter the module's specific HTTP method. By default, the component has the Default Value of GET/PUT/POST/DELETE. Replace this value with the method that applies to your API module. For example, if your API module retrieves weather reports, set the Default Value to GET.
panelRequest Panel
The panelRequest Panel component is where Creators define the APIs request parameters. By default, the Panel component contains a single Hidden component for a request parameter. Add and configure one Hidden component for each request parameter needed. If the API call does not have any request parameters, you can leave this Panel component empty.
Configure each Hidden component according to these best practices:
Setting | Description and Configuration |
|---|---|
Property ID | Enter the name of the parameter as a camelCase string. |
Required | If the parameter is required, set Required to |
Store Data in Database | Determines if the parameter is included in the response. Verify Store Data in Database is set to |
Field Tags | Set the data type for the parameter. The component comes preset with all available tags. Delete all tags that you do not want to apply. The available tags are:
|
Notes | In the Notes modal, enter a parameter description. Ensure you click the Note's Save button after you enter the description. |
Below shows how these settings translate to the API Docs Dashboard:

panelConfig Panel
This panelConfig Panel component is where you add the API configuration logic. This includes a Plug-In, Initializer, and any other component Creators need to complete an API configuration. None of the data in this Panel component persists, so each component's Store Data in Database setting is set to ![]() (OFF).
(OFF).
By default, this Panel component includes a preset Decisions component to configure HTTP response codes. This component lets you manually set up the response codes you want produced by the API call. This configuration is especially helpful to alert you when a call fails.
To learn more about HTTP Output response codes, visit our HTTP Status Codes article.
panelResponse Panel
The panelResponse Panel component lets you define the response parameters. By default, this Panel component contains a single Hidden component for a response parameter. Add and configure one Hidden component for each response parameter needed. If the API call does not have any response parameters, you can leave this Panel component empty.
Configure each Hidden component according to these best practices:
Setting | Description and Configuration |
|---|---|
Property ID | Enter the name of the parameter as a camelCase string. |
Required | Setting Required to |
Store Data in Database | This setting determines whether the parameter is included in the response. Ensure Store Data in Database is set to |
Field Tags | Set the data type for the parameter. The component comes preset with all available tags. Delete all tags that you do not want applied. The available tags are:
|
Notes | In the Notes modal, enter a parameter description. Ensure you click the Note's Save button after you enter the description. |
Below shows how these settings translate to the API Docs Dashboard:

Setting Up the Snippet
The API Specification snippet is essentially an outline to create your own API modules. Because it's an outline, there is plenty of room for customization.
For this example, you'll create an API module that uses the Create Submission API call. This example requires you to add one request and two response parameters.
Setting Up the Module
First, navigate to the application that you want to house this new module.
To create this module in your app:
Click the + Create New button in the top-right corner of the page.
In the Module Name field, enter Create Submission (API).
From the Tags drop-down, select api.
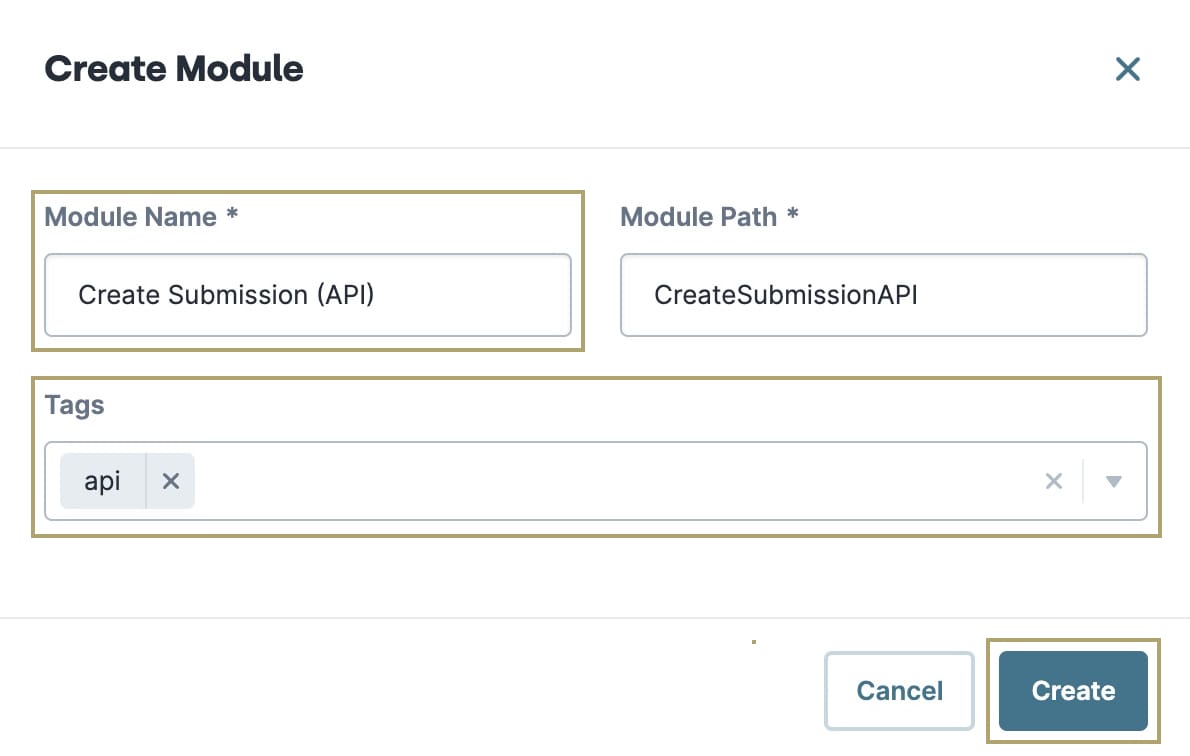
Click Create.
Enabling the Server Side Execution Only Setting
Before you add the API Specification snippet, you need to make this a server-side module.
To enable the Server Side Execution Only setting:
Hover over the left menu bar and click Settings.
Set the Server Side Execution Only toggle to ON.

Click Save Settings.
Hover over the left menu bar and click Edit Module.
Adding the Snippet
In the left sidebar of Module Builder, click the Snippets button.
In the search bar, enter API Specification.
Drag and drop the API Specification snippet onto your canvas.
Hover over each of the panelInfo, panelRequest, panelConfig, and panelResponse Panel components.
A 5-button toolbar displays above the component on hover-over.
Click and drag the
.jpg) (Move) button, dropping each Panel outside the panelAPITemplate Panel component. Doing so improves module performance.
(Move) button, dropping each Panel outside the panelAPITemplate Panel component. Doing so improves module performance.Hover over the panelAPITemplate Panel component.
Using the toolbar, click the
.jpg) (Remove) button.
(Remove) button.
Configuring panelInfo Panel
Use this Panel component to add a basic description and method for your API module.
Updating the HTML Element Component
In the panelInfo Panel component, hover over the HTML Element component.
Using the toolbar, click the
.jpg) (Settings) button.
(Settings) button.In the Content field, enter This module creates a schema module submission with the information in the request.
Click Save.
Updating the Hidden Component
In this component, enter the HTTP method this API module simulates. Your options are GET, PUT, POST, or DELETE.
In the panelInfo Panel component, hover over the method Hidden component.
Using the toolbar, click the
.jpg) (Settings) button.
(Settings) button.In the Default Value field, enter POST.
Click Save.
Configuring panelRequest Panel
Use this Panel component to enter information about the request parameters. Remember, each parameter needs its own Hidden component. For this example, you need to configure a name parameter.
Updating the Hidden Component
In the panelInfo Panel component, hover over the requestParameter Hidden component.
Using the toolbar, click the
.jpg) (Settings) button.
(Settings) button.In the Property ID and Canvas Label Text fields, enter name.
In the Field Tags field, delete all tags except type:string.
Click the Notes tab.
In the Notes field, enter The name of the submission holder.
Under the Notes field, click Save.
Click Save.
Configuring panelConfig Panel
This Panel component is where you add the API's logic. You can also update the Panel's Decisions component to configure a successful or failed response code.
Configuring the Initializer Component
Drag and drop an Initializer component into panelConfig.
In the Property ID and Canvas Label Text fields, enter initCreateSubmission.
Set the Trigger Type as New Submission.
In the Outputs table, enter the following:
Property ID
Type
Value
pluginCreateSubmission
trigger
GO
Click Save.
Configuring the Plug-In Component
Drag and drop a Plug-In component into panelConfig.
In the Property ID and Canvas Label Text fields, enter pluginCreateSubmission.
From the Internal Services drop-down, select Create Module Submission(s).
From the Module drop-down, select a module of your choice. For this example, a schema module with first name and last name fields.
In the Inputs table, enter the following:
Property ID
Mapping
firstName
data.firstName
In the Outputs table, enter the following:
Property ID
Mapping
Option
submission
data.rawData
replace
submissionId
id
replace
Click Save.
Configuring panelResponse Panel
This Panel is where you'll enter your information about the API's response parameters. Remember, each parameter needs its own Hidden component. For this example, add two response parameters.
Updating the Hidden Component
In the panelInfo Panel component, hover over the requestParameter Hidden component.
Using the toolbar, click the
.jpg) (Settings) button.
(Settings) button.In the Property ID and Canvas Label Text fields, enter submissionId.
In the Field Tags field, delete all tags except type:ObjectID.
Set the Store Data in Database toggle to ON.
Click the Notes tab.
In the Notes field, enter This is the submission ID of the submission that has been created.
Under the Notes field, click Save.
Click Save.
Configuring the Hidden Component
Drag and drop a Hidden component, placing it in the panelResponse Panel component.
In the Property ID and Canvas Label Text fields, enter submission.
In the Field Tags field, enter type:object.
Set the Store Data in Database toggle to ON.
Click the Notes tab.
In the Notes field, enter This is the data object of the submission that has been created.
Under the Notes field, click Save.
Click Save.
Save your module.
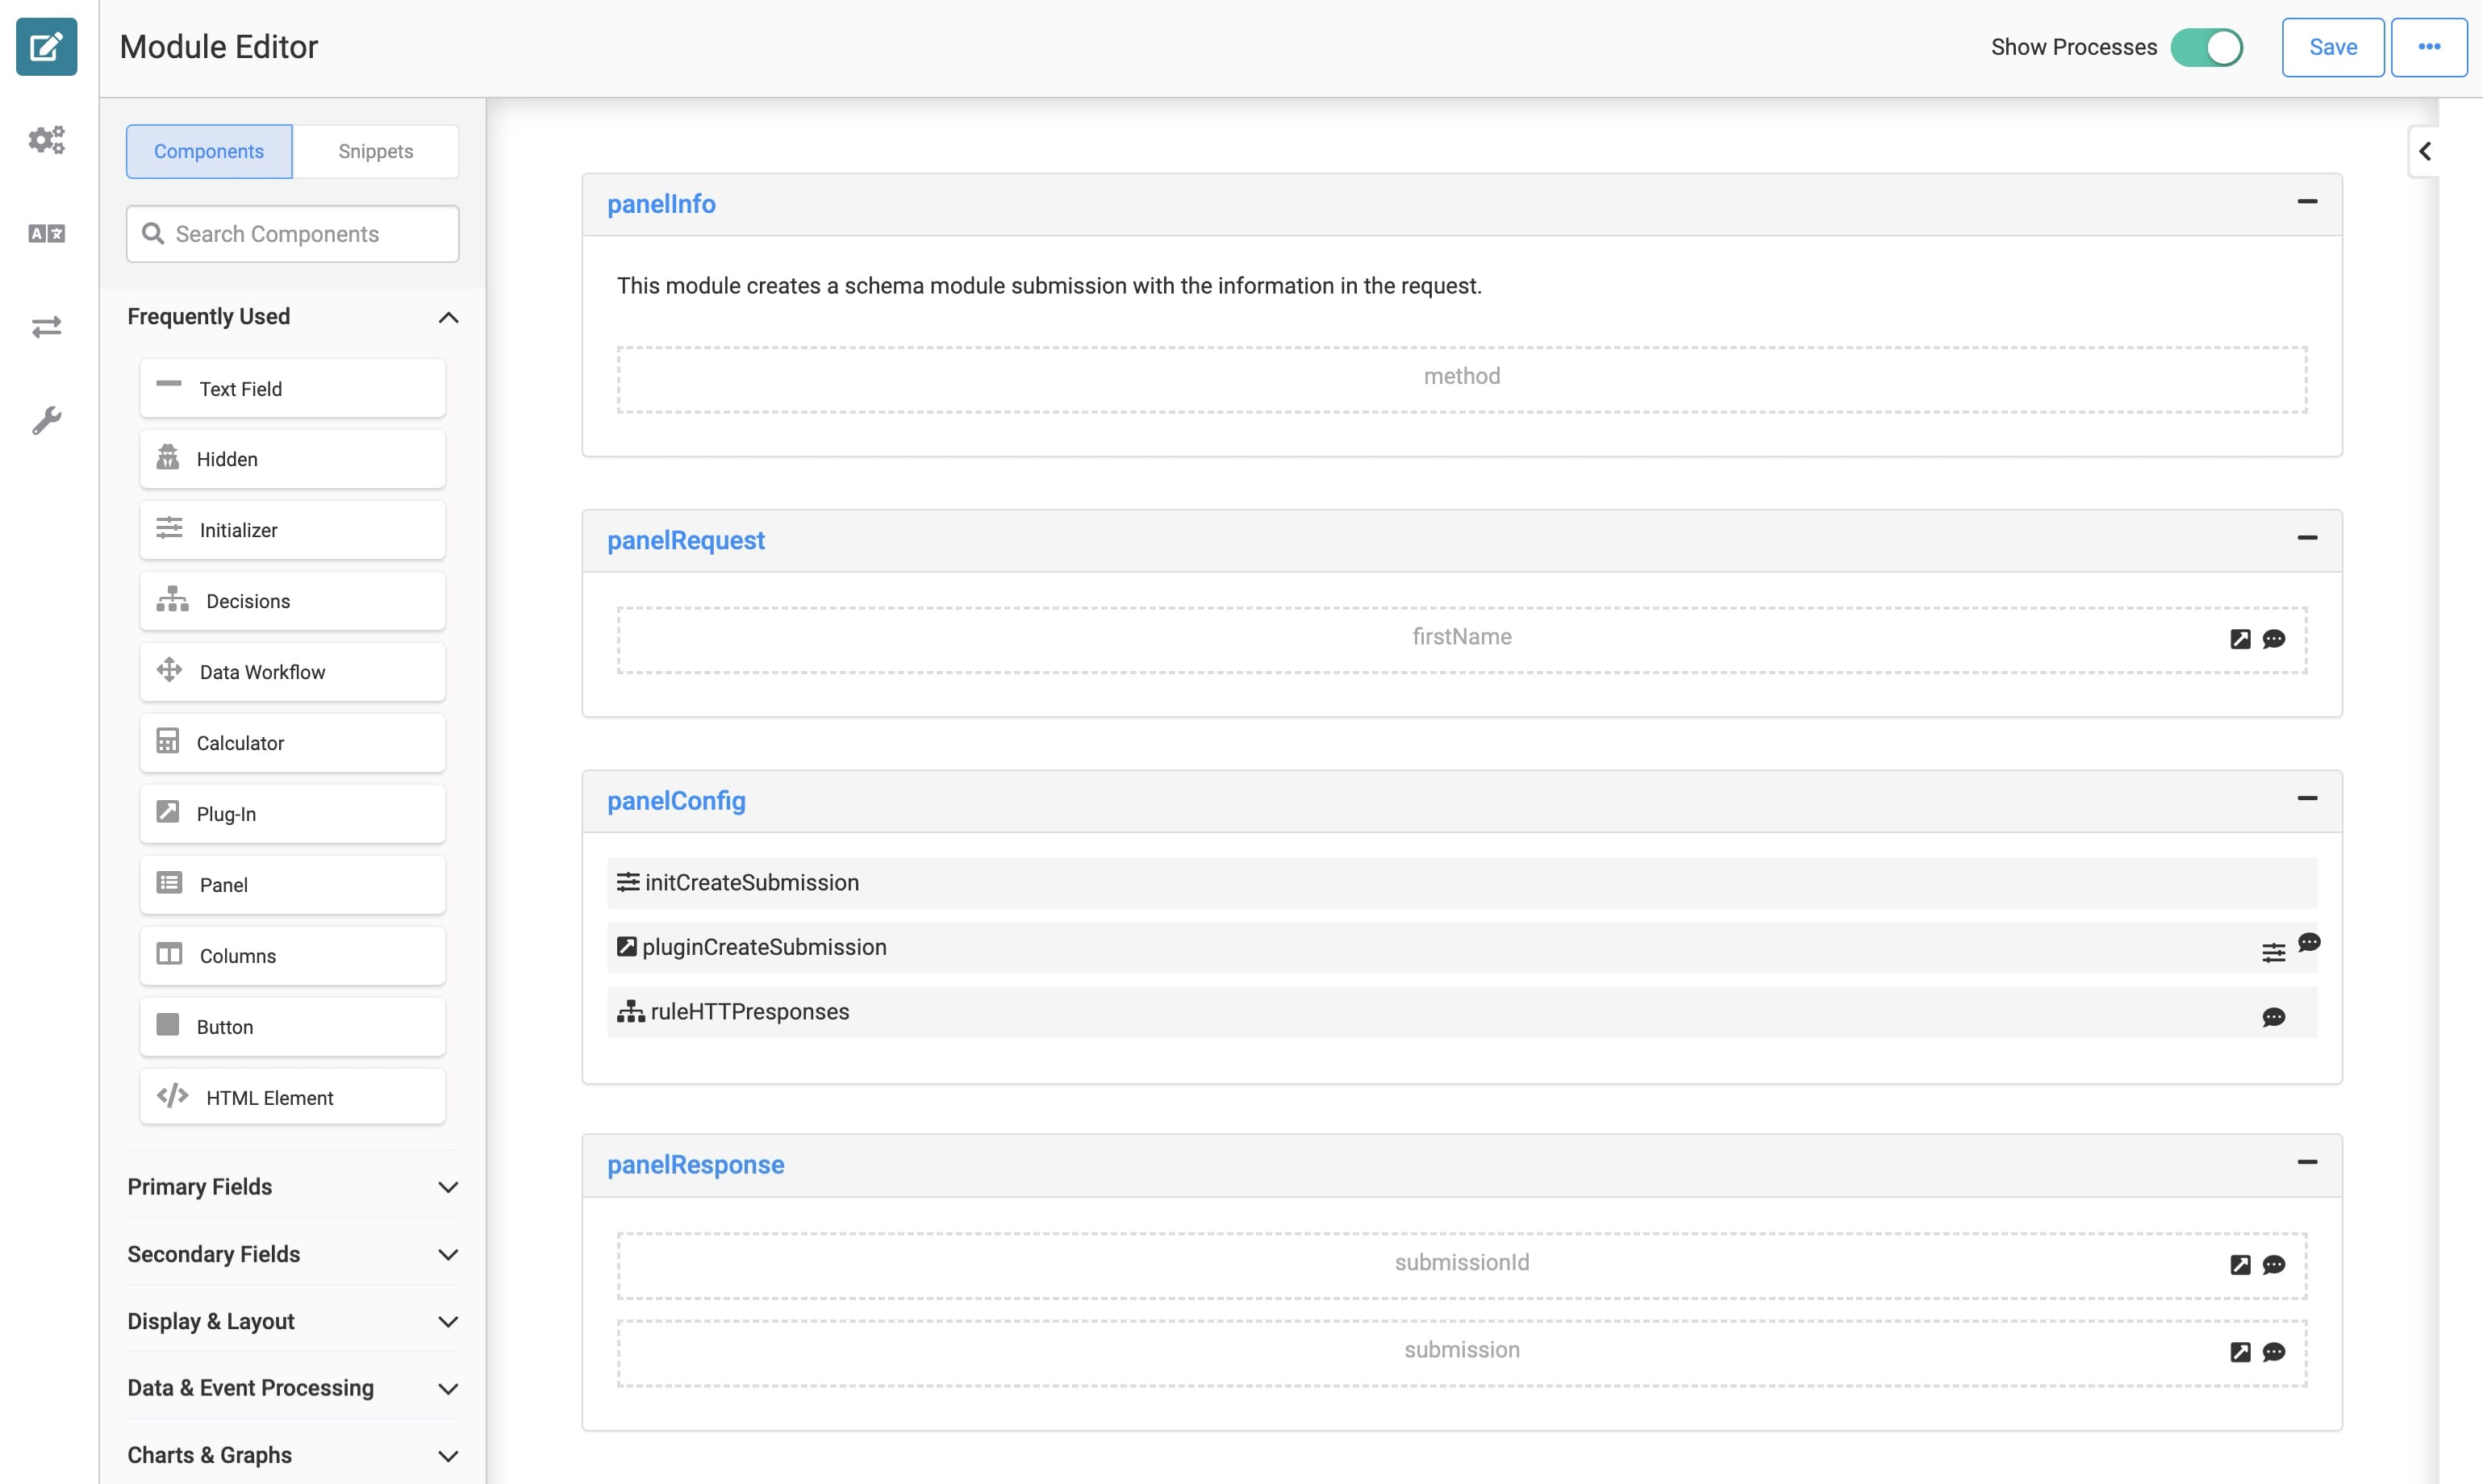
After configuring your API Specification snippet, your Module Builder looks like this:
Viewing your API Module with the API Docs Dashboard Tool
To view your API module using the API Docs Dashboard tool, you need to access the Unqork Development Life Cycle Toolkit.
To access the API Docs Dashboard tool:
At the top right of the Unqork Designer Platform, click the Settings drop-down.
Click UDLC Toolkit.
In the E-mail Address field, enter your Unqork email.
In the Password field, enter your Unqork password.
You must have Designer Administrator access to use the Life Cycle tools.
Click Login.
Under the Plan and Design section, locate the API Docs tool, then click Use This Tool to the right of the tool's name.
You can also access this tool using the Unqork Development Life Cycle Toolkit Chrome extension. For more information on how to access the Unqork Development Life Cycle Toolkit, search Unqork Development Life Cycle Toolkit in our In-Product Help.
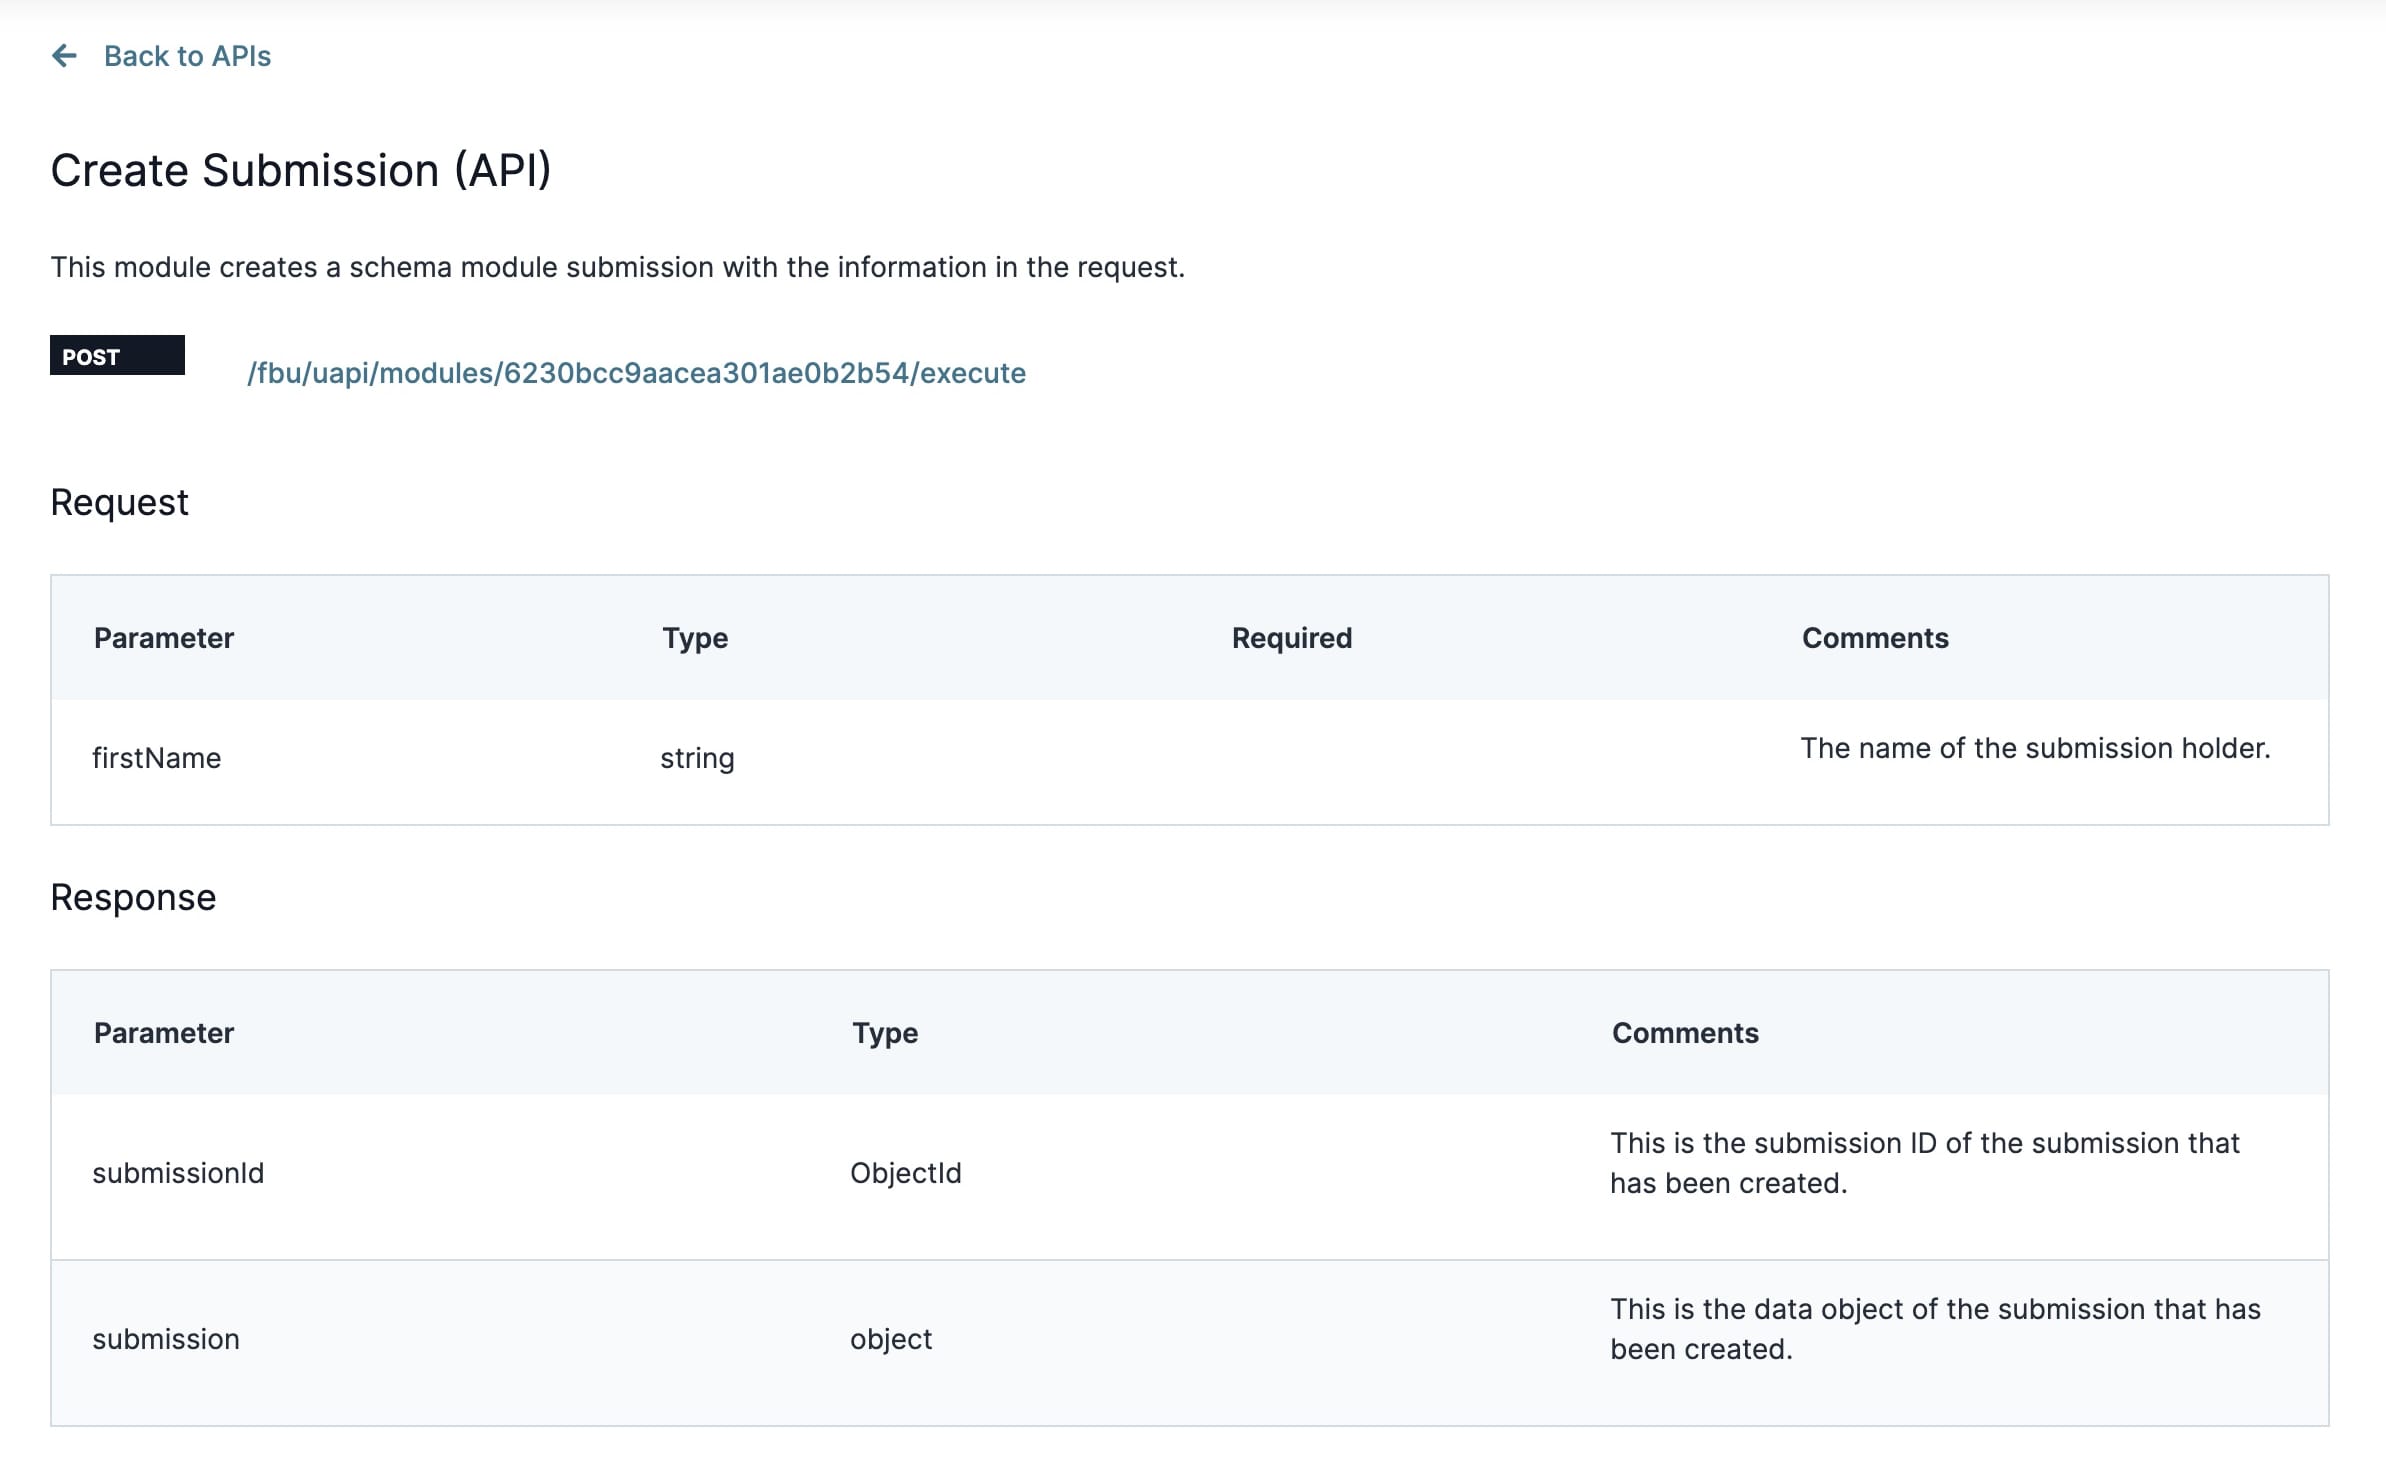
From there, you can search for your API module. Once found, click the View button to see the documentation. Here's the documentation for the Create Submission API module:
