Overview
You might want to take a snapshot of your module or reference it outside of the Unqork Designer Platform. Or you might want to let your end-users keep a record of what they enter in your application. Exporting a module to a PDF is a simple solution. With the Generate PDF Nunjucks snippet, you or your end-user can create a PDF of your module's front-end. The PDF even includes any information the end-user entered in Express View.
With some basic CSS knowledge, you can easily change the appearance of your PDF. This snippet works best for creating PDFs with fairly simple styling. This snippet also works best for applications that don't need a large number of PDFs. A good benchmark to use is one 1-page PDF per submission, and no more than 20 submissions a day.
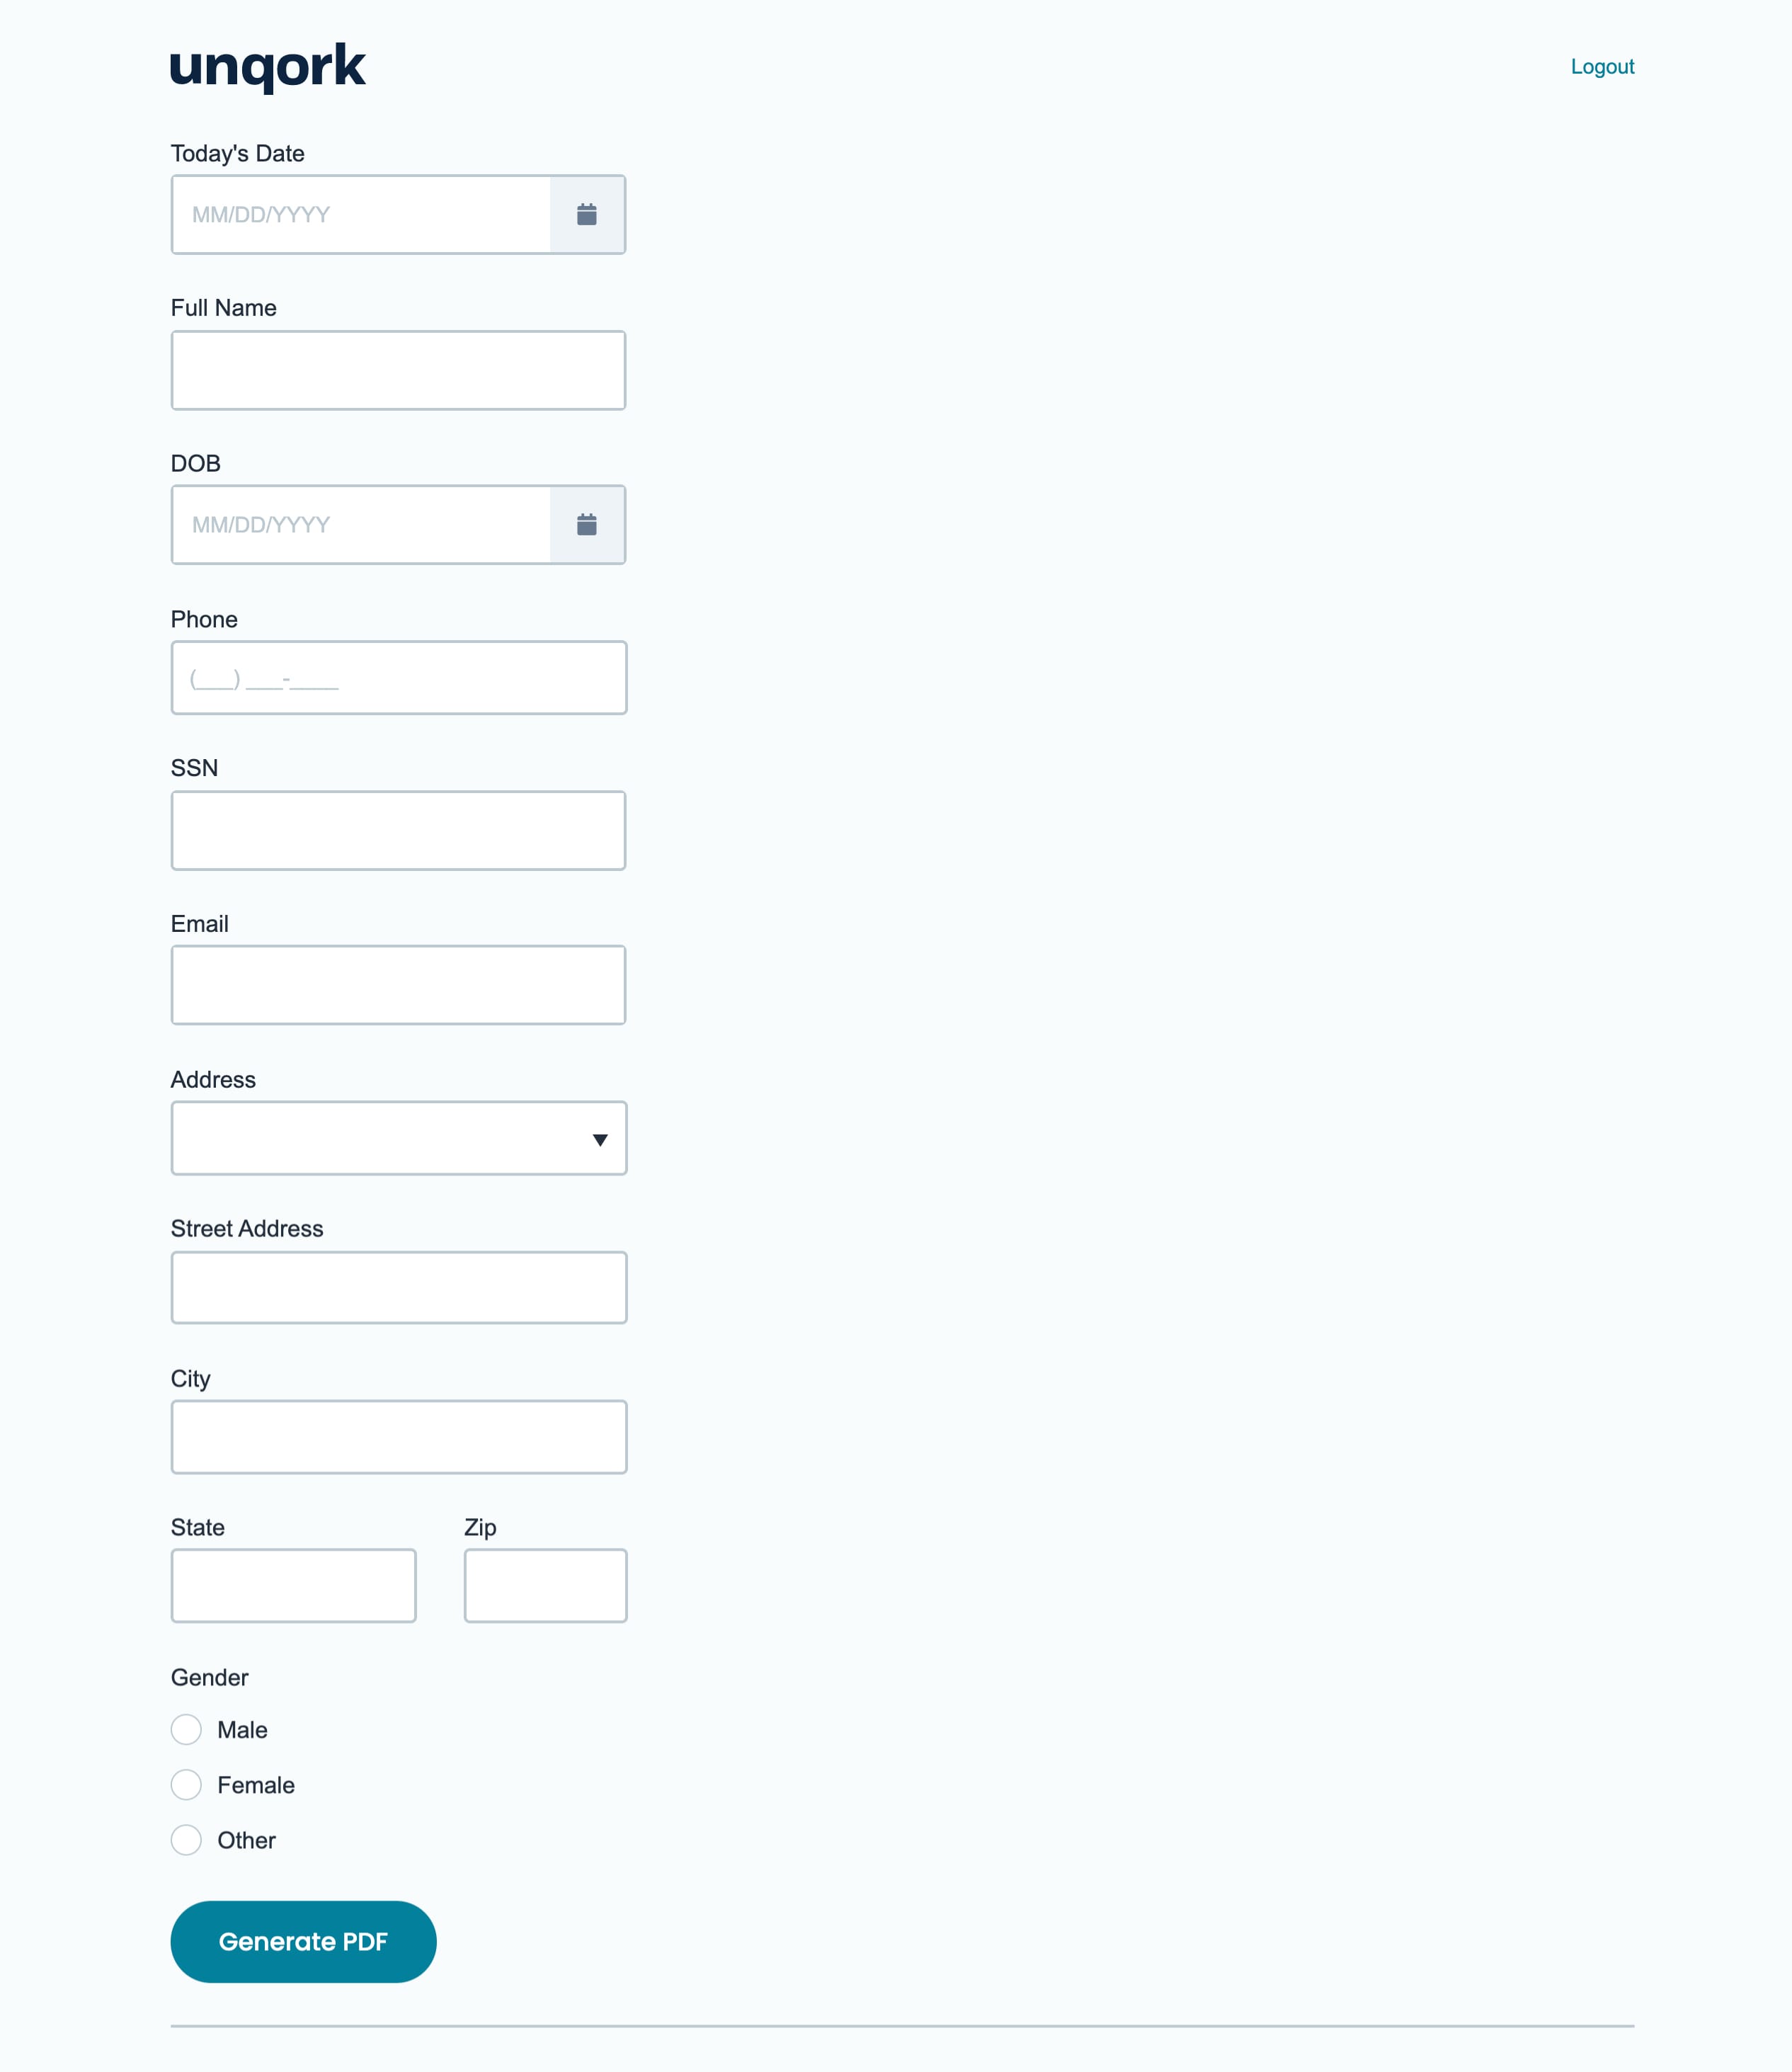
Here's how the Generate PDF Nunjucks snippet looks in Express View:
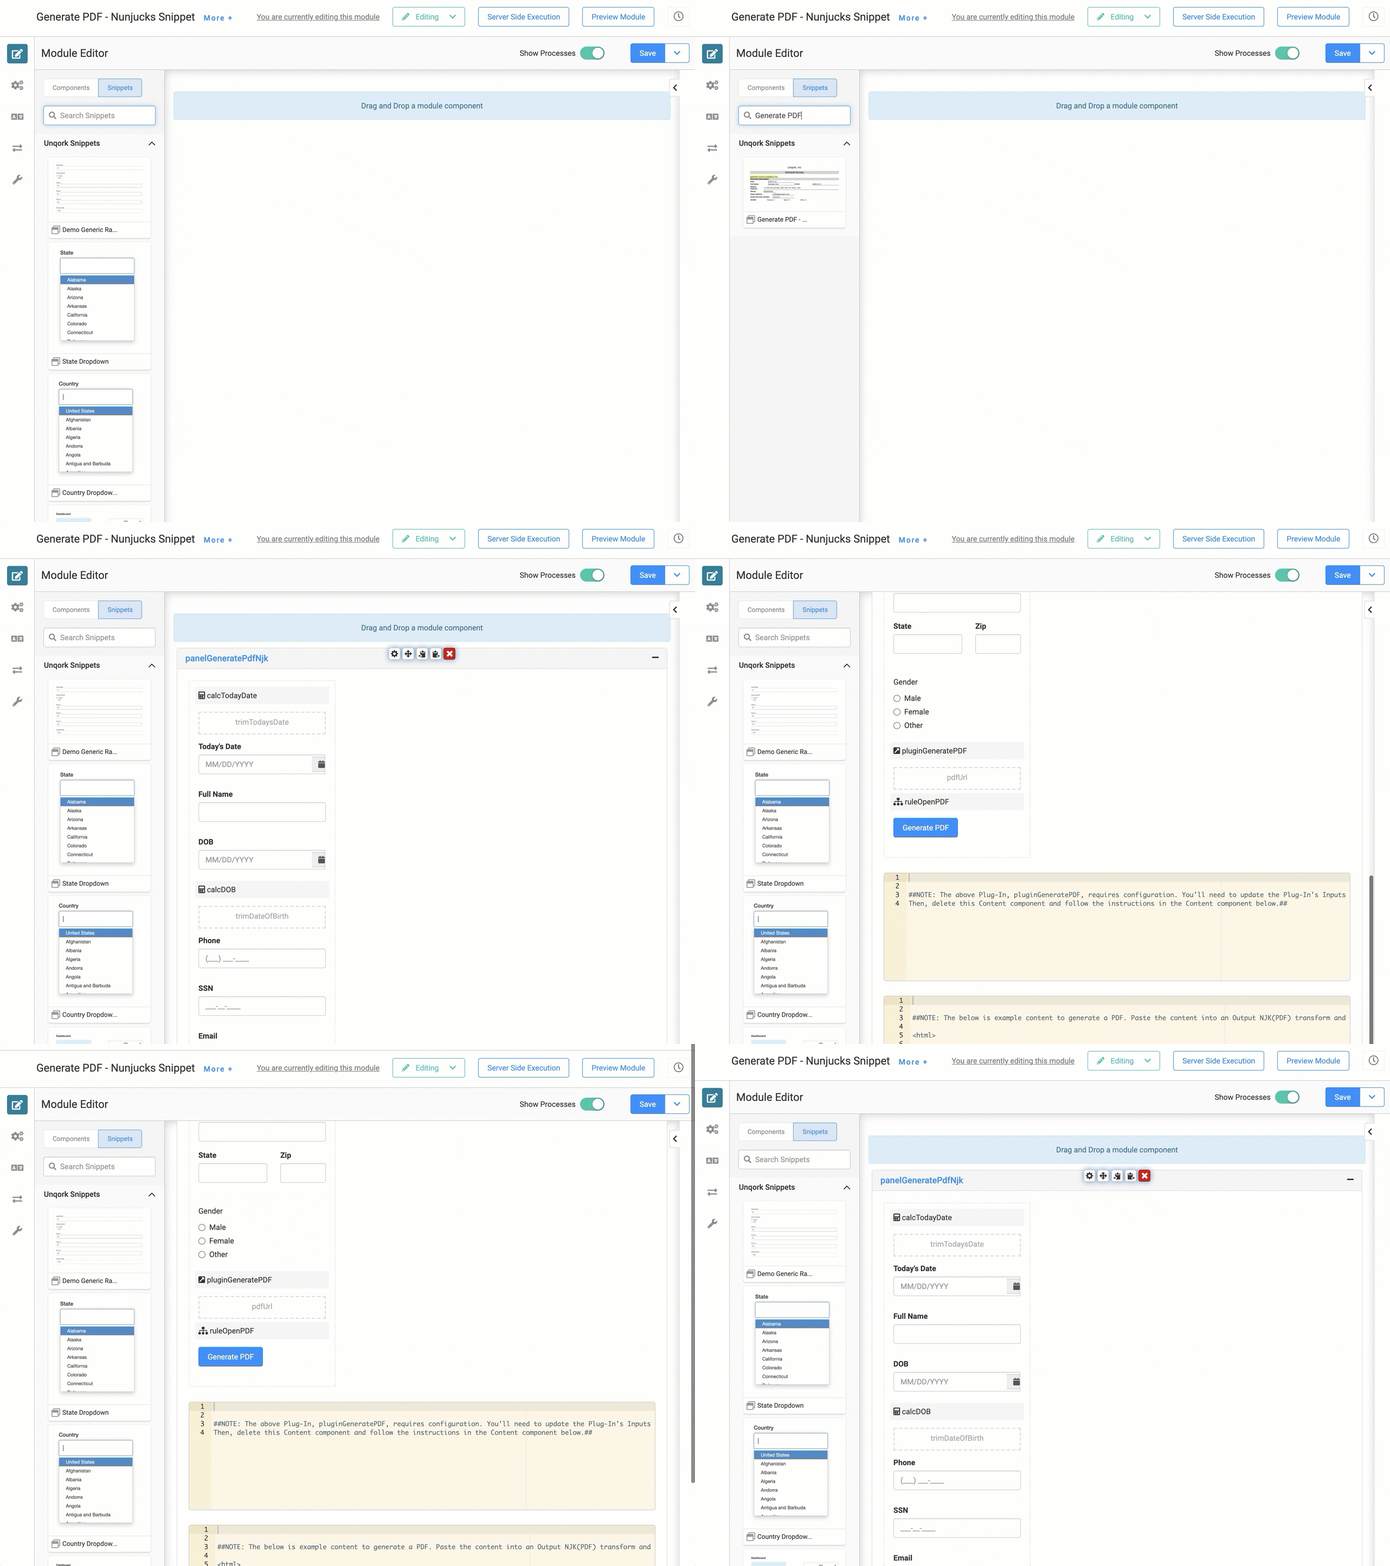
Here's how the snippet looks in the Module Builder:
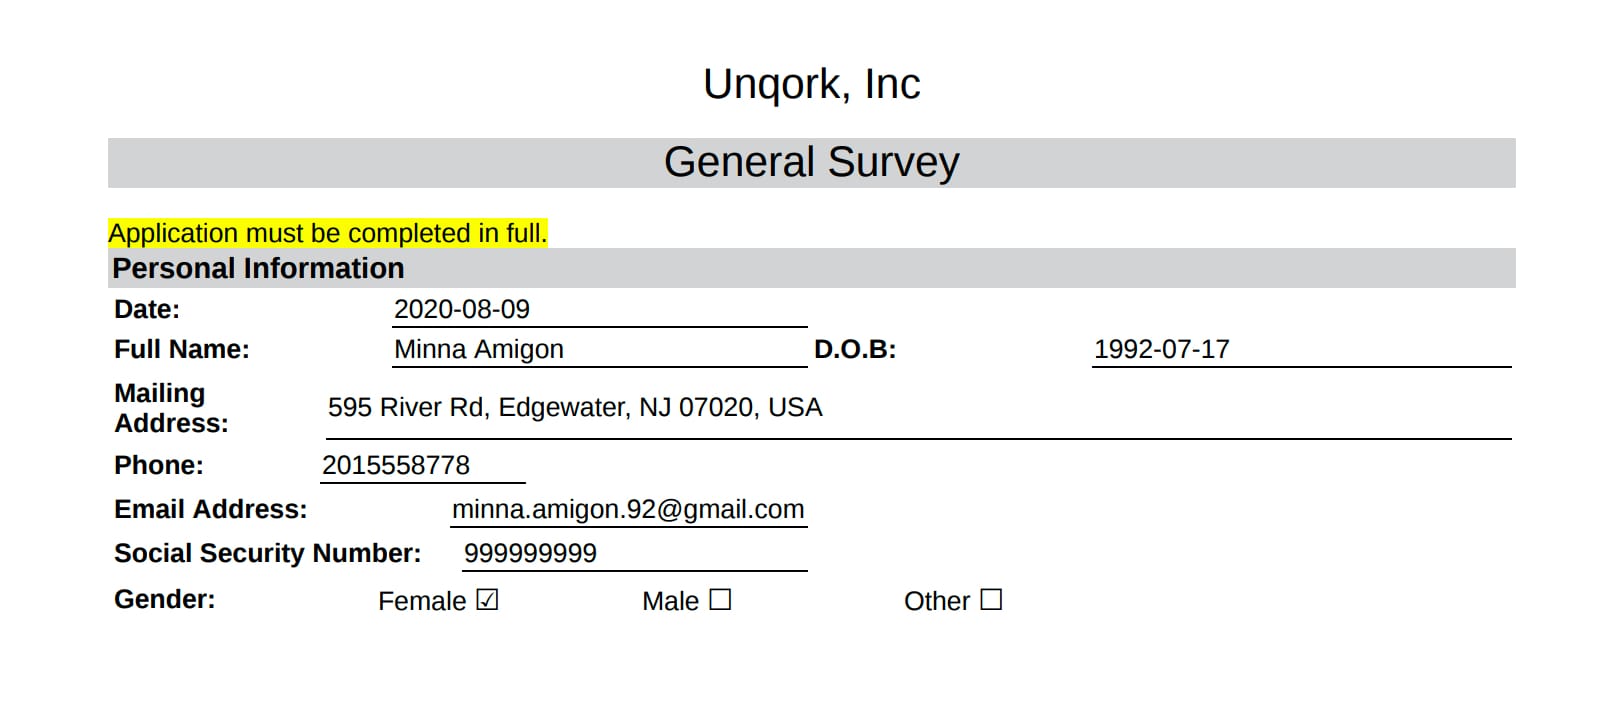
And here's how the generated PDF looks (including some sample data):
How the Snippet Works
The Generate PDF Nunjucks snippet has 3 parts:
The module's front end: an Express View interface, where end-users can enter information.
The module's back end: the components that let you create and display the PDF.
A transform that generates a PDF of the module's front end. The PDF includes any data entered by the end-user in Express View.
The Module's Front End
In Express View, the Generate PDF Nunjucks snippet acts as a basic intake module. It includes fields to collect today's date as well as some information about your end-user. End-users can enter their full name, date of birth, phone number, email address, Social Security number, address, and gender. In the Customizing the Snippet section, you'll learn how to add new fields or remove default ones.
The module's front end also includes a Generate PDF button. When the end-user clicks this button, their information saves as a submission. Clicking the button also triggers the pluginGeneratePDF Plug-In, which executes the transform.
The Module's Back End
The module's back end includes the behind-the-scenes components not visible in Express View. The pluginGeneratePDF Plug-In connects the transform to your module. The Plug-In's Inputs table tells the Plug-In where to find the transform. This includes specifying the name of the transform and what module the transform is in. The Inputs table also gives the transform access to your module's submission data. With this connection, the transform can fill in the PDF with your end-user's information.
Once the transform creates the PDF, the Plug-In also helps to display the PDF. When the transform creates a PDF, the Unqork Designer Platform temporarily hosts that PDF in cloud storage at a unique URL. The Plug-In's Outputs table maps this URL to the pdfURL Hidden component. Then, when a URL displays in the pdfURL Hidden component, the ruleOpenPDF Decision fires. The Decision opens a new tab using the URL stored in the pdfURL Hidden component. From your end-user's perspective, the new tab opens as soon as they click the Generate PDF button. From this new tab, your end-user can view, download, or print their prefilled PDF.
The Transform
The Generate PDF Nunjucks snippet uses a transform to take your module and turn it into a PDF. Transforms format data coming out of Unqork Designer Platform and export that data to a specific file type. The Generate PDF Nunjucks snippet uses a Nunjucks PDF type transform. Nunjucks, abbreviated as NJK, is a Javascript templating language. The transform script that you set up in your module maps to the NJK (PDF) transform snippet.
The transform script uses HTML to create a basic table-based layout. You can see this by looking through the transform, which contains several <table> tags. If you're familiar with HTML, editing the transform script to change the PDF's layout is easy. The transform also includes a style section, where CSS defines the style of the PDF. In the style section, you can set custom font styles, background colors, and more. (If you're new to editing HTML or CSS, view the Customizing the Snippet section.) The transform can also dynamically populate the PDF with submission data. When creating the PDF, the transform references keys in the submission data. For example, the transform replaces the HTML {{ data.email }} with the value from the email key/value pair.
Setting Up the Snippet
Setting up the Generate PDF Nunjucks snippet is straightforward. You'll learn later how to customize the snippet, where you'll match the snippet to your needs.
Add the Transform
The first step in setting up the Generate PDF Nunjucks snippet is adding the transform to your module. It's best practice to add the transform to the same module where you added the snippet.
Hover over the left sidebar menu of the Module Builder.
Click the
 (Transforms) button to open the Transforms page.
In the Enter transform name field, enter generatePDF.
From the Direction of transform options, select Output.
From the Type of transform options, select NJK (PDF).
In the Create new transform below field, copy and paste the following transform:
You can also copy this transform from the second Content component in the snippet.
Transform
##NOTE: The below is example content to generate a PDF. Paste the content into an Output NJK(PDF) transform and name it generatePDF. Then, delete this content component## <html> <head> <style> @page { size: Letter portrait; margin-top: .25in; margin-bottom: .25in; margin-left: .5in; margin-right: .5in; } } td { font-size: 10pt; font-family: Arial; } table { font-size: 10pt; font-family: Arial; } div { font-size: 10pt; font-family: Arial; } h1 { font-size: 16pt; font-weight: normal; } h2 { font-size: 12pt; font-weight: bold; } #checkbox { text-align: right; } #content { border-bottom: 1px solid black; } #sectionHeader { background-color: #d3d3d3; font-family: Arial, sans-serif; font-size: 11pt; font-weight: bold; text-align: left; padding: 2px; } </style> </head> <body> <div align="center"><h1>Unqork, Inc</h1></div> <div align="center" style="background-color:#d3d3d3;"><h1>General Survey</h1></div> <div><span style="background-color:yellow;">Application must be completed in full.</span></div> <div id="sectionHeader">Personal Information</div> <table width="100%"> <tr> <td width="20%"><b>Date:</b></td> <td id="content">{{ data.trimTodaysDate }}</td> </tr> <tr> <td width="20%"><b>Full Name:</b></td> <td width ="30%" id="content">{{ data.fullName }}</td> <td width="20%"><b>D.O.B:</b></td> <td id="content">{{ data.trimDateOfBirth }}</td> </tr> </table> <table width="100%"> <tr> <td width="15%"><b>Mailing Address:</b></td> <td width="85%" id="content">{{ data.address.formatted_address }}</td> </tr> </table> <table width="30%"> <tr> <td width="50%"><b>Phone:</b></td> <td id="content">{{ data.phoneNumber }}</td> </tr> </table> <table width="50%"> <tr> <td width="50%"><b>Email Address:</b></td> <td id="content">{{ data.email }}</td> </tr> </table> <table width="50%"> <tr> <td width="50%"><b>Social Security Number:</b></td> <td id="content">{{ data.SSN }}</td> </tr> </table> <table width="75%"> <tr> <td width="25%" style="vertical-align:center;"><b>Gender:</b></td> <td width="25%">Female <span style="font-size:11pt;">{% if data.Gender == 'Female' %}☑ {% else %} ☐{% endif %}</span></td> <td width="25%">Male <span style="font-size:11pt;">{% if data.Gender == 'Male' %}☑ {% else %} ☐{% endif %}</span></td> <td width="25%">Other <span style="font-size:11pt;">{% if data.Gender == 'Other' %}☑ {% else %} ☐{% endif %}</span></td> </tr> </table> </body> </html>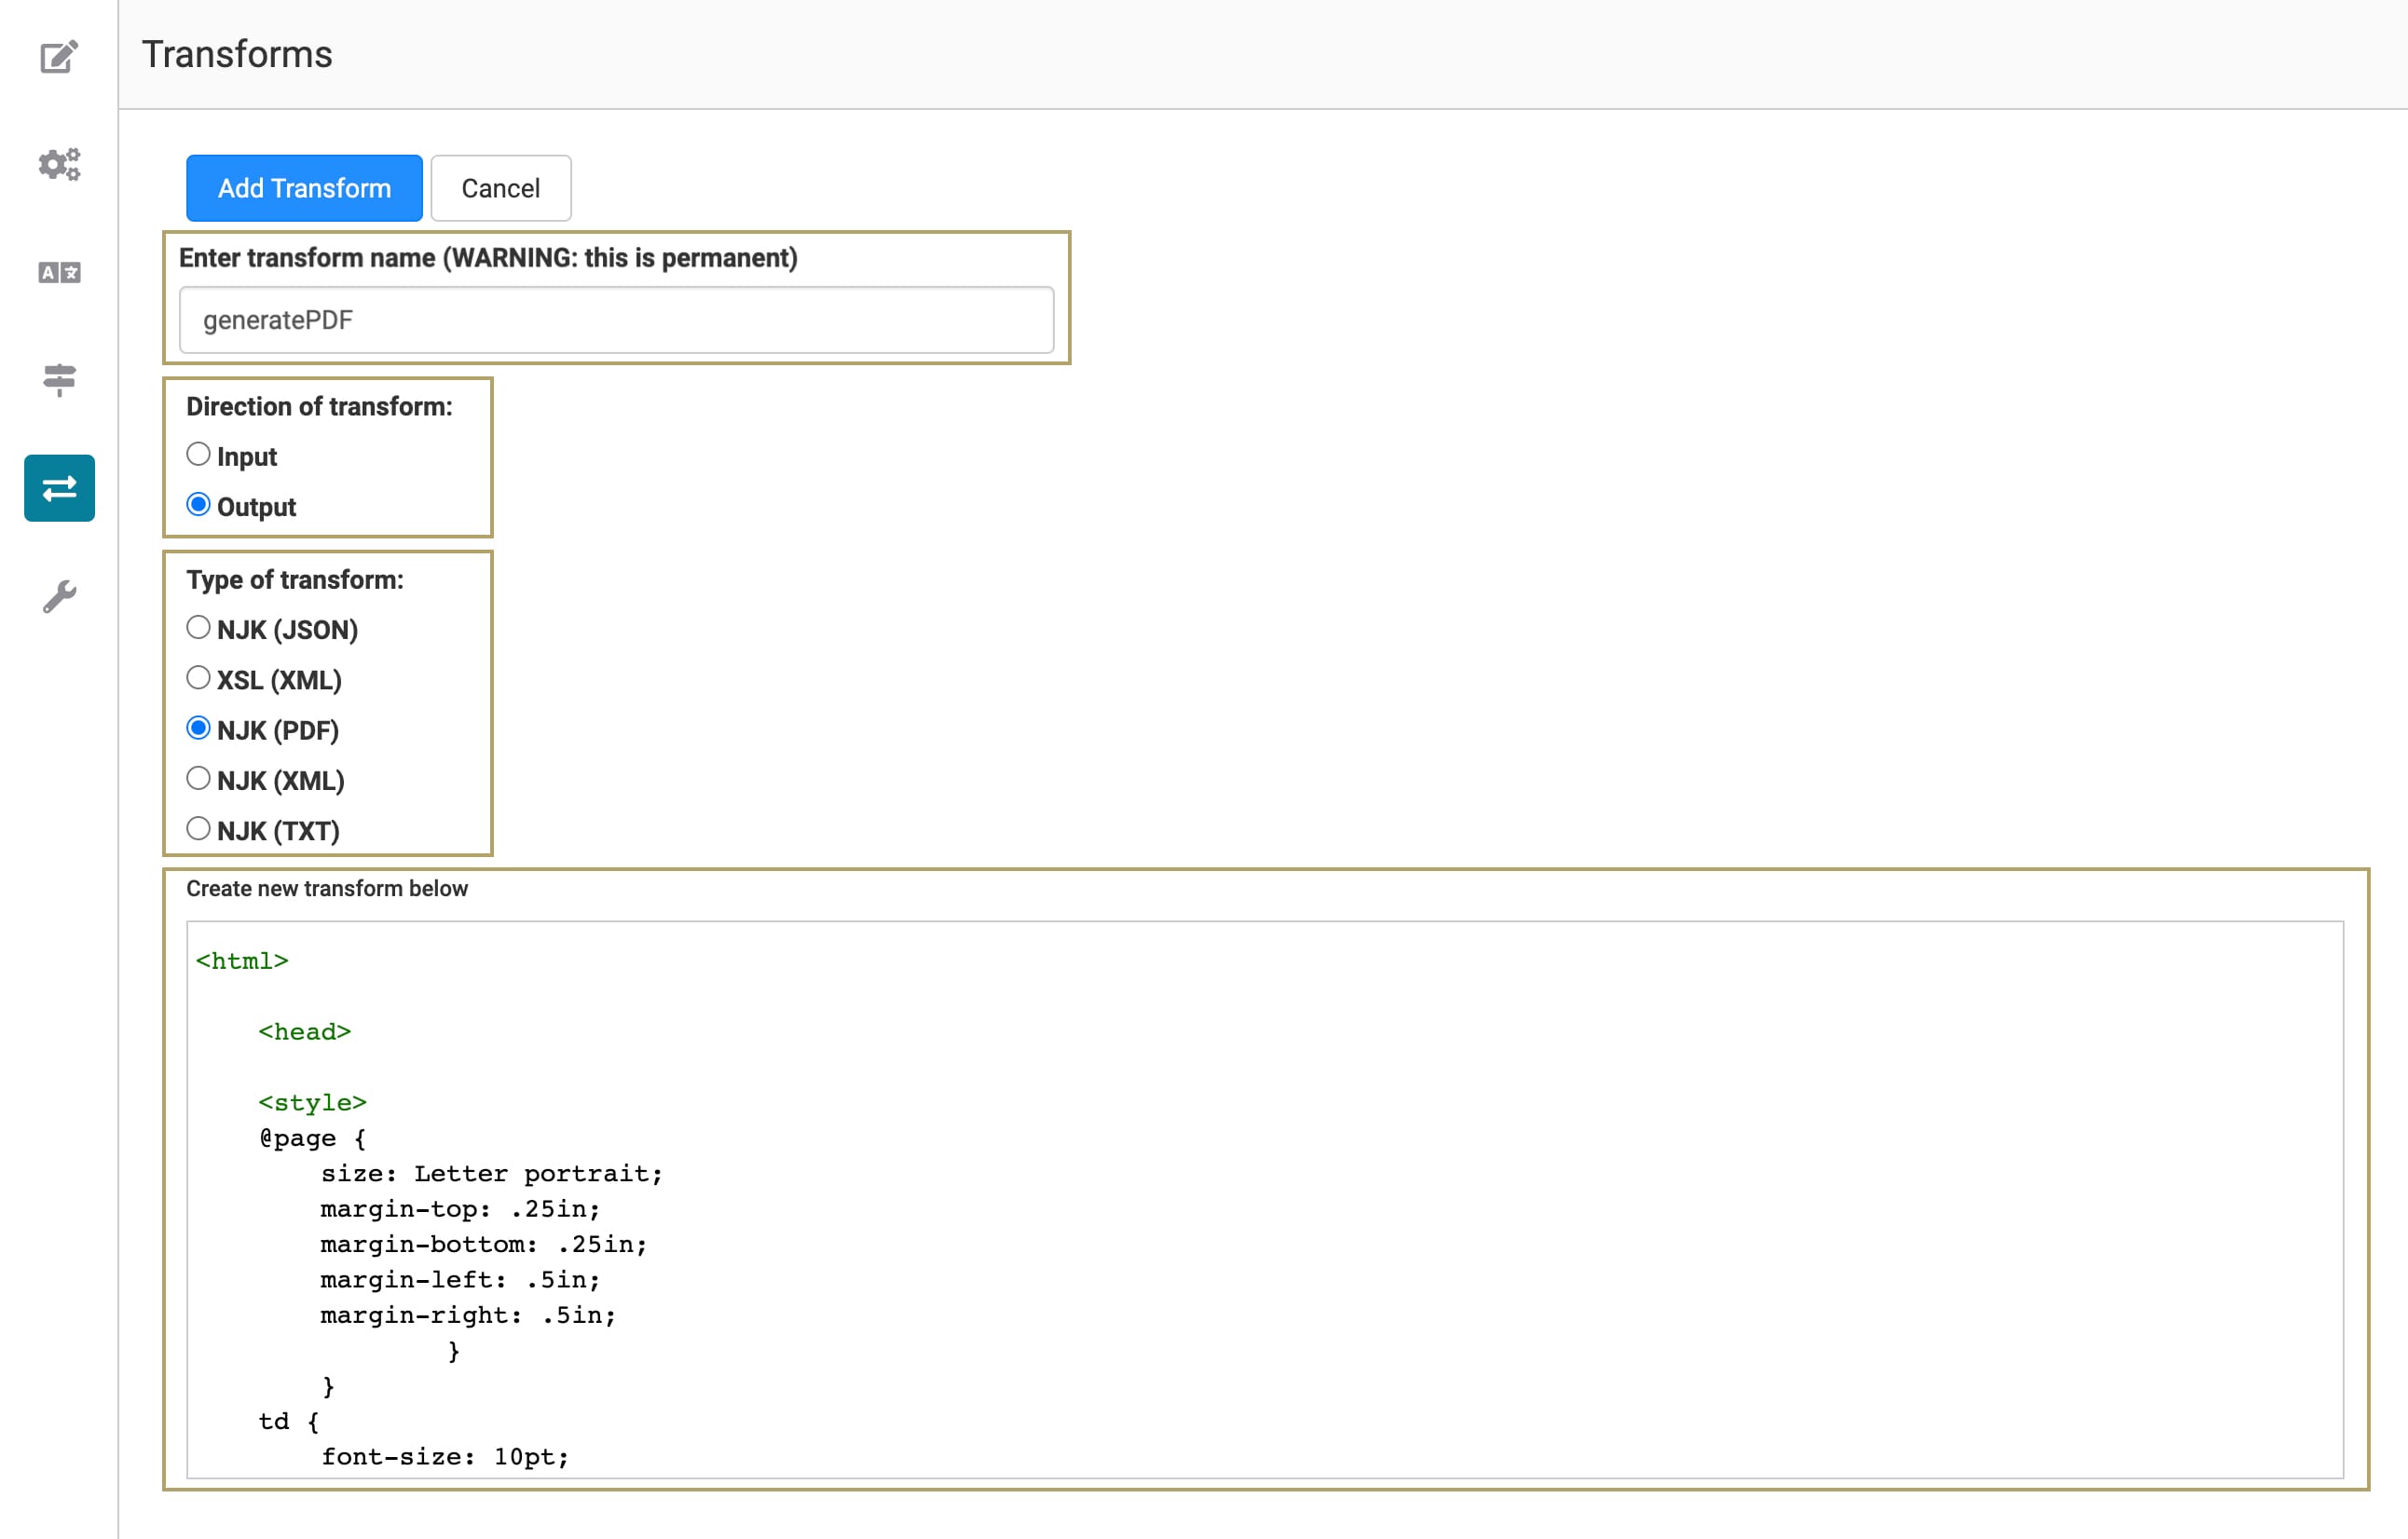
Click Add Transform. Your transform now displays under the Active Transforms list.
Return to the Module Builder and Save your module.
Update the Plug-In Component
Next, update the pluginGeneratePDF Plug-In, to connect it to the transform.
Hover over the pluginGeneratePDF Plug-In component.
A 5-button toolbar displays above the component on hover-over.
Using the toolbar, click the
.jpg) (Settings) button.
(Settings) button.In the Inputs table, replace 'templategeneratepdfnunjucks' with the Module Path of your module. Be sure to surround the Module Path in single quotes.
Use the Module Path of your own module, where you added the transform. You can find a module's Module Path by clicking More + next to its title.

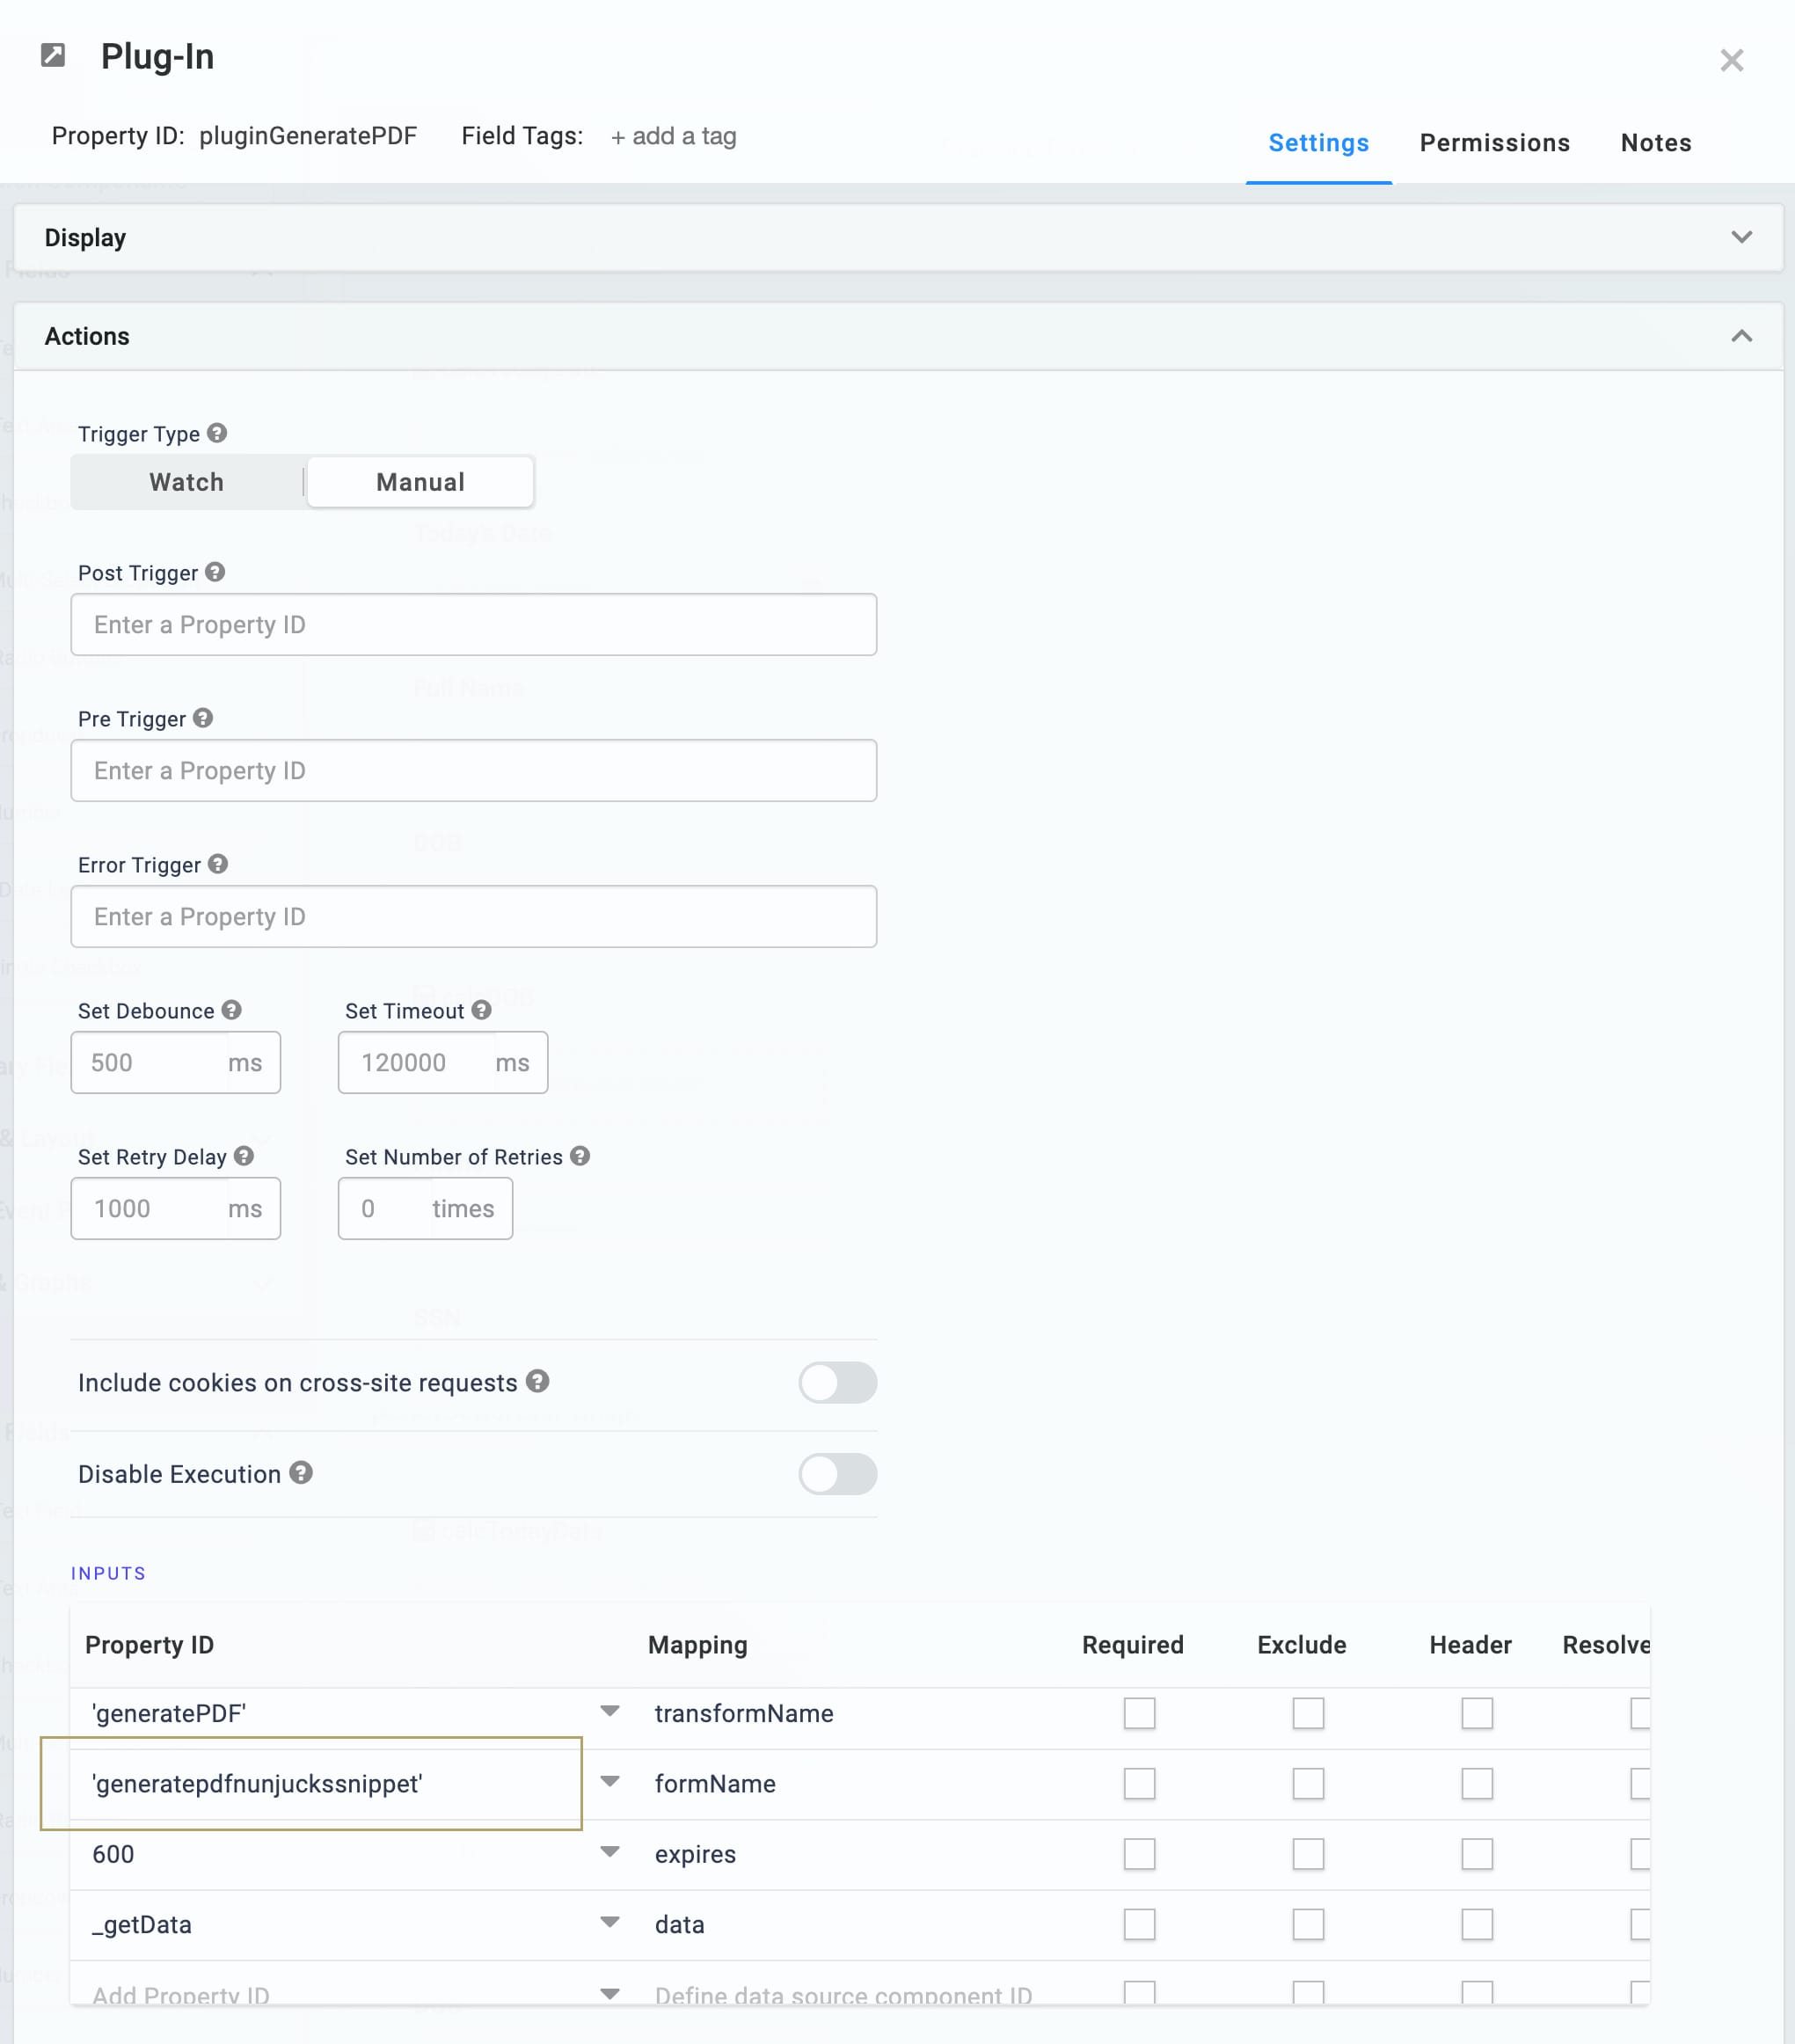
Click Save.
Delete the Content Components
Now that you set up your transform and connected it to the Plug-In, you can delete the snippet's Content components. The first Content component has instructions you don't want to display in Express View. The second Content component contains the transform, which you already added to your module.
Hover over the formIdContent Content component.
A 5-button toolbar displays above the component on hover-over.
Click the
.jpg) (Remove) button.
(Remove) button.Hover over the contentForTransform Content component.
Click the
.jpg) (Remove) button.
(Remove) button.
Now you can preview your module, enter some sample data, and create a test PDF.
Customizing the Snippet
With some knowledge of HTML and CSS, you can easily adjust the layout and styling of your final PDF. In this section, you'll learn how to:
To make these changes, you'll adjust the transform script. To edit your transform:
Hover over the left sidebar menu of the Module Builder.
Click the
 (Transforms) button to open the Transforms page.
In the Active Transforms list, click generatePDF.
Make any changes inside the Transform pane.
Click Save Changes when finished.
Changing the Style of the PDF
In the transform, any code in either <style> or <span style> tags defines the style of the final PDF. Code in the <style> section of the transform defines the appearance of the entire PDF. Code with a <span style> tag defines the appearance of a specific line or element. There are 2 ways that you can adjust the style of the PDF:
Changes to the <style> section.
Changes inside a <span style> tag.
As a reminder, here's how the generated PDF looks by default (including some sample data):

Changes to the <style> Section
Looking at the transform, you see about 50 lines of HTML using <style>, </style> tags. Everything inside these tags defines the appearance of your PDF. For example, h1 { } defines the H1 headers, #checkbox { } defines the checkboxes, and table { } defines the tables. Remember that your PDF uses an HTML table-based layout. Even if all the borders of the tables aren't visible, most of your PDF uses this structure.
With some basic CSS knowledge, it's easy to adjust your PDF's style.
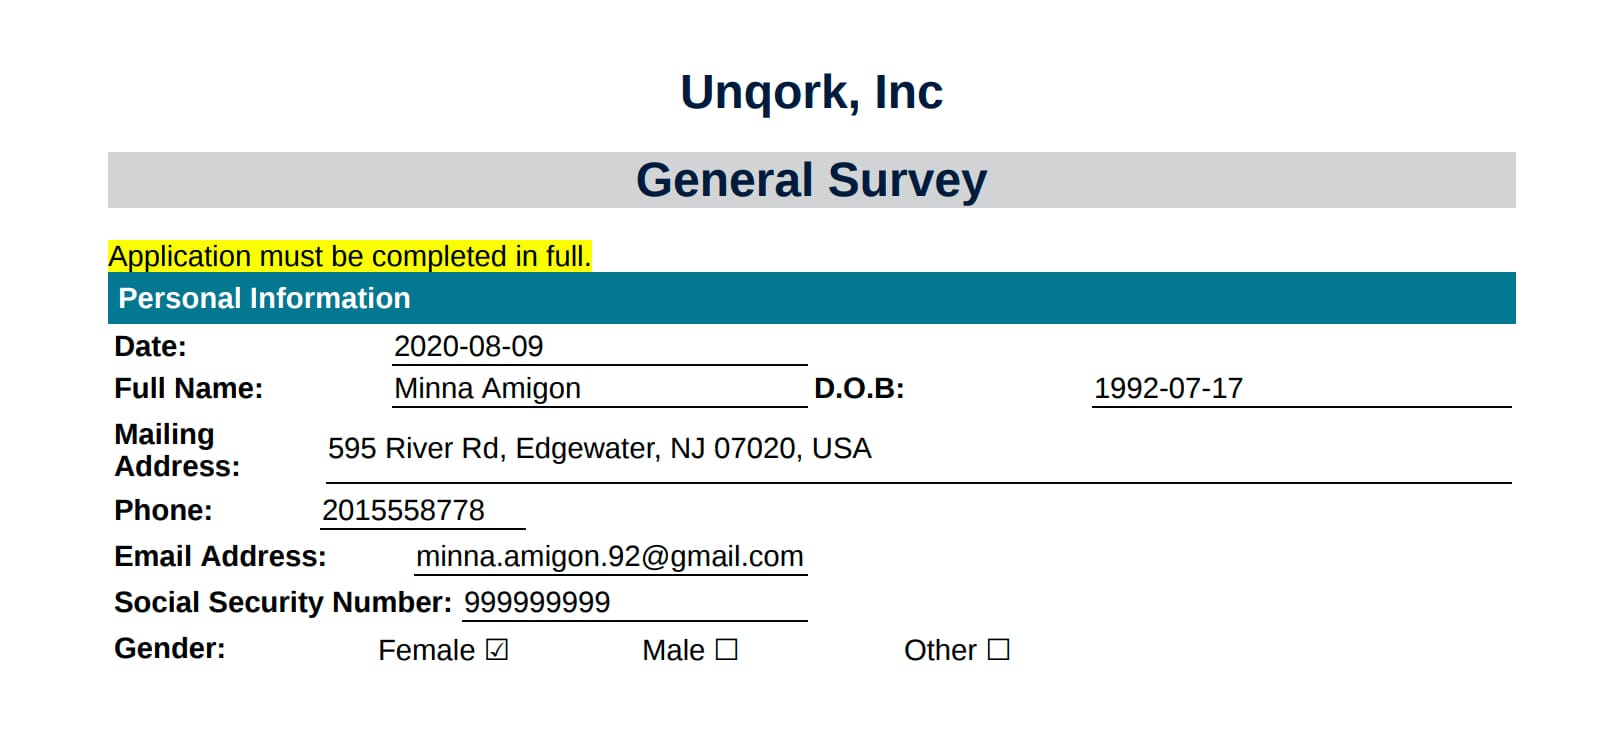
In this example, you increased font sizes (font-size:) and weights (font-weight:). For example, all the PDF's fields are now size 11 font, instead of size 10. Some font and background colors (color:, background-color:) were adjusted. For example, the Personal Information header is now white against a teal background. There's also increased padding in the Personal Information header (padding:). Adjusting padding gives more space around the words. You can also see that the H1 headers (Unqork, Inc and General Survey) are now bolded, dark blue, and larger than before.
The following code reflects the changes made to the <style> section to get the example above:
<style>
@page {
    size: Letter portrait;
    margin-top: .25in;
    margin-bottom: .25in;
    margin-left: .5in;
    margin-right: .5in;
    }

table {
    font-size: 11pt;
    font-family: Arial;
    }

td {
    font-size: 11pt;
    font-family: Arial;
    }

div {
    font-size: 11pt;
    font-family: Arial;
    }

h1 {
    font-size: 18pt;
    font-weight: bold;
    color: #031a3a;
    }
h2 {
    font-size: 14pt;
    font-weight: bold;
    }

#checkbox {
    text-align: right;
    }

#content {
    border-bottom: 1px solid black;
    }

#sectionHeader {
    background-color: #33768e;
    font-family: Arial, sans-serif;
    font-size: 11pt;
    color: #FFFFFF;
    font-weight: bold;
    text-align: left;
    padding: 5px;
    }
</style>
Changes Inside a <span style> Tag
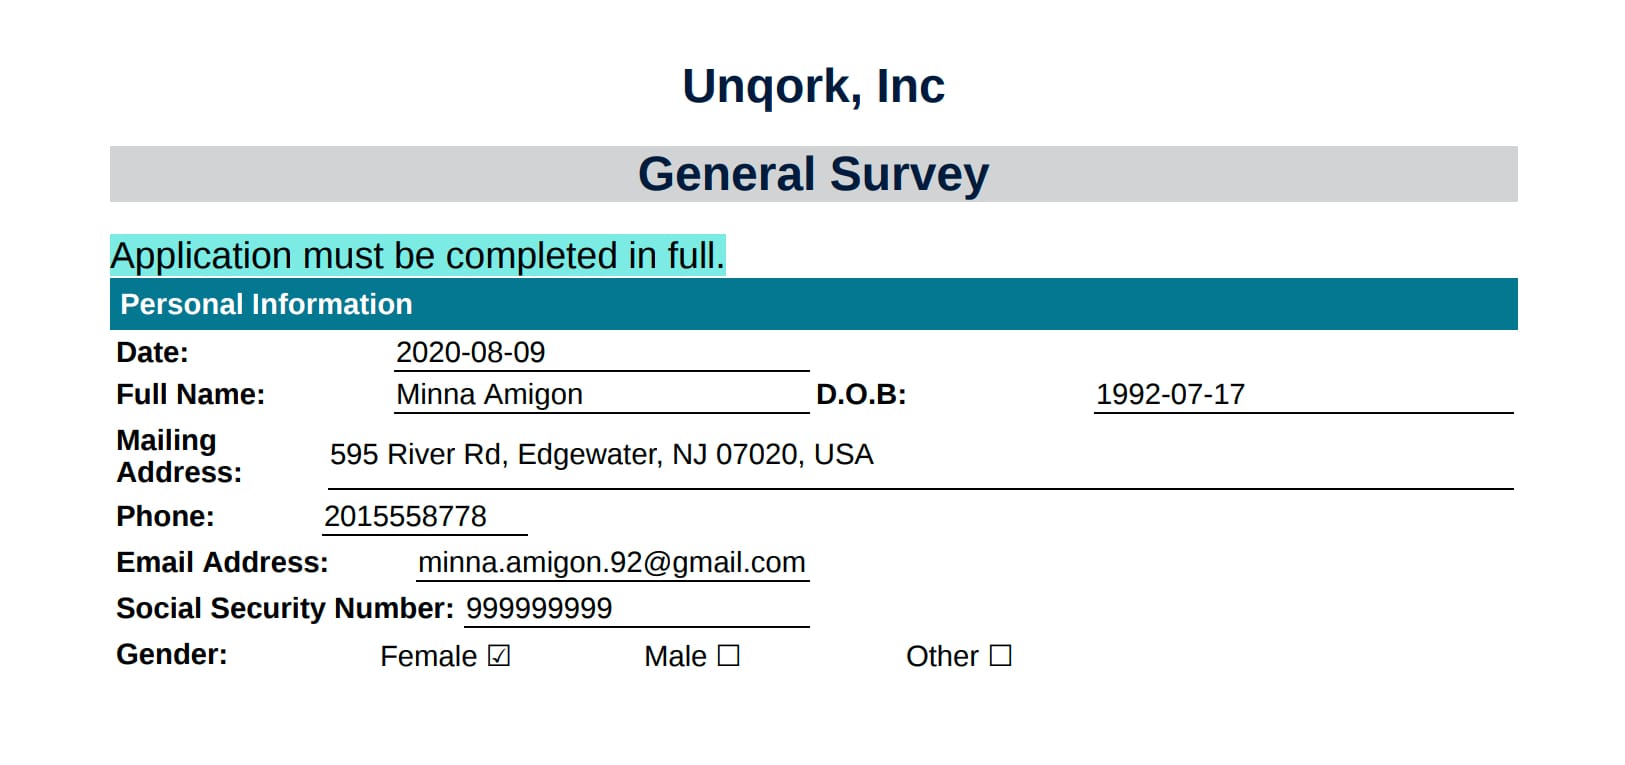
Next, change specific lines or elements, focusing on <span style> tags. As an example, use the following line of the transform: <div><span style="background-color:yellow;">Application must be completed in full.</span></div>.
<span style="background-color:yellow;"> adds a yellow background to the phrase "Application must be completed in full." You can change the background color, and even the style of the font itself. These changes are made inside the <span style> tag. For example:
1
<div><span style="background-color:#97e9e4;font-size:14pt;">Application must be completed in full.</span></div>
The background color uses a Hex color code. Hex codes give you more options for color choices than simply entering a color name. In this case, #97e9e4 is the Hex code for a light shade of aqua.
These adjustments change the background color and font size. Along with the changes you made before, you get this outcome:
Adding Fields to the Module and PDF
In this example, you'll add a field called Occupation. There are 2 steps in this process:
Updating yourmodule.
Updating your transform.
Updating the Module
The first step is adding the Occupation field to your module:
In the Module Builder, drag and drop a Text Field component onto the canvas. Place it below the Social Security Number Text Field.
In the Property ID field, enter occupation.
In the Label Text field, enter Occupation.
Click Save.
Save your module.
Updating the Transform
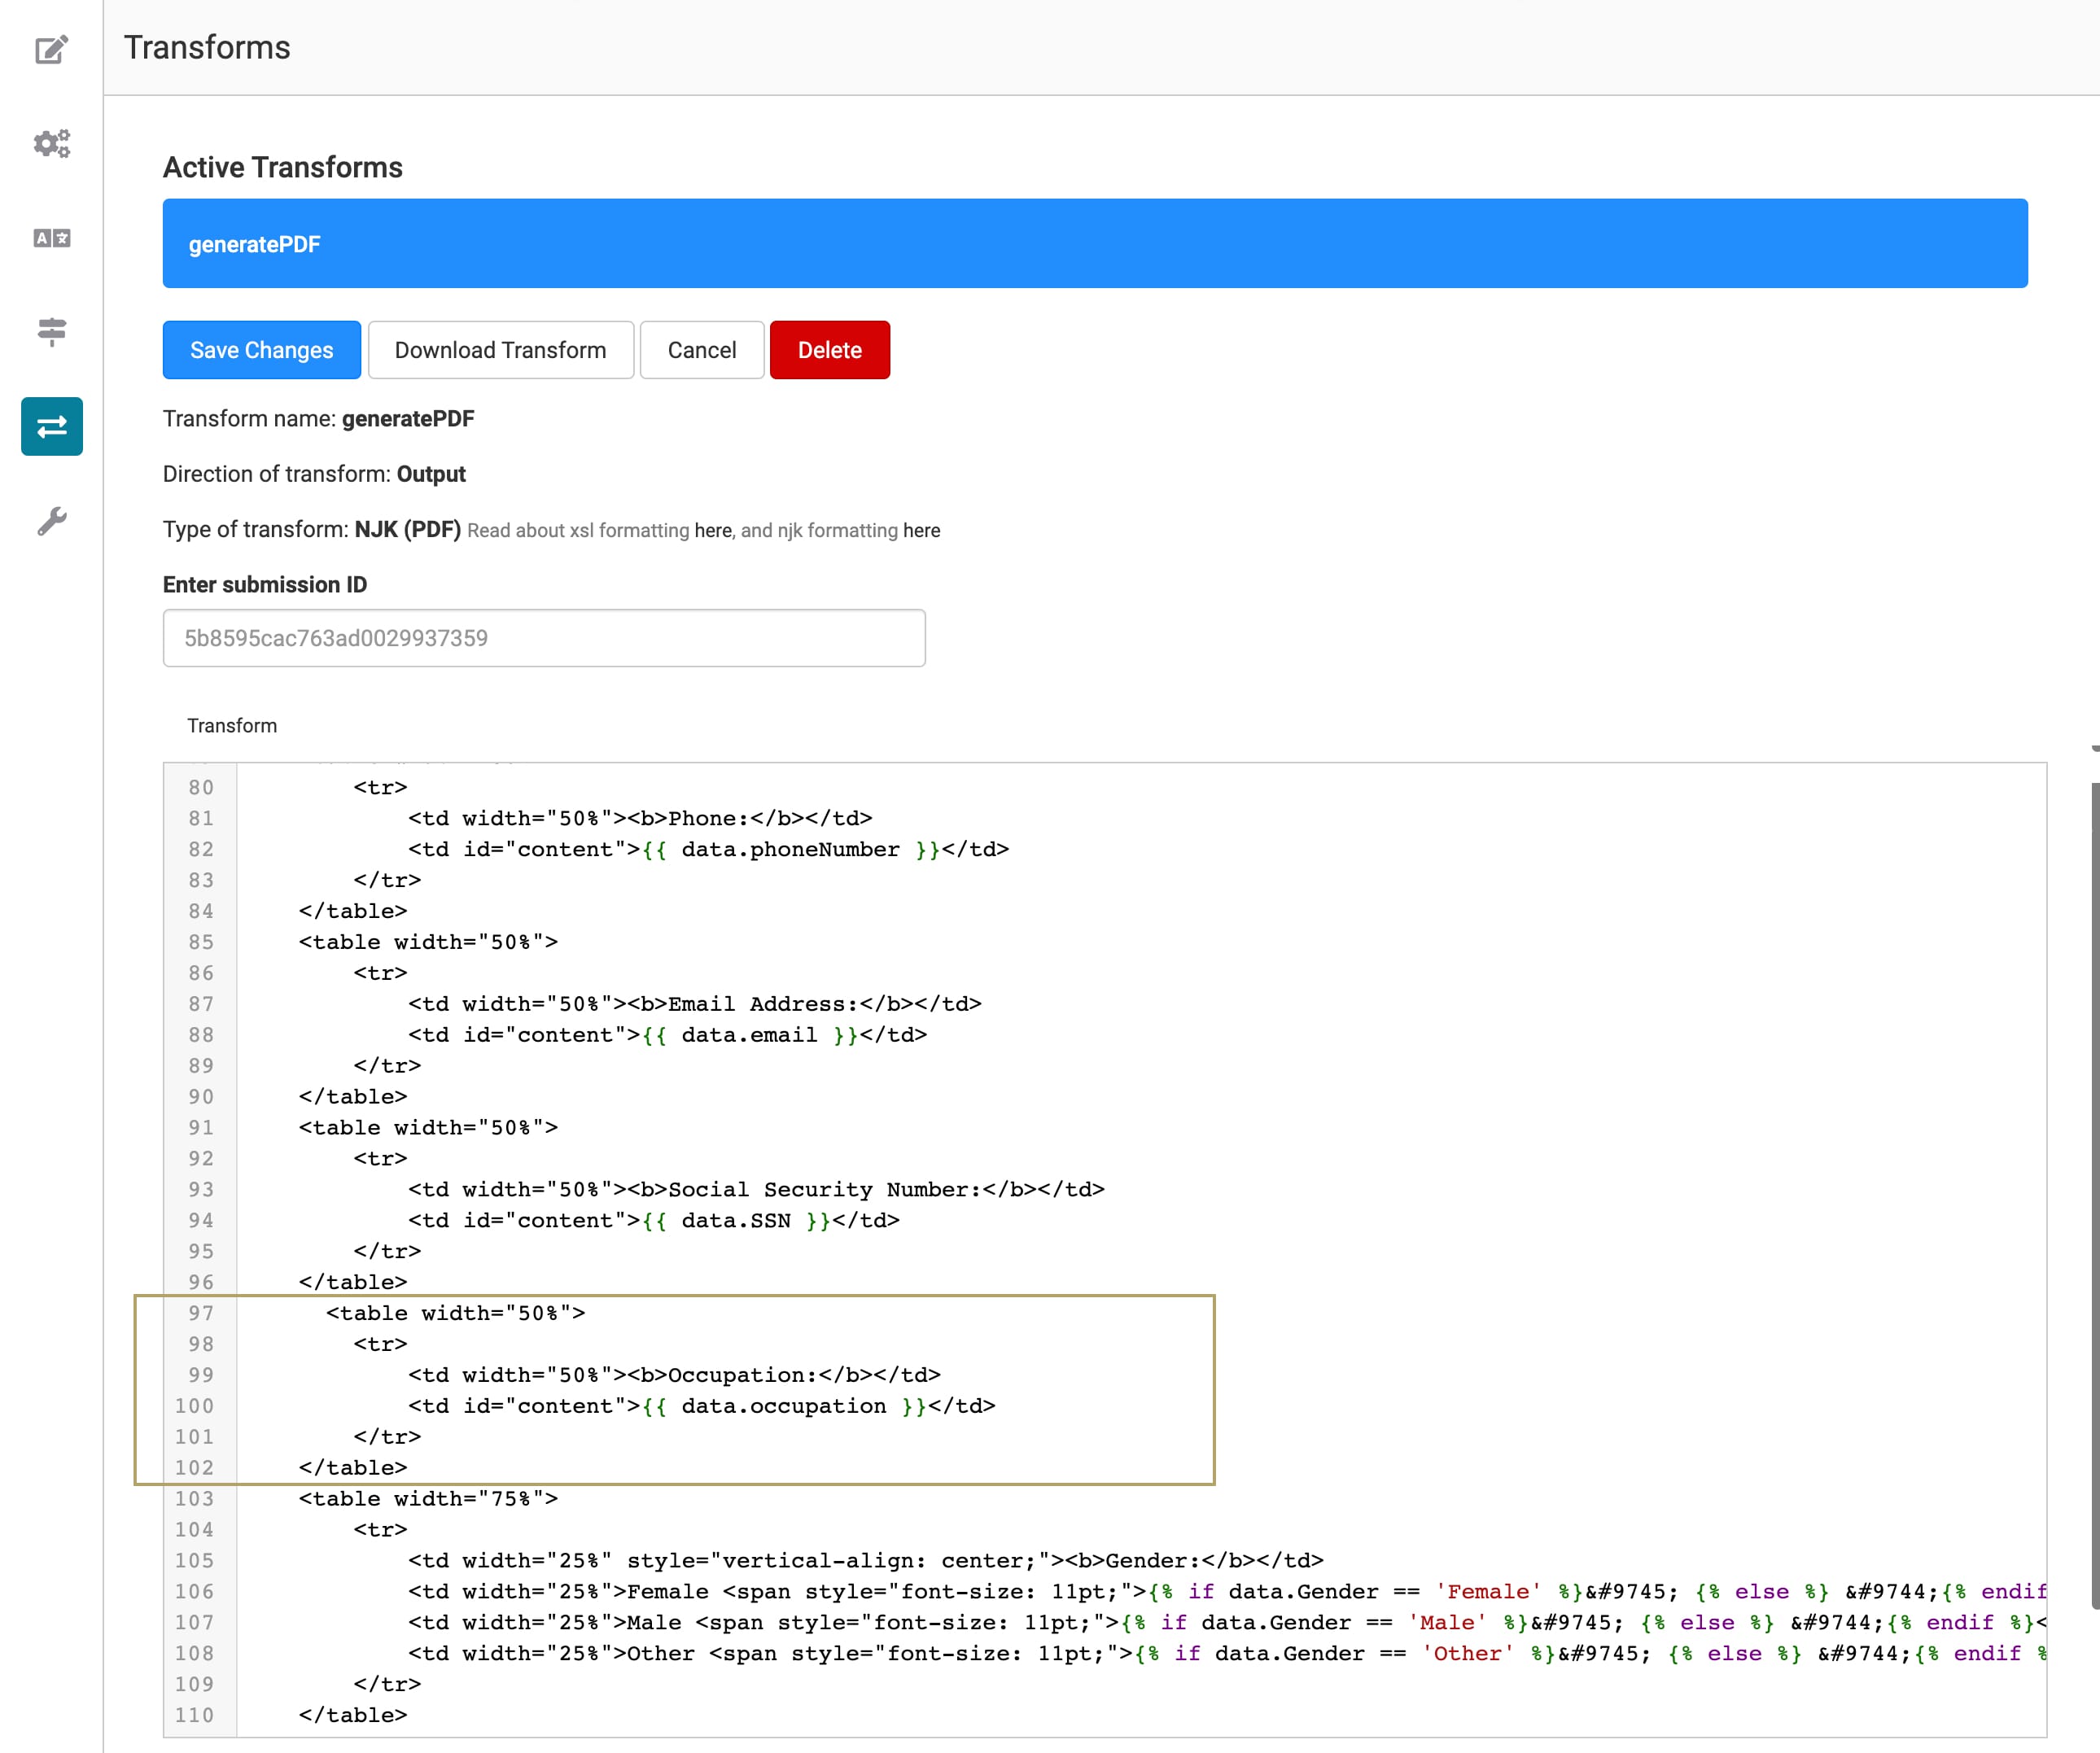
Next, add the Occupation field to your PDF by adjusting the transform. As mentioned earlier, the PDF uses an HTML table-based layout. So, when adding new fields to your PDF you have a few options. You can create another row (<tr>) or column (<td>) in an existing table, or add a new table. Here, add a new table below the Social Security Number table.
In the Transforms tab, open the generatePDF transform.
Paste the following code into the transform below the Social Security Number table (after the </table> tag).
<table width="50%">
    <tr>
        <td width="50%"><b>Occupation:</b></td>
        <td id="content">{{ data.occupation }}</td>
    </tr>
</table>
The HTML {{ data.occupation }} lets the transform dynamically populate the Occupation field from the submission data. occupation is the Property ID of the Occupation Text Field component.
Click Save Changes.
Return to the Module Builder.
Save your module.
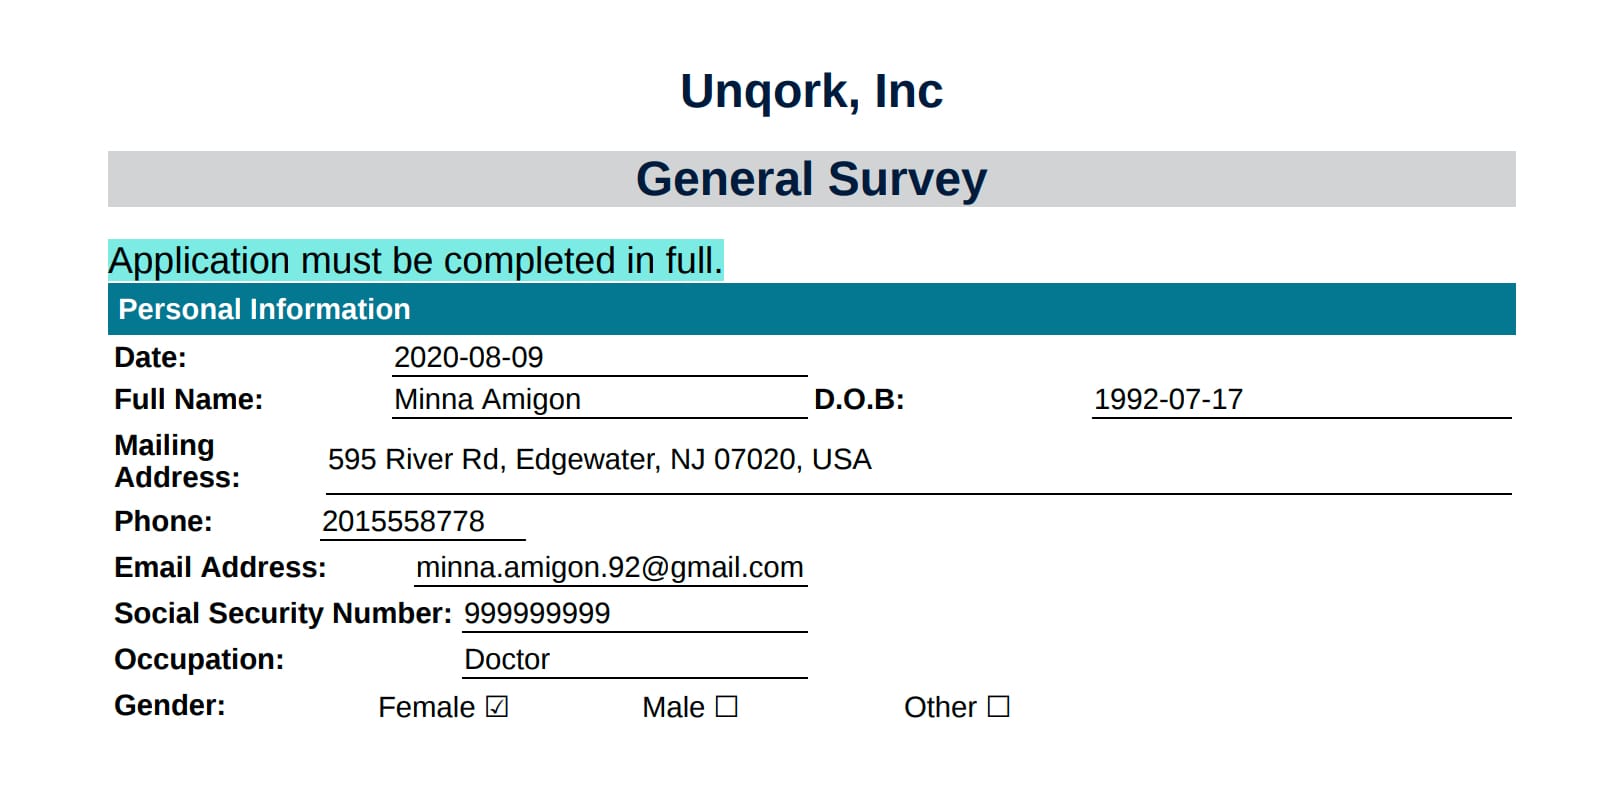
The updated PDF, including the style changes made earlier, looks like this. You can see the new Occupation field below the Social Security Number field.
Removing Fields from the Module and PDF
In this example, you'll remove the Social Security Number Field. There are 2 steps in this process:
Updating yourmodule.
Updating your transform.
Updating the Module
The first step is removing the Social Security Number field from your module:
Hover over the Social Security Number Text Field component.
A 5-button toolbar displays above the component on hover-over.
Click the
.jpg) (Remove) button.
(Remove) button.Save your module.
Updating the Transform
For this example, you'll remove the Social Security Number field from the transform by removing the entire Social Security Number table.
For fields that are part of a larger table, you might need to remove only the row (<tr> to </tr>) or data cell (<td> to </td>).
In the Transforms tab, open the generatePDF transform.
Delete the following code from the transform:
<table width="50%">
    <tr>
        <td width="50%"><b>Social Security Number:</b></td>
        <td id="content">{{ data.SSN }}</td>
    </tr>
</table>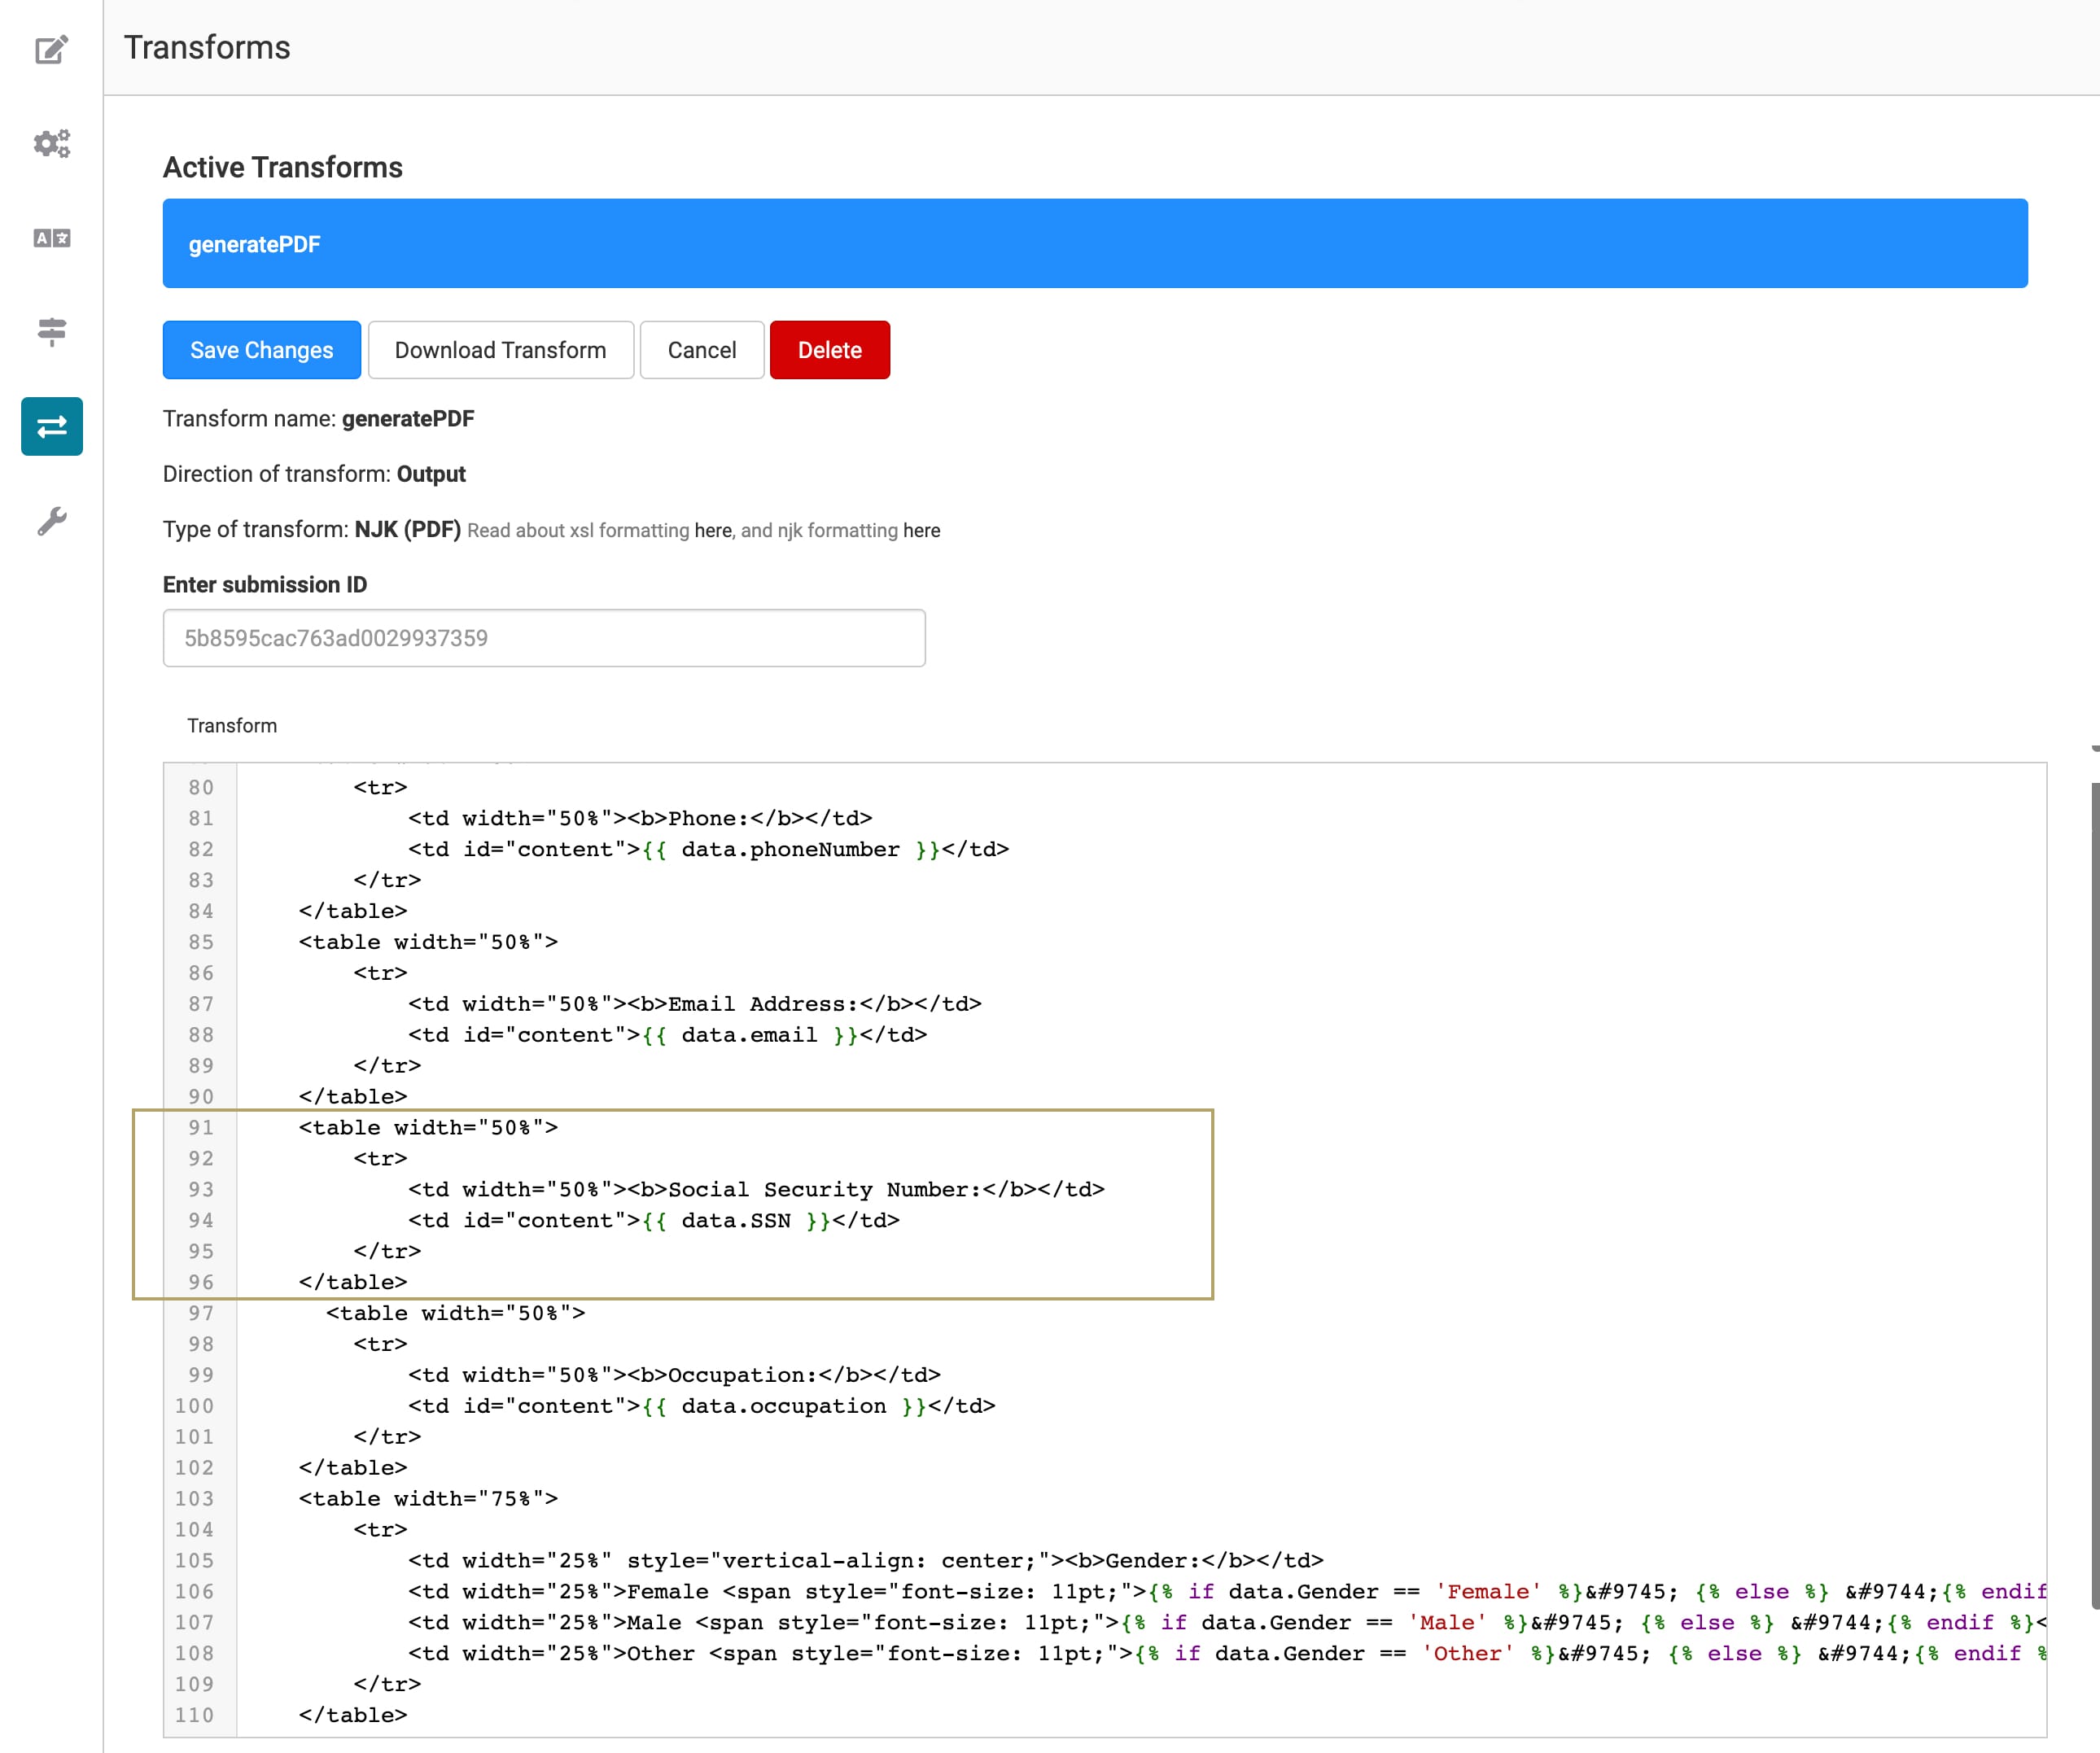
Click Save Changes.
Return to the Module Builder and Save your module.
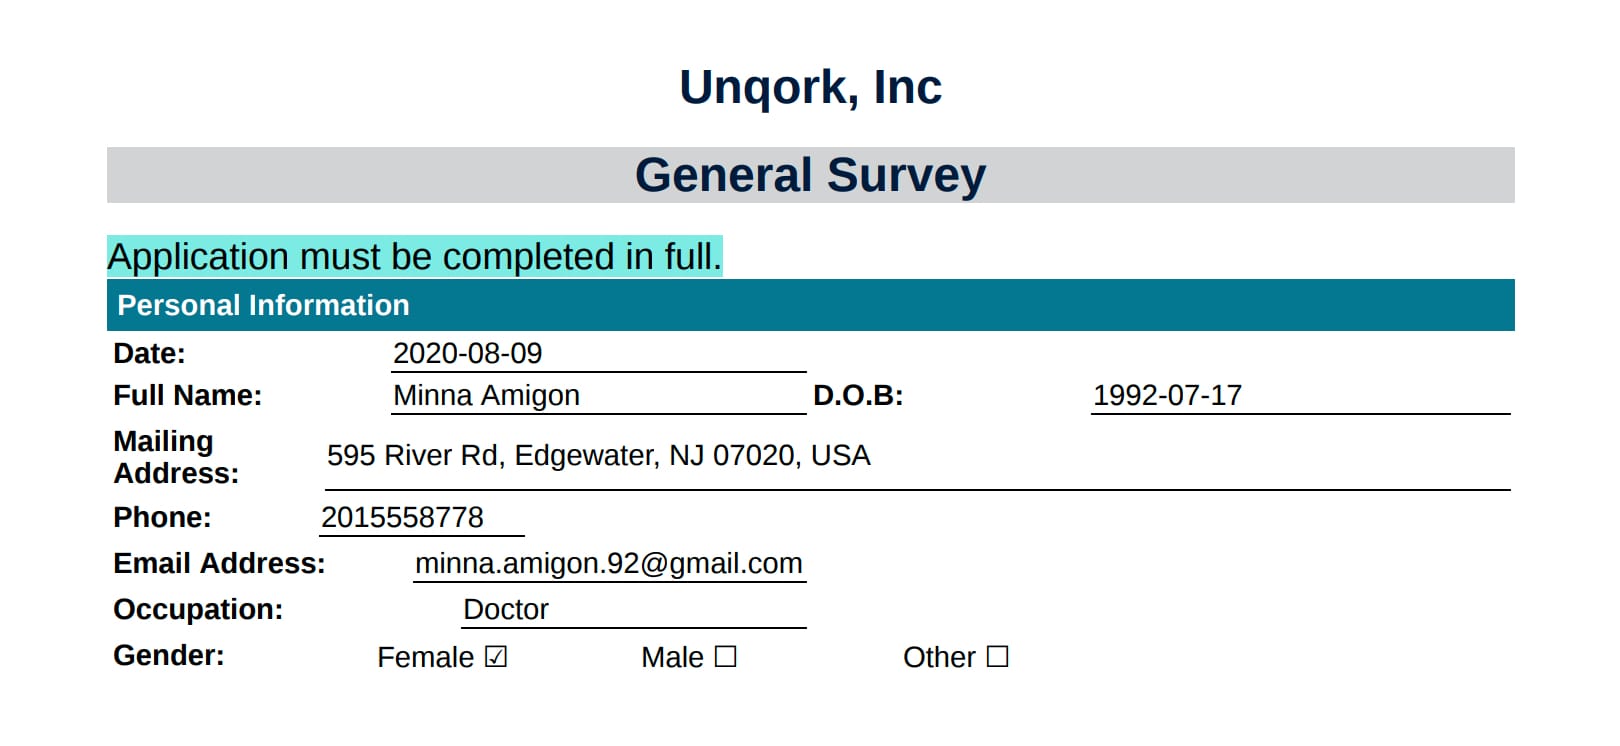
Your updated PDF, including the previous style changes and new Occupation field, looks like this. Notice that the Social Security Number field no longer displays above the Occupation field.
You've seen a few PDF customization options. Feel free to play around with the transform script and try out different styles and layouts!