Overview
Sometimes you'll want to measure performance of a particular activity. For example, you may want to see the number of submissions in your dashboard. Or, maybe you want to see a total amount spent based on submissions. To reveal this information, you can use a KPI (key performance indicator) widget. KPI widgets are a great way to measure and get an at-a-glance view of a key metric. The Numeric KPI Dashboard snippet is ready-to-go with a dashboard, a KPI widget, and a pie chart.
KPIs are your chief ways of establishing what your business needs to achieve and measuring whether you’re on track to achieve it. A KPI dashboard takes this a step further by bringing all your KPIs together in one place.
The setup of this Numeric KPI Dashboard snippet is mostly to help you familiarize yourself with creating a dashboard. So, it shows how to set everything up in 1 module. Generally speaking, best practice is to have the retrieval of submissions live in a separate module. Consider using this snippet with the Paginated Dashboard snippet or the Paginated Retrieve Submissions snippet.
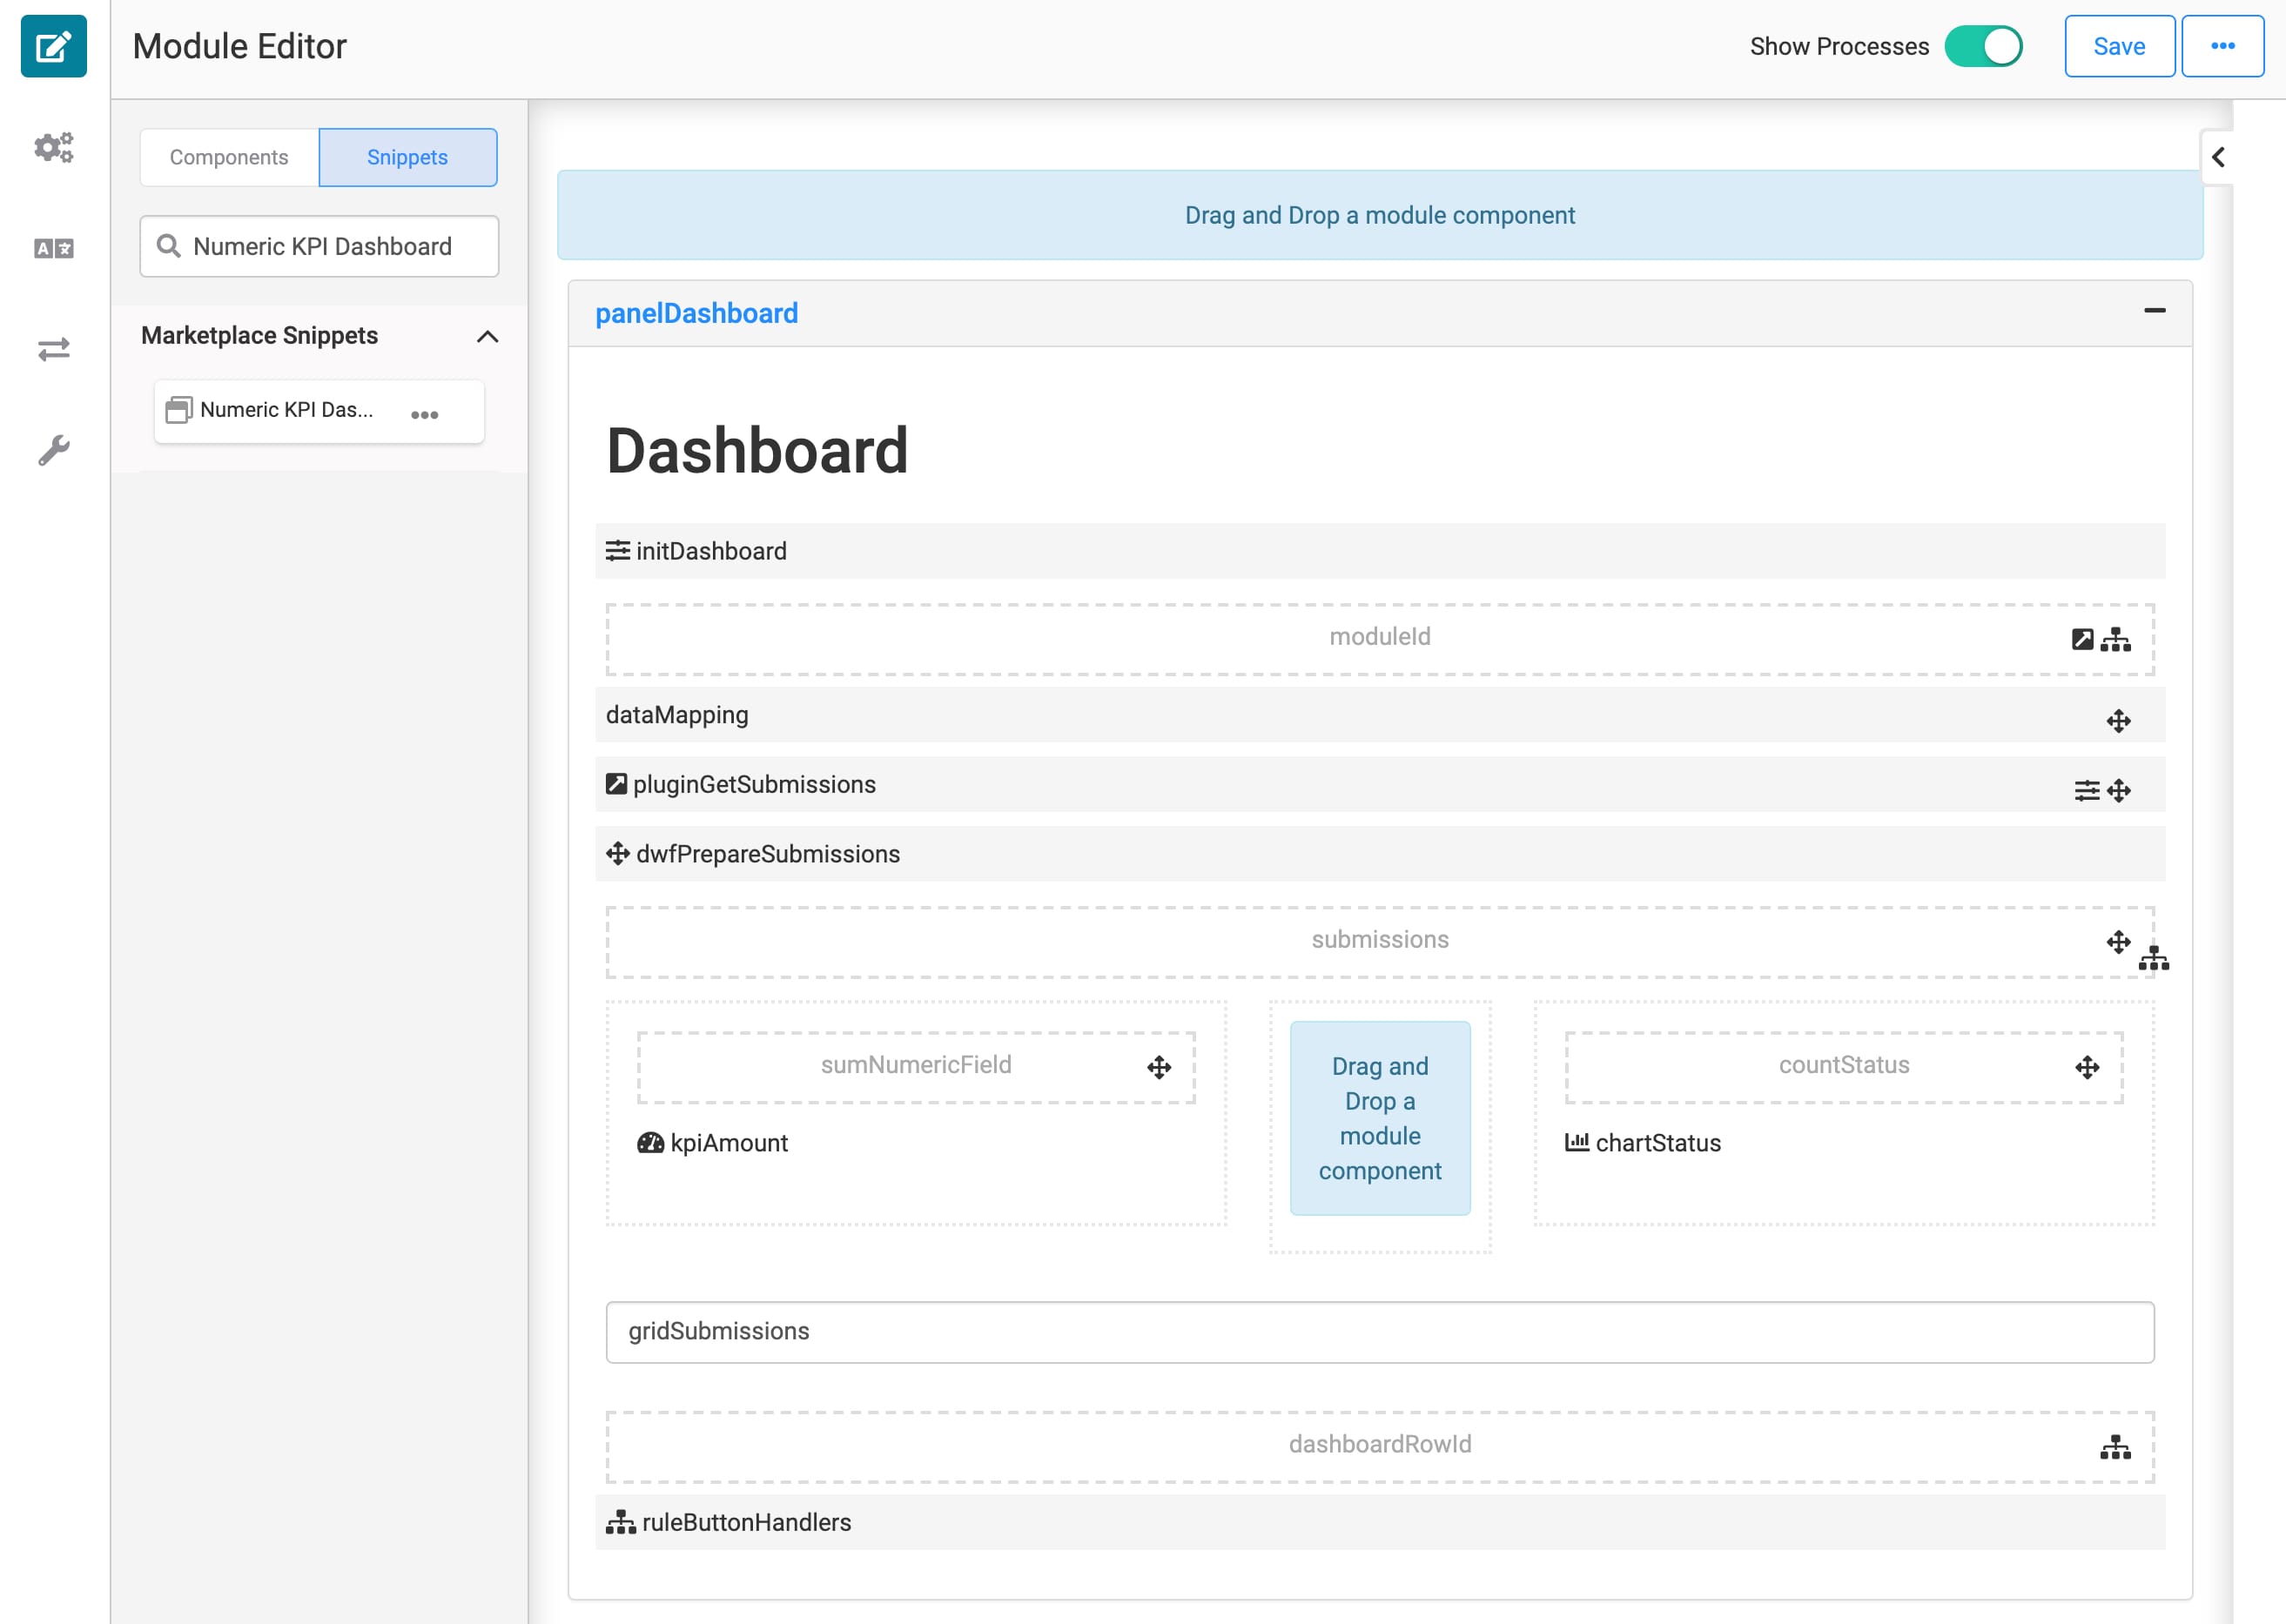
Here's how the snippet looks in the Module Builder:
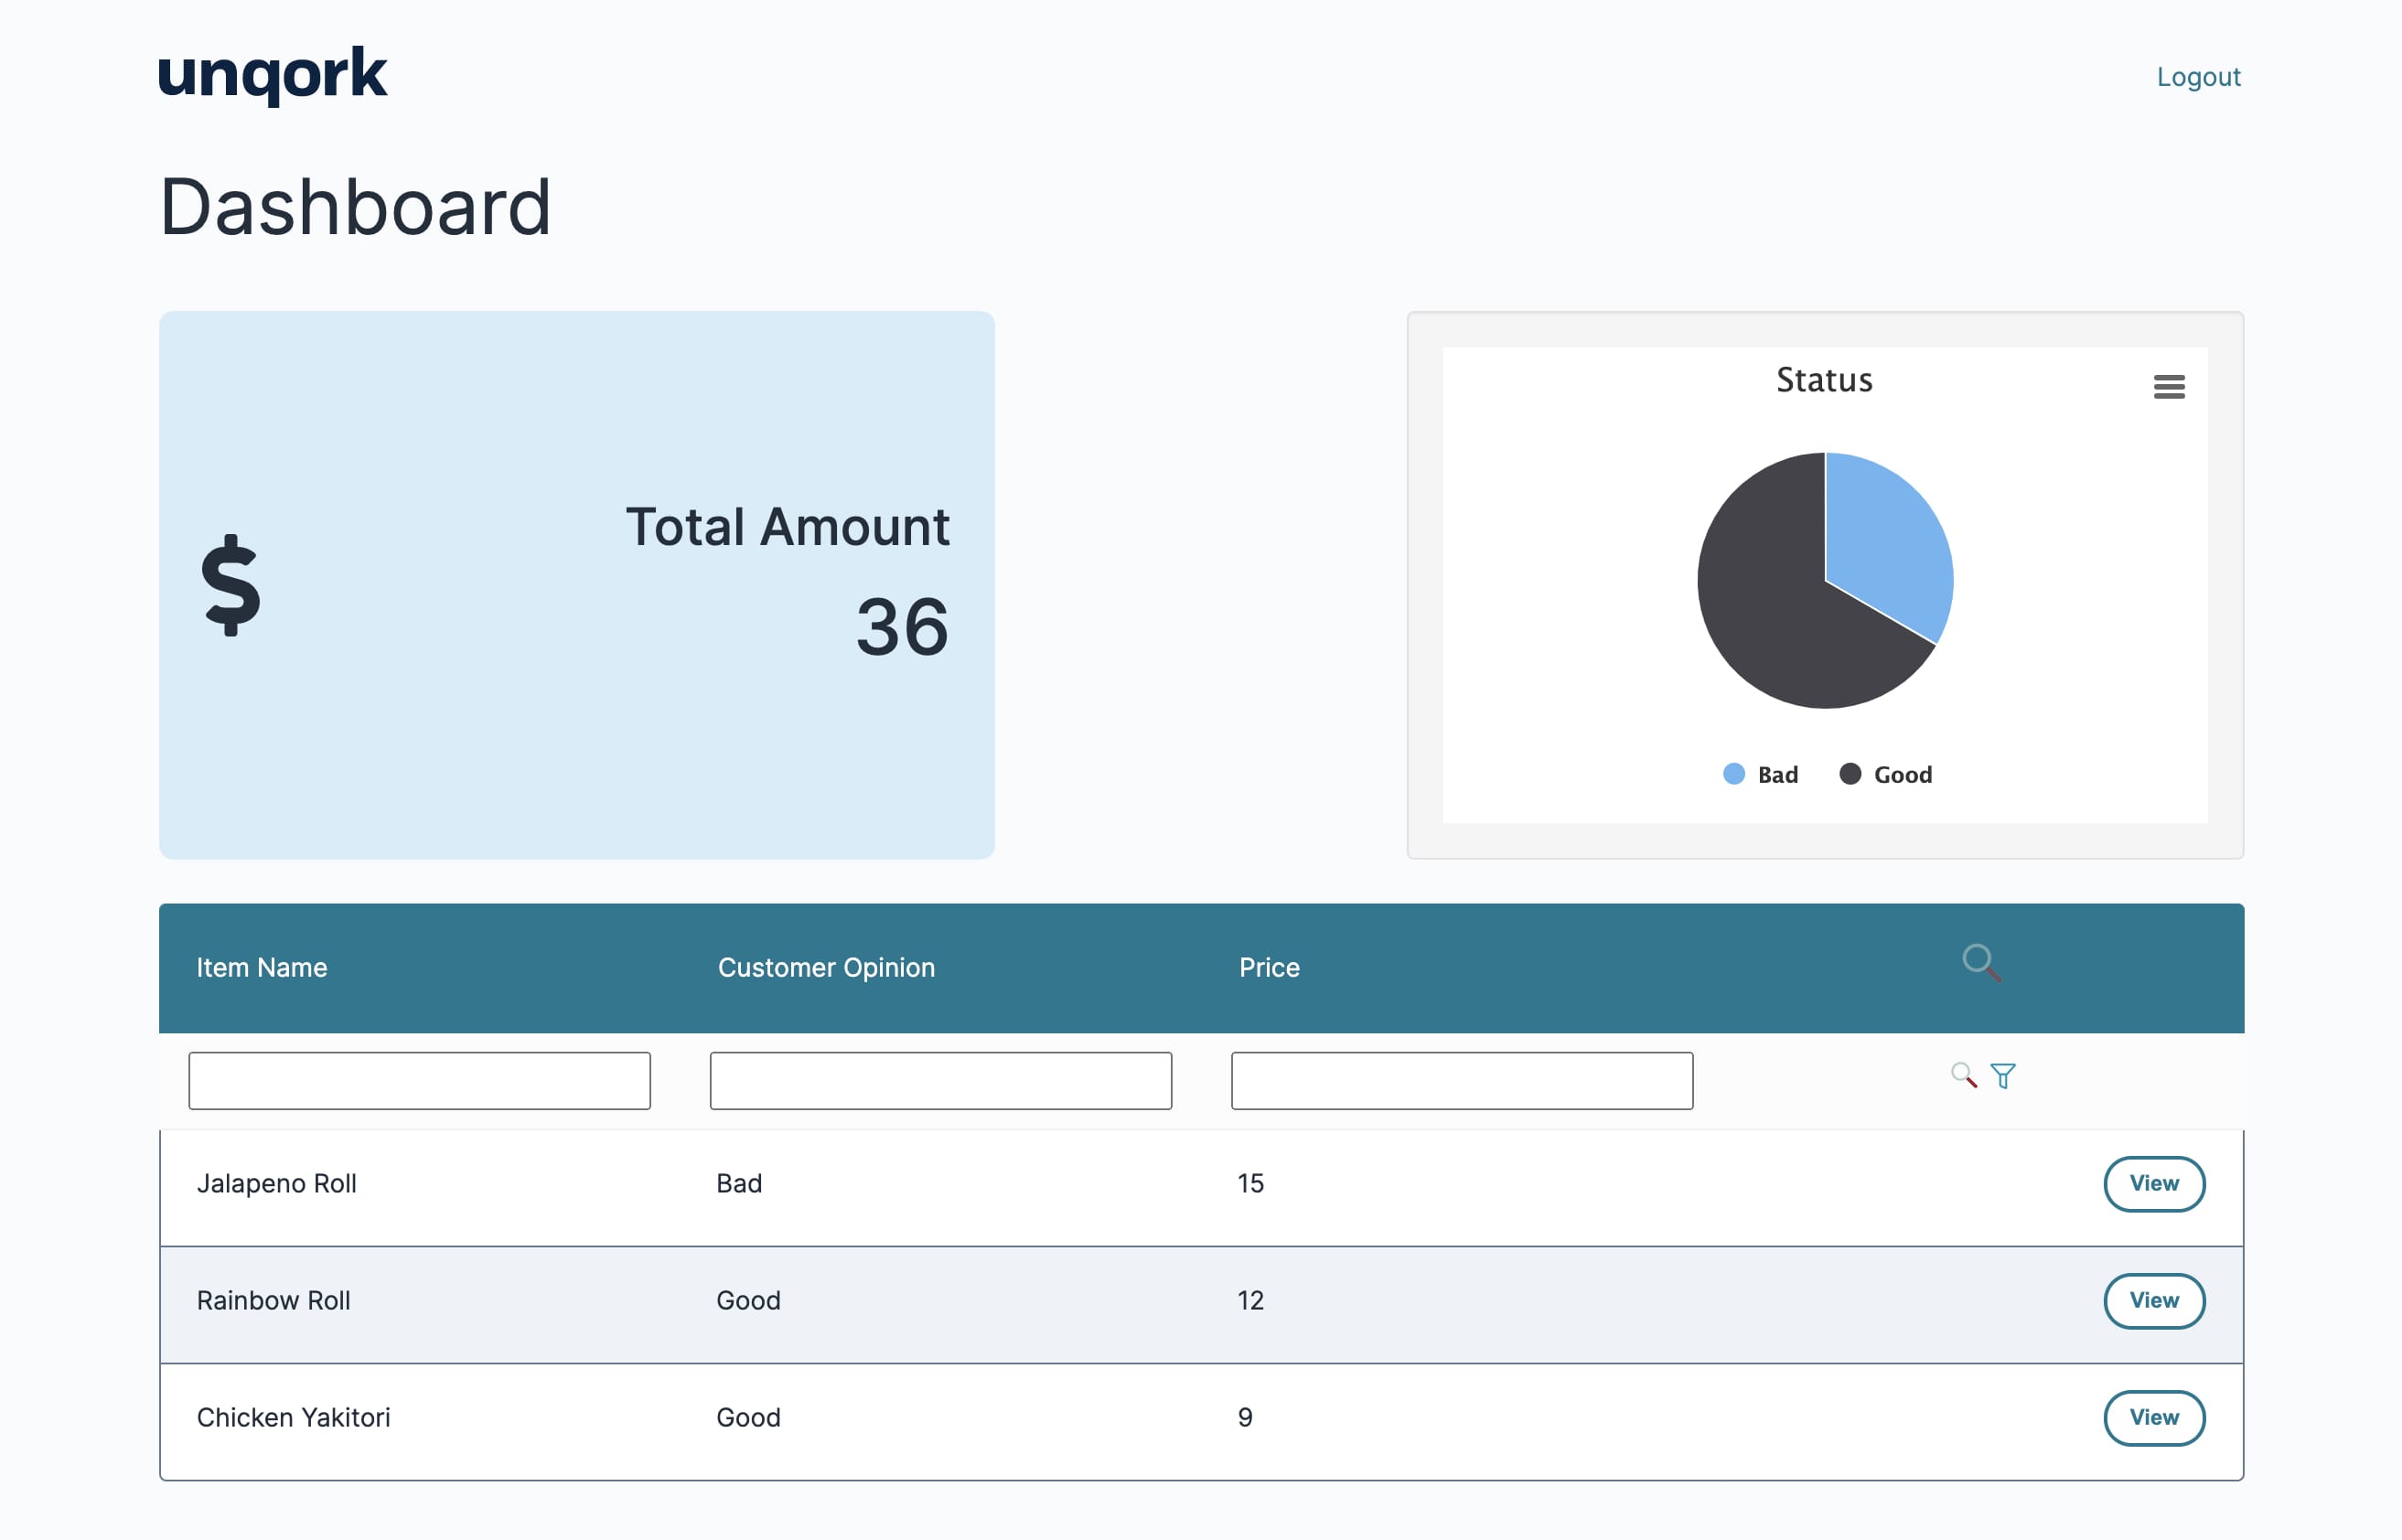
And here's an example of how a customized numeric KPI dashboard might look:
Adding the Snippet
Before you use this snippet in your application, you must install the snippet to your environment. Then, you can drag and drop your new snippet onto your module canvas.
Adding the Snippet to Your Environment
To add the snippet to your environment:
Click Marketplace at the top right of the Unqork Designer Platform.
You can also access the Marketplace at any time by visiting https://marketplace.unqork.io.
Enter Numeric KPI Dashboard in the Search the Marketplace field.
Click on the Numeric KPI Dashboard snippet tile.
Click Install to Environment.
Click Install Template.
If you aren't logged in, you'll see a field for Environment URL and a Login button. Enter your environment's URL where you want to install the template. For example: [environmentname.unqork.io]. Click the Login button. Then, return to step 4 and click Install to Environment again. Follow the remaining steps as listed.
Now, you can now use your newly installed snippet in your application.
Adding the Snippet to Your Module
So, you installed the Numeric KPI Dashboard snippet to your environment. Now what? Now you can drag and drop the snippet right into your module:
In the left sidebar of the Module Builder, click the Snippets button.
Enter Numeric KPI Dashboard in the search bar.
Drag and drop the Numeric KPI Dashboard snippet onto your canvas.
Save your module.
How the Snippet Works
Let's take a look at how this snippet works its magic. First up, the initDashboard Initializer component fires the pluginGetSubmissions Plug-In component. This Plug-In retrieves the submissions you want to display from the module ID specified in the moduleId Hidden component. Then, the Plug-in fires the dwfPrepareSubmissions Data Workflow component. This Data Workflow takes the submissions and maps them using the dataMapping Data Table's mapping. The Data Workflow outputs the mapped submissions to the submissions Hidden component. The gridSubmissions ViewGrid component pulls from the submissions Hidden component. So, those submissions are what display on your dashboard.
The Data Workflow also figures out some math for you. It goes through all the rows, adds them up, and finds the total across all rows for a specific field. That number outputs to sumNumericField, which maps to your KPI in Express View. Then, the Data Workflow counts how many submissions are in each Status and outputs those numbers to countStatus. This countStatus Hidden component is what maps to your pie chart in Express View.
The ruleButtonHandlers Decisions component lets you view a dashboard entry in the Express View of your dashboard. The Decisions component looks for the button-click event. A button-click event is when someone pushes the View button in Express View. Then, the Decision builds a URL and opens to the module you're pulling submissions from, showing that specific submission.
The setup of this Numeric KPI Dashboard snippet is mostly to help you familiarize yourself with creating a dashboard. So, it shows how to set everything up in 1 module. Generally speaking, best practice is to have the retrieval of submissions live in a separate module. Consider using this snippet with the Paginated Dashboard snippet or the Paginated Retrieve Submissions snippet.
Setting Up the Snippet
So, what's needed to get this snippet up and running? To get your dashboard to work as expected, you'll need some submissions to display. And, because this snippet works with a KPI, we assume your submissions have some kind of status. Setting up the snippet is easy. You must:
Update the snippet so it pulls submissions from your schema module.
Update the fields in the Data Table and Plug-In.
Update your View Grid so your dashboard displays how you want it to.
Updating the Hidden Component with Your Module ID
This snippet assumes you have a schema module with saved submissions. To map to your module, you only have to make 1 quick update.
In the Module Builder, hover over the moduleIdHidden component.
A 5-button toolbar appears above the component on hover-over.
Using the toolbar, click the
.jpg) (Settings) button.
(Settings) button.Enter your schema module's ID in the Default Value field.
Click Save.
Save your module.
Updating or Deleting Columns from Your Dashboard
By default, the snippet uses the following column names in the Data Table, Plug-In, and ViewGrid components:
itemName
columnTwo
columnThree
columnFour
columnFive
itemStatus
amountField
You can update the existing column names and delete the ones you don't need. This change takes place in 3 components.
Updating the pluginGetSubmissions Plug-In Component
First up, you'll update the Plug-In component so it pulls the correct fields from your schema submissions.
Hover over the pluginGetSubmissions Plug-In component.
Using the toolbar, click the
(Settings) button.In the Inputs table, update the Property ID column to match the Property IDs of the fields in your schema submissions.
In the Inputs table, delete any rows with the fields you don't need.
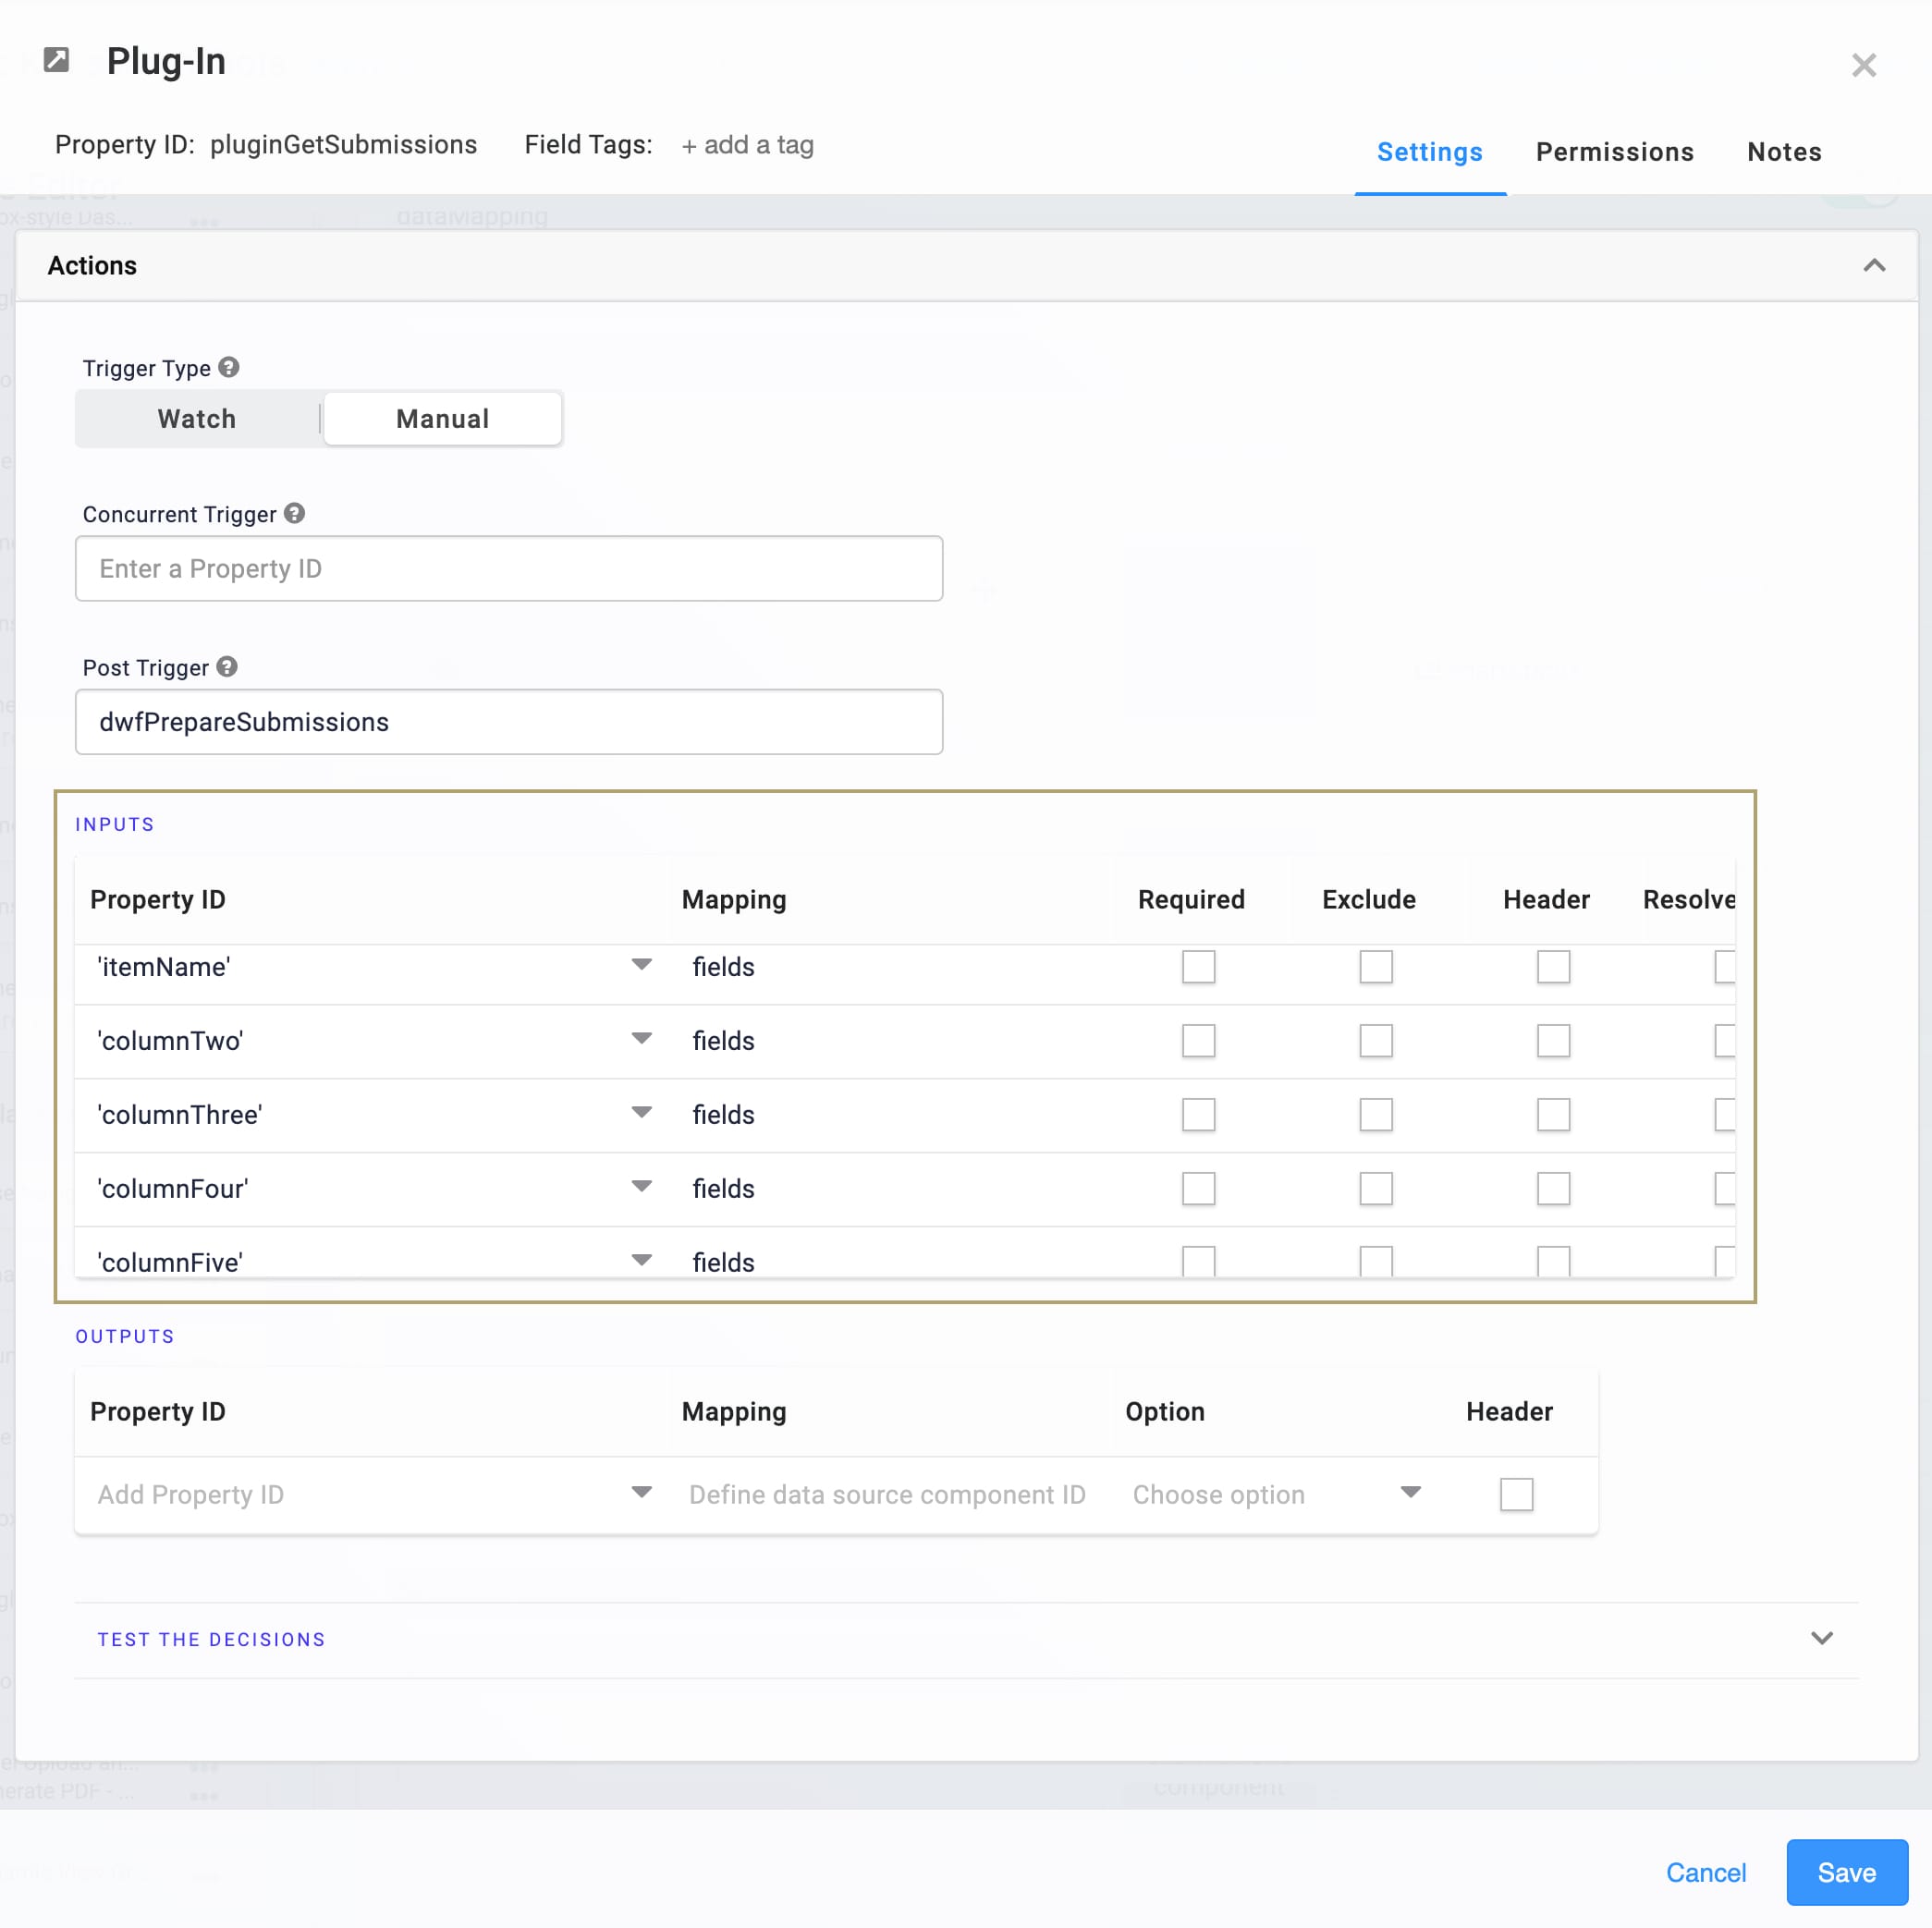
Click Save.
Save your module.
Updating the dataMapping Data Table Component
Next, you'll make a couple quick changes to your Data Table. There are 2 columns in the dataMapping Data Table component. We recommend keeping the Dashboard column as it is, since the rest of the snippet's configuration works off those fields. The Module column is where you'll enter the Property ID of the fields you specified in your Plug-In. These are the fields you want to pull back from your schema module.
Hover over the dataMapping Data Table component.
Using the toolbar, click the
(Settings) button.In the Data Table table, update the fields in the Module column to match the Property IDs of the fields in your Plug-In.
In the Data Table table, delete any rows you don't need.
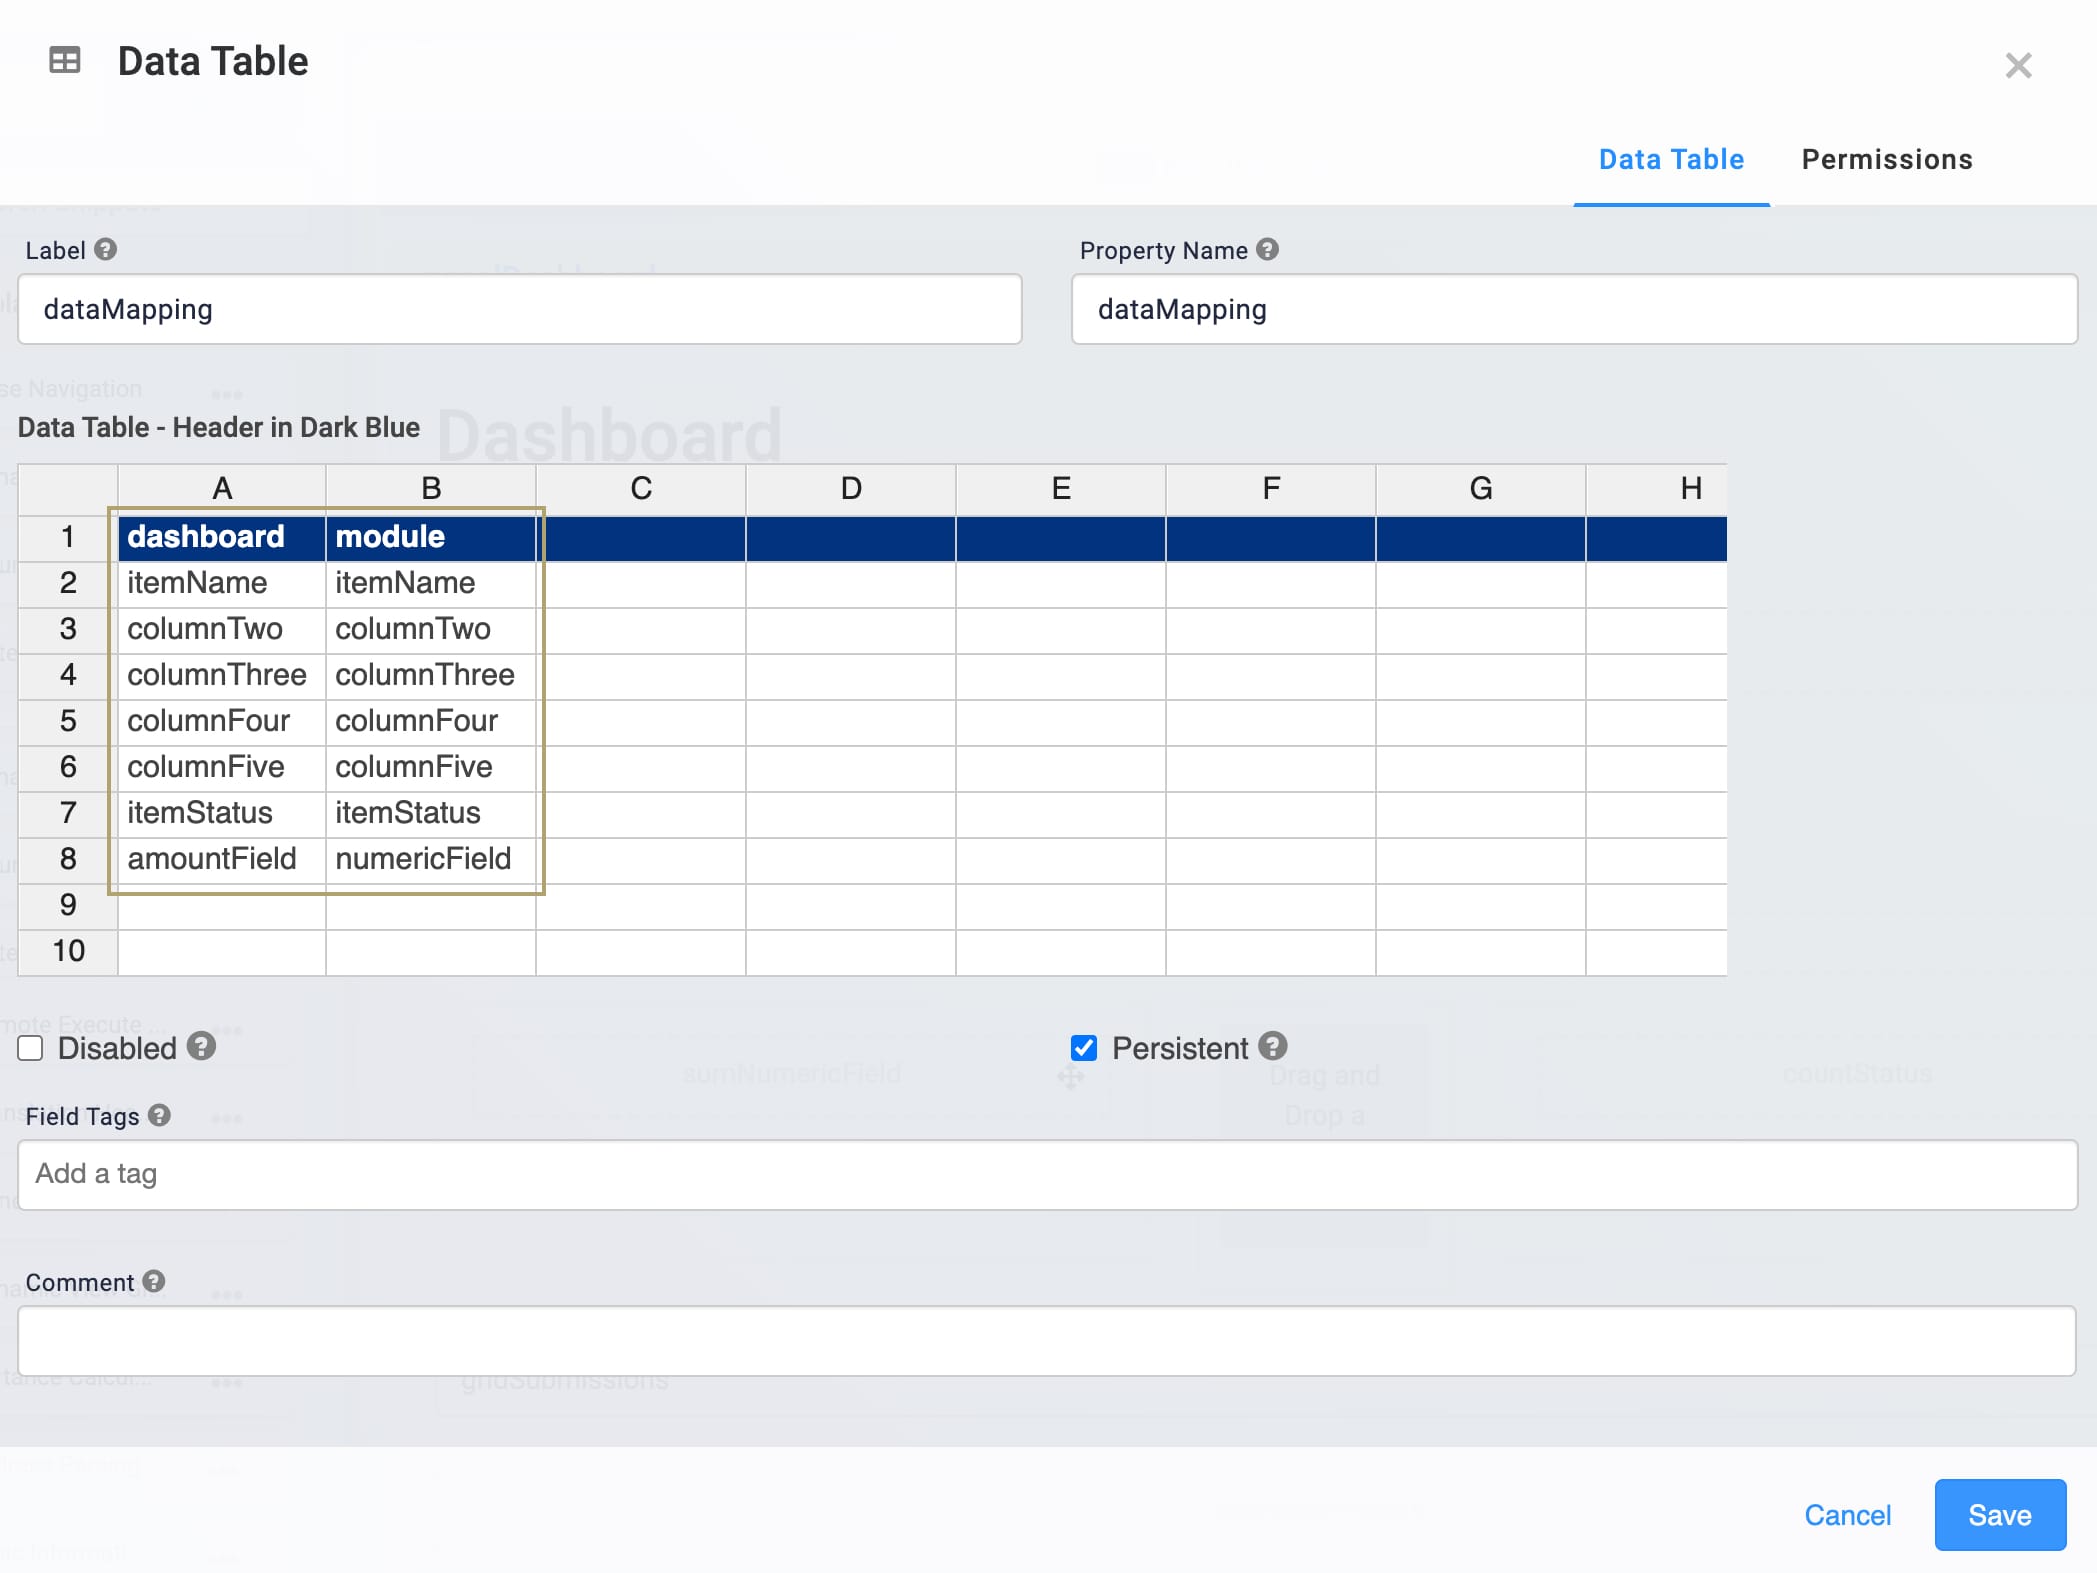
Click Save.
Save your module.
Updating the gridSubmissions ViewGrid Component
Lastly, you'll update the ViewGrid component so that the dashboard only shows the columns you want to display. This is also where you can personalize the columns of your dashboard.
Hover over the gridSubmissions ViewGrid component.
Using the toolbar, click the
(Settings) button.In the Display table, delete any rows that you don't want displayed on your dashboard.
In the Display table, update the Heading column's fields to what you want displayed on your dashboard in Express View.
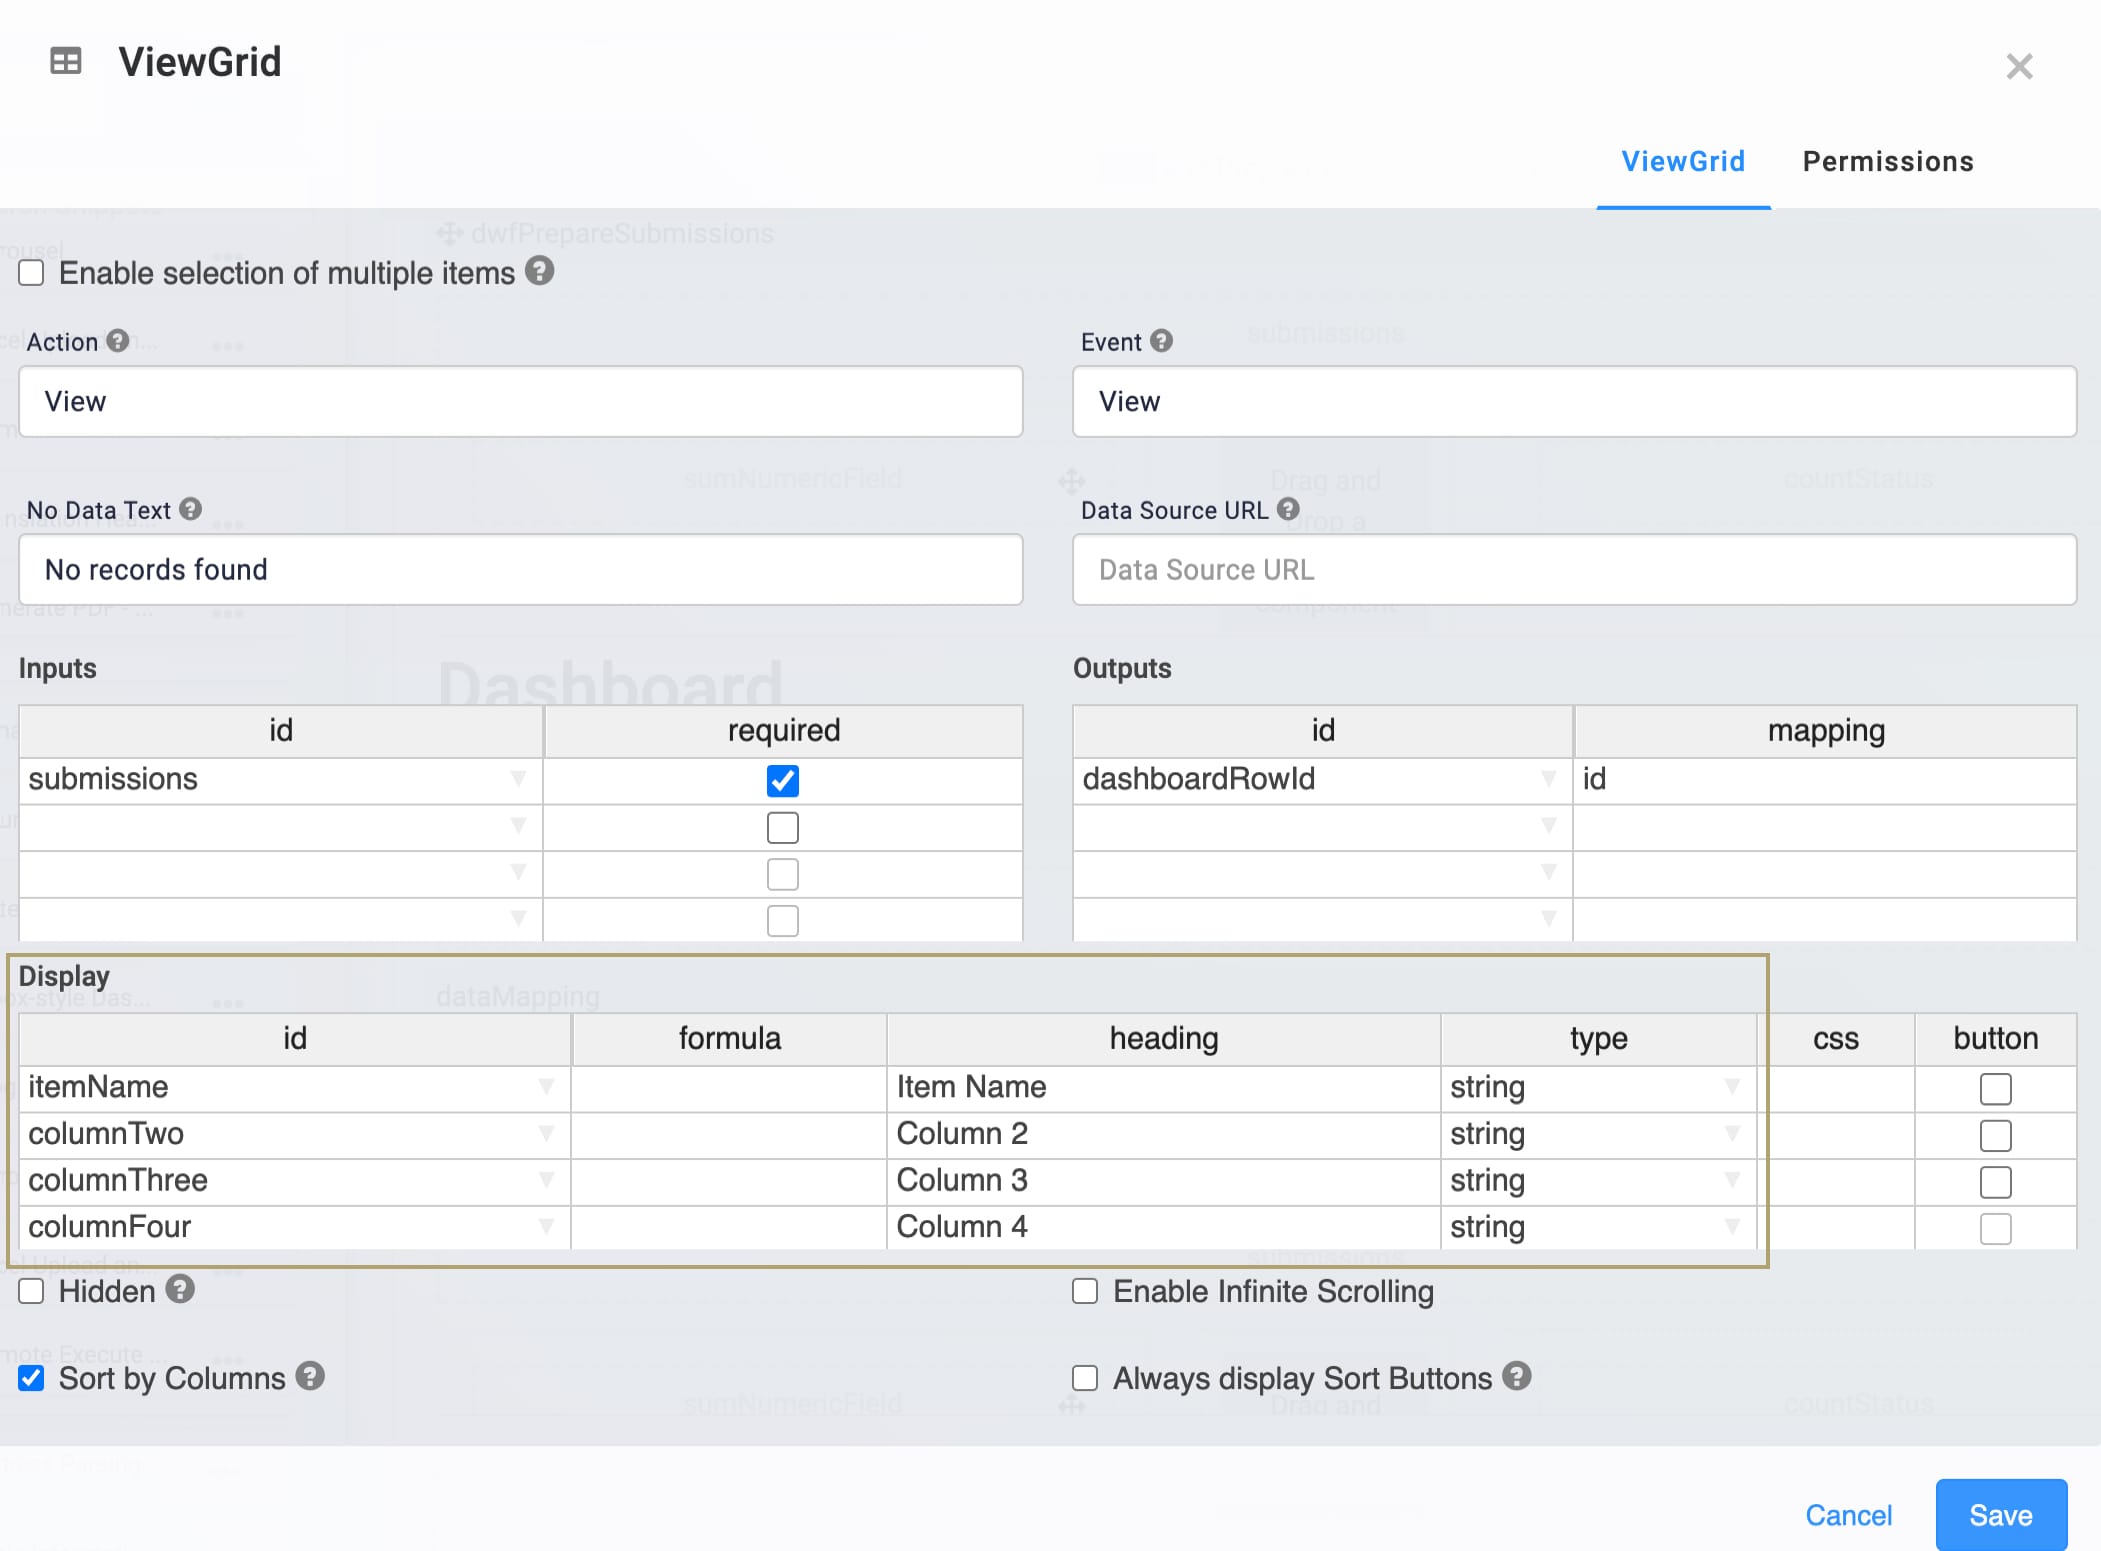
Click Save.
Save your module.
Removing the Snippet
What if you're no longer interested in using this snippet? No problem. We'll walk you through the quick steps to remove the snippet from your module. Then, you'll learn how to uninstall the snippet from your environment.
Removing the Snippet from Your Module
Removing a snippet from your module is easy. To remove the Numeric KPI Dashboard snippet:
In the Module Builder, hover over the panelDashboard Panel.
A 5-button toolbar appears above the component on hover-over.
Using the toolbar, click the
.jpg) (Remove) button.
(Remove) button.Save your module.
Removing the Snippet from Your Environment
Use the Unqork Template Library to remove unused snippets. To uninstall a snippet from your environment:
At the top right of the Unqork Designer Platform, click Library or Templates.
Find the snippet you want to uninstall.
Click the ellipsis (...) in the snippet's tile header.
Click Uninstall Template.
Click Yes, Uninstall in the confirmation modal.
You can visit the Marketplace and reinstall the snippet at any time.
What if you have an existing application built using this snippet and then uninstall the snippet from your environment? No problem. Your existing application remains unaffected. Also, your application doesn't have any ties to the snippet. So, let's say you reinstall a newer version of the snippet in the future. You can rest assured that the installation doesn't impact your existing application.