Overview
When creating applications in Unqork, you often need to pass information between modules. One option is to use a Plug-In component and an internal API (application programming interface) call. Another option is to use a query string. If you're unfamiliar with query strings, they are at the end of URLs and store information. Query strings let you dynamically transmit key information between modules in a URL.
Query strings can communicate data between 2 unconnected modules. For instance, the first module can generate a confirmation number on submission. Then, the second module displays that confirmation number. With query strings, you don't need an internal API call to send or retrieve submission data.
What Is a Query String?
Have you ever opened or shared a YouTube link that started playback at a specific time? A query string made that possible. This is an example of a YouTube URL and a specified playback time of 43 seconds: https://youtu.be/dQw4w9WgXcQ?t=43. The query string includes all characters after the URL's question mark. In this URL, ?t=43 is the query string. This addition to the URL transmits the key information to start playback 43 seconds into the video.
Let's take a closer look at the query string itself. Query strings have 2 parts. These parts include the query parameter name and the property value. An equal sign (=) separates the 2 parts. So, a query string uses the following format: ?{parameter name}={property value}. The parameter name remains the same, while the property value changes. So, in our example, a new query string of ?t=18 would transmit when to start playback. Now, the playback start time is 18 seconds into the video, not 43.
The Create URL Query Parameter and Read URL Query Parameter Snippets
The Create URL Query Parameter snippet helps to generate query strings. The Read URL Query Parameter snippet helps interpret a query string. You can use both of these snippets to work together or alone, depending on your use case.
In this article, you'll set up both snippets to work together between 2 unconnected modules.
Here's a summary of how you can leverage these 2 snippets:
Snippet | Description |
|---|---|
Create URL Query Parameter | This snippet creates a query string. On button-click, Unqork redirects end-users to a URL containing that query string. |
Read URL Query Parameter | This snippet watches the URL of the module it's in, looking for a specific query parameter. It extracts the property value and stores the value in a Hidden component. |
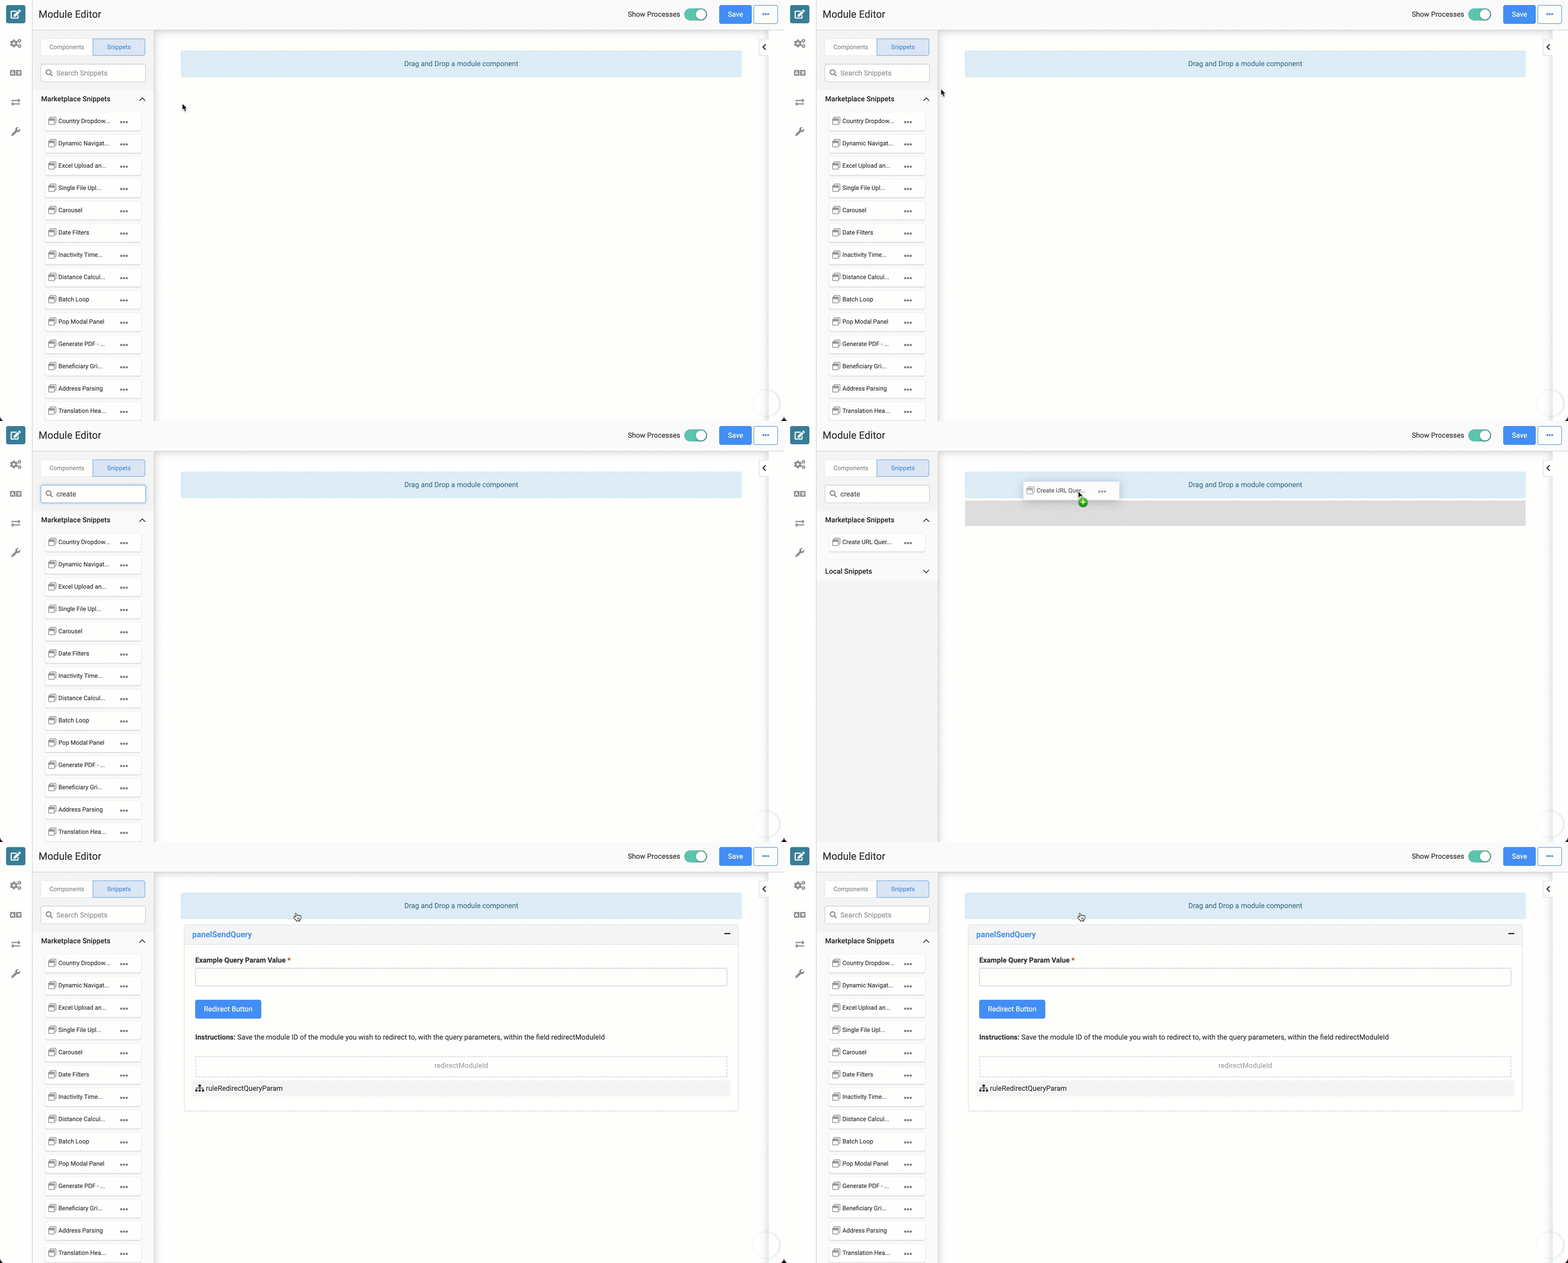
Here's how the Create URL Query Parameter snippet looks in the Module Builder:
Here's how the Create URL Query Parameter snippet looks in Express View:

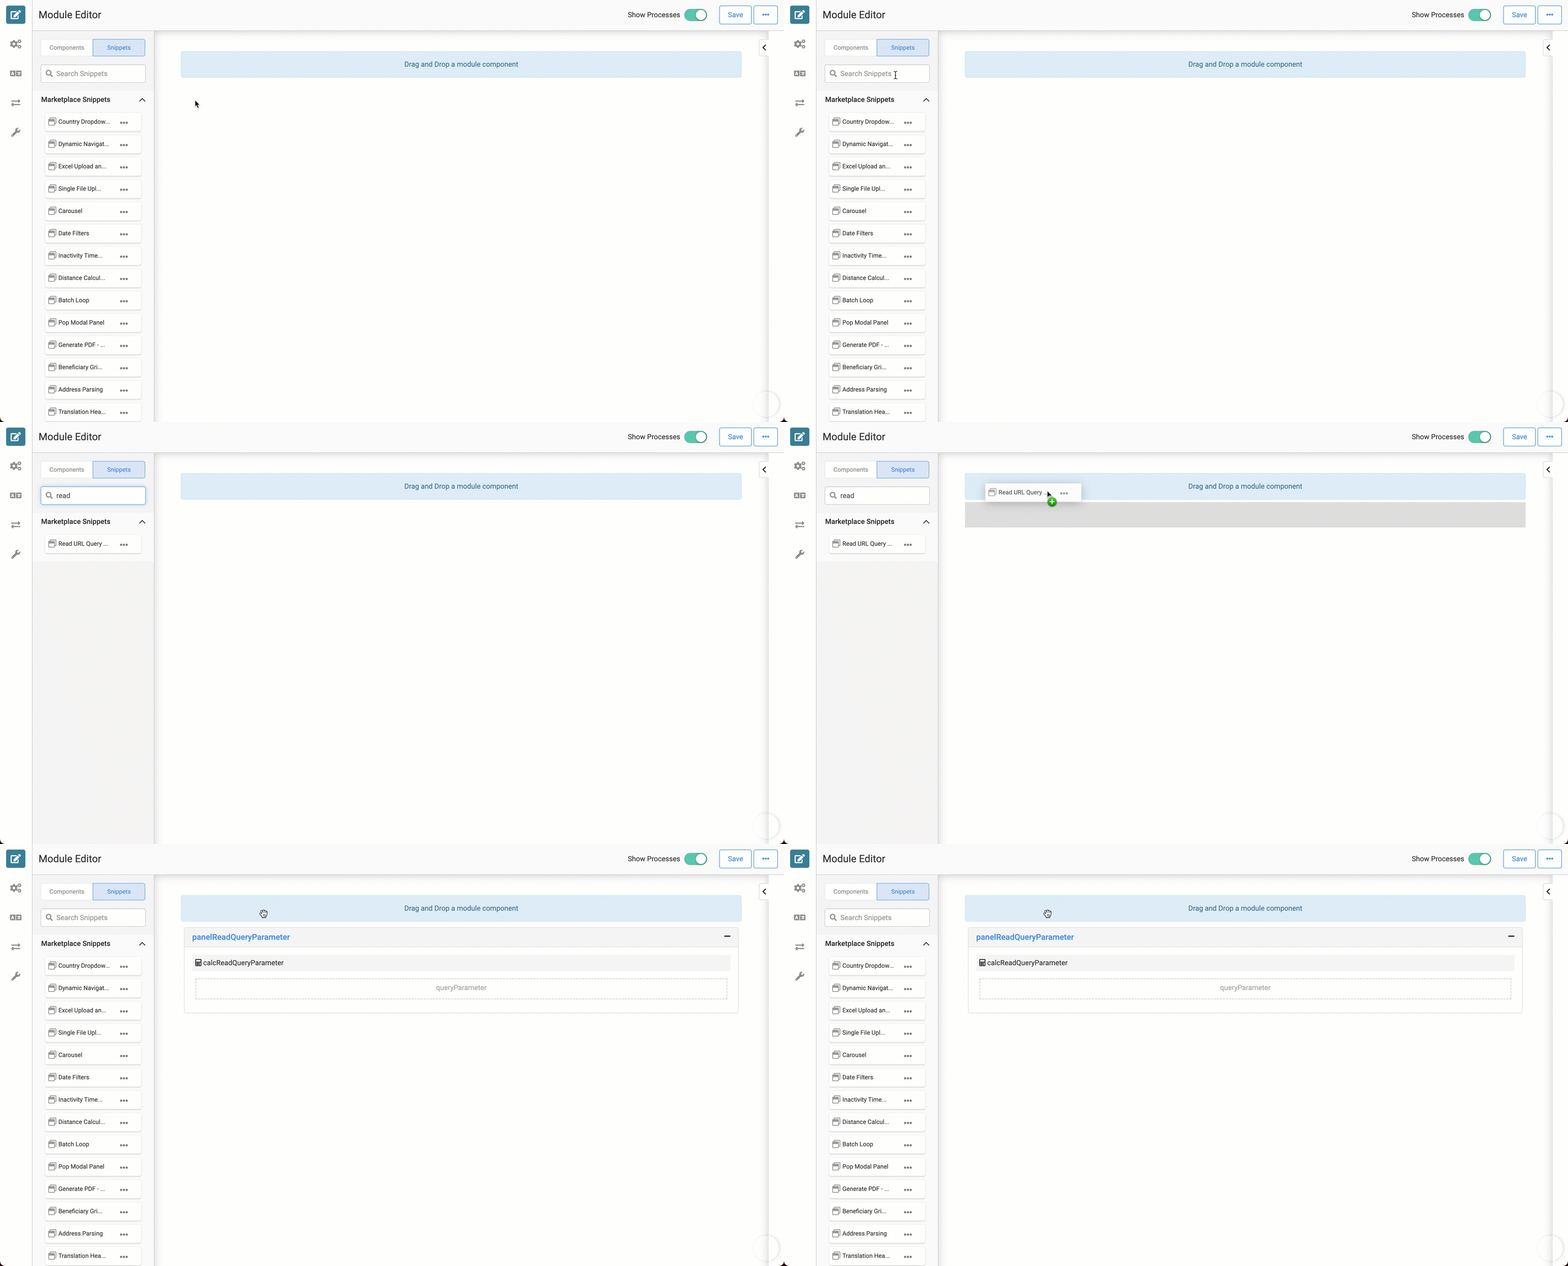
Here's how the Read URL Query Parameter snippet looks in the Module Builder:
Adding the Snippets
To set up the Create URL Query Parameter and Read URL Query Parameter snippets, you must create 2 modules:
Create Query Module: The first module contains the Create URL Query Parameter snippet.
Read Query Module: The second module contains the Read URL Query Parameter snippet.
Both modules must be in the same environment to work together.
Before you use these snippets in your application, you must install the snippets to your environment.
Adding the Create URL Query Parameter Snippet to Your Environment
To add the Create URL Query Parameter snippet to your environment:
At the top right of the Unqork Designer Platform, click Library.
Click Templates.
Click Marketplace.
You can also access the Marketplace at any time by visiting https://marketplace.unqork.io.
In the Search the Listings Directory field, enter Create URL Query Parameter.
Click the Create URL Query Parameter tile.
Click Install to Environment.
Click Install Template.
If you aren't logged in, you'll see a field for Environment URL and a Login button. Enter your environment's URL where you want to install the template. For example: [environmentname.unqork.io]. Click the Login button. Then, return to step 4 and click Install to Environment again. Follow the remaining steps as listed.
Now, you can now use your newly installed snippet in your application.
Adding the Read URL Query Parameter Snippet to Your Environment
To add the Read URL Query Parameter snippet to your environment:
At the top right of the Unqork Designer Platform, click Library.
Click Templates.
Click Marketplace.
You can also access the Marketplace at any time by visiting https://marketplace.unqork.io.
In the Search the Listings Directory field, enter Read URL Query Parameter.
Click the Read URL Query Parameter tile.
Click Install to Environment.
Click Install Template.
If you aren't logged in, you'll see a field for Environment URL and a Login button. Enter your environment's URL where you want to install the template. For example: [environmentname.unqork.io]. Click the Login button. Then, return to step 4 and click Install to Environment again. Follow the remaining steps as listed.
Now, you can now use your newly installed snippet in your application.
Adding the Create URL Query Parameter Snippet to Your Create Query Module
After you install the Create URL Query Parameter snippet to your environment, you can drag and drop the snippet into your Create Query module:
In the left sidebar of the Module Builder, click the Snippets button.
In the search bar, enter Create URL Query Parameter.
Drag and drop the Create URL Query Parameter snippet onto your canvas.
If you don't see the snippet at first, make sure to expand the Marketplace Snippets section.
Save your module.
Adding the Read URL Query Parameter Snippet to Your Read Query Module
After you install the Read URL Query Parameter snippet to your environment, you can drag and drop the snippet into your Read Query module:
In the left sidebar of the Module Builder, click the Snippets button.
In the search bar, enter Read URL Query Parameter.
Drag and drop the Read URL Query Parameter snippet onto your canvas.
If you don't see the snippet at first, make sure to expand the Marketplace Snippets section.
Save your module.
How the Snippets Work
The Create URL Query Parameter and Read URL Query Parameter snippets are unique. Typically, you use these snippets together. How you configure and update them depends on your use case. Here's how you can use the 2 snippets in an application.
The Create URL Query Parameter Snippet
At its basic level, the Create URL Query Parameter snippet does 2 things. First, it creates a query string. Then, it redirects your end-user to a URL containing that query string. To better understand the snippet, look at its configuration.
queryParameterExample Text Field component (labeled Example Query Param Value): In Express View, an end-user enters a property value in this field. That property value becomes part of the URL's query string. Remember, a query string follows this format: ?{parameter name}={property value}.
btnRedirect Button component: This Button triggers the ruleRedirect Decisions component.
redirectModuleId Hidden component: This component stores the module ID of your redirect destination module.
ruleRedirect Decisions component: This component creates the redirect URL, including the query string. Taking a closer look at the Micro Decisions table, you can see how the component creates the redirect URL.
The component's Micro Decisions table includes the following formula: =concatenate('#/display/',redirectModuleId,'?queryParameter=',queryParameterExample). The concatenate formula combines the following into the URL:
#/display: Displays the Express View version of a module, as opposed to the Module Builder view.
redirectModuleId: Indicates the module ID of the destination module. This part of the URL gets dynamically replaced with the module ID housed in the redirectModuleId Hidden component.
?queryParameter=: The first half of the query string. queryParameter is acting as a generic query parameter name.
You can customize the parameter name by replacing queryParameter in this formula.
queryParameterExample: The property value of the query string. This part of the URL gets dynamically replaced by the value your end-user enters in the Text Field component. queryParameterExample is that component's Property ID.
And so, the ruleRedirect Decisions component creates the redirect URL. Since the Output type is page, the redirect URL opens in a new page in the same tab. And the query string lets you pass the queryParameter value to an unconnected module.
The Read URL Query Parameter Snippet
The Read URL Query Parameter snippet watches the module's URL and extracts a specified query parameter from the query string. Then, it stores that parameter in a Hidden component.
The calcGetQueryParameter Calculator looks in the query string for a specified query parameter. Then, it outputs the parameter's property value to the Hidden component. By default, the Calculator looks for the generic queryParameter parameter. This parameter is the same as the generic queryParameter parameter in the Create URL Query Parameter snippet.
It's also easy to adjust the Calculator's formula to extract a different property value, if you want. You can specify a different query parameter name in the Calculator component's Inputs table.
Setting Up the Snippets
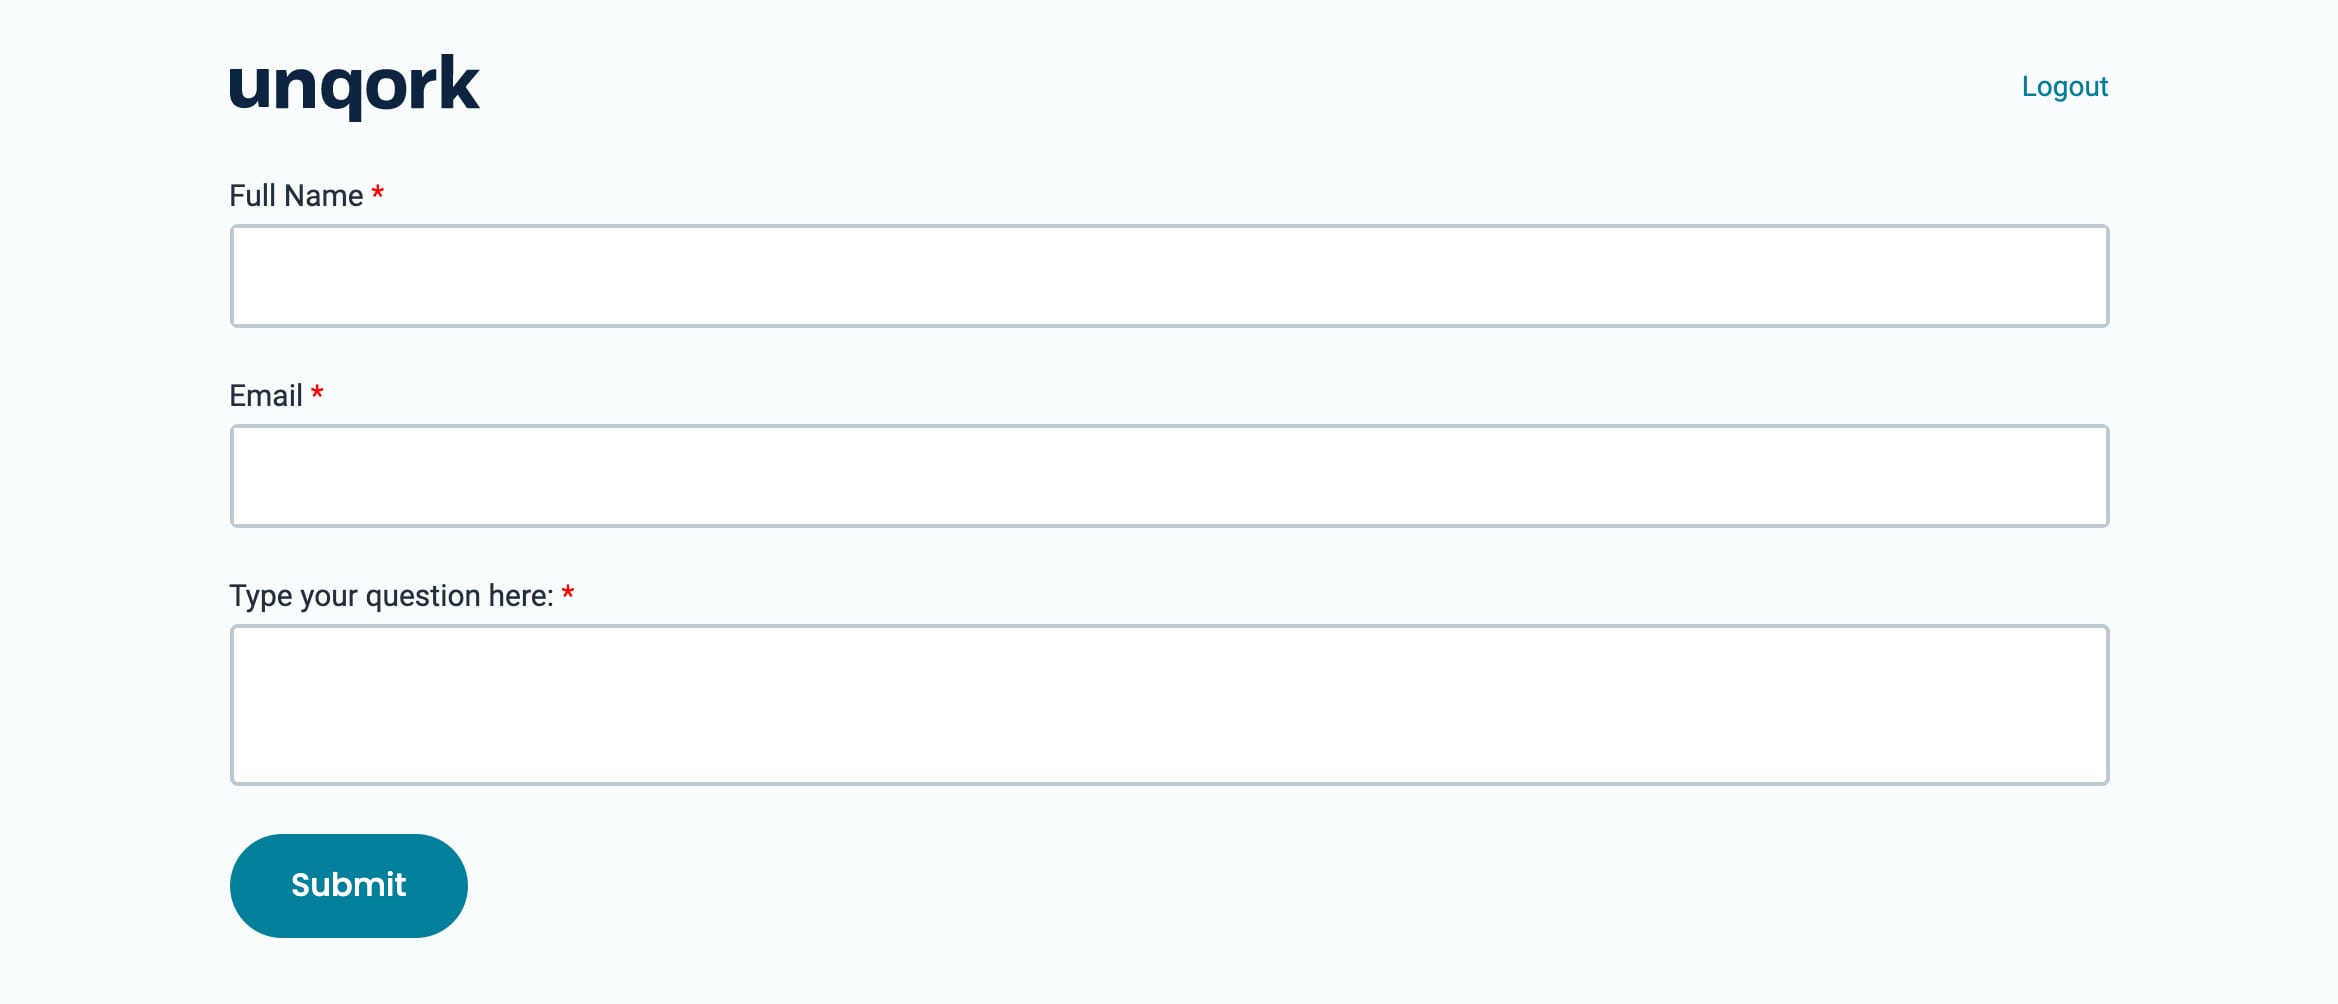
For this example, you want to build a simple contact form into your application. You want each end-user to receive a confirmation number after submitting a question. You need to configure the snippets so they create, transmit, and extract that confirmation number. This setup uses the 2 modules you created earlier. Here's an overview of what you'll do:
Module | Description |
|---|---|
Create Query Module | This module contains the Create URL Query Parameter snippet. You'll update some of the snippet's components, and add some new components, too. This module is where your end-user submits their name, email, and question. For end-user clarity, you need to update the snippet's Button component to a Submit button. On button-click, a new Initializer triggers a Calculator component and the ruleRedirect Decisions component. The new Calculator creates a random confirmation number and the Decisions component adds the confirmation number to the query string. The query string and confirmation number are part of the URL redirected to your Read Query Module. |
Read Query Module | This module contains the Read URL Query Parameter snippet. You need to add a Content component to the module that displays a confirmation message to your end-user. The snippet's calcGetQueryParameter Calculator extracts the confirmation number from the query string and the confirmation number dynamically displays in the Content component's message. |
Create Query Module
First, update and reconfigure the Create URL Query Parameter snippet in your Create Query Module.
These instructions assume you already added the Create URL Query Parameter snippet to this module.
For this configuration, you need:
1 Email component
1 Text Area component
1 Initializer component
1 Calculator component
1 Hidden component
Here's how your completed module looks in Express View:
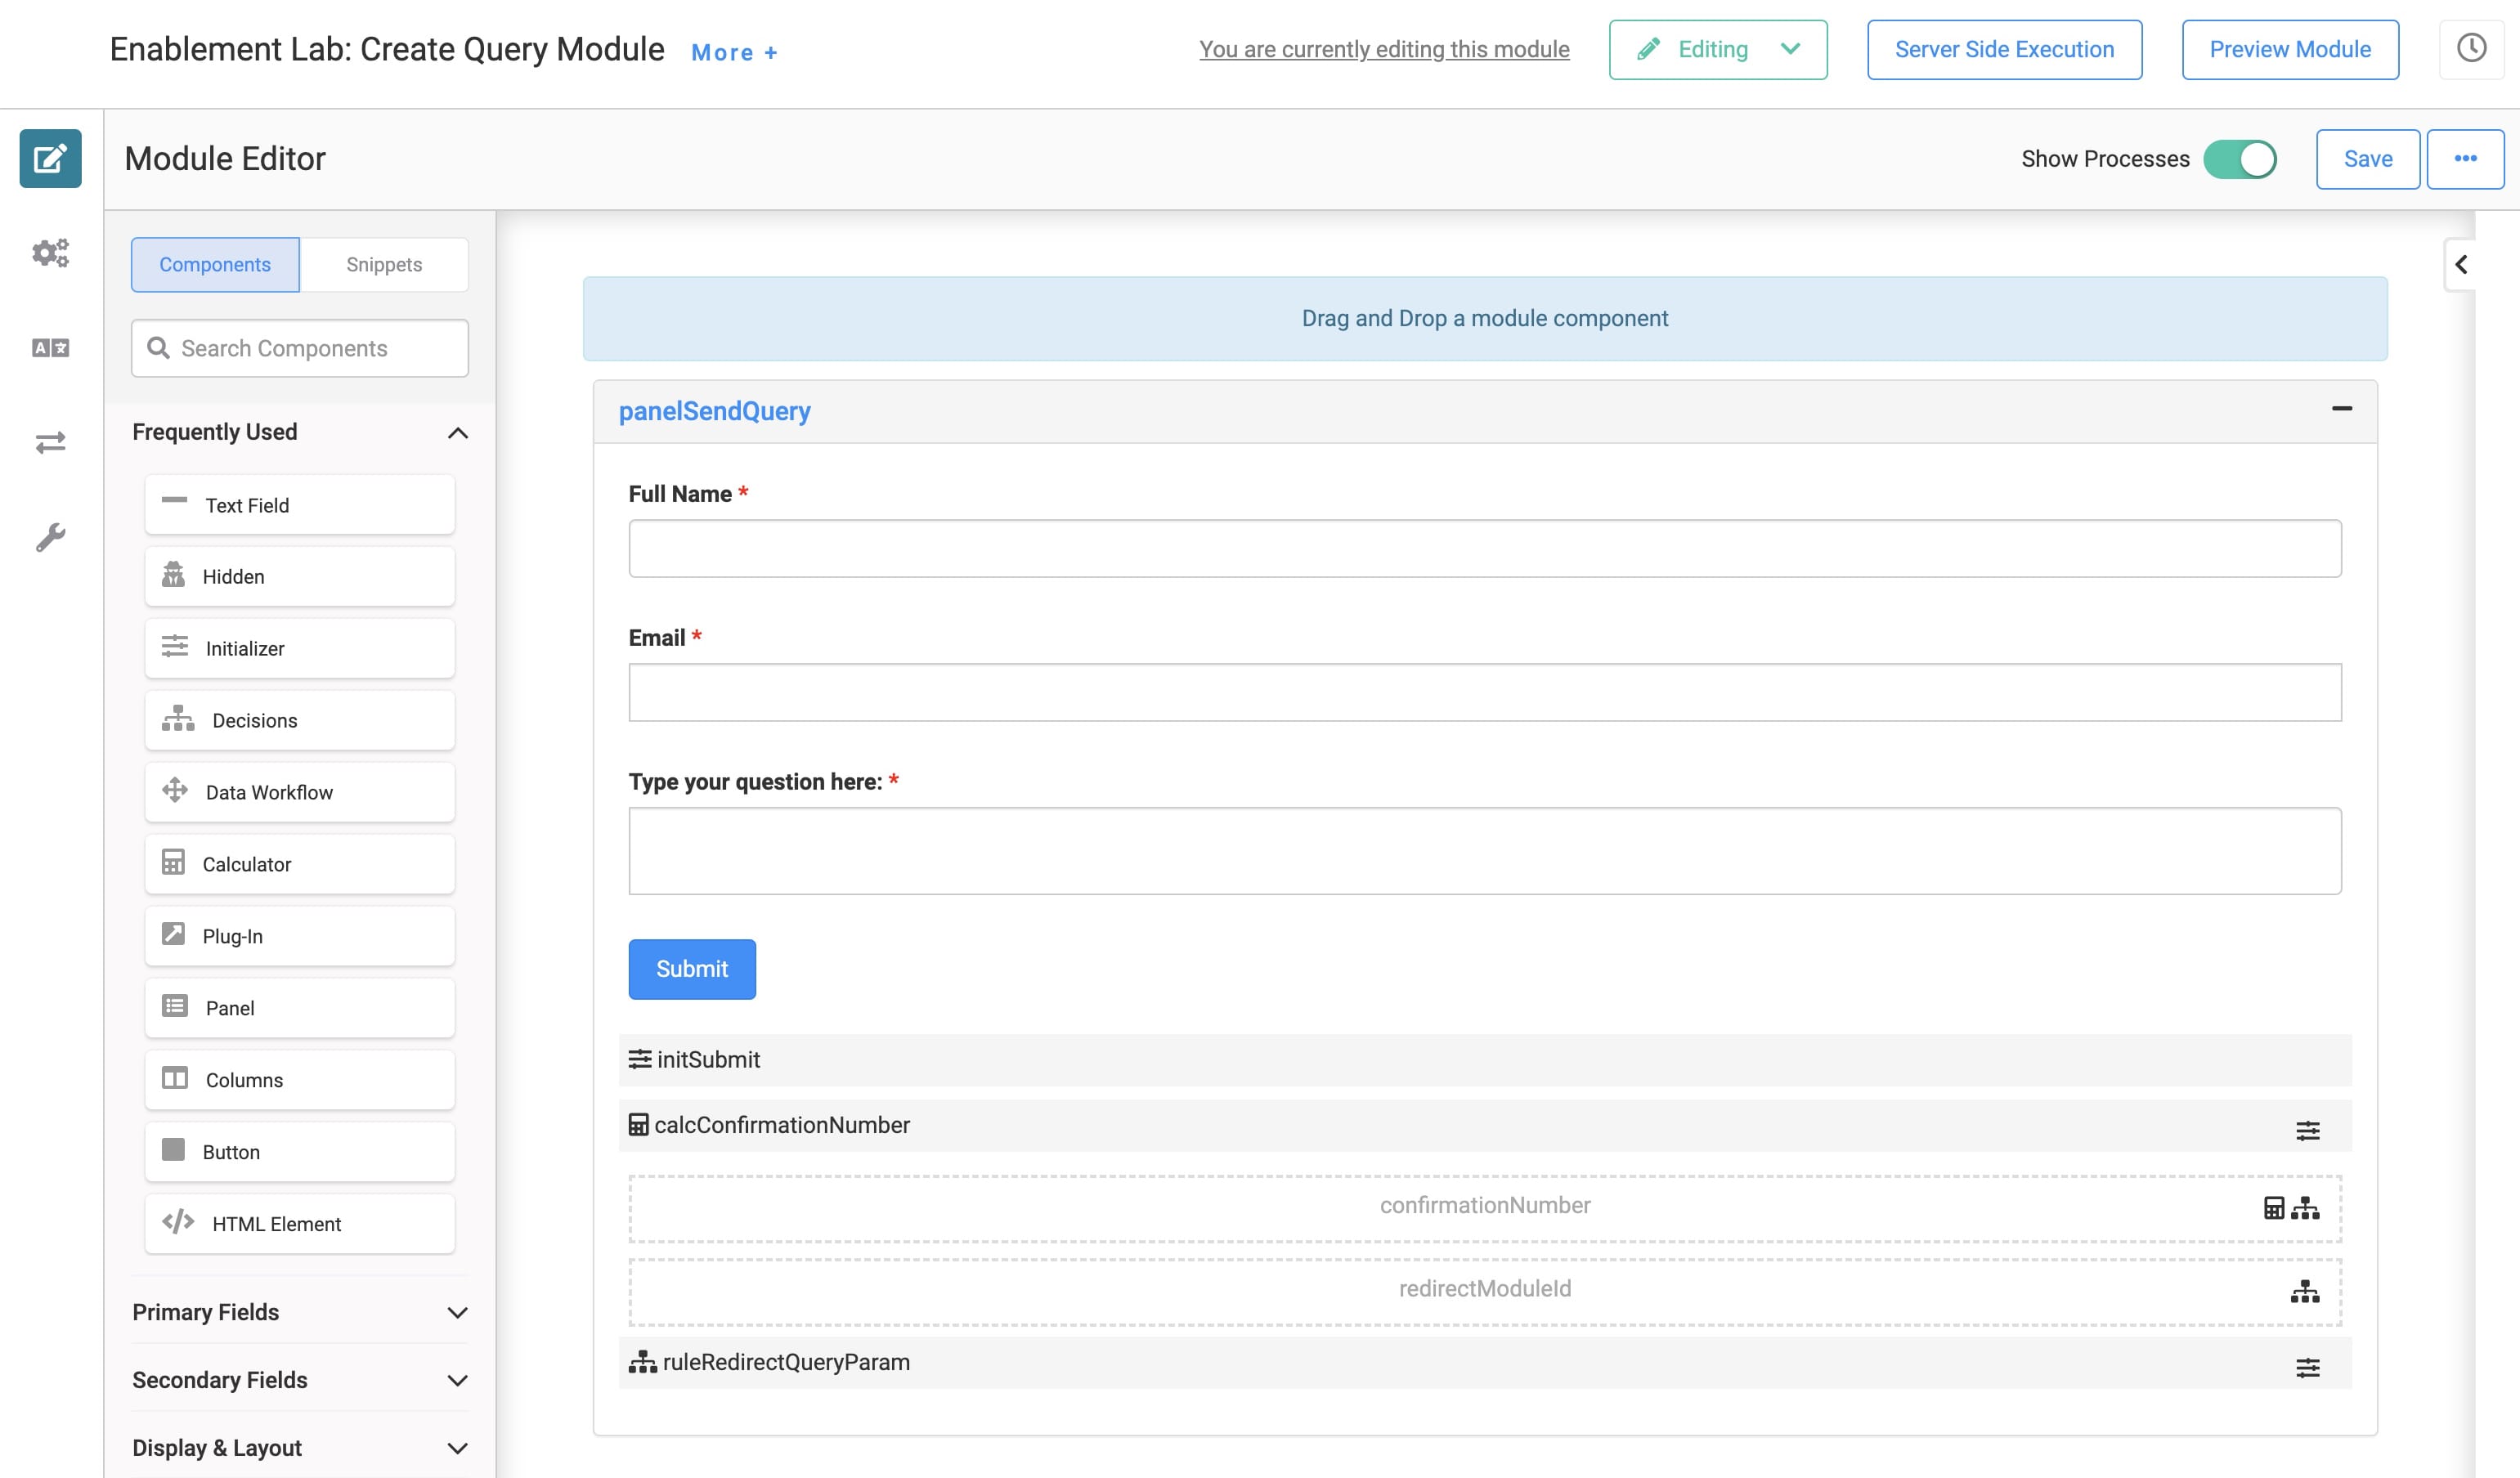
Here's how your completed module looks in the Module Builder:
Update the queryParameterExample Text Field Component
First, add a Text Field component so your end-user can enter their name.
Hover over the queryParameterExample Text Field component.
A 5-button toolbar displays above the component on hover-over.
Using the toolbar, click the
.jpg) (Settings) button.
(Settings) button.In the Property ID field, enter fullName.
In the Label Text field, enter Full Name.
Click Save.
Configure the Email Component
Next, add an Email component so your end-user can enter their email address.
Drag and drop an Email component onto your canvas, placing it below the Text Field component.
In the Property ID field, enter email.
In the Label Text field, enter Email.
Set the Required toggle to ON.
Click Save.
Configure the Text Area Component
Next, add a Text Area component so your end-user can write a question.
Drag and drop a Text Area component onto your canvas, placing it below the Email component.
In the Property ID field, enter questionText.
In the Label Text field, enter Type your question here:.
Set the Required toggle to ON.
Click Save.
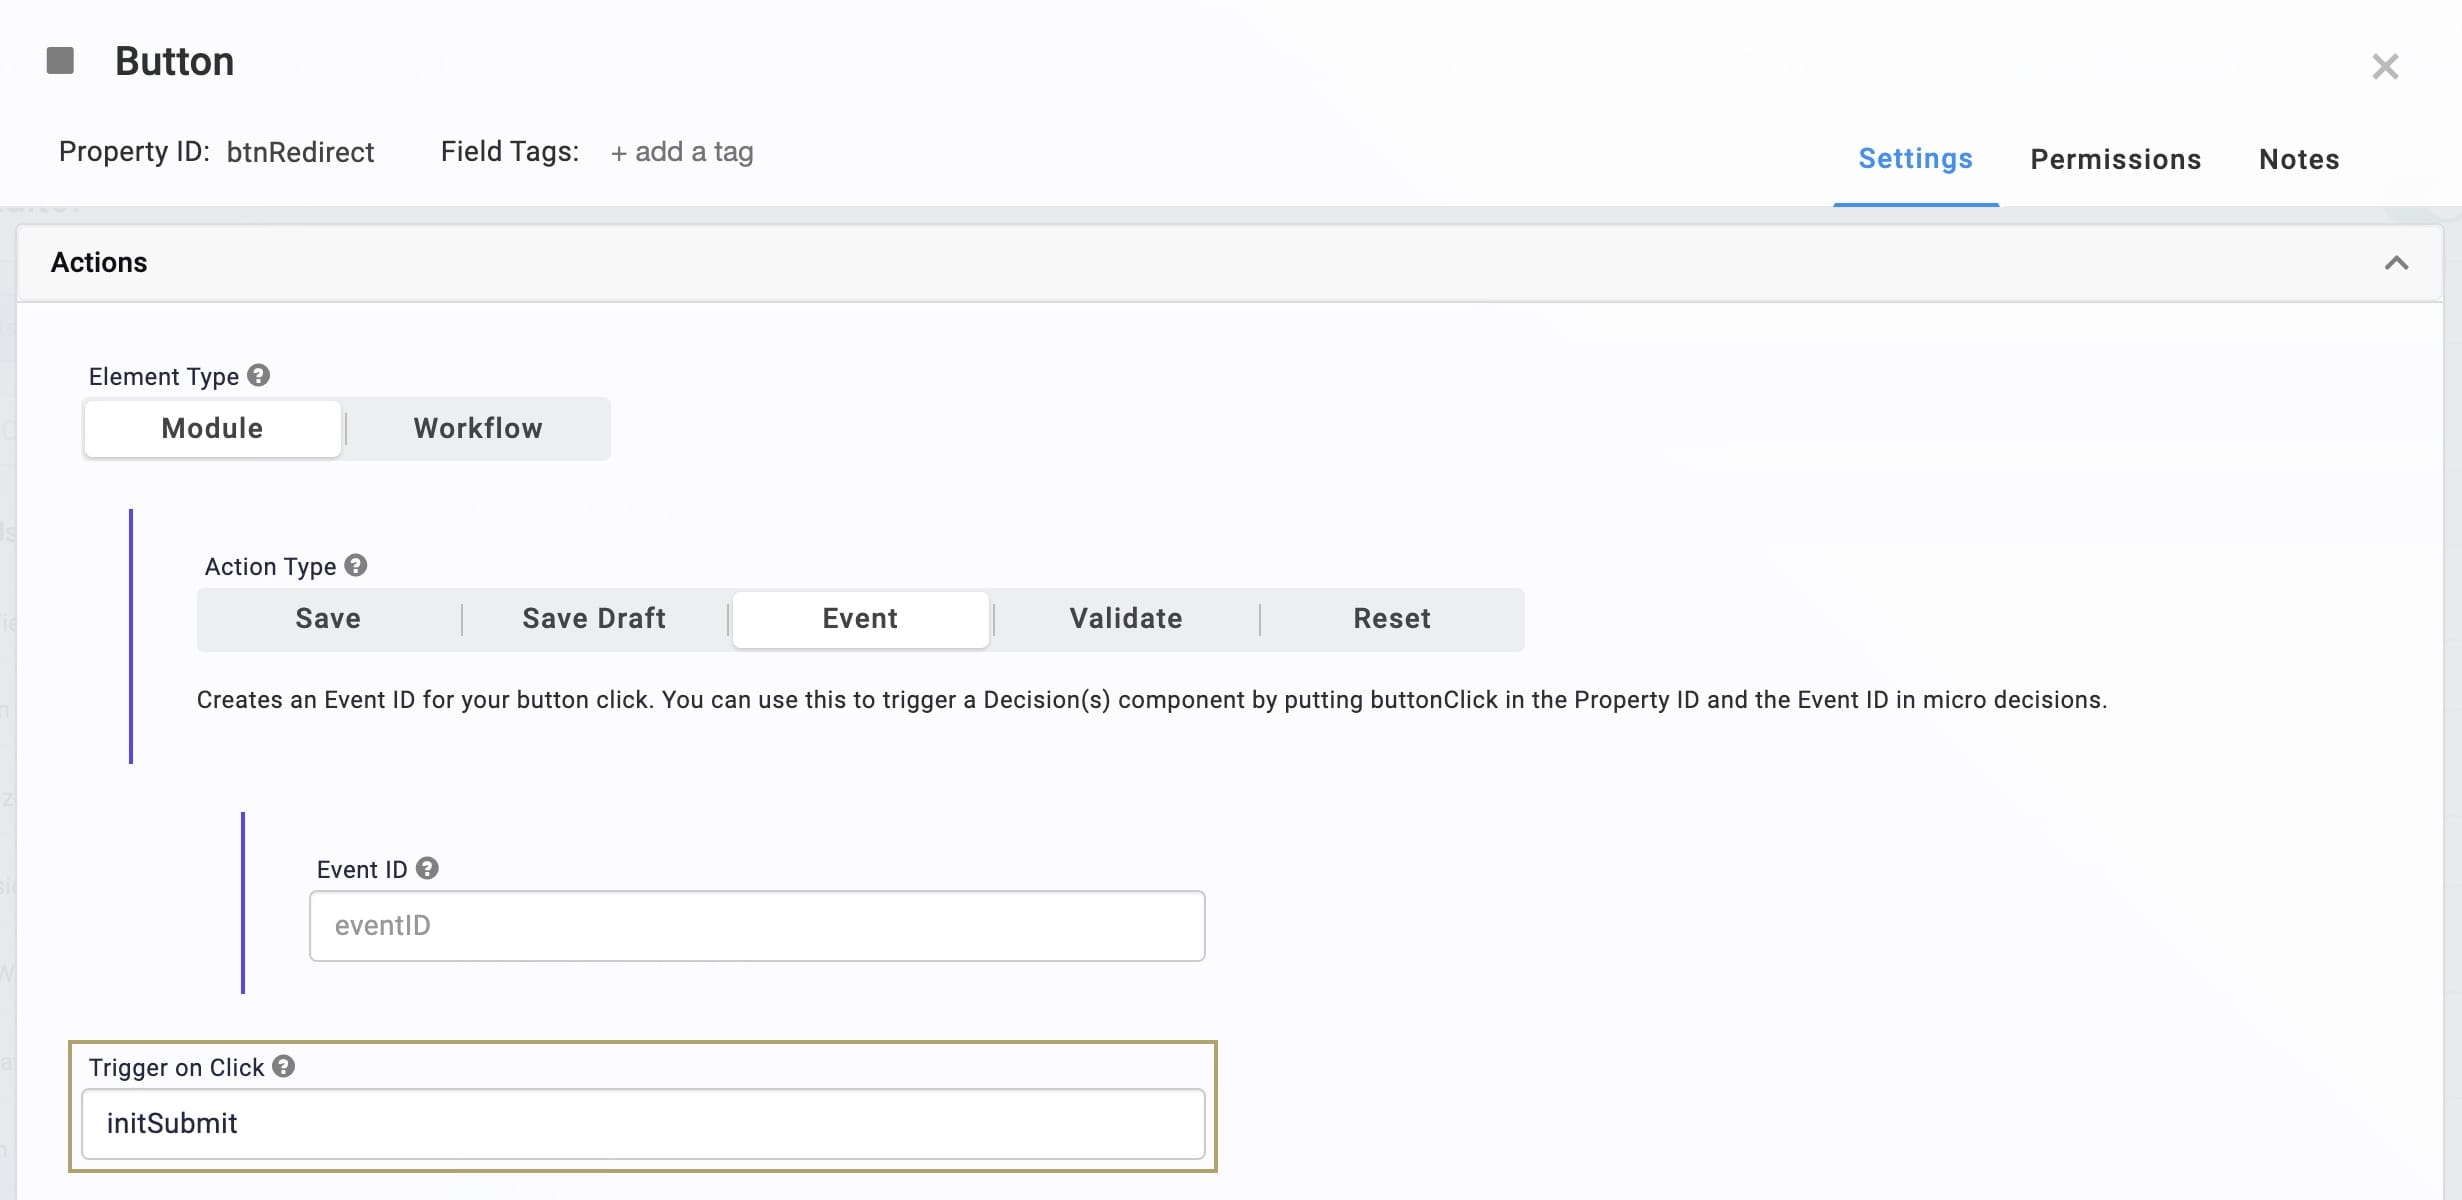
Update the btnRedirect Button Component
Now, you'll update the Redirect button, giving it a more intuitive label for your end-user. You'll also update Event Trigger. Instead of triggering the ruleRedirect Decisions component, you need to trigger the initSubmit Initializer. You need to configure this Initializer component next.
Hover over the btnRedirect Button component.
Click the
.jpg) (Settings) button.
(Settings) button.In the Label Text field, enter Submit.
In the Trigger On Click field, replaceruleRedirectQueryParam with initSubmit.
Click Save.
Configure the Initializer Component
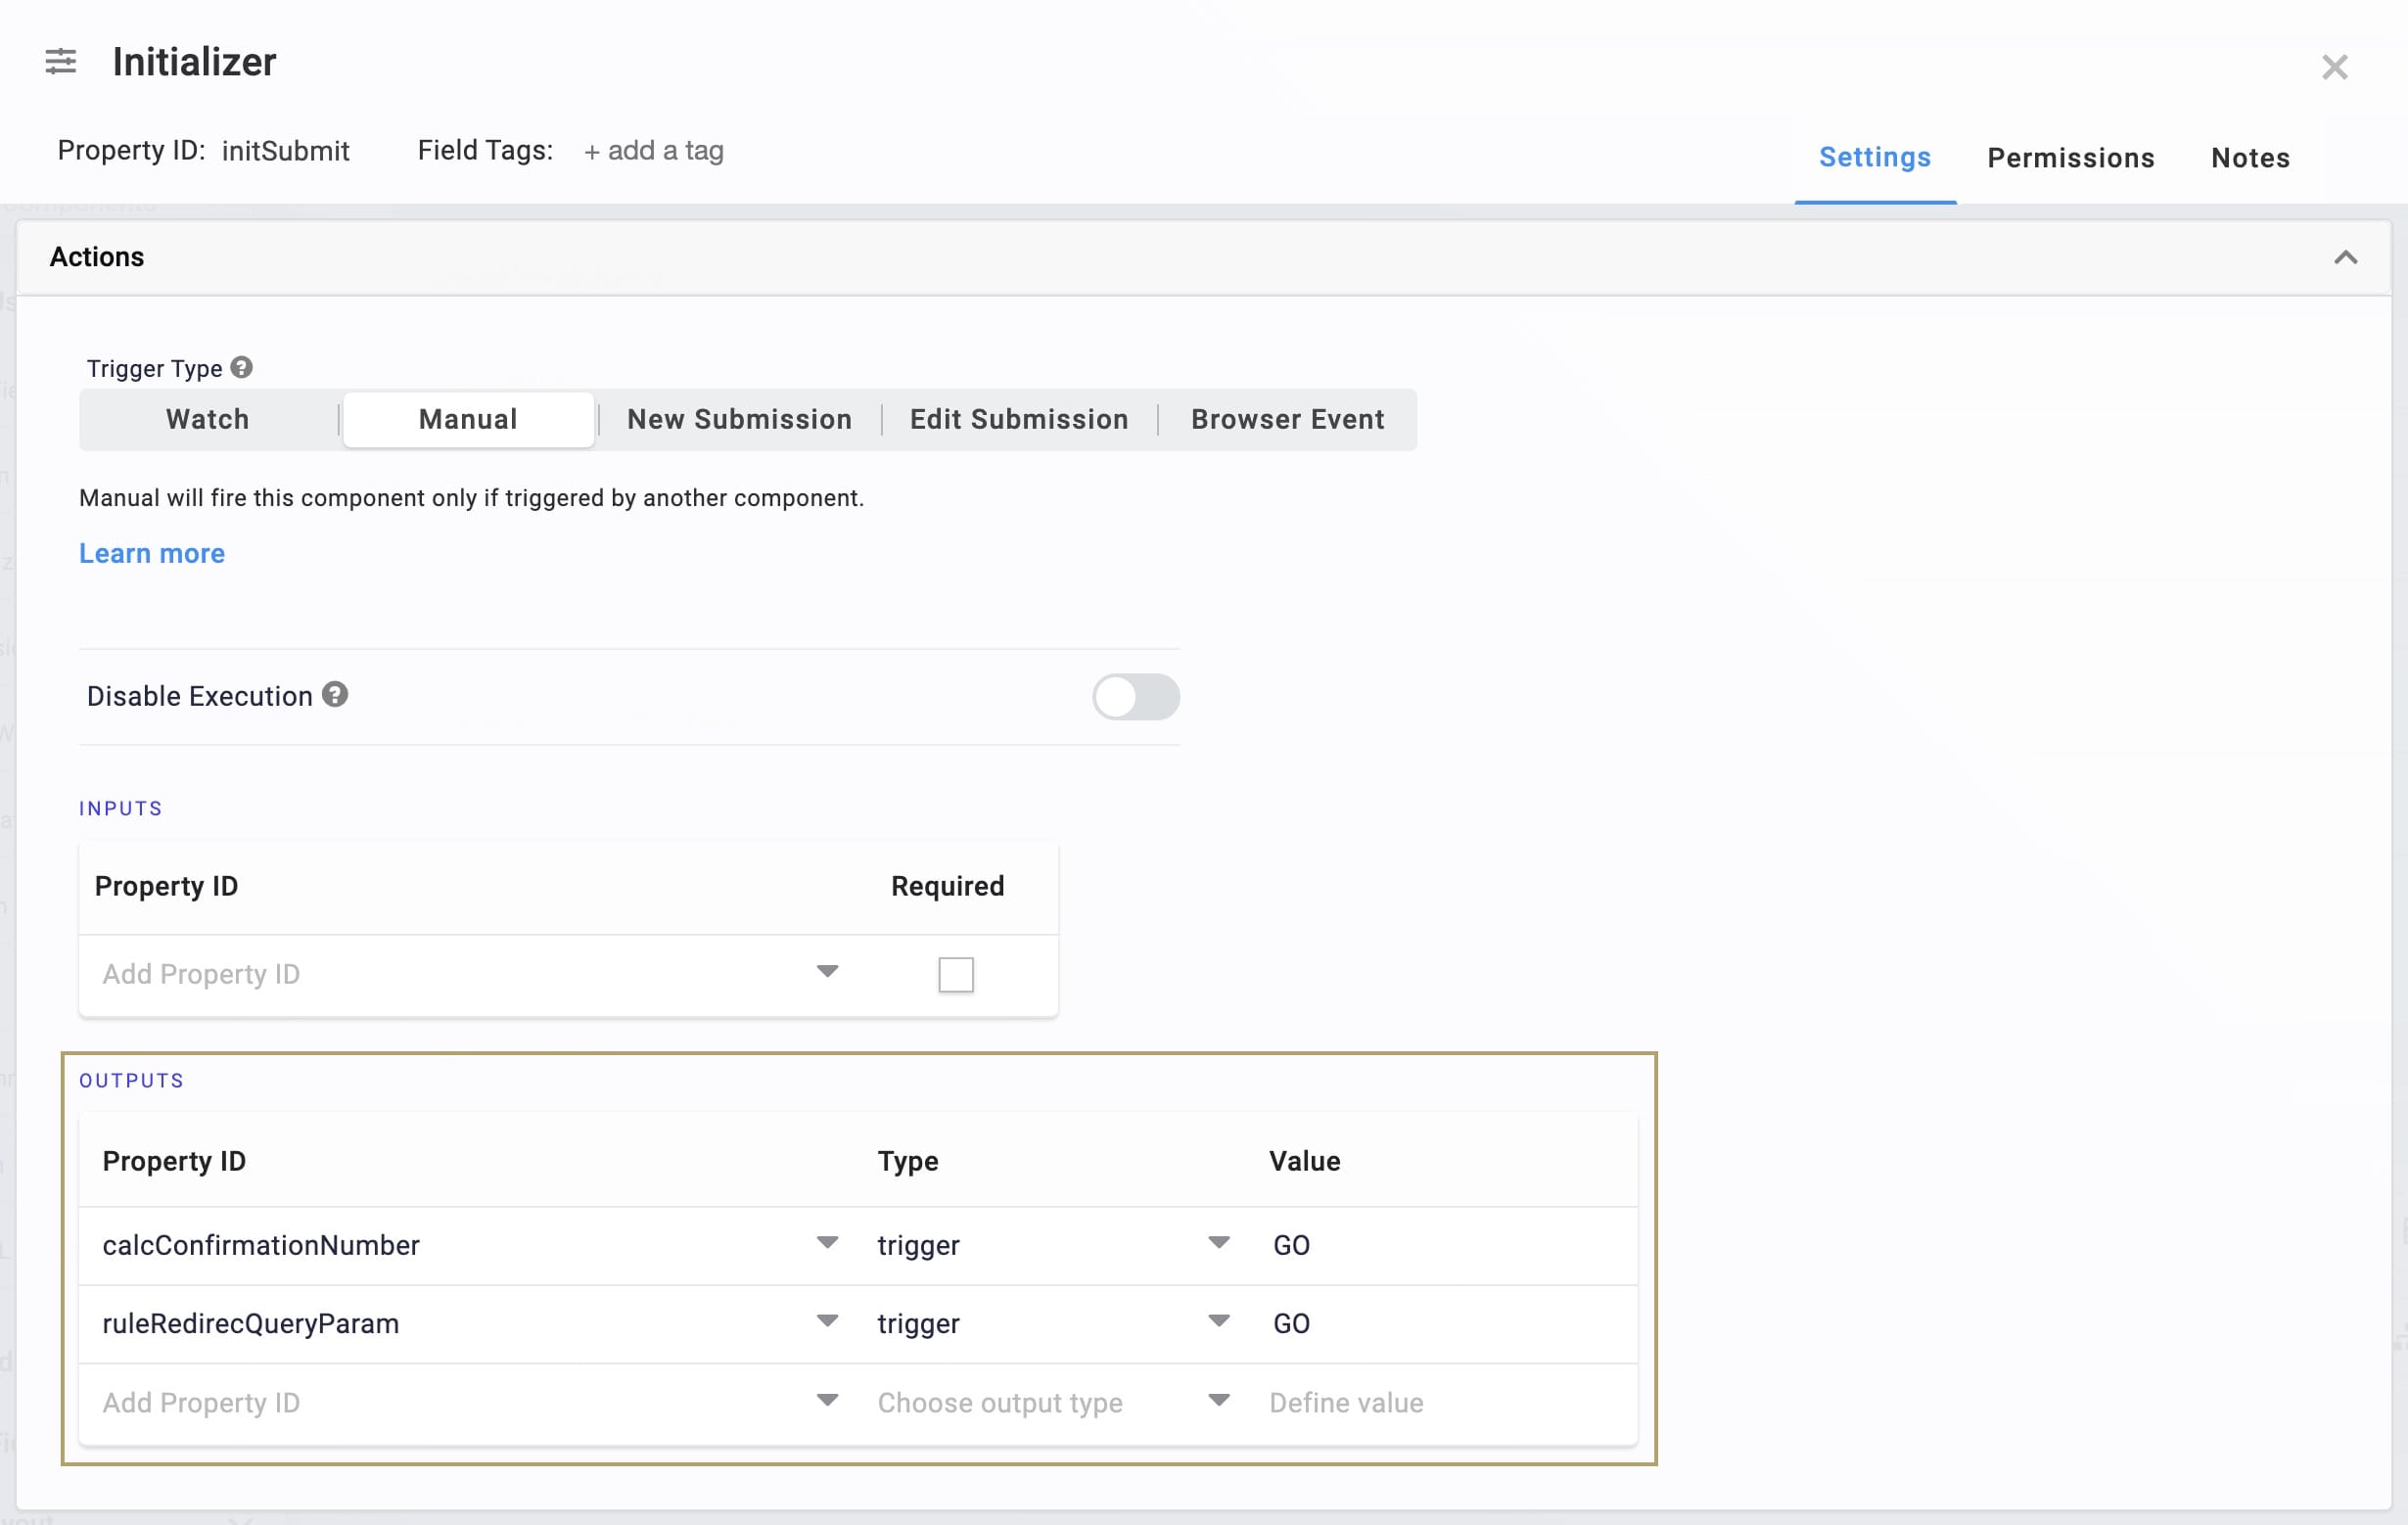
This Initializer component triggers the calcConfirmationNumber Calculator and ruleRedirect Decisions components.
Drag and drop an Initializer component to your canvas, placing it below the Button component.
In the Property ID and Canvas Label Text fields, enter initSubmit.
Set the Trigger Type as New Submission.
In the Outputs table, enter the following:
Property ID
Type
Value
calcConfirmationNumber
trigger
GO
ruleRedirectQueryParam
trigger
GO
Click Save.
Configure the Calculator Component
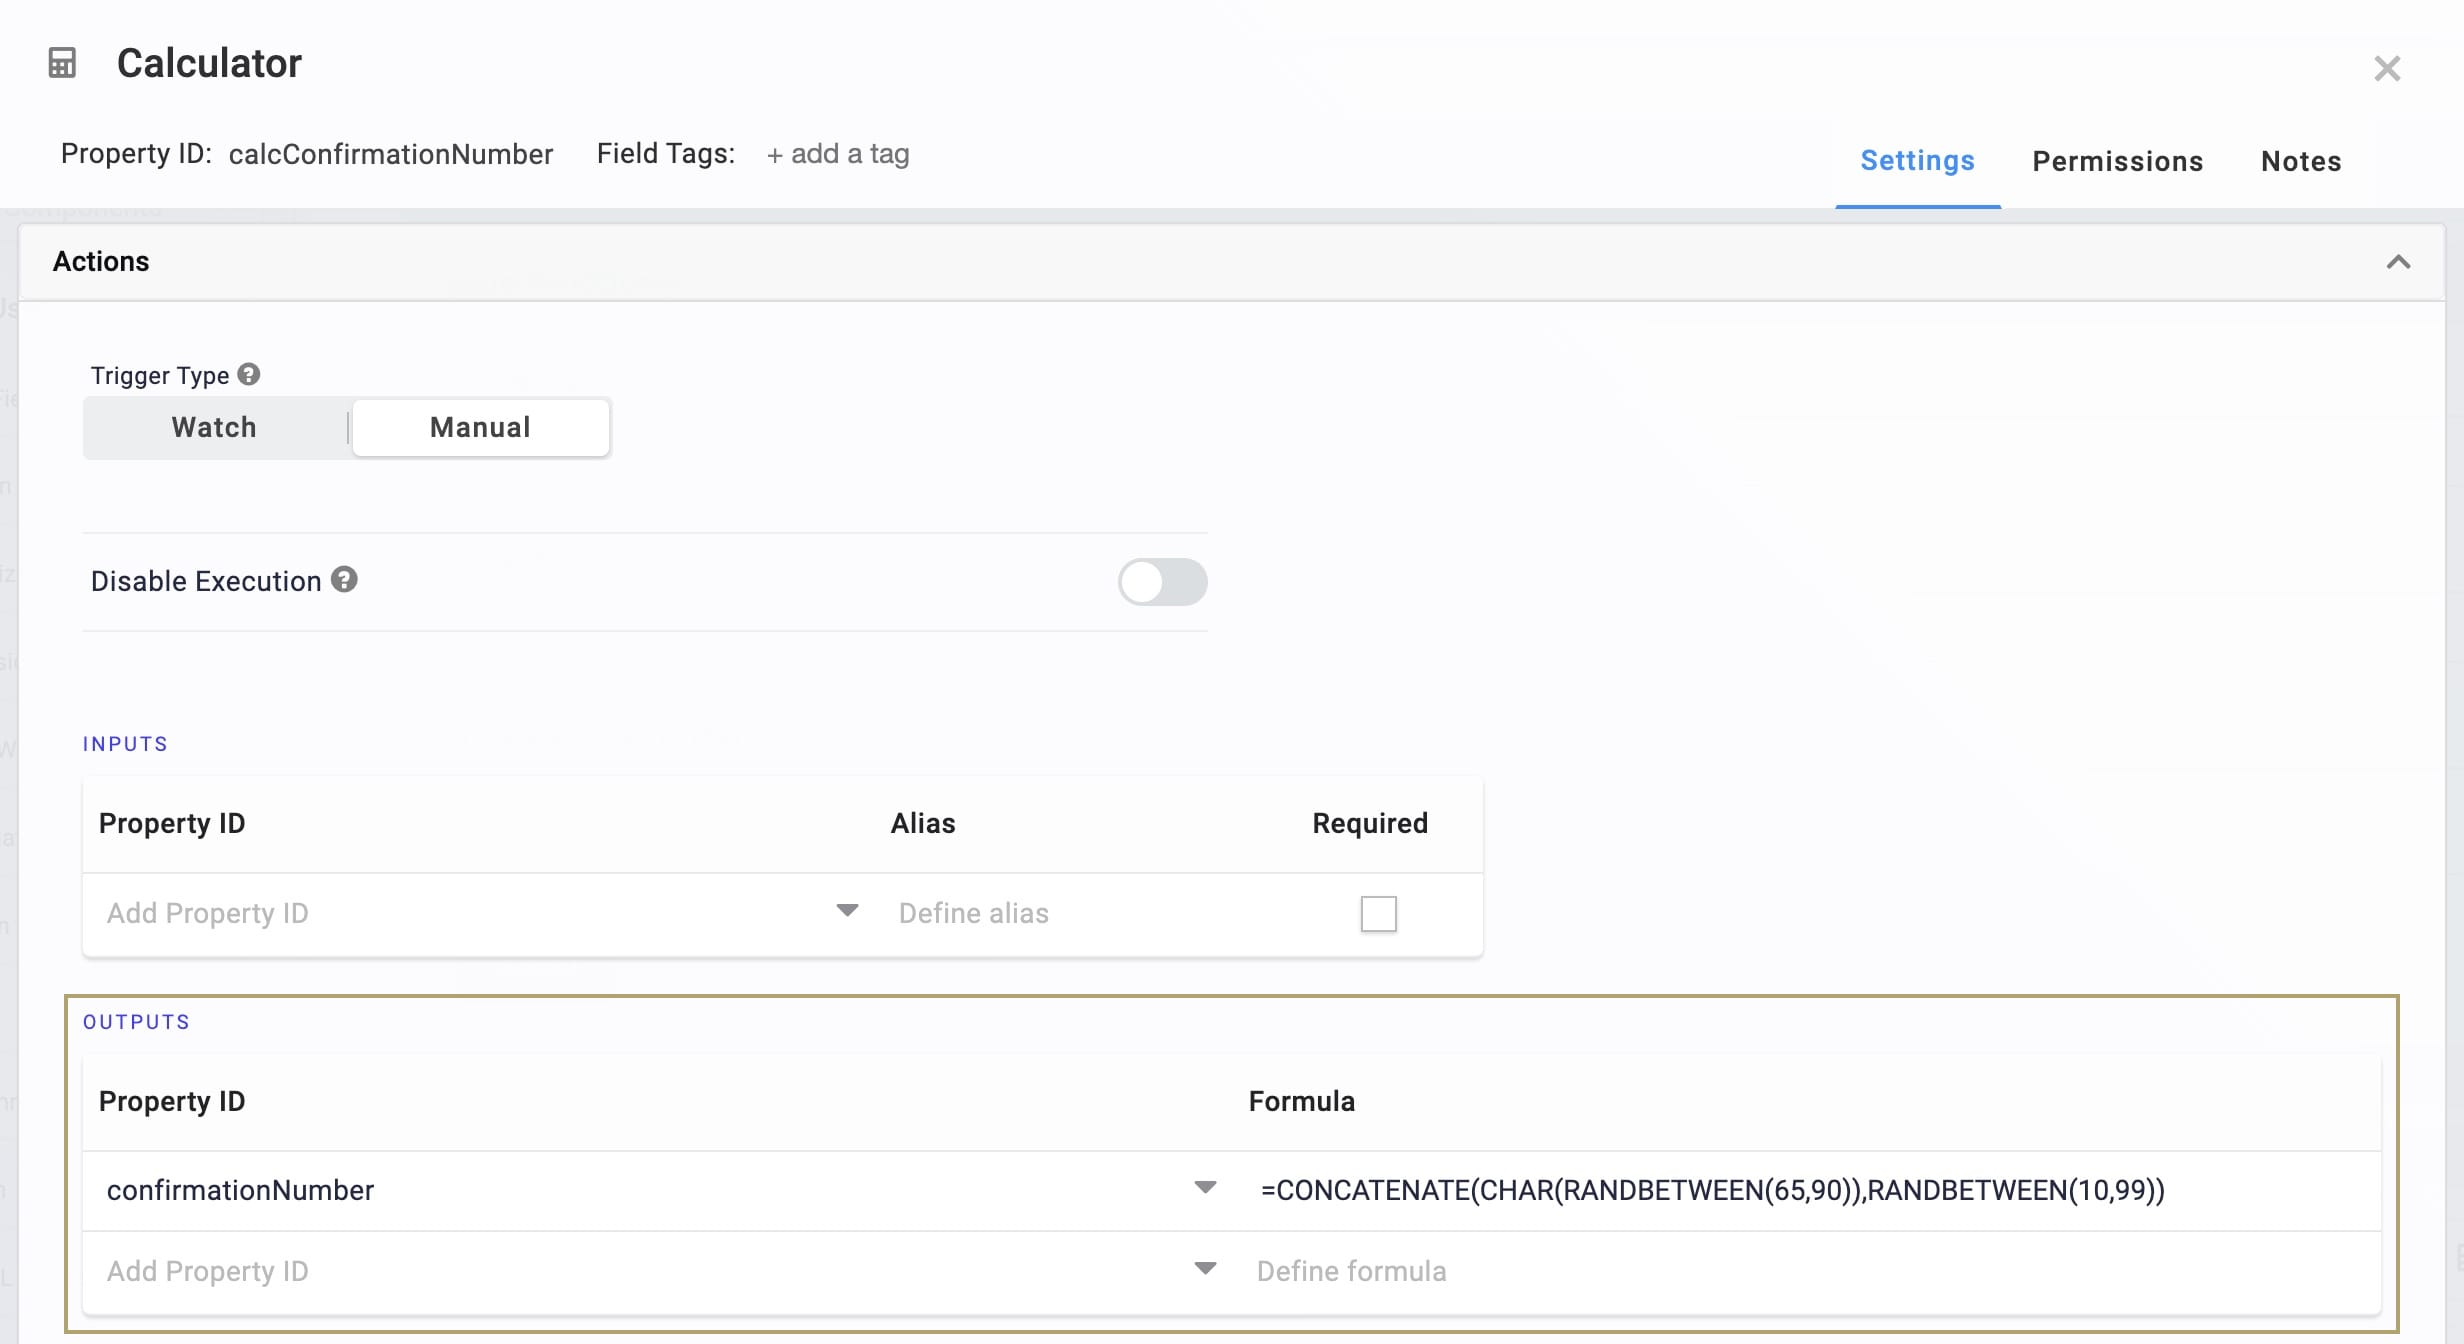
This Calculator generates a random confirmation number. Then, it outputs the number to a Hidden component. This confirmation number is the property value transmitted in the query string. You need to set up the Hidden component next.
Drag and drop a Calculator component onto your canvas, placing it below the Initializer component.
In the Property ID and Canvas Label Text fields, enter calcConfirmationNumber.
In the Outputs table, enter the following:
Property ID
Formula
confirmationNumber
=CONCATENATE(CHAR(RANDBETWEEN(65,90)), RANDBETWEEN(10,99),RANDBETWEEN(10,99))
RANDBETWEEN() creates a random number within the specified range. CHAR() converts the randomly generated number to its text equivalent in the ASCII (American Standard Code for Information Interchange). 65-90 in ASCII numbers are uppercase letters. So, the 5-digit confirmation code starts with a random uppercase letter, followed by 2 random 2-digit numbers. For example, A1234.
Click Save.
Configure the confirmationNumber Hidden Component
This Hidden component stores the randomly generated confirmation number.
Drag and drop a Hidden component onto your canvas, placing it below the Calculator component.
In the Property ID and Canvas Label Text fields, enter confirmationNumber.
Click Save.
Update the redirectModuleId Hidden Component
Next, update the snippet's redirectModuleId Hidden component. You need to adjust the default value, so your Decisions component adds the module ID to the redirect URL. Because you're connecting your 2 modules, enter the module ID of your Read Query Module. You can pull the module ID from its URL as follows: https://training.unqork.io/#/form/5f3bd210fd953e021000eb0e/edit.
Hover over the redirectModuleId Hidden component.
Click the
.jpg) (Settings) button.
(Settings) button.In the Default Value field, enter the module ID of your Read Query Module.
Click Save.
Update the Decisions Component
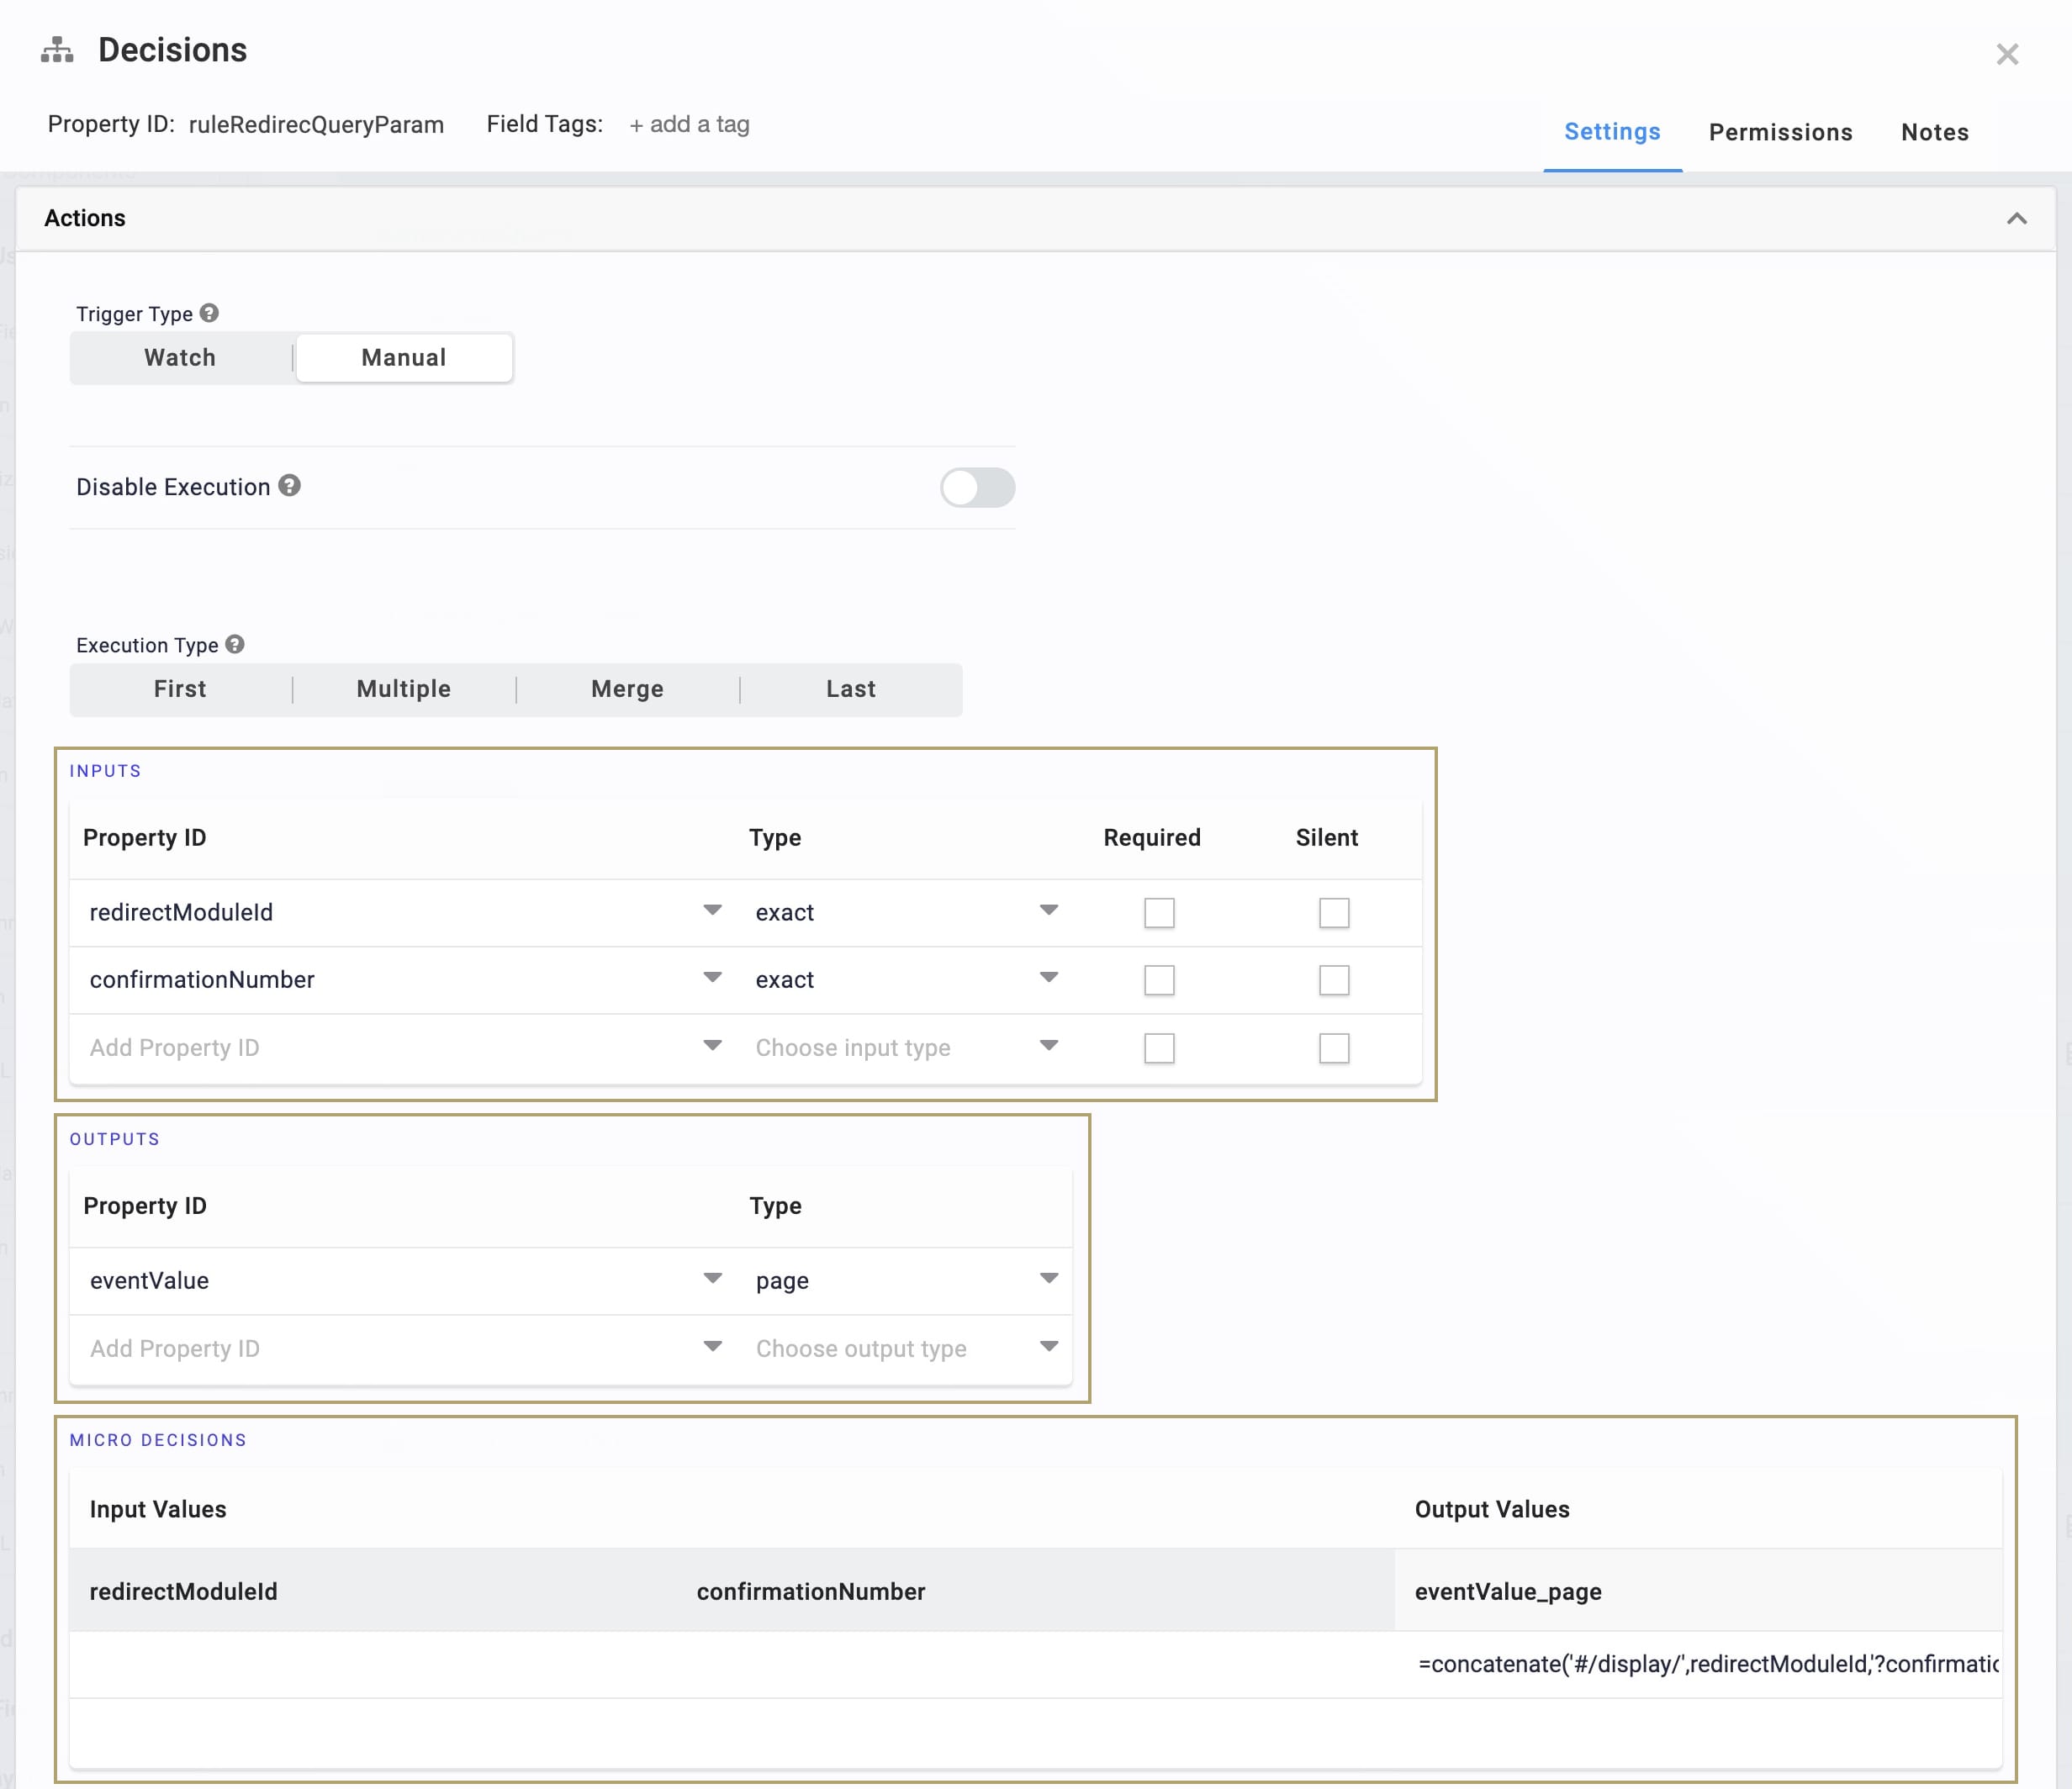
Lastly, the Decisions component defines the redirect URL. Right now, it's filling in the query string with the generic queryParameter parameter. It's also populating the query string's property value from the original queryParameterExample Text Field component. You need to update the formula used to create the redirect URL. These changes let the redirect URL's query string transmit the confirmation number instead.
Hover over the ruleRedirectQueryParam Decisions component.
Using the toolbar, click the
.jpg) (Settings) button.
(Settings) button.In the Inputs table, replace queryParameterExample with confirmationNumber.
In the Output Values column of the Micro Decisions table, replace the eventValue_page cell's contents with =concatenate('#/display/',redirectModuleId,'?confirmationNumber=',confirmationNumber).
This updated formula makes 2 changes to the query string. The parameter name is now confirmationNumber. And, the property value dynamically populates with the value housed in the confirmationNumber Hidden component.
Click Save.
Save your module.
Read Query Module
Next, update your Read Query Module.
These instructions assume you already added the Read URL Query Parameter snippet to the Read Query Module.
For this configuration, you need:
1 Content component
Here's how your completed module looks in Express View. You can see that a random 3-digit confirmation number generates.

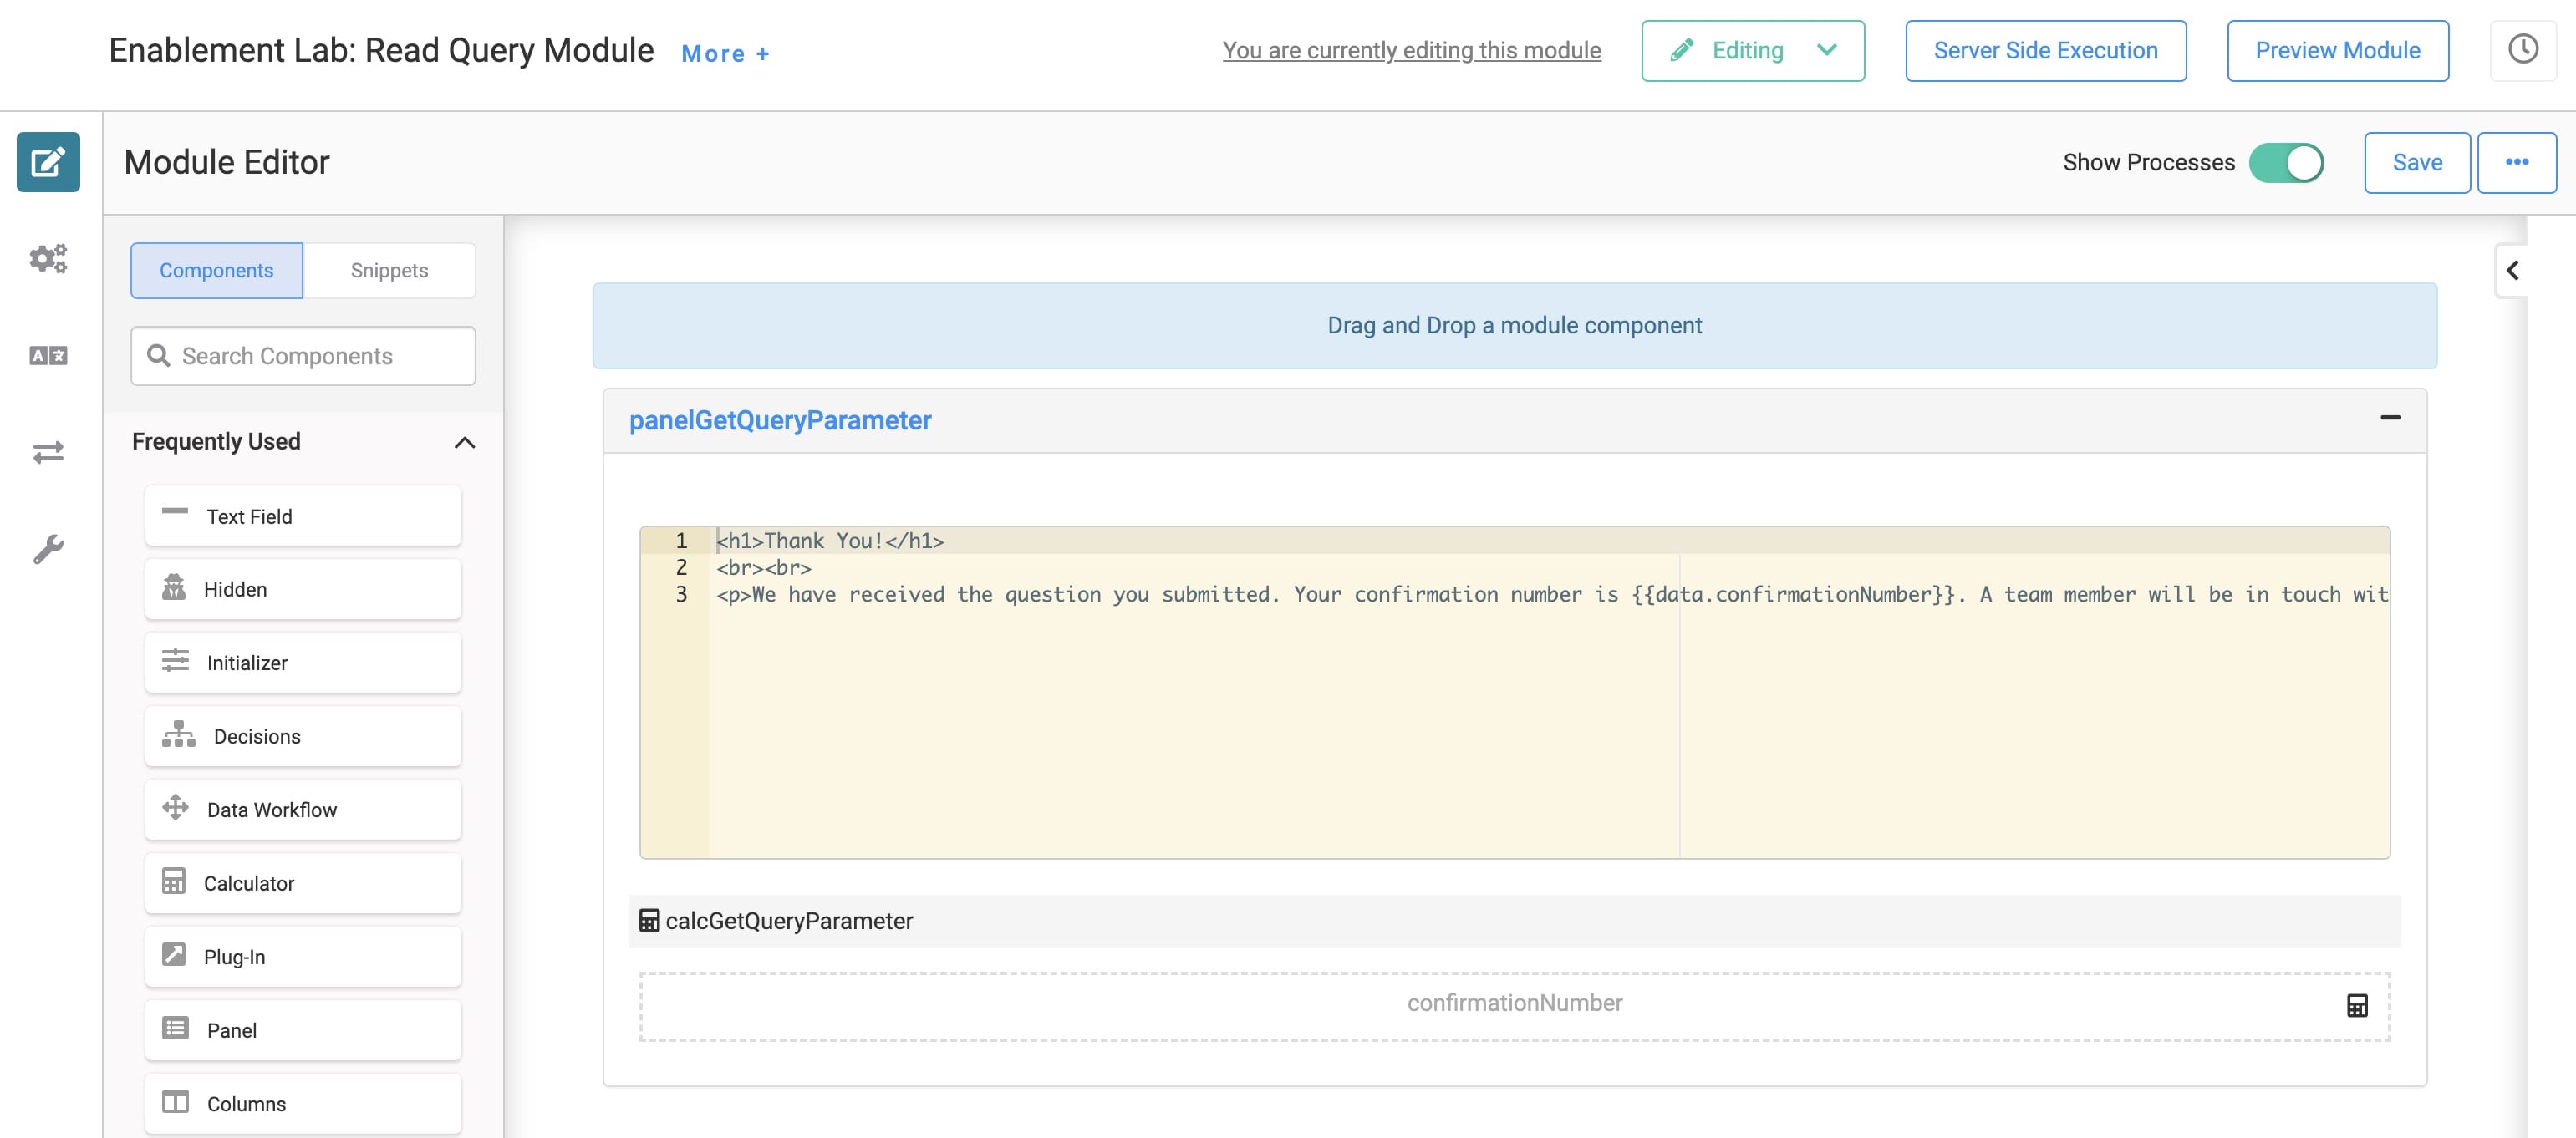
Here's how your completed module looks in the Module Builder:
Configure the Content Component
The Content component displays a confirmation message to your end-user. The message dynamically populates the confirmation number housed in the confirmationNumber Hidden component.
Drag and drop a Content component to your canvas, place it inside the panelGetQueryParameter Panel, above the other components.
In the Property ID and Canvas Label Text fields, enter contentConfirmation.
Click Save.
In the Module Builder, paste the following HTML in the Content component:
<h1>Thank You!</h1>
<br><br>
<p>We have received the question you submitted. Your confirmation number is {{data.confirmationNumber}}. A team member will be in touch within the next 24 hours.</p>
Update the Calculator Component
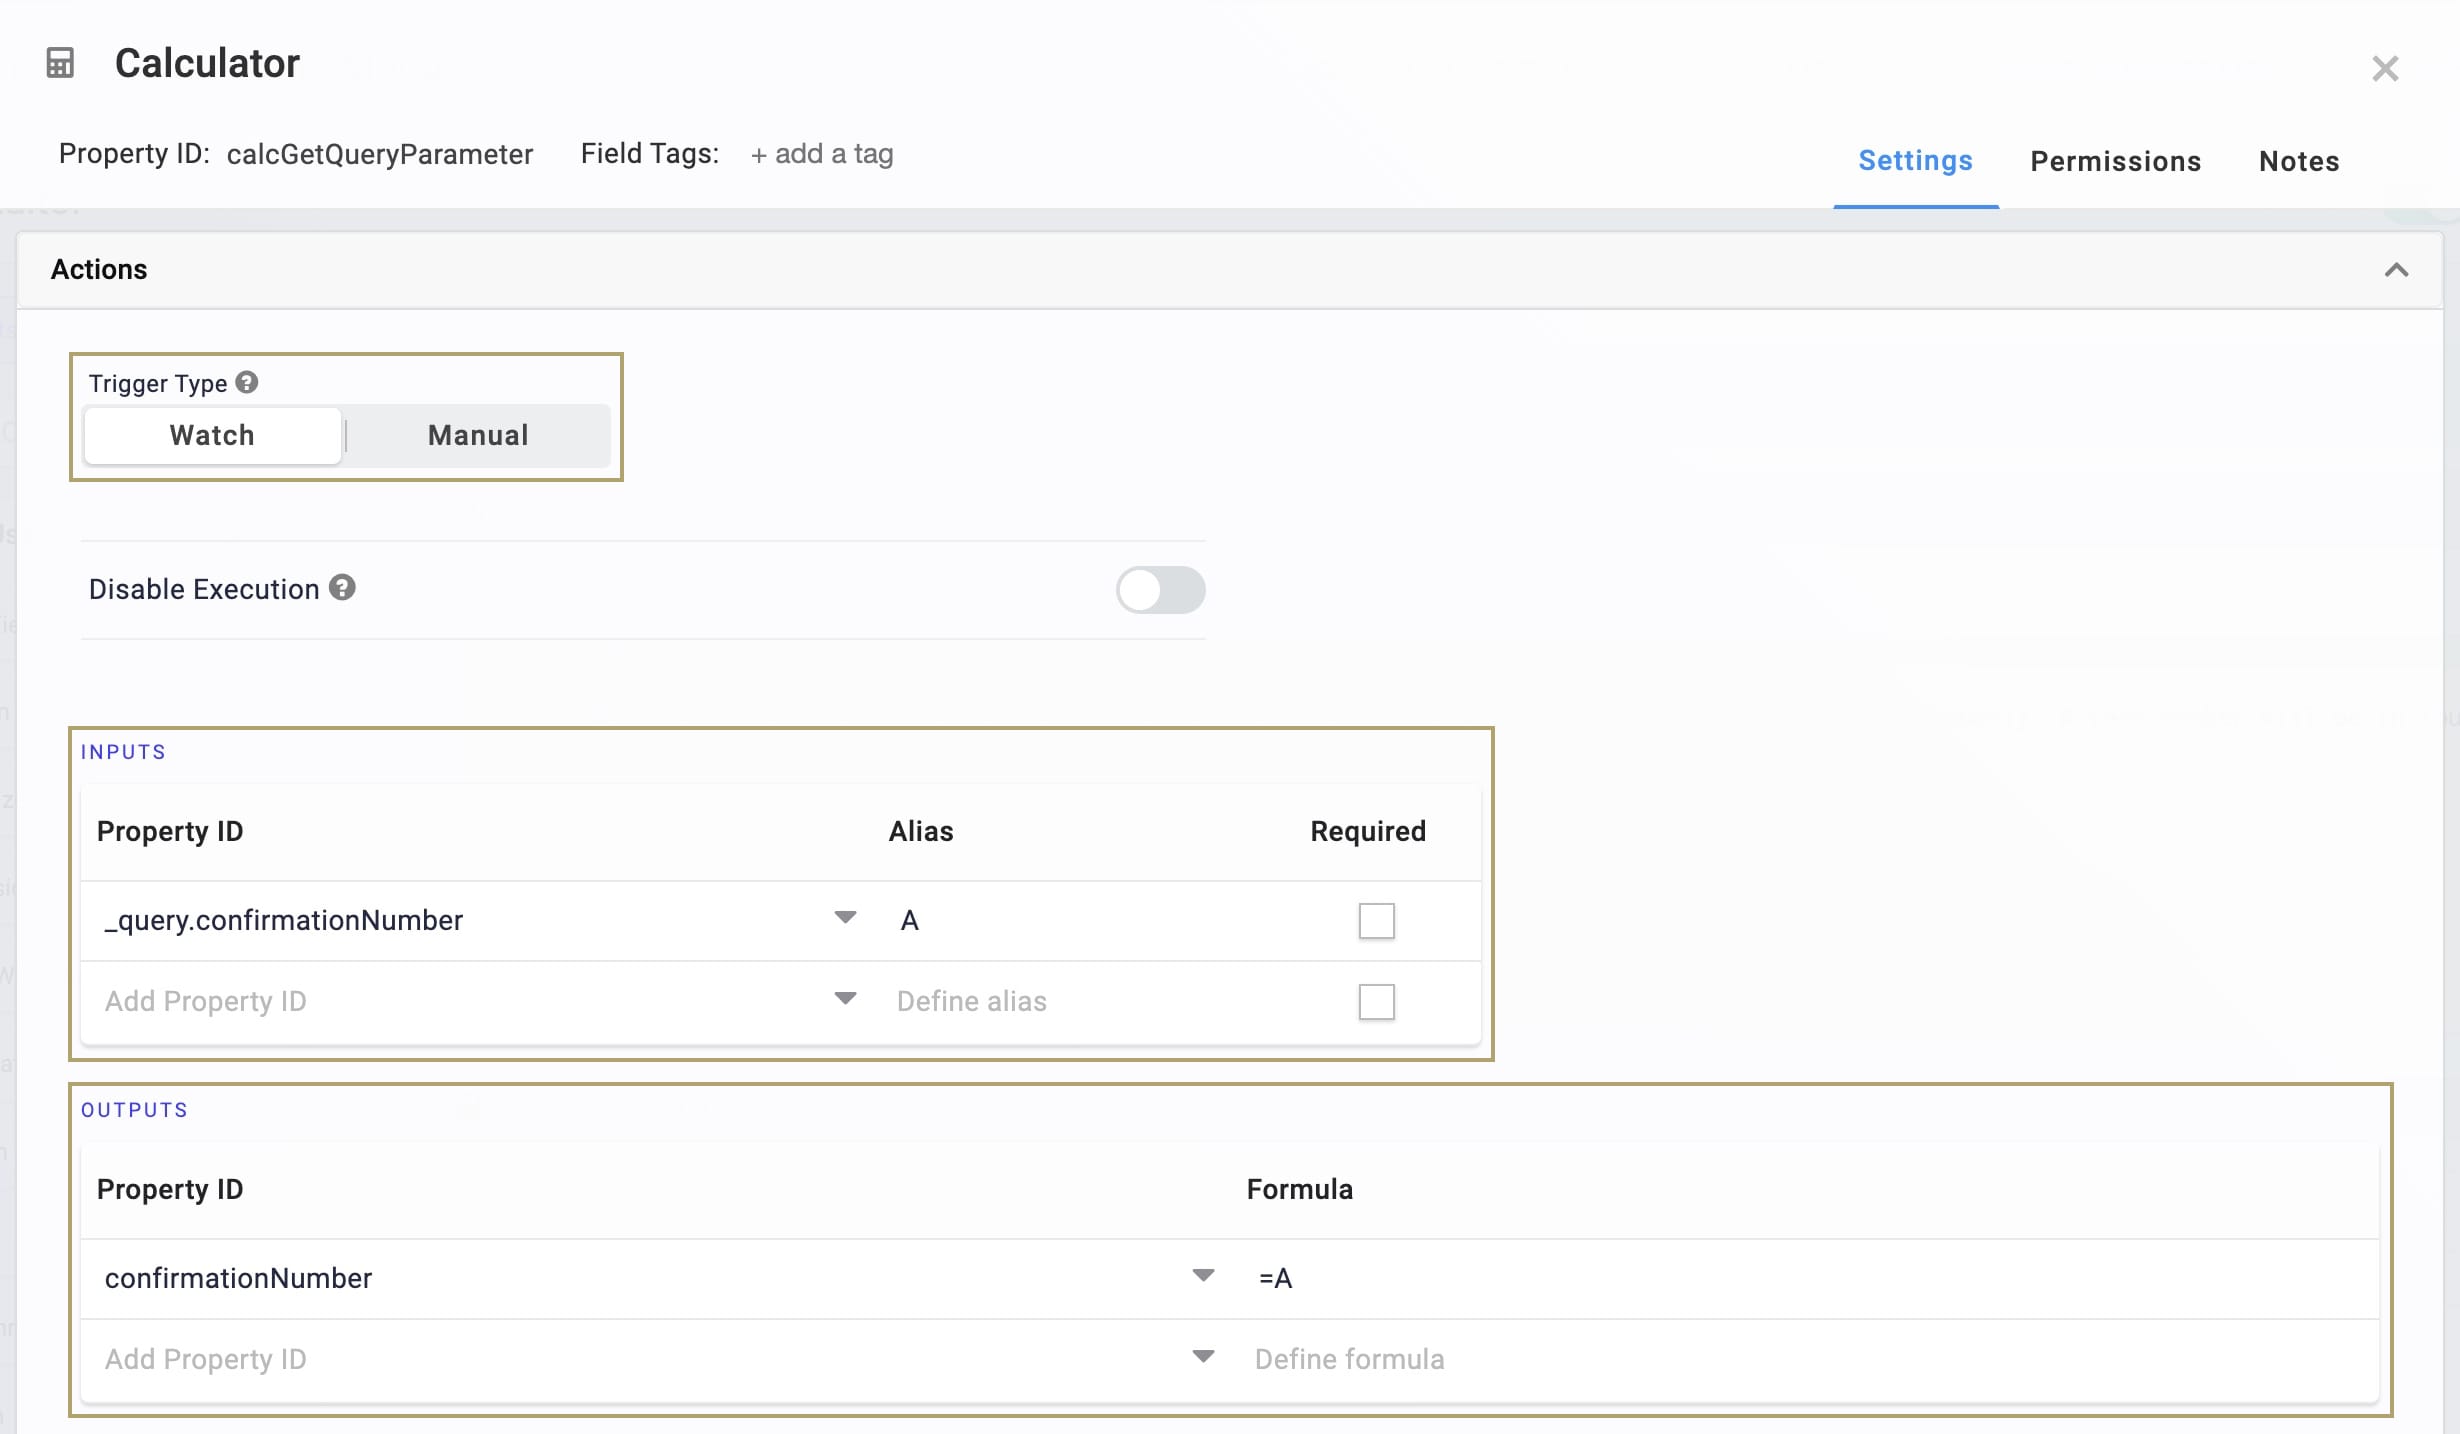
The Calculator component extracts information from the query string. Right now, it's looking for the generic queryParameter parameter. When you configured your Create Query Module, you changed the query parameter to confirmationNumber. So, you need to update the Calculator so it looks for confirmationNumber in the query string.
Hover over the calcGetQueryParameter Calculator component.
Click the
.jpg) (Settings) button.
(Settings) button.Select Watch as the Trigger Type.
In the Inputs table, replace _query.queryParameter with _query.confirmationNumber.
In the Outputs table, replace queryParameter with confirmationNumber.
Click Save.
Update the Hidden Component
Next, replace the queryParameter Hidden component's Property ID Canvas Label Text. You need to match them to the query parameter the Calculator component now extracts. This change also lets the Calculator output the confirmationNumber value to this Hidden component.
Hover over the queryParameter Hidden component.
Click the
.jpg) (Settings) button.
(Settings) button.In the Property ID and Canvas Label Text fields, enter confirmationNumber.
Click Save.
Now you're ready to test your new contact form. Return to your Create Query Module and preview it in Express View. Fill out the required fields, then click Submit. You redirect to your Read Query Module and see a random confirmation number in the URL and confirmation message.
Removing the Snippet
You might want to remove these snippets from your application. Here, you'll learn how to remove the snippet from your module. Then, you'll learn how to uninstall the snippet from your environment.
Remove the Create URL Query Parameter Snippet from Your Modules
To remove the Create URL Query Parameter snippet:
In the Module Builder, hover over the panelSendQuery Panel in your Create Query module.
A 5-button toolbar displays above the component on hover-over.
Using the toolbar, click the
.jpg) (Remove) button.
(Remove) button.Save your module.
Remove the Read URL Query Parameter Snippet from Your Modules
To remove the Read URL Query Parameter snippet:
In the Module Builder, hover over the panelGetQuery Panel in your Read Query module.
A 5-button toolbar displays above the component on hover-over.
Using the toolbar, click the
.jpg) (Remove) button.
(Remove) button.Save your module.
Remove the Snippets from Your Environment
Use the Unqork Template Library to remove unused snippets. To uninstall a snippet from your environment:
At the top right of the Unqork Designer Platform, click Library or Templates.
Find the snippet you want to uninstall.
Click the ellipsis (...) in the snippet's tile header.
Click Uninstall Template.
Click Yes, Uninstall in the confirmation modal.
You can visit the Marketplace and reinstall the snippet at any time.
What if you have an existing application built using this snippet and then uninstall the snippet from your environment? No problem. Your existing application remains unaffected. Also, your application doesn't have any ties to the snippet. So, let's say you reinstall a newer version of the snippet in the future. You can rest assured that the installation doesn't impact your existing application.