Overview
Dynamic Index is one of the most powerful features for using complex logic with a Dynamic Grid component. In this configuration guide, you'll learn how to use logic and triggers with the Dynamic Index feature. This how-to snippet helps you understand dynamic indexing for a specific use case. It also helps you explore the extent of this type of logic. Specifically for use cases where you might want to trigger an event when clicking an individual cell or row.
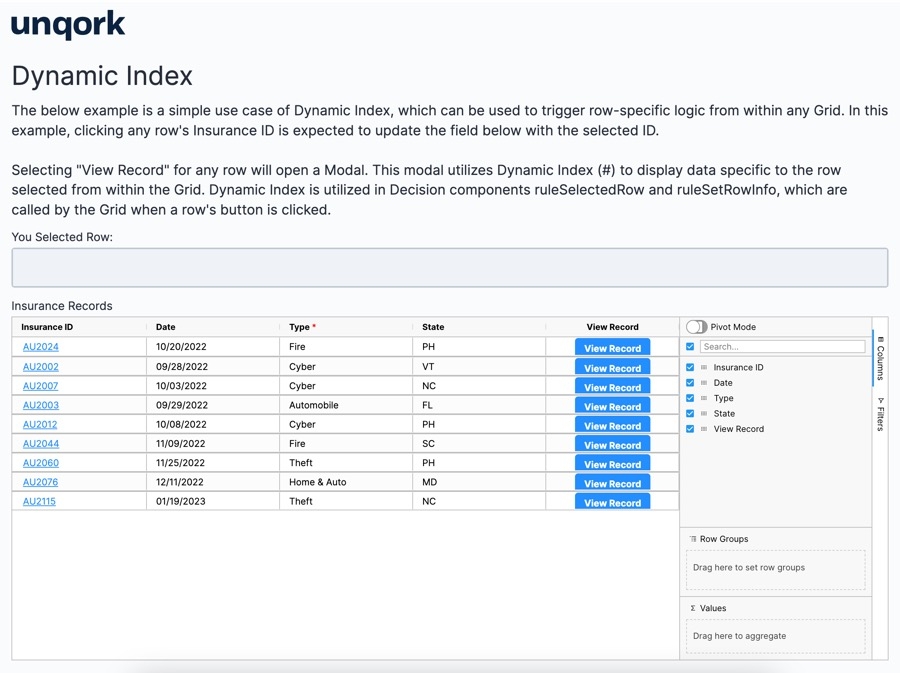
In this snippet, a Dynamic Grid displays several rows of values. These rows include insurance ID and type, date, and the US State associated with the insurance policy. This module uses Dynamic Index to set a variable row index (#). The module's configuration invokes dynamic indexing when selecting a row's insurance ID or when clicking the View Record button in the Dynamic Grid. This button triggers logic that displays row-specific data in a modal, for easy review.
It's important to note that for Dynamic Index to work, you must trigger logic inside the grid. If you configure a Button component to trigger outside the grid, Dynamic Index doesn't know which row you selected.
Here's how the snippet looks in Express View:
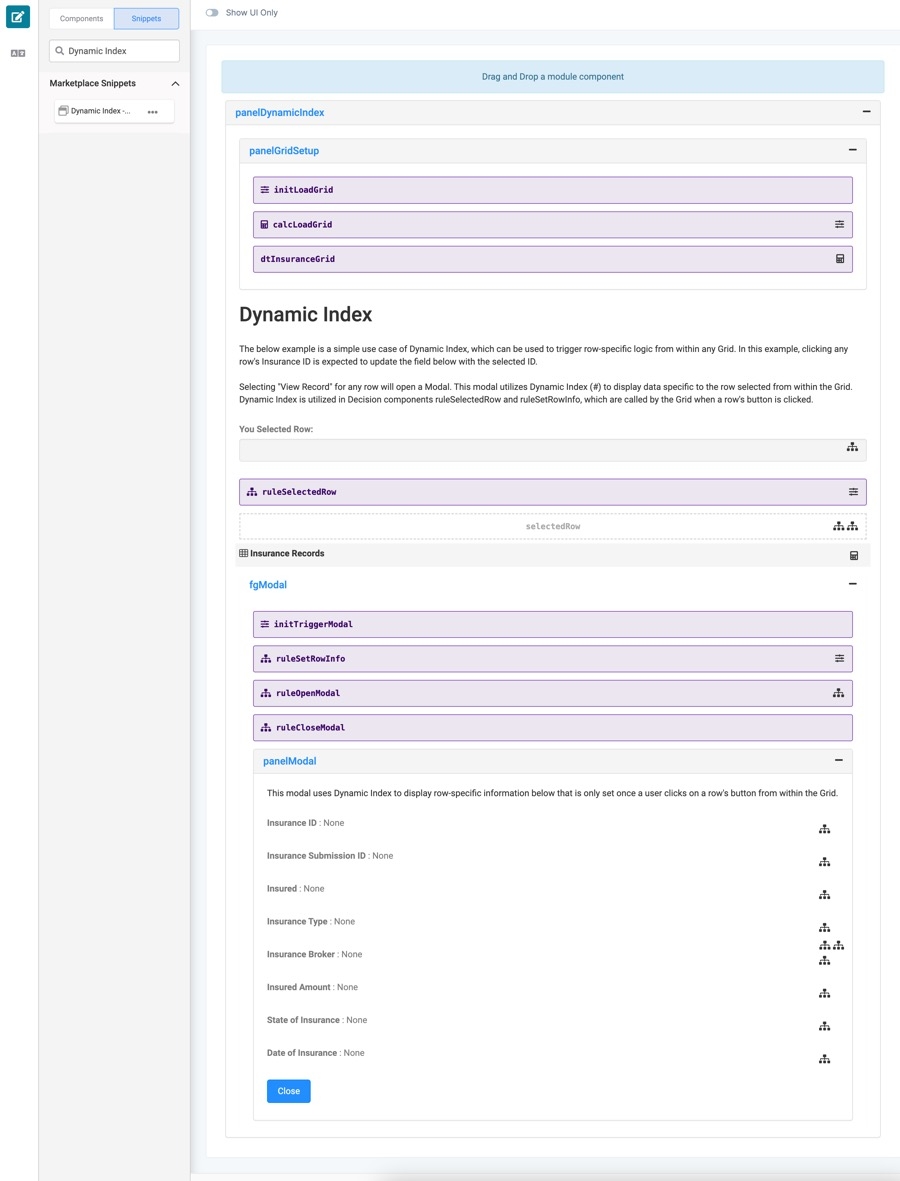
And here's how the snippet looks in the Module Builder:
How to Reference Dynamic Index
The Dynamic Grid component syntax supports referencing Dynamic Index. Dynamic Index can stand in as a row index value and lets you set up logic that triggers an event in any row index. An event could refer to adding or editing a row. But, you can only trigger events using your logic component's Manual Trigger Type.
To reference Dynamic Index, you can use # anywhere you use the rowIndex parameter. For example: myGrid.row(#).col(insuranceId). It's also important to note that Dynamic Index is specific to submission data. It ignores visual attributes, like row grouping, filtering, sorting, aggregation, and pivoting. Dynamic Index also doesn't work when a Dynamic Grid is set up using a Data Reference Key. Dynamic Index relies on the grid's submission.data. If you configure a Data Reference Key, it references another component's submission.data.
When creating triggers or rules referencing a row index value, you'll rarely need to hard-code that row index value in your configuration. It's often more useful to define the index value at run time, based on end-user interaction. For example, referencing the row index value of the row the end-user selects. Dynamic Index is a way to set a variable row index (#) in your configuration. Then, when your trigger or rule runs, the associated row index passes along to the triggered logic component based on the end-user's interaction. The logic component, in turn, can use the dynamically-populated row index value.
What You'll Learn
After completing this article, you'll learn how the Dynamic Index snippet works and how to customize it.
How the Snippet Works
This snippet uses Dynamic Index to set a variable row index (#). When your end-user clicks View Record, the associated row index passes to two Decisions components. These logic components use the dynamically-populated row index value selected by the end-user. A modal displays giving the end-user information specific to that row.
Let's look at the specific components that make this configuration work.
How the insuranceRecords Dynamic Grid Component Works
The insuranceRecords ![]() Dynamic Grid component has the following preconfigured column setup:
Dynamic Grid component has the following preconfigured column setup:
Header Label | Property ID | Column Type |
|---|---|---|
Insurance ID | insuranceId | Text Field |
Date | dateOfInsurance | Text Field |
Type | insuranceType | Single-select Dropdown |
State | insuredState | Text Field |
View Record | button | Button |
This configuration populates the Dynamic Grid with preconfigured data from the dtInsuranceGrid .png) Data Table component. When the end-user clicks an insurance ID in the Dynamic Grid, the action triggers the ruleSelectedRow
Data Table component. When the end-user clicks an insurance ID in the Dynamic Grid, the action triggers the ruleSelectedRow ![]() Decisions component. This Decisions component displays the insurance ID in the rowDisplay
Decisions component. This Decisions component displays the insurance ID in the rowDisplay .png) Text Field component.
Text Field component.
When the end-user clicks View Record, it triggers the initTriggerModal .png) Initializer component. This Initializer initiates the gathering of that row's information and displays it in a modal.
Initializer component. This Initializer initiates the gathering of that row's information and displays it in a modal.
The Dynamic Grid component also has the following settings enabled:
Setting | Description |
|---|---|
Allow User to Group Rows | When set to
|
Allow User to Aggregate & Pivot Across All Columns | When set to Aggregation lets your end-user apply pre-defined functions to values. To see aggregated values, apply the row group or set Pivot Mode to The available aggregation actions vary by column type. For example:
Pivoting allows for data generalization across another axis (Y-axis). Your end-user can pivot all data-based column types. This excludes the Button column type. To use Pivot Mode, the Pivot Mode toggle in the grid's Side Panel must be set to |
Allow User to Sort by Column | When set to When sorted in ascending order, an |
Allow Multi-Column Sorting | When set to |
Allow User to Filter Columns | When set to The available filtering actions vary by column type. For example:
|
Show Filter Panel | When selected, a Filter panel shows in the Side Panel. From the Side Panel, your end-user can apply column-specific filters. The available filtering actions vary by column type. |
Allow User to Invoke Edit State Upon Single-Click | Select how many times the end-user must click an editable cell to edit the cell. |
For more information on Dynamic Grid settings, see our Dynamic Grid Component article.
How the ruleSelectedRow Decisions Component Works
The ruleSelectedRow ![]() Decisions component fires when the initTriggerModal
Decisions component fires when the initTriggerModal .png) Initializer component triggers. The Initializer fires as a result of an end-user clicking View Record for a specific row.
Initializer component triggers. The Initializer fires as a result of an end-user clicking View Record for a specific row.
The ruleSelectedRow ![]() Decisions component does the following:
Decisions component does the following:
Inputs the Dynamic Index of insuranceRecords.row(#).col(insuranceId) to retrieve the submission data for the selected row in the Dynamic Grid component.
Outputs and stores the data in the selectedRow
.png) Hidden component.
Hidden component.Outputs the insurance ID to display in the rowDisplay
.png) Text Field component.
Text Field component.
The rowDisplay .png) Text Field component is simply a visual component for the end-user. When an end-user clicks an insurance ID in the
Text Field component is simply a visual component for the end-user. When an end-user clicks an insurance ID in the ![]() Dynamic Grid, the text field displays that insurance ID. The selectedRow
Dynamic Grid, the text field displays that insurance ID. The selectedRow ![]() Hidden component stores the data for the ruleSetRowInfo
Hidden component stores the data for the ruleSetRowInfo ![]() Decisions component.
Decisions component.
How the ruleSetRowInfo Decisions Component Works
The ruleSetRowInfo ![]() Decisions component fires when the initTriggerModal
Decisions component fires when the initTriggerModal .png) Initializer component triggers. The Initializer fires as a result of an end-user clicking View Record for a specific row.
Initializer component triggers. The Initializer fires as a result of an end-user clicking View Record for a specific row.
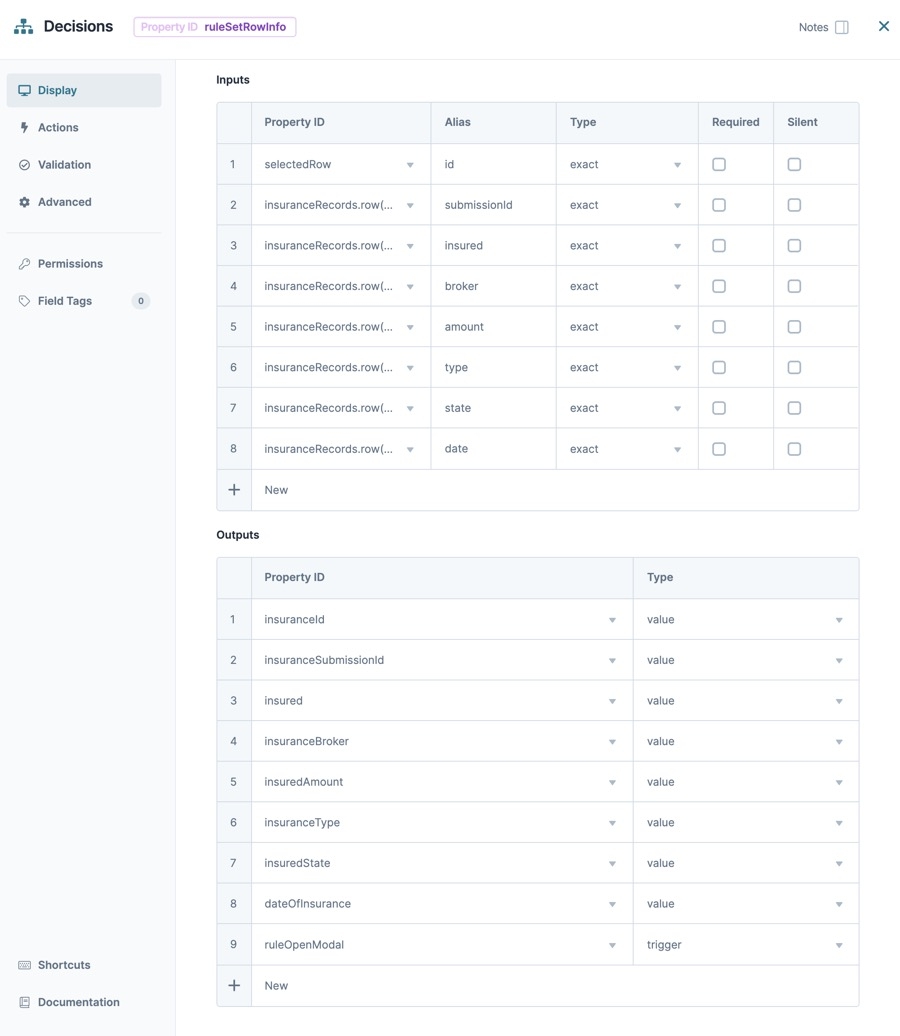
The ruleSetRowInfo ![]() Decisions component does the following:
Decisions component does the following:
Inputs the stored submission data from the selectedRow
.png) Hidden component.
Hidden component.Inputs the submission ID of the selected row.
Inputs all preconfigured fields from the submission.
Outputs all values from the input fields to display in a modal.
Triggers the ruleOpenModal
.png) Decisions component. The ruleOpenModal
Decisions component. The ruleOpenModal .png) Decisions component opens and displays all the submission data associated with that selected row.
Decisions component opens and displays all the submission data associated with that selected row.
Here's how the ruleSetRowInfo ![]() Decisions component looks in the Module Builder:
Decisions component looks in the Module Builder:
How the panelModal Panel Component Works
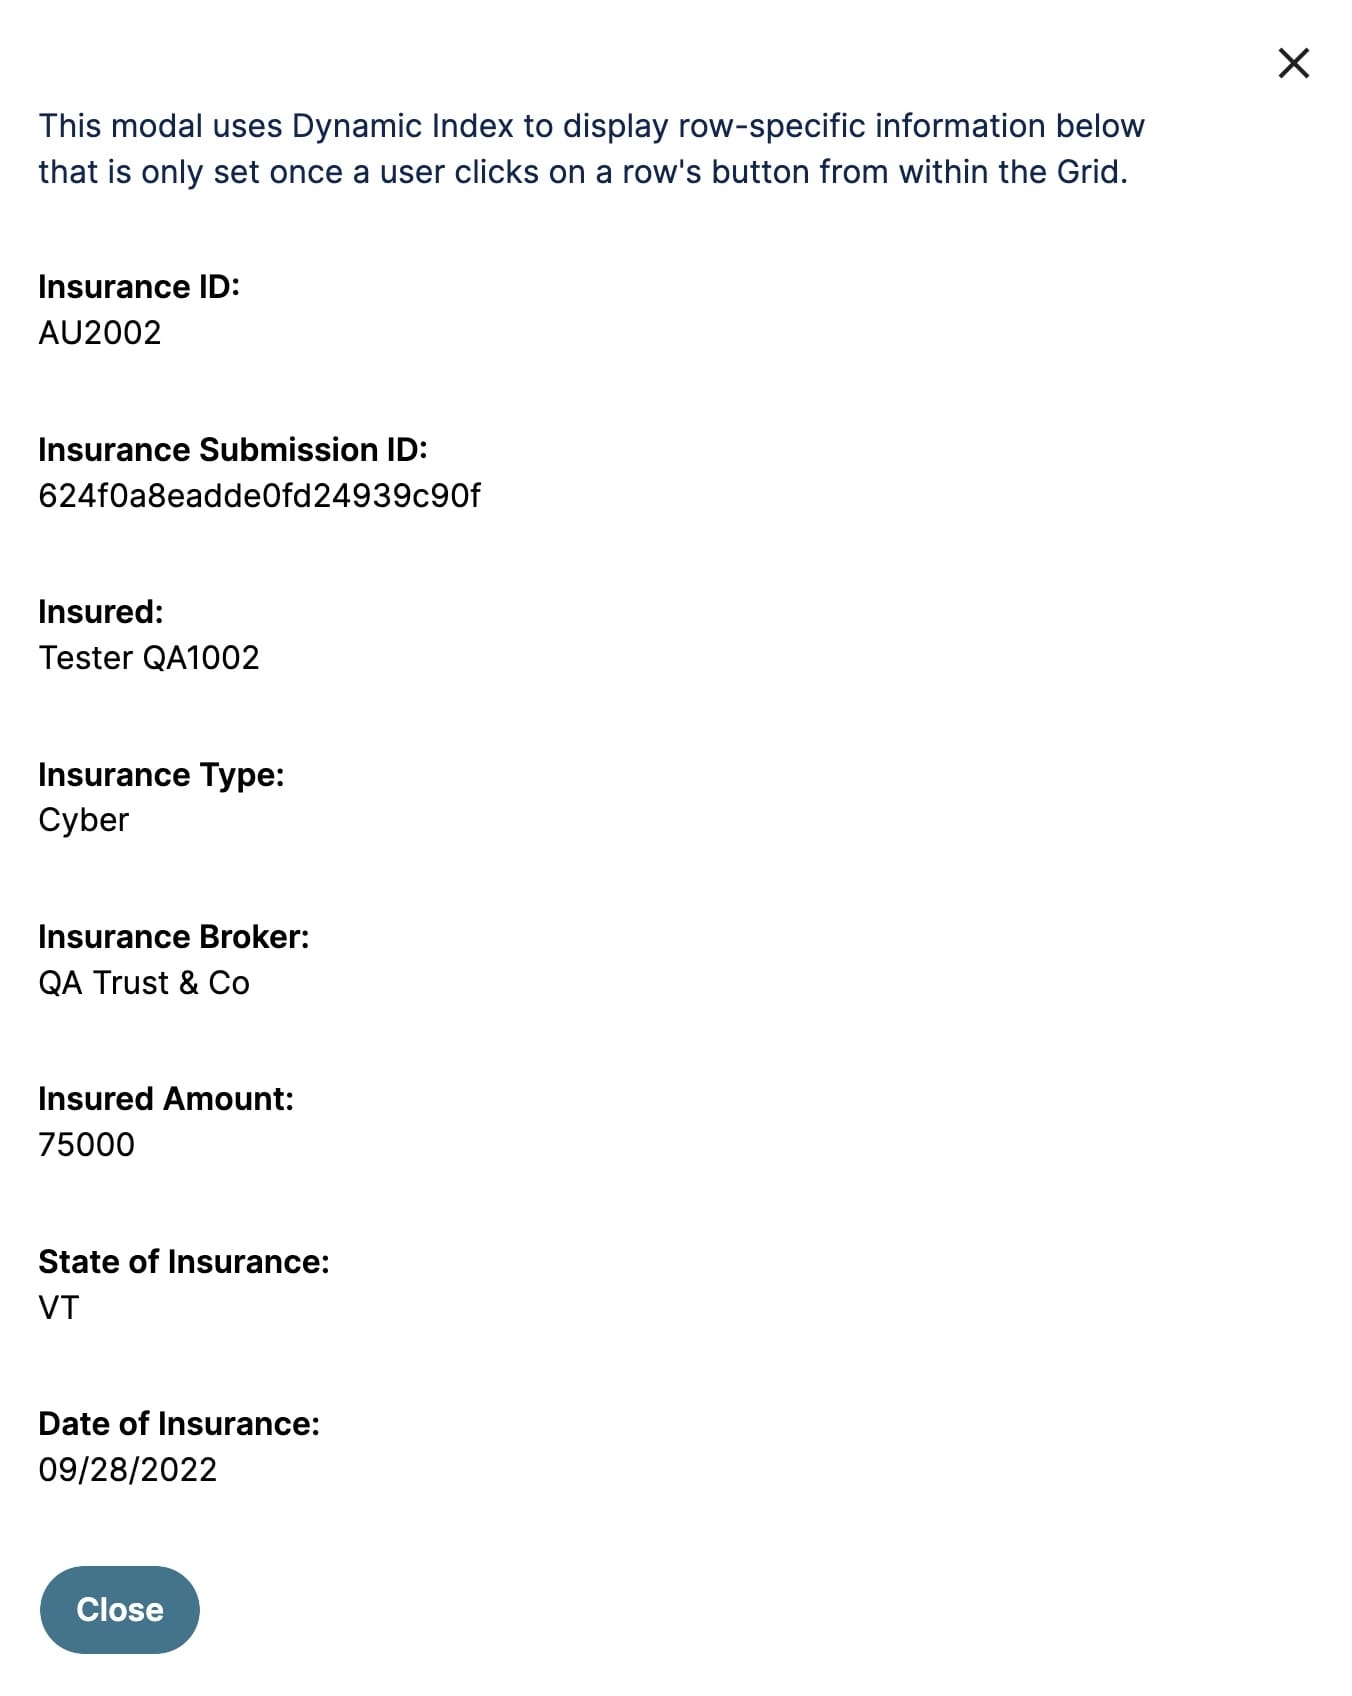
After triggering the module by clicking View Record, a pop-up modal displays with that row's specific information. Preview the module in Express View to see the results. Click View Record for any of the preconfigured rows. The snippet comes preconfigured with the following fields:
Insurance ID
Insurance Submission ID
Insured
Insurance Type
Insurance Broker
Insured Amount
State of Insurance
Date of Insurance
Here's how the modal looks in Express View:
Customizing the Snippet
The focus of the Dynamic Index - How To snippet is to help you understand how to set up a variable row index (#) in your configuration. But the snippet is completely customizable. Dynamic Index syntax works similarly with our Dynamic Grid, Freeform Grid, and Uniform Grid components. That way, you can use this snippet to set up a variable row index (#) with any grid component.
You can also customize the grid component to meet your business needs. For example, you might want end-users to add or edit rows in the grid.


