Overview
You can use data tables to store a large amount of data into arrays. But, the more data you have, the more difficult it is to find specific data. The Filter Data Table snippet lets you filter specific data to view.
The Filter Data Table snippet uses drop-down menus to filter a data table. The snippet comes with default filters for reconfiguration and gives you the ability to add others. If you sell car parts and want to filter a specific part, you can configure a filter to find that specific part. This snippet saves you time so you don't need to sift through the entire table.
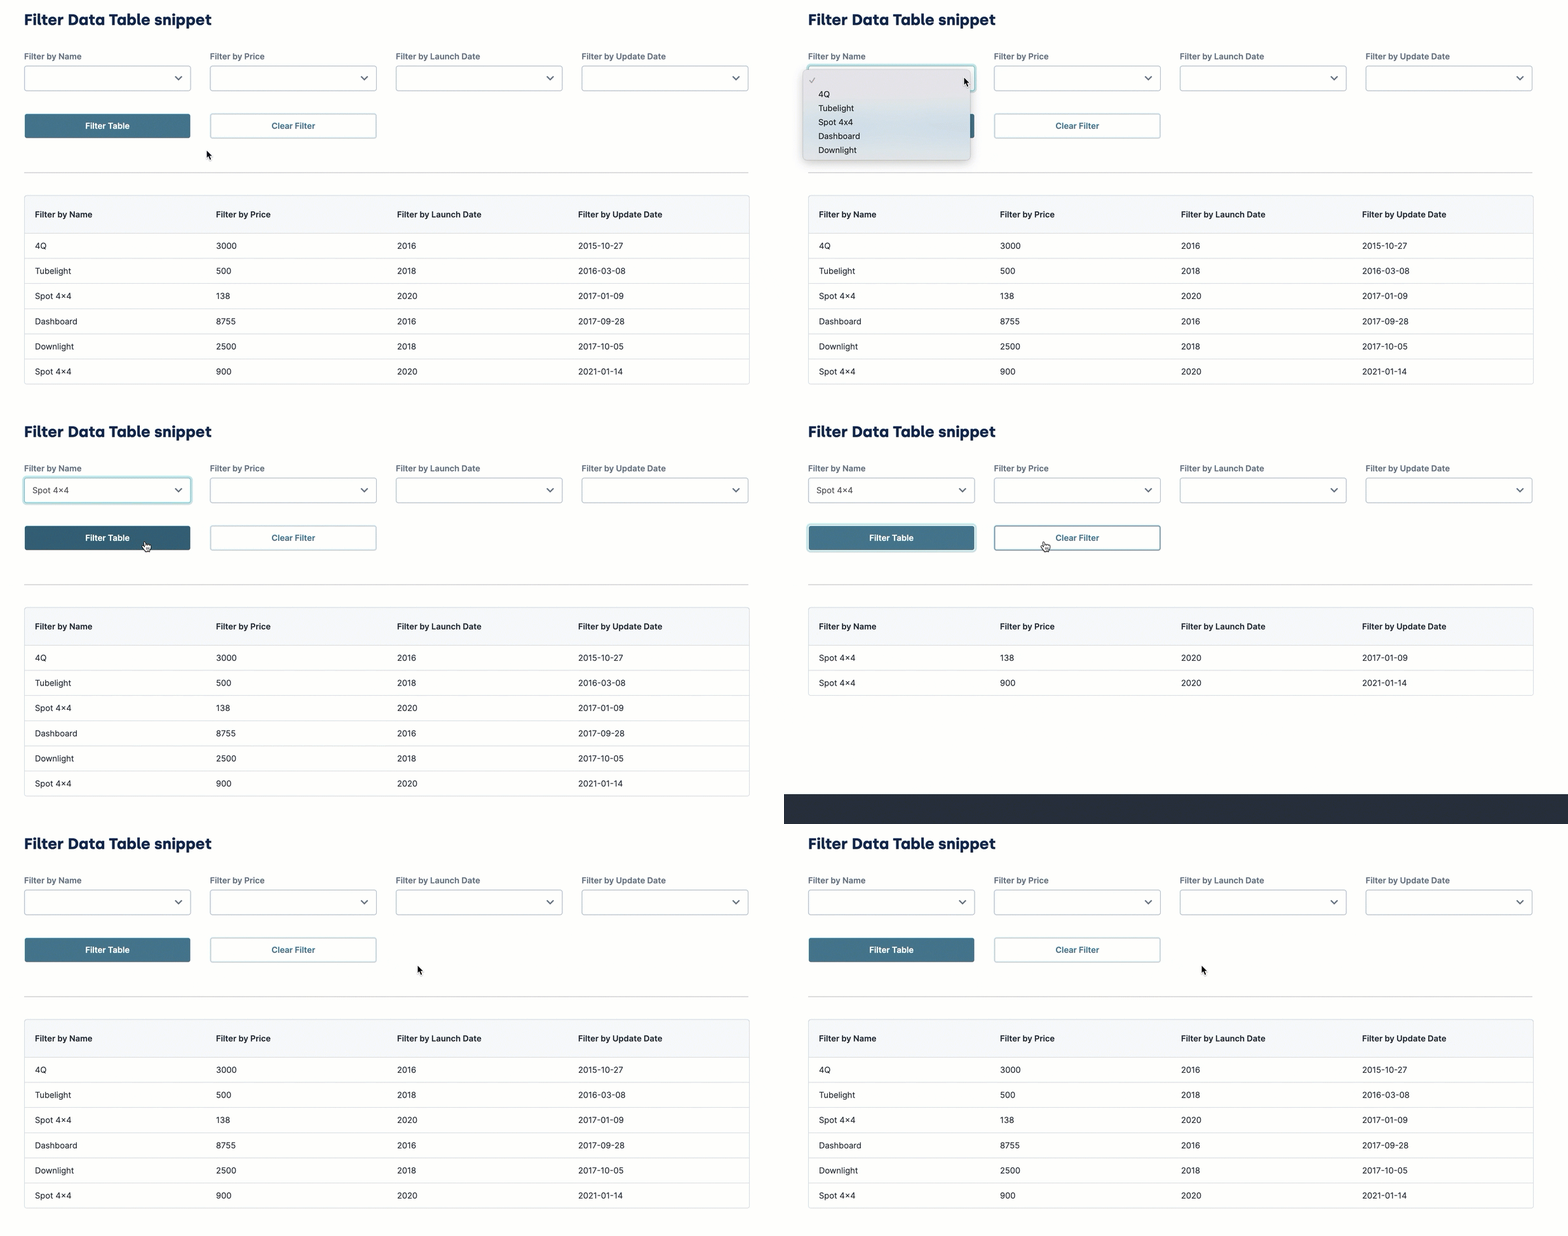
Here's how the snippet looks in Express View:
And here's how the snippet looks in the Module Builder: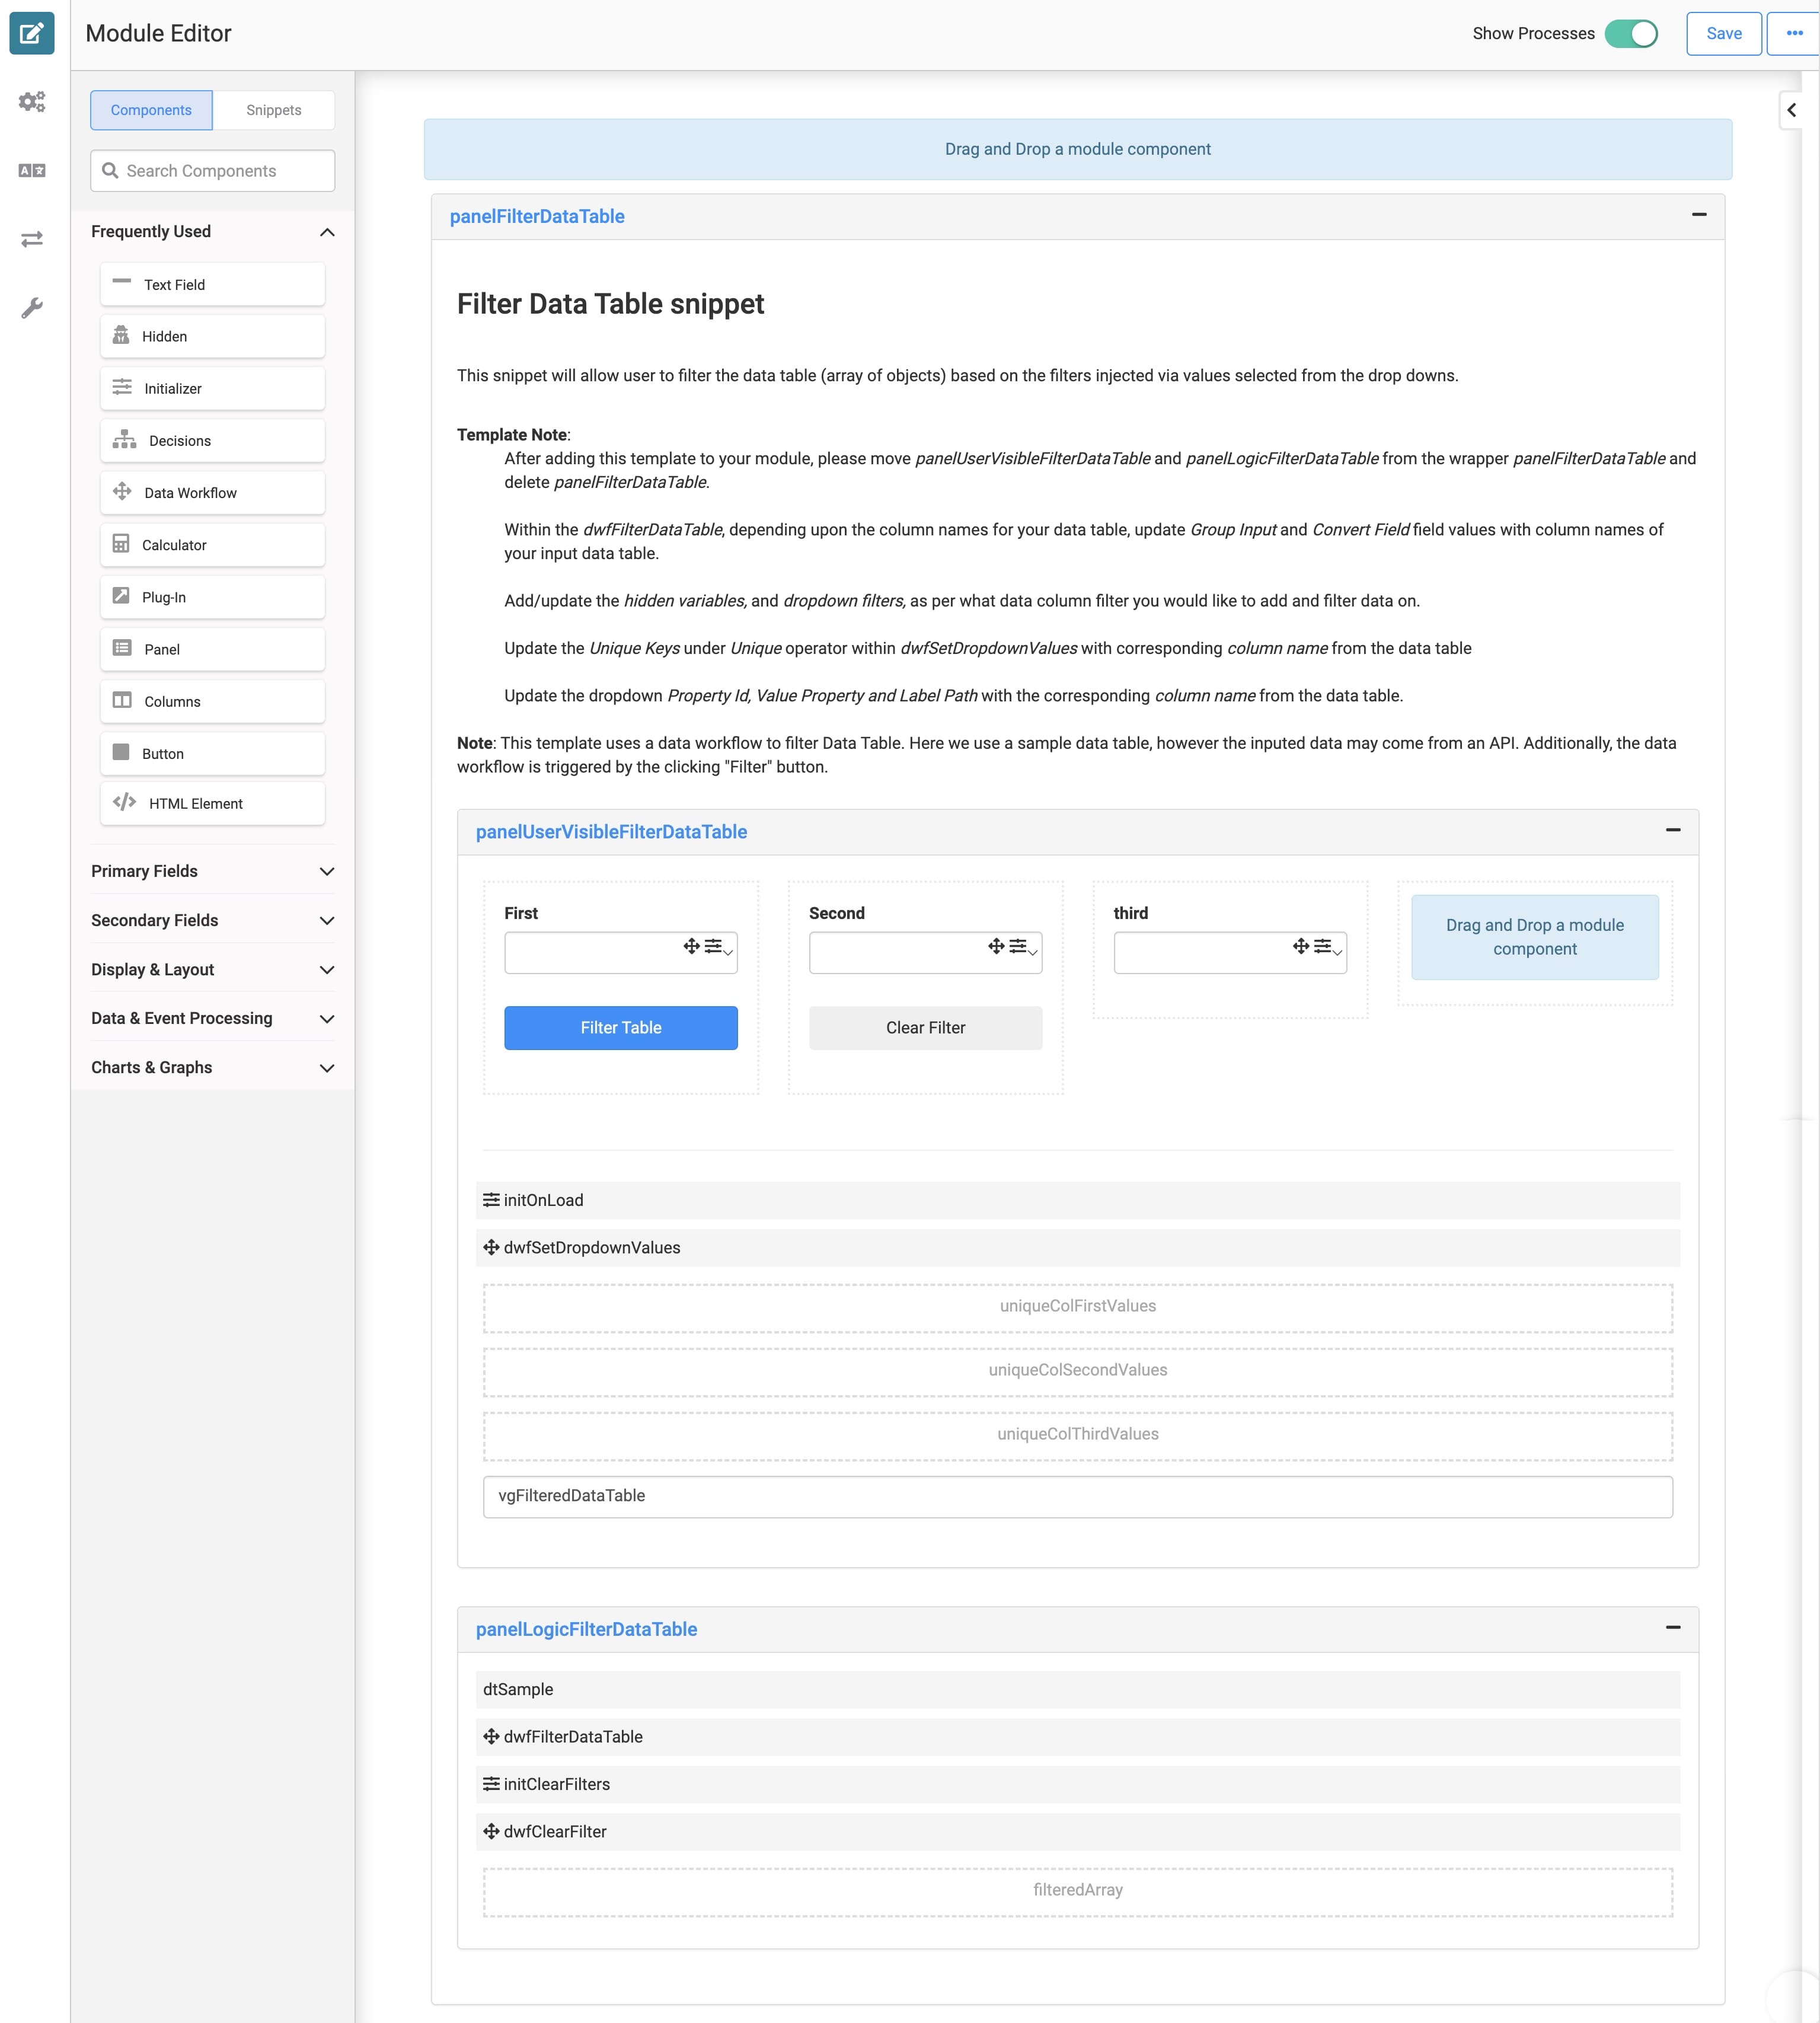
Adding the Snippet
It's easy to access the Filter Data Table in Unqork Marketplace. Before you use this snippet in your application, you must install the snippet to your environment.
Adding the Snippet to Your Environment
To add the snippet to your environment:
At the top right of the Unqork Designer Platform, click Library.
Click Templates.
Click Marketplace.
You can also access the Marketplace at any time by visiting https://marketplace.unqork.io.
In the Search the Listings Directory field, enter Filter Data Table.
Click the Filter Data Table tile.
Click Install to Environment.
Click Install Template.
If you aren't logged in, you'll see a field for Environment URL and a Login button. Enter your environment's URL where you want to install the template. For example: [environmentname.unqork.io]. Click the Login button. Then, return to step 4 and click Install to Environment again. Follow the remaining steps as listed.
Now, you can now use your newly installed snippet in your application.
Adding the Snippet to Your Module
After you install the Filter Data Table snippet to your environment, you can drag and drop the snippet into your module:
In the left sidebar of the Module Builder, click the Snippets button.
In the search bar, enter Filter Data Table.
Drag and drop the Filter Data Table snippet onto your canvas.
If you don't see the snippet at first, make sure to expand the Marketplace Snippets section.
Save your module.
How the Snippet Works
When you open the Filter Data Tablesnippet in Express View, you see various drop-down filters. You can select one option from any or all of the filters to narrow your search results. Clicking Filter Table reloads the data table to show the specific information you search for. Clicking Clear Filter, returns the data table without any filters applied.
A few key components power this snippet. All data lives in the snippet's Data Table component. The snippet is set up to use the Data Table's column headers as data keys. So, each header of the table is a filter and the Dropdown components reference the individual columns of your table.
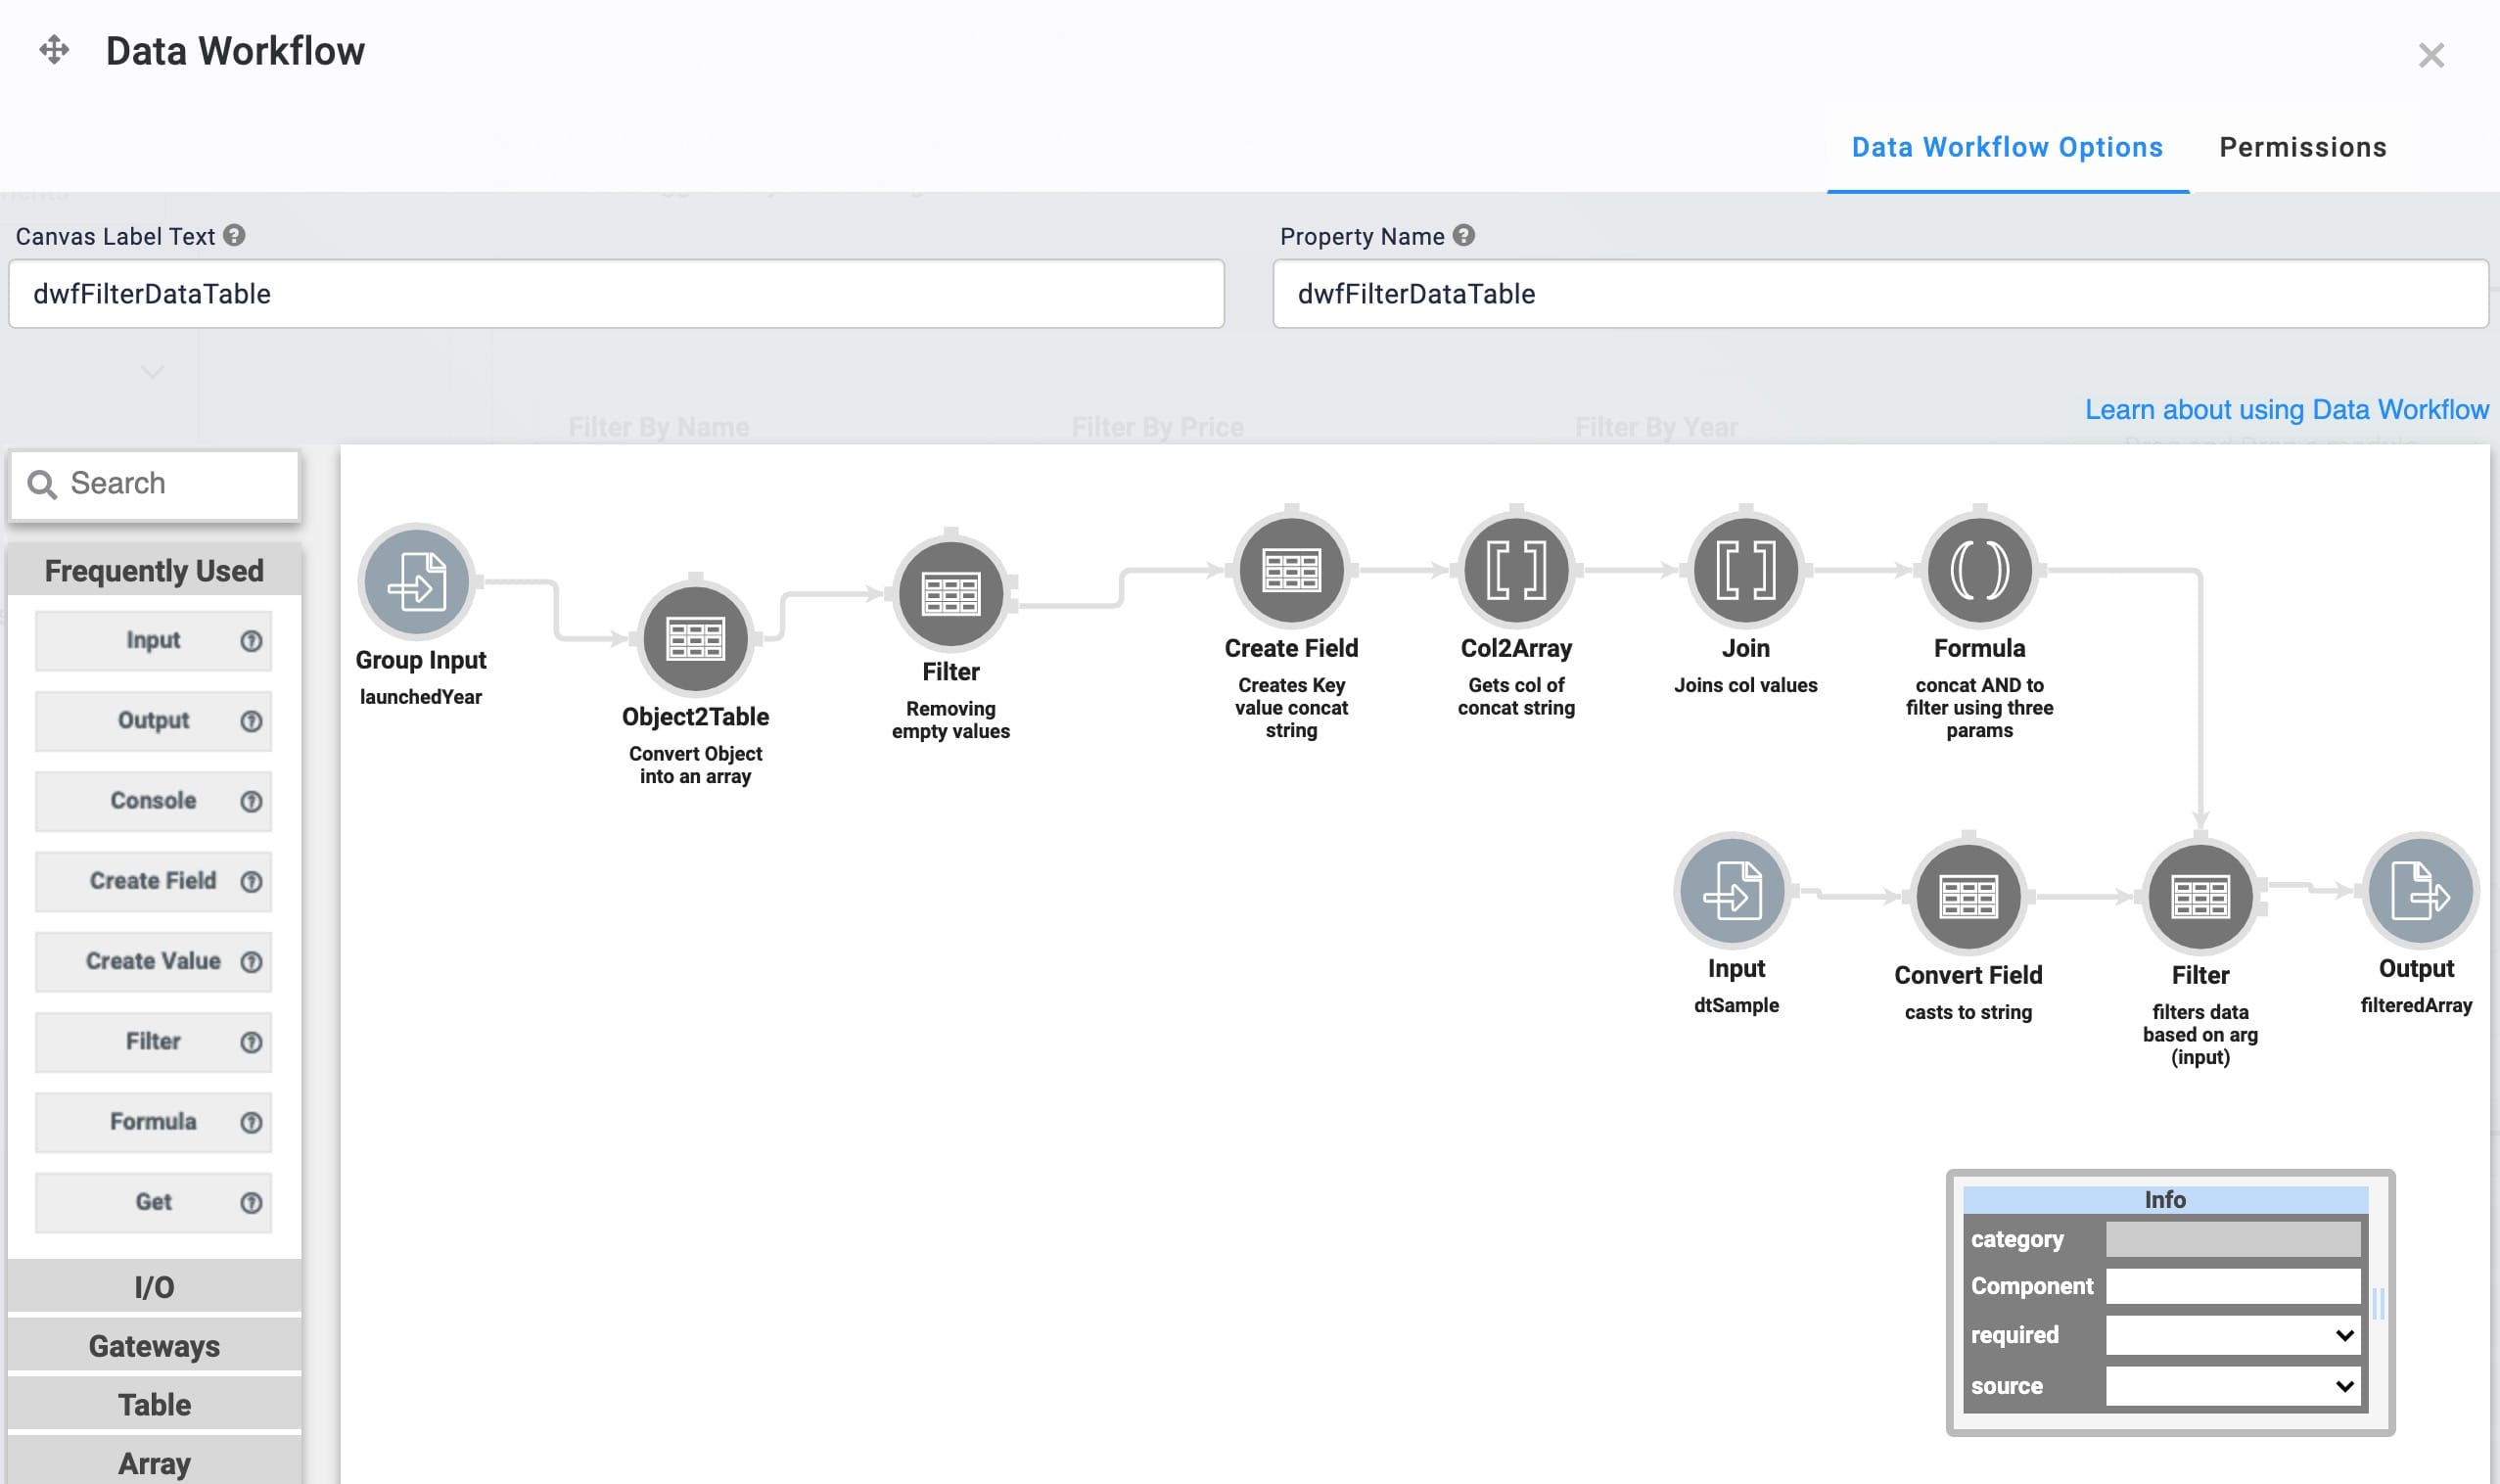
When you click Filter Table in Express View, it triggers a Data Workflow component that filters the data. The flow at the top of the canvas creates a custom filter based on the input from Express View. It maps each header, or filter, in the Group Input node. Then, it converts all the headers into their own arrays, removes any filters that aren't selected, and concatenates the selected filters.
The image below shows the configuration of this Data Workflow:
Setting Up the Snippet
For this snippet to function correctly, you need to make a few adjustments. You must replace the sample data with your own. This snippet comes with 3 columns of sample data for demonstrative purposes. So, if your data table has more than or fewer than 3 columns to filter by, then you need to update the Dropdown and Data Workflow components.
Updating the Data Table Component
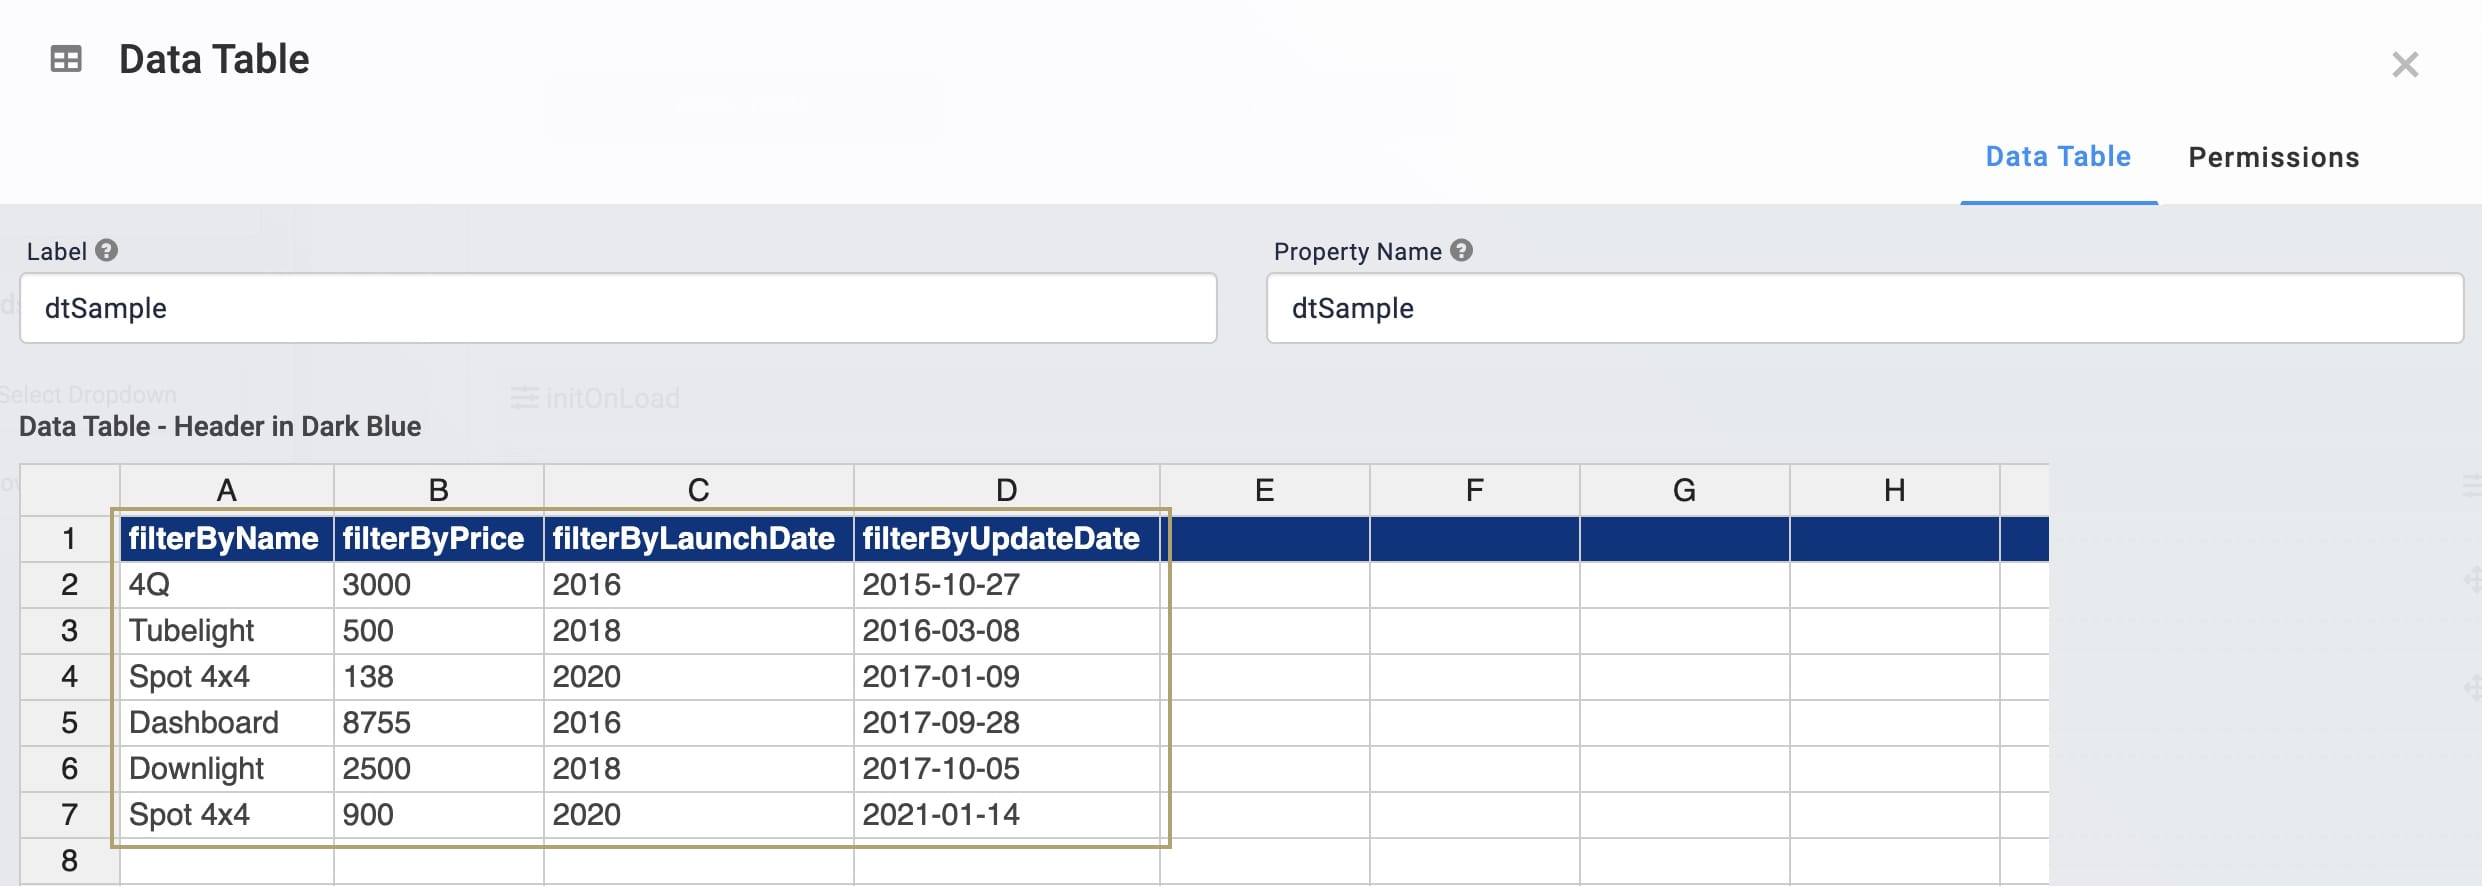
First, replace these columns with the data you want to add. For this example, you'll replace the 3 columns with part name, price, and launch date data. Then, you'll add a new column for an updated timestamp. You'll learn how to configure this new column into the template later.
To update the Data Table component:
In the Module Builder, hover over the dtSample Data Table component.
A 5-button toolbar displays above the component on hover-over.
Click the
.jpg) (Settings) button to open the Configuration window.
(Settings) button to open the Configuration window.In the data table, enter the following:
filterByName
filterByPrice
filterByLaunchDate
filterByUpdateDate
4Q
3000
2016
2015-10-27
Tubelight
500
2018
2016-03-08
Spot 4x4
138
2020
2017-01-09
Dashboard
8755
2016
2017-09-28
Downlight
2500
2018
2017-10-05
Spot 4x4
900
2020
2021-01-14
Click Save.
Updating the Dropdown Components
Next, modify the Dropdown components so the correct filters show in Express View. For this example, you'll adjust the template's prebuilt Dropdown components and add a new one.
To adjust the first, second, and third Dropdown components:
In the Module Builder, hover over each of the first, second, and third Dropdown components.
A 5-button toolbar displays above the component on hover-over.
Click the
.jpg) (Settings) button to open the Configuration window.
(Settings) button to open the Configuration window.In the Property ID fields, replace the default values for each component with the following:
Default Value
New Value
first
filterByName
second
filterByPrice
third
filterByLaunchDate
In the Label Text fields, replace the default values for each component with the following:
Default Value
New Value
First
Filter by Name
Second
Filter by Price
Third
Filter by Launch Date
In the Value Property fields, replace the default values for each component with the following:
Default Value
New Value
first
filterByName
second
filterByPrice
third
filterByLaunchDate
In the Label Path fields, replace the default values for each component with the following:
Default Value
New Value
first
filterByName
second
filterByPrice
third
filterByLaunchDate
Below is an example of the updates made to the first Dropdown component:
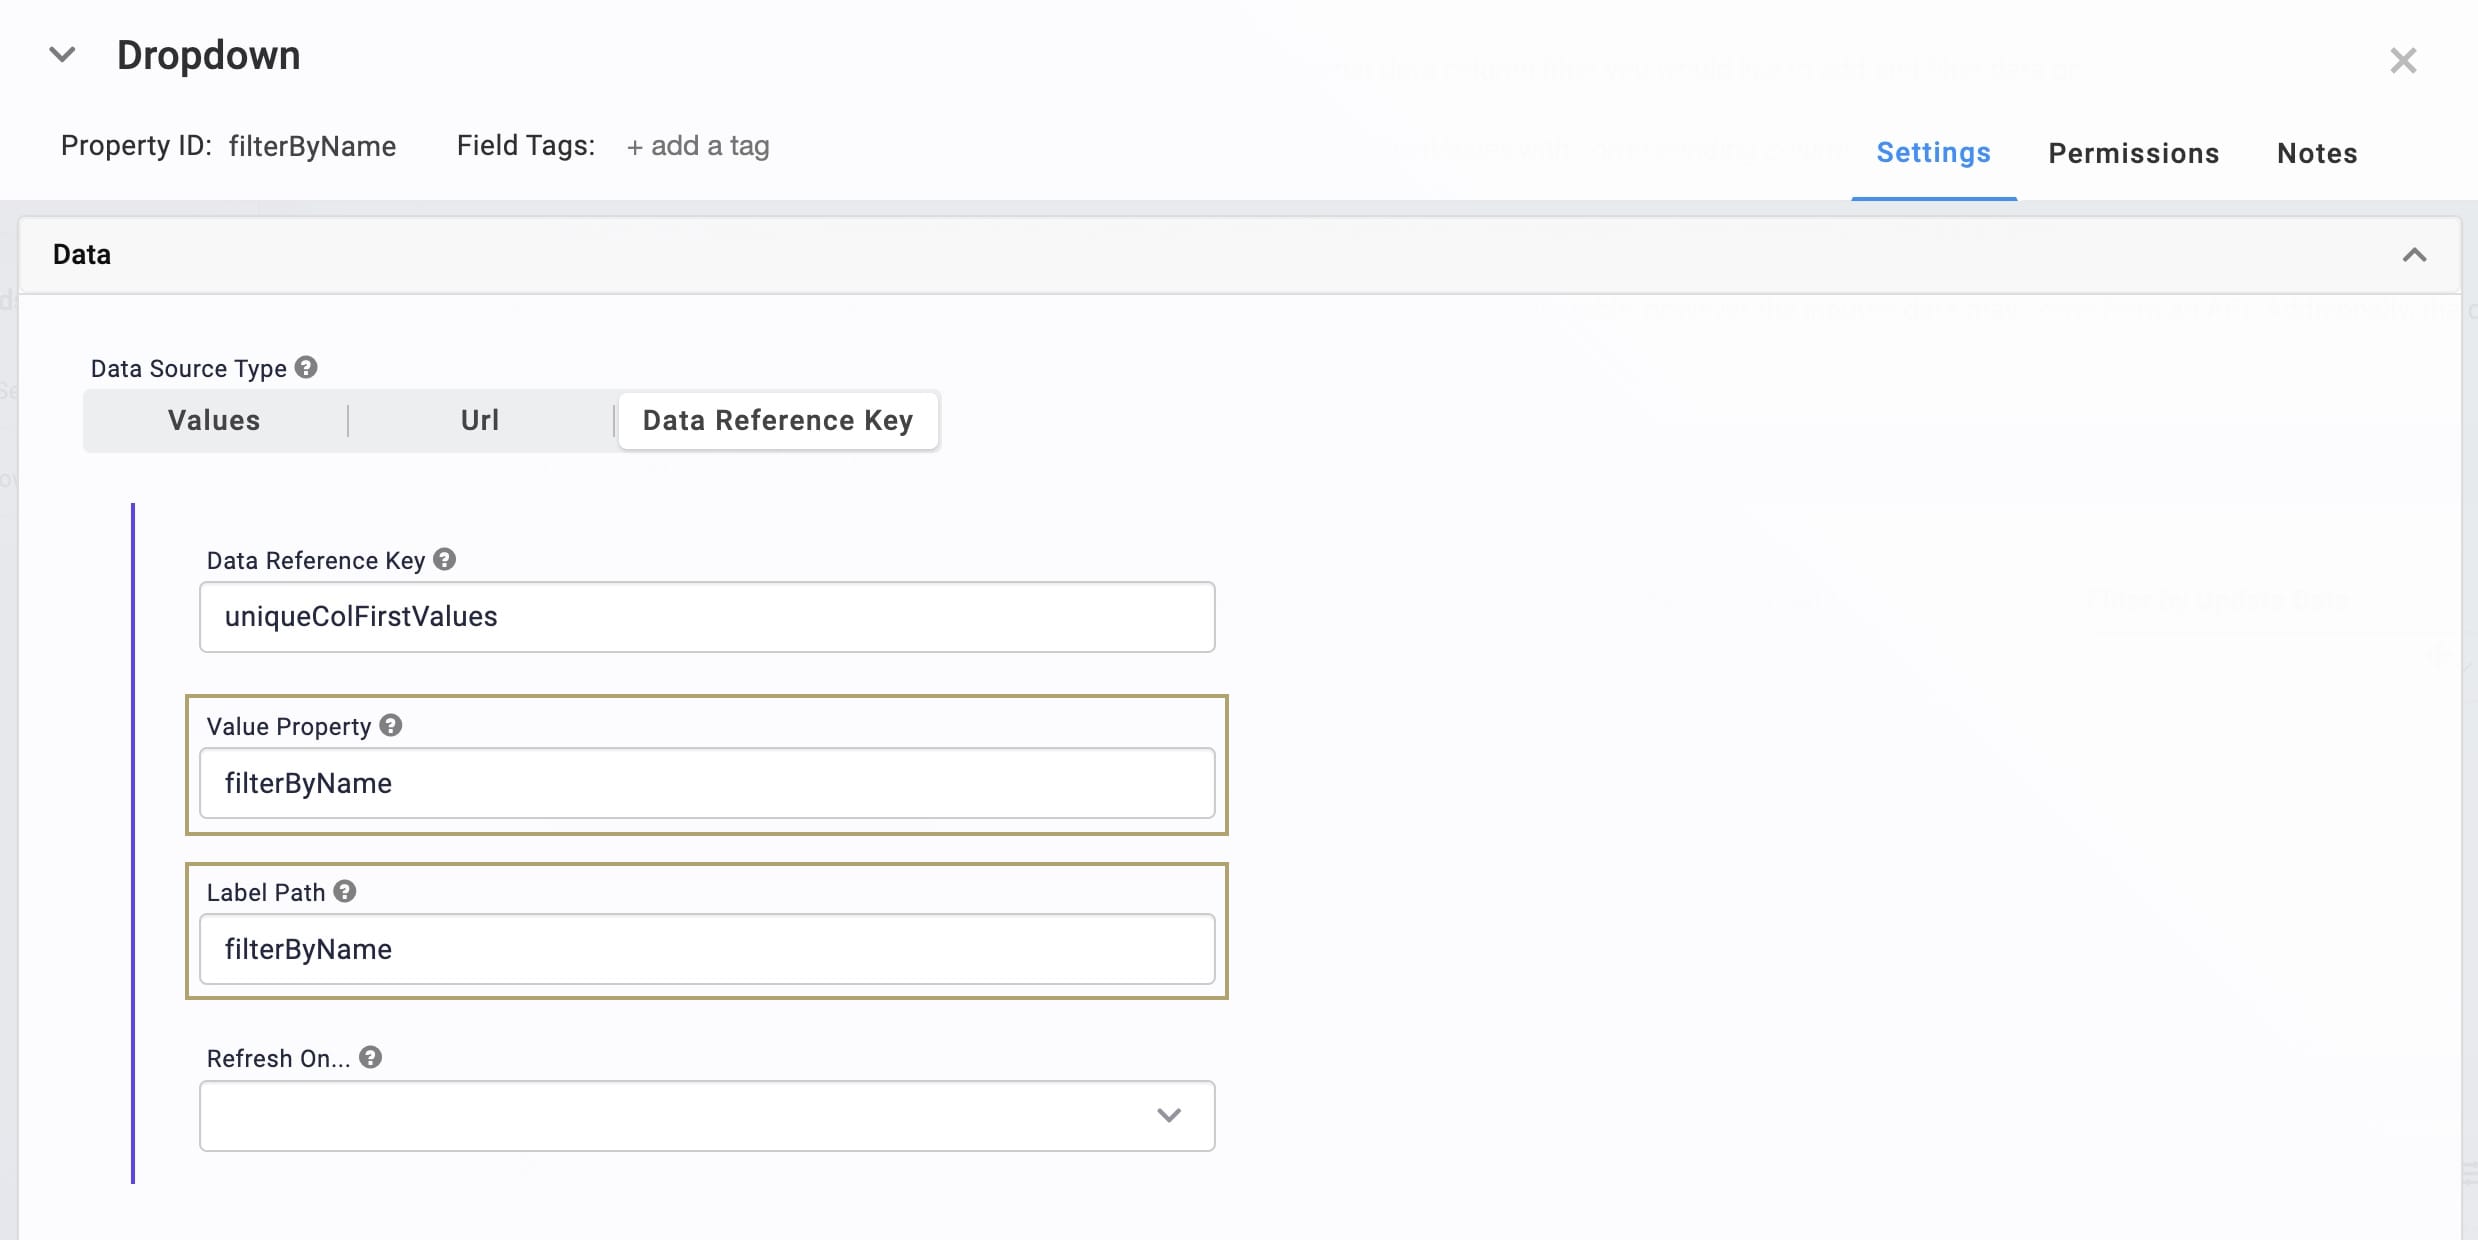
Save each component as you update it.
Adding the filterByUpdateDate Dropdown Component
To let end-users filter your new Updated timestamp column, configure a new Dropdown component. The Dropdown component references the information from a Hidden component that you'll configure later.
To add the filterByUpdateDate Dropdown component:
Drag and drop a Dropdown component onto your canvas. Place this Dropdown component in the empty fourth column at the top of the panelUserVisibleFilterDataTable Panel.
In the Property ID field, enter filterByUpdateDate.
In the Label Text field, enter Filter by Update Date.
Select Data Reference Key as your Data Source Type.
In the Data Reference Key field, enter uniqueColFourthValues. This references the Hidden component you'll set up next.
In the Value Property and Label Path fields, enter filterByUpdateDate.
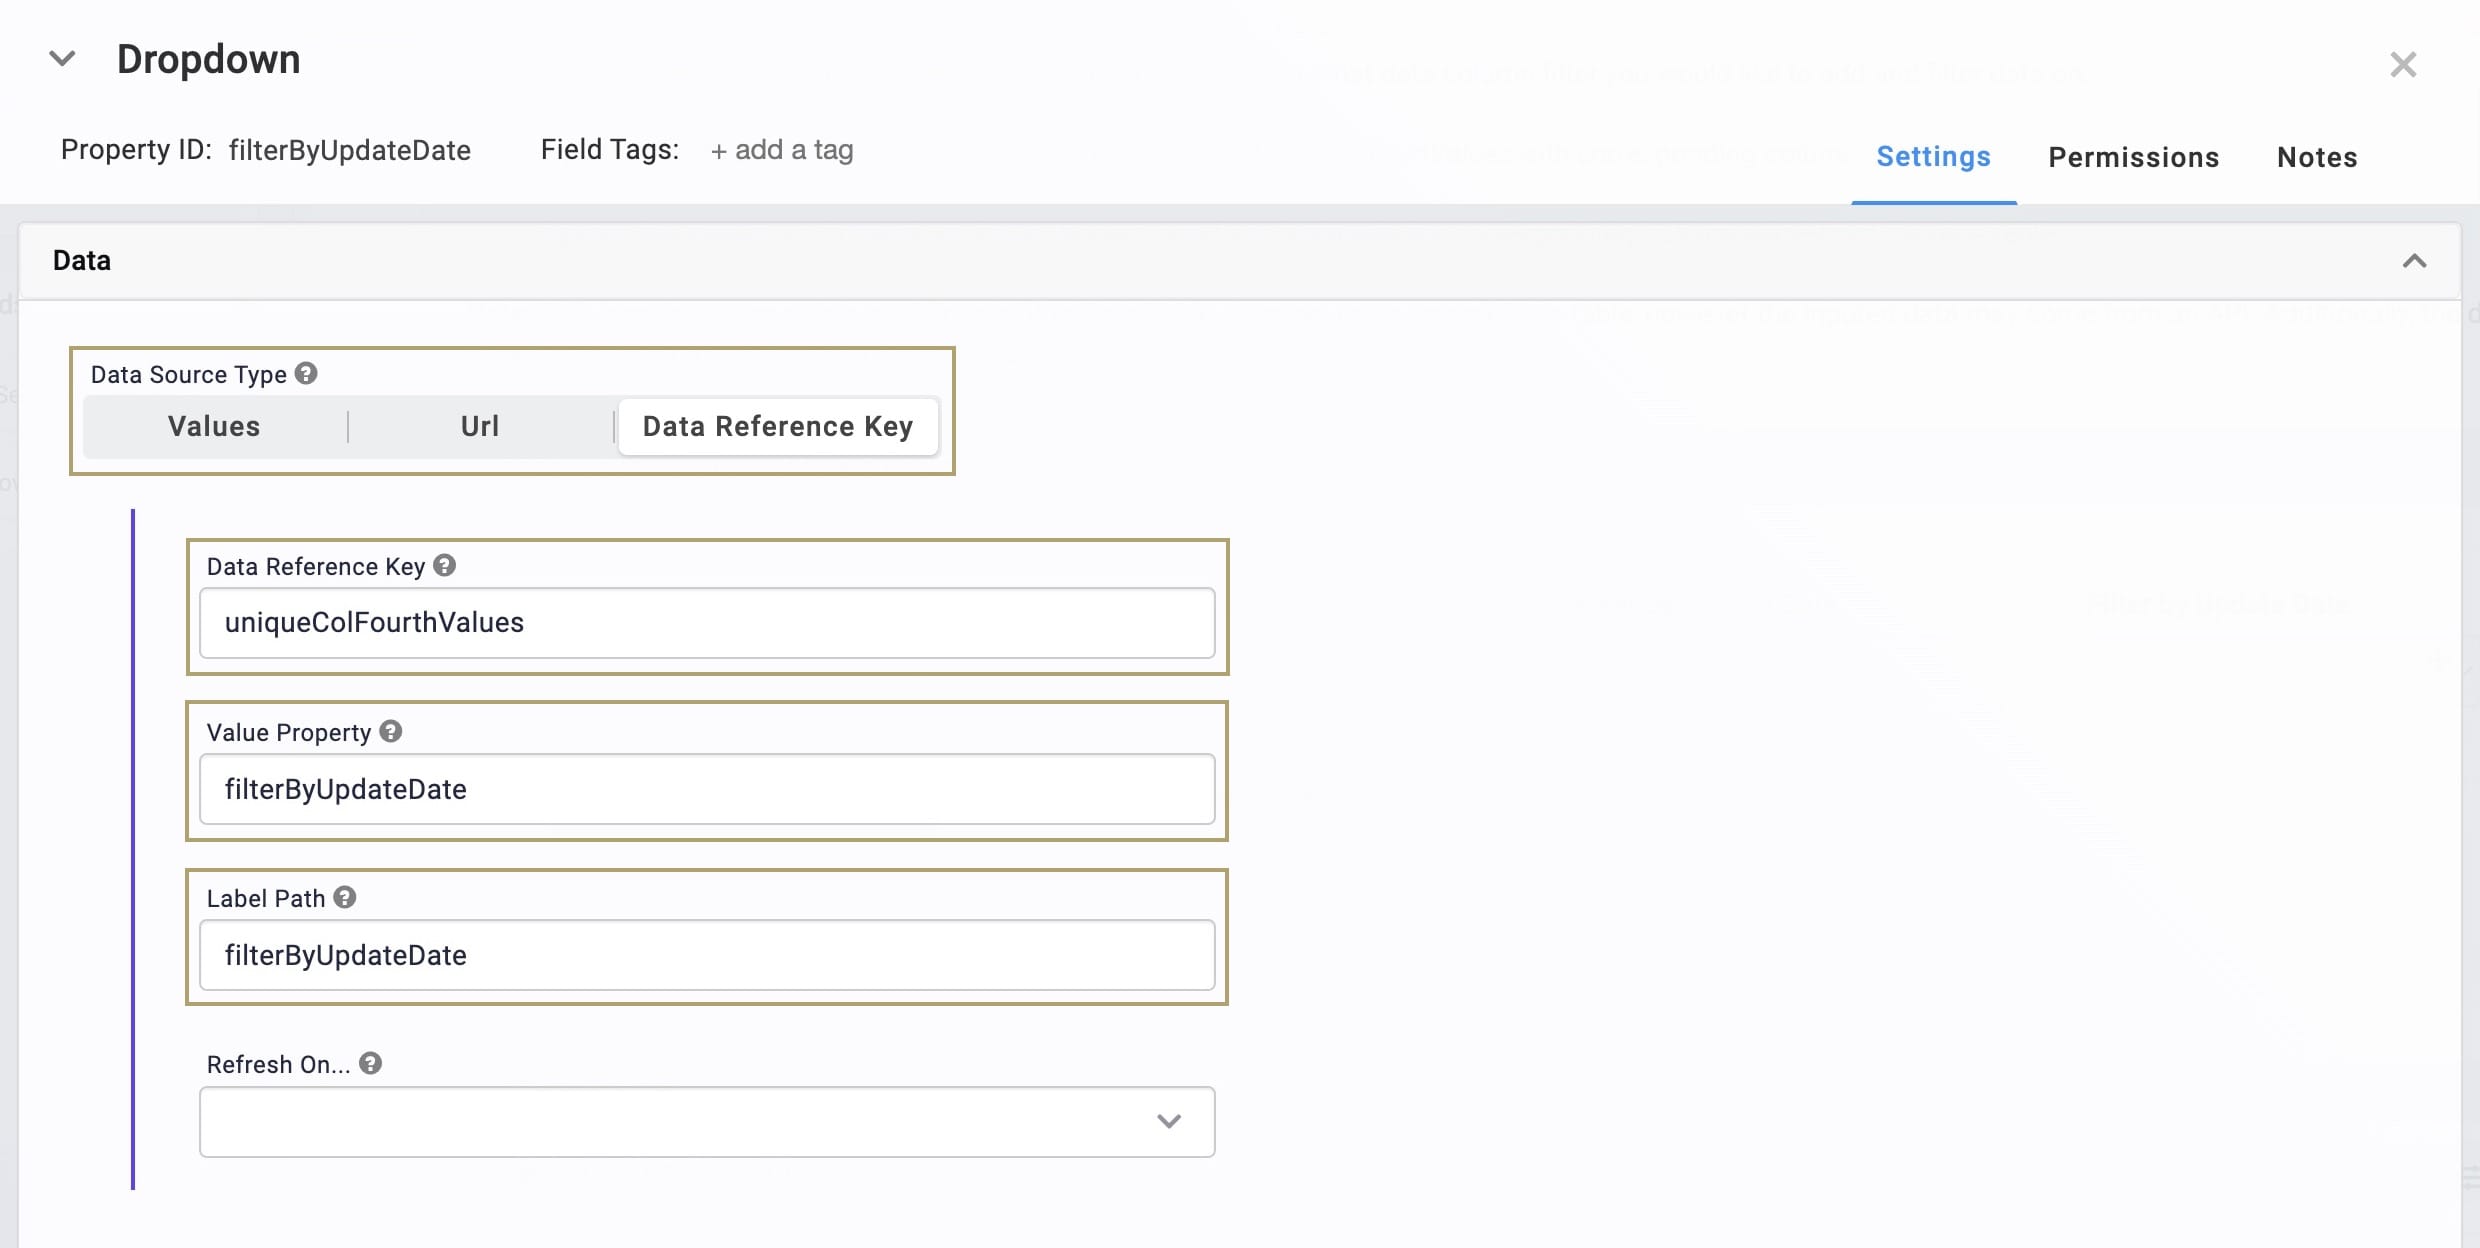
Click Save.
Adding the uniqueColFourthValues Hidden Component
Now, create a Hidden component to store the data from the filterByUpdateDate column you added to your Data Table.
To add the uniqueColFourthValues Hidden component:
Drag and drop a Hidden component onto your canvas, placing it below your uniqueColThirdValues Hidden component.
In the Property ID and Canvas Label Text fields, enter uniqueColFourthValues.
Click Save.
Updating the vgFilteredDataTable ViewGrid Component
Next, add your Dropdown component Property IDs and headings to the ViewGrid component's Display table.
To update the ViewGrid component:
In the Module Builder, hover over each of the vgFilteredDataTable ViewGrid components.
A 5-button toolbar displays above the component on hover-over.
Click the
.jpg) (Settings) button to open the Configuration window.
(Settings) button to open the Configuration window.In the Display table, replace the default Property IDs and Headings with the following:
ID
Formula
Heading
filterByName
Filter by Name
filterByPrice
Filter by Price
filterByLaunchDate
Filter by Launch Date
filterByUpdateDate
Filter by Update Date
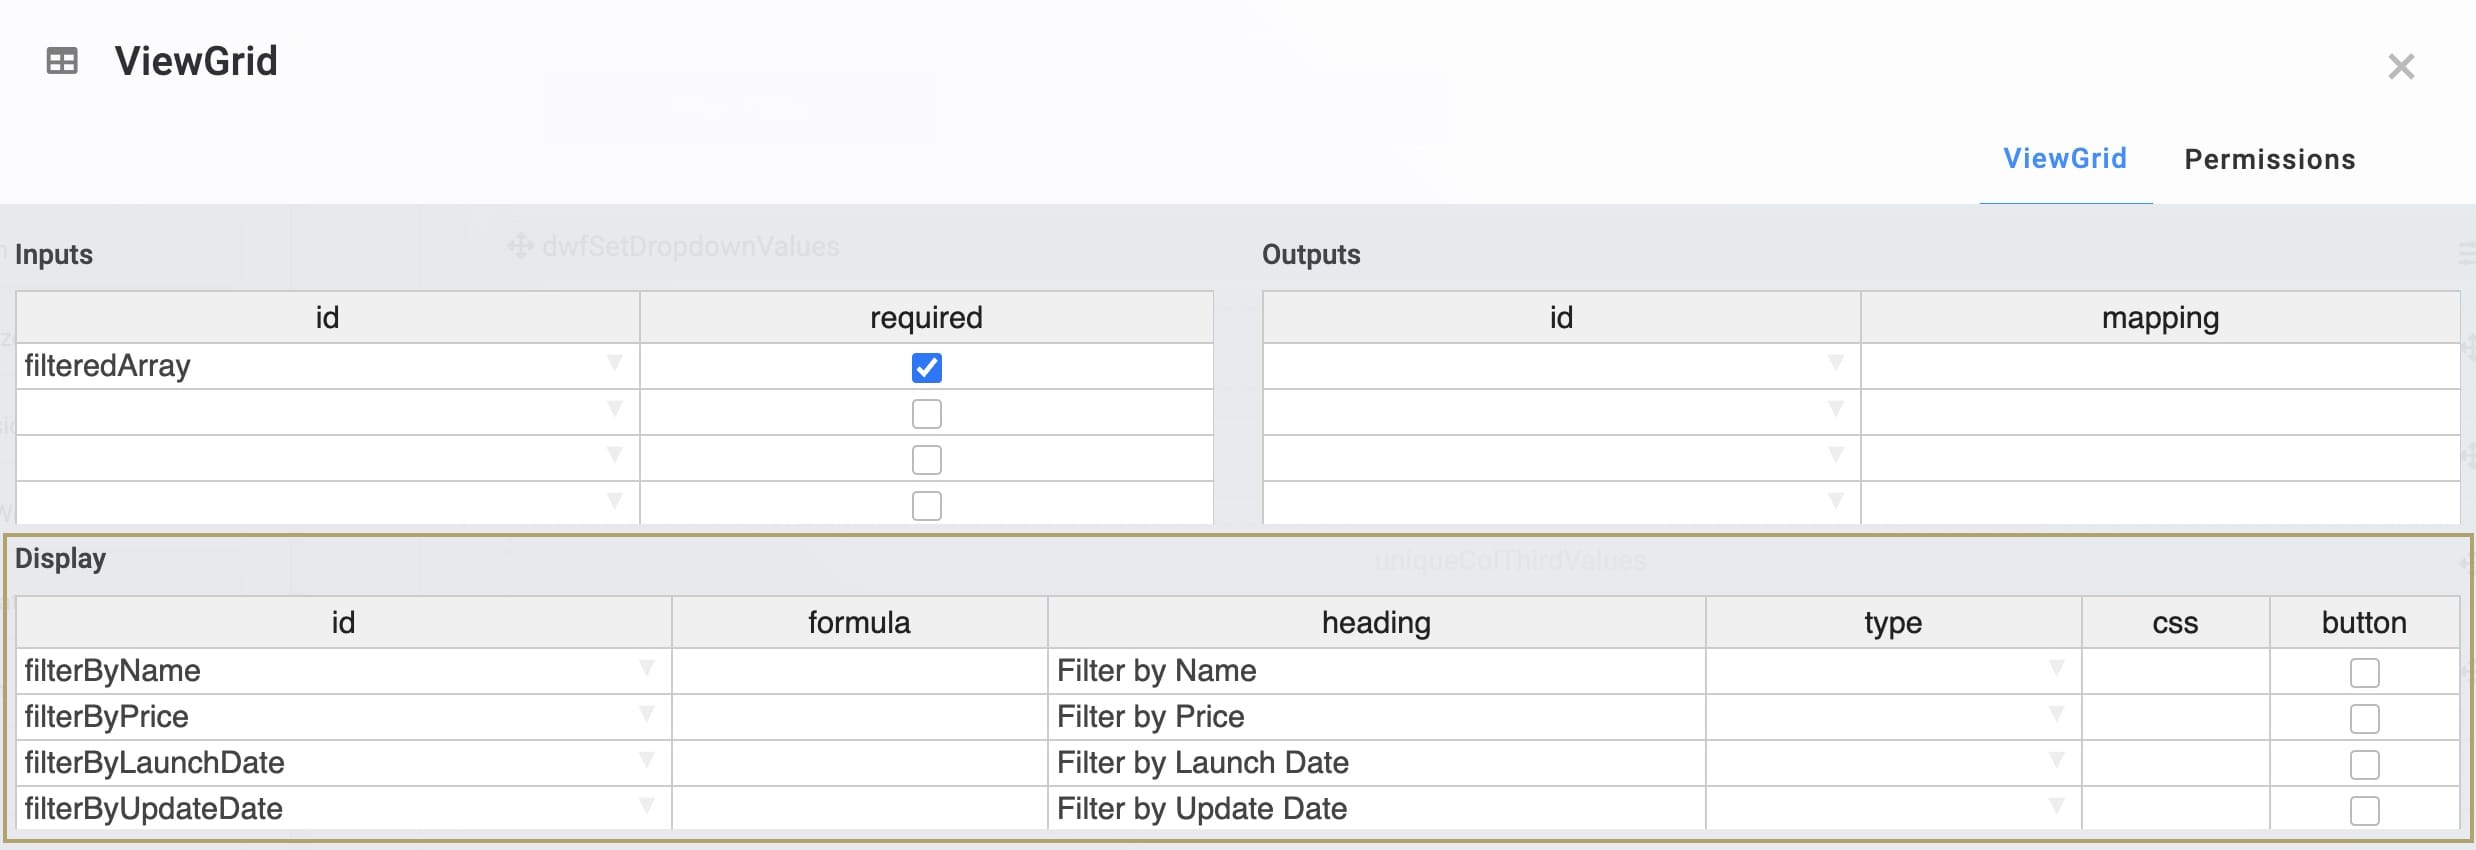
Click Save.
Updating the dwfSetDropdownValues Data Workflow Component
This Data Workflow component inputs your Data Table's data and outputs the data into your Hidden components by table column. You need to update the Unique Keys and create a new output for your Filter by Updated Date column.
Updating the Snippet's Default Unique Operators
First, update the Data Workflow's Unique operators.
To update the Col First Records Unique operator:
In the Module Builder, hover over the dwfSetDropdownValues Data Workflow component.
A 5-button toolbar displays above the component on hover-over.
Click the
.jpg) (Settings) button to open the Configuration window.
(Settings) button to open the Configuration window.To open the Unique operator's Info window, click the Col First Records Unique operator.
Configure the Col First Records Unique operator's Info window as follows:
Setting
Value
Category
Unique
Label
Col First Records
Unique Keys
filterByName
To update the Col Second Records Unique operator:
To open the Unique operator's Info window, click the Col Second Records Unique operator.
Configure the Col Second Records Unique operator's Info window as follows:
Setting
Value
Category
Unique
Label
Col Second Records
Unique Keys
filterByPrice
To update the Col Third Records Unique operator:
To open the Unique operator's Info window, click the Col Third Records Unique operator.
Configure the Col Third Records Unique operator's Info window as follows:
Setting
Value
Category
Unique
Label
Col Third Records
Unique Keys
filterByLaunchDate
Adding the Col Fourth Records Unique Operator
Next, add and configure a Unique operator to output data to your new uniqueColFourthValues Hidden component.
To add the Col Fourth Records Unique operator:
Drag and drop a Unique operator onto your Data Workflow canvas.
Configure the Col Fourth Records Unique operator's Info window as follows:
Setting
Value
Category
Unique
Label
Col Fourth Records
Unique Keys
filterByUpdateDate
Connect the output port (right) of the dtSample Input operator to the input port (left) of the Col Fourth Records Unique operator.
Adding the uniqueColFourthValues Output Operator
Lastly, add and configure an Output operator to output data to the uniqueColFourthValues Hidden component.
To add the uniqueColFourthValues Output operator:
Drag and drop an Output operator onto your Data Workflow canvas.
Configure the uniqueColFourthValues Output operator's Info window as follows:
Setting
Value
Category
Output
Component
uniqueColFourthValues
Action
Value
Connect the output port (right) of the Col Fourth Records Unique operator to the input port (left) of the uniqueColFourthValues Output operator.
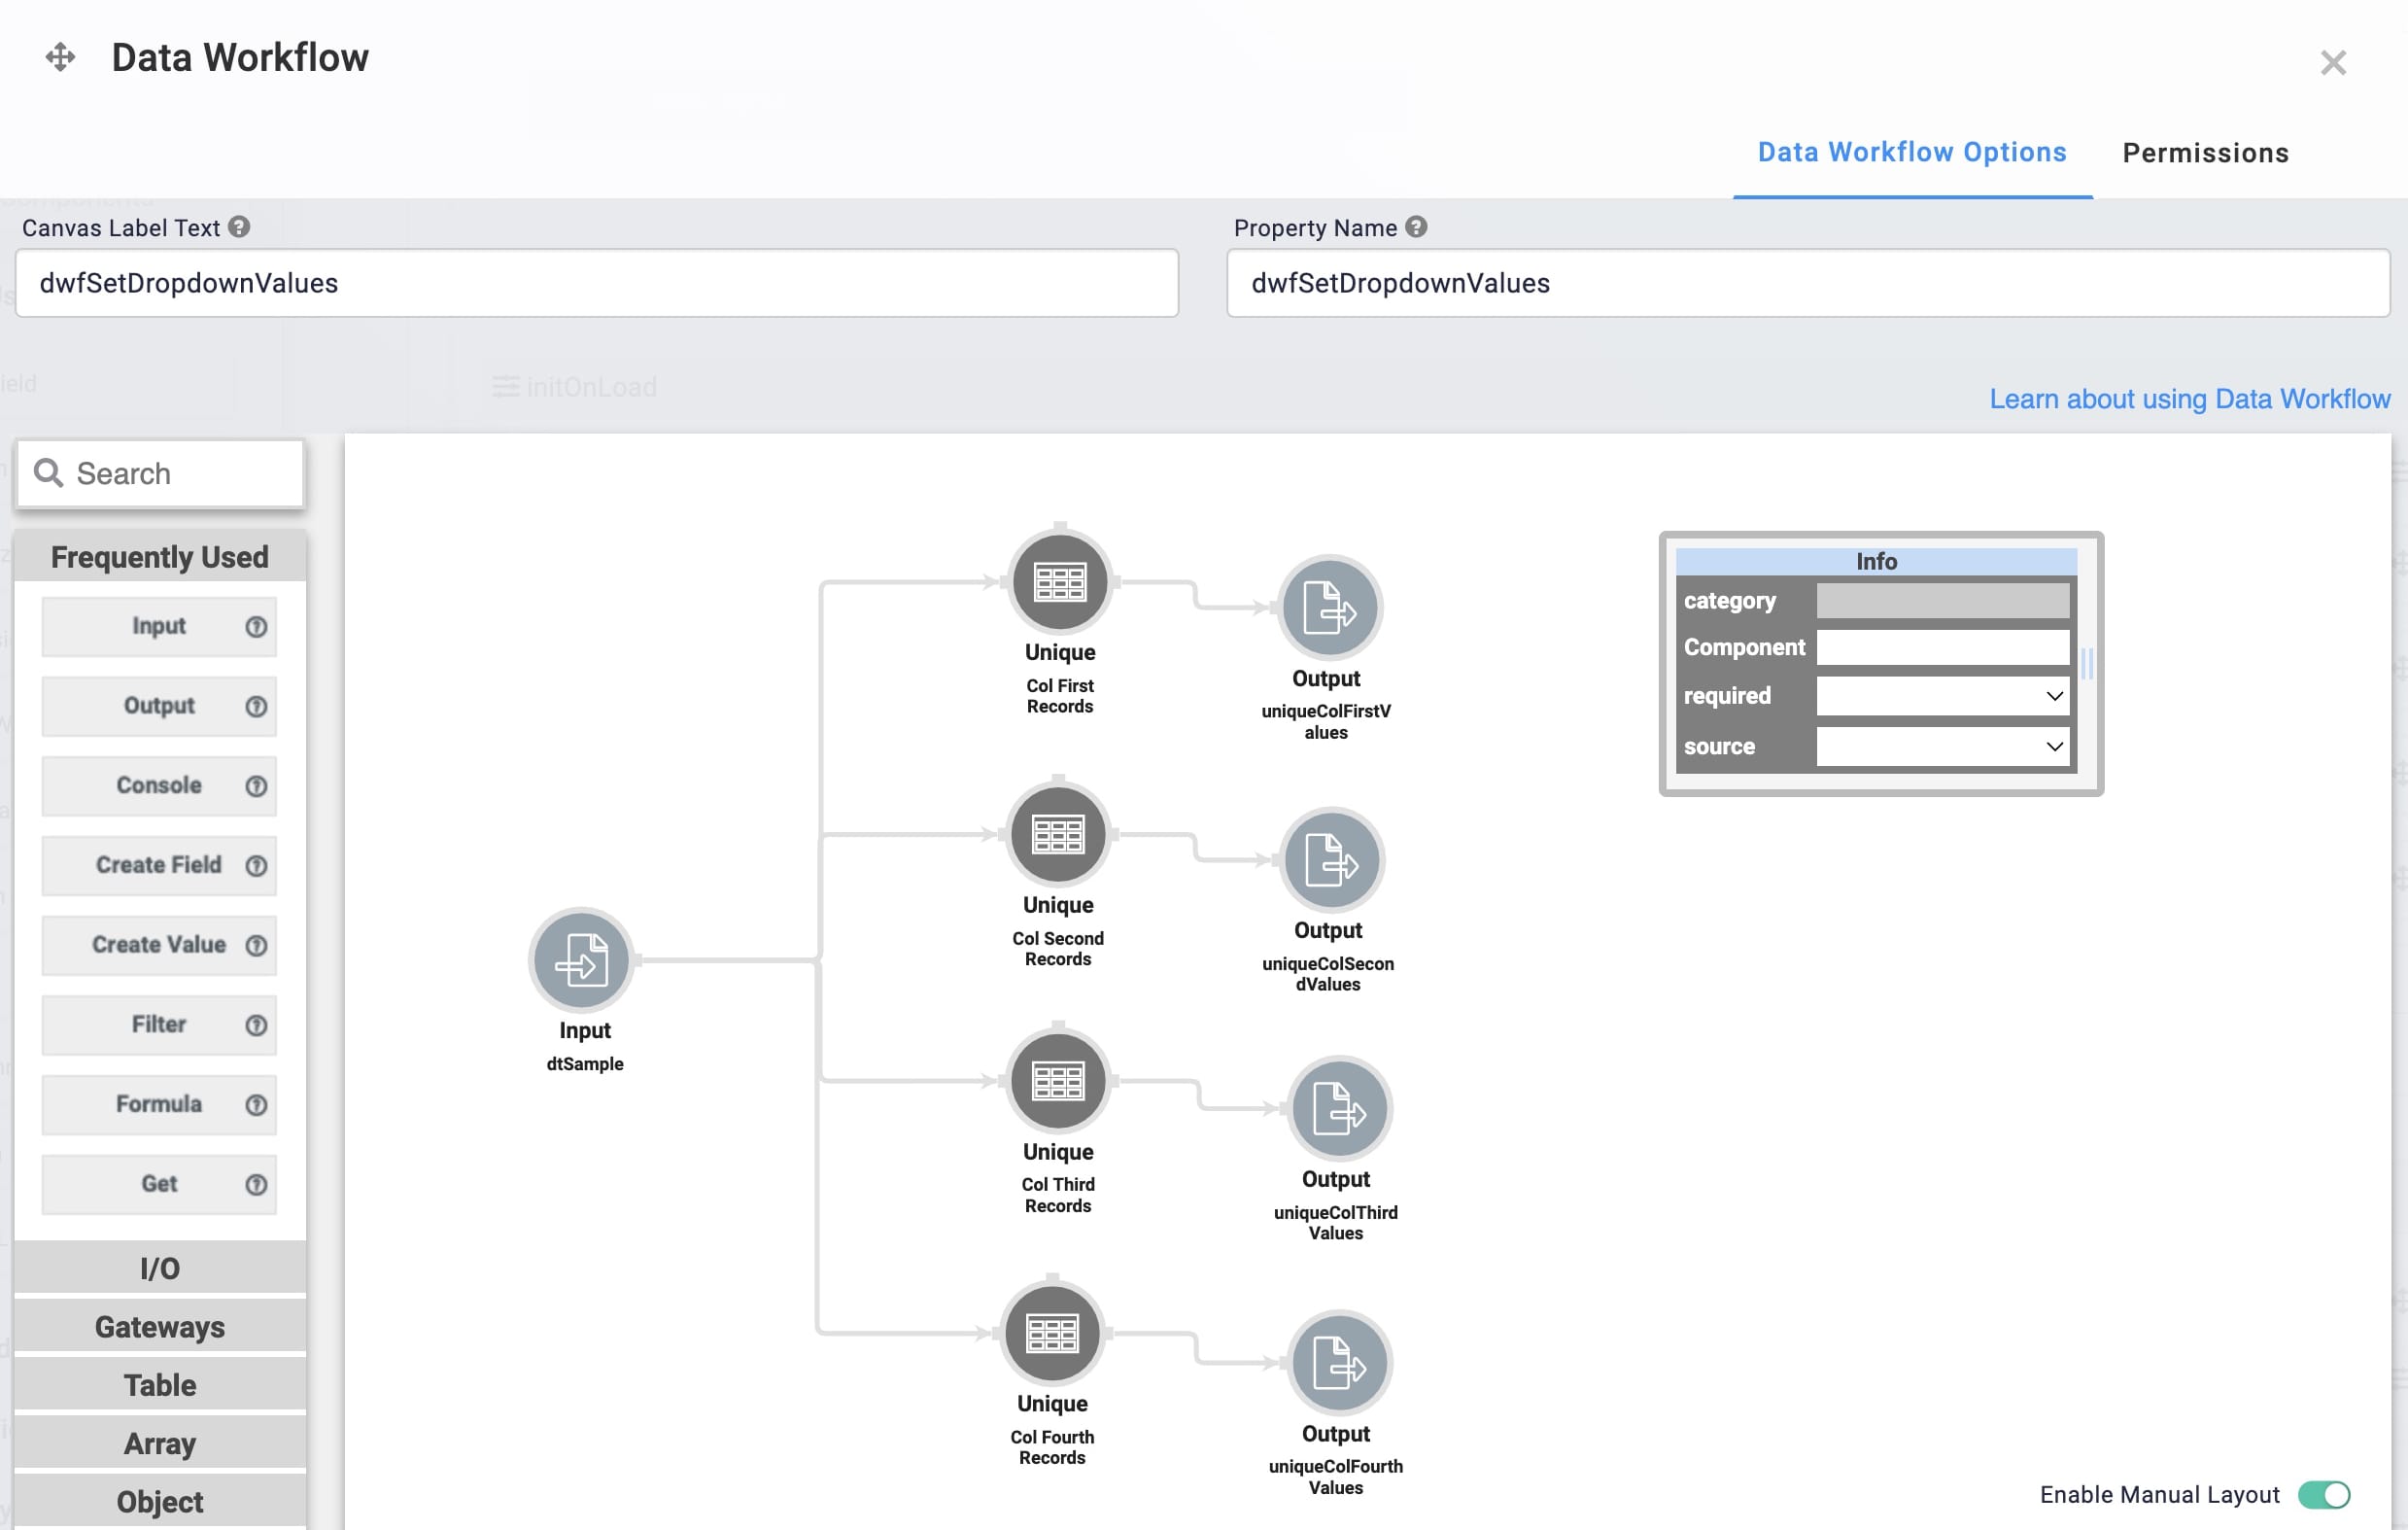
Click Save.
Updating the dwfFilterDataTable Data Workflow Component
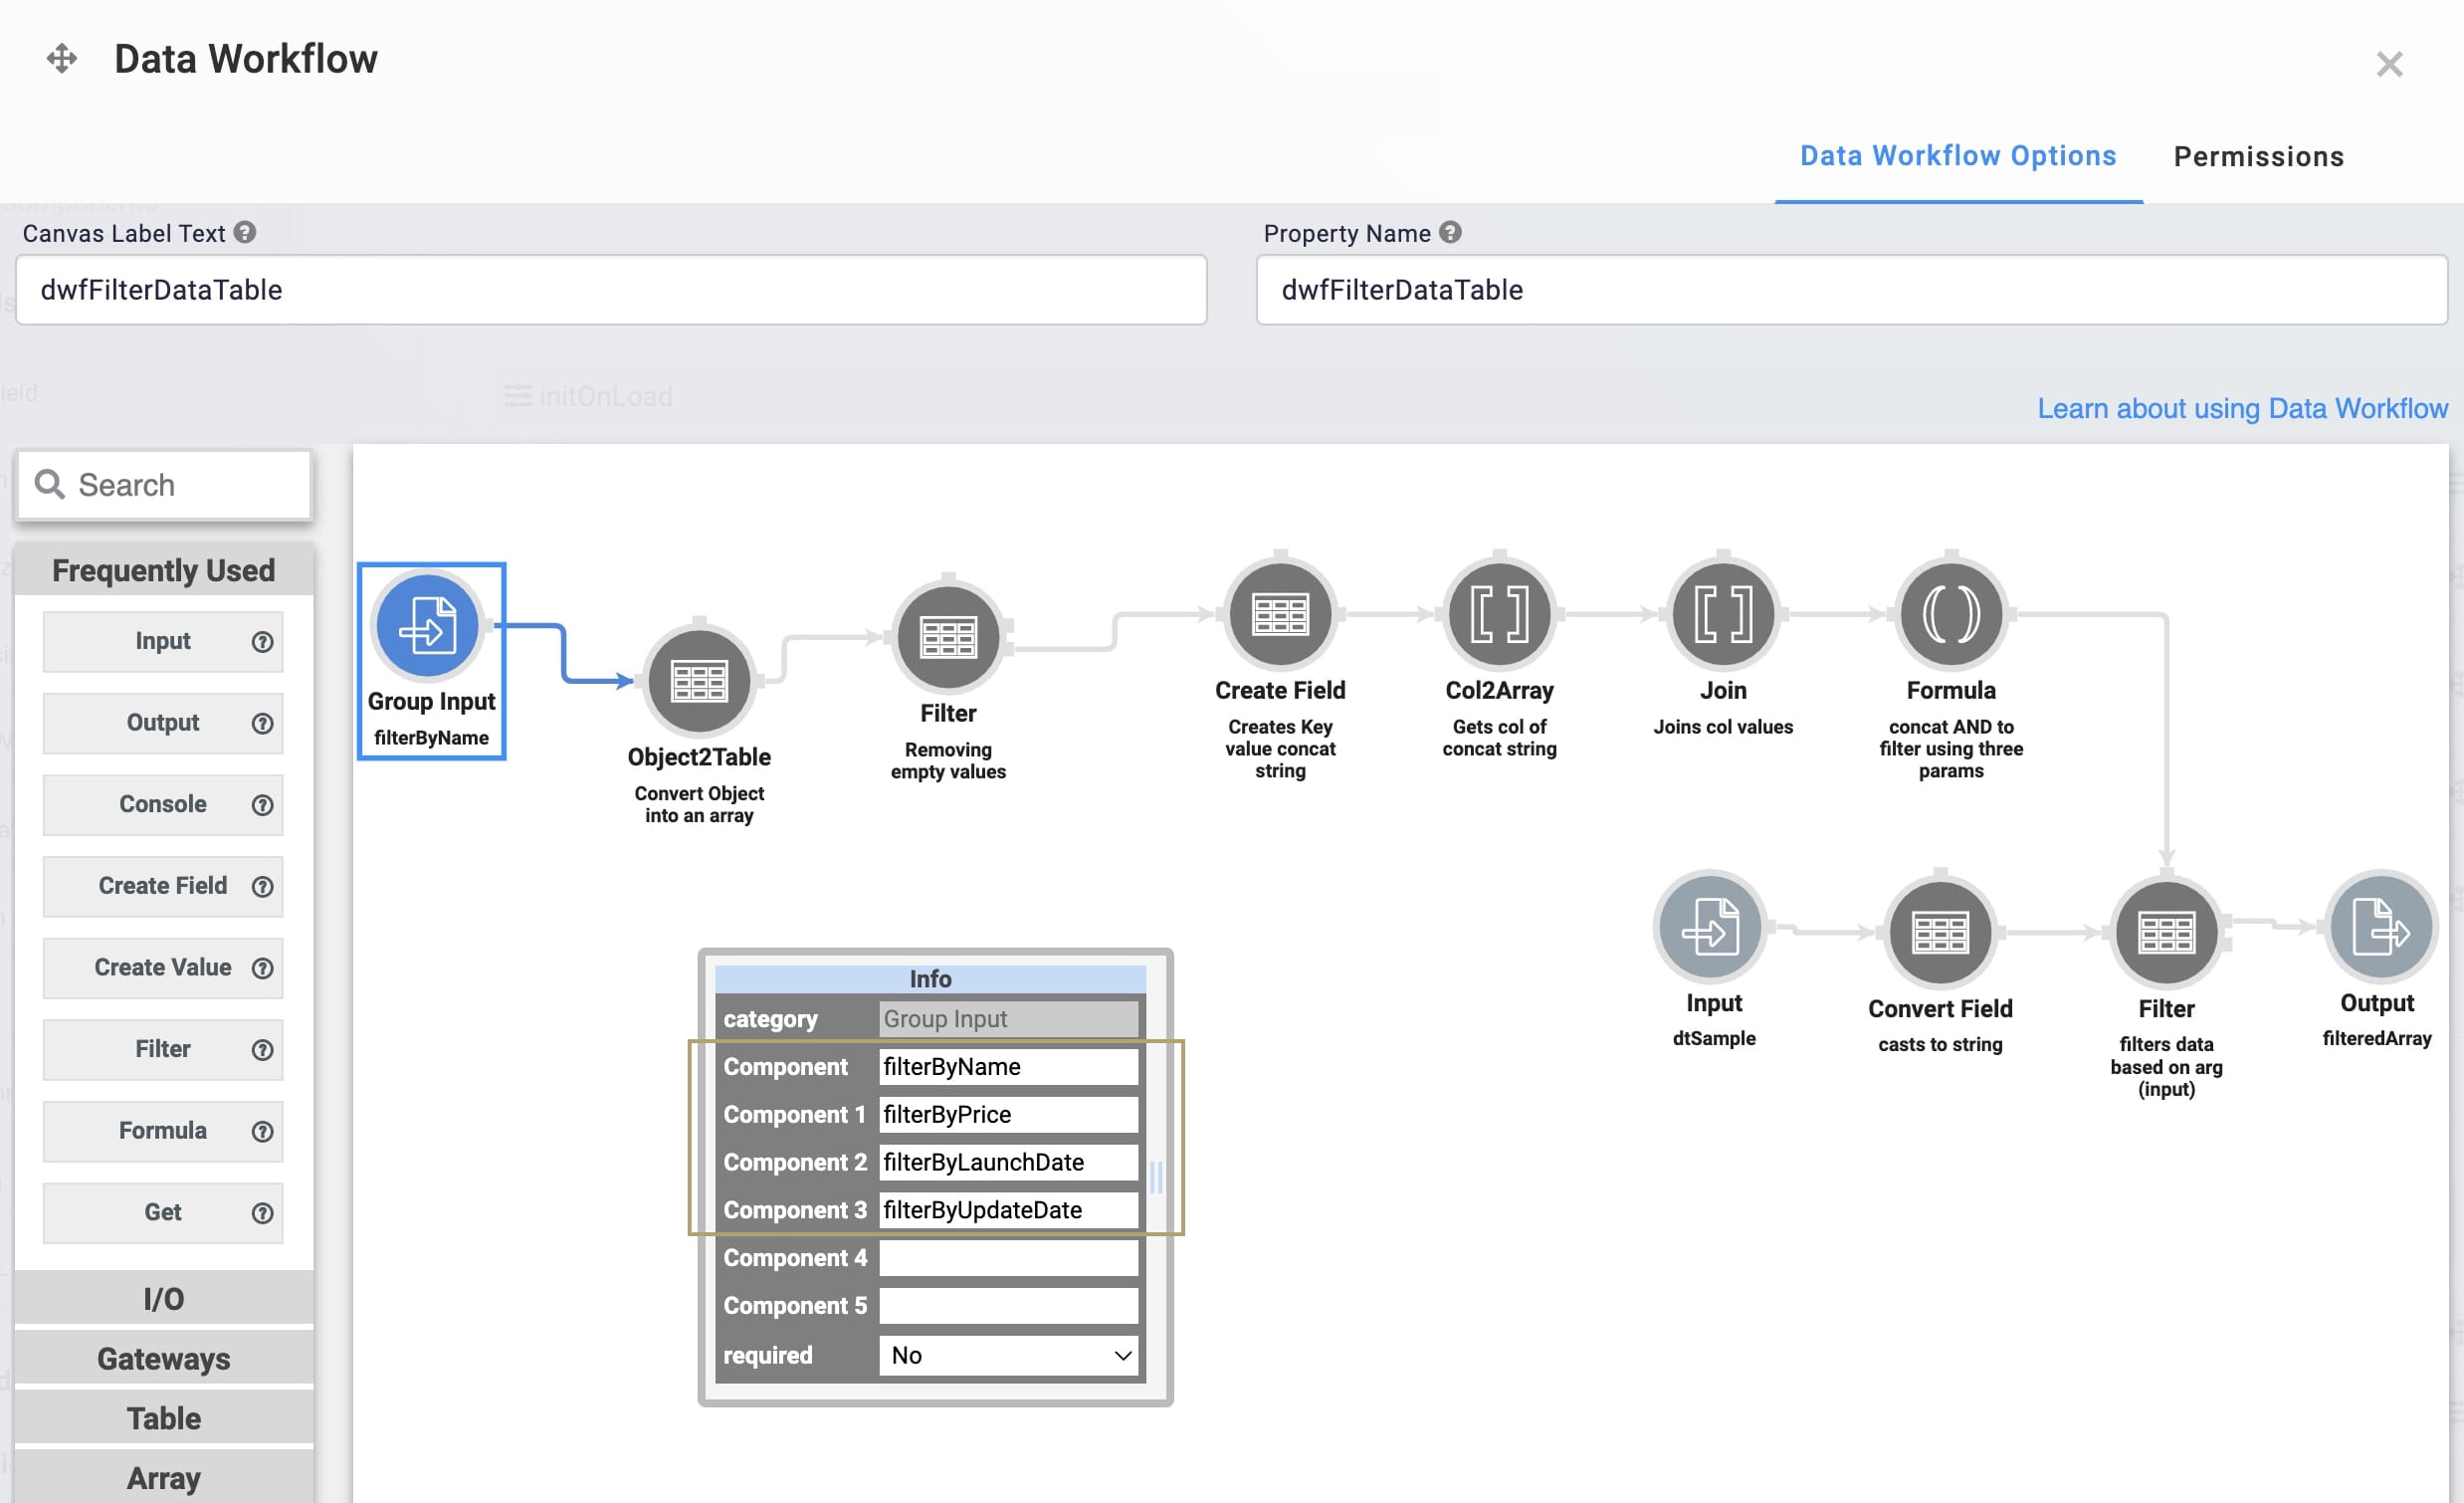
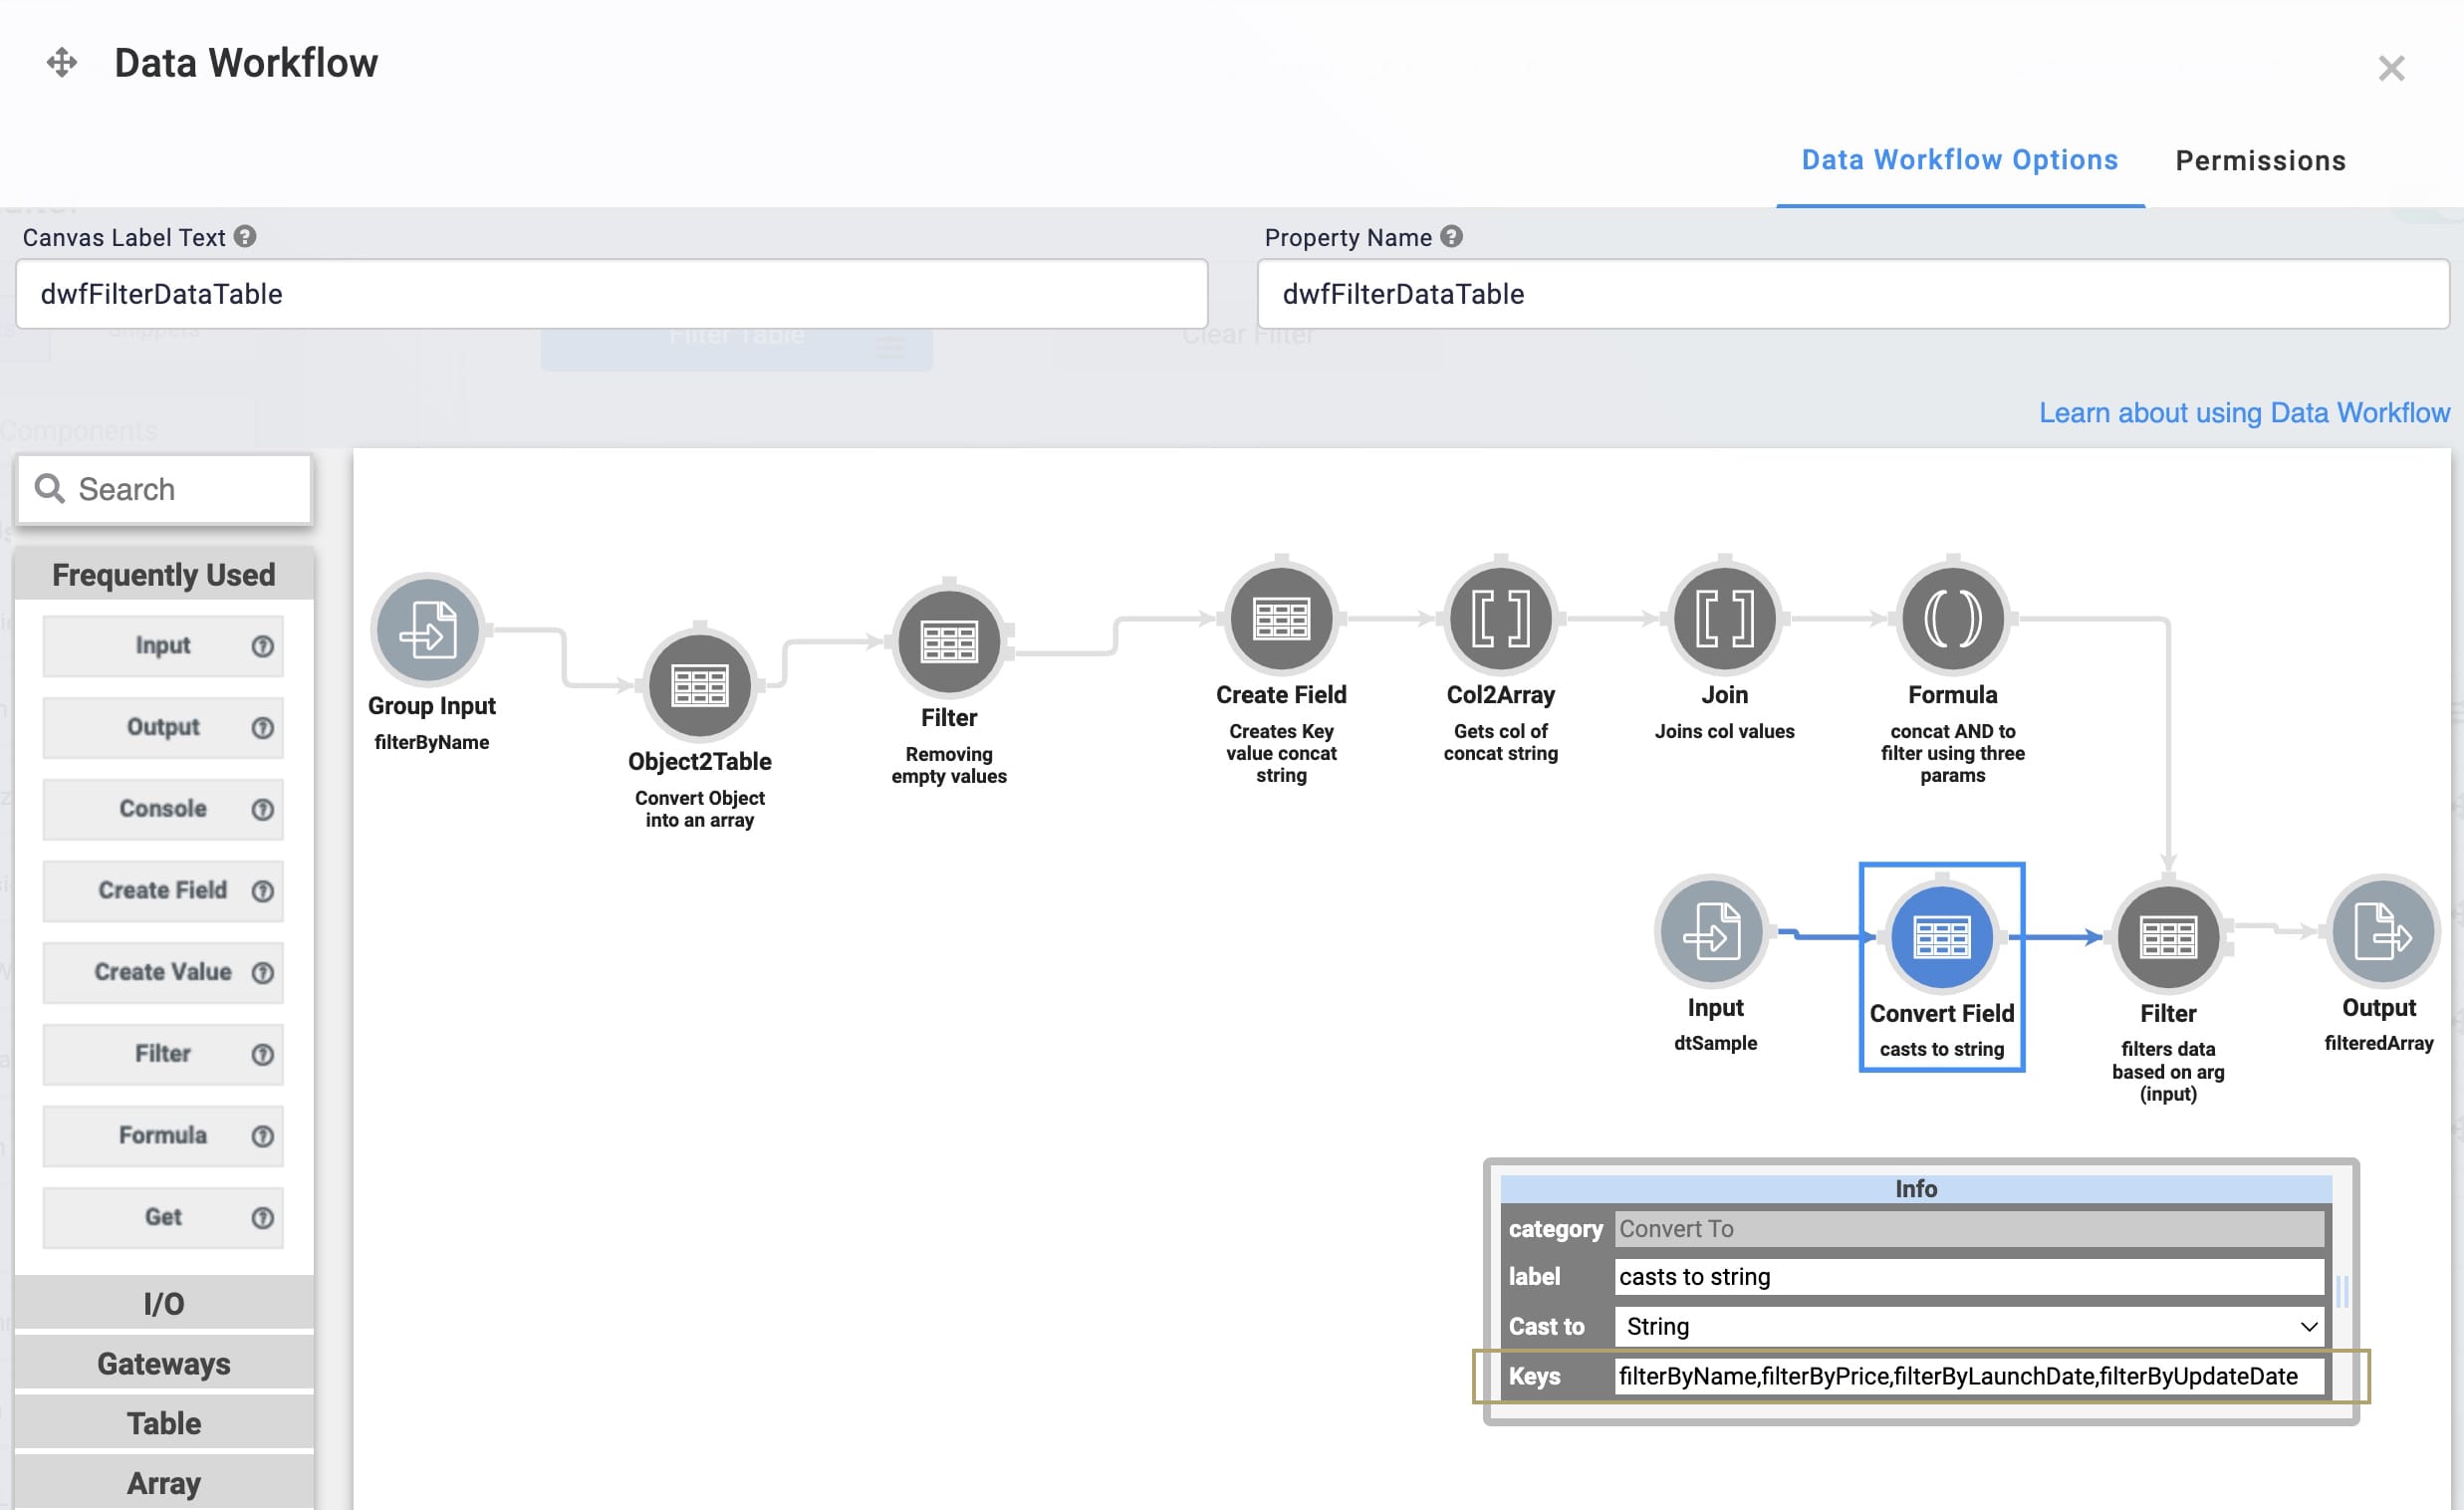
Now, update the dwfFilterDataTable Data Workflow component's Group Input and Convert Field operators. The Group Input's Component settings act as the filters of the module in Express View. And, the Convert Field operator casts the data to strings based on column headings.
Updating the first Group Input Operator
To update the first Group Input Operator component:
In the Module Builder, hover over the dwfFilterDataTable Data Workflow component.
A 5-button toolbar displays above the component on hover-over.
Click the
.jpg) (Settings) button to open the Configuration window.
(Settings) button to open the Configuration window.To open the Group Input operator's Info window, click the first Group Input operator.
Configure the first Group Input operator's Info window as follows:
Setting
Value
Category
Group Input
Component
filterByName
Component 1
filterByPrice
Component 2
filterByLaunchDate
Component 3
filterByUpdateDate
Component 4
Component 5
Required
No
Updating the Casts to String Convert Field Operator
To update the casts to string Convert Field component:
To open the Convert Field operator's Info window, click the Casts to String Convert Field operator.
Configure the casts to string Convert Field operator's Info window as follows:
Setting
Value
Category
Group Input
Label
casts to string
Cast to
String
Keys
filterByName,filterByPrice,filterByLaunchDate,filterByUpdateDate
Click Save.
Updating the initClearFilters Component
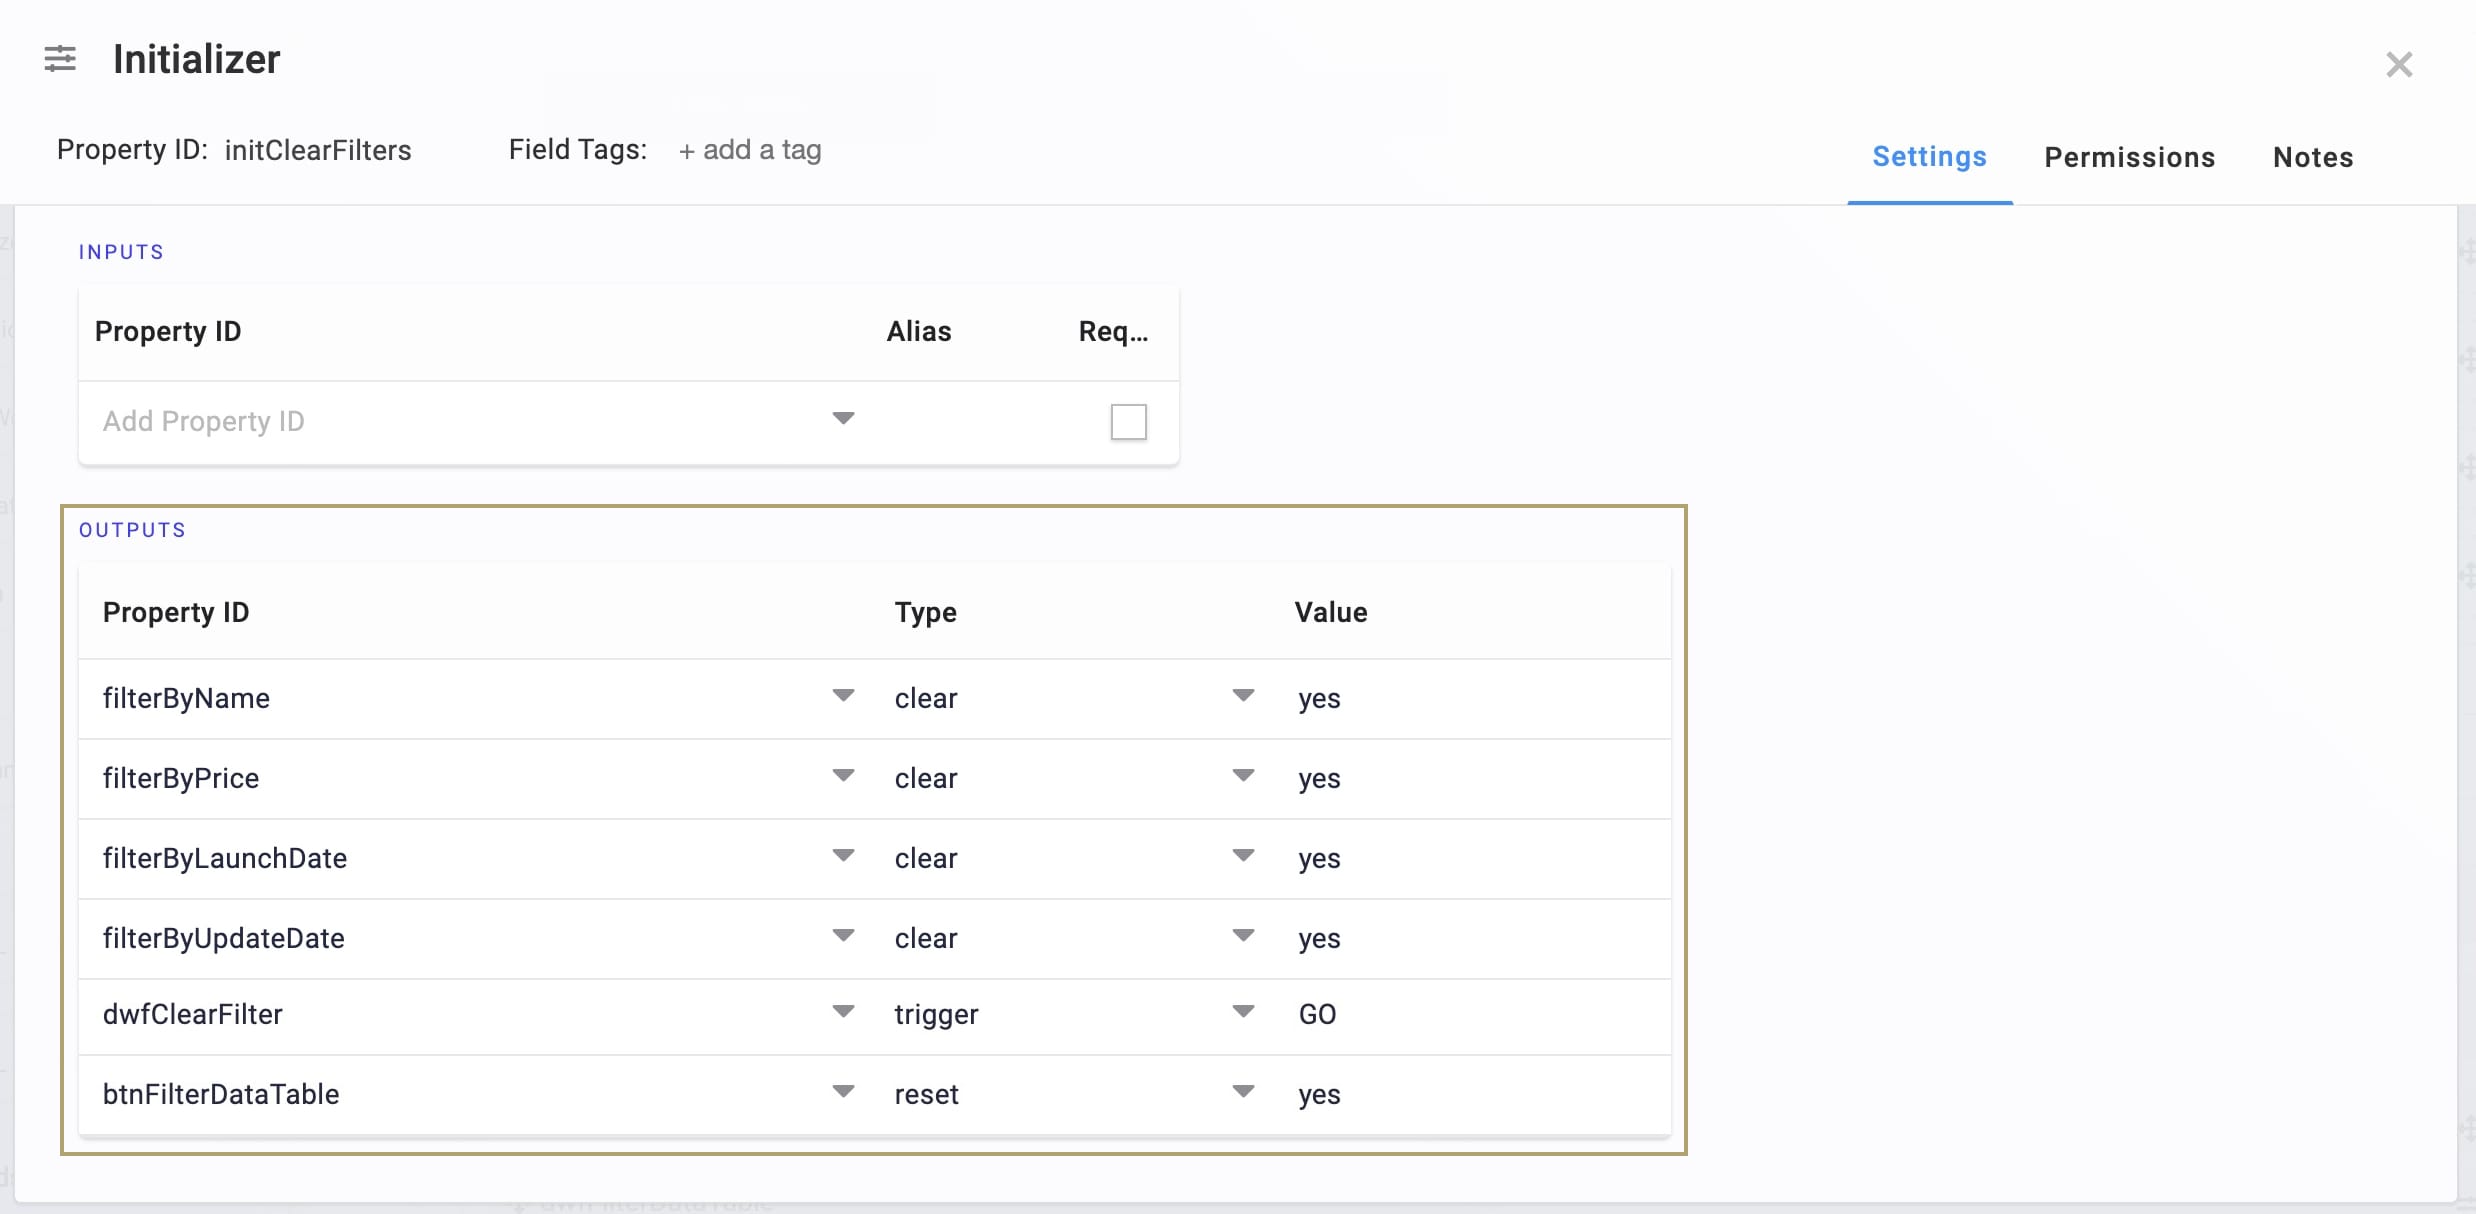
Lastly, update the initClearFilters Initializer component so the Clear Filter button clears all the Dropdown filters.
To update the initClearFilters Initializer component:
In the Module Builder, hover over the initClearFilters Initializer component.
A 5-button toolbar displays above the component on hover-over.
Click the
.jpg) (Settings) button to open the Configuration window.
(Settings) button to open the Configuration window.In the Outputs table, replace the default Outputs with the following:
Click Save.
Now you can preview the module in Express View and test the filters.
Removing the Snippet
You might want to remove a snippet from your application. Here, you'll learn how to remove the snippet from your module. Then, you'll learn how to uninstall the snippet from your environment.
Remove the Snippet from Your Module
To remove the Filter Data Table snippet:
In the Module Builder, hover over the panelFilterDataTable Panel.
A 5-button toolbar displays above the component on hover-over.
Using the toolbar, click the
.jpg) (Remove) button.
(Remove) button.Save your module.
Remove the Snippet from Your Environment
Use the Unqork Template Library to remove unused snippets. To uninstall a snippet from your environment:
At the top right of the Unqork Designer Platform, click Library or Templates.
Find the snippet you want to uninstall.
Click the ellipsis (...) in the snippet's tile header.
Click Uninstall Template.
Click Yes, Uninstall in the confirmation modal.
You can visit the Marketplace and reinstall the snippet at any time.
What if you have an existing application built using this snippet and then uninstall the snippet from your environment? No problem. Your existing application remains unaffected. Also, your application doesn't have any ties to the snippet. So, let's say you reinstall a newer version of the snippet in the future. You can rest assured that the installation doesn't impact your existing application.