Overview
The Dynamic View Grid snippet gives you the framework to add and store information to a ViewGrid. Essentially, you’ll have the same functionality as an Advanced DataGrid without the pop-up. Once you’ve configured the snippet, your end-users can add new data in Express View. Or your end-users can change or delete any of their stored data as needed.
Here's how the snippet looks in the Module Builder: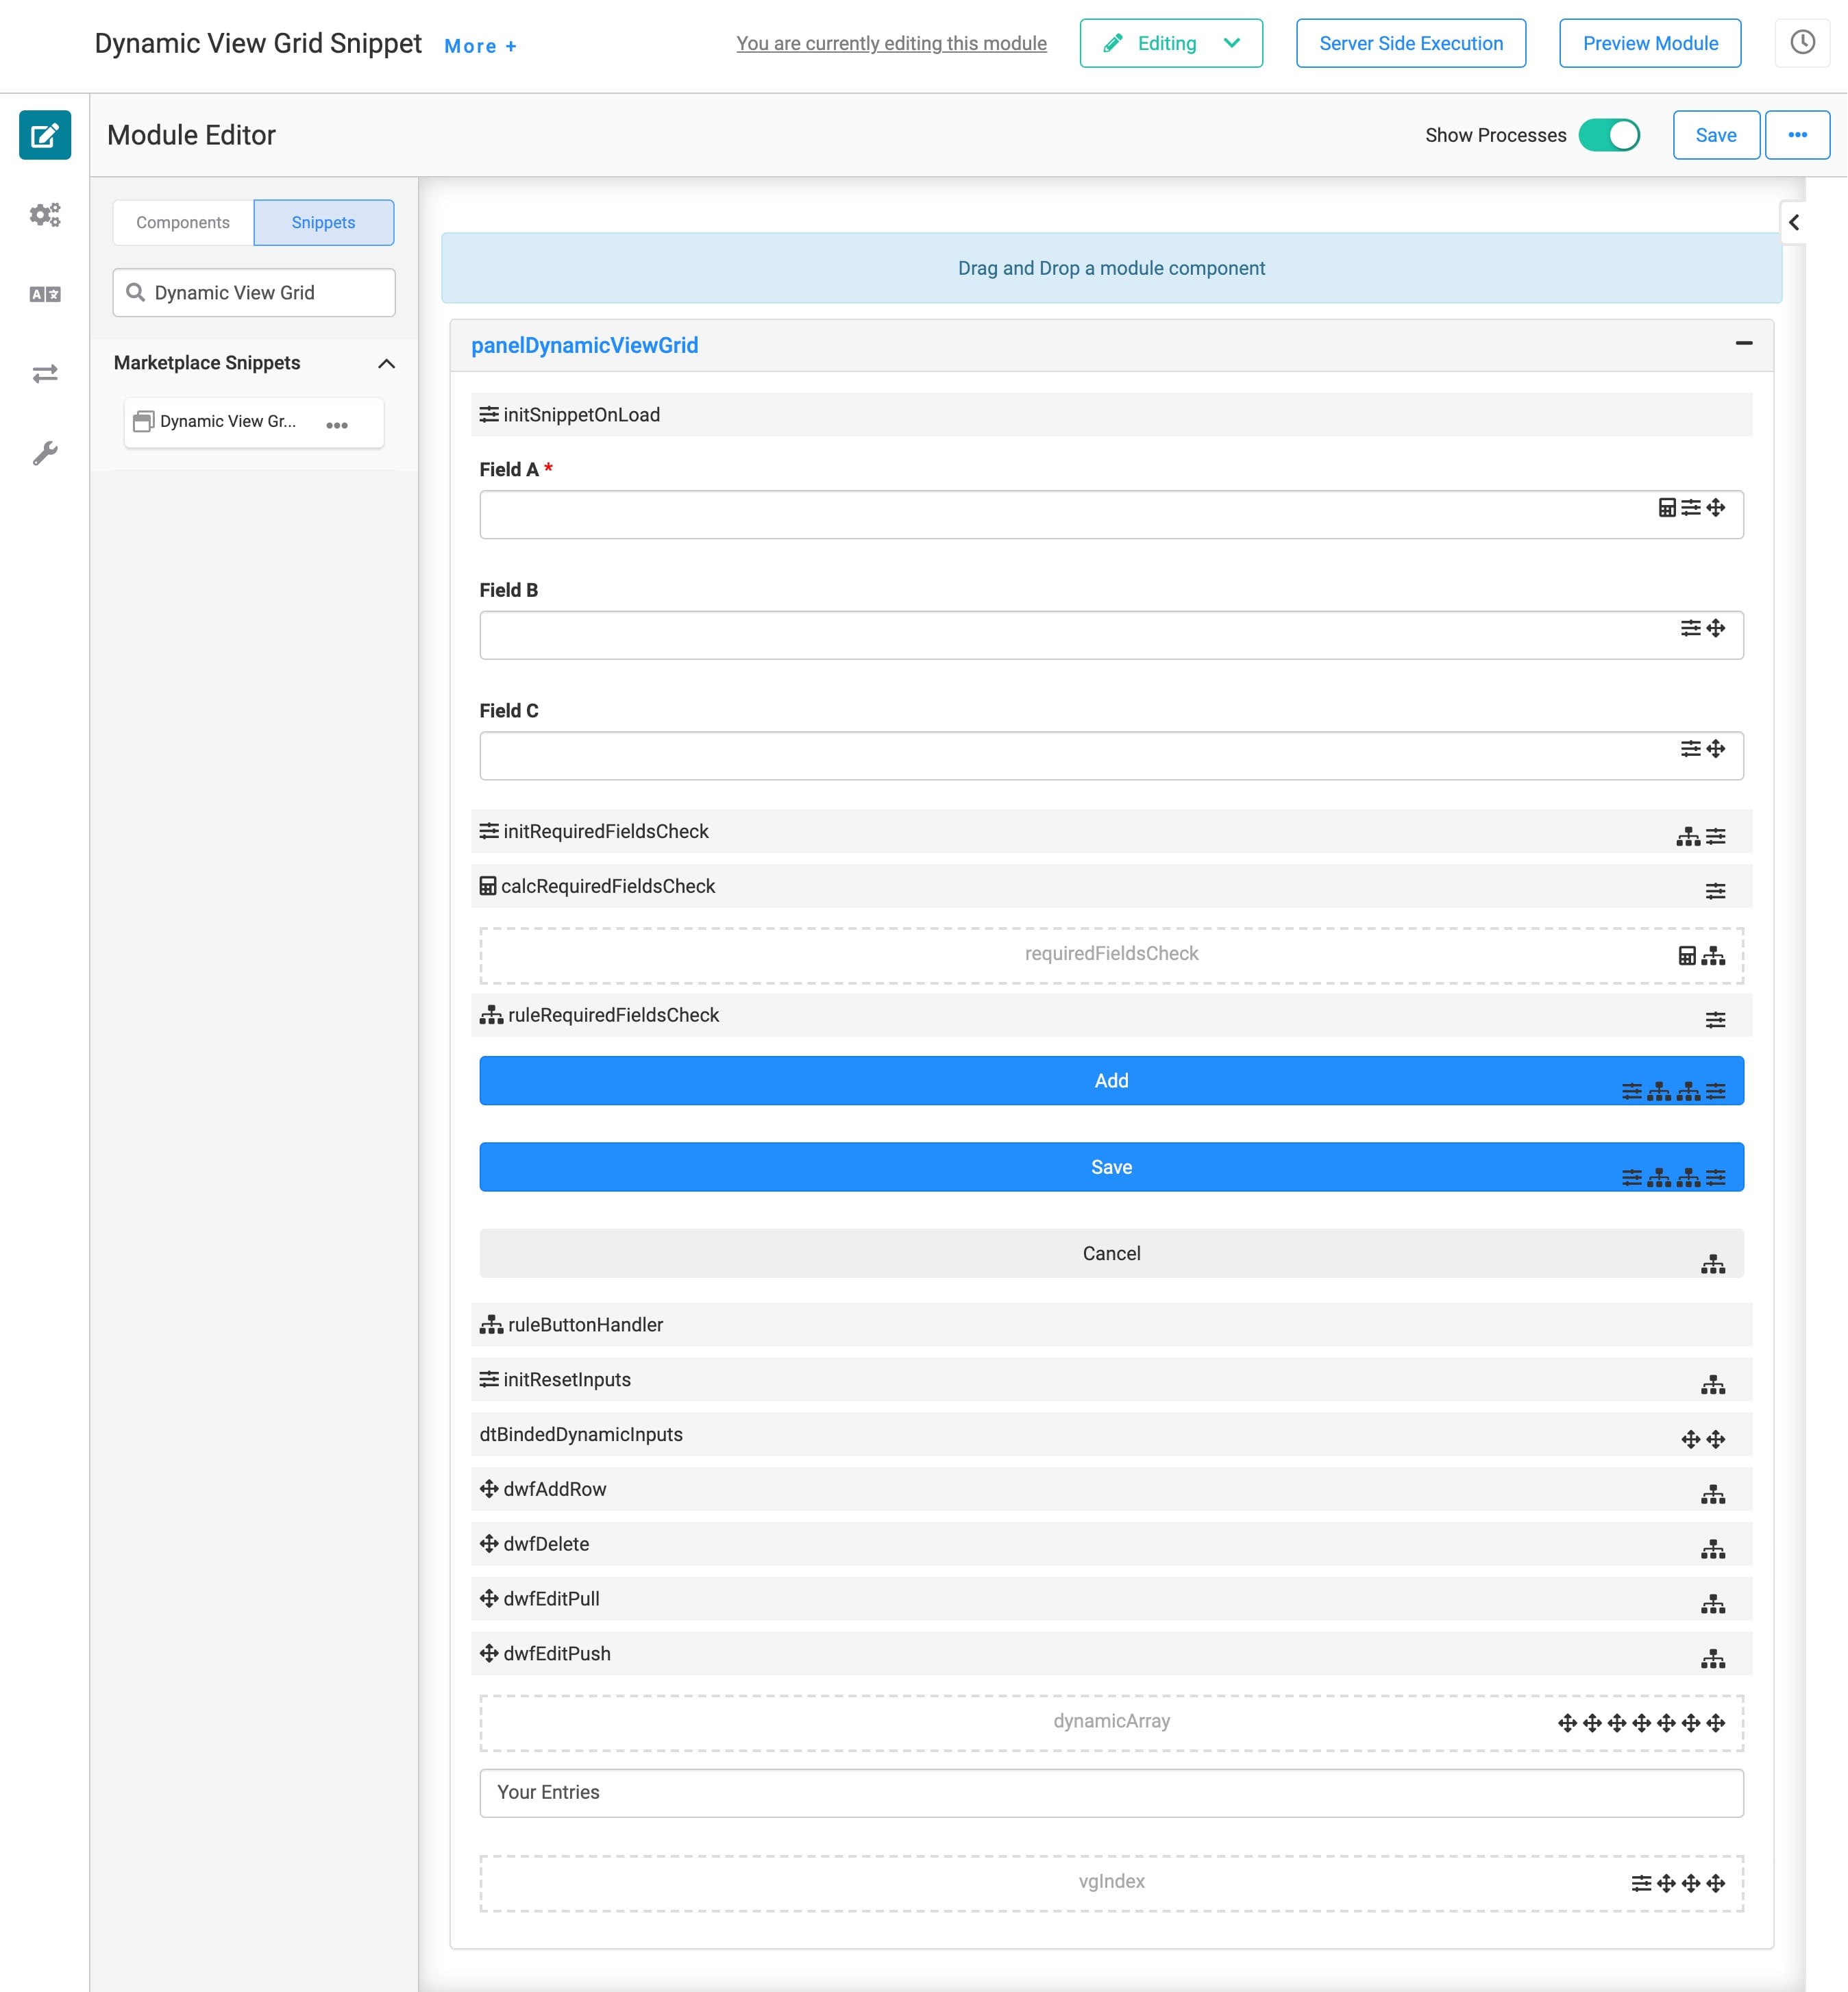
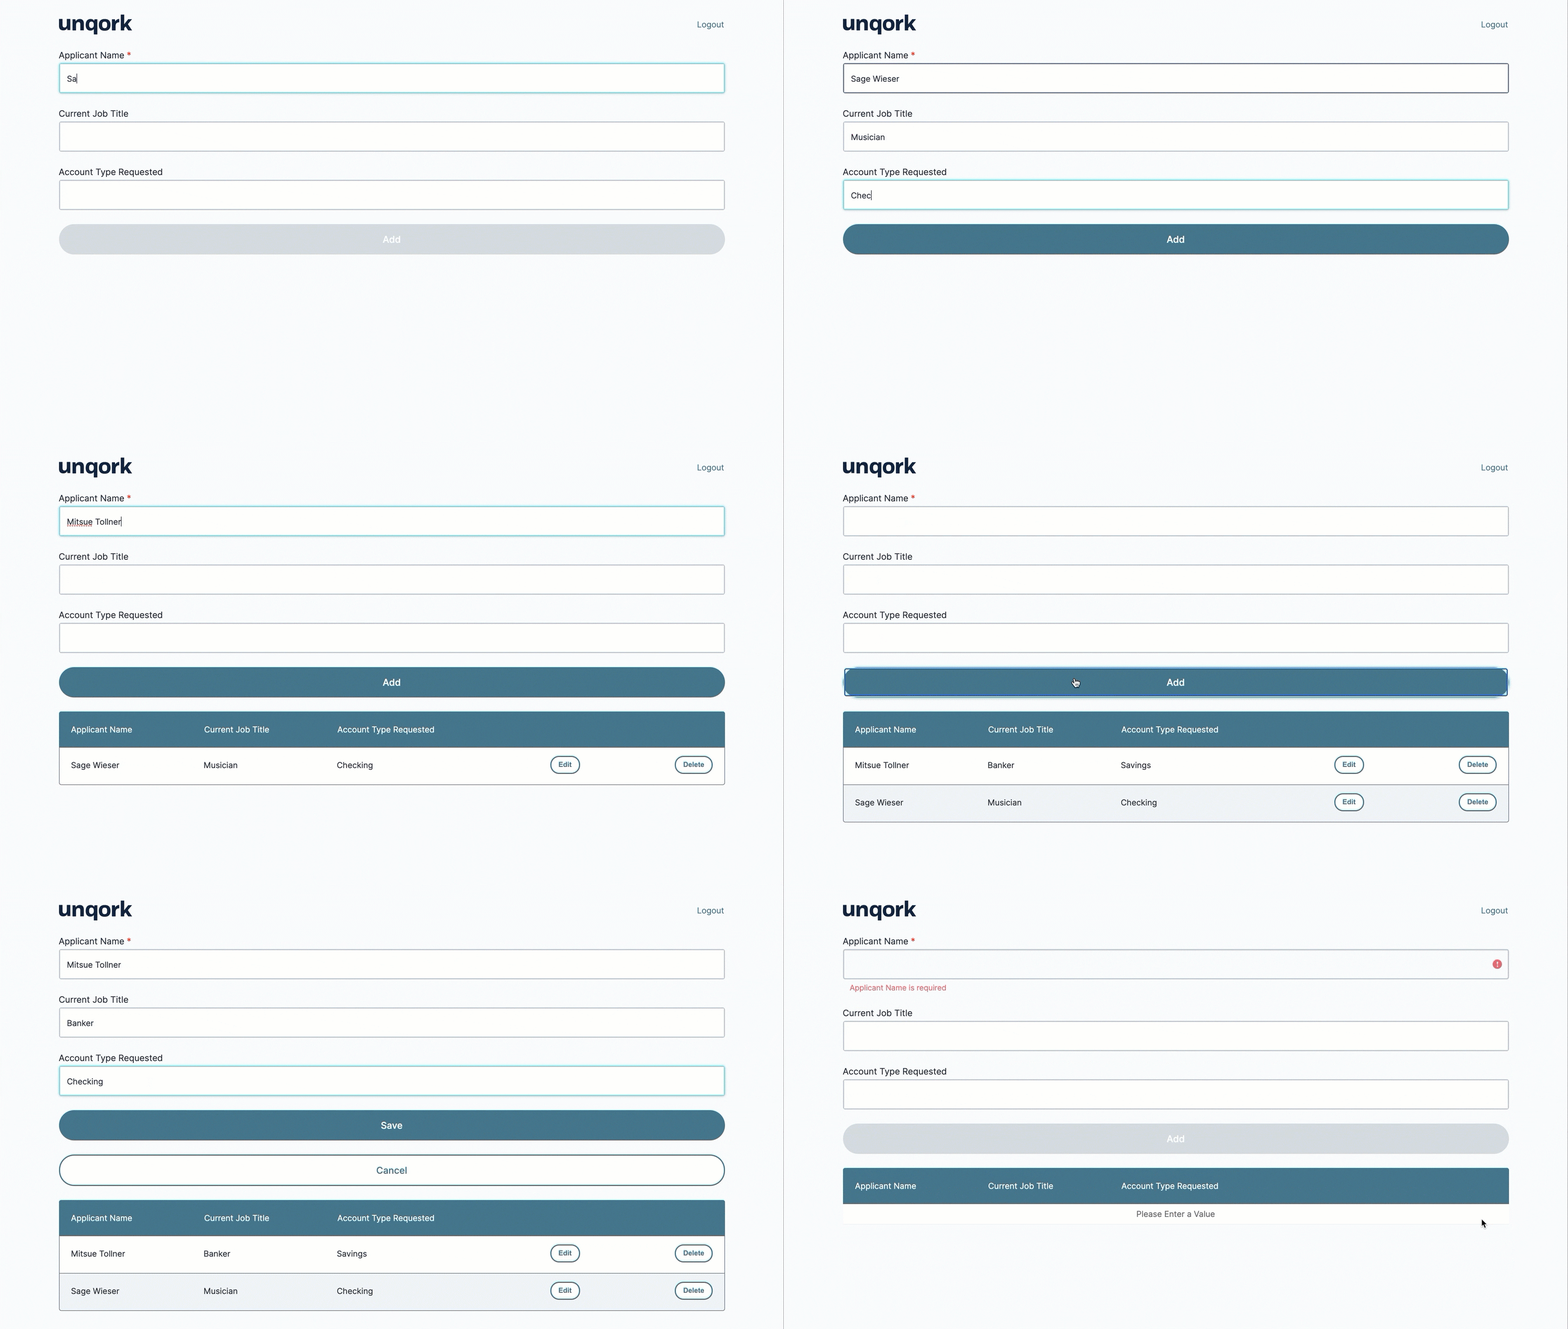
And here's an example of a customized Dynamic View Grid snippet in Express View:
Adding the Snippet
Before you use this snippet in your application, you must install the snippet to your environment.
Adding the Snippet to Your Environment
To add the snippet to your environment:
Click Marketplace at the top right of the Unqork Designer Platform.
You can also access the Marketplace at any time by visiting https://marketplace.unqork.io.
Enter Dynamic View Grid in the Search the Marketplace field.
Click on the Dynamic View Grid tile.
Click Install to Environment.
Click Install Template.
If you aren't logged in, you'll see a field for Environment URL and a Login button. Enter your environment's URL where you want to install the template. For example: [environmentname.unqork.io]. Click the Login button. Then, return to step 4 and click Install to Environment again. Follow the remaining steps as listed.
Now, you can now use your newly installed snippet in your application!
Adding the Snippet to Your Module
So, you installed the Dynamic View Grid snippet to your environment. Now what? Now you can drag and drop the snippet right into your module:
In the left sidebar of the Module Builder, click the Snippets button.
Enter Dynamic View Grid in the search bar.
Drag and drop the Dynamic View Grid snippet onto your canvas.
If you don't see the snippet at first, make sure to expand the Marketplace Snippets section.
Save your module.
How the Snippet Works
Let's take a look at how this snippet works. The snippet comes standard with 3 placeholder Text Fields: Field A, Field B, and Field C. The initSnippetOnLoad Initializer triggers the calcRequiredFieldsCheck Calculator. As it stands, the first Text Field in this snippet is a required field. The Calculator component works with the ruleRequiredFieldsCheck Decisions component. Your end-user can only add an entry after completing the first Text Field.
The initResetInputs Initializer clears and resets the entry fields after your end-user adds an entry to the ViewGrid. The ruleButtonHandler Decisions component looks for a button-click event. The Decisions component triggers a Data Workflow based on the action your end-user takes. Lastly, there's a ViewGrid component called Your Entries. This is where you set up how your dashboard looks in Express View.
Setting Up the Snippet
In this section, we'll cover how to set up the Dynamic View Grid snippet. Through these steps, you'll also learn some ways you can further customize your snippet. While the Dynamic View Grid snippet works right off the shelf, it comes with placeholder fields. You'll want to change these fields to fit your needs. Below, we cover the steps that make this happen.
We'll walk you through the steps to change the placeholder fields to Applicant Name, Current Job Title, and Account Type Requested. Of course, you can change these to whatever works for you.
Updating the Text Fields
The snippet comes standard with 3 placeholder Text Fields: Field A, Field B, and Field C. You'll want to update these to something that fits your specific use case. To follow along with our example use case, these steps update the fields to Applicant Name, Current Job Title, and Account Type Requested.
To update each Text Field component:
Hover over the Text Field component.
Using the toolbar, click the
.jpg) (Settings) button.
(Settings) button.A 5-button toolbar appears above the component on hover-over.
Update the Property ID and Canvas Label Text as follows for the 3 Text Field components:
Property ID
Canvas Label Text
name
Applicant Name
jobTitle
Current Job Title
accountType
Account Type Requested
Click Save in each component after you update it.
Save your module.
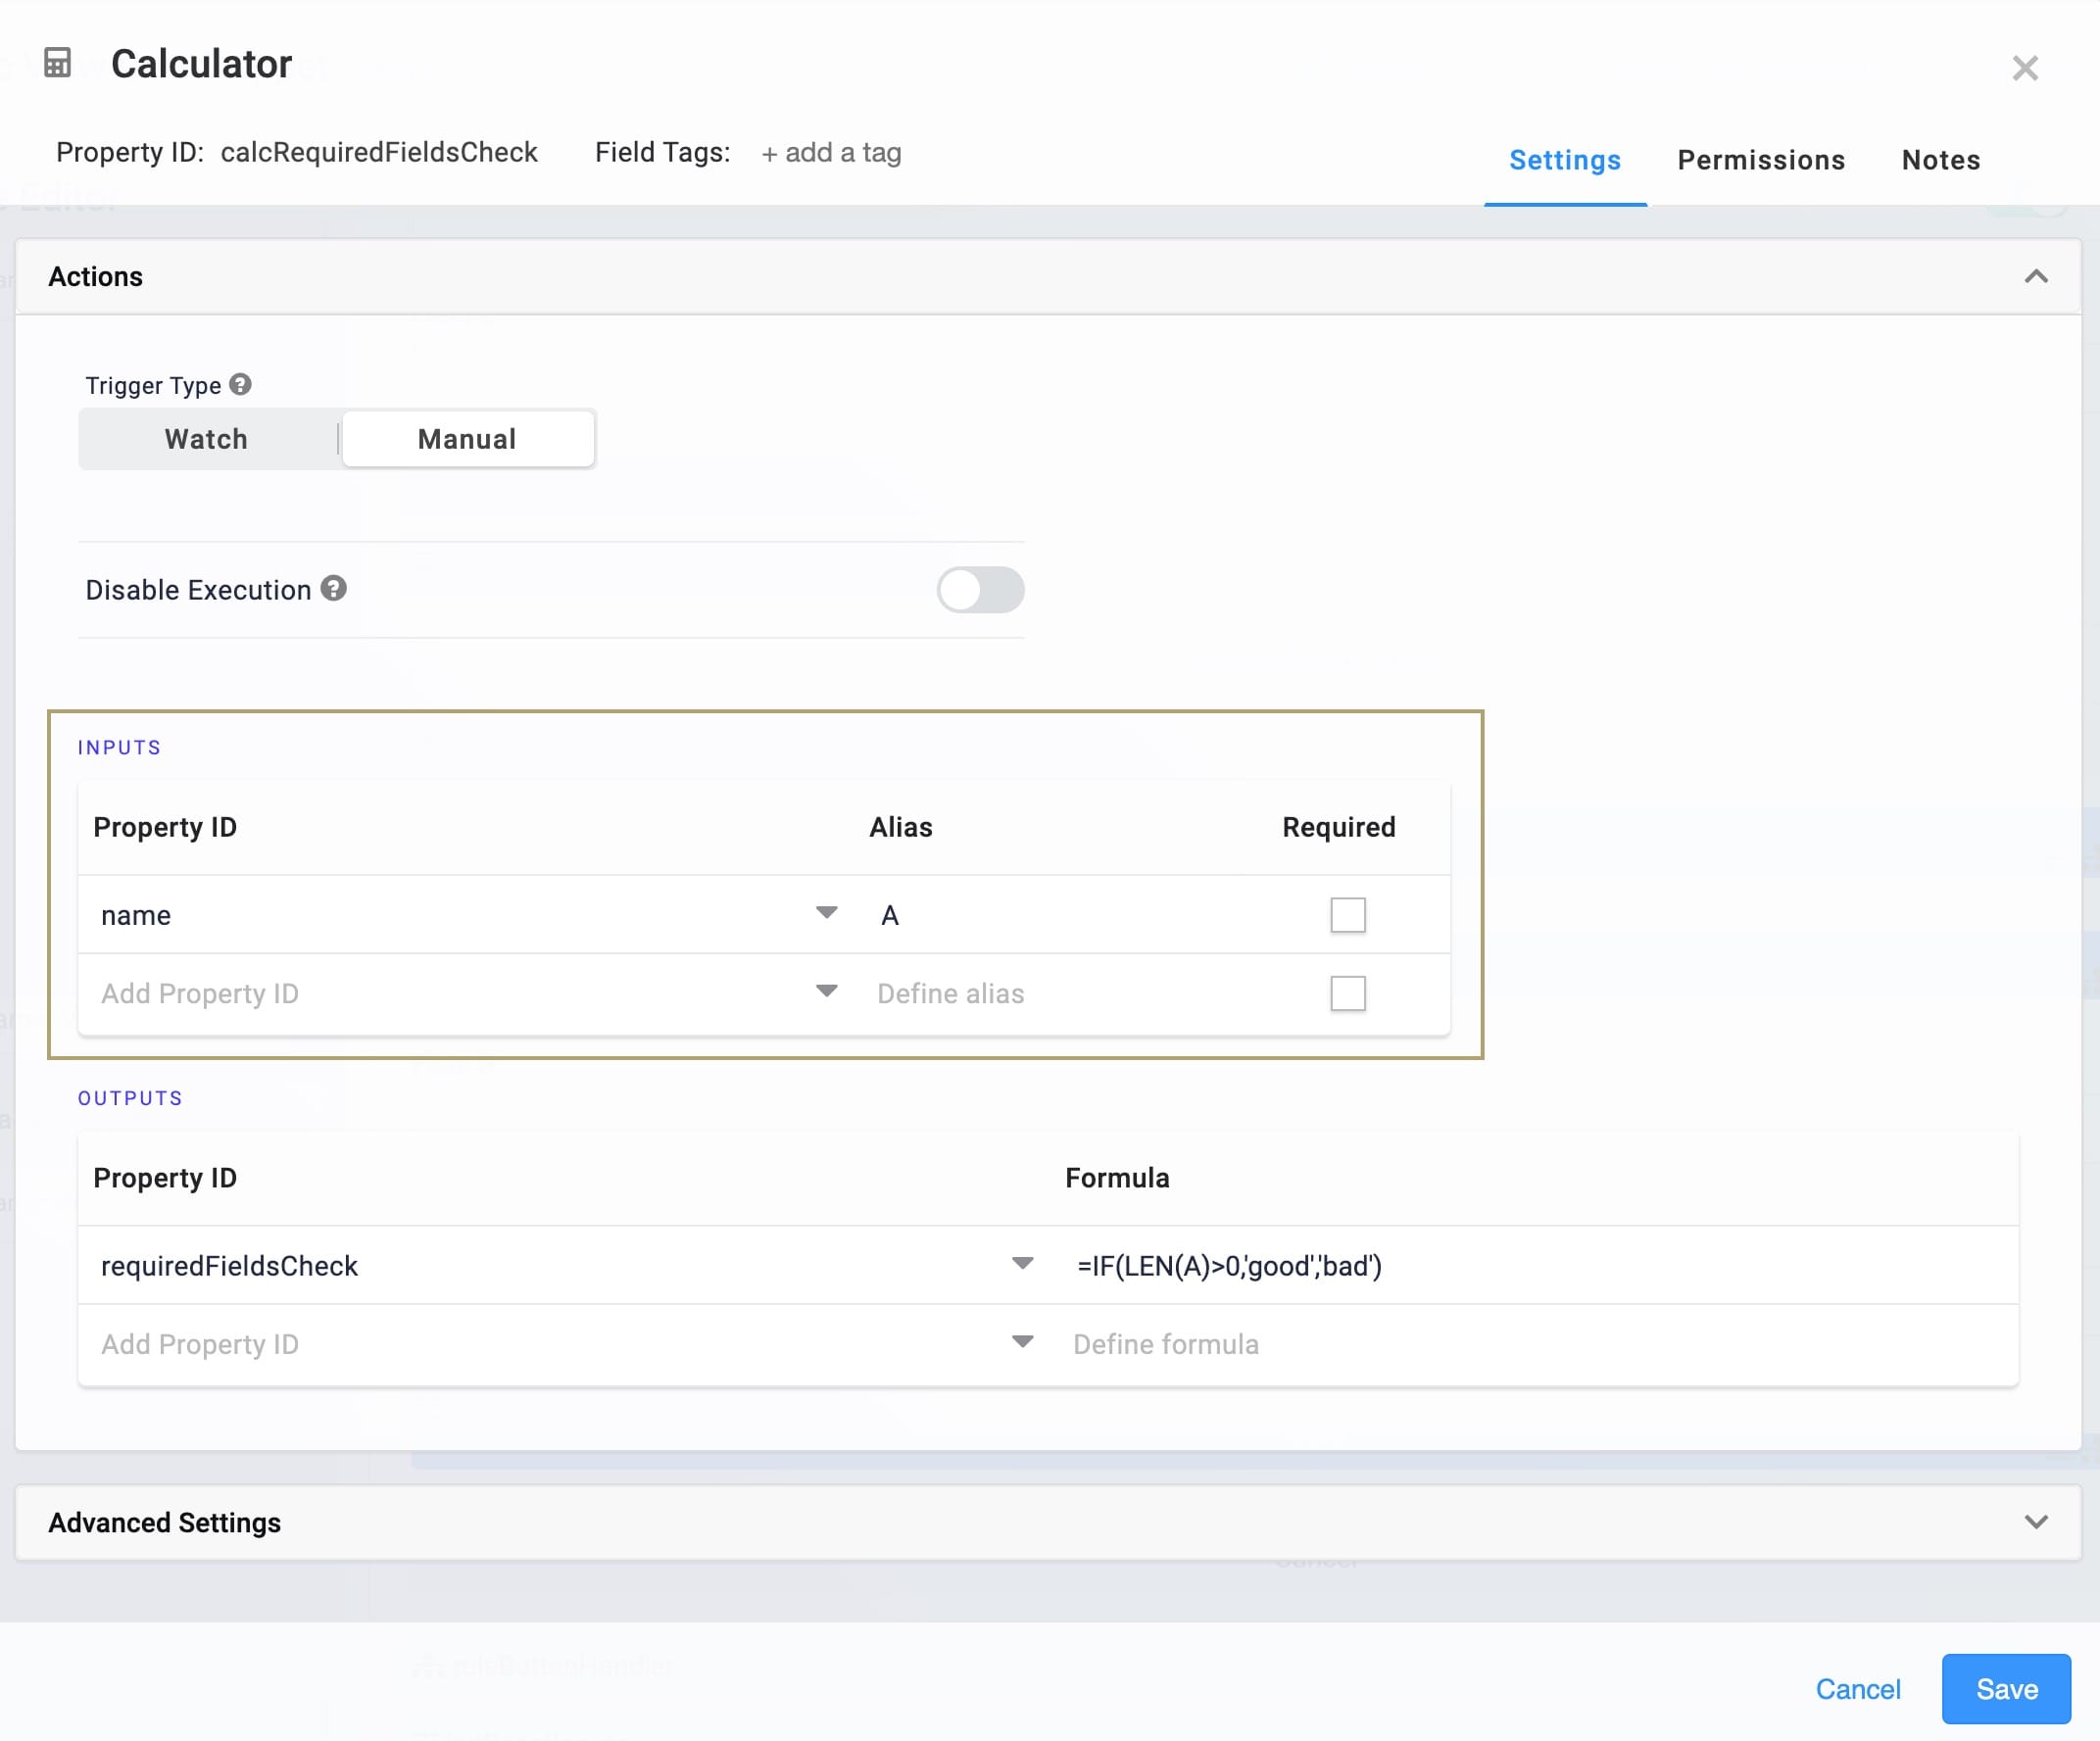
Updating the Calculator Component
As it stands, the first Text Field in this snippet is a required field. The Calculator component ensures your end-user can only add an entry if they've completed the first Text Field.
To update the Calculator component:
Hover over the calcRequiredFieldsCheck Calculator component.
Using the toolbar, click the
.jpg) (Settings) button.
(Settings) button.Update the Inputs table as follows:
Property ID
Alias
Required
name
A
No (unchecked)
Click Save.
Updating the initResetInputs Initializer Component
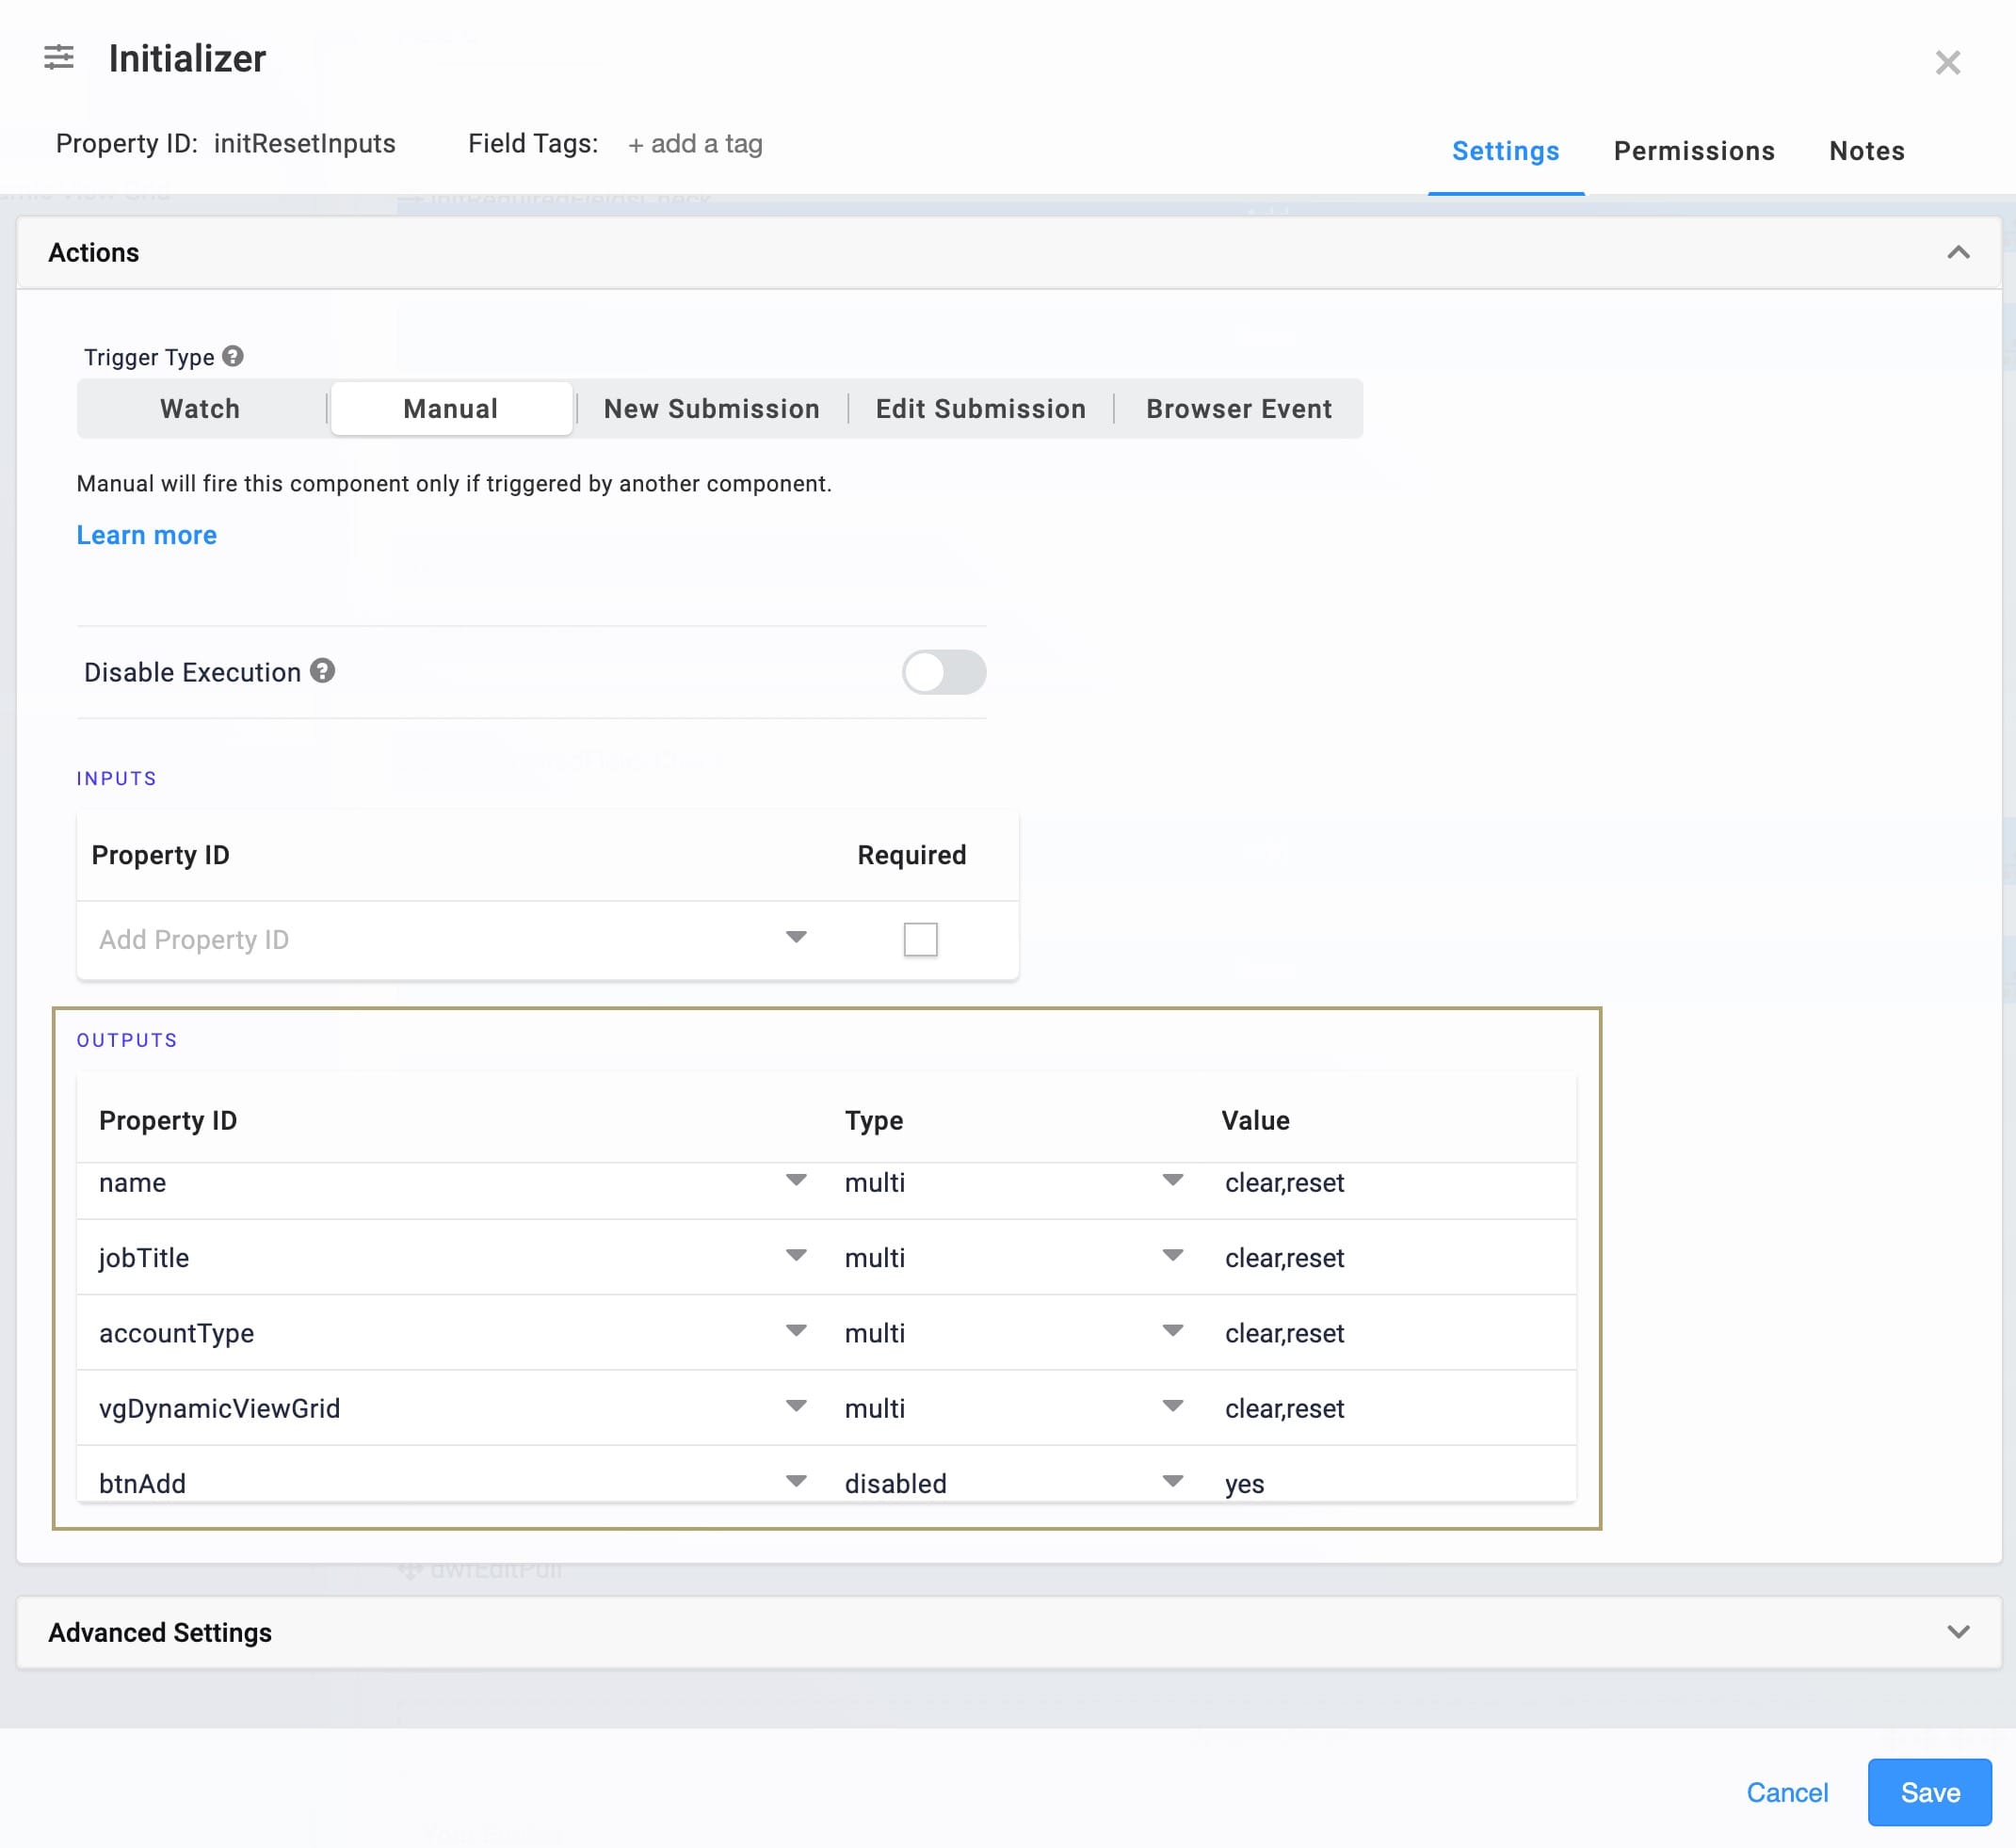
The initResetInputs Initializer resets the entry fields when your end-user adds a row to the ViewGrid.
To update the Initializer component:
Hover over the initResetInputs Initializer component.
Using the toolbar, click the
.jpg) (Settings) button.
(Settings) button.Update the Outputs table with the updated Property IDs of your Text Fields as follows:
Property ID
Type
Value
name
multi
clear,reset
jobTitle
multi
clear,reset
accountType
multi
clear,reset
vgIndex
multi
clear,reset
Click Save.
Updating the Data Table Component
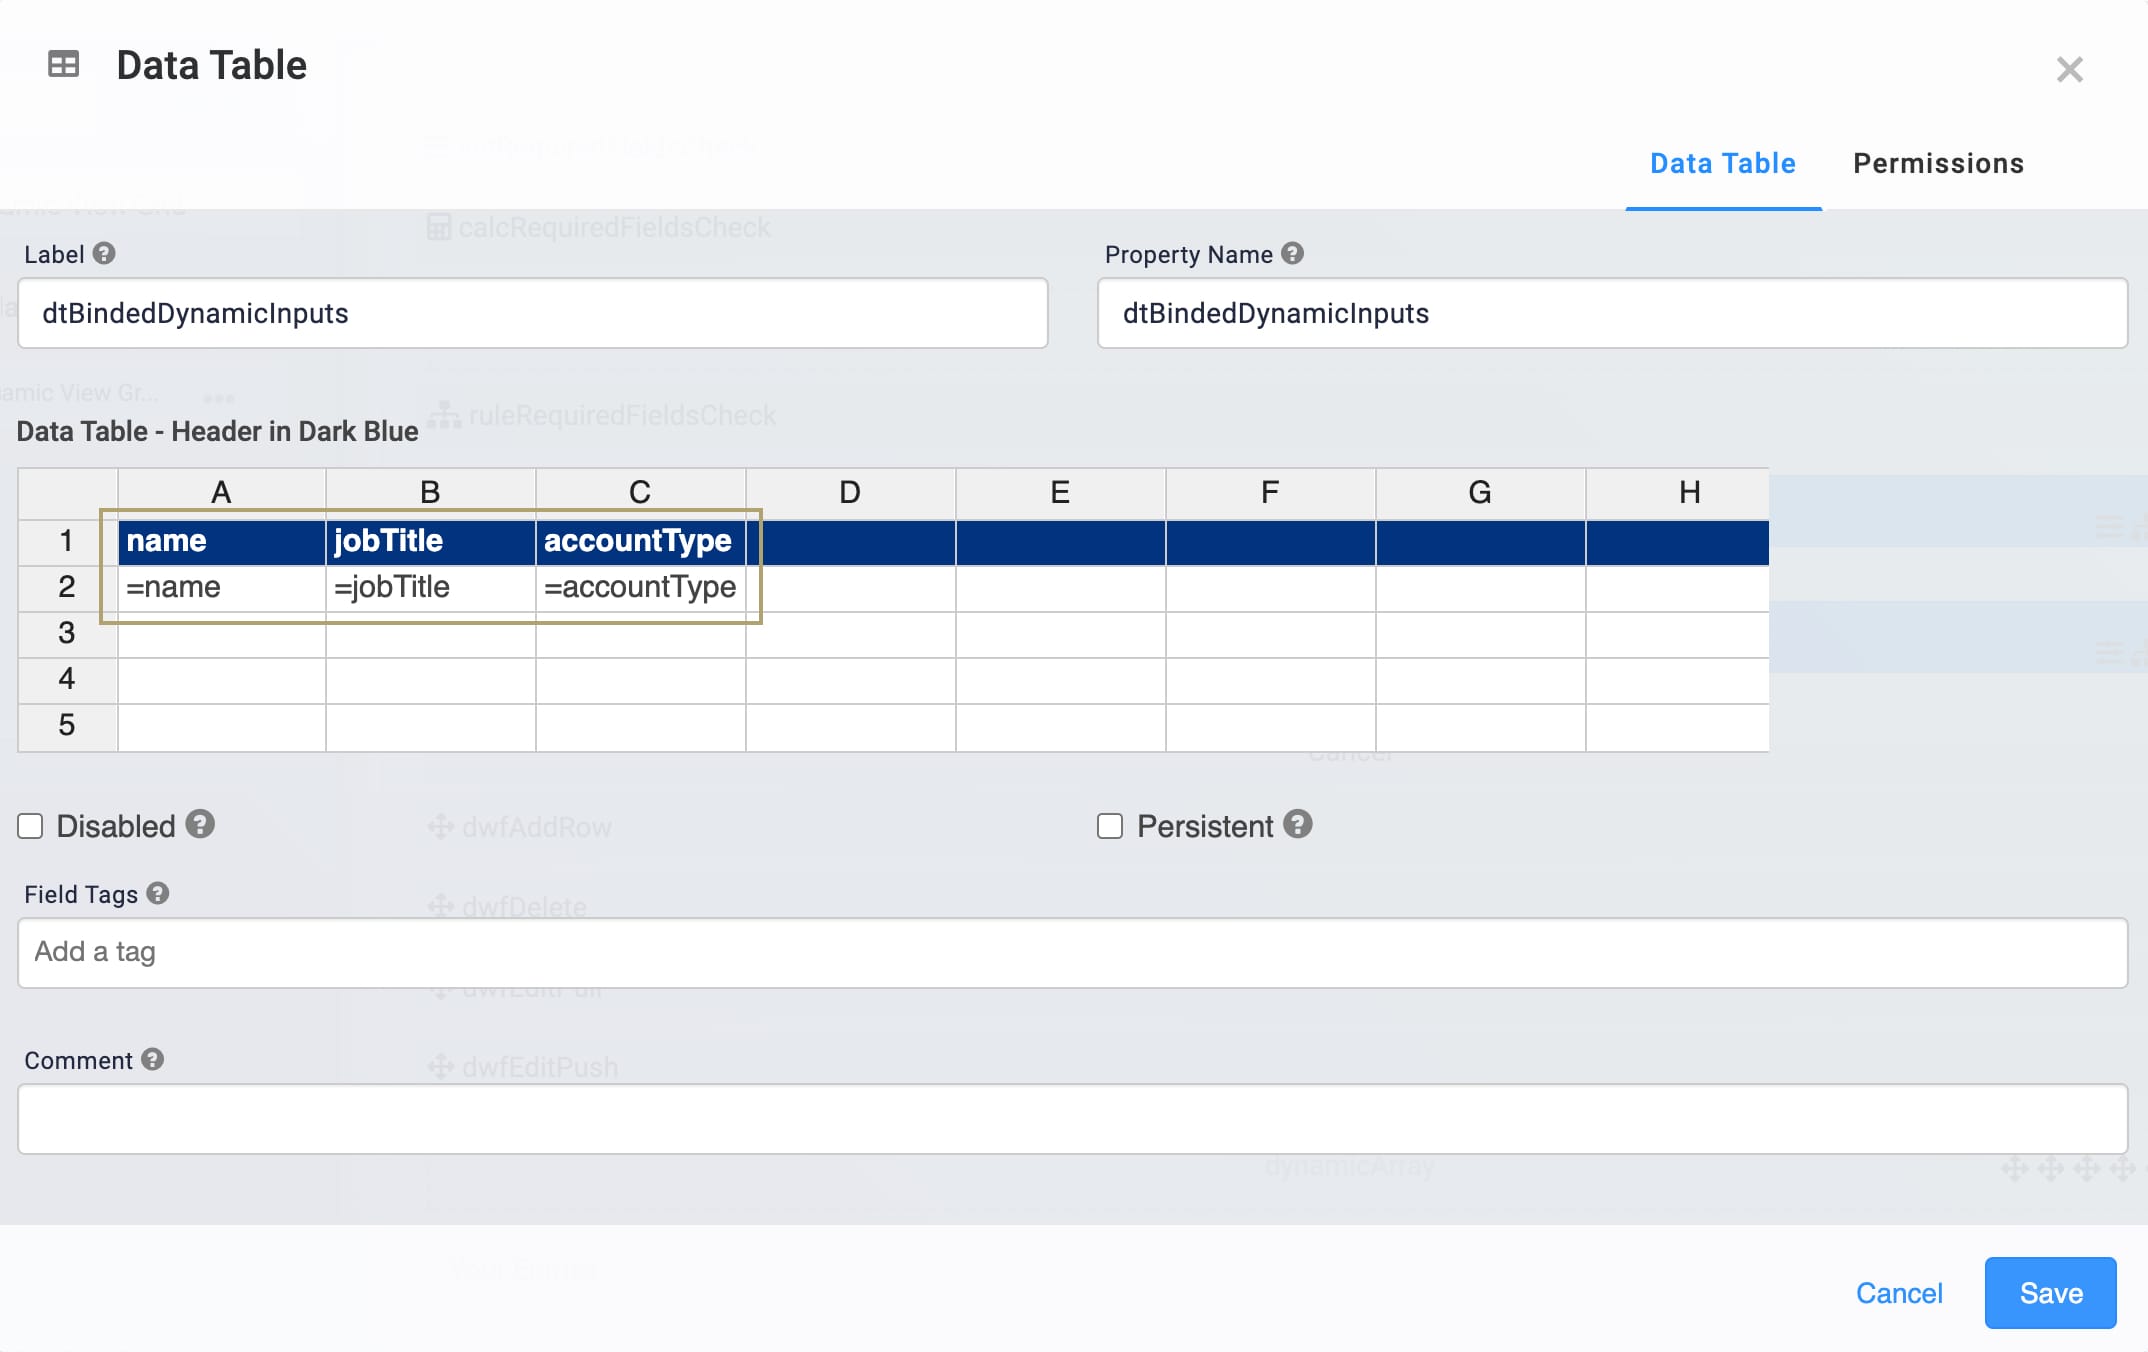
Next, you'll make a few quick changes to your Data Table.
Hover over the dtBindedDynamicInputs Data Table component.
Using the toolbar, click the
.jpg) (Settings) button.
(Settings) button.In the Data Table table, update columns A, B, and C to match the updated Property IDs of your Text Field components. To follow along with our use case, update as follows:
name
jobTitle
accountType
=name
=jobTitle
=accountType
Click Save.
Updating the dwfEditPull Data Workflow Component
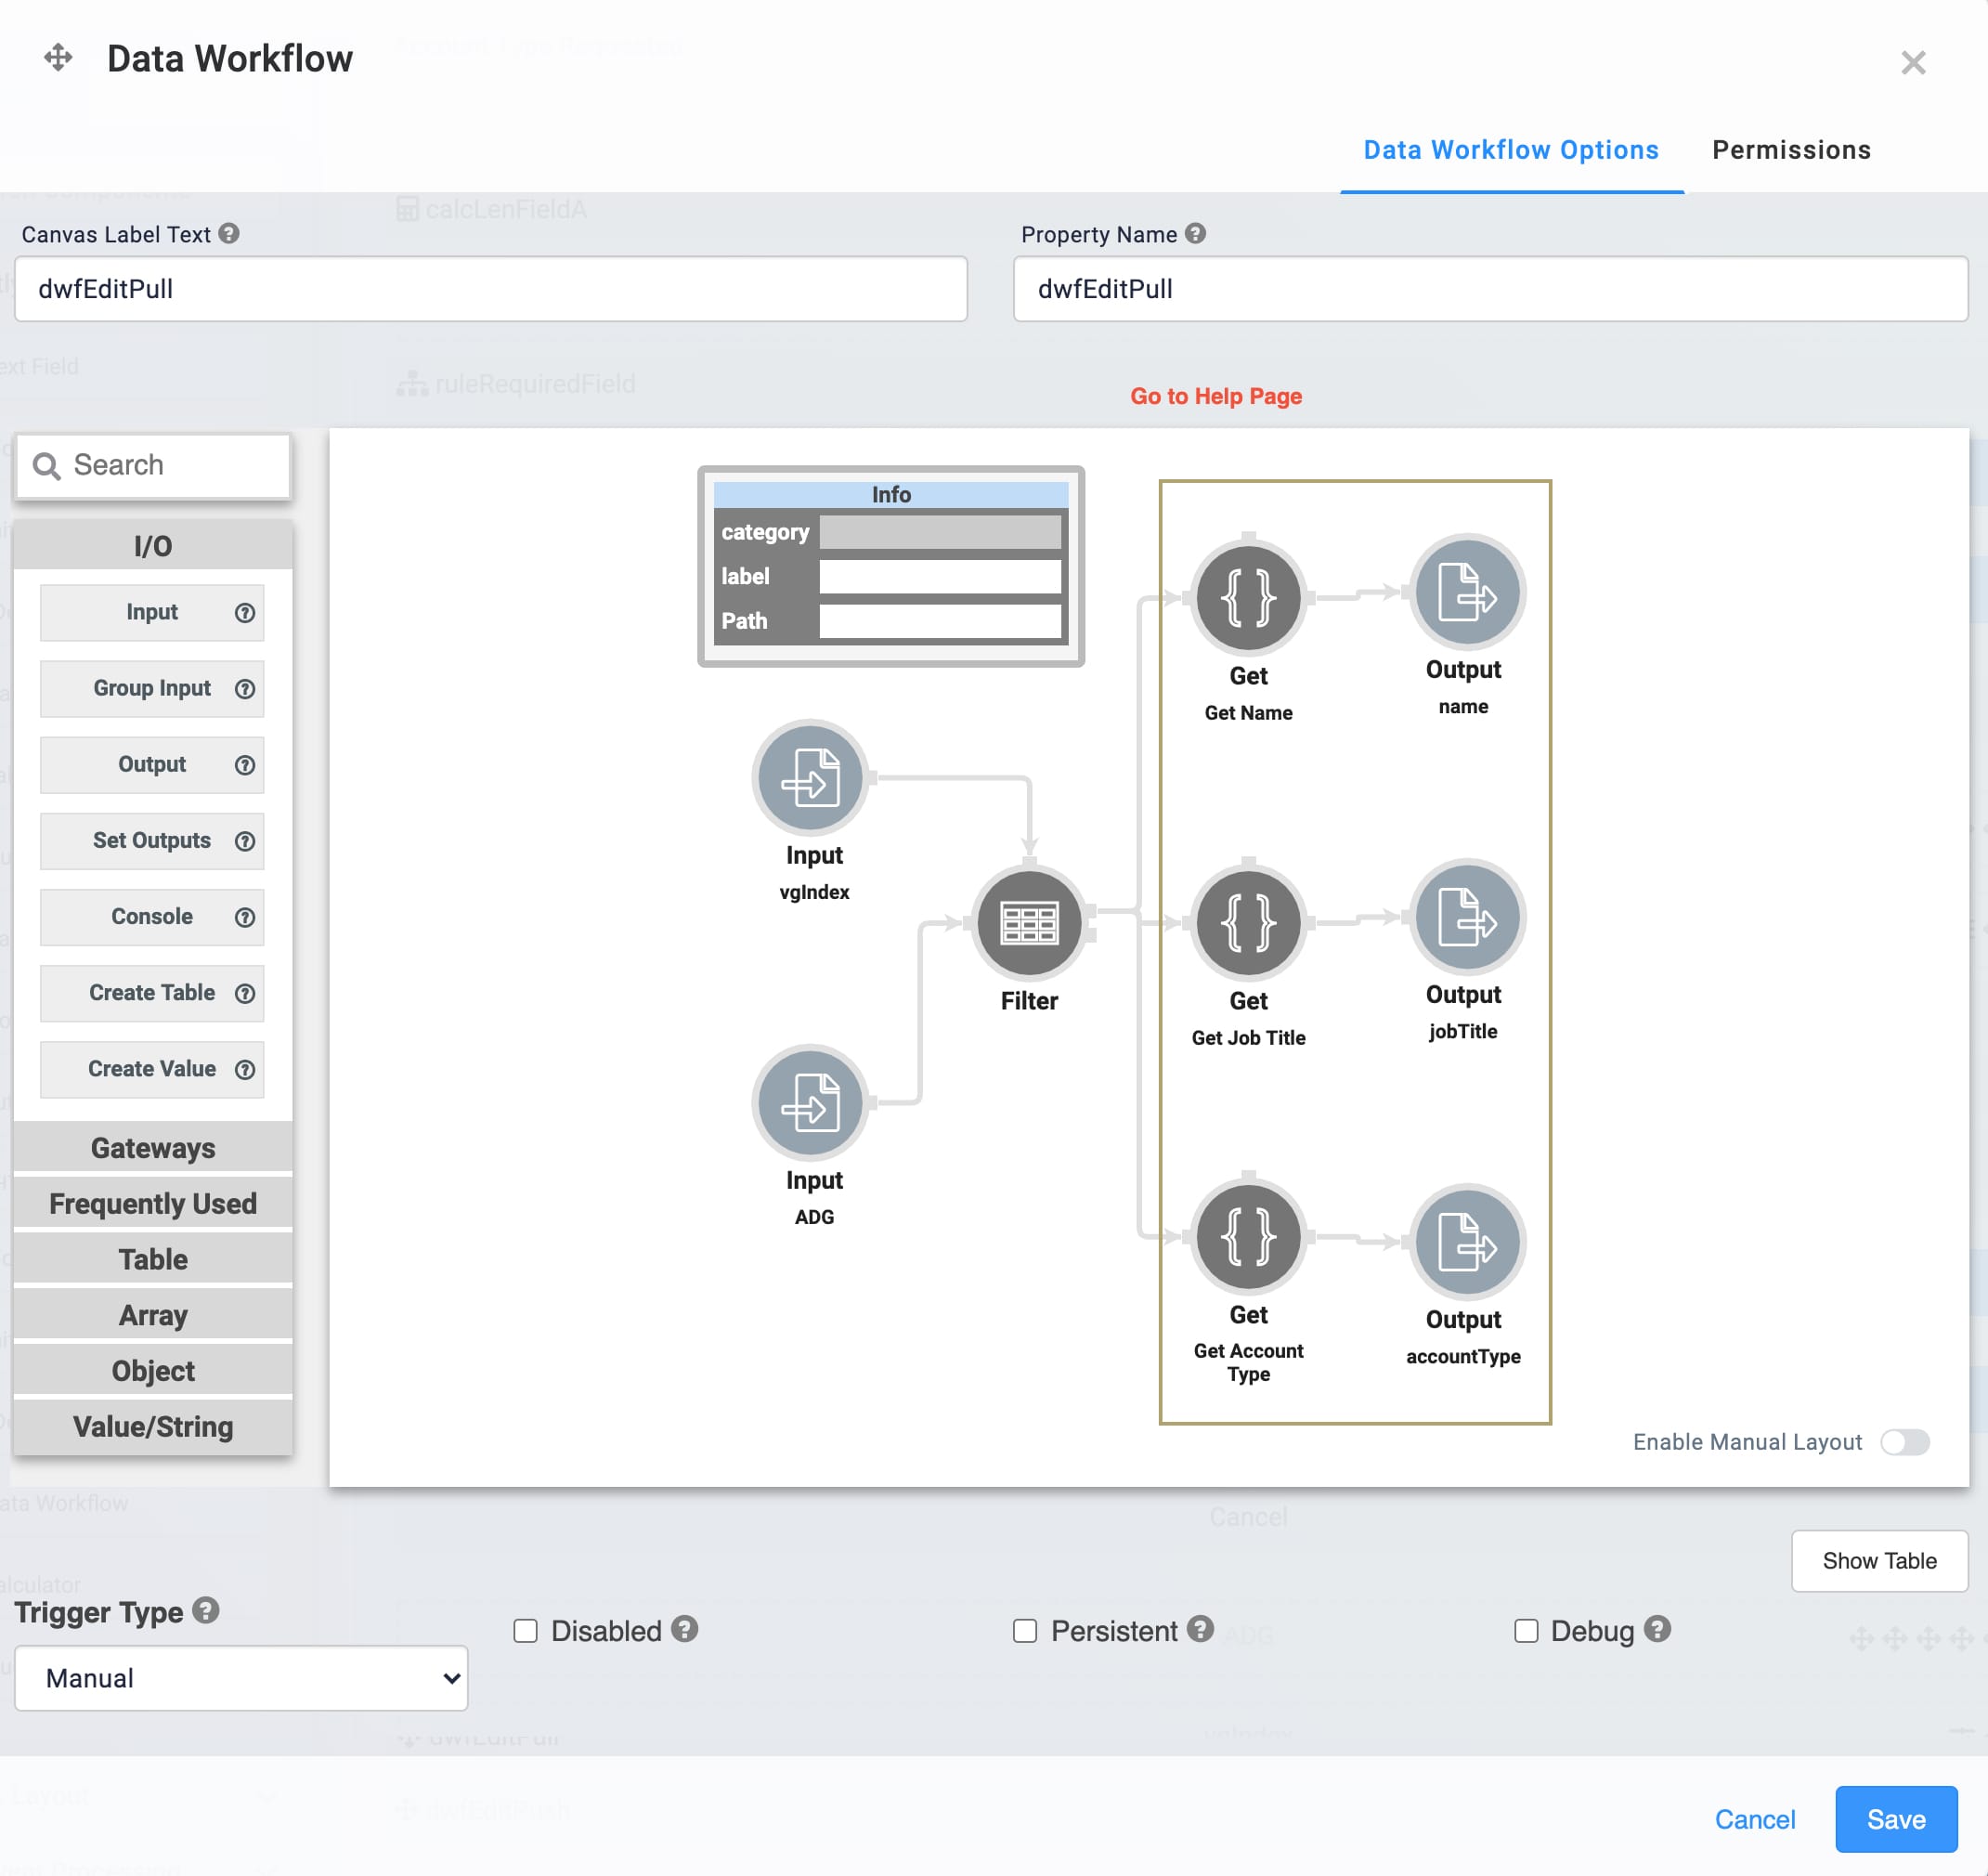
This update takes place in 6 operators. Here's how your dwfEditPull Data Workflow will look after the updates:
Updating the Get Operators
The dwfEditPull Data Workflow has 3 Get operators. By default, these pull from the original placeholder Text Fields. So, you'll change each of them so they connect to your updated Text Fields.
Hover over the dwfEditPull Data Workflow component.
Using the toolbar, click the
.jpg) (Settings) button.
(Settings) button.Click the Get operator that you want to update. Adjust the settings for each as follows:
Category
Label
Path
Get
Get Name
[0].name
Get
Get Job Title
[0].jobTitle
Get
Get Account Type
[0].accountType
Click Save.
Updating the Output Operators
The 3 Output operators output to the snippet's placeholder Text Fields. A quick change to each Output operator will make your Data Workflow behave the way it should.
Hover over the dwfEditPull Data Workflow component.
Using the toolbar, click the
.jpg) (Settings) button.
(Settings) button.Click the Output operator that you want to update. Adjust the settings for each as follows:
Category
Component
Action
Output
name
value
Output
jobTitle
[0].jobTitle
Output
accountType
[0].accountType
Click Save.
Save your module.
Updating the ViewGrid Component
Lastly, you'll update the ViewGrid component so that the dashboard displays with the updated fields. This is also where you can personalize the column headings for your dashboard.
Hover over the vgDynamicViewGrid ViewGrid component.
Using the toolbar, click the
.jpg) (Settings) button.
(Settings) button.In the Display table, update the ID and Heading columns to match your updated Text Field components. To follow along with our use case, update as follows:
ID
Formula
Heading
Type
name
Applicant Name
string
jobTitle
Current Job Title
string
accountType
Account Type Requested
string
Edit
Edit
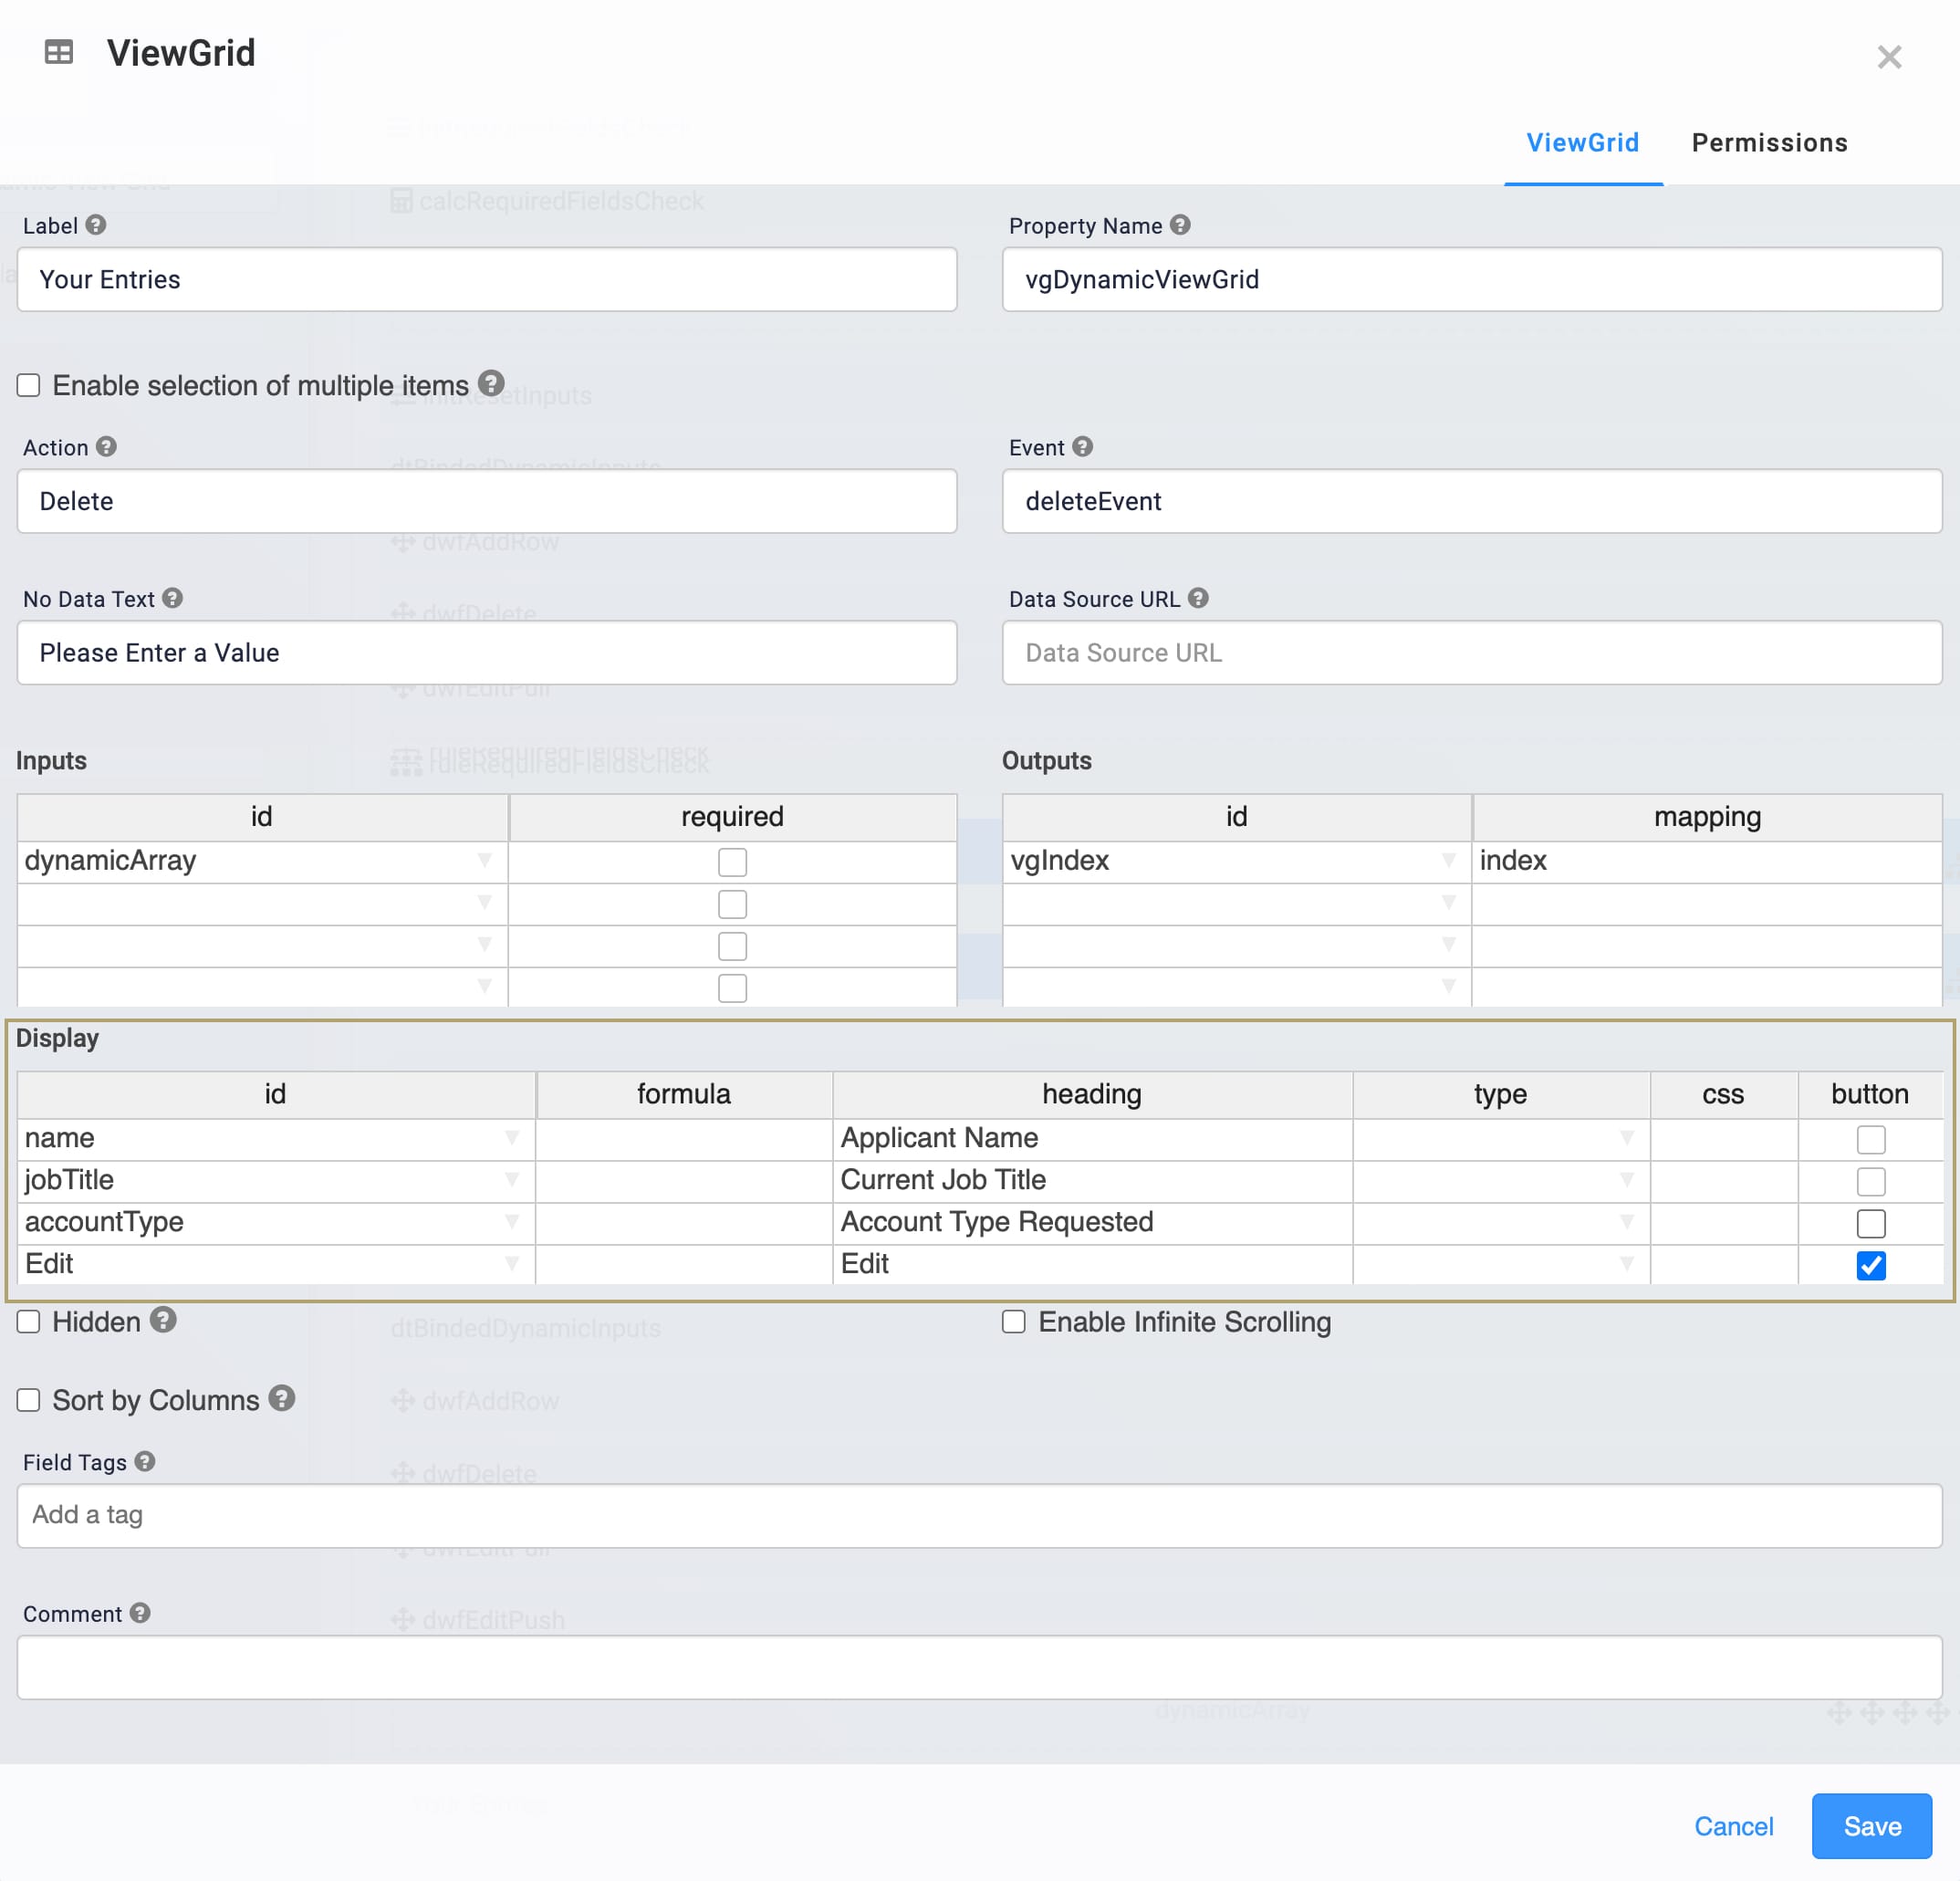
Make sure the Type field is correct for each component. This is best practice when working with ViewGrids and helps with sorting. For example, you could pick from the following types: date, currency, number, or string.
Click Save.
Save your module.
Now, when you preview your module in Express View, you'll see the updated entry fields and ViewGrid.
Removing the Snippet
What if you're no longer interested in using this snippet? No problem. We'll walk you through the quick steps to remove the snippet from your module. Then, you'll learn how to uninstall the snippet from your environment.
Removing the Snippet from Your Module
Removing a snippet from your module is easy. To remove the Dynamic View Grid snippet:
In the Module Builder, hover over the panelDynamicViewGrid Panel.
Using the toolbar, click the
.jpg) (Remove) button.
(Remove) button.Save your module.
Removing the Snippet from Your Environment
Use the Unqork Template Library to remove unused snippets. To uninstall a snippet from your environment:
At the top right of the Unqork Designer Platform, click Library or Templates.
Find the snippet you want to uninstall.
Click the ellipsis (...) in the snippet's tile header.
Click Uninstall Template.
Click Yes, Uninstall in the confirmation modal.
You can visit the Marketplace and reinstall the snippet at any time.
What if you have an existing application built using this snippet and then uninstall the snippet from your environment? No problem. Your existing application remains unaffected. Also, your application doesn't have any ties to the snippet. So, let's say you reinstall a newer version of the snippet in the future. You can rest assured that the installation doesn't impact your existing application.
Lab
You'll find the completed lab for this use case here: https://training.unqork.io/#/form/60d23337f32edc02e4375835/edit.