Overview
The Update Multiple Submissions snippet allows quick configuration to specify where to retrieve and update your submissions. The snippet lets you specify the module to retrieve submission data from and adds or updates the submissions with the new fields. The snippet also lets you configure any fields you want to add or update.
Here's how the snippet looks in the Module Builder: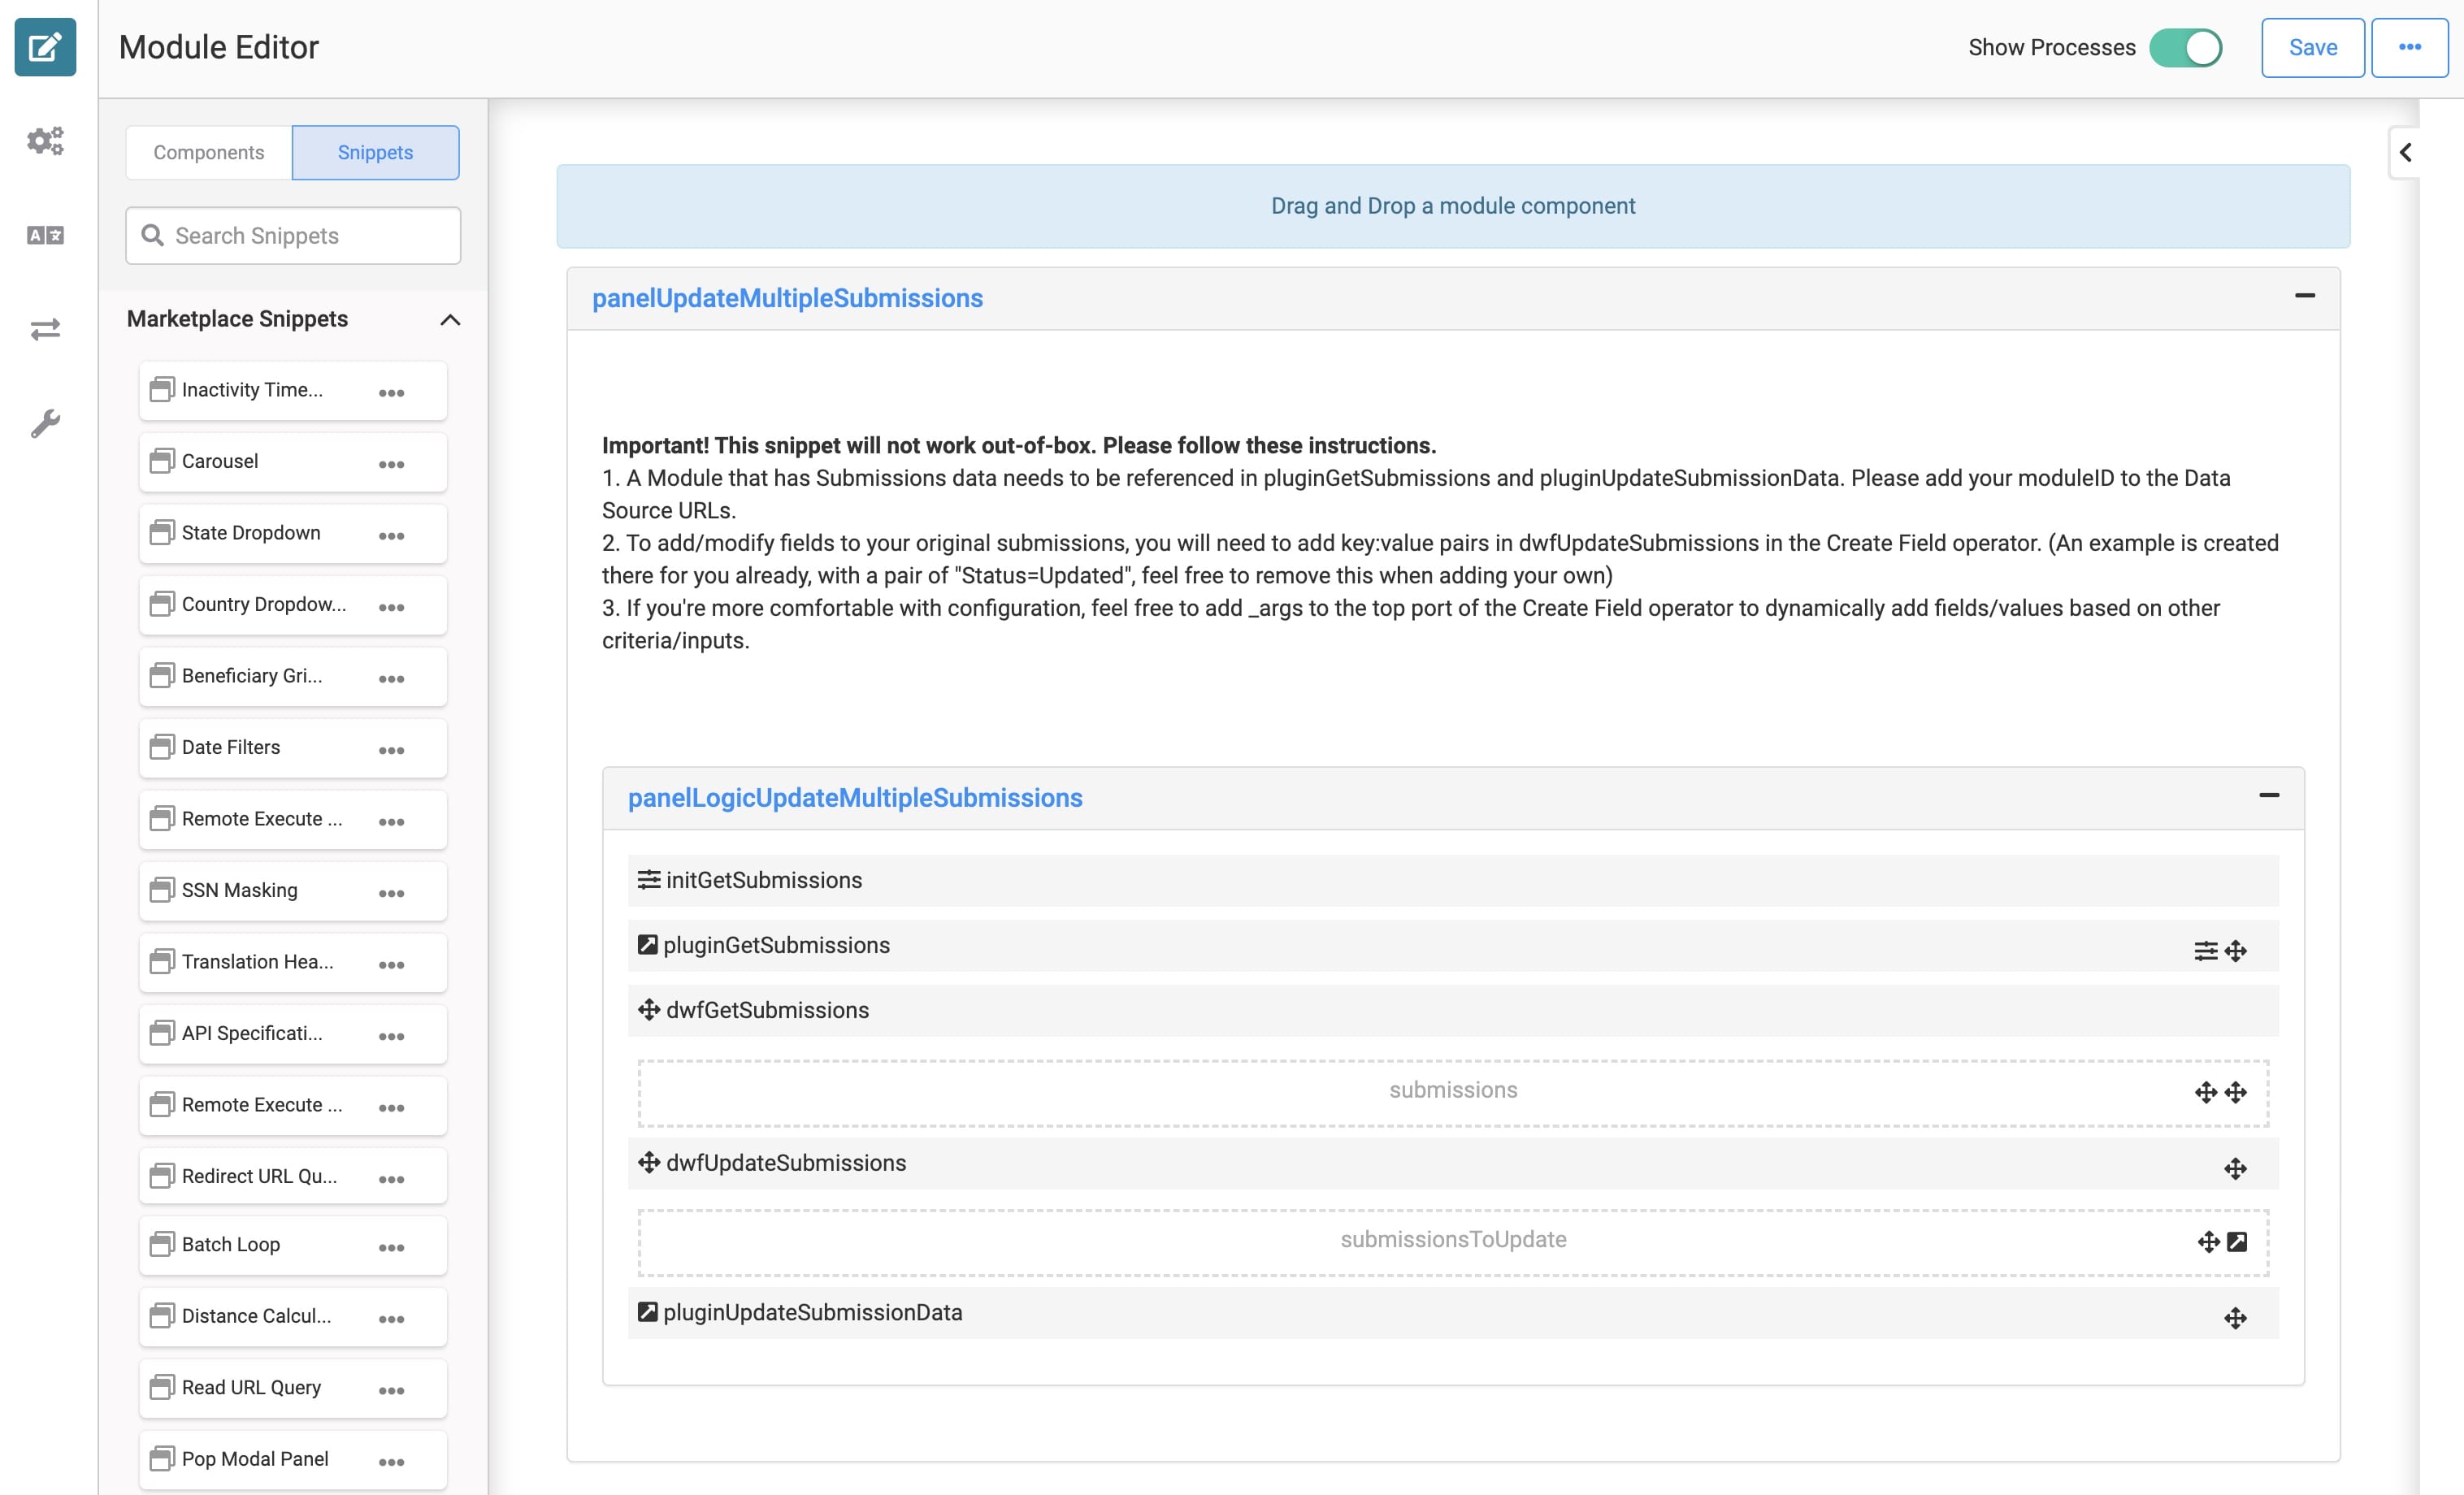
Adding the Snippet
It's easy to access the Update Multiple Submissions snippet in Unqork Marketplace. Before you use this snippet in your application, you must install the snippet to your environment.
Adding the Snippet to Your Environment
To add the snippet to your environment:
At the top right of the Unqork Designer Platform, click Library.
Click Templates.
Click Marketplace.
You can also access the Marketplace at any time by visiting https://marketplace.unqork.io.
In the Search the Listings Directory field, enter Update Multiple Submissions.
Click the Update Multiple Submissions tile.
Click Install to Environment.
Click Install Template.
If you aren't logged in, you'll see a field for Environment URL and a Login button. Enter your environment's URL where you want to install the template. For example: [environmentname.unqork.io]. Click the Login button. Then, return to step 4 and click Install to Environment again. Follow the remaining steps as listed.
Now, you can now use your newly installed snippet in your application.
Adding the Snippet to Your Module
After you install the Update Multiple Submissions snippet to your environment, you can drag and drop the snippet into your module:
In the left sidebar of the Module Builder, click the Snippets button.
In the search bar, enter Update Multiple Submissions.
Drag and drop the Update Multiple Submissions snippet onto your canvas.
If you don't see the snippet at first, make sure to expand the Marketplace Snippets section.
Save your module.
How the Snippet Works
The Update Multiple Submissions snippet retrieves submissions from your own schema module. Or, you can configure your application to display submission data in a dashboard. There are no limitations on configuration when using the Update Multiple Submissions snippet. The key function of the snippet is to retrieve the submissions and update them with configured fields. After making updates to the submission, the snippet updates the data to the schema module with fields of your choice.
You can see the submission data in the DevTools Console after running the angular command. Open the Data tab to see the following information:
pluginGetSubmissions: The original submission data retrieved from your schema module.
pluginUpdateSubmissionData: This Plug-In component validates the updated submissions. If successfully updated, a 200 response code displays.
submissions: The original submission data retrieved by the snippet's pluginGetSubmissions Plug-In component. Your chosen fields display with the updated submission data to confirm the updated submission.
submissionsToUpdate: The updated submissions that return to the schema module, with new or updated fields.
For the snippet to work correctly, update the Data Source URL for each of the snippet's Plug-In components. The default Data Source URL for each Plug-In component is /fbu/uapi/modules/{moduleId}/submissions. To retrieve and update submission data, you need to replace {moduleId} with the module ID of your schema module.
Next, add a field or fields to display with the updated submission data. There are 2 ways to add fields:
Adding key/value pairs in dwfUpdateSubmissions Data Workflow component's Create Field operator. A default example of the key/value pair "Status=Update" already exists in the Create Field operator. Feel free to remove this when adding your own fields.
Add _arg to the top port of the Create Field operator to dynamically add fields/values based on other criteria/inputs.
The snippet's built-in validation confirms the submission update, and adds or updates the field to the submission(s).
Customizing the Snippet
There are a few ways you can customize the Update Multiple Submissions snippet.
Update the pluginGetSubmissions Plug-In component's Data Source URL.
Update the pluginUpdateSubmissionData Plug-In component's Data Source URL.
Update the dwfUpdateSubmissions Data Workflow component's Create Field operator.
Updating the pluginGetSubmissions Plug-In Component
First, update the pluginGetSubmissions Plug-In component's Data Source URL to retrieve your schema module's submission data.
To update the Data Source URL:
In the Module Builder, hover over the pluginGetSubmissions Plug-In component.
A 5-button toolbar displays above the component on hover-over.
Click the
.jpg) (Settings) button to open the Configuration window.
(Settings) button to open the Configuration window.In the Data Source URL field, replace the {moduleId} portion of the URL with your schema module's module ID.
Click Save.
Updating the pluginUpdateSubmissionData Plug-In Component
Next, update the pluginUpdateSubmissionData Plug-In component's Data Source URL to update your schema module's submission data.
To update the Data Source URL:
In the Module Builder, hover over the pluginUpdateSubmissionData Plug-In component.
A 5-button toolbar displays above the component on hover-over.
Click the
.jpg) (Settings) button to open the Configuration window.
(Settings) button to open the Configuration window.In the Data Source URL field, replace the {moduleId} portion of the URL with your schema module's module ID.
Click Save.
Updating the dwfUpdateSubmissions Data Workflow Component
Lastly, update the dwfUpdateSubmissions Data Workflow component's Create Field operator. You can replace the operator's default field with your own field, and add other fields as you wish. You can also configure an argument into the top of the Create Field operator. The following sections show the 2 options.
Updating the Create Field operator
To update the Create Field operator's fields:
In the Module Builder, hover over the dwfUpdateSubmissions Data Workflow component.
A 5-button toolbar displays above the component on hover-over.
Click the
.jpg) (Settings) button to open the Configuration window.
(Settings) button to open the Configuration window.Click the Add in Fields Here Create Field operator to open the Info window.
In the Field 1 field, replace status='Updated' with a field of your choice. Add any other fields you want in the Field 2, Field 3, Field 4, and Field 5 fields.
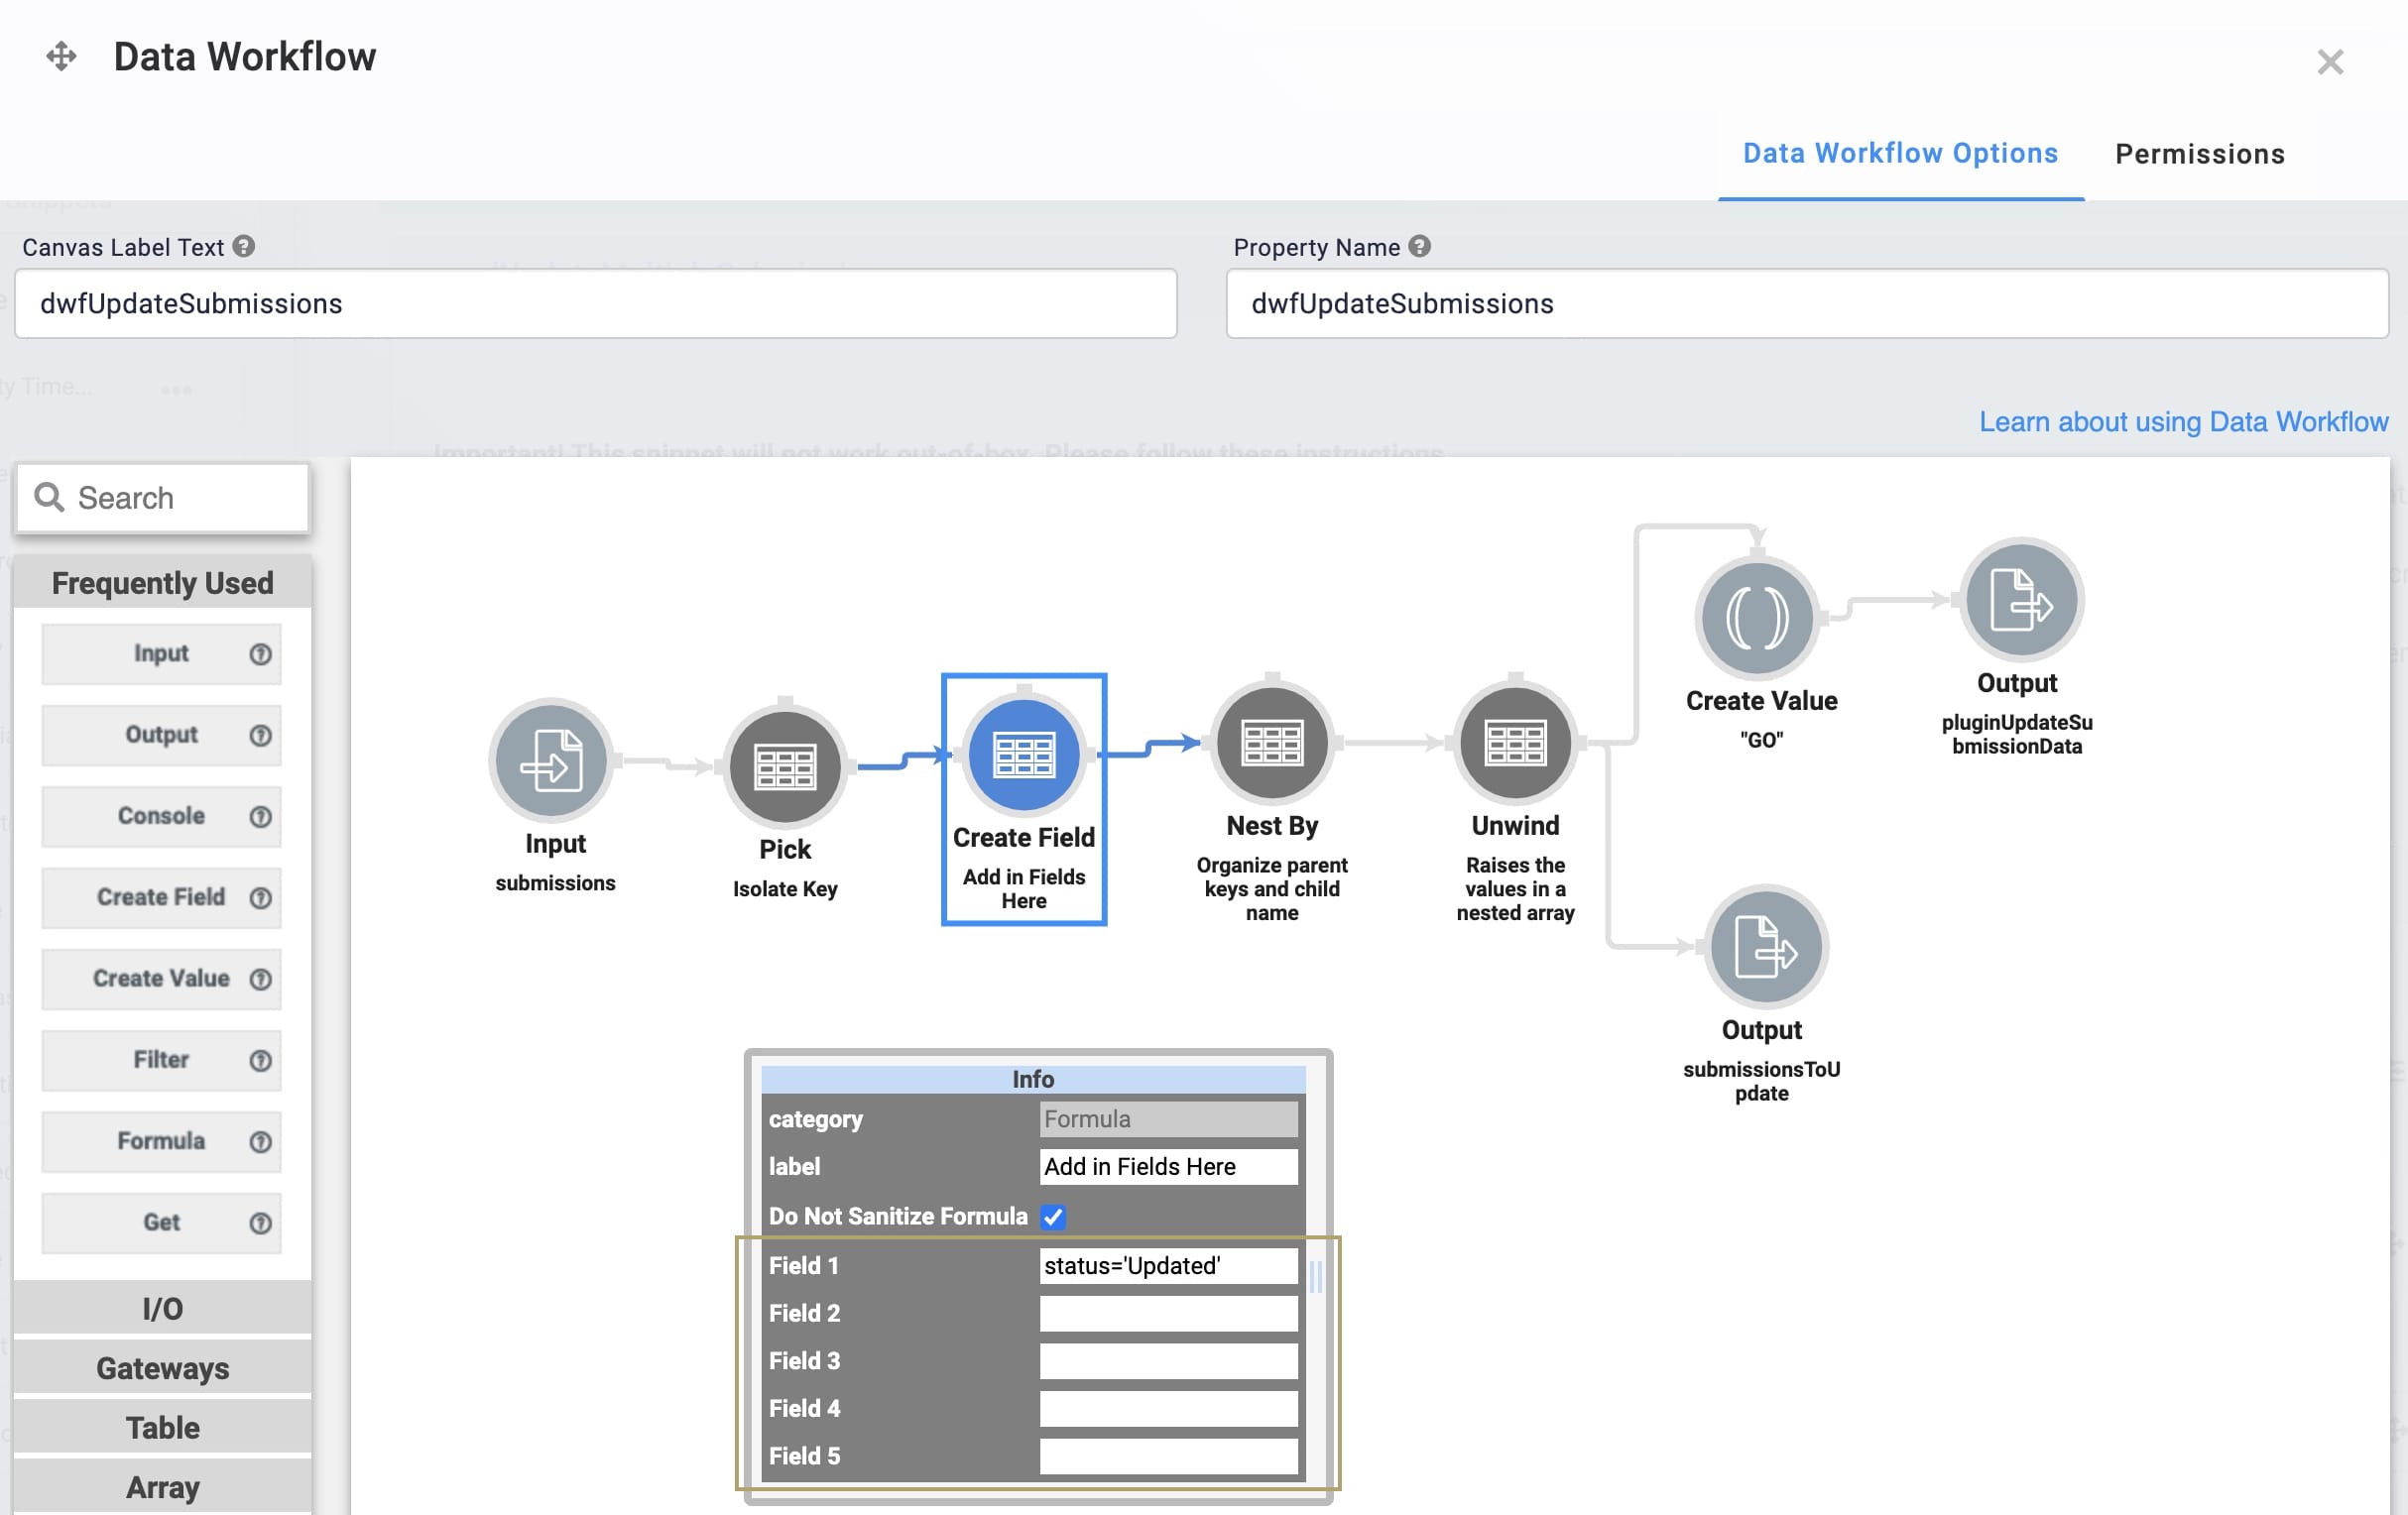
Click Save.
Save your module.
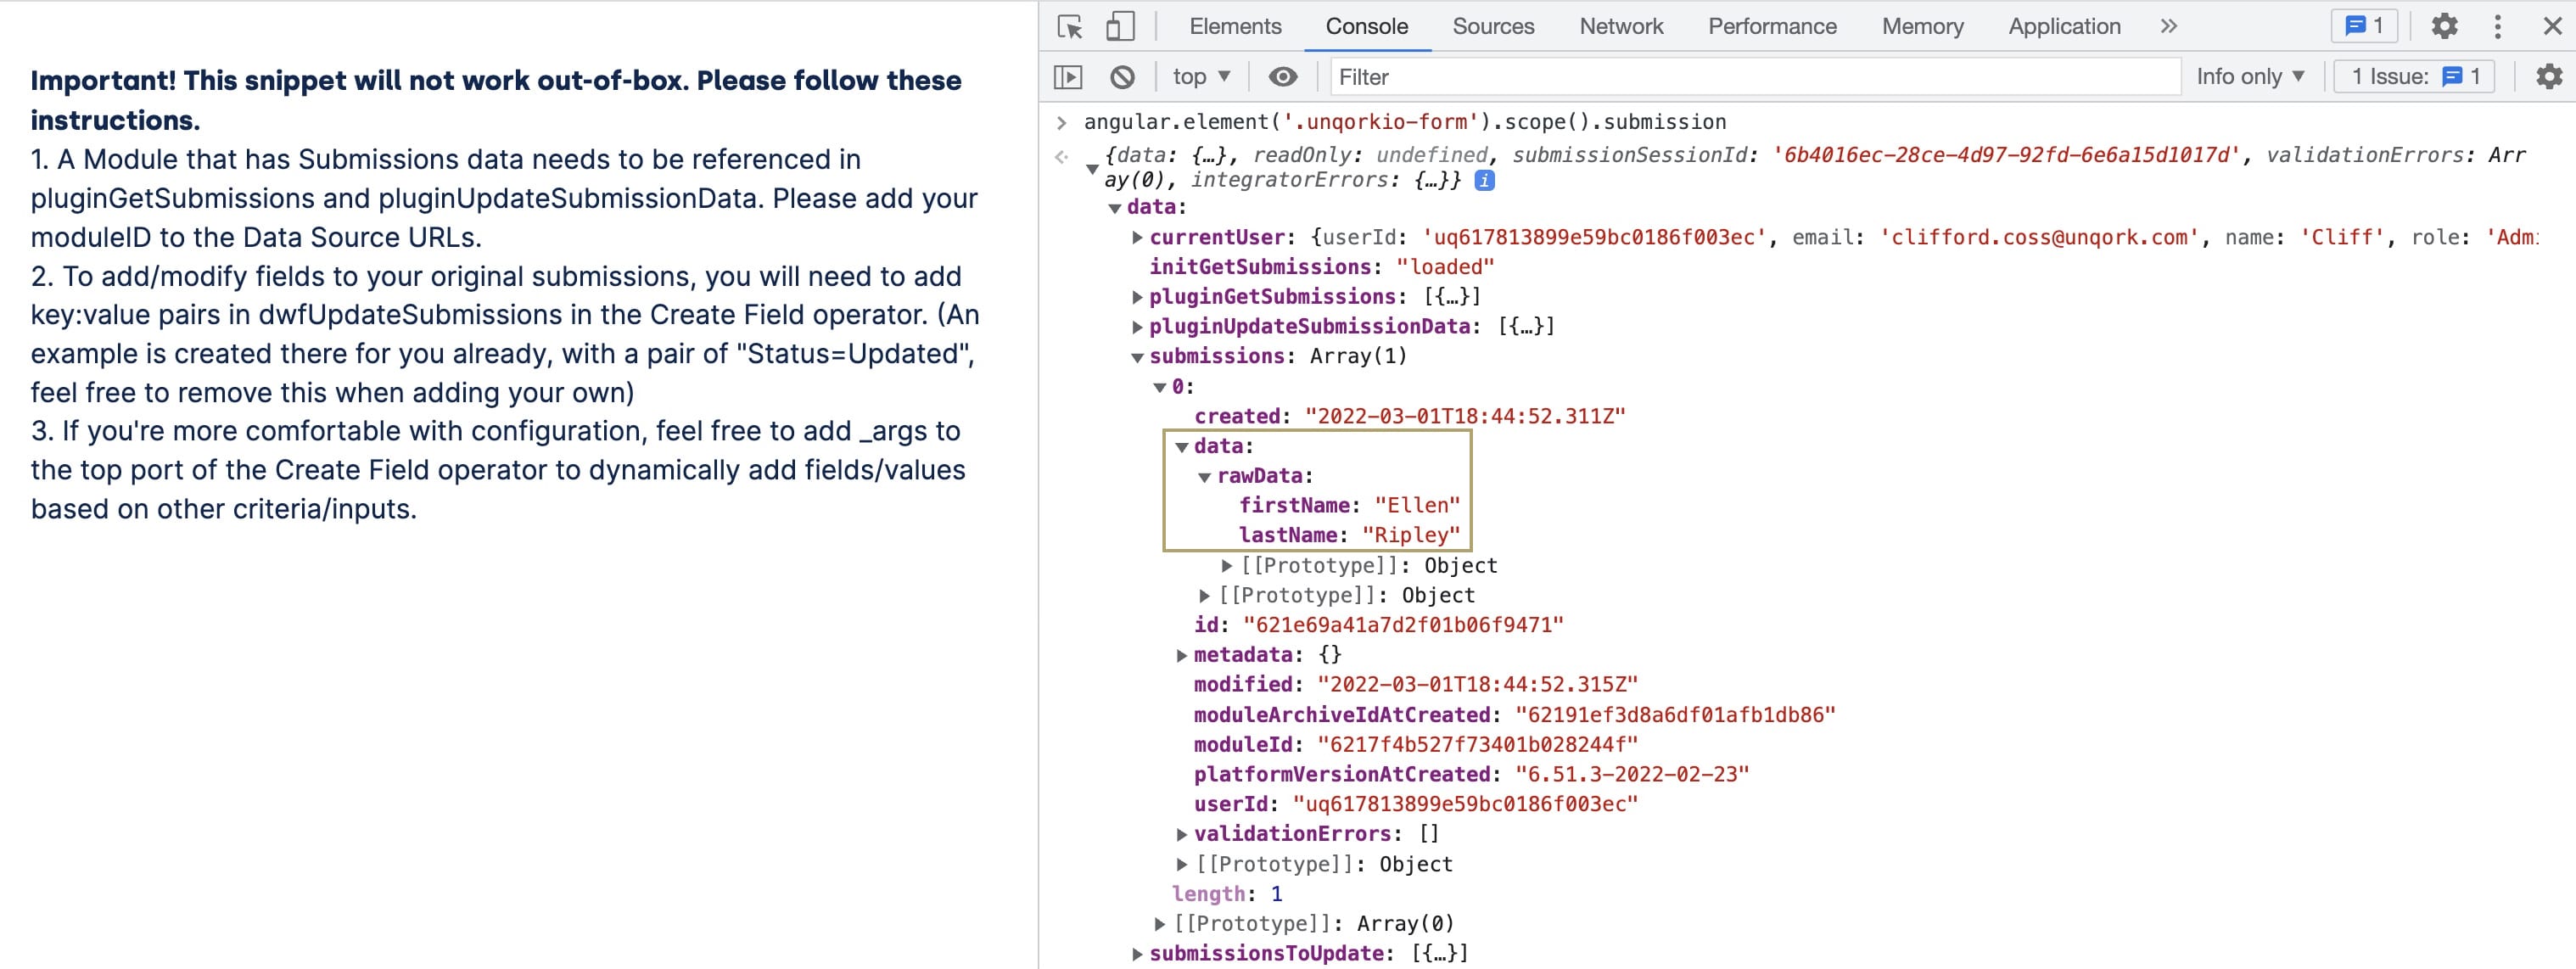
Let's say your end-user enters their first and last name into your schema module. Let's say this is the first submission in your application. You can preview your snippet in Express View, and open DevTools Console. Run the angular command to see the submission data. Or, view submission data using the Data Source URL associated with the submissions. For example, {{environment}}x.unqork.io/fbu/uapi/system/getSubmissions.
No updates occurred because this is the first submission.
Below is what your DevTools Console might look like:
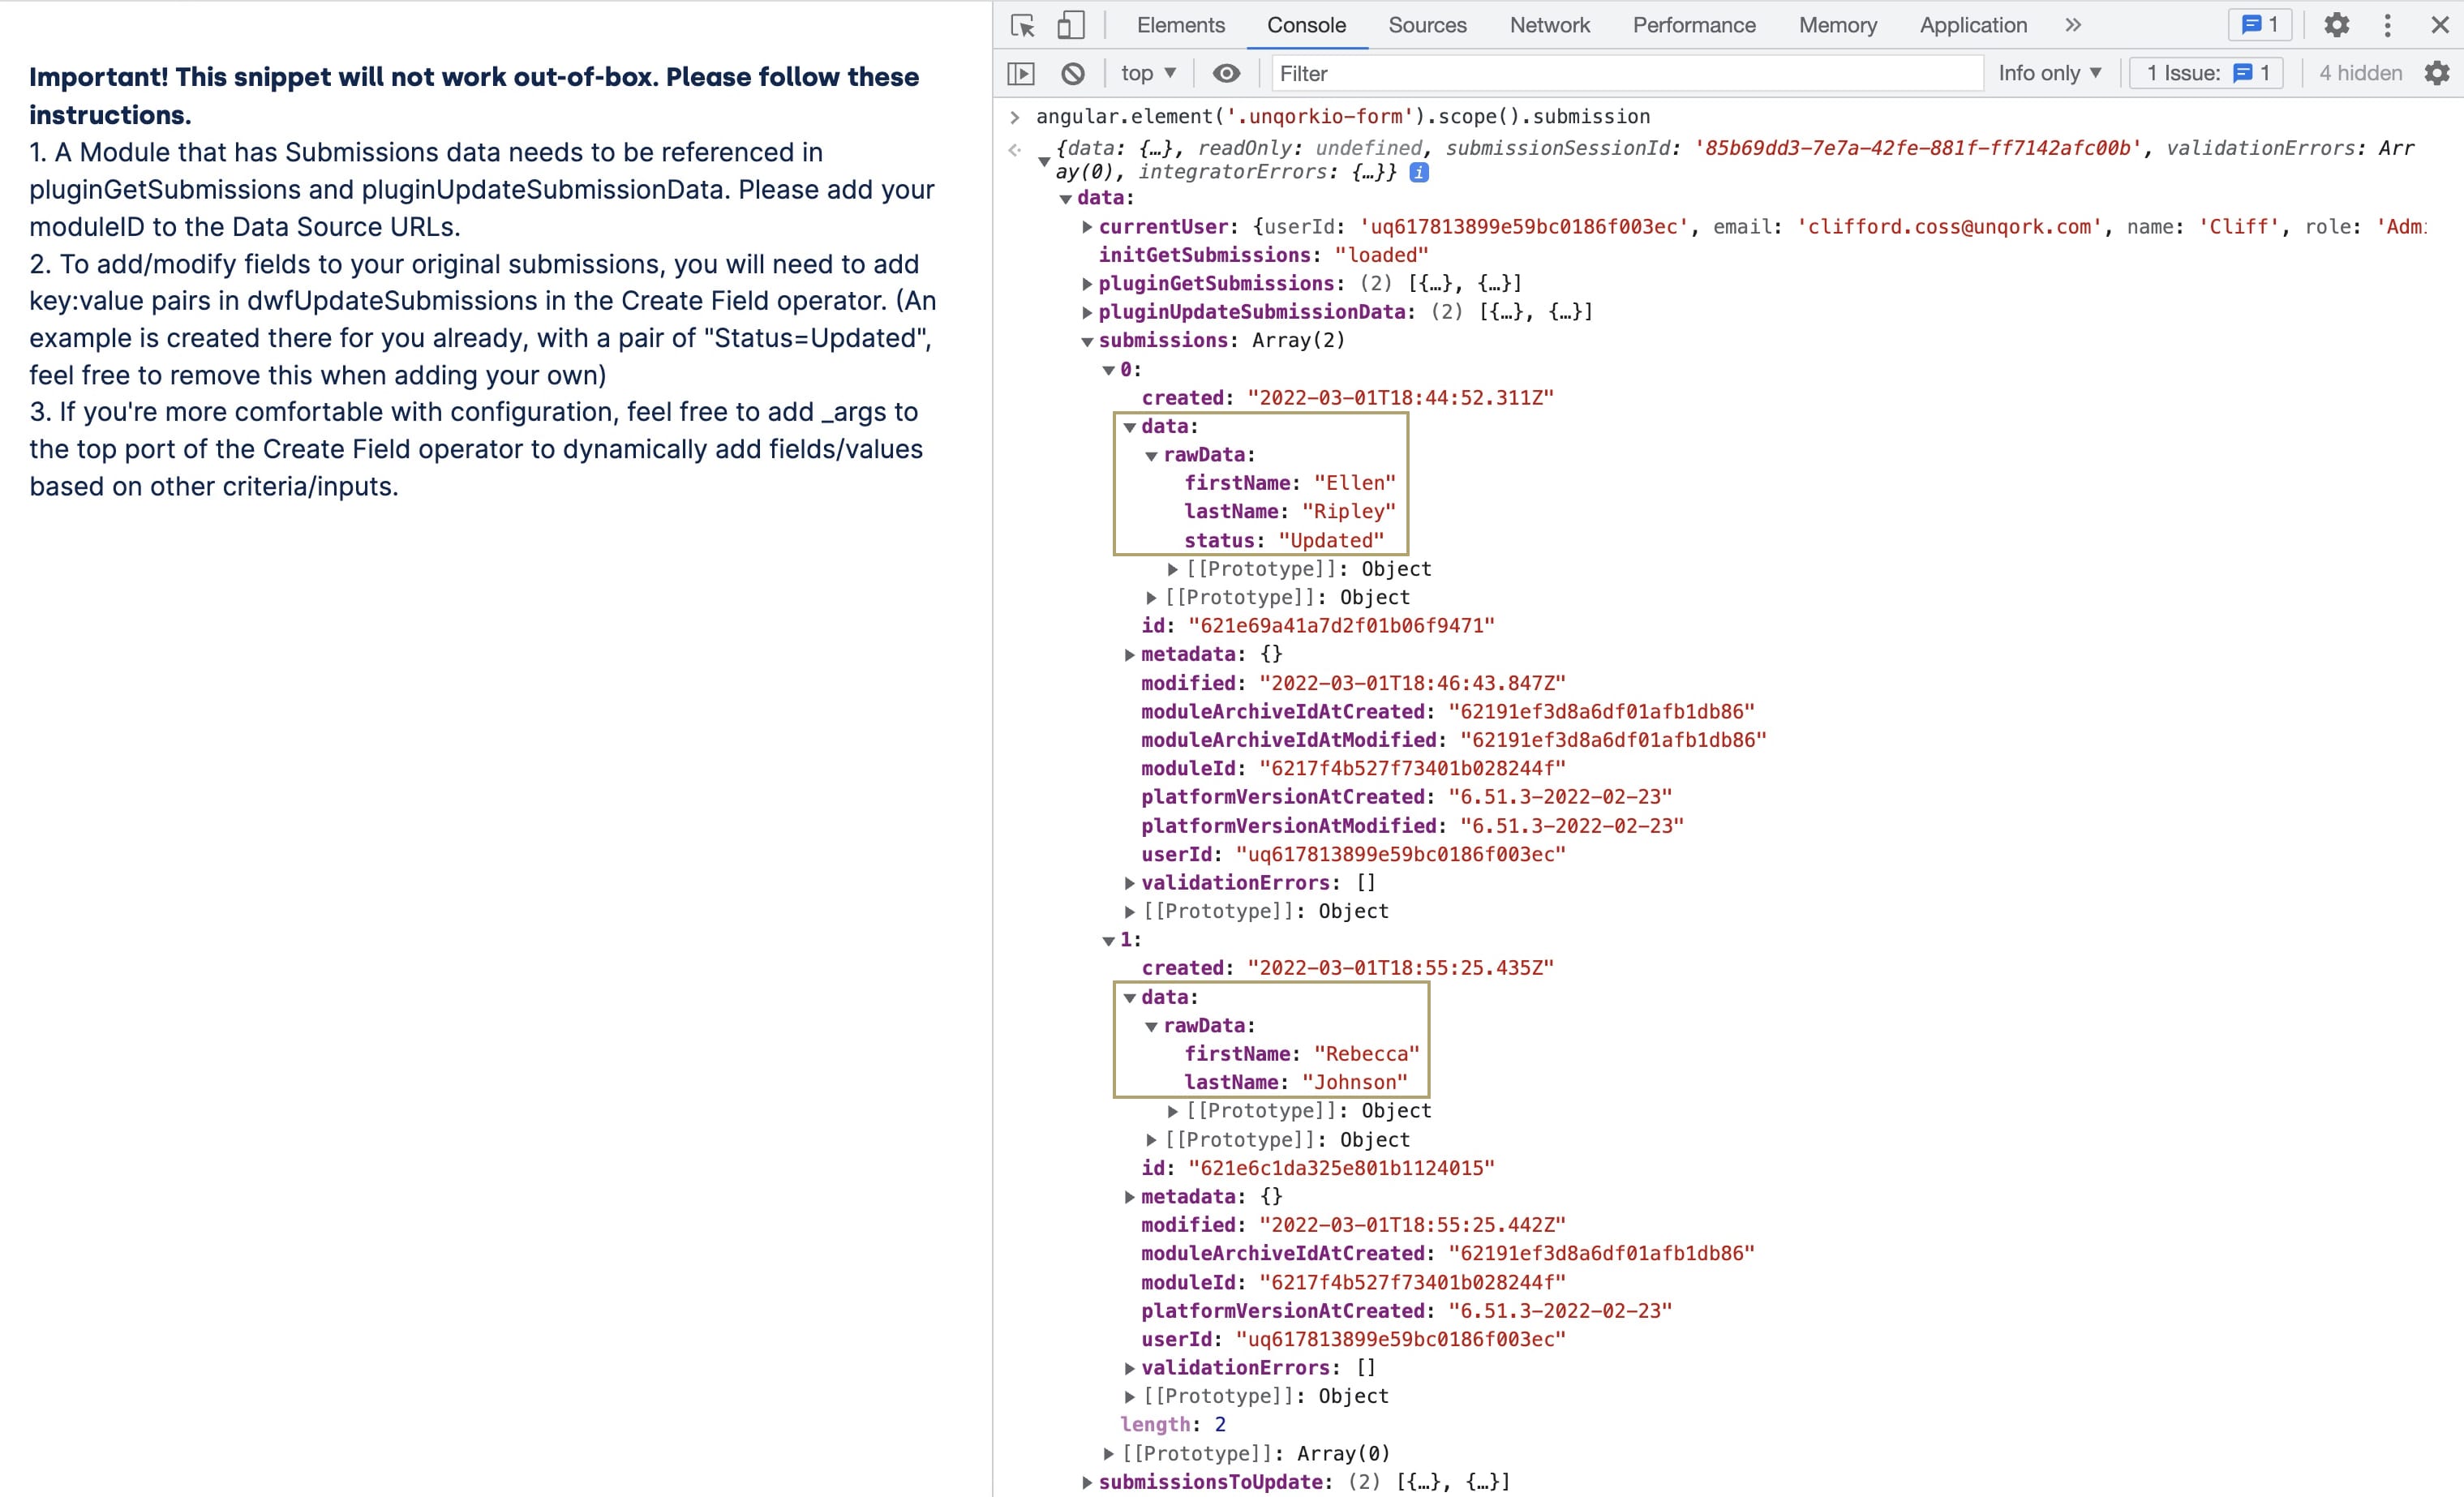
Now, another end-user enters their information. Not only do you see the new submission in the Console, but the snippet adds your new field to indicate that the original submission is updated.
Below is what your DevTools Console might look like:
Creating an Argument in the Create Field Operator
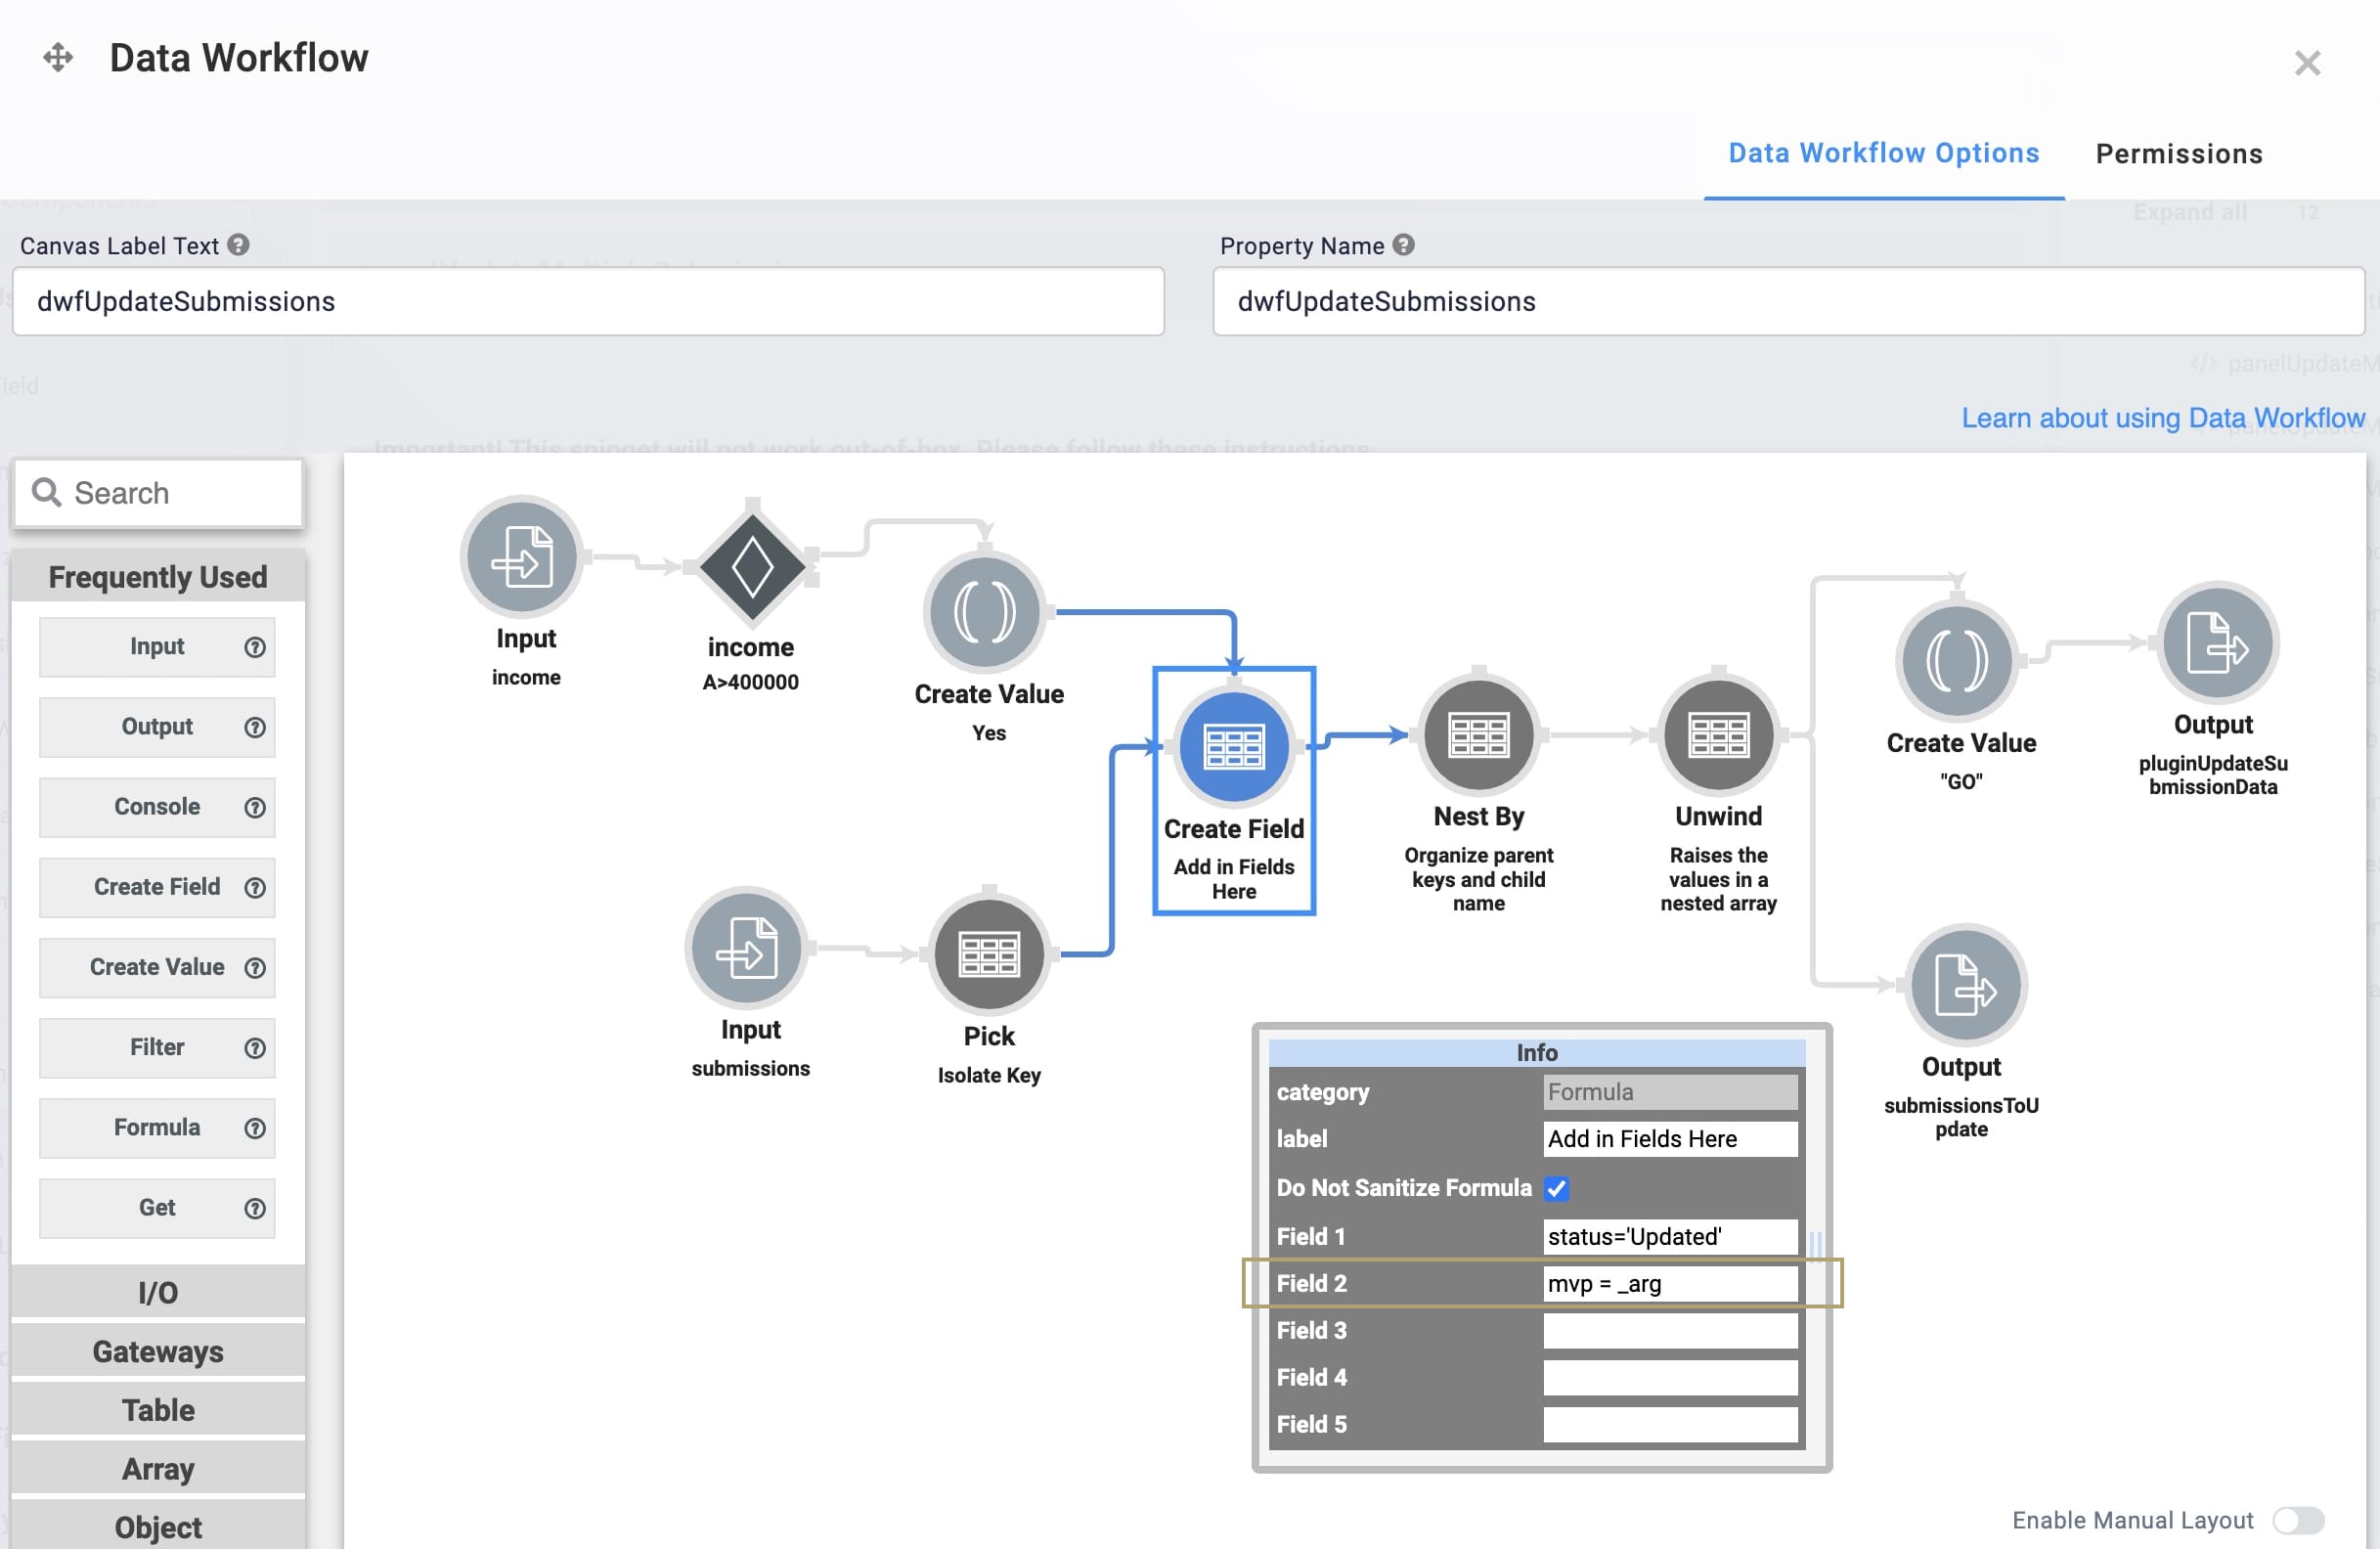
Let's say you have a submissions field called income. And, you want to see if the income is greater than $400,000. If it is, then you want to create a field key of mvp with a value of Yes.
For this example, you need to configure the following:
Input operator: This second Input operator inputs the income submission data.
Decision operator: If the value is greater than 400,000, this operator passes true.
Create Value operator: This operator passes the value of Yes to the Create Field operator.
Lastly, you need to enter mvp = _arg in the Field 2 field of the Create Field operator. The _arg, in this case, creates a value of Yes from your Create Value operator.
Removing the Snippet
You might want to remove a snippet from your application. Here, you'll learn how to remove the snippet from your module. Then, you'll learn how to uninstall the snippet from your environment.
Remove the Snippet from Your Module
To remove the Update Multiple Submissions snippet:
In the Module Builder, hover over the panelUpdateMultipleSubmissions Panel.
A 5-button toolbar displays above the component on hover-over.
Using the toolbar, click the
.jpg) (Remove) button.
(Remove) button.Save your module.
Remove the Snippet from Your Environment
Use the Unqork Template Library to remove unused snippets. To uninstall a snippet from your environment:
At the top right of the Unqork Designer Platform, click Library or Templates.
Find the snippet you want to uninstall.
Click the ellipsis (...) in the snippet's tile header.
Click Uninstall Template.
Click Yes, Uninstall in the confirmation modal.
You can visit the Marketplace and reinstall the snippet at any time.
What if you have an existing application built using this snippet and then uninstall the snippet from your environment? No problem. Your existing application remains unaffected. Also, your application doesn't have any ties to the snippet. So, let's say you reinstall a newer version of the snippet in the future. You can rest assured that the installation doesn't impact your existing application.