Overview
For an easy way to process array rows in batches, you'll use the Batch Loop snippet. But first, you'll learn what an array is.
In your application, you have data. When you group that data together, you make an object. And when you group objects together, you have an array. As an array grows, manipulating the data it holds can grow more challenging. That's where the Batch Loop snippet helps.
For example, you might have an array of credit card applicants. This array holds data for many people, but you need to run a credit check for each individual person. With the Batch Loop snippet, you can extract one at a time and verify the credit score.
Here's another example of how you can use this snippet. Let's say you have an investment firm. And, you're considering doing business with another entity (country or group). You want to check trade restrictions between the United States and other countries. With the Batch Loop snippet, this is easy to do.
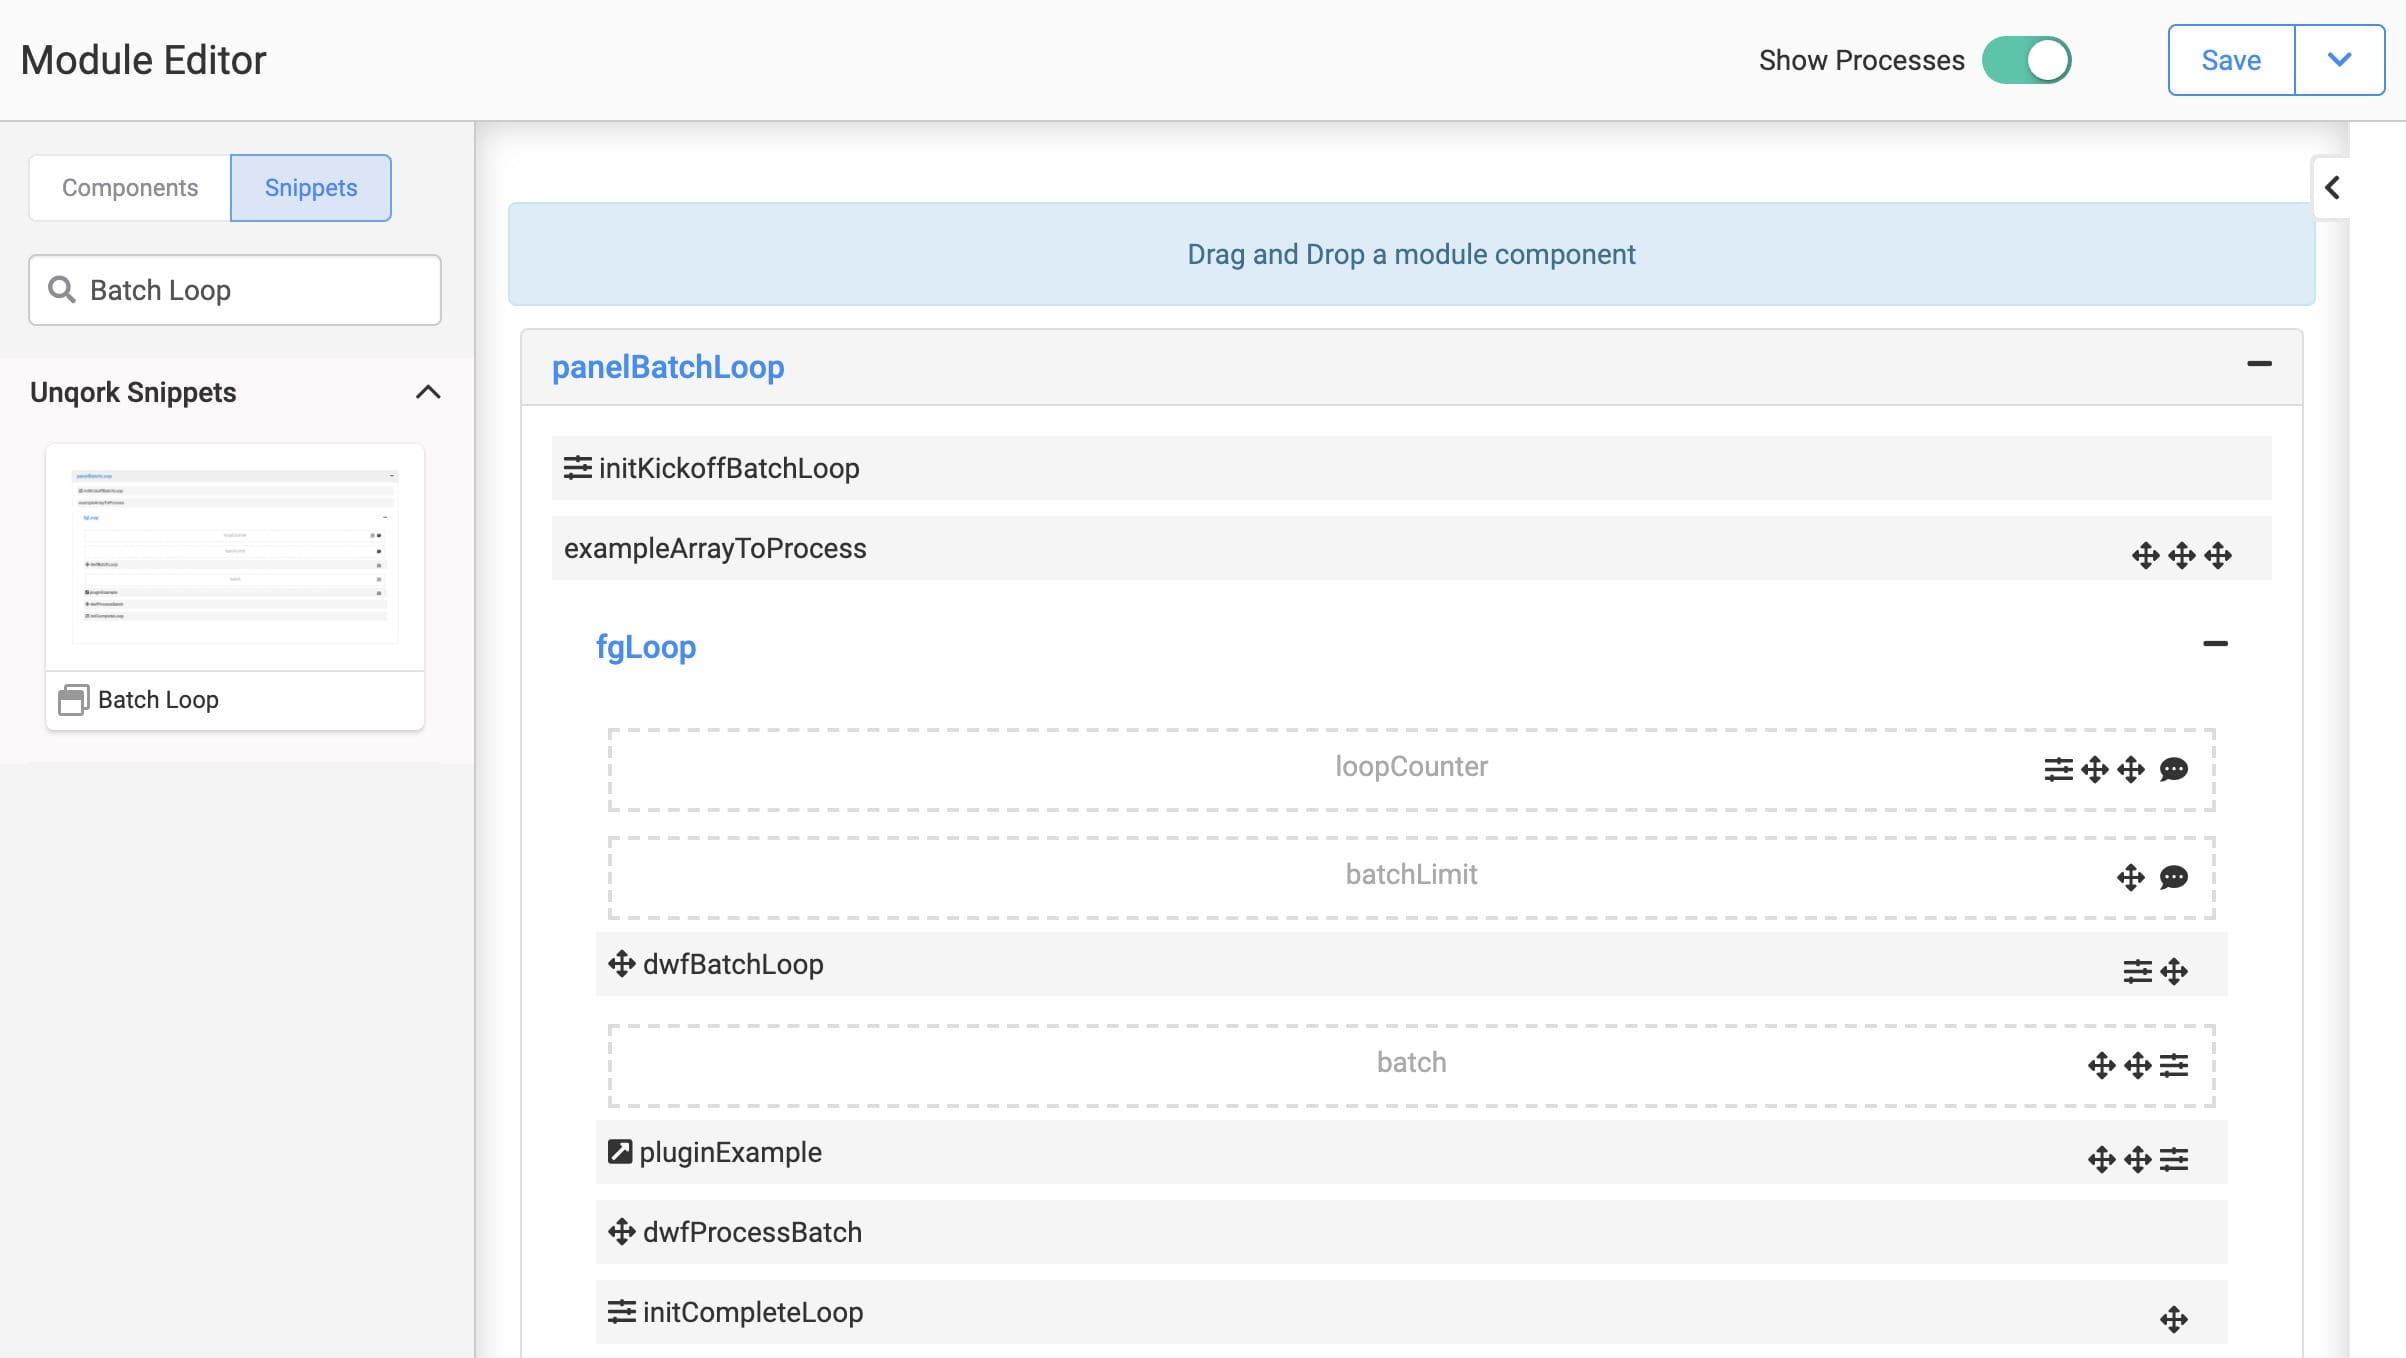
Here's how the snippet looks in Express View:
And here's how the snippet looks in the Module Builder:
Adding the Snippet
Once you determine a need for a batch loop process, you'll add the Batch Loop Snippet.
Before you use this snippet in your application, you must install the snippet to your environment.
Adding the Snippet to Your Environment
To add the snippet to your environment:
At the top right of the Unqork Designer Platform, click Library.
Click Templates.
Click Marketplace.
You can also access the Marketplace at any time by visiting https://marketplace.unqork.io.
In the Search the Listings Directory field, enter Batch Loop.
Click the Batch Loop tile.
Click Install to Environment.
Click Install Template.
If you aren't logged in, you'll see a field for Environment URL and a Login button. Enter your environment's URL where you want to install the template. For example: [environmentname.unqork.io]. Click the Login button. Then, return to step 4 and click Install to Environment again. Follow the remaining steps as listed.
Now, you can now use your newly installed snippet in your application.
Adding the Snippet to Your Module
After you install the Batch Loop snippet to your environment, you can drag and drop the snippet into your module:
In the left sidebar of the Module Builder, click the Snippets button.
In the search bar, enter Batch Loop.
Drag and drop the Batch Loop snippet onto your canvas.
If you don't see the snippet at first, make sure to expand the Marketplace Snippets section.
Save your module.
How the Snippet Works
Data Workflows are the main drivers of the Batch Loop snippet. You'll find 2 Data Workflow components when using this snippet:
dwfBatchLoop: Separates the data in your array and sends it through the API (application programming interface) you're calling (more on that later). This works in tandem with the Plug-In component included in the snippet, which runs the API call. As mentioned above, that API call might check a credit score. Or it can find trade restrictions between the US and a specific country. The call itself depends on the configuration of your Plug-In.
dwfProcessBatch: Reassembles the returned data for easy display in a ViewGrid.
Now, to do their job, your Data Workflows reference 3 Hidden components. Here's a look at each:
loopCounter: Counts how many pieces of data have gone through the first Data Workflow. This ensures the process stops when you're out of data.
batchLimit: Sets how many rows to process at once. Your dwfBatchLoop references this before it begins processing data.
batch: This is where your dwfBatchLoop puts returned data. Your dwfProcessBatch then references this component to put the data back together.
Of course, your Batch Loop doesn't work if you don't have any data to process. That's why your snippet also includes a Data Table. The Data Table comes preloaded with sample data to use for demonstration purposes. Or, you can replace it with your own.
Finally, to start and stop the batch, the snippet includes 2 Initializer components.
You'll also see a Field Group component included in the snippet. As is the nature of a Field Group component, this is here for organization and structure. If you need to move the inner-workings of the snippet for any reason, the Field Group makes it easy to do so.
Now it's time to take a look at the snippet in action.
Setting Up the Snippet
Out of the box, the Batch Loop snippet contains a simple demonstration. But to see what's happening inside your application, you'll connect it to a ViewGrid. As an example, create a module that checks if the U.S. has trade restrictions on a particular country. This is useful for banking and investing, when you don't want to do business with certain entities. For example, a country can have unethical influences, which show up on a list kept by the Office of Foreign Assets Control (OFAC). You'll set up a Batch Loop that compares a list of countries to that OFAC list.
What You Need
To complete this use case, you need:
1 ViewGrid component
1 Button component
1 Batch Loop snippet
The Batch Loop snippet includes:
1 Panel component
2 Initializer components
1 Data Table component
1 Field Group component
3 Hidden components
2 Data Workflow components
1 Plug-In component
Add the Batch Loop Snippet
To start, add the Batch Loop snippet to your canvas.
In the left sidebar of the Module Builder, click Snippets.
Enter Batch Loop in the search bar.
Drag and drop the Batch Loop snippet onto your canvas.
Update the Data Table Component
Next, configure the snippet to fit our example. The first update you'll make to the snippet is to include a list of countries. To do that, rename the Data Table component and add new data to it.
Hover over the exampleArrayToProcess Data Table component.
A 5-button toolbar displays above the component on hover-over.
Click the
.jpg) (Settings) button to open the Configuration window.
(Settings) button to open the Configuration window.In the Label and Property Name fields, enter dtOfacEntities.
Update cell A1 to read Entity.
Update cells A2 through A9, to read: Uruguay, Iran, USA, Germany, Kazakhstan, Ireland, Qatar, and Mexico.
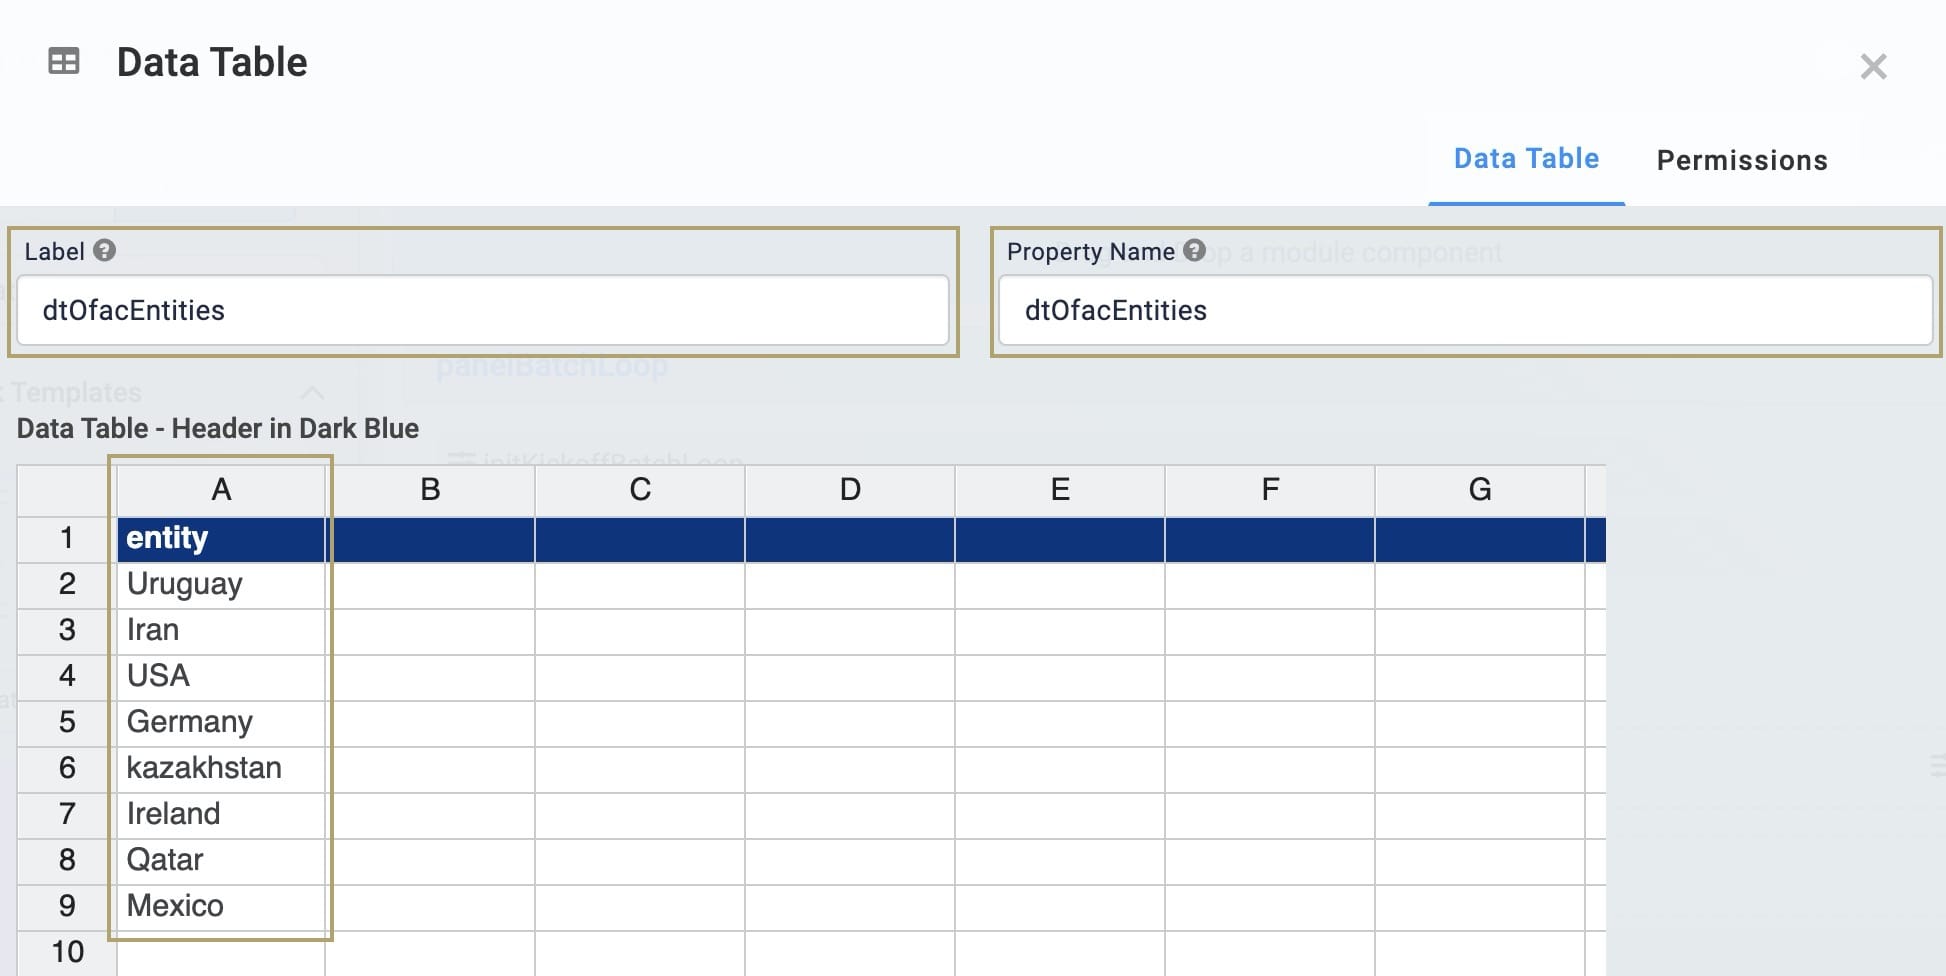
Click Save.
Update the Limit Hidden Component
By default, the snippet processes 10 rows of the array in each batch. For this example, you only want to process one row at a time. To make that change, update the batchLimit Hidden component.
Hover over the batchLimit Hidden component.
A 5-button toolbar displays above the component on hover-over.
Click the
(Settings) button to open the Configuration window.In the Default Value field, enter 1.
Click Save.
Update the Plug-In Component
Next, update the Plug-In component to reference an external service. Here, you'll use an API to look up records from the Office of Foreign Assets Control (OFAC).
For this to work, your environment must have this API configured under Services Administration. (You can read more on that in our Services Administration article.) If you're working in the Unqork Training environment (training.unqork.io), you're good to go!
Hover over the pluginExample Plug-In component.
A 5-button toolbar displays above the component on hover-over.
Click the
(Settings) button to open the Configuration window.In the Property ID and Label Text field, enter pluginOfacAPILookup.
Update the Inputs table to read:
Property ID: enter 'Bearer 3a80c050-07ce-3642-9ccf-0b3781b2fb6b'.
Mapping: enter Authorization.
Header: Yes (checked).
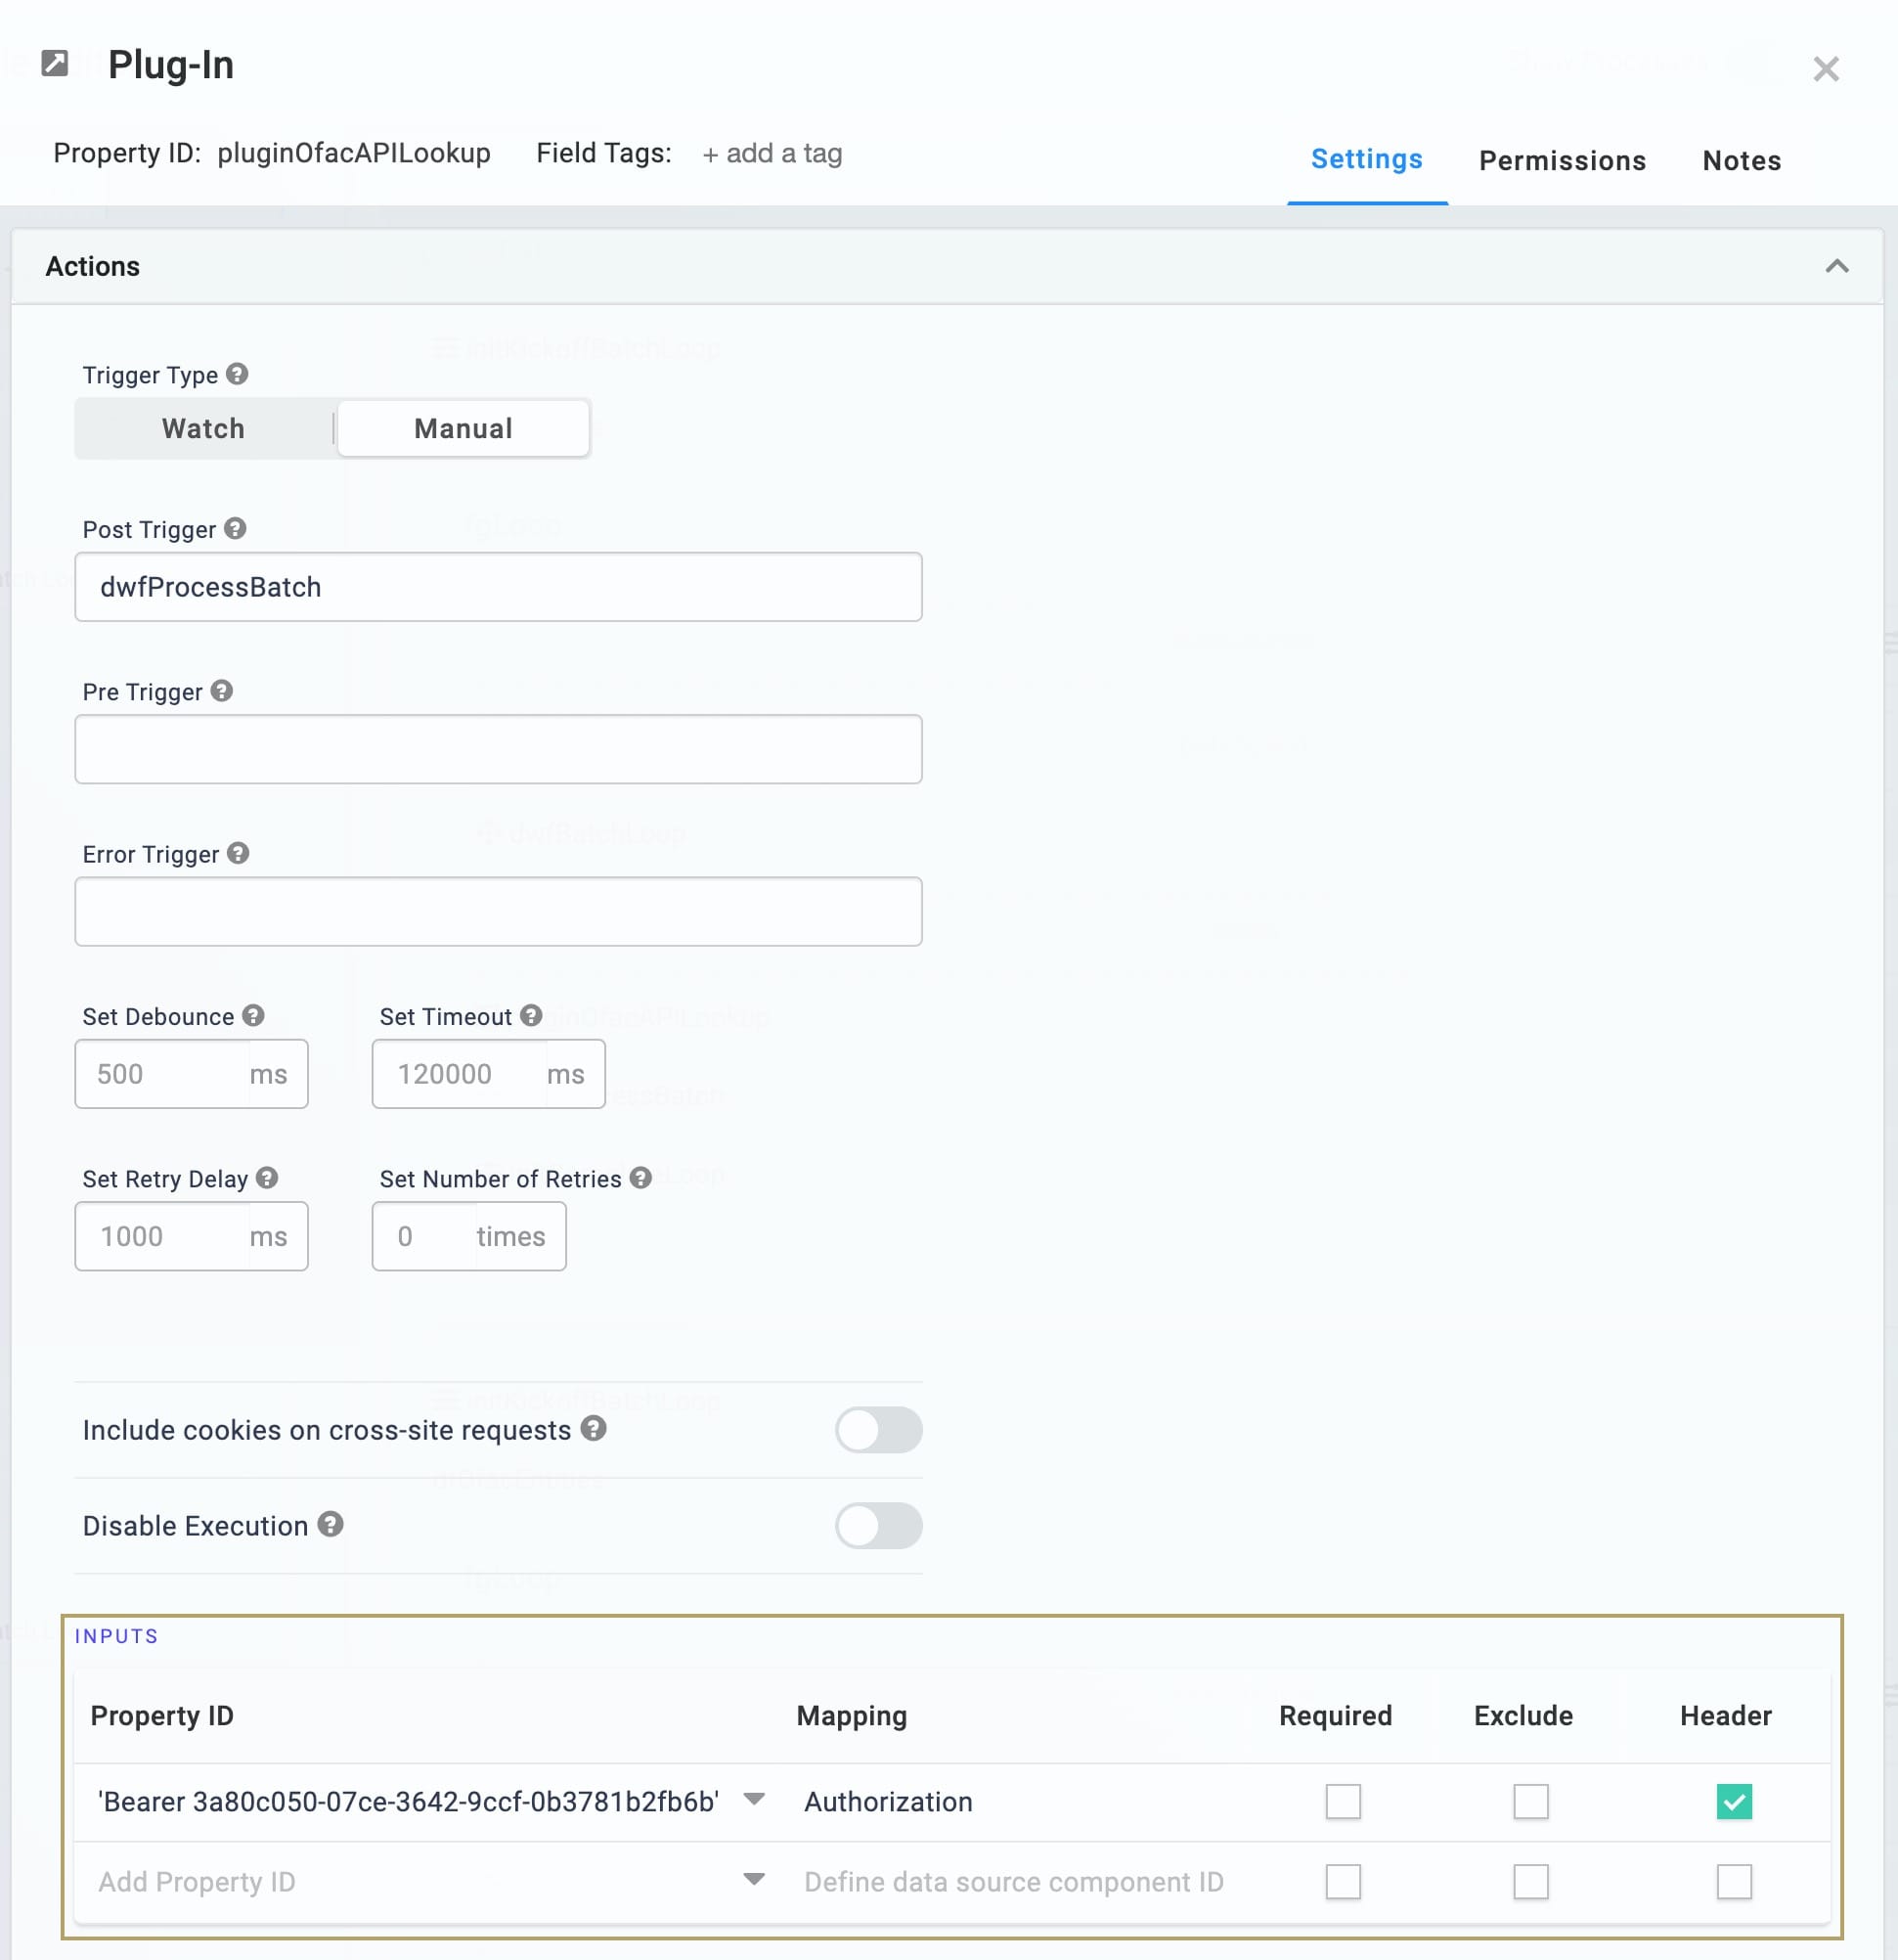
Clear the Internal Services drop-down by opening the drop-down and clicking Choose one.
In the Data Source URL field, enter https://api.trade.gov/Gateway/v1/consolidated_screening_list/search?q={{data.batch[0].entity}}.
This URL links to the Consolidated Screening List (CSL). Remember, this example is for an investment firm looking to do business with other countries. The CSL is the U.S. government's list of entities that have certain restrictions.

Click Save.
Update the First Data Workflow Component
You changed the names of your Plug-In and Data Table components. So, you need to update the components that reference them. First, update the dwfBatchLoop Data Workflow to match your updated Plug-In and Data Table components.
Hover over the dwfBatchLoop Data Workflow component.
A 5-button toolbar displays above the component on hover-over.
Click the
(Settings) button to open the Configuration window.
Update the Input Operator
Click the exampleArrayToProcess Input operator to open its Info window.
Configure the Input operator's Info window as follows:
Setting
Value
Category
Input
Component
dtOfacEntities
Required
No
Source
Default
Update the Output Operator
Click the pluginExample Output operator to open its Info window.
Configure the Output operator's Info window as follows:
Setting
Value
Category
Output
Component
pluginOfacAPILookup
Required
trigger
Click Save.
Update the Second Data Workflow Component
Now, update the Create Field operator to calculate the number of times an entity appears on OFAC's list.
Hover over the dwfProcessBatch component.
A 5-button toolbar displays above the component on hover-over.
Click the
(Settings) button to open the Configuration window.
Update the First Input Operator
Click the pluginExample Input operator to open its Info window.
Configure the Input operator's Info window as follows:
Setting
Value
Category
Input
Component
pluginOfacAPILookup
Required
No
Source
Default
Update the Second Input Operator
Click the exampleArrayToProcess Input operator to open its Info window.
Configure the Input operator's Info window as follows:
Setting
Value
Category
Input
Component
dtOfacEntities
Required
No
Source
Default
Update the Get Operator
Click the Get operator to open its Info window.
Configure the Get operator's Info window as follows:
Setting
Value
Category
Get
Label
Retrieve the counter value from the plugin response
Path
total
Update the Create Operator
Click the Create Field operator to open its Info window.
Configure the Create Field operator's Info window as follows:
Setting
Value
Category
Input
label
create a new field in each row with the counter value for this batch
Do Not Sanitize Formula
unchecked
Field 1
numberOfacHits = _arg
Field 2
sanctioned = IF(_arg>0,"Yes","No")
Update the Output Operator
Click the exampleArrayToProcess Output operator to open its Info window.
Configure the Output operator's Info window as follows:
Setting
Value
Category
Output
Component
dtOfacEntities
Action
value
Click Save.
Update the Initializer Component
Next, update the initCompleteLoop Initializer component to reflect your updated Plug-In.
Hover over the initCompleteLoop Initializer component.
A 5-button toolbar displays above the component on hover-over.
Click the
(Settings) button to open the Configuration window.In the Outputs table, enter the following:
Property ID
Type
Value
batch
clear
yes
pluginOfacAPILookup
clear
yes
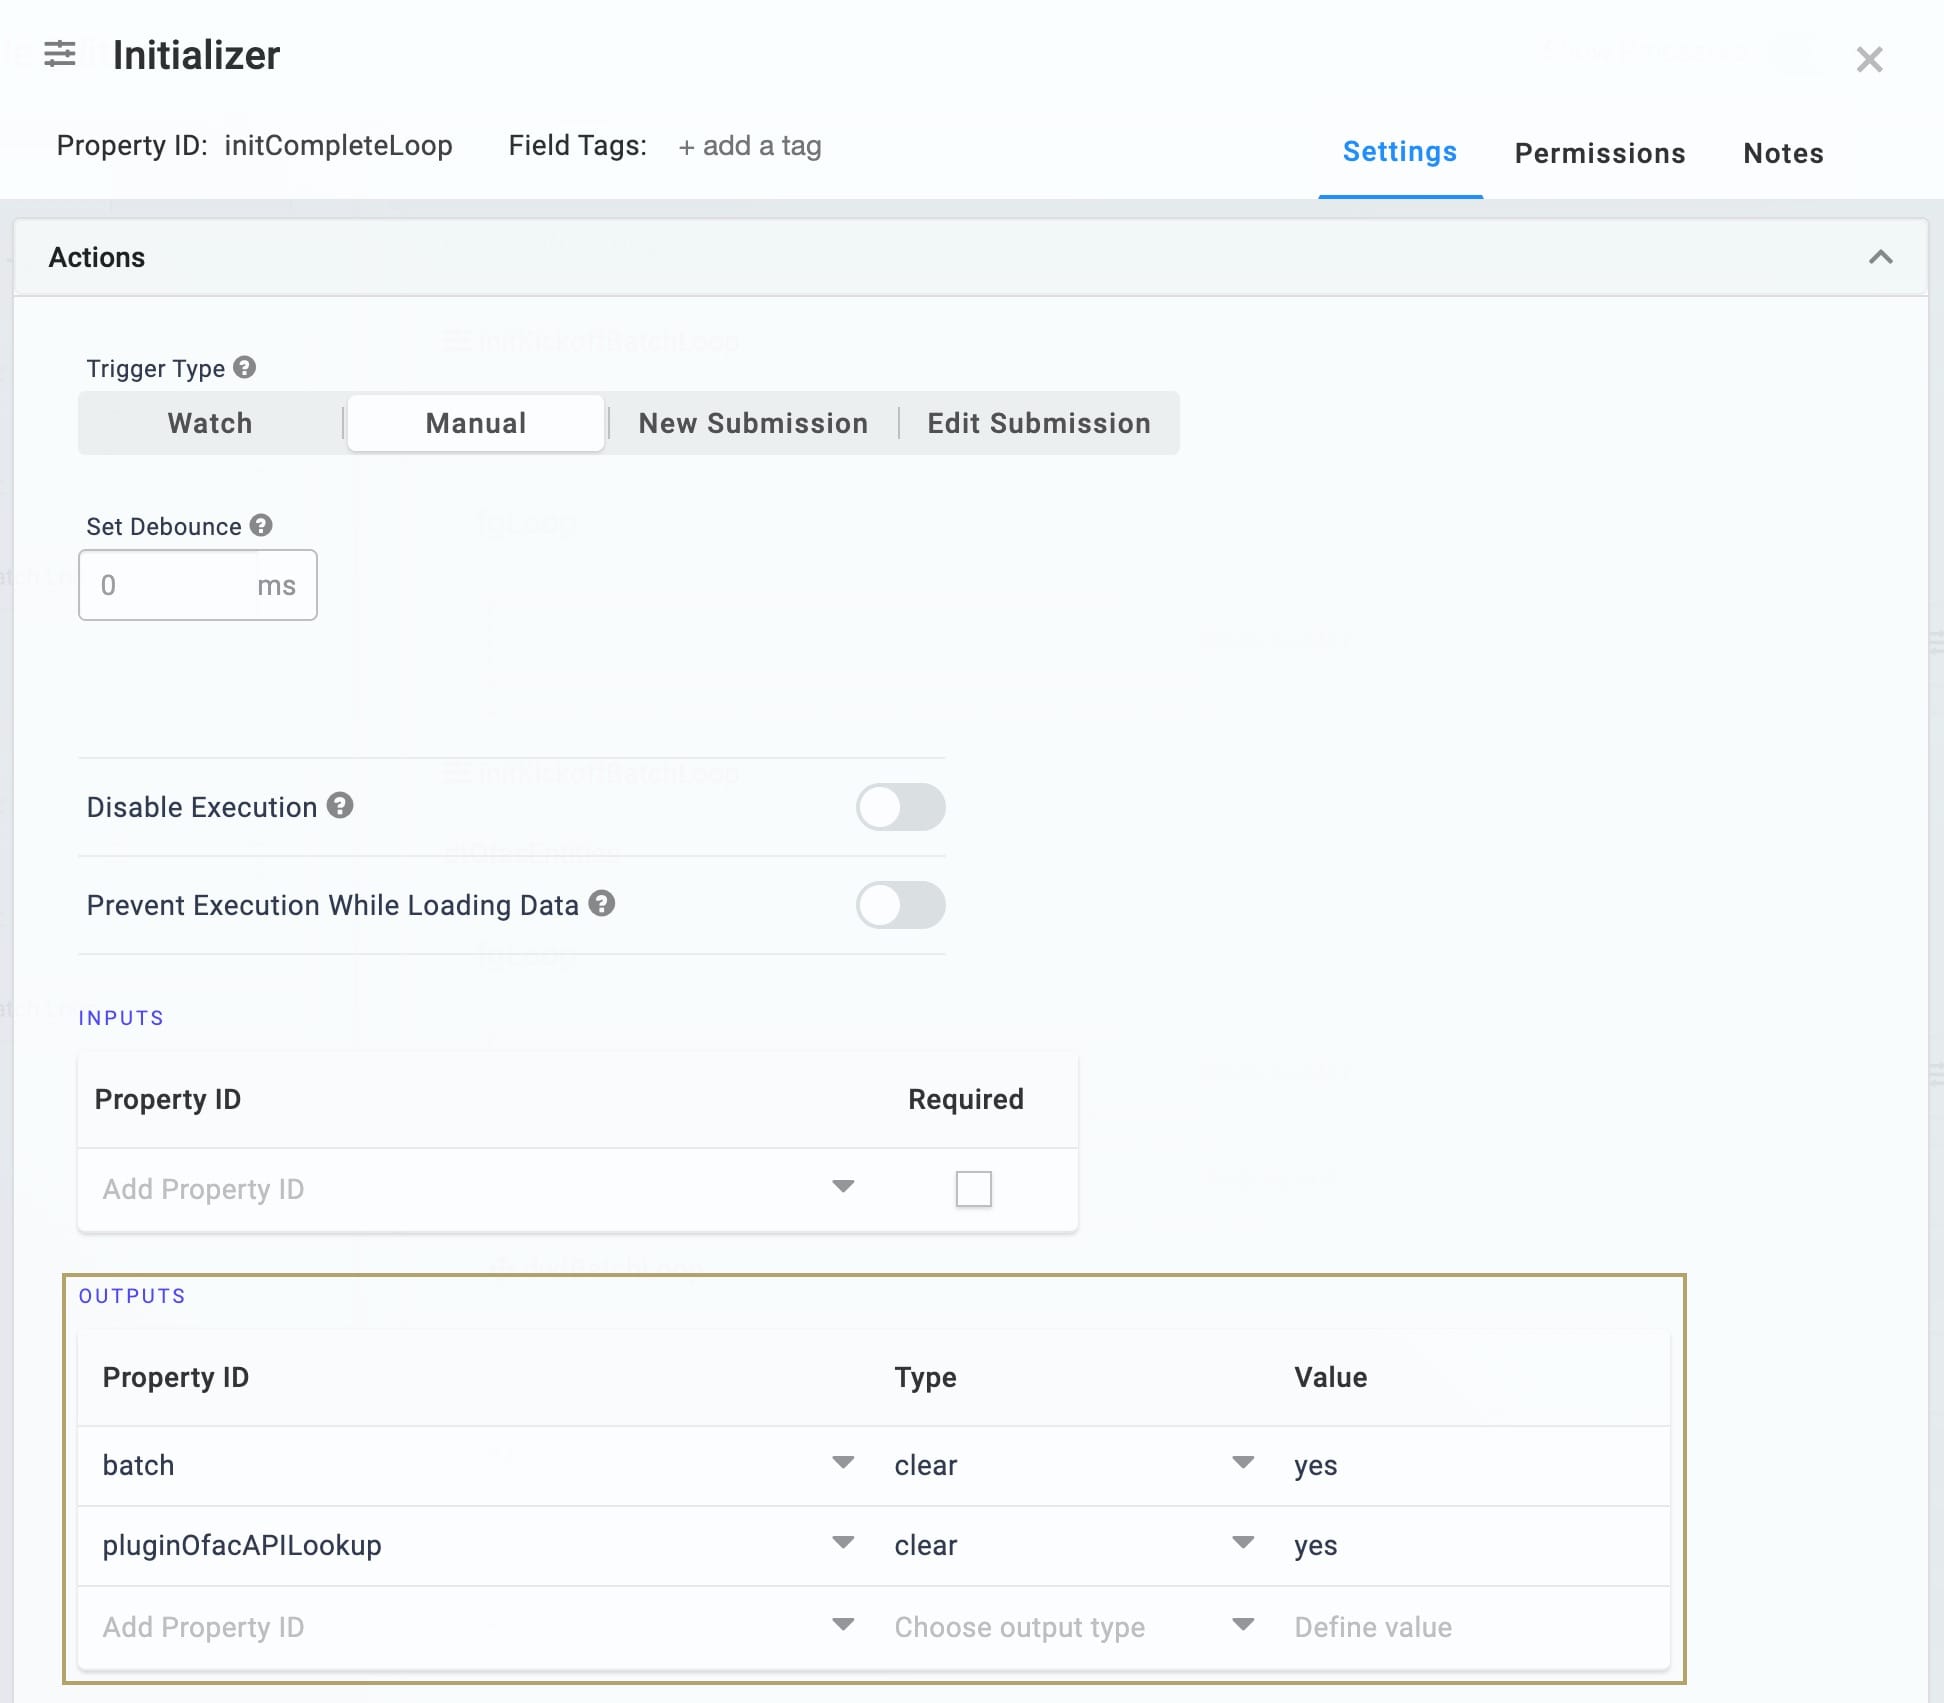
Click Save.
Configuring the ViewGrid Component
Now, add a ViewGrid component to display the entities and their OFAC hits.
Drag and drop a ViewGrid component onto the canvas. Place your ViewGrid component in your panelBatchLoop panel below your initCompleteLoop Initializer.
In the Label and Property Name fields, enter vgOfacHits.
In the Inputs table, enter the following:
ID: enter dtOfacEntities.
In the Display table, enter the following:
ID
Formula
Heading
Type
entity
Entity Name
string
numberOfacHits
Number of OFAC Hits
number
sanctioned
Sanctioned
string
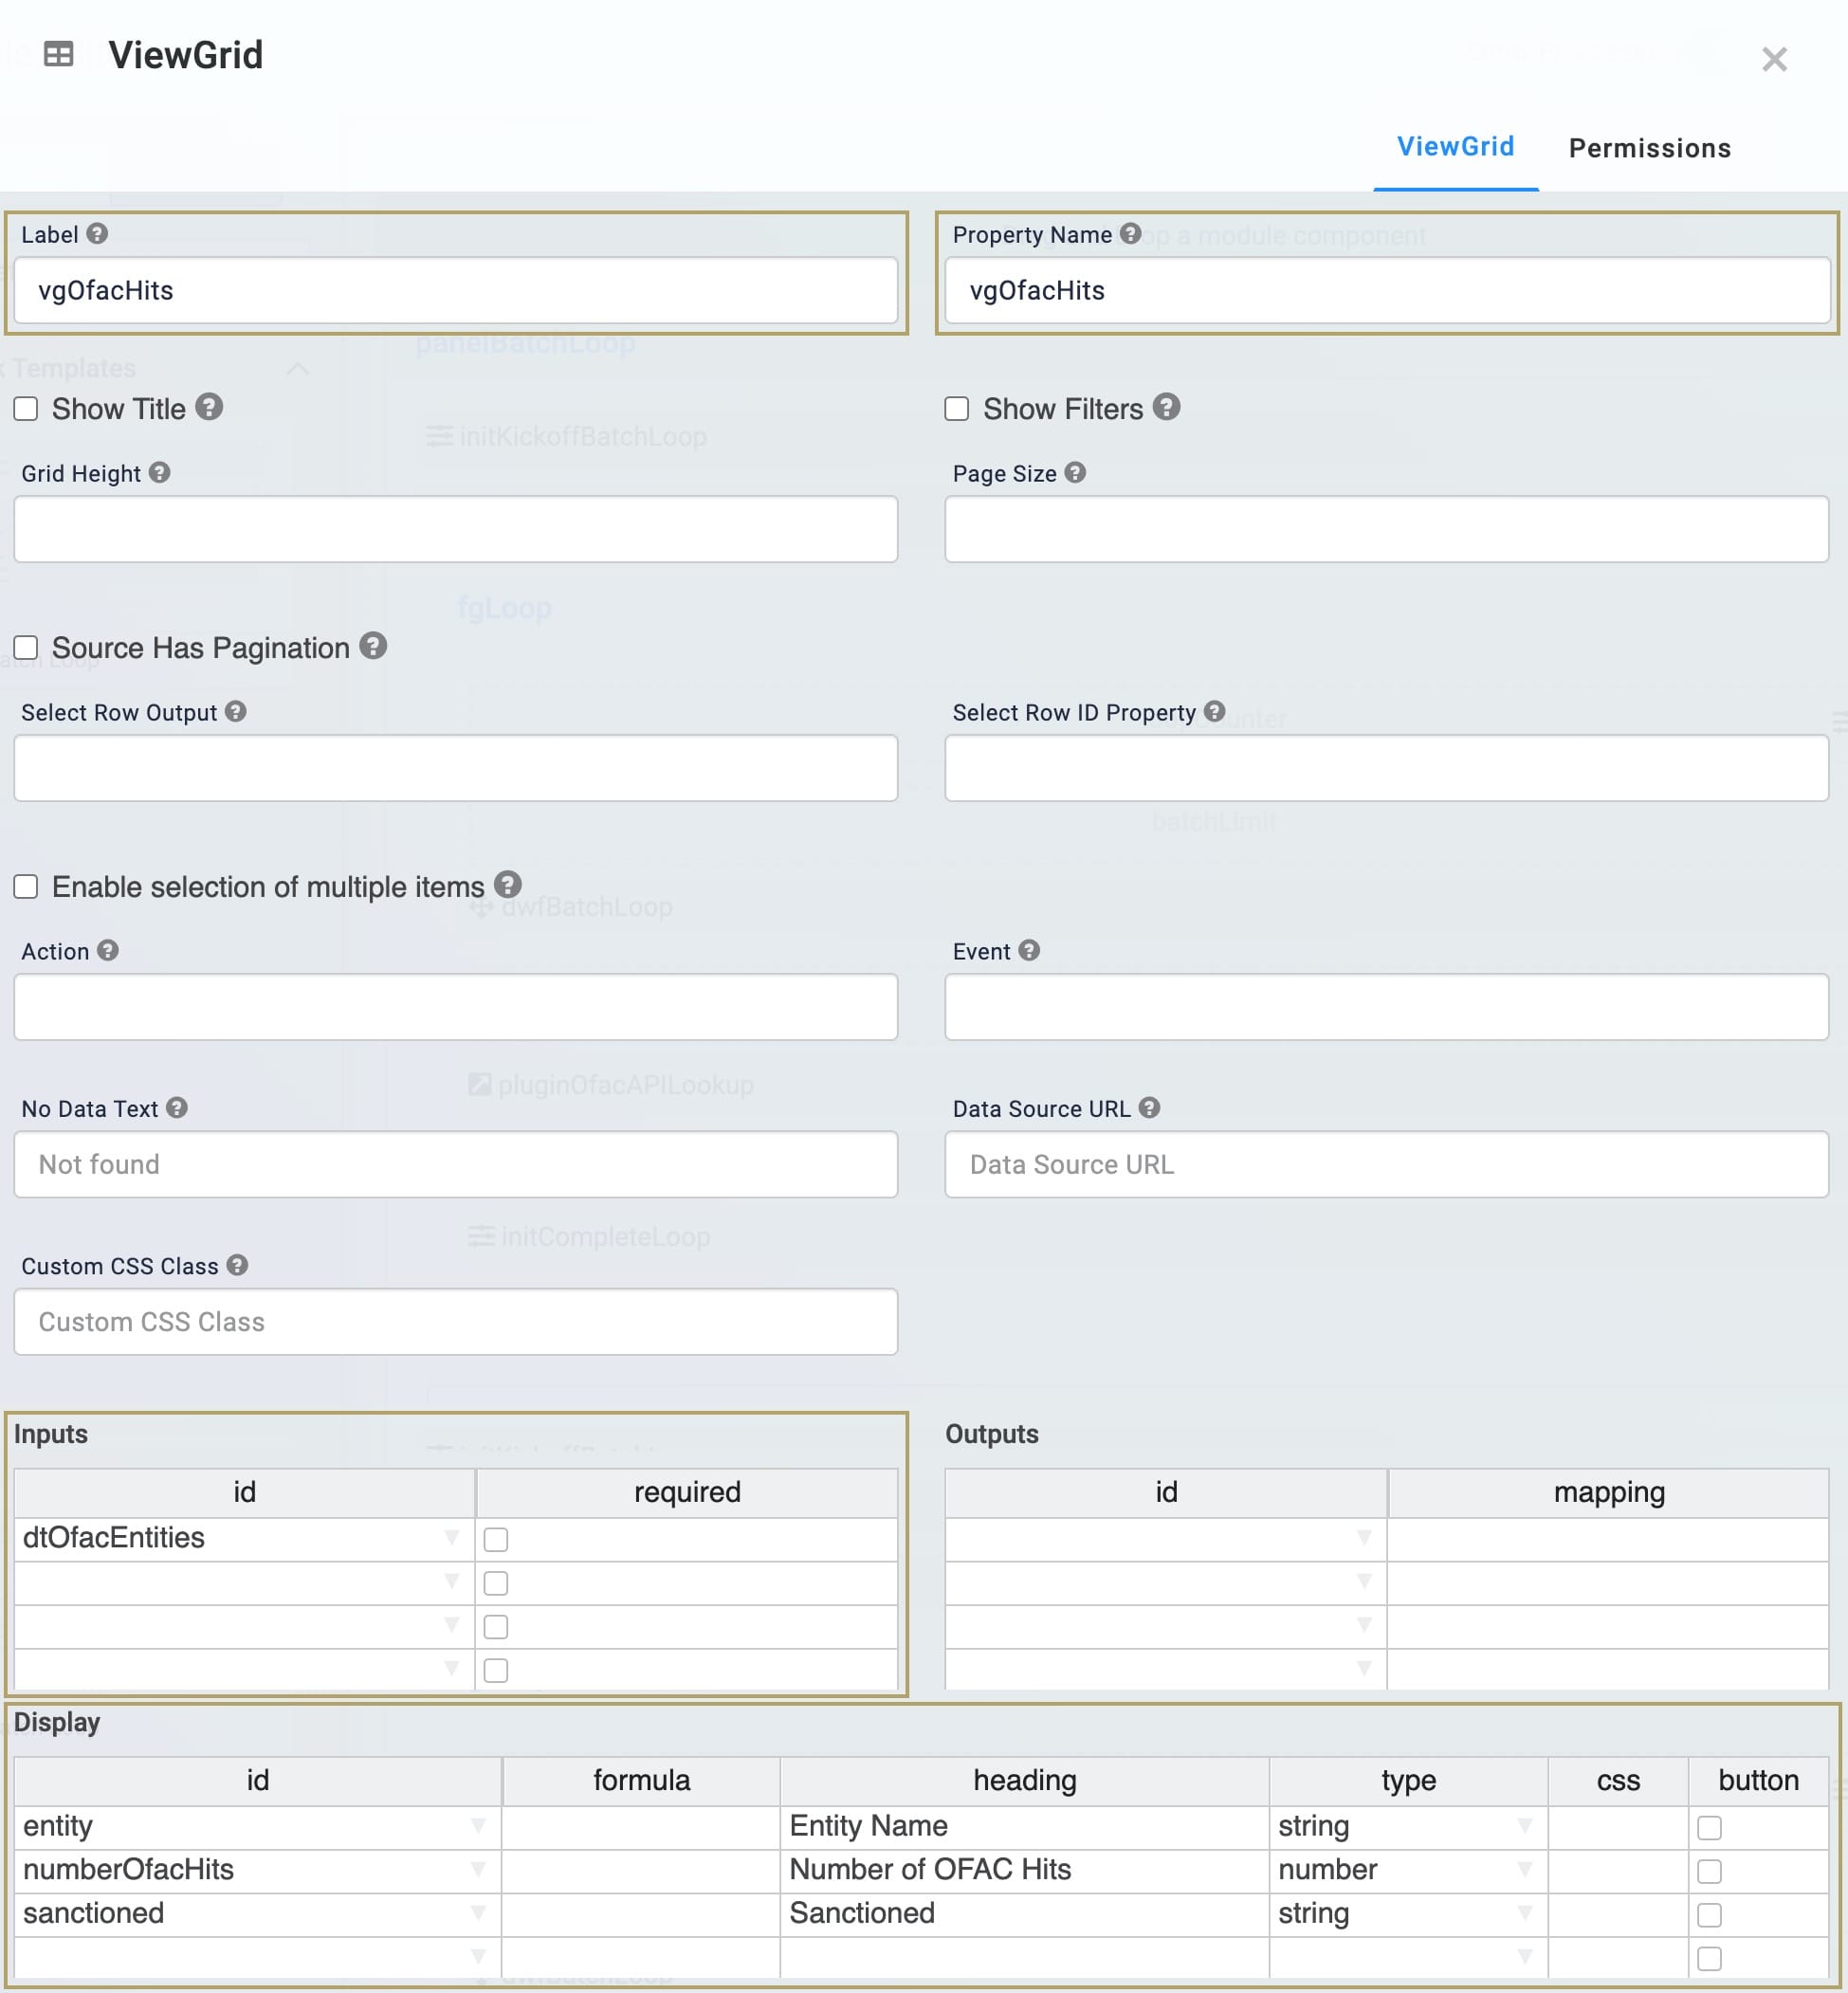
The data displayed under each heading comes from the API call executed by your Plug-In component. Each heading aligns with a piece of data that API returns to your module.
Click Save.
Configure the Button Component
Next, add a Button component to trigger the entire process.
Drag and drop a Button component onto your canvas. Place your Button component below your ViewGrid component.
In the Property ID field, enter btnRunLoop.
In the Label Text field, enter Run Loop.
From the Button Action Type, select Event.
In the Trigger on Click field, enter initKickoffBatchLoop.
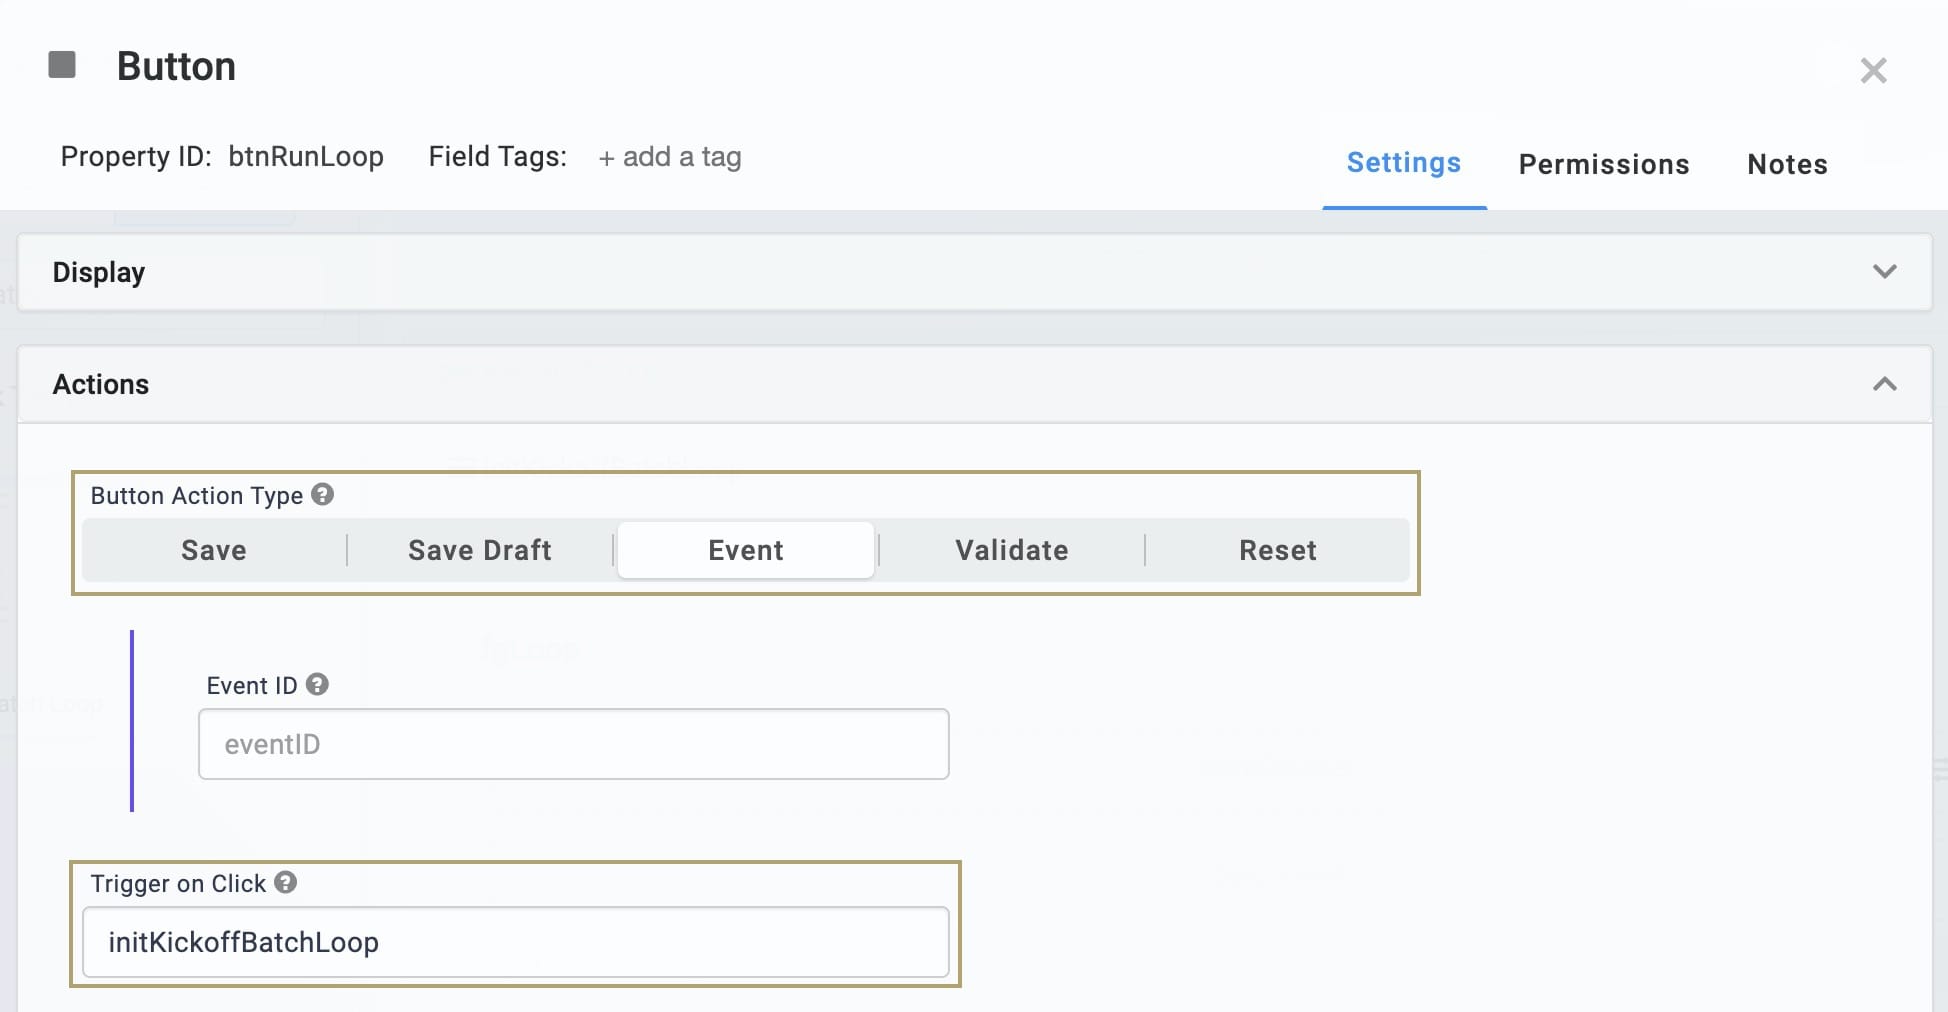
Click Save.
Update the Initializer Component
Finally, update the Trigger type for the Initializer component. You'll change the Trigger Type to Manual now that your Button triggers the Initializer.
Hover over the initKickoffBatchLoop Initializer component.
A 5-button toolbar displays above the component on hover-over.
Click the
(Settings) button to open the Configuration window.Select Manual from the Trigger Type.
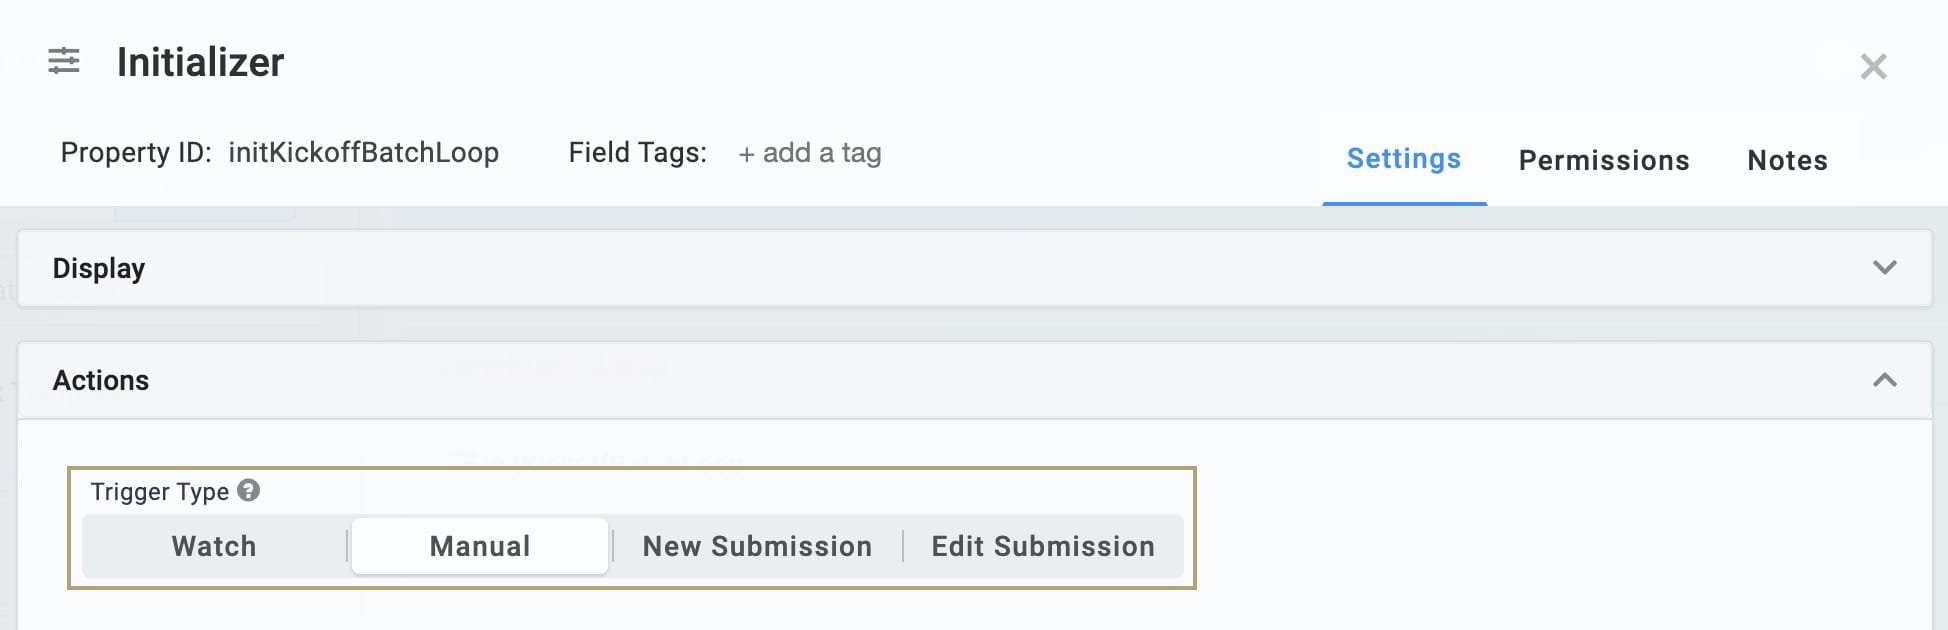
Click Save.
Save your module.
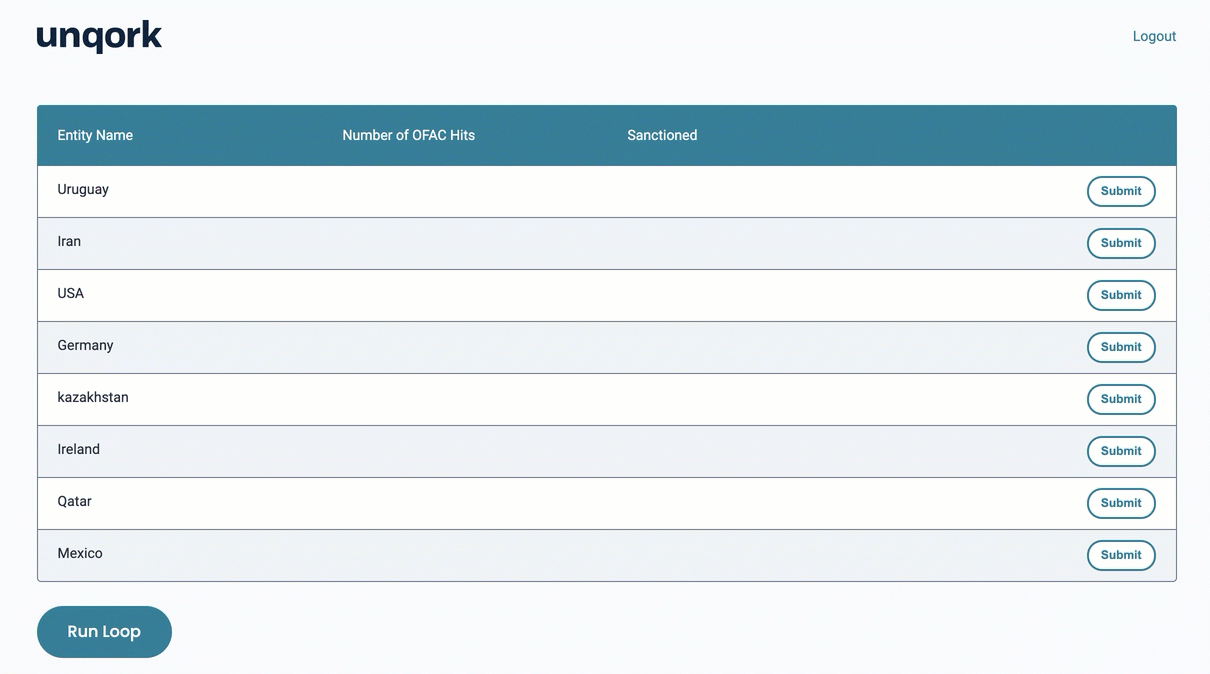
Now, preview your module. You'll see the list of countries in a table. Click the Run Loop button. When the loop finishes, the Number of OFAC Hits shows the number of hits each country has on the list. The sanctioned column indicates which countries are under sanctions by the United States. This information helps the investment firm decide who they want to do business with.
Removing the Snippet
You might want to remove a snippet from your application. Here, you'll learn how to remove the snippet from your module. Then, you'll learn how to uninstall the snippet from your environment.
Remove the Snippet from Your Module
To remove the Batch Loop snippet:
In the Module Builder, hover over the [propertyIDOfPanel] Panel.
A 5-button toolbar displays above the component on hover-over.
Using the toolbar, click the
.jpg) (Remove) button.
(Remove) button.Save your module.
Remove the Snippet from Your Environment
Use the Unqork Template Library to remove unused snippets. To uninstall a snippet from your environment:
At the top right of the Unqork Designer Platform, click Library or Templates.
Find the snippet you want to uninstall.
Click the ellipsis (...) in the snippet's tile header.
Click Uninstall Template.
Click Yes, Uninstall in the confirmation modal.
You can visit the Marketplace and reinstall the snippet at any time.
What if you have an existing application built using this snippet and then uninstall the snippet from your environment? No problem. Your existing application remains unaffected. Also, your application doesn't have any ties to the snippet. So, let's say you reinstall a newer version of the snippet in the future. You can rest assured that the installation doesn't impact your existing application.