Overview
The Inbox Style Dashboard snippet gives you a dashboard view much like what you see in Microsoft Outlook. You’ll have a simple list of submissions on the left of the page. When you click a submission, a panel opens on the right of the page showing submission details. This dashboard style is great if you want a simpler display with the option to expand each submission.
Here's how the snippet looks in the Module Builder:

And here's an example of a customized Inbox Style Dashboard snippet in Express View:
Adding the Snippet
Before you use this snippet in your application, you must install the snippet to your environment.
Adding the Snippet to Your Environment
To add the snippet to your environment:
Click Marketplace at the top right of the Unqork Designer Platform.
You can also access the Marketplace at any time by visiting https://marketplace.unqork.io.
Enter Inbox Style Dashboard in the Search the Marketplace field.
Click on the Inbox Style Dashboard tile.
Click Install to Environment.
Click Install Template.
If you aren't logged in, you'll see a field for Environment URL and a Login button. Enter your environment's URL where you want to install the template. For example: [environmentname.unqork.io]. Click the Login button. Then, return to step 4 and click Install to Environment again. Follow the remaining steps as listed.
Now, you can now use your newly installed snippet in your application.
Adding the Snippet to Your Module
So, you installed the Inbox Style Dashboard snippet to your environment. Now what? Now you can drag and drop the snippet right into your module:
In the left sidebar of the Module Builder, click the Snippets button.
Enter Inbox Style Dashboard in the search bar.
Drag and drop the Inbox Style Dashboard snippet onto your canvas.
If you don't see the snippet at first, make sure to expand the Marketplace Snippets section.
Save your module.
How the Snippet Works
Let's take a look at how this snippet works. First up, the initOnLoad Initializer component fires the pluginGetSubmissions Plug-In component. This Plug-In retrieves the submissions you want to display from the module ID specified in the moduleId Hidden component. The vgSubmissions ViewGrid has the pluginGetSubmissions Plug-In as an Input. If you click a dashboard row in Express View, the ViewGrid outputs the submission ID of your selection to the selectionId Hidden component. Then, the initSelectionView Initializer triggers the pluginGetSubmission Plug-In, which retrieves the entire submission and displays it in a panel to the right of the dashboard.
Setting Up the Snippet
There are 5 steps to setting up this snippet. You can do these in any order. Here’s what’s needed to get the snippet up and running:
Update the snippet so it pulls submissions from your schema module.
Update the Text Fields to match the data you want displayed.
Update the fields in the pluginGetSubmissions Plug-In.
Update your ViewGrid so your dashboard displays the way you want.
Update the pluginGetSubmission Plug-In.
Updating the Hidden Component with Your Schema Module ID
This snippet assumes you have a schema module with saved submissions. To map to your module, you only have to make a quick update.
In the Module Builder, hover over the moduleId Hidden component.
A 5-button toolbar appears above the component on hover-over.
Using the toolbar, click the
.jpg) (Settings) button.
(Settings) button.Enter your schema module's ID in the Default Value field.
Click Save.
Save your module.
Updating the Text Fields
The snippet comes standard with 4 placeholder Text Fields: Field A, Field B, Field C, and Field D. You'll update these to match the fields in your schema module. To follow along with our example use case, the following steps update the fields to Book Title, Author, Price, and Status.
To update each Text Field component:
Hover over the Text Field component.
Using the toolbar, click the
(Settings) button.Update the Property ID and Canvas Label Text as follows for the 4 Text Field components:
Property ID
Canvas Label Text
bookTitle
Book Title
author
Author
price
Price
itemStatus
Status
Click Save in each component after you update it.
Save your module.
Updating the pluginGetSubmissions Plug-In Component
Next up, you'll update the Plug-In component so it pulls the correct fields from your schema submissions.
Hover over the pluginGetSubmissions Plug-In component.
Using the toolbar, click the
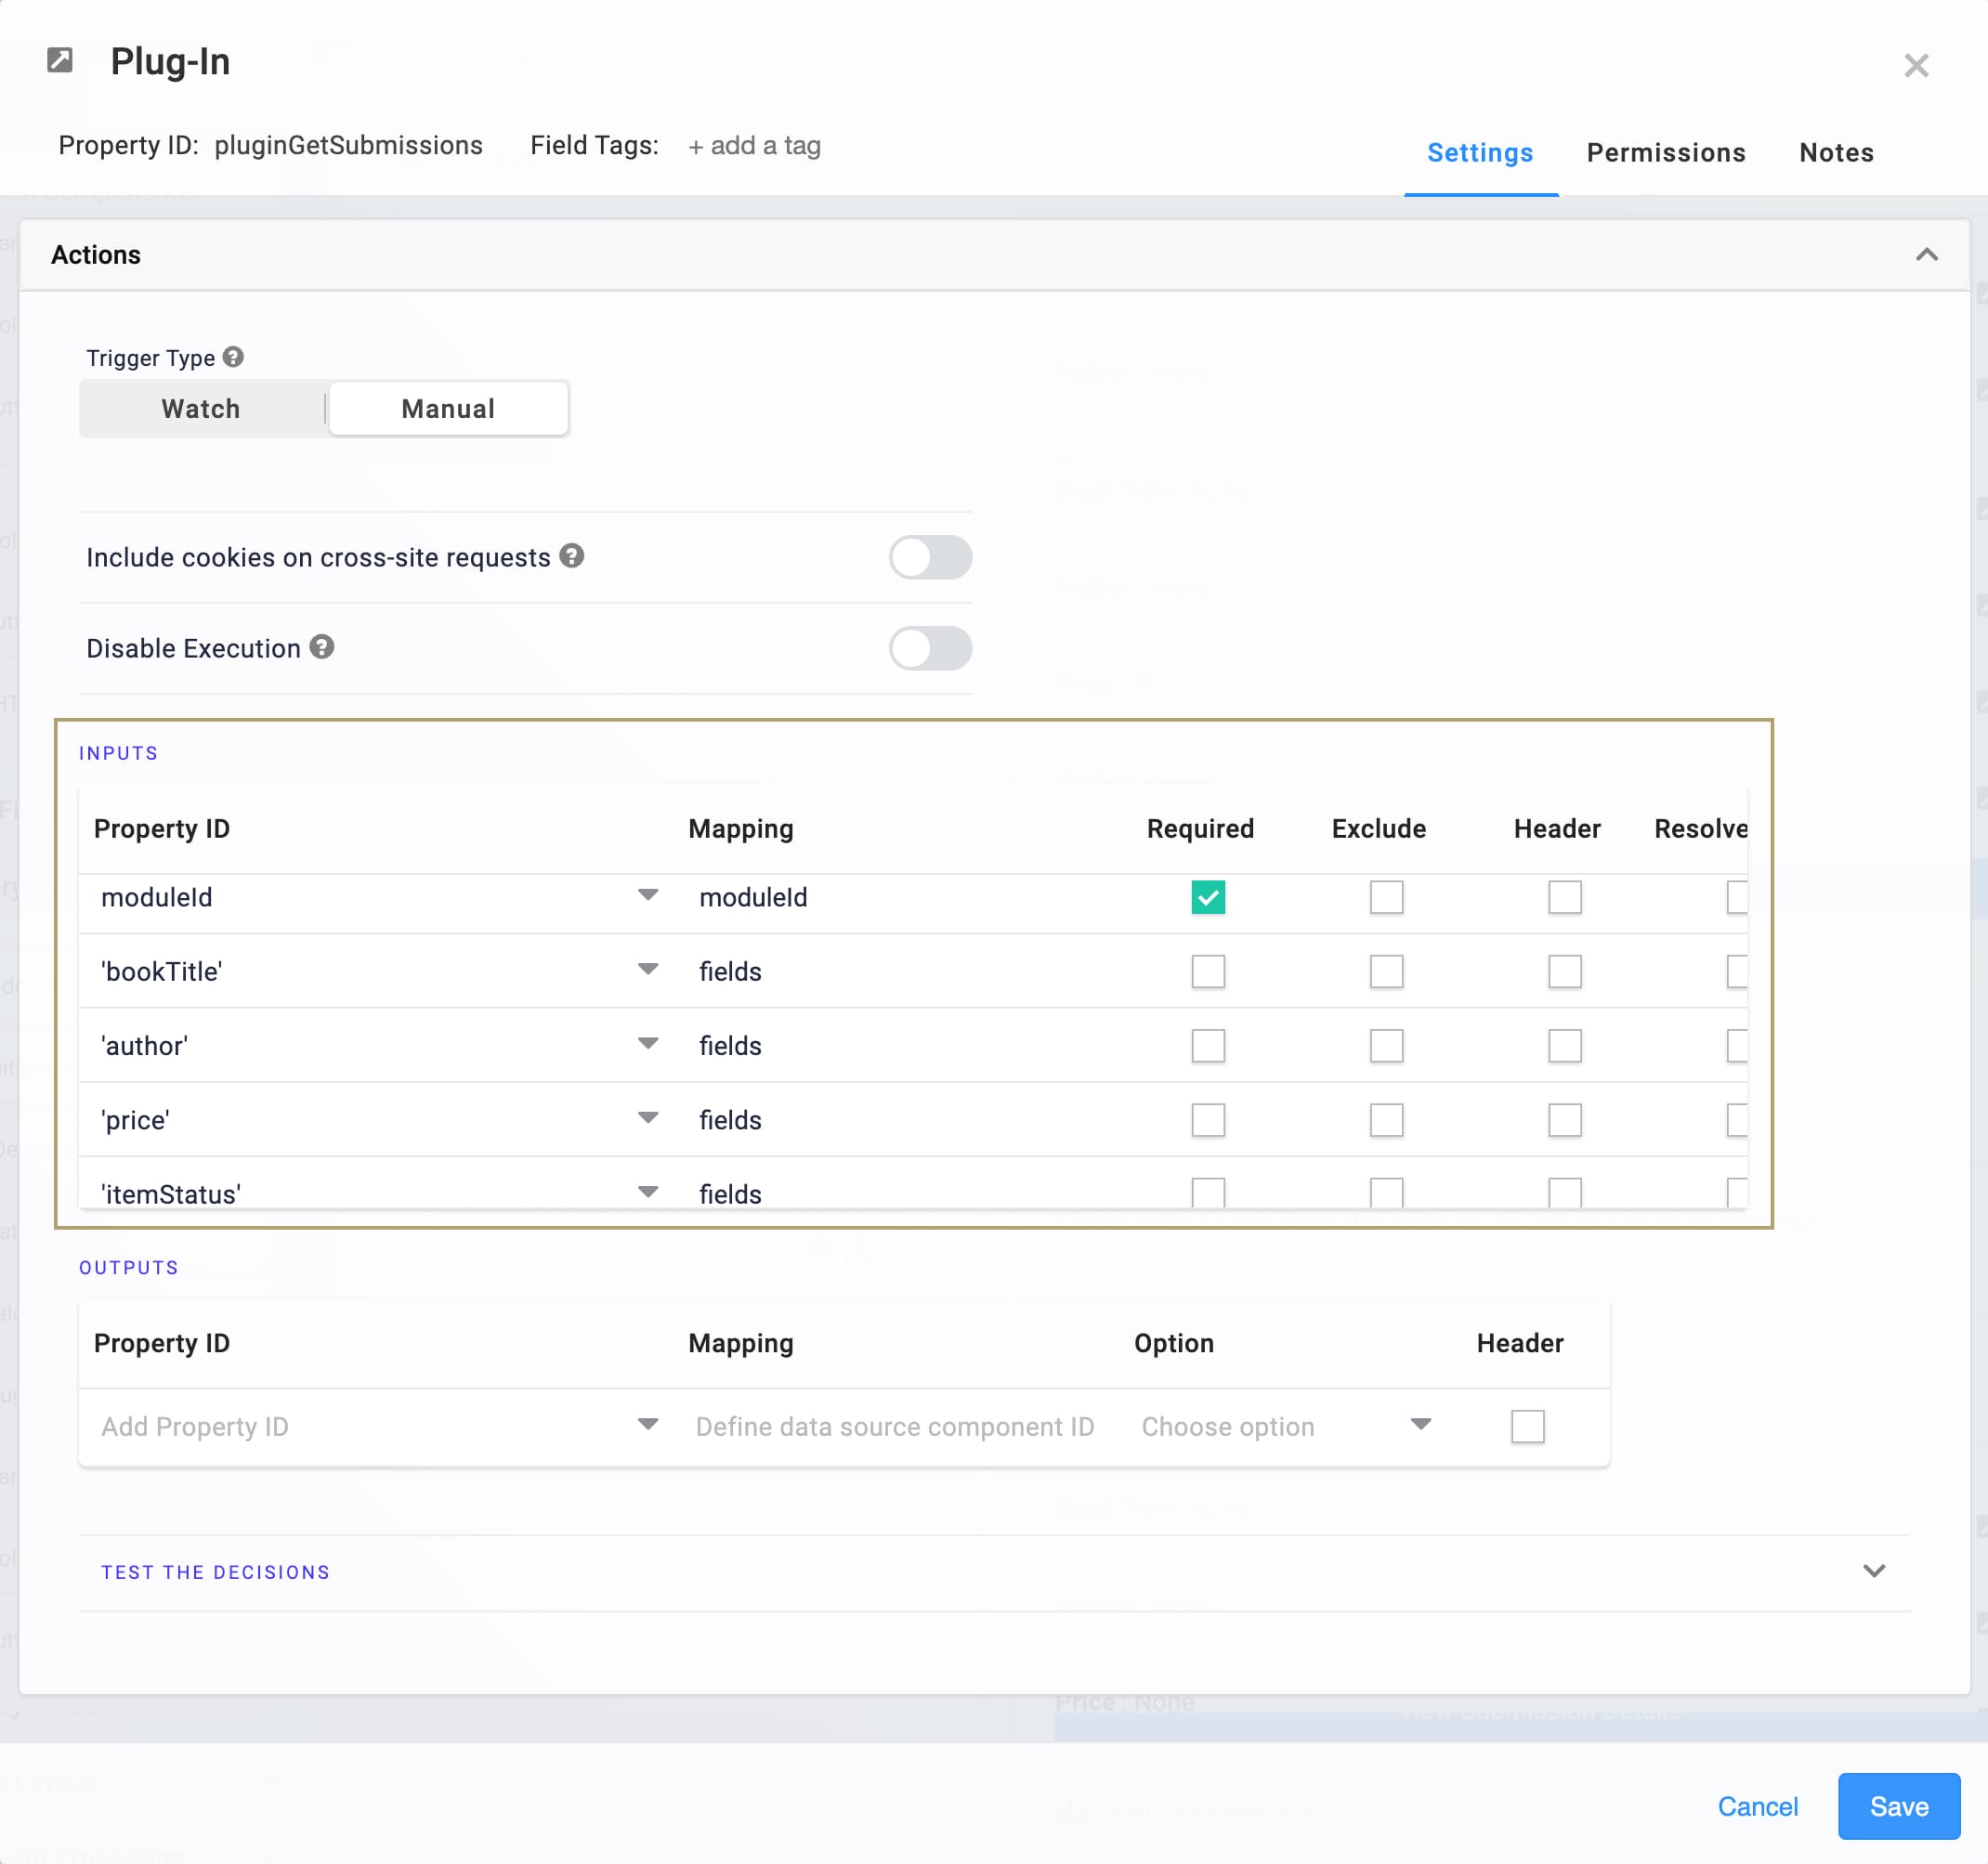
(Settings) button.In the Inputs table, update the Property ID column to match the Property IDs of the fields in your schema submissions. For our use case, update as follows:
Property ID
Mapping
moduleId
moduleId
'bookTitle'
fields
'author'
fields
'price'
fields
'itemStatus'
fields
Click Save.
Save your module.
Updating the vgSubmissions ViewGrid Component
Now, you'll update the ViewGrid component so that the dashboard only shows the columns you want to display. This is also where you can personalize the column headings for your dashboard. Since the Inbox Style Dashboard snippet has a small and simple dashboard view, it's best to limit the number of fields you display. If you add too many fields, your dashboard can look crowded.
Hover over the vgSubmissions ViewGrid component.
Using the toolbar, click the
(Settings) button.In the Display table, update the Heading column's fields to what you want displayed on your dashboard in Express View. To follow along with our use case, update as follows:
ID
Formula
Heading
Type
bookTitle
Book Title
string
author
Author
string
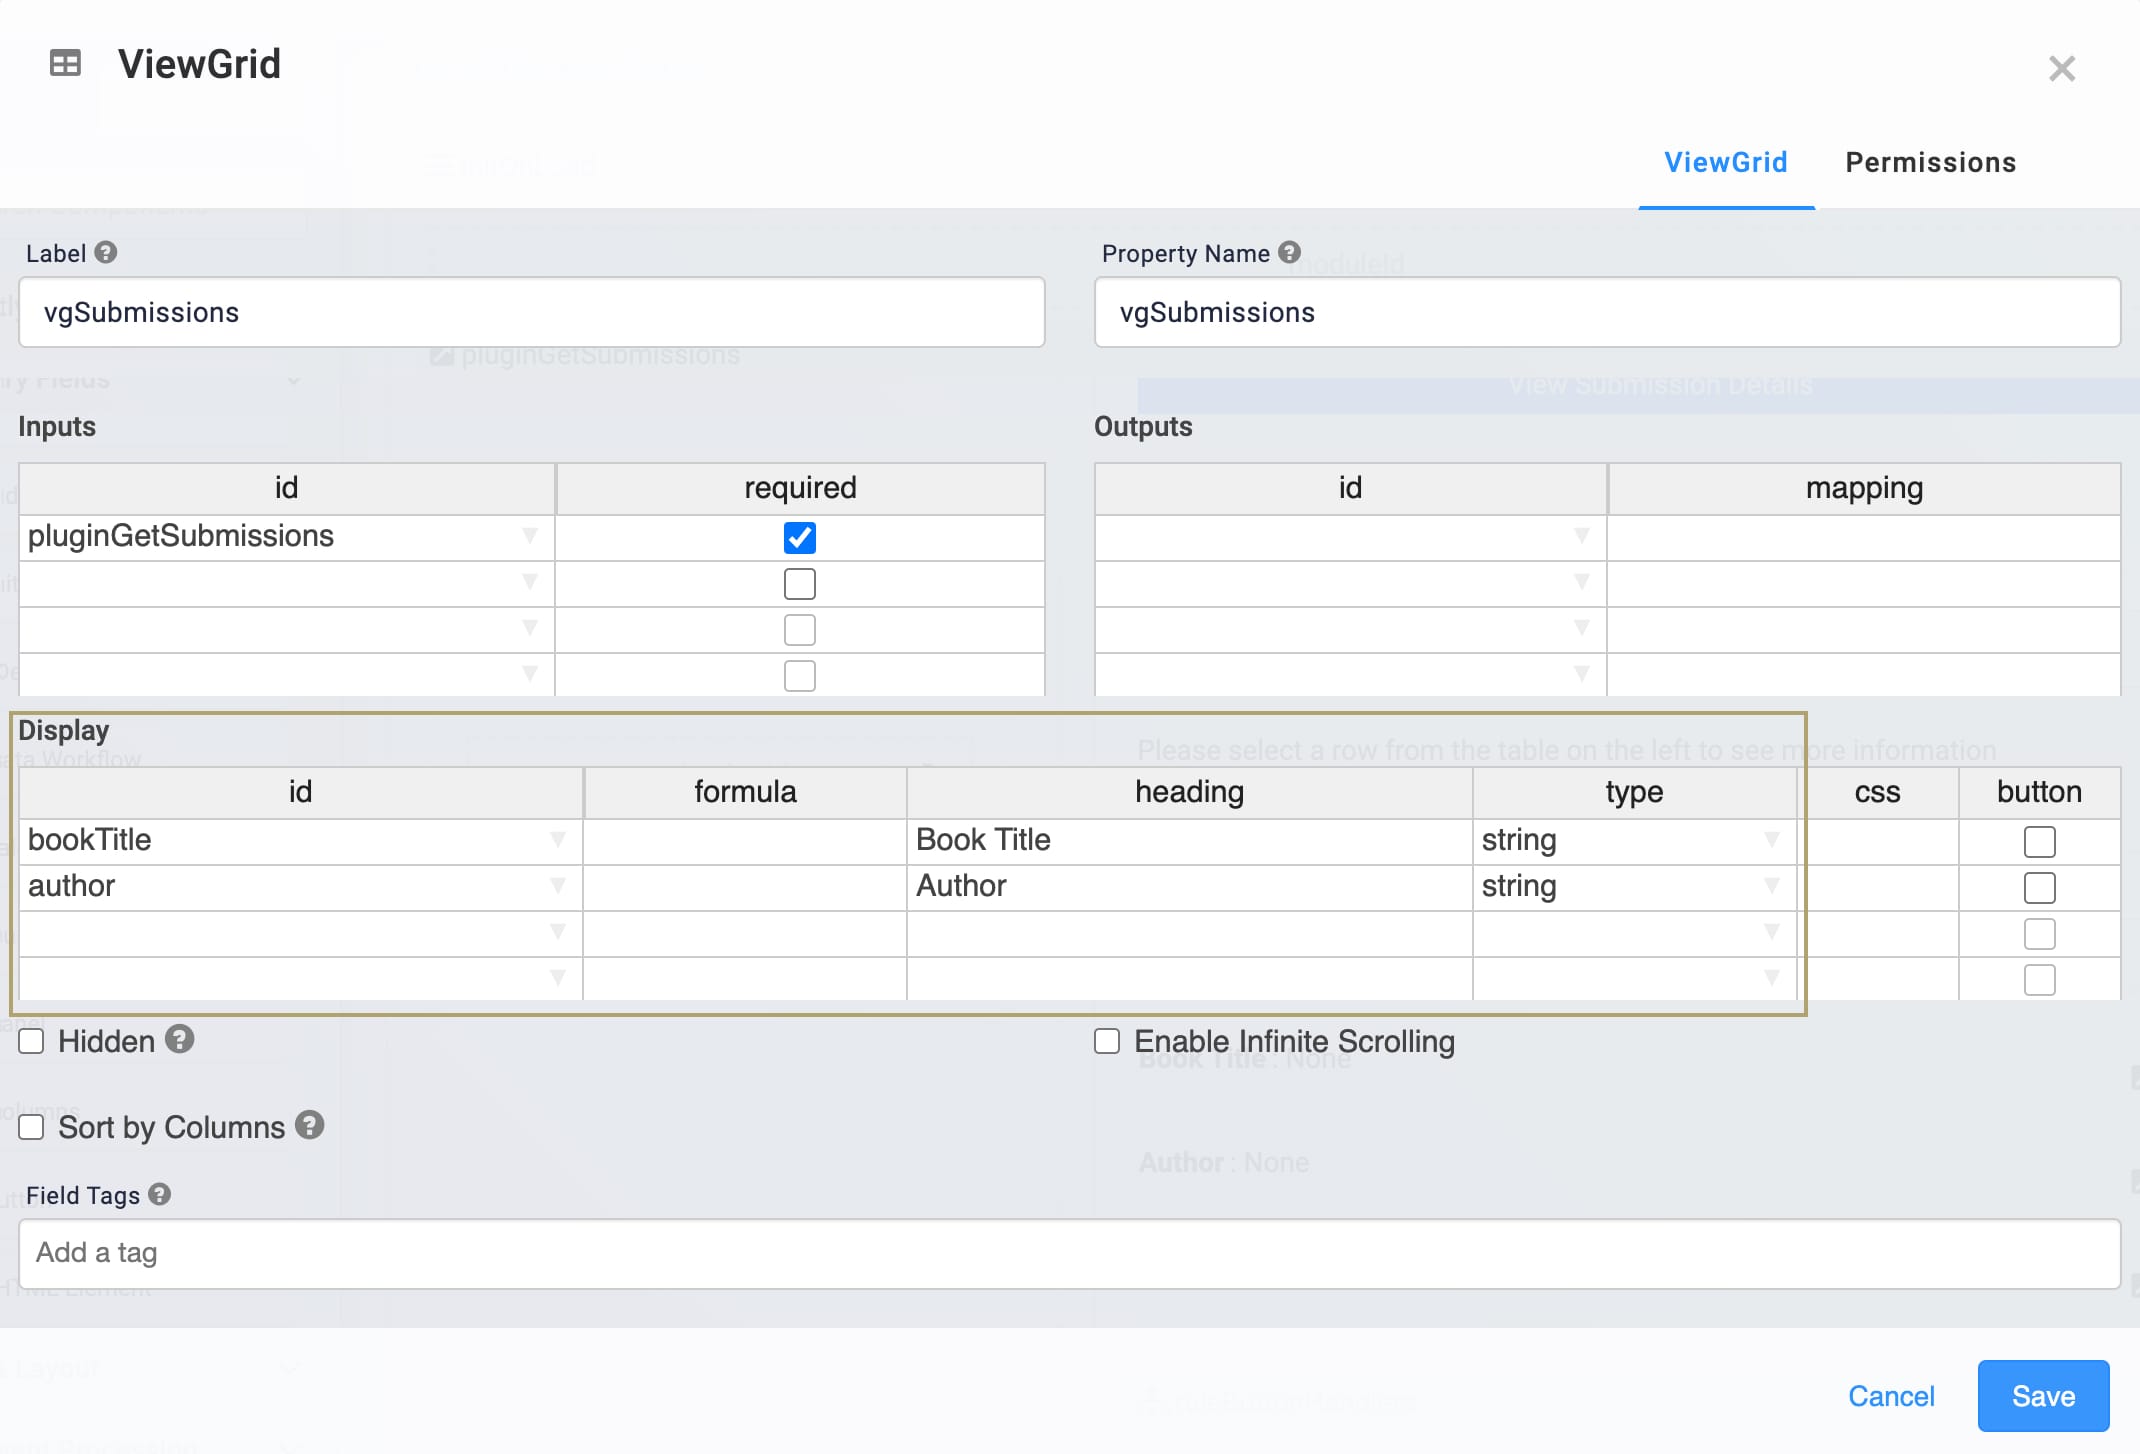
Make sure the Type field is correct for each component. This is best practice when working with ViewGrids and helps with sorting. For example, you could pick from the following types: date, currency, number, or string.
Click Save.
Save your module.
Updating the pluginGetSubmission Plug-In Component
Lastly, you must update the Outputs table in the pluginGetSubmission Plug-In. This update ensures your dashboard selection properly displays on the right side of the screen.
Hover over the pluginGetSubmission Plug-In component.
Using the toolbar, click the
(Settings) button.Update the Outputs table for the Property IDs of the fields in your schema submissions. For our use case, update as follows:
Property ID
Mapping
bookTitle
data.rawData.bookTitle
author
data.rawData.author
price
data.rawData.price
itemStatus
data.rawData.itemStatus

Click Save.
Save your module.
Removing the Snippet
What if you're no longer interested in using this snippet? No problem. We'll walk you through the quick steps to remove the snippet from your module. Then, you'll learn how to uninstall the snippet from your environment.
Removing the Snippet from Your Module
Removing a snippet from your module is easy. To remove the Inbox Style Dashboard snippet:
In the Module Builder, hover over the panelInboxDashboard Panel.
Using the toolbar, click the
.jpg) (Remove) button.
(Remove) button.Save your module.
Removing the Snippet from Your Environment
Use the Unqork Template Library to remove unused snippets. To uninstall a snippet from your environment:
At the top right of the Unqork Designer Platform, click Library or Templates.
Find the snippet you want to uninstall.
Click the ellipsis (...) in the snippet's tile header.
Click Uninstall Template.
Click Yes, Uninstall in the confirmation modal.
You can visit the Marketplace and reinstall the snippet at any time.
What if you have an existing application built using this snippet and then uninstall the snippet from your environment? No problem. Your existing application remains unaffected. Also, your application doesn't have any ties to the snippet. So, let's say you reinstall a newer version of the snippet in the future. You can rest assured that the installation doesn't impact your existing application.
Lab
You'll find the source module for this use case here: https://training.unqork.io/#/form/60d20cc5f32edc02e43749de/edit.
You'll find the schema module for this use case here: https://training.unqork.io/#/form/60d20cddf32edc02e43749e2/edit.