Overview
For an easy way to filter through submissions in a dashboard, use the Date Filters snippet. At first, you might find navigating your dashboard without filters to be simple. As your dashboard accumulates submissions, though, navigation can grow more challenging. That's where the Date Filters snippet helps.
Imagine trying to find one specific submission in a dashboard of hundreds. You can probably guess that's no small feat. With the Date Filters snippet, you can view submissions from a range of dates. You can either set a custom date range or choose from preset options in a drop-down menu.
Here's how the snippet looks in Express View:
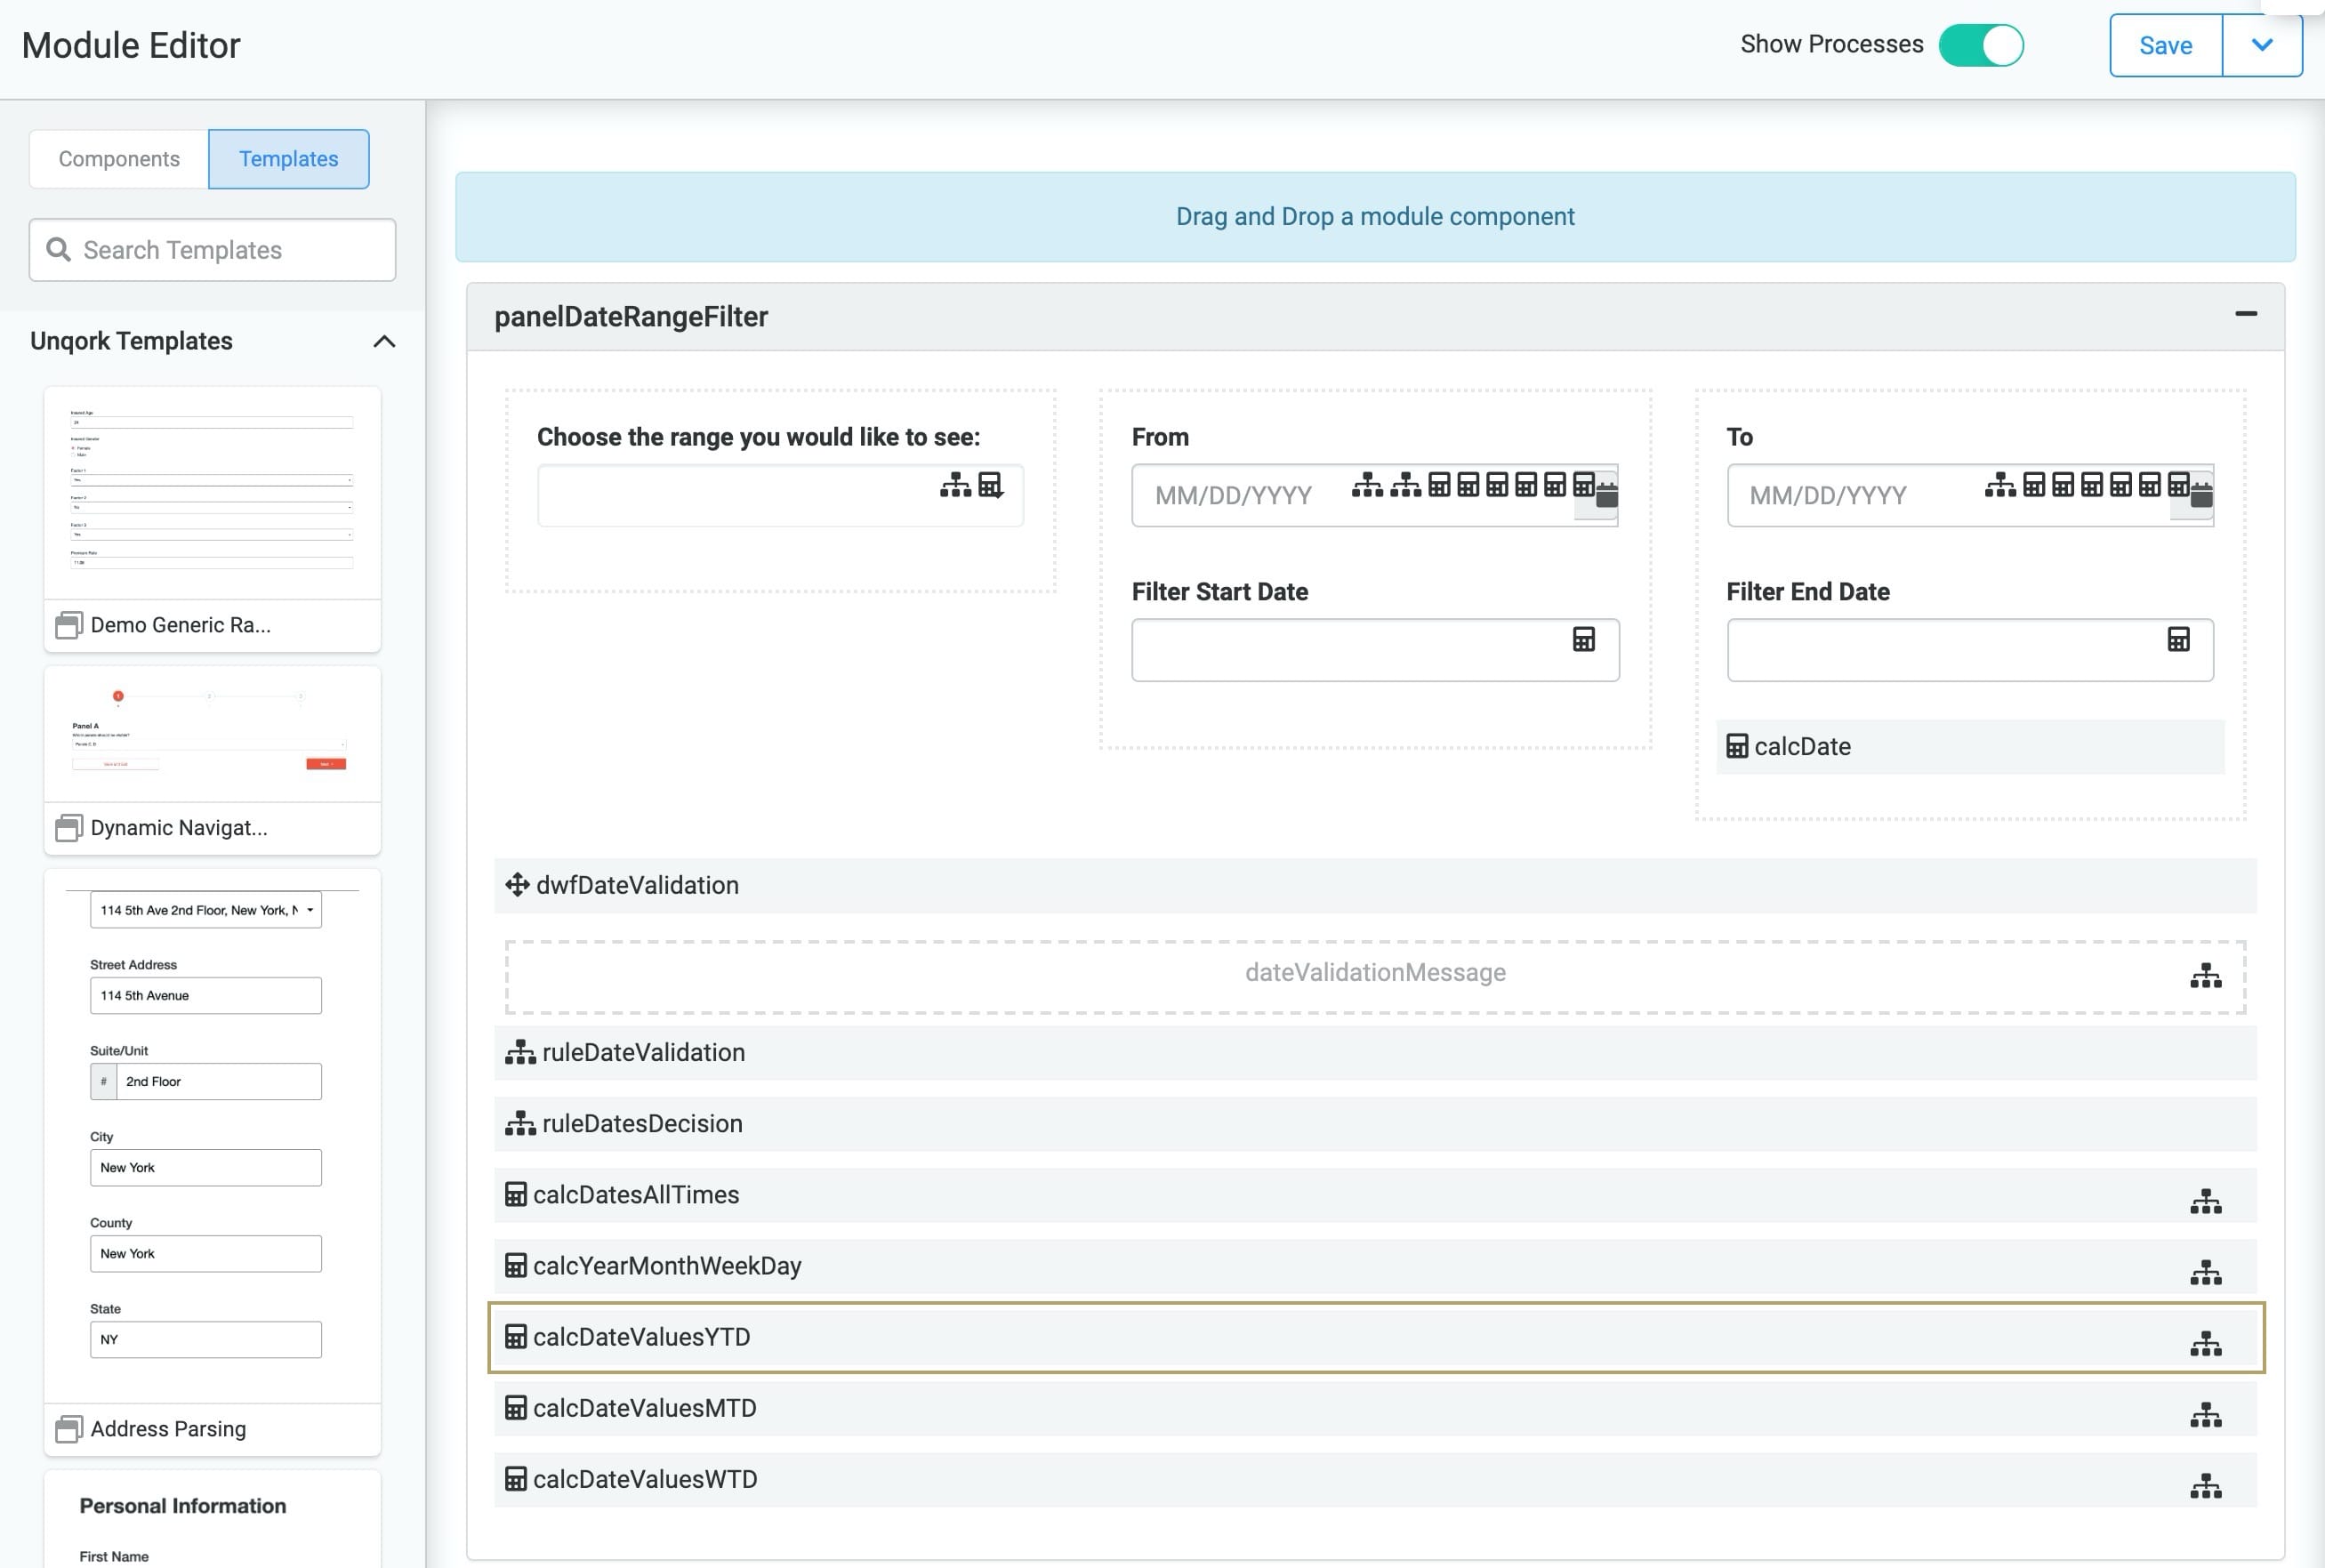
And here's how the snippet looks in the Module Builder: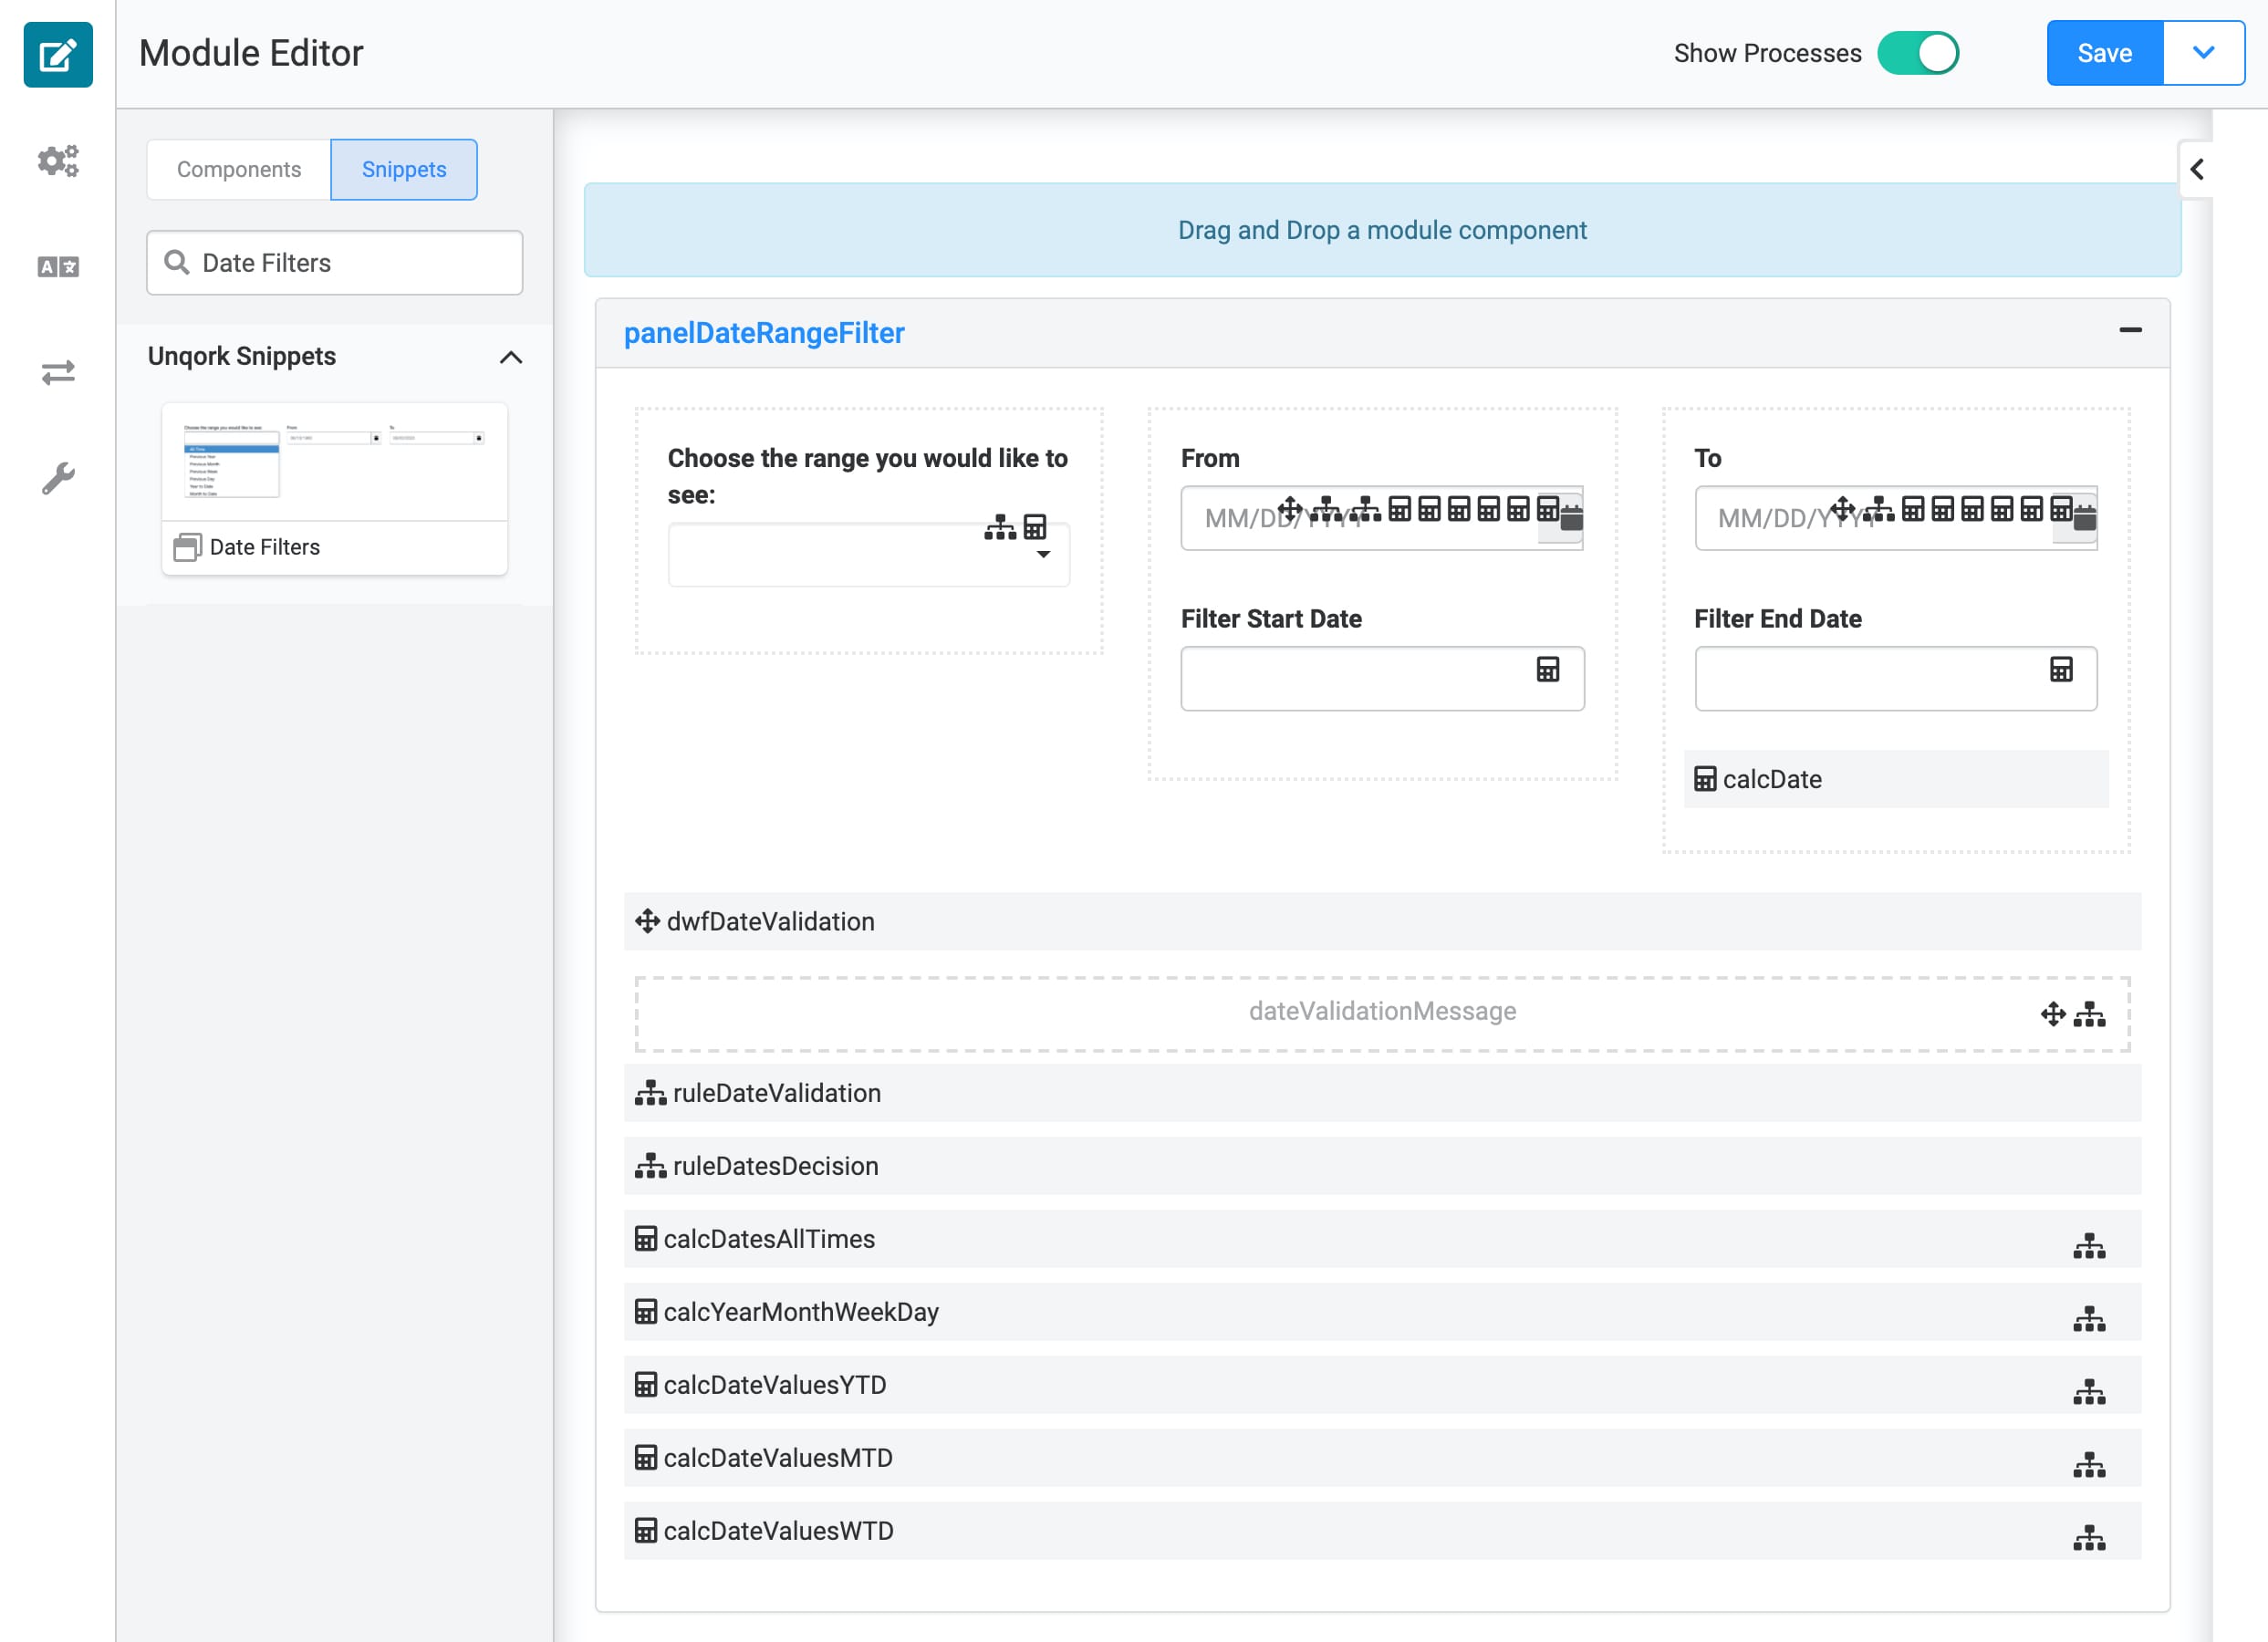
Adding the Snippet
Once you determine a need to filter by date, you'll add the Date Filters Snippet.
Before you use this snippet in your application, you must install the snippet to your environment.
Adding the Snippet to Your Environment
To add the snippet to your environment:
At the top right of the Unqork Designer Platform, click Library.
Click Templates.
Click Marketplace.
You can also access the Marketplace at any time by visiting https://marketplace.unqork.io.
In the Search the Listings Directory field, enter Date Filters.
Click the Date Filters tile.
Click Install to Environment.
Click Install Template.
If you aren't logged in, you'll see a field for Environment URL and a Login button. Enter your environment's URL where you want to install the template. For example: [environmentname.unqork.io]. Click the Login button. Then, return to step 4 and click Install to Environment again. Follow the remaining steps as listed.
Now, you can now use your newly installed snippet in your application.
Adding the Snippet to Your Module
After installing the Date Filters snippet to your environment, you can drag and drop the snippet into your module:
In the left sidebar of the Module Builder, click the Snippets button.
In the search bar, enter Date Filters.
Drag and drop the Date Filters snippet onto your canvas.
If you don't see the snippet at first, make sure to expand the Marketplace Snippets section.
Save your module.
How the Snippet Works
In the Date Filters snippet, you'll use two Date Input components to set a date range. Your dashboard updates to only show submissions that fall in that date range.
You also have the option to choose a preset date range. For preset date ranges, the snippet uses a Multi-Select Dropdown component. When you make a selection there, your Date Input fields populate accordingly.
At first glance, the Date Filters snippet might seem simple. But behind the scenes, a lot is going on. The snippet has several Calculator components that each determine a different date range. Each selection from the Multi-Select Dropdown component triggers a different Calculator. For example, by selecting Previous Year, you trigger a Calculator called calcDateValuesYTD. This Calculator takes today's date and finds the date one year ago.
For custom ranges, the snippet includes a Data Workflow that validates the entries. This Data Workflow ensures that your From date always comes before your To date. If the dates entered are invalid, an issue occurs in the Data Workflow. An error message displays from a hidden Text Field component.
While this snippet offers a lot of functionality, it doesn't work off-the-shelf. First, you'll configure the components to connect to your existing dashboard.
If you have more than one date field in your dashboard, you can set the snippet to sort by any field of your choosing. A walk-through for this is in the next section.
Setting Up the Snippet
Your Date Filters snippet collects the date range you want to view. The configuration you complete communicates that date range to your actual dashboard. Since this snippet requires more setup than most, here is a sample use case.
Create a dashboard where you can view some customer information. Your dashboard module will draw submissions from a source module (5ef380b5804251020c3b019b). Each submission has a field for Investment Date. Using the Date Filters snippet, you'll sort by this Investment Date.
What You Need
To complete this use case, you need:
1 Panel component
1 Button component
2 Initializer components
1 Calculator component
3 Hidden components
1 Plug-In component
1 ViewGrid component
1 Decisions component
1 Date Filters snippet
The Date Filters snippet includes:
1 Panel component
1 Columns component
1 Multi-Select Dropdown component
2 Date Input components
2 Text Field components
6 Calculator components
1 Data Workflow component
1 Hidden component
2 Decisions components
Pre-Configuration
First, create a new module from scratch to hold a dashboard. You'll use that dashboard to display submissions from your source module. You'll use a Plug-In component to perform a Get Submissions API call. And you'll use a ViewGrid component to display the results of that call.
Configure the Panel Component
To keep things organized, you'll add a Panel component to hold the core pieces of your dashboard.
Drag and drop a Panel component onto your canvas.
In the Property ID, enter panelDashboard.
Click Save.
Configure the Initializer Component
This Initializer component triggers the Plug-In components that you'll set up later.
Drag and drop an Initializer component onto your canvas. Place your Initializer inside the Panel.
In the Property ID and Label Text fields, enter initStart.
Select New Submission from the Trigger Type options.
In the Outputs table, enter the following:
Property ID: enter pluginGetSubmissions.
Type: enter trigger.
Value: enter GO.
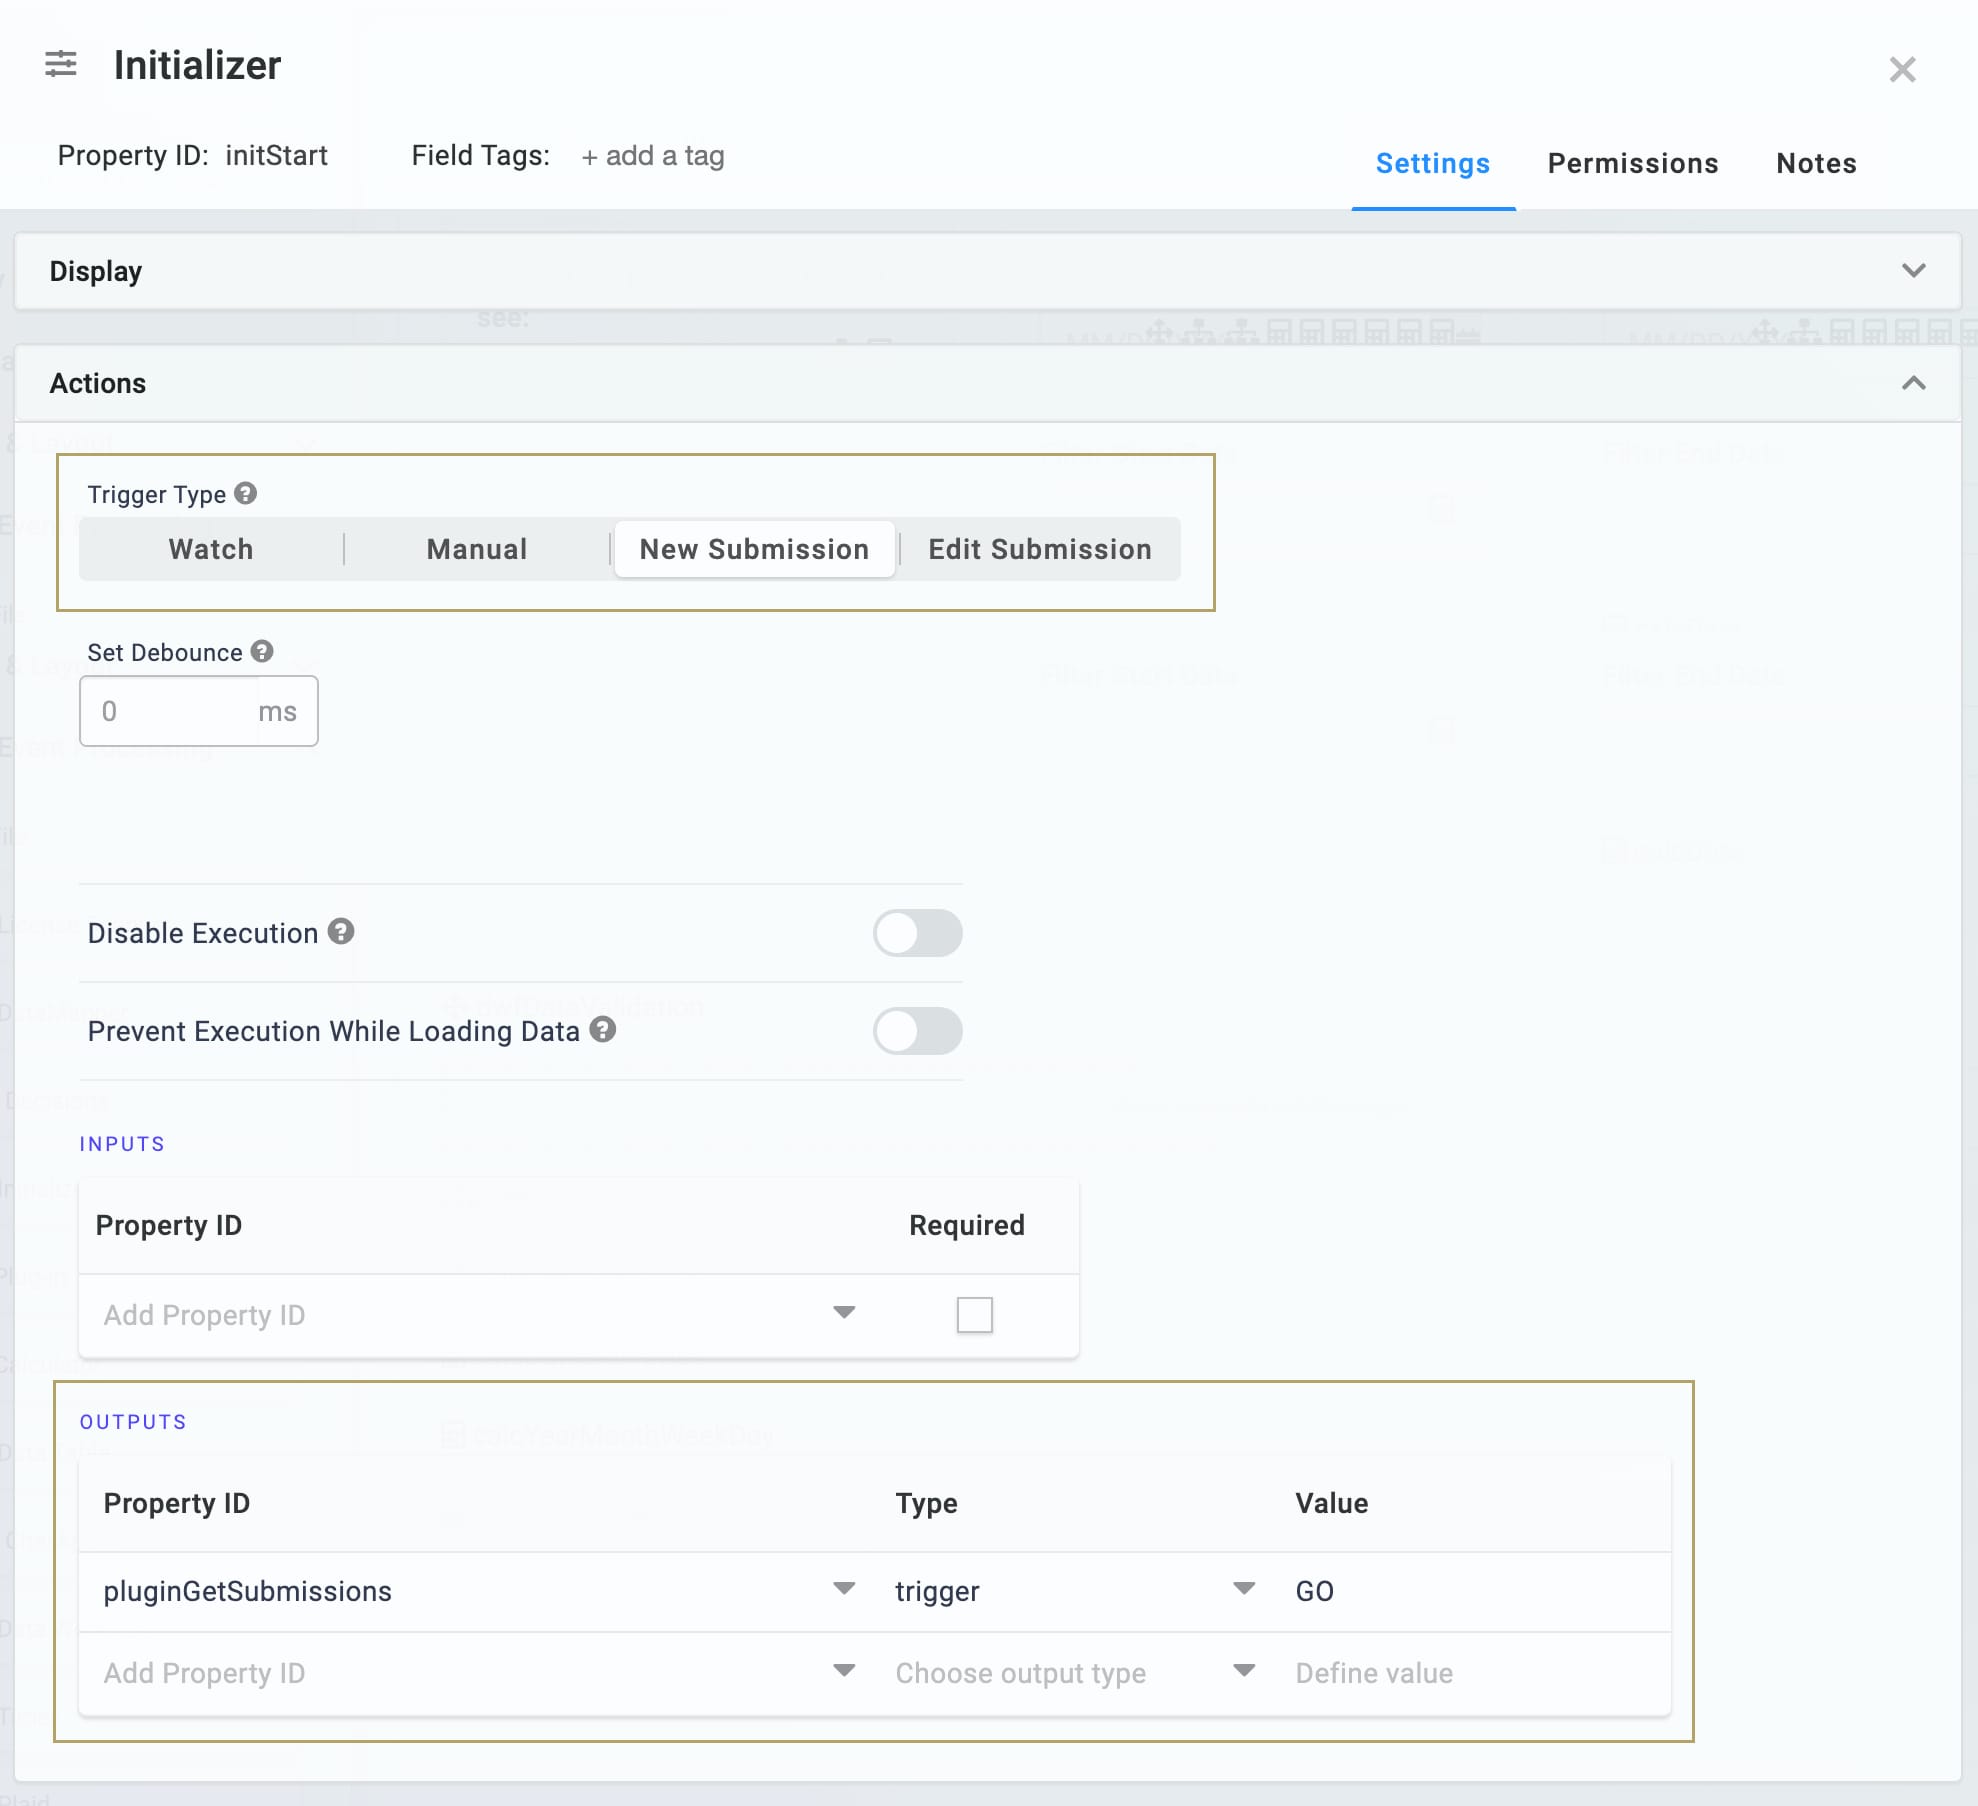
Click Save.
Configure the Hidden Component
This is the first of 2 Hidden components you'll use for your dashboard. It houses the module ID of your source or submission module. You can pull the module ID from the source module’s hyperlink as follows: https://training.unqork.io/#/form/5ef380b5804251020c3b019b/edit.
Drag and drop a Hidden component onto your canvas. Place your Hidden component below the Initializer.
In the Property ID and Label Text fields, enter moduleId.
In the Default Value field, enter 5ef380b5804251020c3b019b. This is the source module's module ID.
Click Save.
Configure the Plug-In Component
This Plug-In connects your module to the outside world. To make this connection, use an application programming interface (API). You'll use this Plug-In to get submissions to display in your dashboard.
Drag and drop a Plug-In component onto your canvas. Place your Plug-In below the moduleId Hidden component.
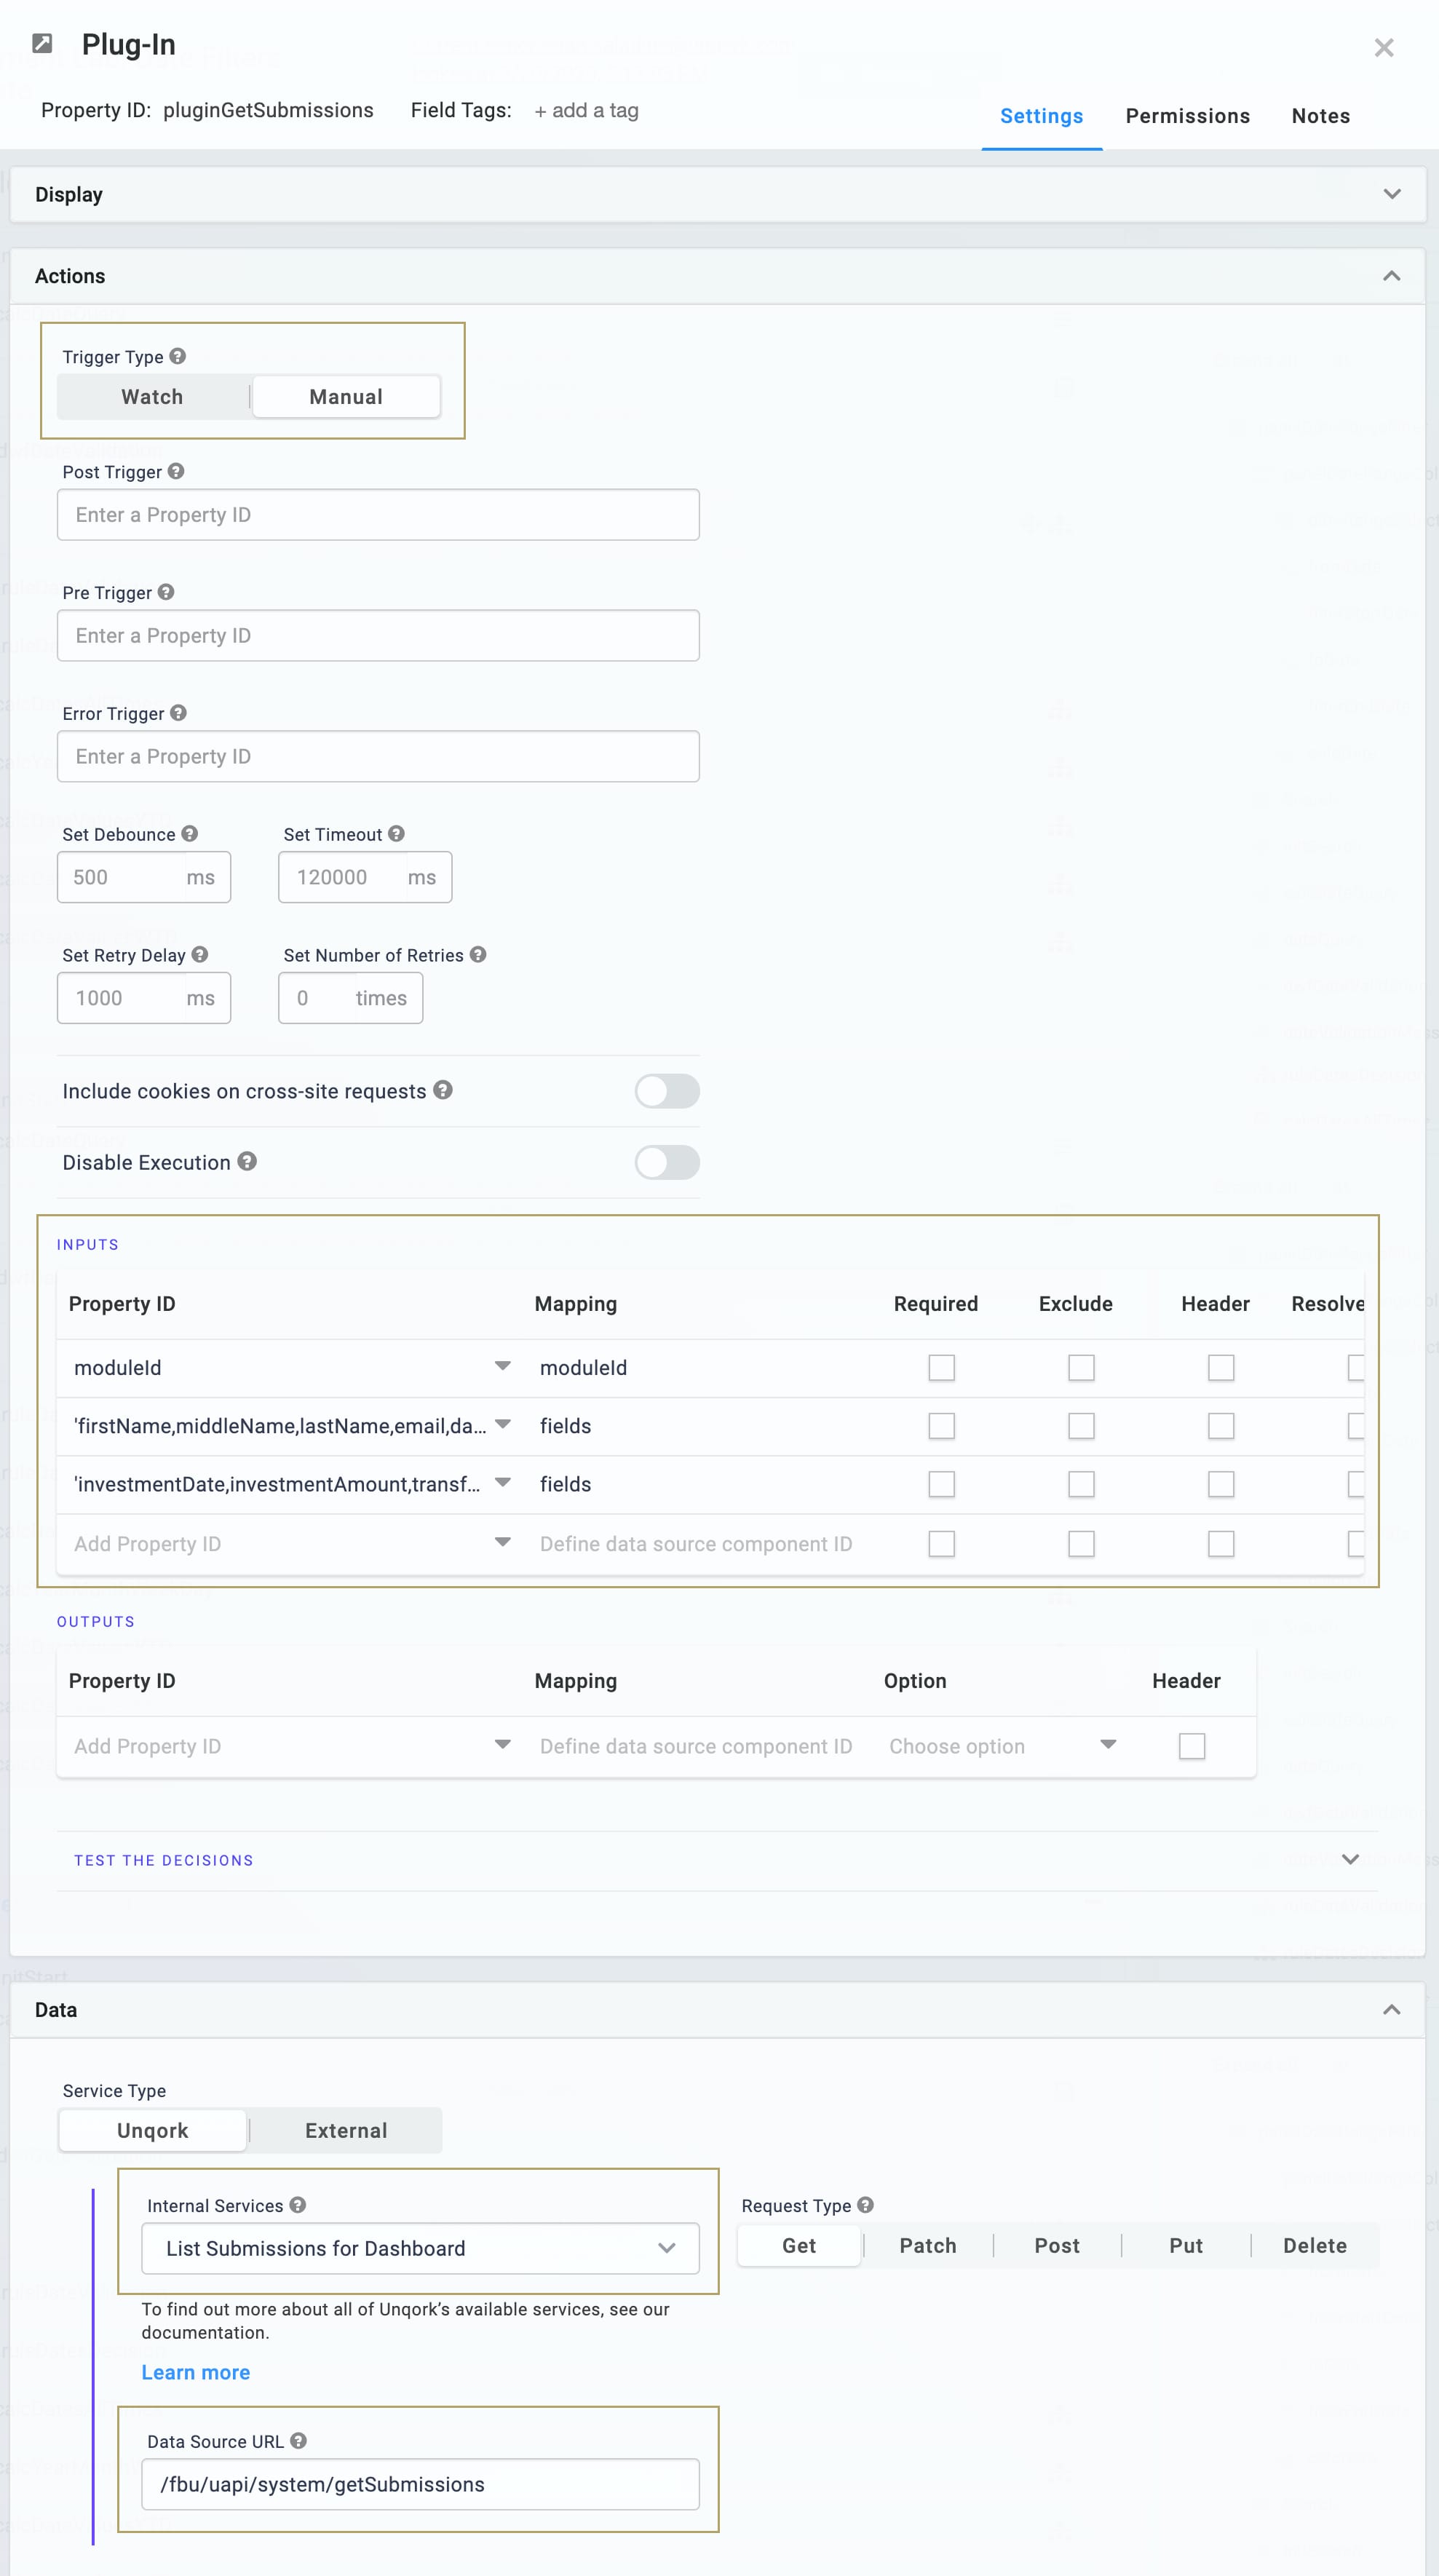
In the Property ID and Label Text fields, enter pluginGetSubmissions.
From the Unqork Service drop-down, select List Submissions for Dashboard. /fbu/uapi/system/GetSubmissions will appear in the Data Source URL field.
Select Manual from the Trigger Type options.
Complete the Inputs table as follows:
Property ID
Mapping
moduleId
moduleId
'firstName,middleName,lastName,email,dateOfBirth'
fields
'investmentDate,investmentAmount,transferringBank'
fields
The first row references the module ID stored in the moduleId Hidden component. The second and third rows show which fields you're pulling into the dashboard. Here, you'll pull the firstName, middleName, lastName, email, dateOfBirth, investmentDate, investmentAmount, and transferringBank fields. The values entered in the Mapping column (moduleId and fields) are native values recognized by the Unqork Designer Platform. Add these as shown.
Click Save.
Configure the Hidden Component
This is the second Hidden component you'll use for your dashboard. It houses the submission ID.
Drag and drop a Hidden component onto your canvas. Place your Hidden component below your Plug-In.
In the Property ID and Label Text fields, enter submissionId.
Click Save.
Configure the ViewGrid Component
Next, addn a ViewGrid component to display your dashboard.
Drag and drop a ViewGrid component onto your canvas. Place your ViewGrid below the submissionId Hidden component.
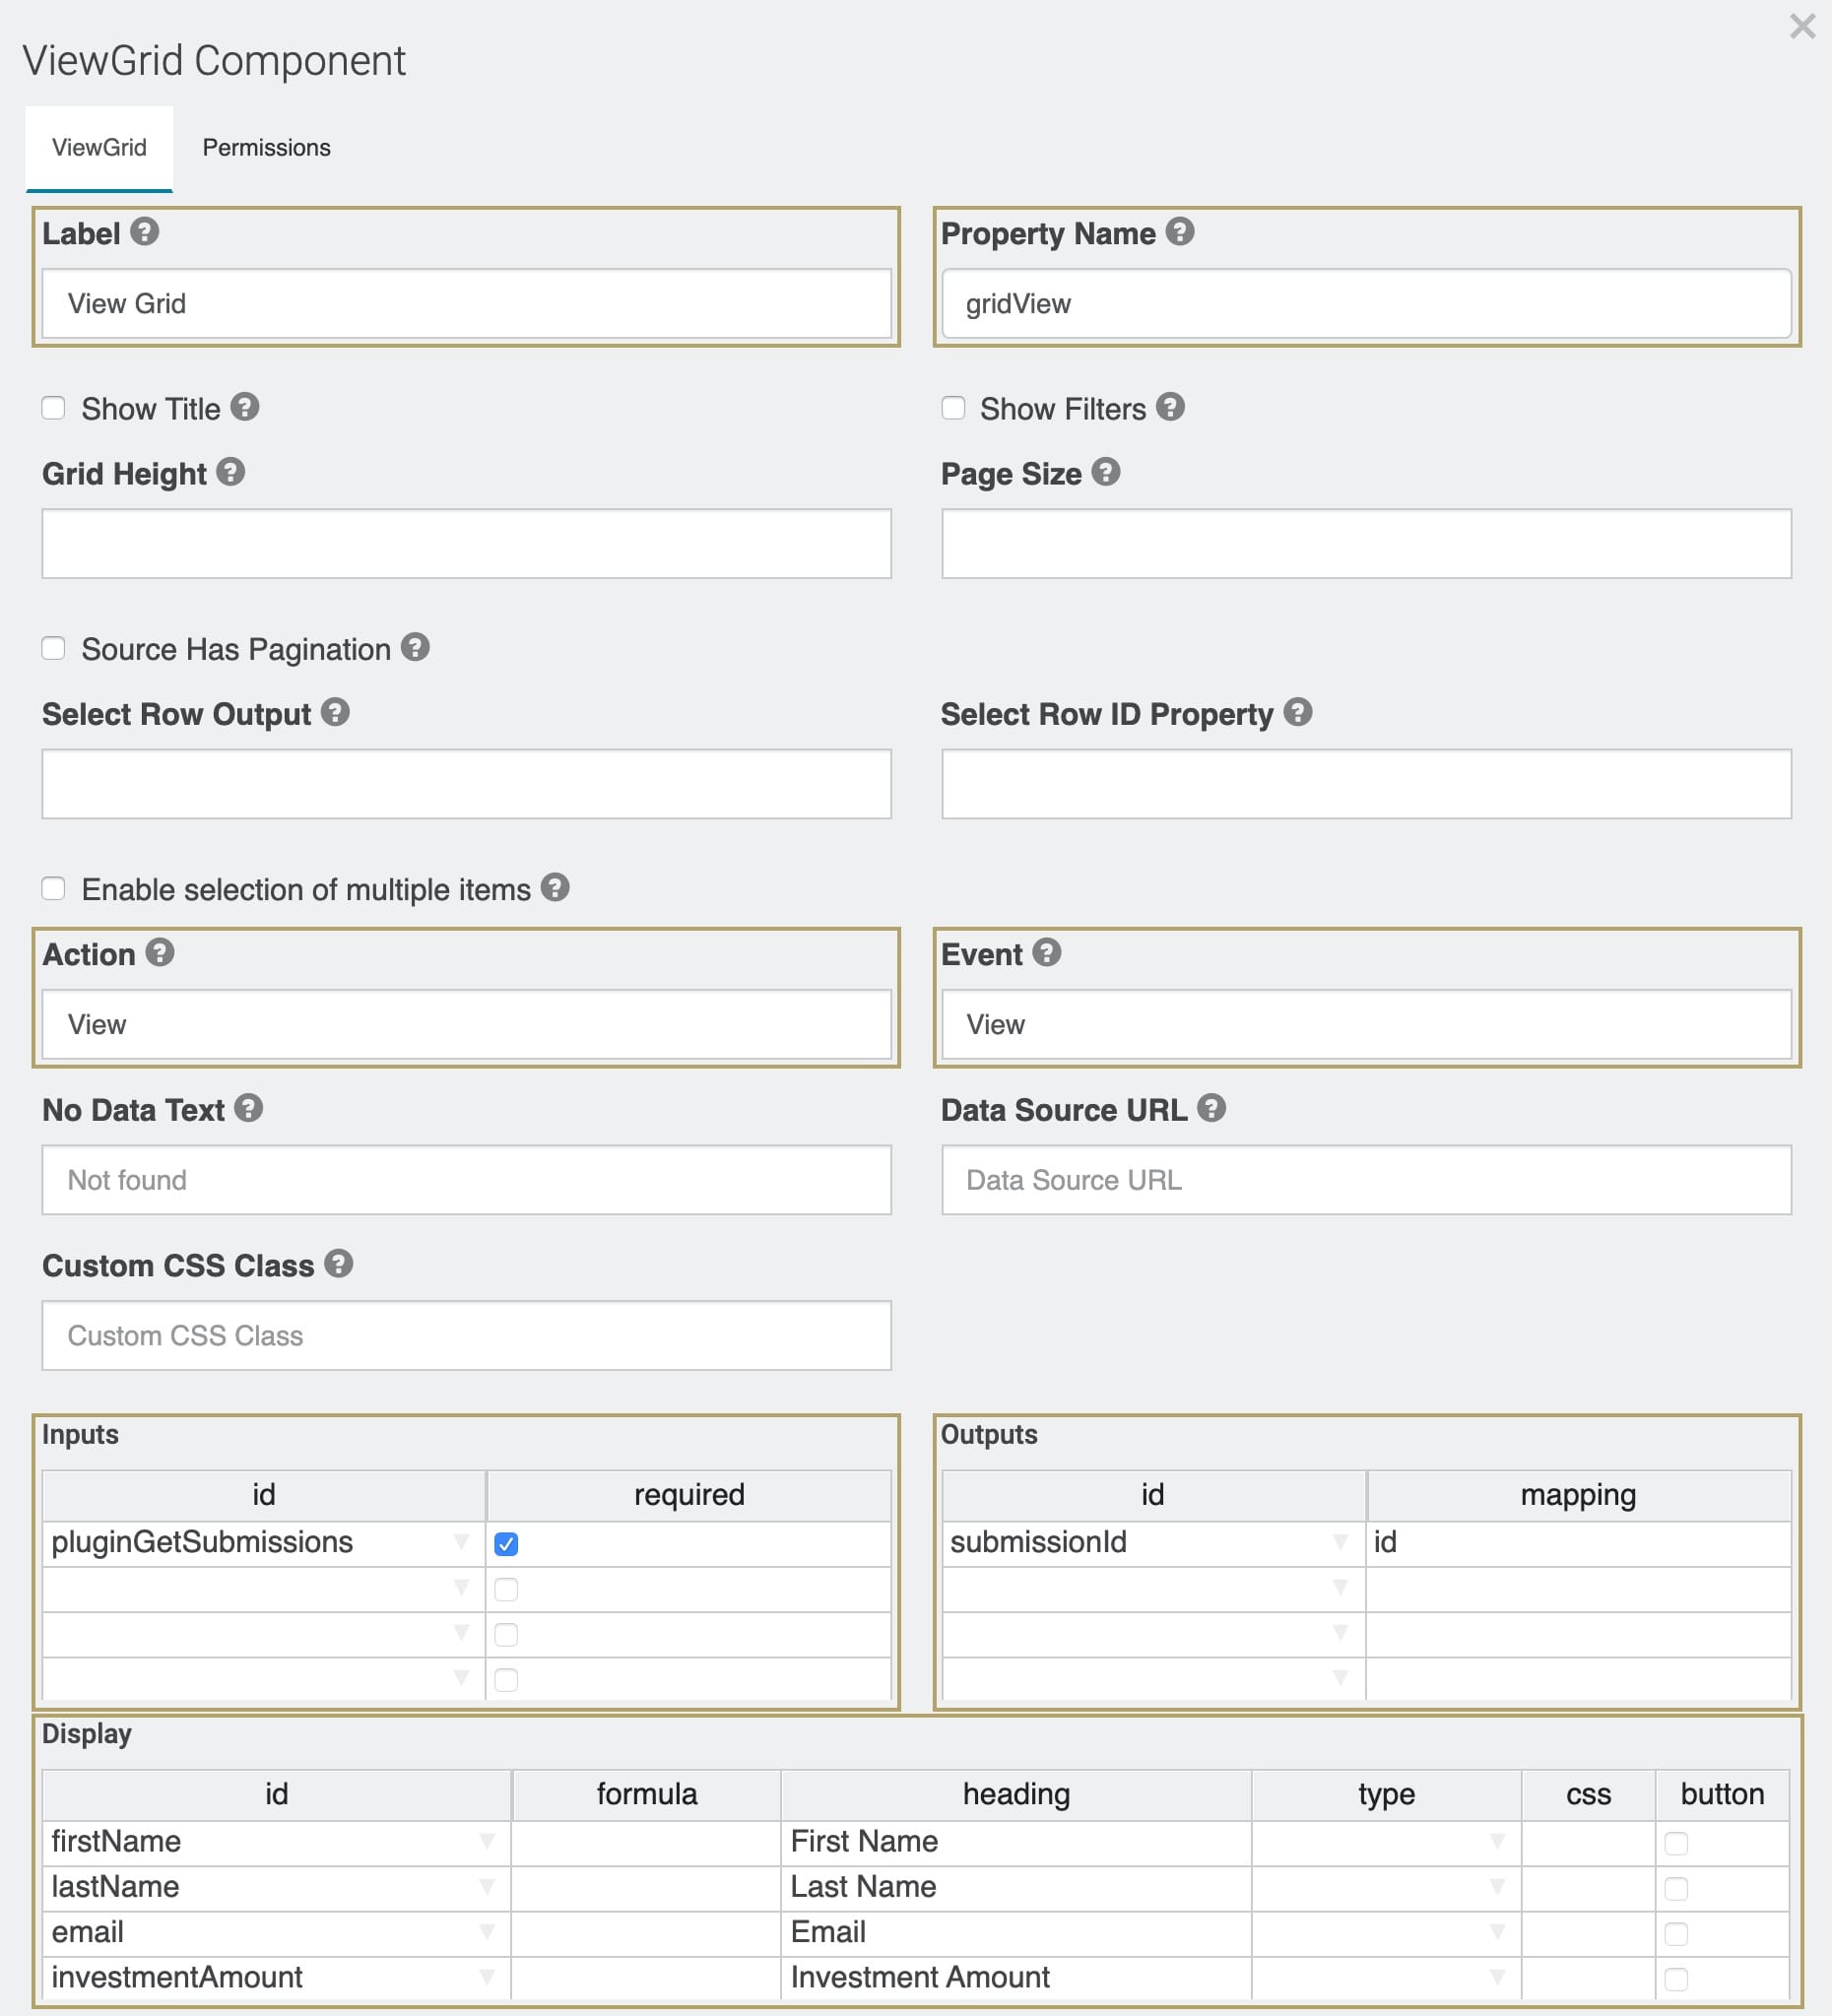
In the Label field, enter View Grid.
In the Property Name field, enter gridView.
In the Action field, enter View.
In the Event field, enter View.
In the Inputs table, enter the following:
ID: enter pluginGetSubmissions.
Required: select Yes.
In the Outputs table, enter the following:
ID: enter submissionId.
Mapping: enter id.
In the Display table, enter the following:
ID
Formula
Heading
firstName
First Name
lastName
Last Name
email
Email
investmentAmount
Investment Amount
transferringBank
Transferring Bank
investmentDate
Investment Date
Click Save.
Configure the Decisions Component
Drag and drop a Decisions component onto the canvas. Place it below your ViewGrid component.
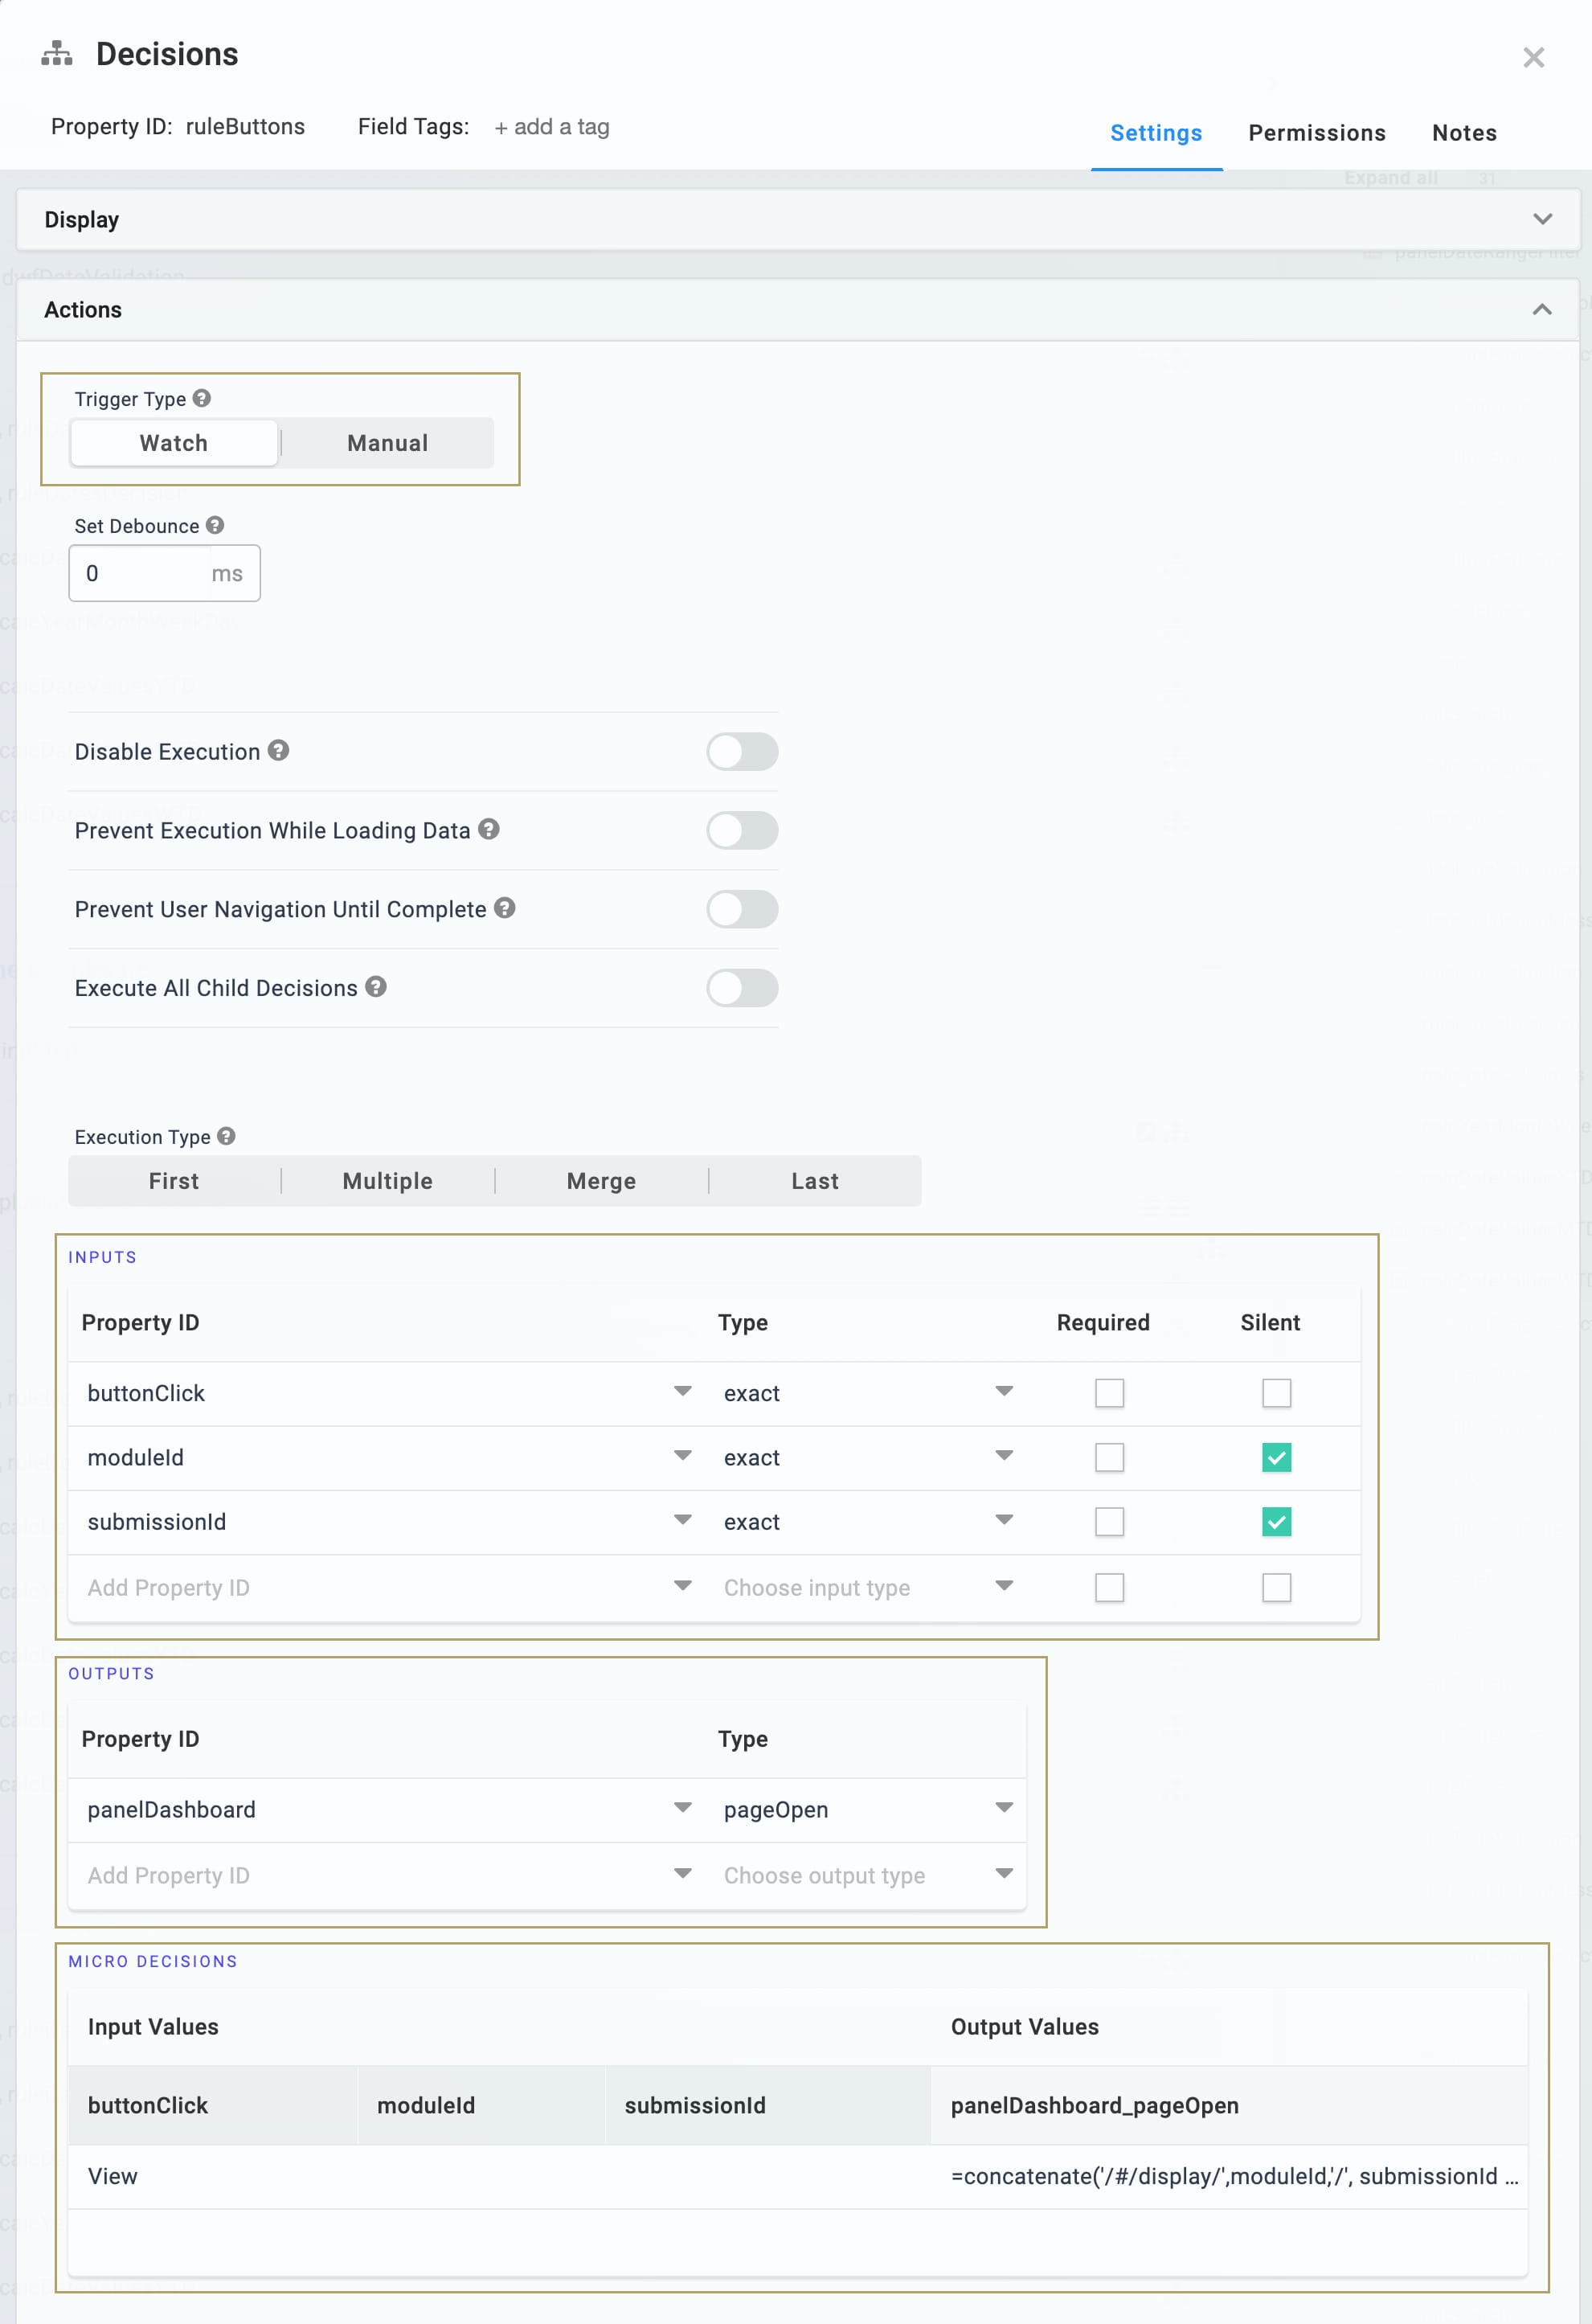
In the Property ID and Label Text fields, enter ruleButtons.
Select Watch from the Trigger Type options. This setting means your Decision watches for any change before executing.
In the Inputs table, enter the following:
Property ID
Type
Required
Silent
buttonClick
exact
moduleId
exact
Yes (checked)
submissionId
exact
Yes (checked)
Every row in the Inputs table gets an associated column in the Micro Decisions table. If an input doesn't have a value in its Micro Decisions column, Unqork sets it to silent. In the next steps, you won't add values to the moduleId and submissionId columns. You'll only use these inputs in the panelDashboard_pageOpen micro decision. So, you can mark these values as silent, or let Unqork do it for you.
In the Outputs table, enter the following:
Property ID: enter panelDashboard.
Type: enter pageOpen.
In the Micro Decisions table, enter the following:
buttonClick: enter View.
panelDashboard_pageOpen: enter =concatenate('/#/display/',moduleId,'/', submissionId , '/',moduleId).
Click Save.
Configuration
Now that you have your dashboard to view submissions, add the Date Filters snippet. Then, you'll customize the snippet to integrate with your dashboard.
Add the Date Filters Snippet
In the left sidebar of the Module Builder, click Snippets.
In the Search bar, enter Date Filters.
Drag and drop the Date Filterssnippet onto your canvas. Place the snippet above your dashboard.
Configure the Calculator Component
Next, add a Calculator component. Your Calculator puts your date range into a single string called a query string. You'll later add this query string to the Plug-In component for your dashboard.
Drag and drop a Calculator component onto your canvas. Place your Calculator component above the dwfDateValidation Data Workflow component.
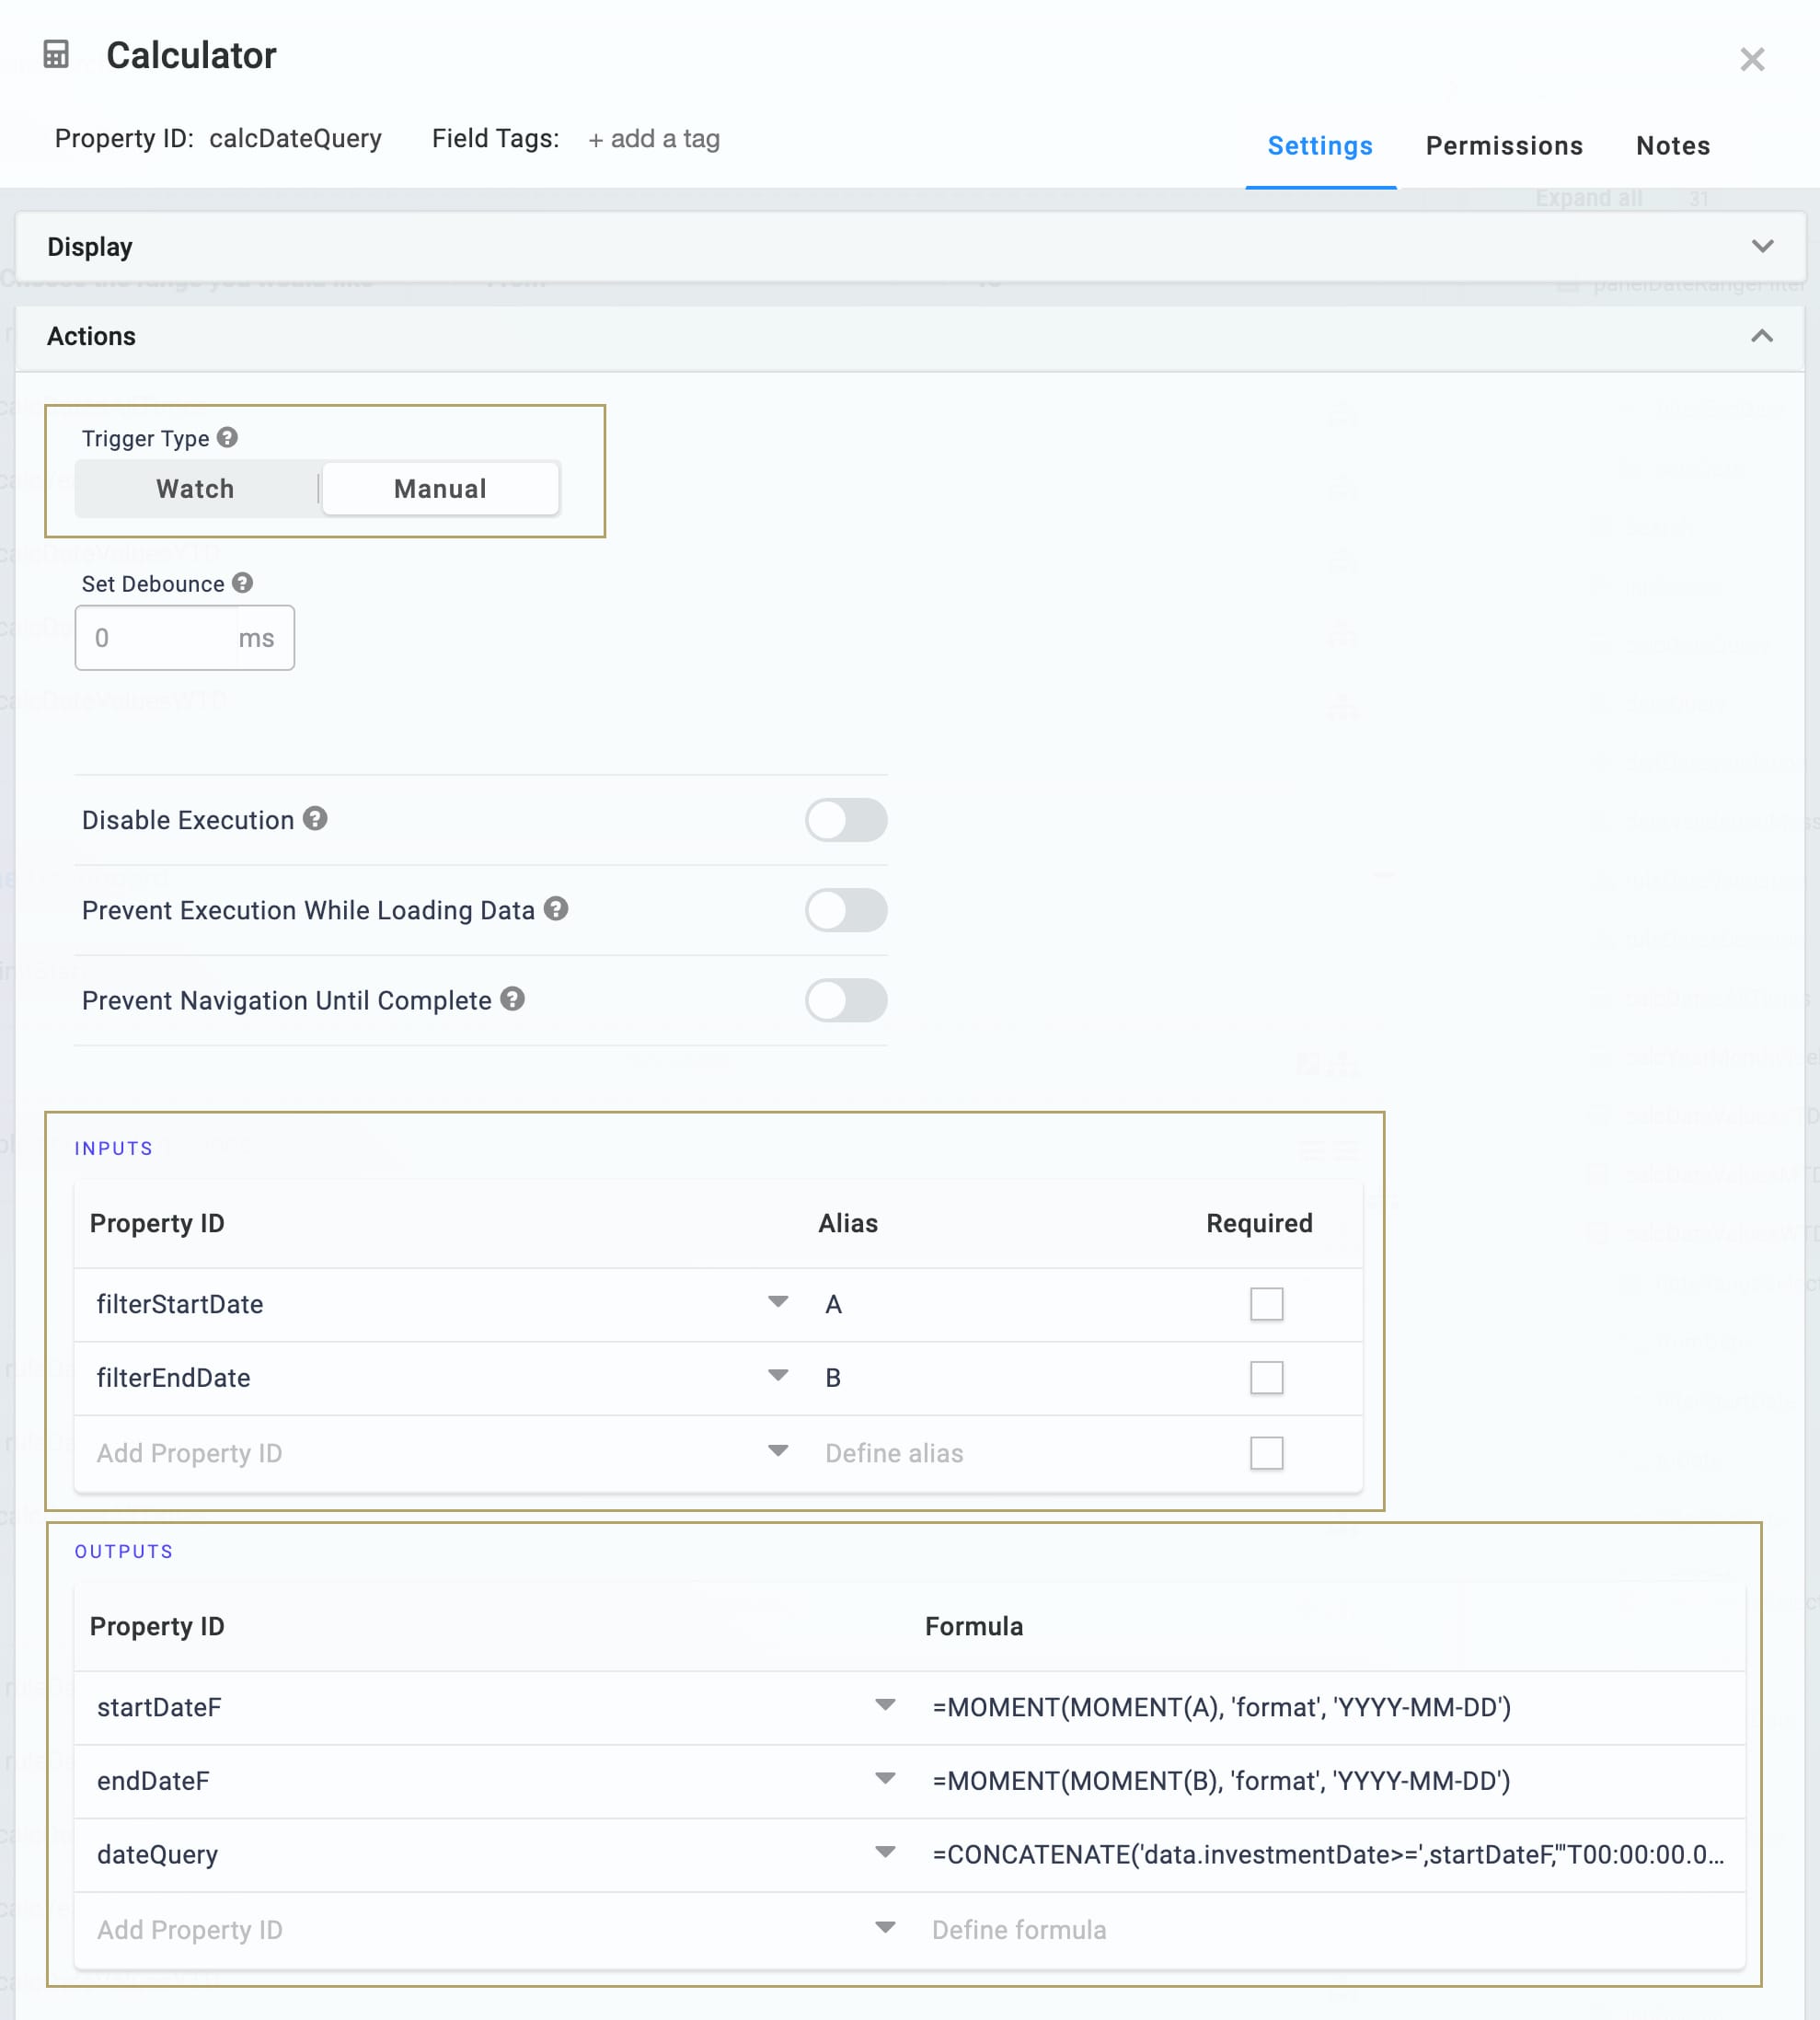
In the Property ID and Label Text fields, enter calcDateQuery .
Select Manual from the Trigger Type options.
In the Inputs table, enter the following:
Property ID
Alias
filterStartDate
A
filterEndDate
B
In the Outputs table, enter the following:
Property ID
Formula
startDateF
=MOMENT(MOMENT(A), 'format', 'YYYY-MM-DD')
endDateF
=MOMENT(MOMENT(B), 'format', 'YYYY-MM-DD')
dateQuery
=CONCATENATE('data.investmentDate>=',startDateF,'"T00:00:00.000Z"','&data.investmentDate<=',endDateF,'"T00:00:00.000Z"')
In this example, queries are for the Investment date. Change investmentDate to any date field you want to filter.
In your ID column, dateQuery refers to the Hidden component you'll add in the next step.
Click Save.
Configure the Hidden Component
Next, add a Hidden component to house the query string from your Calculator. Later, you'll reference this component in your Plug-In component.
Drag and drop a Hidden component onto your canvas. Place your Hidden component above the dwfDateValidation Data Workflow component.
In the Property ID and Label Text fields, enter dateQuery.
Click Save.
Update the pluginGetSubmissions Plug-In Component
To tie your Date Filters to your dashboard, you'll need to modify your Plug-In component. You'll update the Data Source URL using the data from your dateQuery Hidden component.
In the Module Builder hover over the pluginGetSubmissionsPlug-In.
A 5-button toolbar displays above the component on hover-over.
Using the toolbar, click the
.jpg) (Settings) button.
(Settings) button.At the end of the Data Source URL, add ?{{data.dateQuery}}.
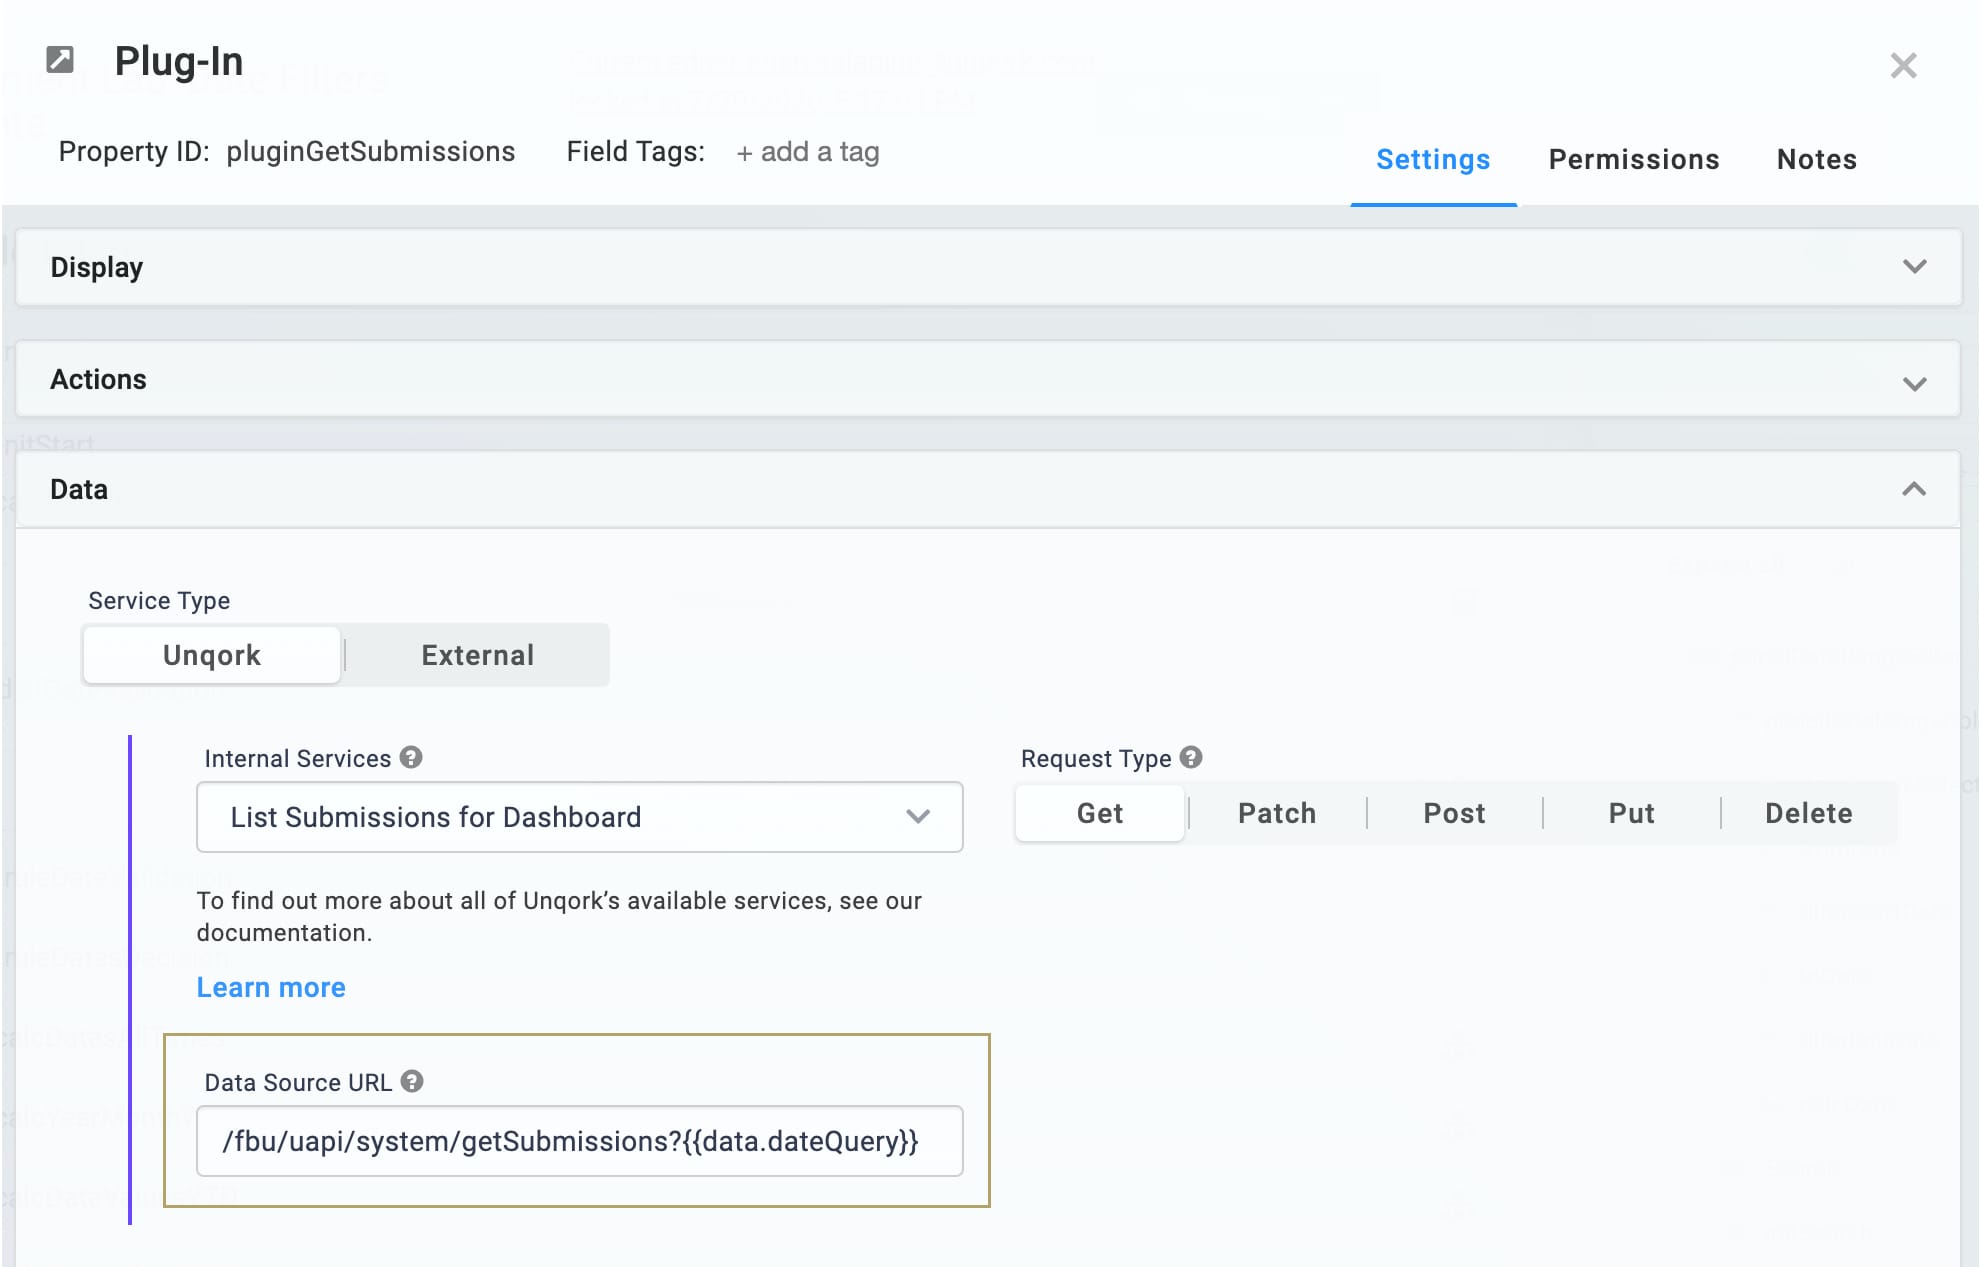
Click Save.
Configure the Initializer Component
Next, you'll add a second Initializer component to the configuration. The initStart Initializer for your dashboard fires on page load. So, you'll need to add another that fires when you update your Date Filters. Your new Initializer will trigger both your calcDateQuery Calculator and your Plug-In component. Later, you'll add a Button component to trigger this Initializer.
Drag and drop an Initializer component onto your canvas. Place your Initializer component above the calcDateQuery Calculator component.
In the Property ID and Label Text fields, enter initSearch.
Select Manual from the Trigger Type options.
In the Outputs table, enter the following:
Property ID
Type
Value
calcDateQuery
trigger
GO
pluginGetSubmissions
trigger
GO
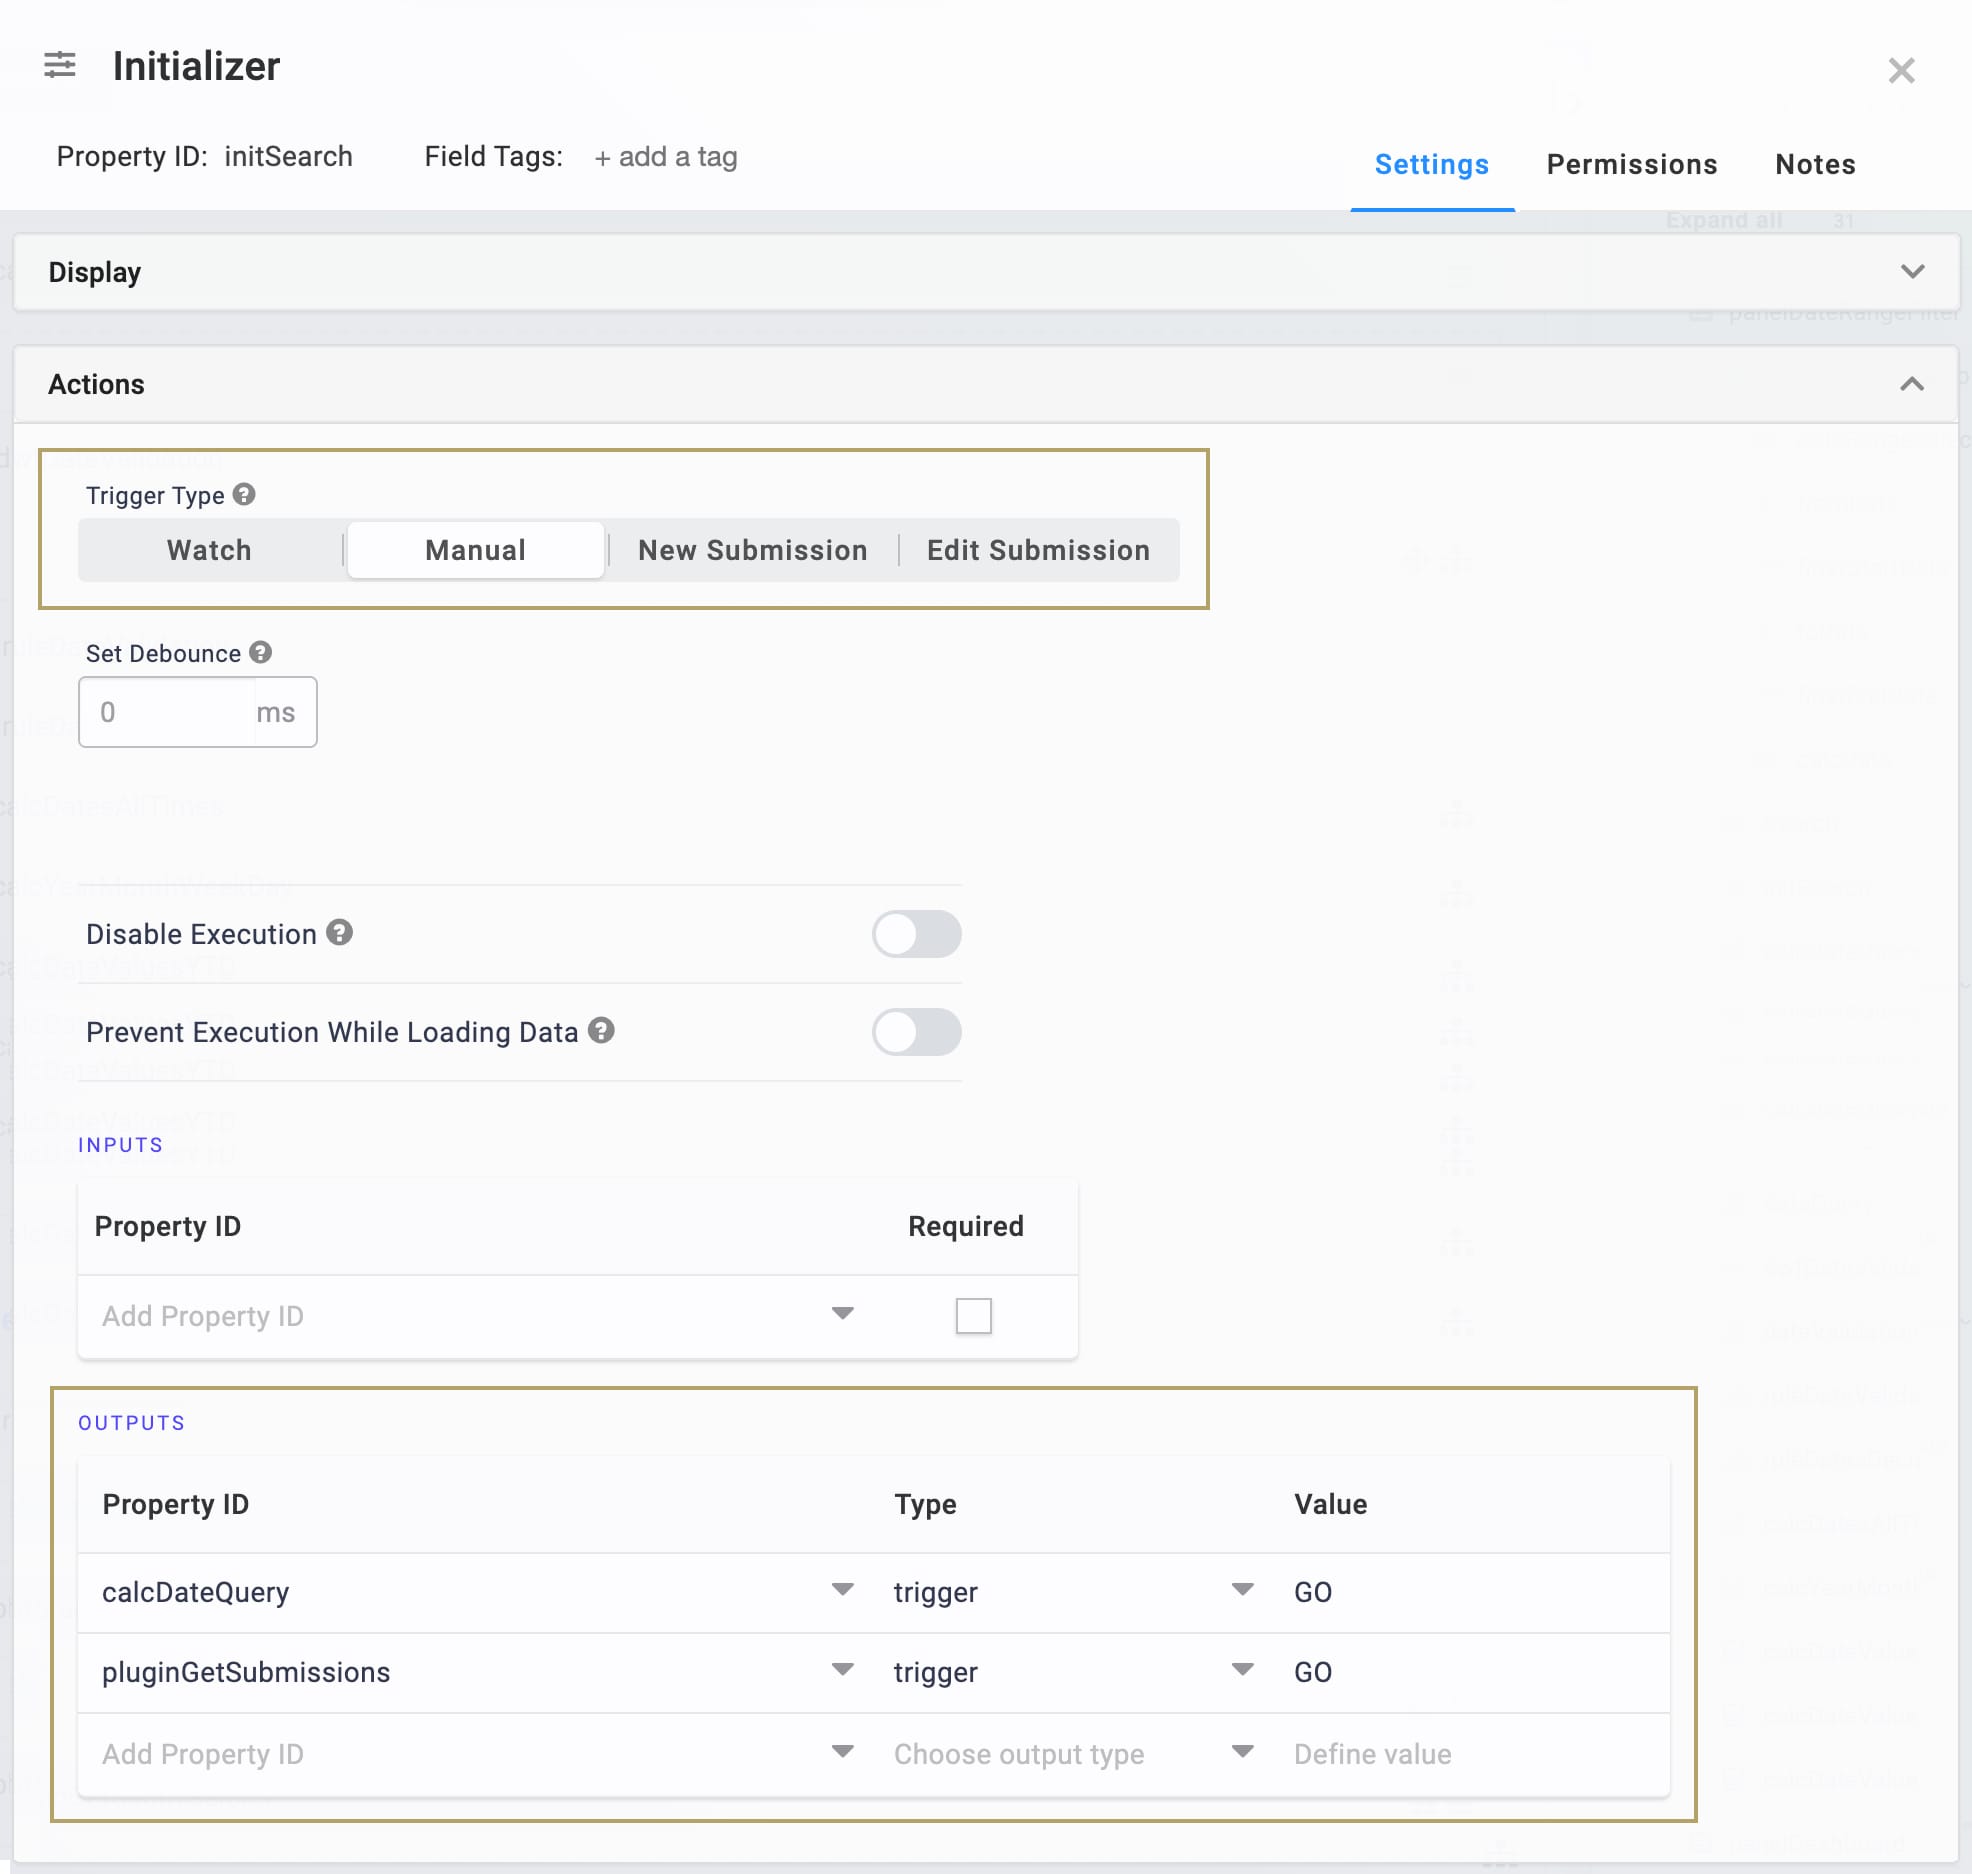
Click Save.
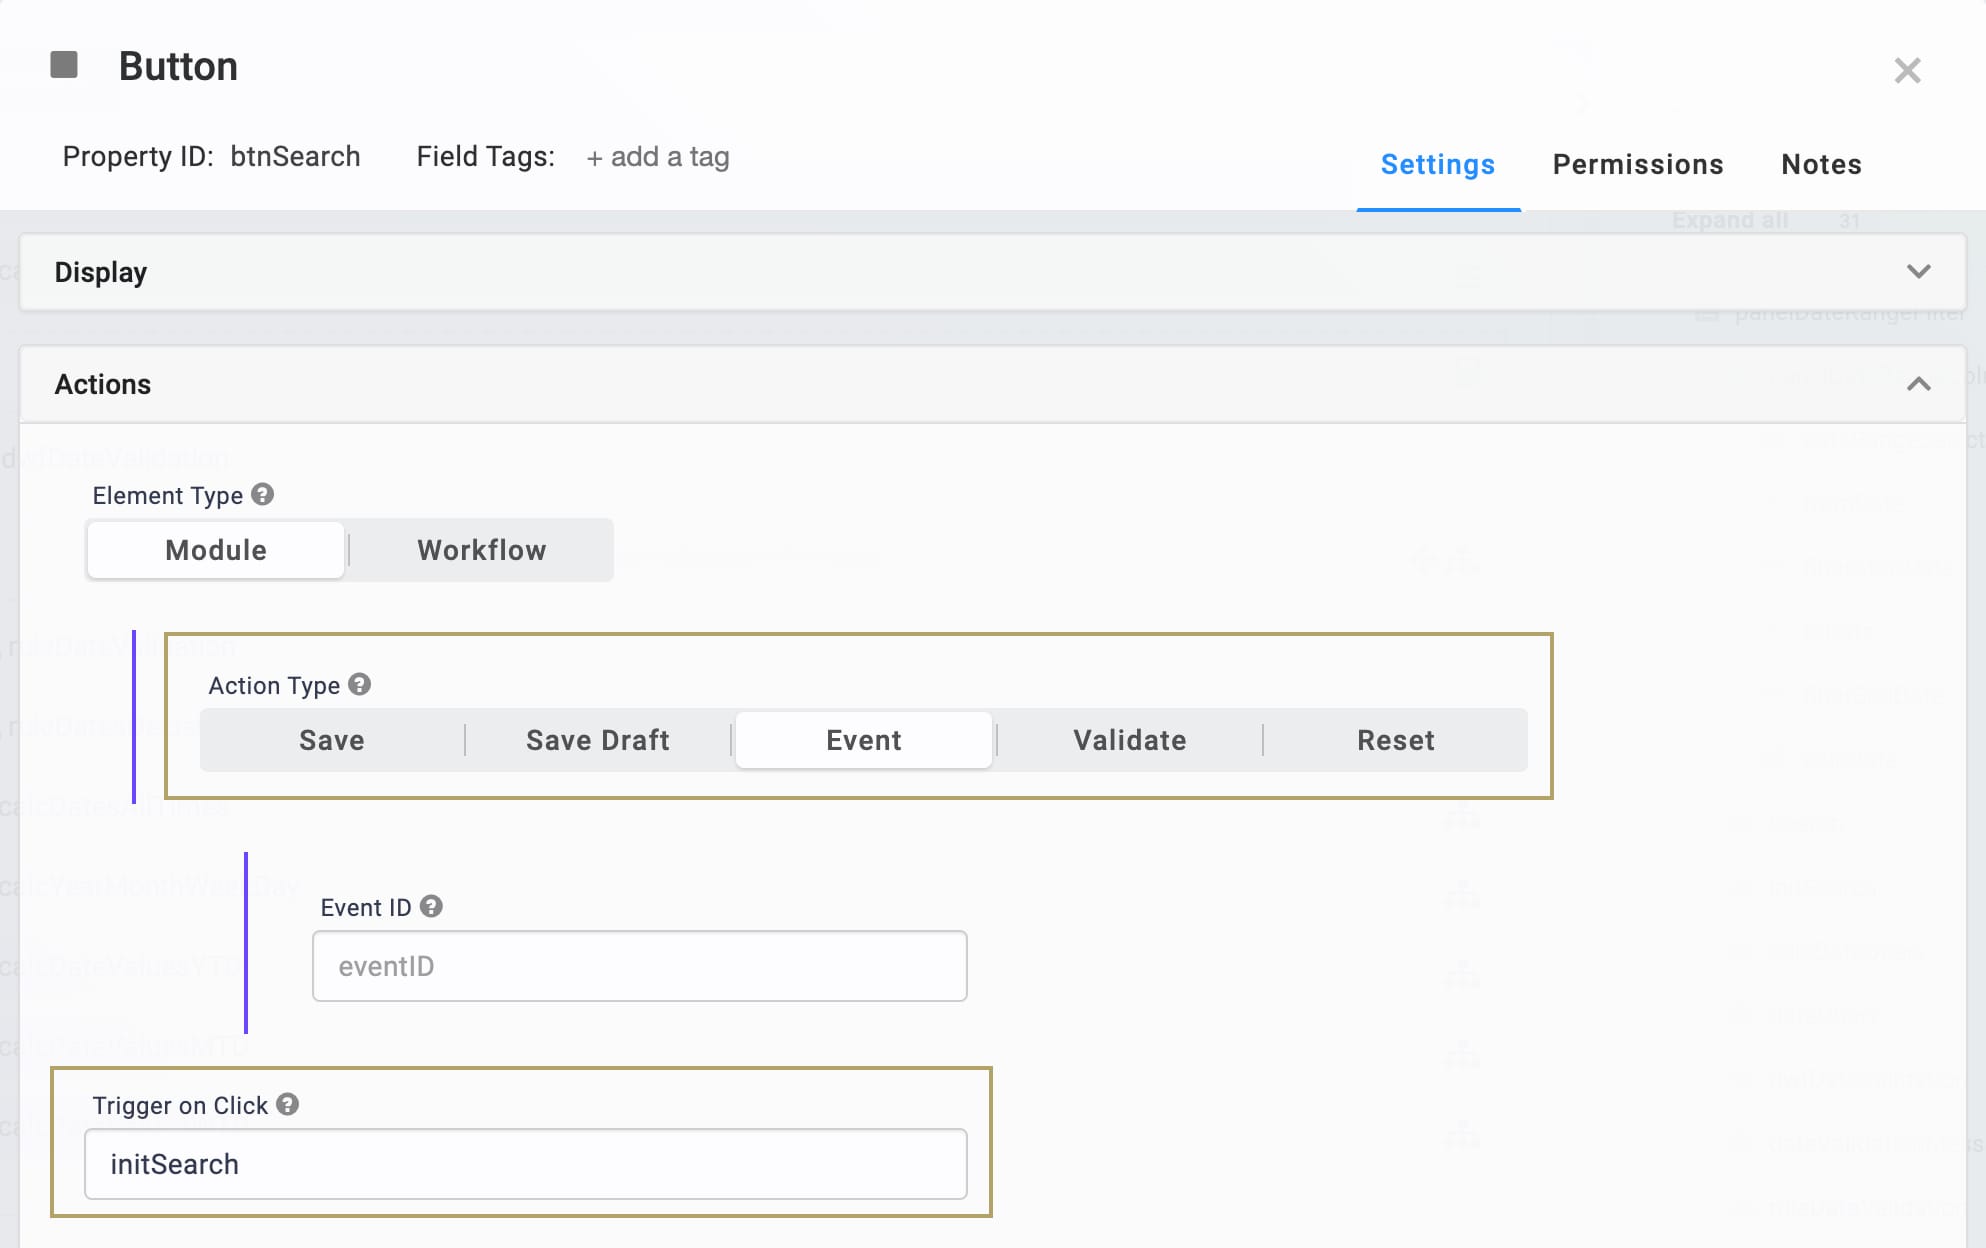
Configure the Button Component
Finally, add a Button component to trigger your Initializer. Clicking this button is what results in your filtered dashboard view.
Drag and drop a Button component onto your canvas. Place your Button component above the initSearch Initializer component.
In the Property ID field, enter btnSearch.
In the Label Text field, enter Search.
Select Event from the Action Type options.
In the Trigger on Click field, enter initSearch.
Click Save.
Save your module.
With this configuration complete, you can now preview your module in Express View. You'll see your Date Filter options above your dashboard. Enter a date range and click Search. Your dashboard updates to only show the applicable submissions.
Removing the Snippet
You might want to remove a snippet from your application. Here, you'll learn how to remove the snippet from your module. Then, you'll learn how to uninstall the snippet from your environment.
Remove the Snippet from Your Module
To remove the Date Filters snippet:
In the Module Builder, hover over the panelDateRangeFilter Panel.
A 5-button toolbar displays above the component on hover-over.
Using the toolbar, click the
.jpg) (Remove) button.
(Remove) button.Save your module.
Remove the Snippet from Your Environment
Use the Unqork Template Library to remove unused snippets. To uninstall a snippet from your environment:
At the top right of the Unqork Designer Platform, click Library or Templates.
Find the snippet you want to uninstall.
Click the ellipsis (...) in the snippet's tile header.
Click Uninstall Template.
Click Yes, Uninstall in the confirmation modal.
You can visit the Marketplace and reinstall the snippet at any time.
What if you have an existing application built using this snippet and then uninstall the snippet from your environment? No problem. Your existing application remains unaffected. Also, your application doesn't have any ties to the snippet. So, let's say you reinstall a newer version of the snippet in the future. You can rest assured that the installation doesn't impact your existing application.