Overview
Pagination is a helpful strategy to make sure your APIs (application programming interfaces) run smoothly. Pagination divides records across multiple pages rather than showing all results at once. The total number of records calculate server-side before they're paginated and returned client-side. The Paginated Submissions API snippet includes an API that’s already set up for pagination. Using limit and offset commands, you can quickly page through your data and display it on a dashboard.
The Paginated Submissions API snippet works hand-in-hand with the Paginated Dashboard snippet.
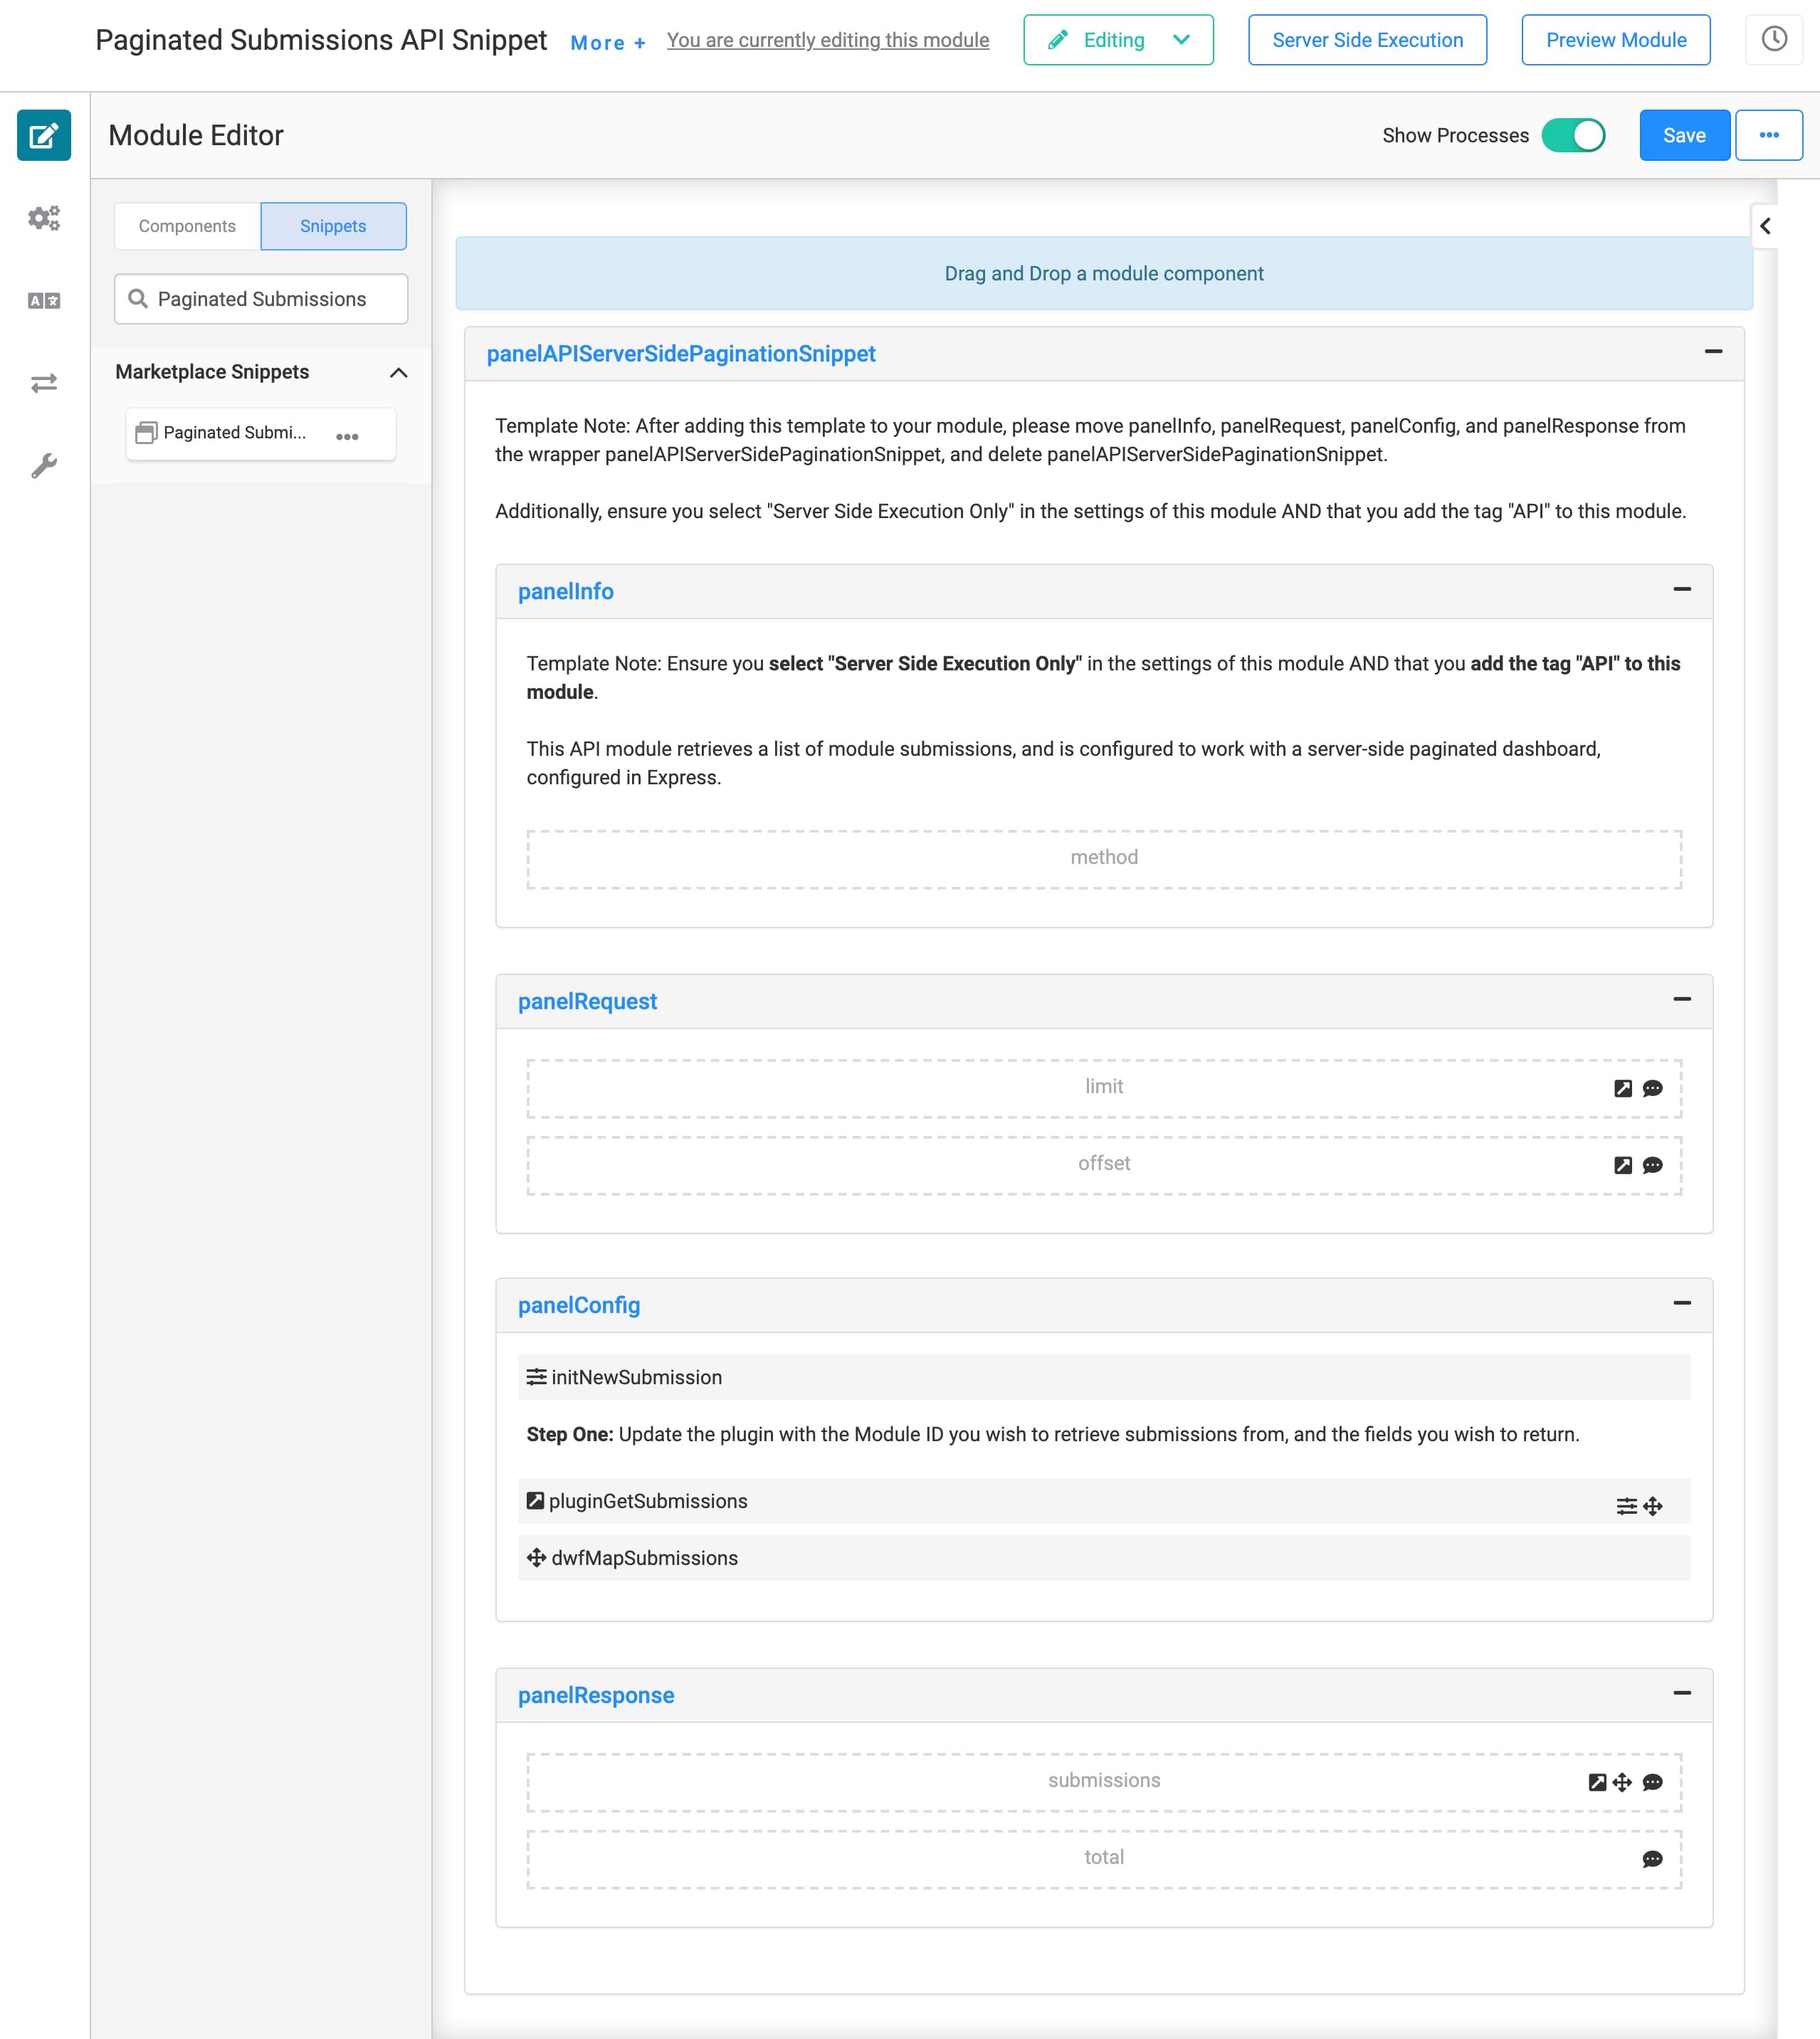
Here's how the snippet looks in the Module Builder:

Adding the Snippet
Before you use this snippet in your application, you must install the snippet to your environment.
Adding the Snippet to Your Environment
To add the snippet to your environment:
Click Templates at the top right of the Unqork Designer Platform.
Click Marketplace.
You can also access the Marketplace at any time by visiting https://marketplace.unqork.io.
Enter Paginated Submissions API in the Search the Listings Directory field.
Click the Paginated Submissions API tile.
Click Install to Environment.
Click Install Template.
If you aren't logged in, you'll see a field for Environment URL and a Login button. Enter your environment's URL where you want to install the template. For example: [environmentname.unqork.io]. Click the Login button. Then, return to step 4 and click Install to Environment again. Follow the remaining steps as listed.
Now, you can now use your newly installed snippet in your application!
Adding the Snippet to Your Module
Once you install the snippet into your environment, you can drag and drop it right into your module.
In the left sidebar of the Module Builder, click the Snippets button.
Enter Paginated Submissions API in the search bar.
Drag and drop the Paginated Submissions API snippet onto your canvas.
If you don't see the snippet at first, make sure to expand the Marketplace Snippets section.
Save your module.
How the Snippet Works
Here are the basic steps of how this snippet works:
The Paginated Submissions API snippet retrieves submissions from a schema module. It only retrieves the submissions in batches based on the limit and offset Hidden components. Limit is how many submissions it retrieves at a time. Offset is where in the list it starts.
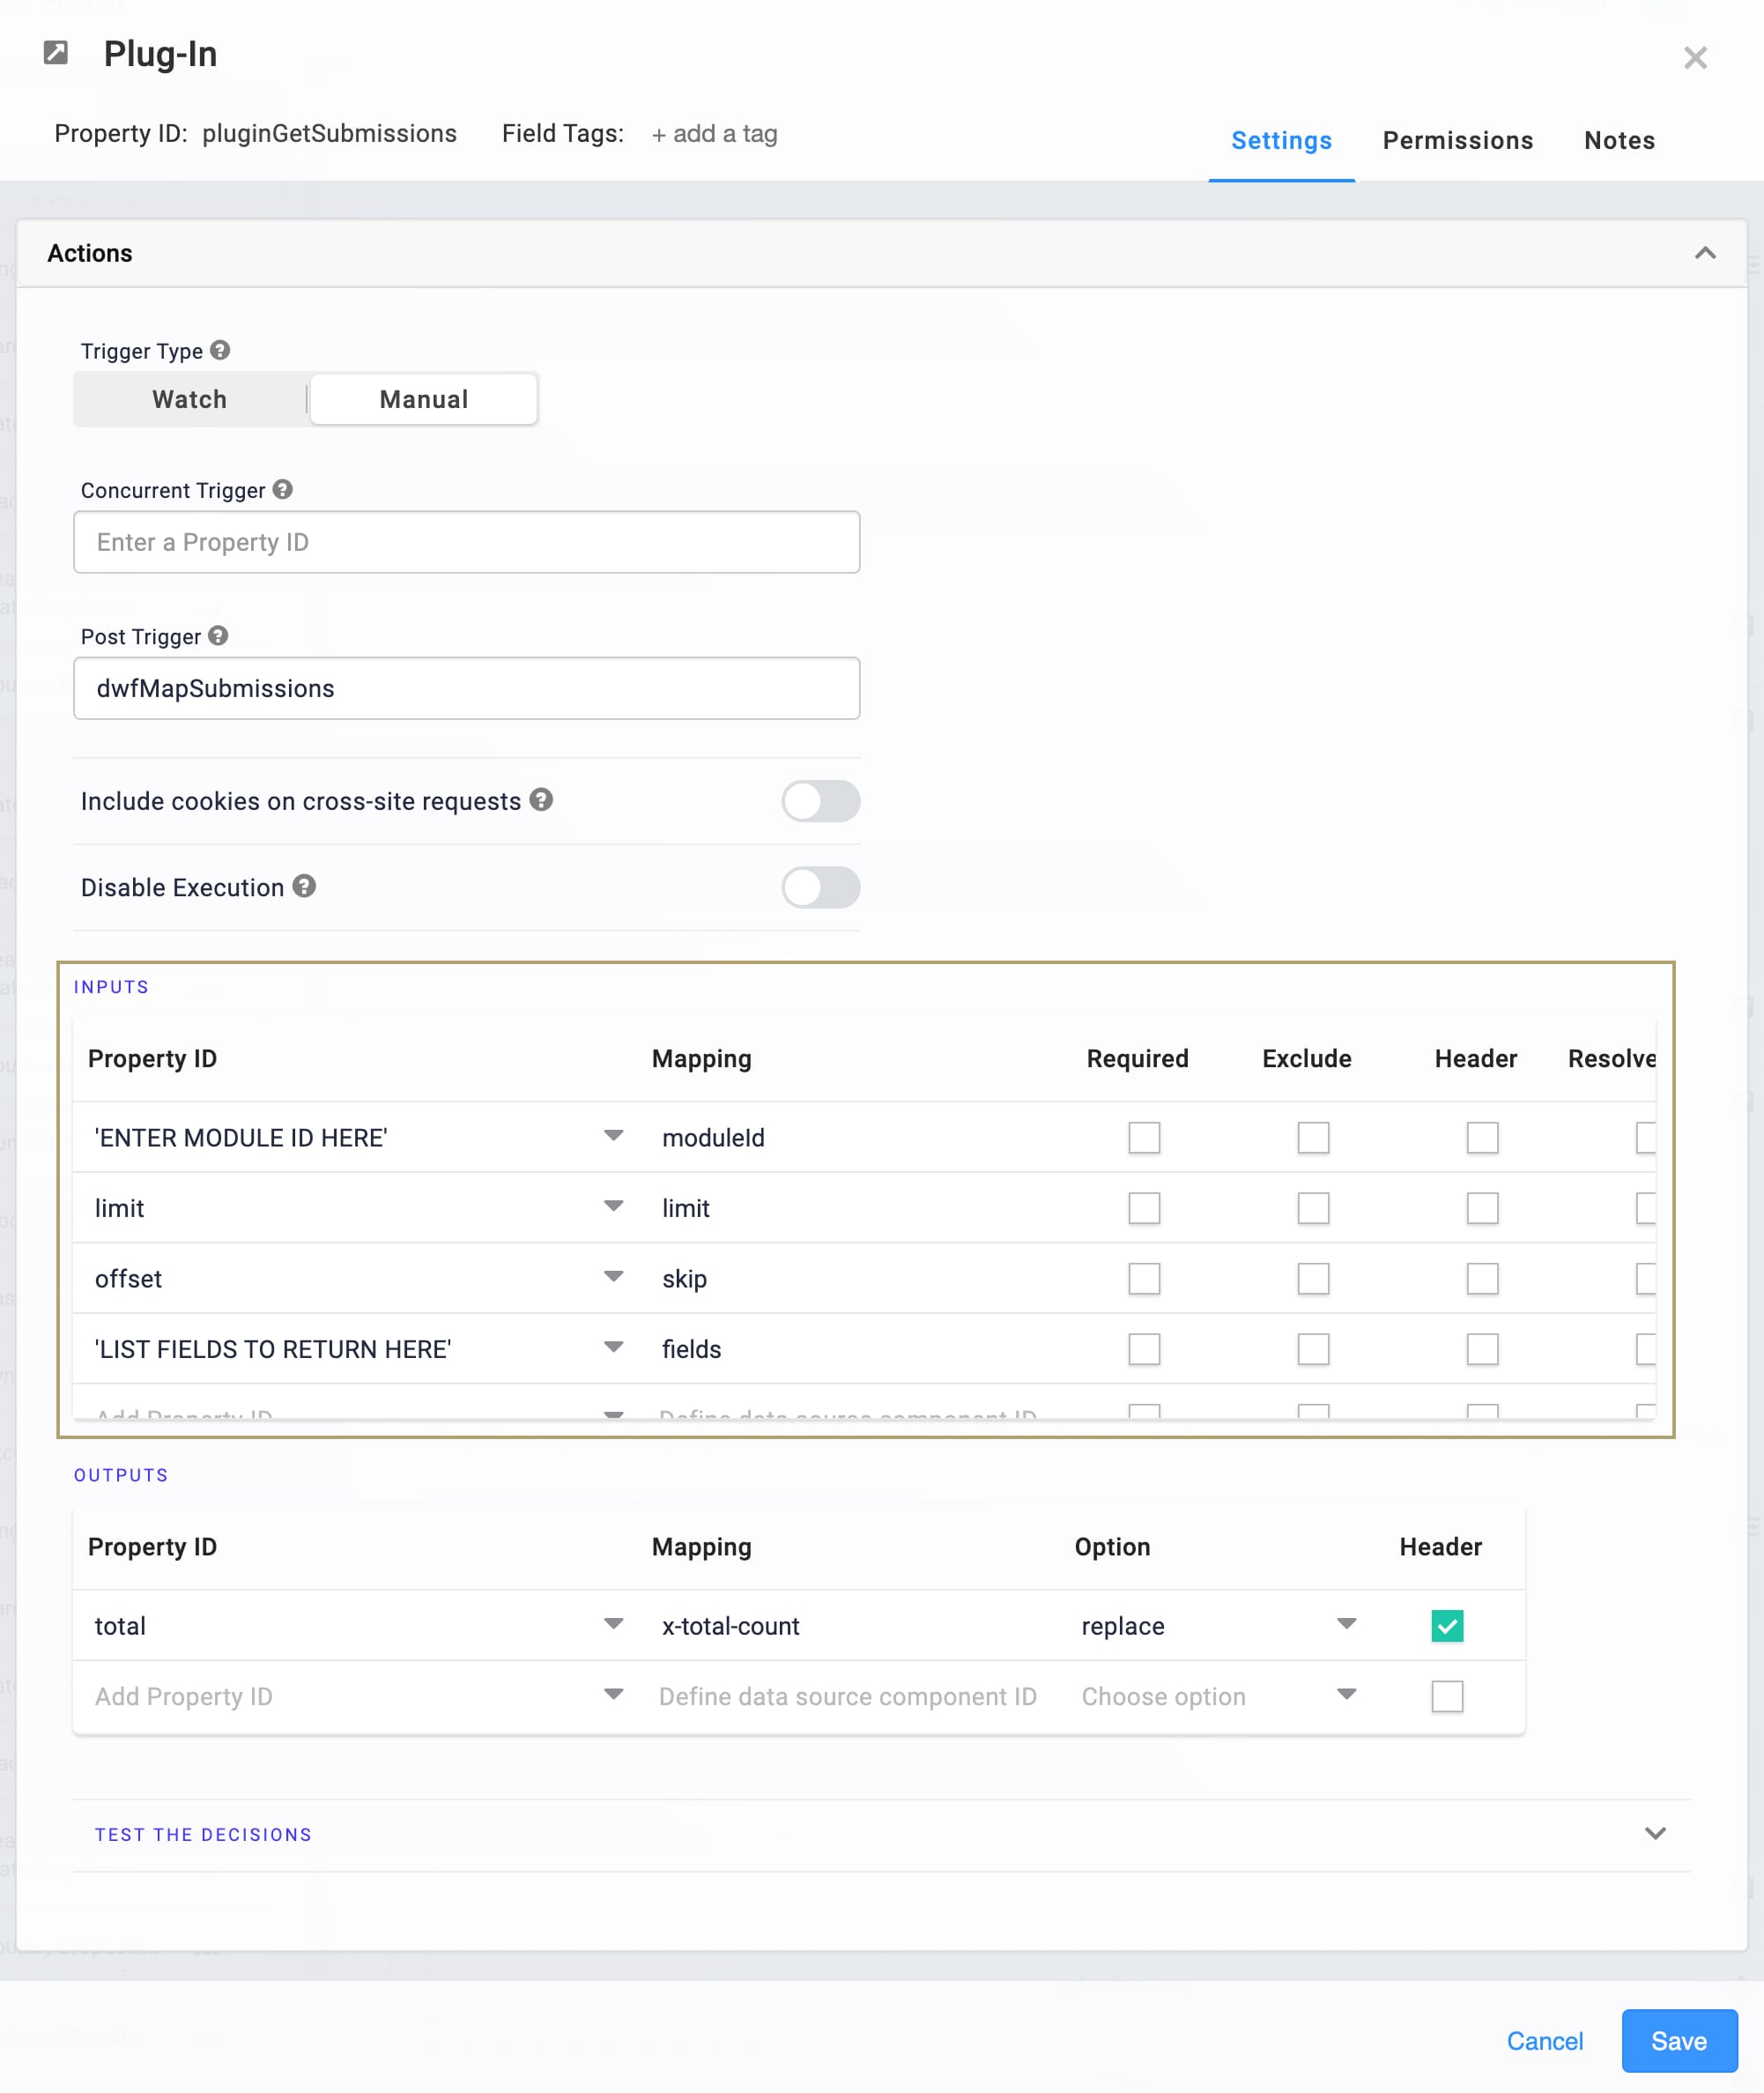
The pluginGetSubmissions Plug-In maps to your schema module and the fields you want to pull.
The Plug-In outputs the total number of submissions to the total Hidden component.
From there, the dwfMapSubmissions fires, outputting the submissions to the submissions Hidden component.
The Paginated Submissions API snippet works hand-in-hand with the Paginated Dashboard snippet. So, the next step is to link your dashboard module to this Paginated Submissions API module.
Setting Up the Snippet
To use this snippet, you need a module with a server-side pagination dashboard. We recommend using the Paginated Dashboards snippet. You also need a schema module. The schema module is where you'll pull submissions from.
Here’s what’s required to get the snippet up and running:
Properly configure the module to align with Unqork’s API specifications.
Update the snippet so it pulls submissions from your schema module.
Align Module with API Specifications
There are four adjustments you'll make to your module to align it with Unqork's API specifications.
Add the api tag to your module.
Enable Server Side Execution Only in Module Settings.
Pull all Panels out of the panelAPIServerSidePaginationSnippet Panel.
Delete the panelAPIServerSidePaginationSnippet Panel.
First, you'll add the api tag and adjust the module's settings. From your open module:
Click the More+ button to the right of the module title.
Enter api in the Tags field. Hit Enter or Return on your keyboard.
Click Settings on the left sidebar menu.
Set the Server Side Execution Only toggle to ON.
Click Save Settings.
On the left sidebar, click Edit Module to return to the Module Builder.
Next, you'll need to move the Panel components.
Move the panelInfo, panelRequest, panelConfig, and panelResponse outside of the container panelAPIServerSidePaginationSnippet Panel.
Hover over the panelAPIServerSidePaginationSnippet Panel.
A 5-button toolbar appears above the component on hover-over.
Using the toolbar, click the
.jpg) (Remove) button.
(Remove) button.Save your module.
Map the Snippet to Your Schema Module
Lastly, you must update the pluginGetSubmissions Plug-In component. You'll map it to your schema module and add the fields you want to pull from your schema module.

Removing the Snippet
What if you're no longer interested in using this snippet? No problem. We'll walk you through the quick steps to remove the snippet from your module. Then, you'll learn how to uninstall the snippet from your environment.
Removing the Snippet from Your Module
Removing a snippet from your module is easy. To remove the [Name of Snippet] snippet:
In the Module Builder, hover over the panelAPIServerSidePaginationSnippet Panel.
If you've already moved the other Panels outside of this container Panel, you'll need to delete each individual Panel.
Using the toolbar, click the
.jpg) (Remove) button.
(Remove) button.Save your module.
Removing the Snippet from Your Environment
Use the Unqork Template Library to remove unused snippets. To uninstall a snippet from your environment:
At the top right of the Unqork Designer Platform, click Library or Templates.
Find the snippet you want to uninstall.
Click the ellipsis (...) in the snippet's tile header.
Click Uninstall Template.
Click Yes, Uninstall in the confirmation modal.
You can visit the Marketplace and reinstall the snippet at any time.
What if you have an existing application built using this snippet and then uninstall the snippet from your environment? No problem. Your existing application remains unaffected. Also, your application doesn't have any ties to the snippet. So, let's say you reinstall a newer version of the snippet in the future. You can rest assured that the installation doesn't impact your existing application.