Introduction to the Module Builder


Overview

The Module Builder is one of the core functions of the Unqork Designer Platform. With modules built in the Module Builder, Creators Also known as Unqork Users, or Designer Users; is anyone who is inside the Unqork platform. develop applications that businesses use to facilitate their products. These applications can be as simple as a questionnaire for end-users End-users, also known as Express Users, are the individuals accessing an application through Express View. In most cases, end-users are the customers using the product. to fill out or complex interfaces that can manipulate databases and display dynamic information in a dashboard.

To learn more about what modules are, view our What Is a Module? article.

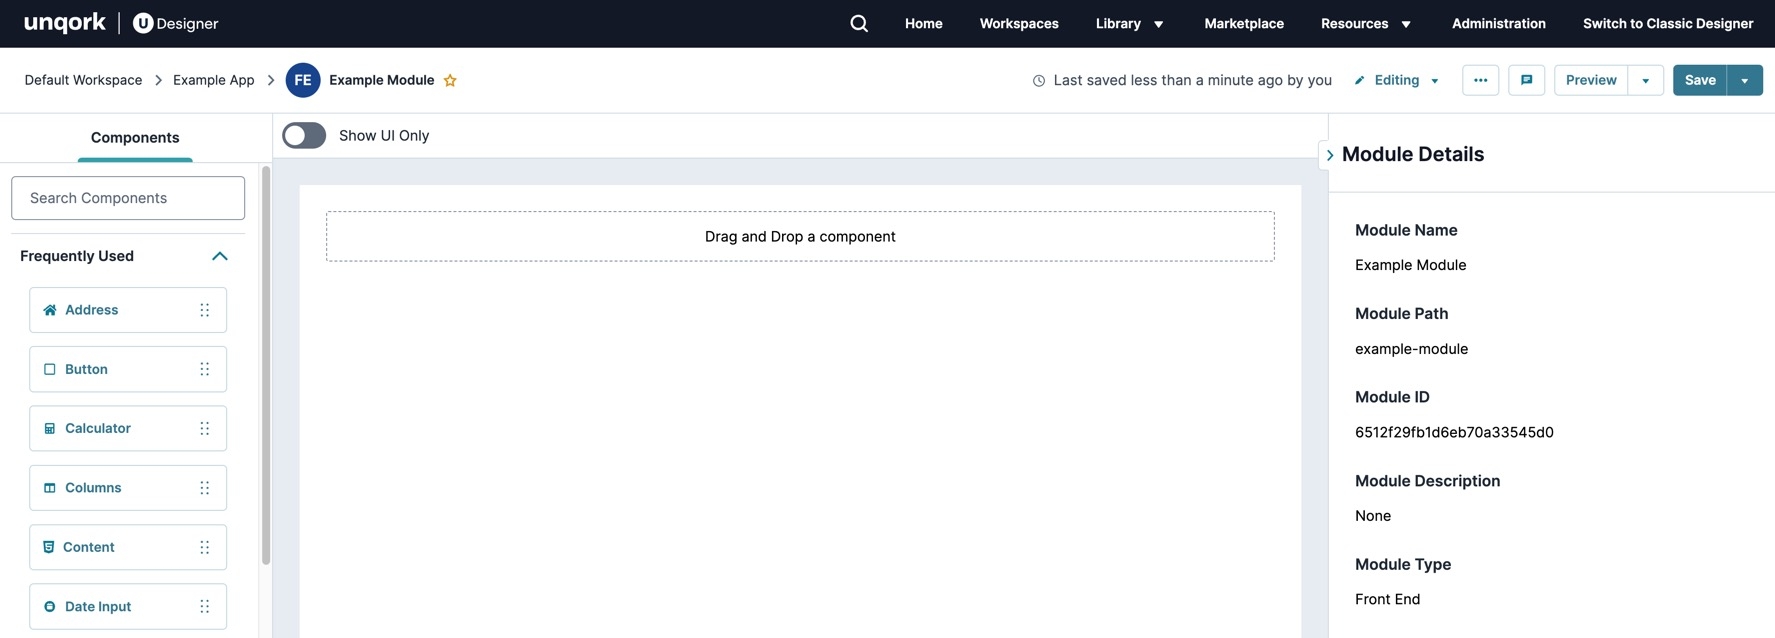
A static image displaying the Module Editor in the Unqork Platform.

Navigating the Module Builder

The Module Builder is the Designer view or the back-end of your module. From this view, you can modify the module's settings and contents. The Module Builder includes the Module Header and Designer View sections.

Module Header

The module header displays general information, like the name and location of the module. It also provides access to module settings, previewing the module in Express View Express View is how your end-user views you application. Express View also lets you preview your applications to test your configuration and view the styling. This is also the view your end-users will see when interacting with your application. After configuring a module, click Preview in the Module Builder to interact with the module in Express View., server-side executing testing, and saving changes.

Module Header Settings include:

  Setting Description

1

Module Type

Module types include:

  • API API: An API-type module includes preconfigured components that meet Unqork API specifications for server-side/remote execution. An API tag is also added by default to ensure the module displays in the API Docs Dashboard tool. When creating an API-type module, the Server-Side Execution setting is set to (ON) by default, and disabled. Disabling this setting promotes security best practices.

  • FE Front-End: A Front-End-type module is an  element built for user interfaces. When creating a Front-End module, the Server-Side Execution setting is set to (OFF) by default, and disabled. Disabling this setting ensures this module type is always accessible in Express View.

  •  O  Other: An Other-type module is for module elements that aren’t considered Front-End or API modules. This module type includes modules used for storing data, rerouting data, and so on. When creating an Other-type module, the Server-Side Execution setting is set to (OFF) by default. With Other-type modules, you can choose to set the Server-Side Execution setting to (ON).

2

Navigation Breadcrumbs

These links display where you are in your environment. For example, if you view a module in an application, then the breadcrumbs display as: Home > workspaceName > applicationName.

3 Module Name

The name you choose for your module. A module's title must be unique to an individual environment. Click the (drop-down arrow) to display other modules in the application.

4

Last Saved

Displays the time and Creator email that last saved the module. If you are the last Creator to save the module, it displays you instead of your Creator email address.

Clicking on the Last Save text opens the Module History page.

5

Viewing / Editing

Indicates if you are viewing or editing the module.

  • Preview icon Viewing: While viewing a module, component configurations can be inspected.

  • Edit icon Editing: While editing a module, a Creator can add or remove components, modify component configurations, and access the Server-Side Execution Testing page for API (API) modules.


6

···

Opens the module options drop-down. Click the ··· (ellipsis) button to display the following settings:

  • Copy Module Definition: This option lets you copy the entire module definition to your clipboard. Copying the definition ensures you copy the component's entire configuration.

  • Paste Module Definition: This option lets you paste the entire module definition from your clipboard to another module.
    This setting is only available while editing a module.

To learn more about copying and pasting module definitions, view our How To: Copy and Paste Module Definitions article.

  • Module History: Opens the Module History page. From this page, you can view or restore previous versions of the module.

  • Delete Module: Opens the Delete Module confirmation modal. Deleting a module removes it from the application. Modules deleted this way can be recovered using Unqork's API.
    This setting is only available while editing a module.

7

PreviewOpen Dropmenu icon/

Server-Side ExecutionOpen Dropmenu icon 

There are two ways to preview your module:

Depending on which module type you create, this button either displays as Preview or Server-Side Execution. To switch between them, click the Open Dropmenu icon (drop-down) button.

8

SaveOpen Dropmenu icon

This button lets you save any recent configuration changes. When you save your module for the first time, Unqork assigns a unique module ID to your module.

Click the Open Dropmenu icon (drop-down) button to display the following options:

  • Save and Update: Updates all imported modules and saves the current module. With this option, you don't have to update each module separately.

  • Save as Snippet: Lets you save your current module as a snippet. A snippet is a reusable configuration. Selecting this option opens the Save as Snippet pop-up modal.

Module Builder Designer View

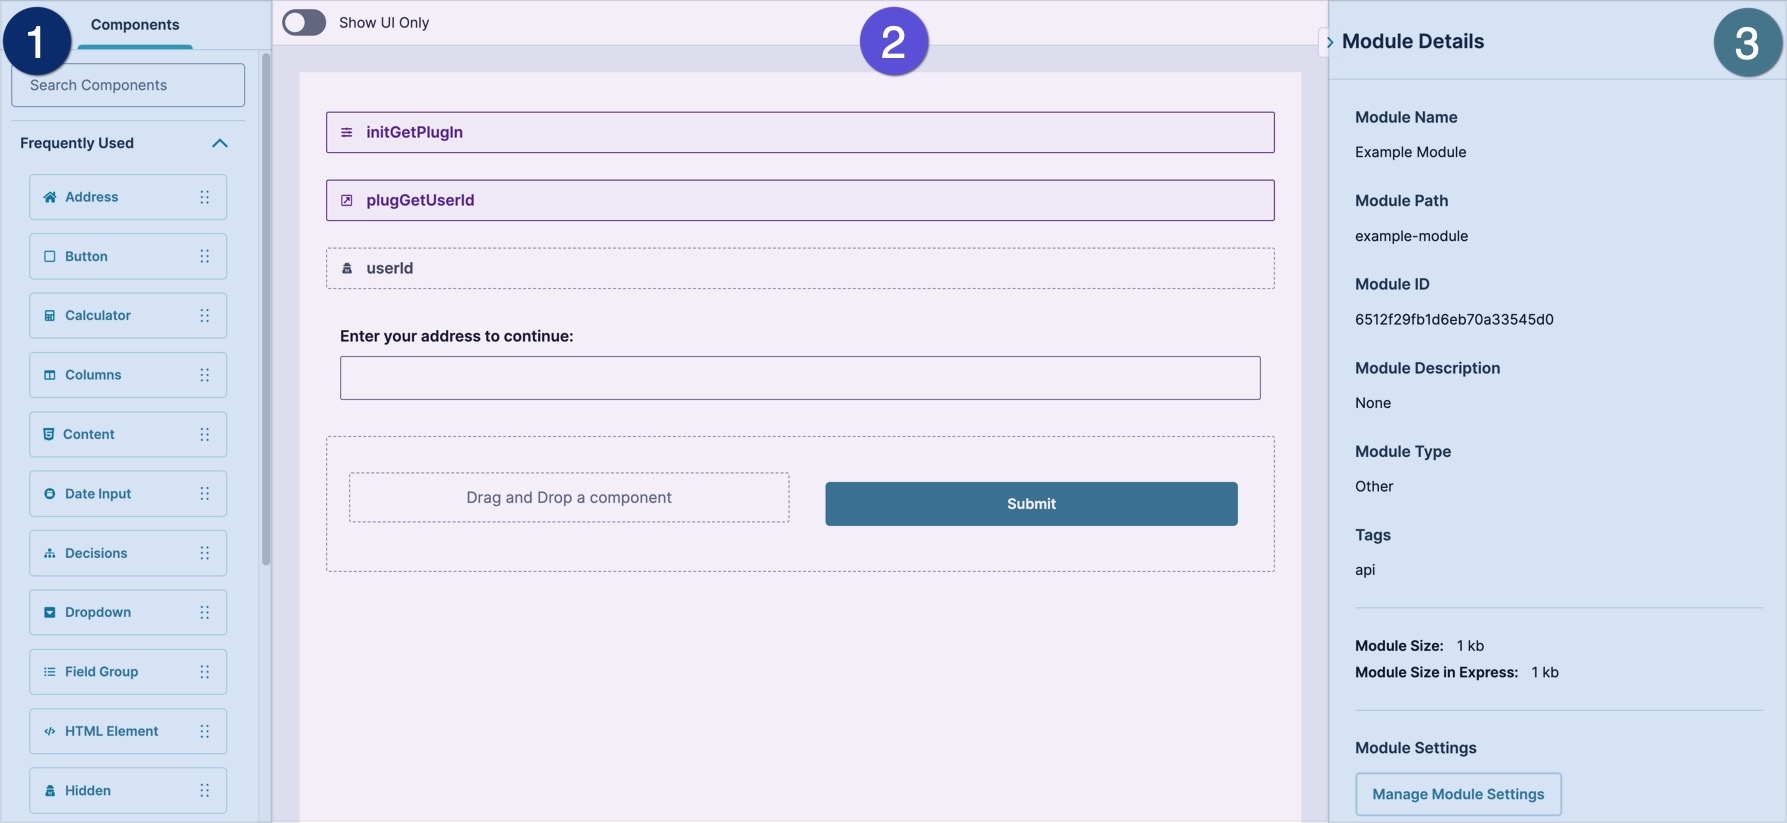
The Module BuilderDesigner View provides the tools needed to create a no-code application. The Designer View consists of the component tray, canvas, and Module Outline. In the image below, the three sections of the Module Builder have been highlighted. Use the tables below to better understand each of these sections.

A static image displaying the Module Editor. The layout has been divided into three sections: Section one is the Components tray, section two is the canvas, and section three is the Module Outline.

Section 1 - Components Component Tray

The Component Tray contains the building blocks of a module. From this tray, components can be selected and dragged onto the canvas. Alternatively, Snippets, which are pre-configured component collections, can also be selected and dragged onto the canvas.

Setting Description

ComponentsSnippetsData

Displays Components, Snippets, and Data Models in the tray.

To learn more about snippets, view our Introduction to Snippets article. To learn more about Data Models, view our Introduction to Data Modeling article.

Search Icon Search Components

Enter part or all of a component or snippet's name to filter the component tray list.

Component Library

Drag and drop component building blocks of your module. You'll use components to create fields, layouts, and logic for your application. Unqork organizes components into five categories:

  • Frequently Used: Includes the most frequently used components in Unqork.

  • Primary Fields: These components let you create end-user functions, like entering text, making radio button choices, or selecting options from a drop-down. They include the Date Input, Multi-Select Dropdown, Radio Buttons, and Text Field components.

  • Secondary Fields: These components are another type that let end-users make selections. They include the Address Search, Button, Email, Phone Number, and Protected Field components.

  • Display & Layout: These components help you organize, structure, and create module dashboards. They include the Columns, HTML Element, Panel, and ViewGrid components.

  • Data & Event Processing: These components work on the back-end of your module to perform logic and send and receive information using API calls. They include the Calculator, Data Table, Decisions, Initializer, and Plug-In components.

  • Charts & Graphs: These components let you display information in charts, graphs, and KPI widgets. They include the Chart, KPI, and Map components.

Section 2 - Canvas Canvas

The canvas is where you build a module's contents. Add components to the canvas from the component tray, then configure their settings.

Setting Description

Show UI Only

Set this toggle to (ON) to hide all components that Express View users won't see.

To learn more about the Show UI Only toggle, view our Module Header: Show UI Only article.

Module Canvas

The Module Builder Canvas is where components from the component tray are placed. In the canvas view, you can add, remove, copy, paste, or modify components to create individual modules.

To learn more about moving and modifying components, view our Component Toolbar Settings article.

Section 3 - Module OutlineModule Outline

The Module Outline provides a high-level view of the components of your module. From this list, you can search for components, select ones to highlight on the canvas, or see if there are configuration issues with your components.

To learn more about identifying configuration issues with the Module Outline, view our Real-Time Configuration Analysis Tool article.

Setting Description

Search Icon Search This Module

Enter part or all of a component's name or Property ID A Property ID is the unique field ID used by Unqork to track and link components in your module. to filter the list.

Collapse All/Expand All

The Collapse All/Expand All text is a toggle that collapses or expands panels and columns in the hierarchy and canvas. When you open your module in the Module Builder, the Module Outline shows as expanded. When collapsed, the text changes to Expand all.

By default, the Module Outline list is expanded.

Show Labels

By default, only the Property ID displays in the Module Outline. Click Show labels to include the component Title or Label Text below the Property ID. Click Hide labels to show only the Property ID.

Components List

In the Module Outline panel, you’ll find all the components in your module. Use the component icon, Property ID, and Label Text to help you locate components.

To learn more about the Module Outline tool, view our Module Outline article.

Resources


Overview

The Module Builder is one of the core functions of the Unqork Designer Platform. With modules built in the Module Builder, Creators Also known as Unqork Users, or Designer Users; is anyone who is inside the Unqork platform. develop applications that businesses use to facilitate their products. These applications can be as simple as a questionnaire for end-users End-users, also known as Express Users, are the individuals accessing an application through Express View. In most cases, end-users are the customers using the product. to fill out or complex interfaces that can manipulate databases and display dynamic information in a dashboard.

To learn more about what modules are, view our What Is a Module? article.

A static image displaying the Module Editor in the Unqork UDesigner Platform.

Navigating the Module Builder

The Module Builder is the Designer view or the back-end of your module. From this view, you can modify the module's settings and contents. The Module Builder includes the Module Header and Designer View sections.

Module Header

The module header displays general information, like the name and location of the module. It also provides access to module settings, previewing the module in Express View Express View is how your end-user views you application. Express View also lets you preview your applications to test your configuration and view the styling. This is also the view your end-users will see when interacting with your application. After configuring a module, click Preview in the Module Builder to interact with the module in Express View., server-side executing testing, and saving changes.

Module Header Settings include:

  Setting Description

1

Navigation Breadcrumbs

These links display where you are in your environment. For example, if you view a module in an application, the breadcrumbs display as: Home > workspaceName > applicationName.

2

Module Type

Module types include:

  • API API: An API-type module includes preconfigured components that meet Unqork API specifications for server-side/remote execution. An API tag is also added by default to ensure the module displays in the API Docs Dashboard tool. When creating an API-type module, the Server-Side Execution setting is set to (ON) by default, and disabled. Disabling this setting promotes security best practices.
  • FE Front-End: A Front-End-type module is an  element built for user interfaces. When creating a Front-End module, the Server-Side Execution setting is set to (OFF) by default, and disabled. Disabling this setting ensures this module type is always accessible in Express View.

  •  O  Other: An Other-type module is for module elements that aren’t considered Front-End or API modules. This module type includes modules used for storing data, rerouting data, and so on. When creating an Other-type module, the Server-Side Execution setting is set to (OFF) by default. With Other-type modules, you can choose to set the Server-Side Execution setting to (ON).

Click the (star Starring elements stores them in the Starred tab of your UDesigner homepage for quick access. You can star any element, regardless if it's yours or belongs to another team member.) next to the module name to display the module in the Starred tab of your UDesigner homepage.

3 Module Name

The name you choose for your module. A module's title must be unique to an individual environment.

4

Last Saved

Displays the time and Creator email that last saved the module. If you are the last Creator to save the module, it displays you instead of your Creator email address.

5

Preview icon Viewing / Edit icon Editing

Indicates if you are viewing or editing the module.

  • Preview icon Viewing: While viewing a module, component configurations can be inspected.

  • Edit icon Editing: While editing a module, a Creator can add or remove components, modify component configurations, and access the Server-Side Execution Testing page for API (API) modules.


6

···

Opens the module options drop-down. Click the ··· (ellipsis) button to display the following settings:

  • Copy Module Definition: This option lets you copy the entire module definition to your clipboard. Copying the definition ensures you copy the component's entire configuration.

  • Paste Module Definition: This option lets you paste the entire module definition from your clipboard to another module.
    This setting is only available while editing a module.

To learn more about copying and pasting module definitions, view our How To: Copy and Paste Module Definitions article.

  • Module History: Opens the Module History page. From this page, you can view or restore previous versions of the module.

  • Delete: Opens the Delete Module confirmation modal. Deleting a module removes it from the application. Modules deleted this way can be recovered using Unqork's API.
    This setting is only available while editing a module.

7

(Comment)

Opens the Comments pane. Creators can create comments on the module, or its individual components. Creators can also tag other creators to notify them of the comment.

8

PreviewOpen Dropmenu icon/

Server-Side ExecutionOpen Dropmenu icon 

There are two ways to preview your module:

Depending on which module type you create, this button either displays as Preview or Server-Side Execution. To switch between them, click the Open Dropmenu icon (drop-down) button.

9

SaveOpen Dropmenu icon

This button lets you save any recent configuration changes. When you save your module for the first time, Unqork assigns a unique module ID to your module.

Click the Open Dropmenu icon (drop-down) button to display the following options:

  • Save and Update: Updates all imported modules and saves the current module. With this option, you don't have to update each module separately.

  • Save as Snippet: Lets you save your current module as a snippet. A snippet is a reusable configuration. Selecting this option opens the Save as Snippet pop-up modal.

Designer View

The Module BuilderDesigner View provides the tools needed to create a no-code application. The Designer View consists of the component tray, canvas, and Module Outline. In the image below, the three sections of the Module Builder have been highlighted. Use the tables below to better understand each of these sections.

A static image displaying the Module Editor. The layout has been divided into three sections: Section one is the Components tray, section two is the canvas, and section three is the Module Outline.

Section 1 - Components Component Tray

The Component Tray contains the building blocks of a module. From this tray, components can be selected and dragged onto the canvas. Alternatively, Snippets, which are pre-configured component collections, can also be selected and dragged onto the canvas.

Setting Description

Components

Displays Components available to the environment.

Search Components

Enter part or all of a component or snippet's name to filter the component tray list.

Component Library

Drag and drop component building blocks of your module. You use components to create fields, layouts, and logic for your application.

Section 2 - Canvas Canvas

The canvas is where you build a module's contents. Add components to the canvas from the component tray, then configure their settings.

Setting Description

Show UI Only

Set this toggle to (ON) to hide all components that Express View users won't see.

To learn more about the Show UI Only toggle, view our Module Header: Show UI Only article.

Module Canvas

The Module Builder Canvas is where components from the component tray are placed. In the canvas view, you can add, remove, copy, paste, or modify components to create individual modules.

To learn more about moving and modifying components, view our Component Toolbar Settings article.

Section 3 - Module OutlineModule Details

The Module Details panel provides a high-level view of the components of your module. From this list, you can search for components, select ones to highlight on the canvas, or see if there are configuration issues with your components.

Setting Description

Module Name

The name of your module. You can change the Module Name in Module settings.

Module Path

Displays themodule path value. The Module Path value can only contain letters, numbers, and hyphens consistent with HTML file path naming conventions. You can change the Module Name in Module settings.

Module ID

The unique identifier of your module. Click Copy to copy your module ID.

You cannot change the module ID once the module has been created.

Module Description

A short description of the module's purpose to make it easier to onboard team members or hand off projects. You can edit the Module Description in Module settings.

Module Type

The type of function this module is designed for. Module types include:

  • API API: An API-type module includes preconfigured components that meet Unqork API specifications for server-side/remote execution. An API tag is also added by default to ensure the module displays in the API Docs Dashboard tool. When creating an API-type module, the Server-Side Execution setting is set to (ON) by default, and disabled. Disabling this setting promotes security best practices.
  • FE Front-End: A Front-End-type module is an  element built for user interfaces. When creating a Front-End module, the Server-Side Execution setting is set to (OFF) by default, and disabled. Disabling this setting ensures this module type is always accessible in Express View.

  •  O  Other: An Other-type module is for module elements that aren’t considered Front-End or API modules. This module type includes modules used for storing data, rerouting data, and so on. When creating an Other-type module, the Server-Side Execution setting is set to (OFF) by default. With Other-type modules, you can choose to set the Server-Side Execution setting to (ON).

You can switch the Module Type in Module settings.

Tags

The tags applied to the module Tags are optional but can help locate specific modules in your environment. Add, edit, or remove tags in Module settings.

Module Size

The size of the module configuration in the Unqork database. This field does not include the size of any Automatically Referenced Imported Modules, as they are imported on load.

Modules greater than 8 MB in size cause performance issues with the Real-Time Configuration Analysis tool.

When the Enable Translations setting toggle is set to (ON), the module size is also dependent on the size of your translations information.

Module Size in Express

The size of the module that loads in Express View Express View is how your end-user views you application. Express View also lets you preview your applications to test your configuration and view the styling. This is also the view your end-users will see when interacting with your application. After configuring a module, click Preview in the Module Builder to interact with the module in Express View.. This field includes all Automatically Referenced Imported Modules.

When the Enable Translations setting toggle is set to (ON), the module size is also dependent on the size of your translations information.

Module Settings

Click Manage Module Settings to open the Module Settings modal.

Resources