The Button component adds an interactive, clickable element to your module. Buttons allow end-users to perform actions and make choices with a single button-click. As a creator, you can use Buttons to set custom actions or process flows based on your end-user's choices.
You'll find the component under the Secondary Fields group to the left of the Module Builder.
About the Configuration Window
To learn more about general component settings and those that display when a component is associated with Data Models, view our General Component Settings article.
Display Settings
Field Text
Setting | Description |
|---|---|
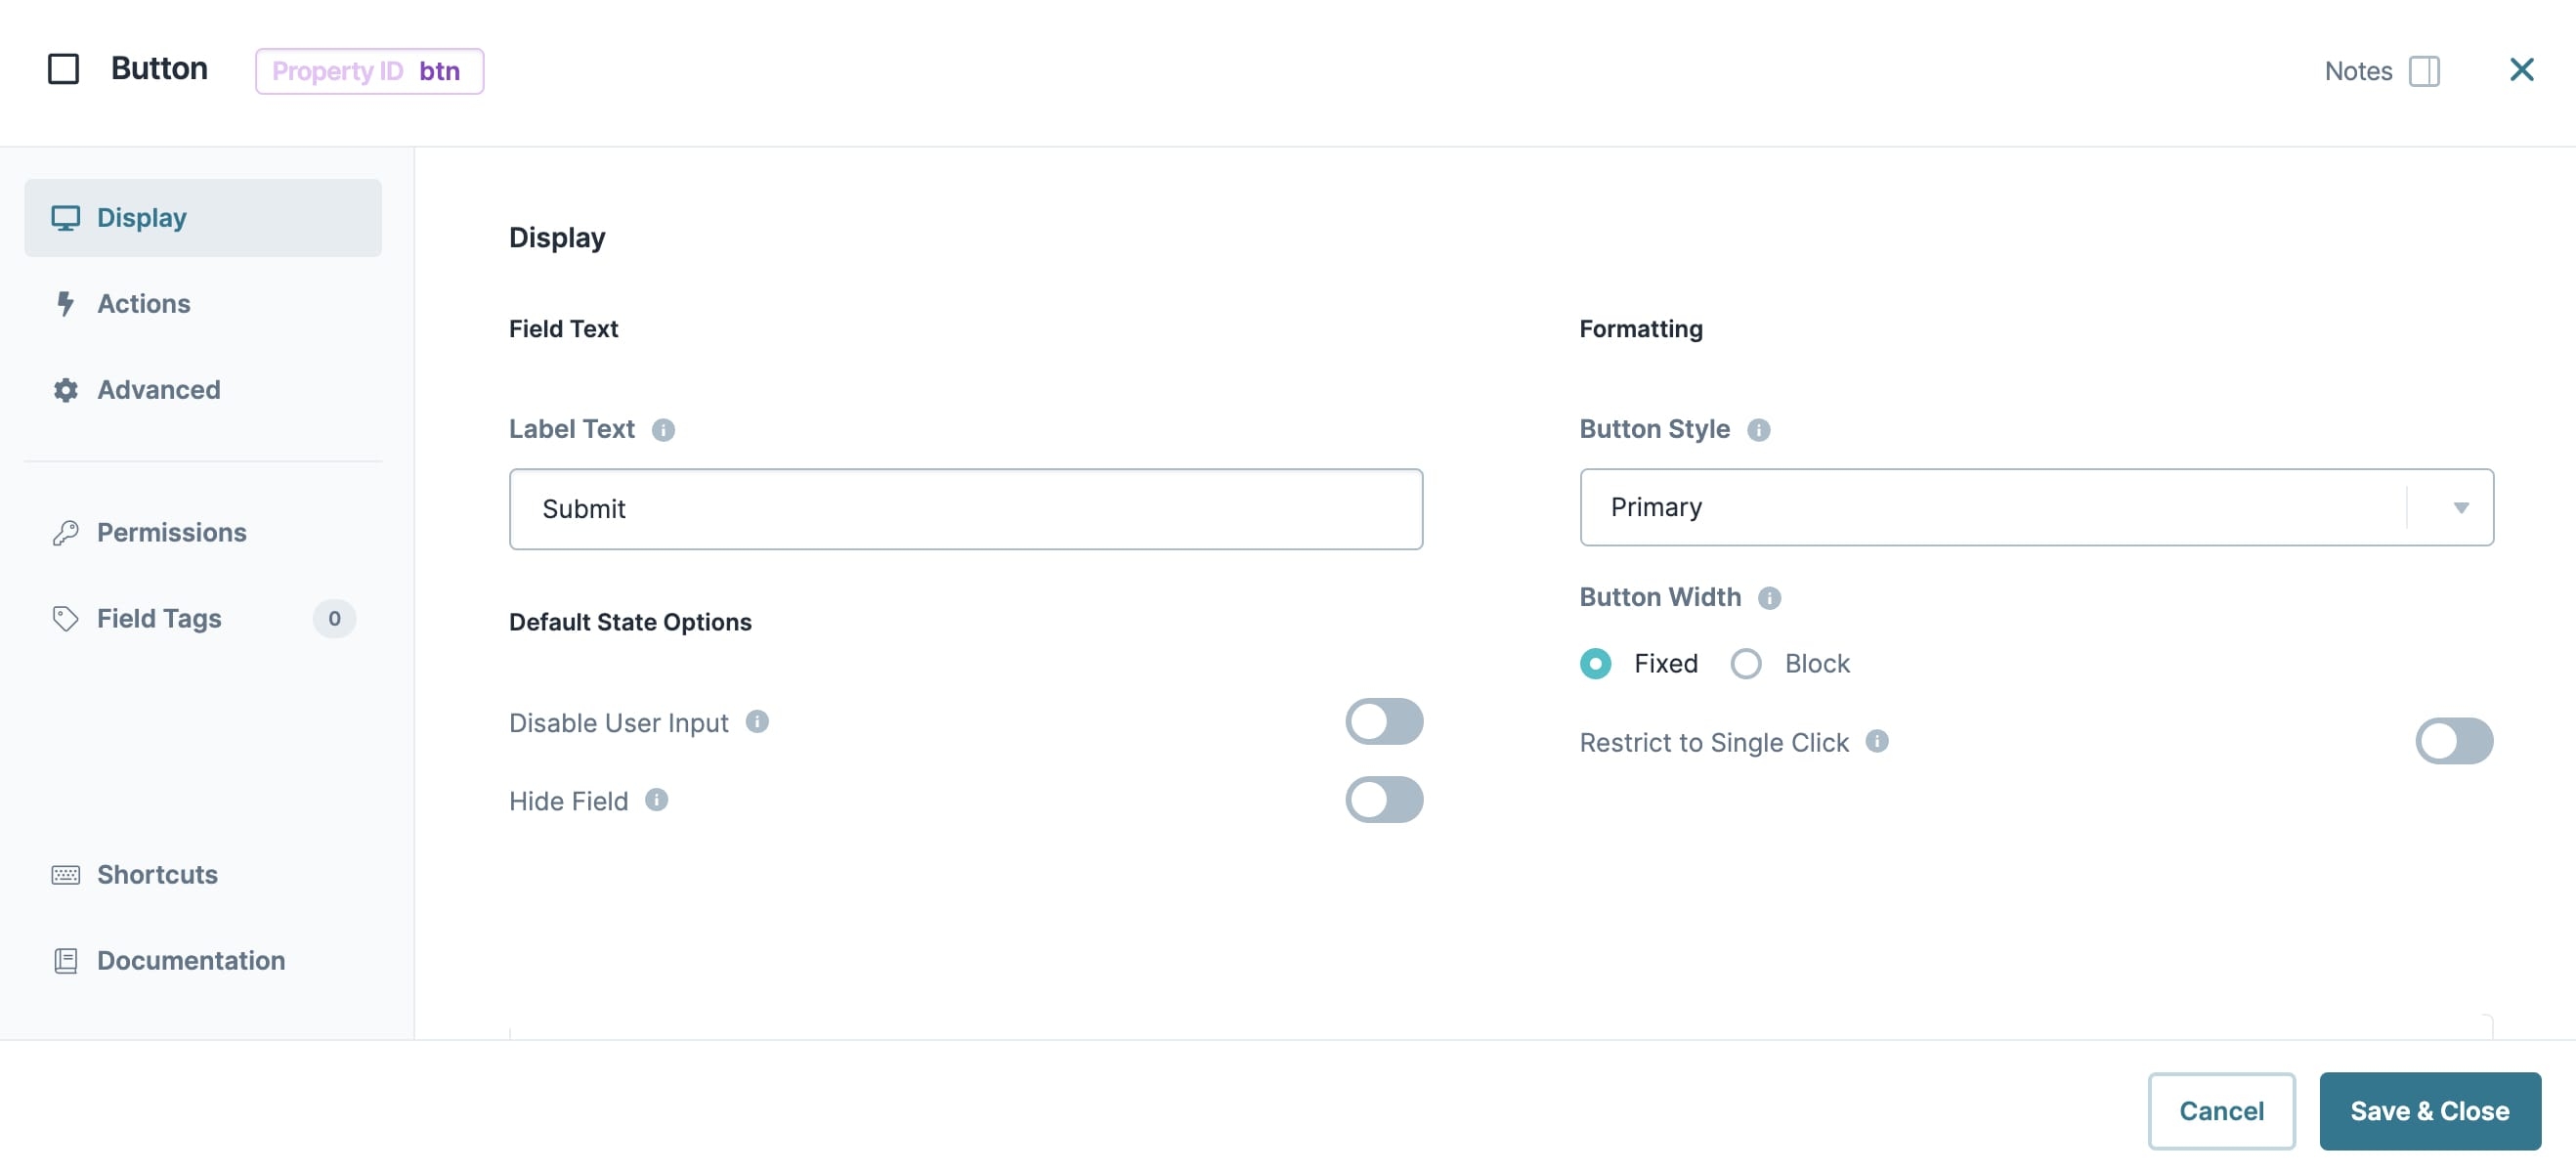
Label Text | Label Text conveys what the input component is and what information it displays. Enter the purpose of the corresponding component or field. User-friendly labels make your module more accessible. Keep labels short and descriptive (a word or two) using title case. For longer entries, use sentence case. |
Default State Options
Setting | Description |
|---|---|
Hide Field | Displays or hides the Button from view. Setting the Hide Button toggle to ON hides the Button in Express View. Setting the toggle back to By default, the Hide Button toggle is set to |
Formatting
Setting | Description |
|---|---|
Button Style | Sets the visual appearance of the button. Options include: |
Button Width | Options for determining the width of the button:
|
Restrict to Single Click | When set to If you need to re-enable a disabled button, you can do so using a logic component. To re-enable, set up a logic component, like an Initializer, to send a disabled value of no to your Button component. This can be helpful if the action your Button triggers fails. Restrict to Single Click, Prevent Disabling on Submission, and Disable on Invalid Forms are all guardrails. The Restrict to Single Click option applies to every button-click, whether you create a submission or not. By default, the Restrict to Single Click toggle is set to |
Input Behavior
Setting | Description |
|---|---|
Input Behavior | Controls how end-users interact with the component. Choose from the following options:
|
Actions Settings
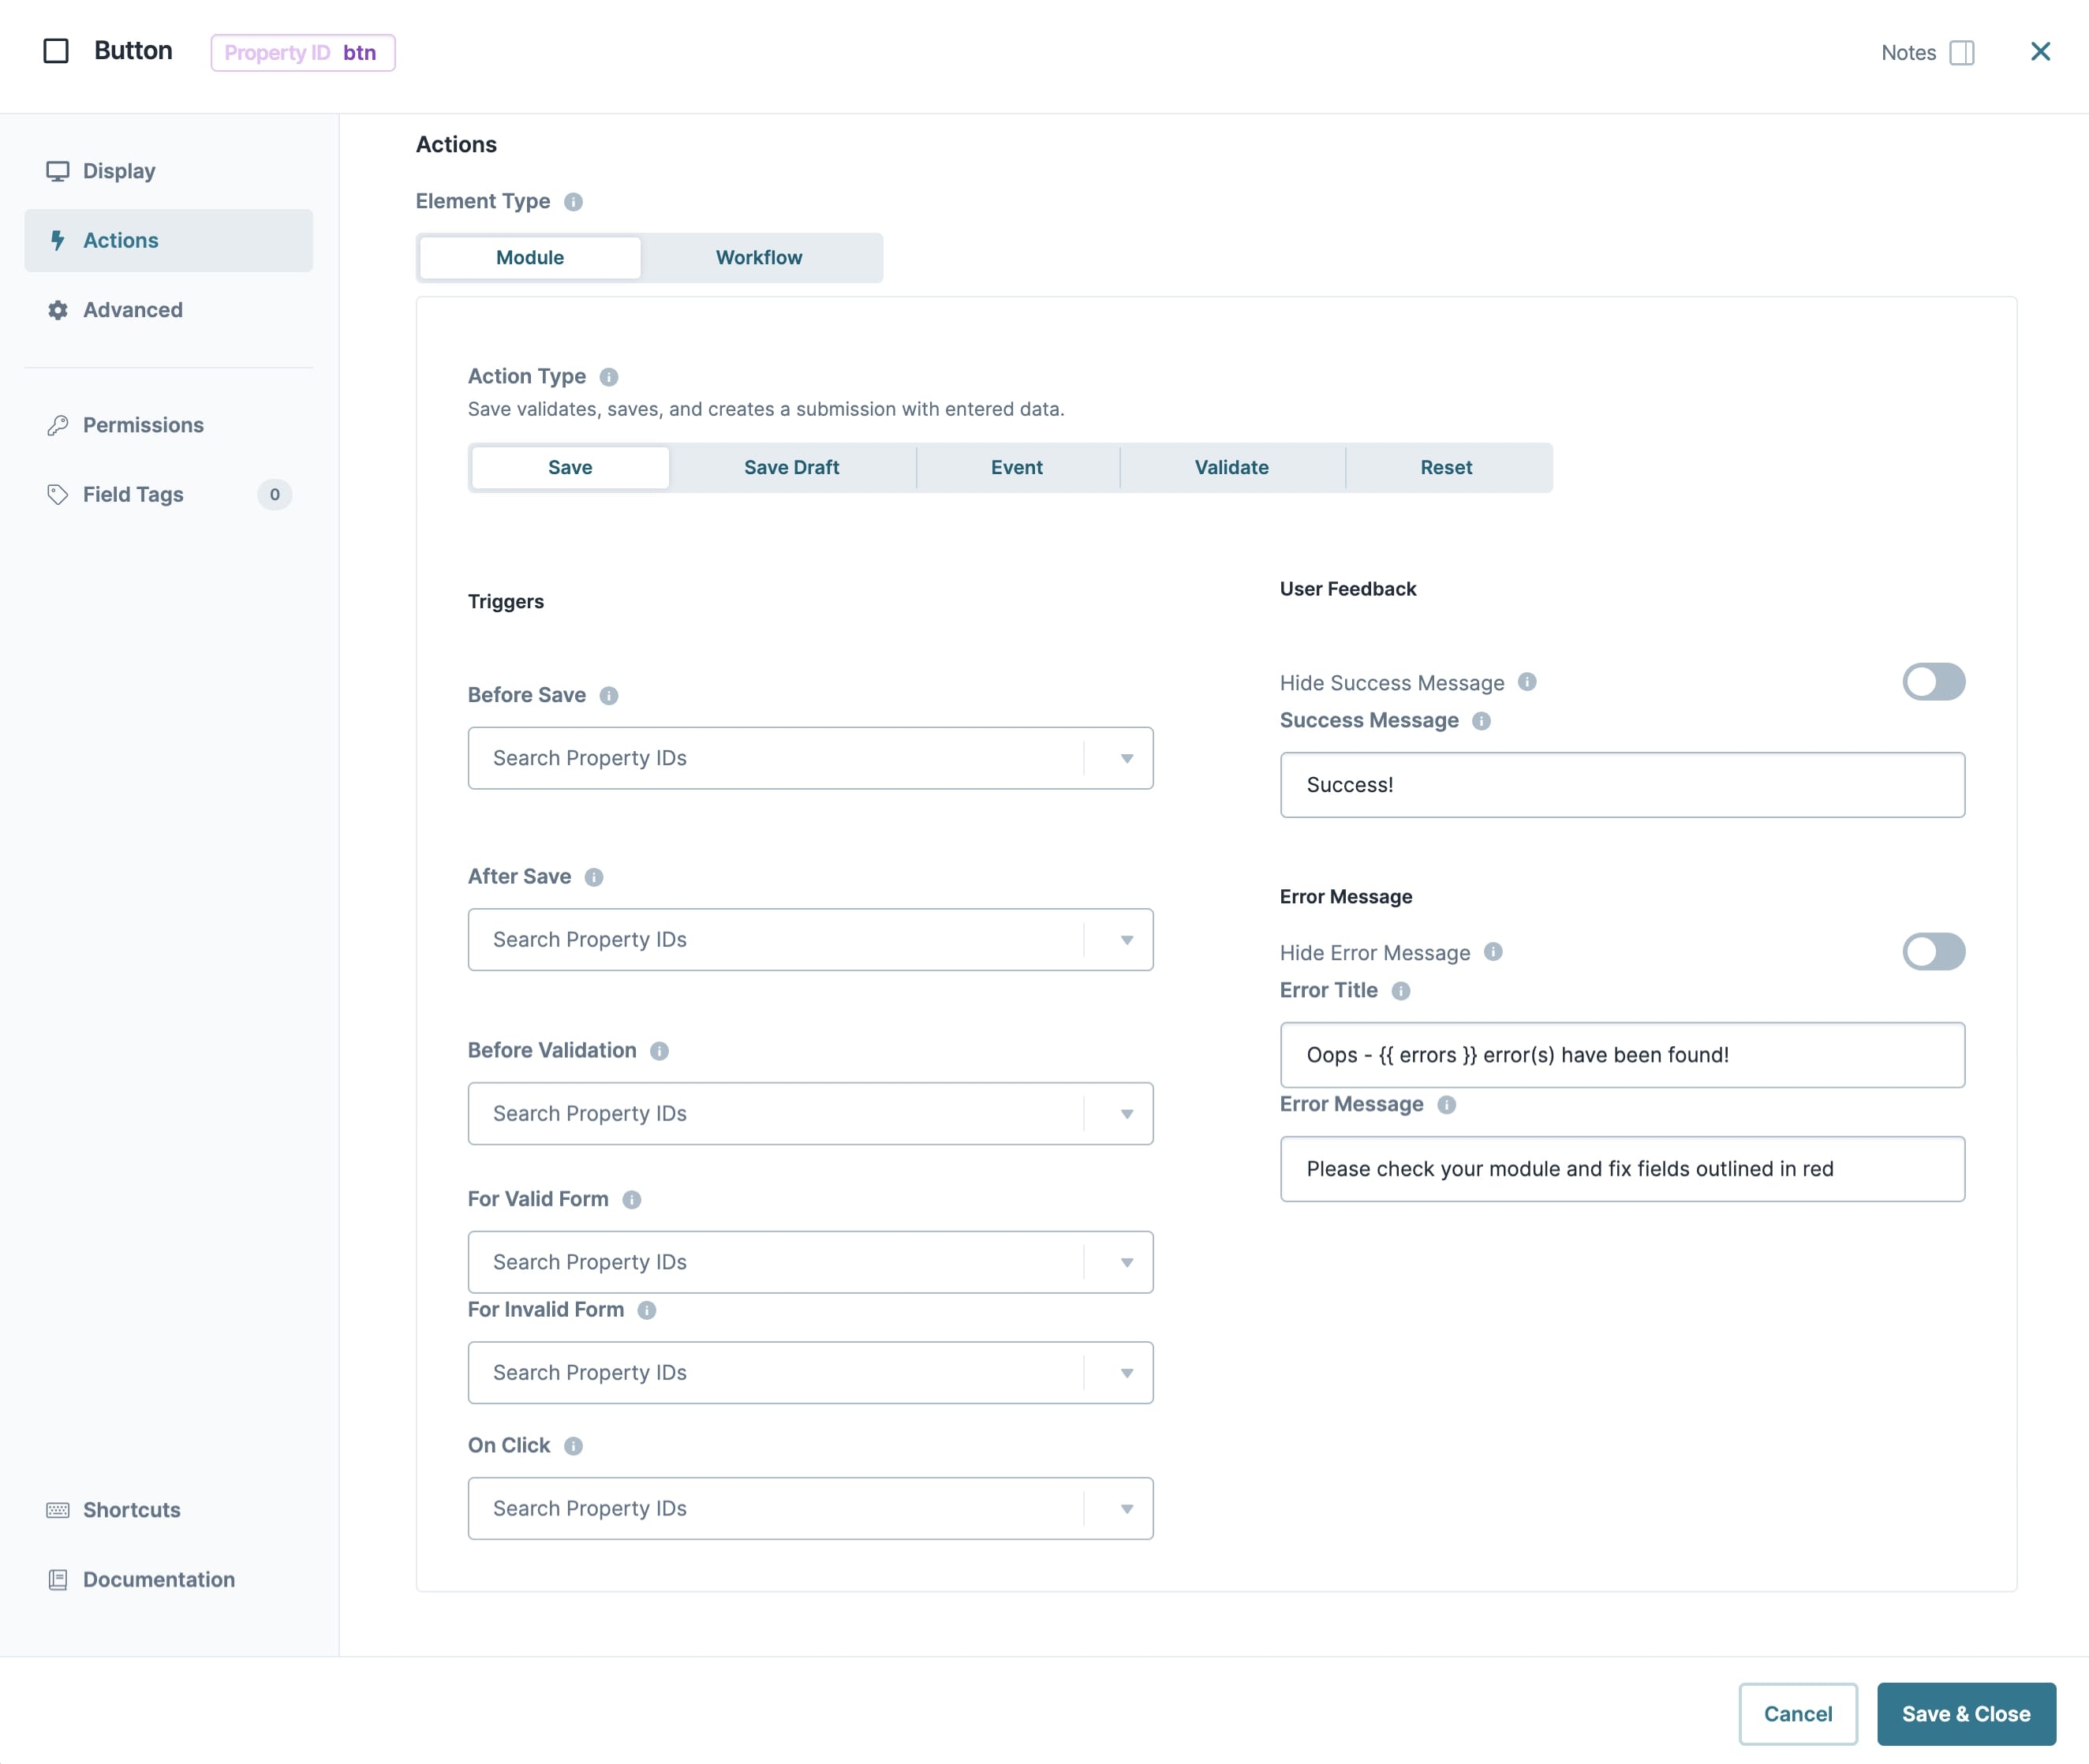
.jpg)
Setting | Description |
|---|---|
Element Type | This setting provides the following options:
|
Action Type | The Action Type setting varies based on the chosen Element Type. See the Action Type Triggers (Module) or Action Type Triggers (Workflow) tables for additional information and available triggers. |
Triggers
After selecting an Element Type, the Triggers section displays setting specific options for Module or Workflow applications. Use the trigger settings to execute other components, modules, applications, or workflows.
Action Type Triggers (Module)
Action Type Triggers for module include Save, Save Draft, Event, Validate, and Reset. Each Module Action Type contains a unique set of trigger options.
Setting | Description |
|---|---|
Save | Saves, validates, and creates a submission to the database. Triggers include:
|
Save Draft | Saves and creates a submission to the database but doesn't validate the page's information. Triggers include:
|
Event | Trigger an event by specifying a Property ID in a Trigger field. Or, lets you create an Event ID to reference in another component to trigger that component on button-click. Triggers include:
|
Validate | Validates the information on the page but doesn't create a submission. Triggers include:
|
Reset | Clears data and resets the Disabled, Hidden, and Required settings for all components in the module. This setting is similar to using the Reset and Clear Output Types together in a logic component. Triggers include:
|
Action Type Triggers (Workflow)
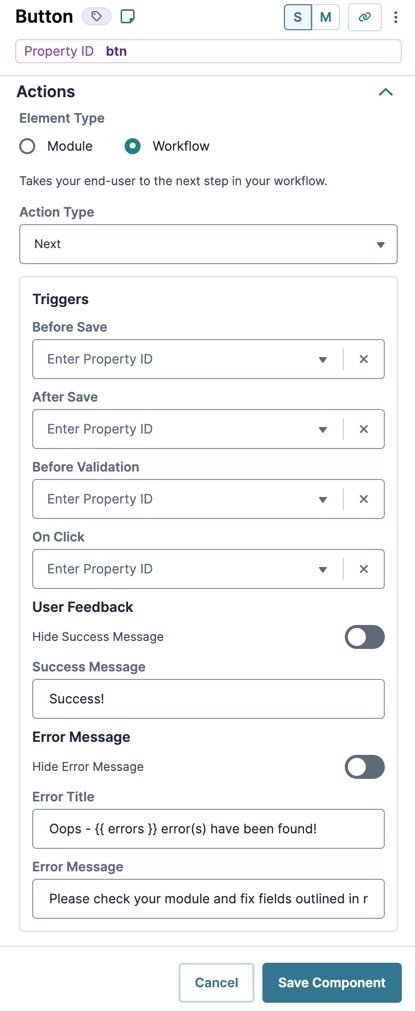
Action Types for workflows include Next, Previous, and Go To. Each Workflow Action Type contains a unique set of trigger options.
Setting | Description |
|---|---|
Next | Takes the end-user to the next step in your workflow. Triggers include:
|
Previous | Takes the end-user to the previous step in your workflow. Triggers include:
|
Go to | Takes the end-user to the step specified in the Step Path* field. Enter the Path of the workflow step where you want your button to lead. When your end-user clicks this button, they'll go to that step. Triggers include:
*You must assign a Step Path to use the Go To Action Type. |
User Feedback
Setting | Description |
|---|---|
Hide Success Message | Displays or hides a success message on successful submission, validation, or saving of a draft. Setting the Hide Success Message toggle to By default, the Hide Success Message toggle is set to |
Success Message | Enter a custom success message to display on successful submission, validation, or saving of a draft. |
Click Event | Displays when selecting the Event Action Type under the Module Element Type. Enter an Event ID to assign the Button's designated event. You can then reference this Event ID in other components. |
Error Message
Setting | Description |
|---|---|
Hide Error Message | Displays or hides an error message on successful submission, validation, or saving of a draft. Setting the Hide Error Message toggle to By default, the Hide Error Message toggle is set to |
Error Title | Enter a title for the error message to display when there are validation issues. |
Error Message | Enter a custom error message to display when there are validation issues. |
Advanced Settings
Additional Display Options
Setting | Description |
|---|---|
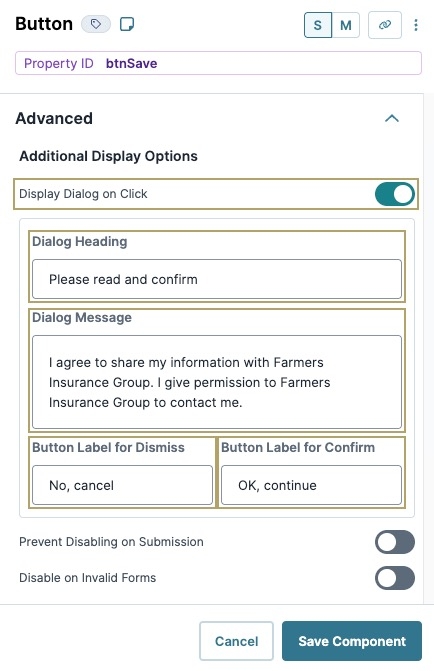
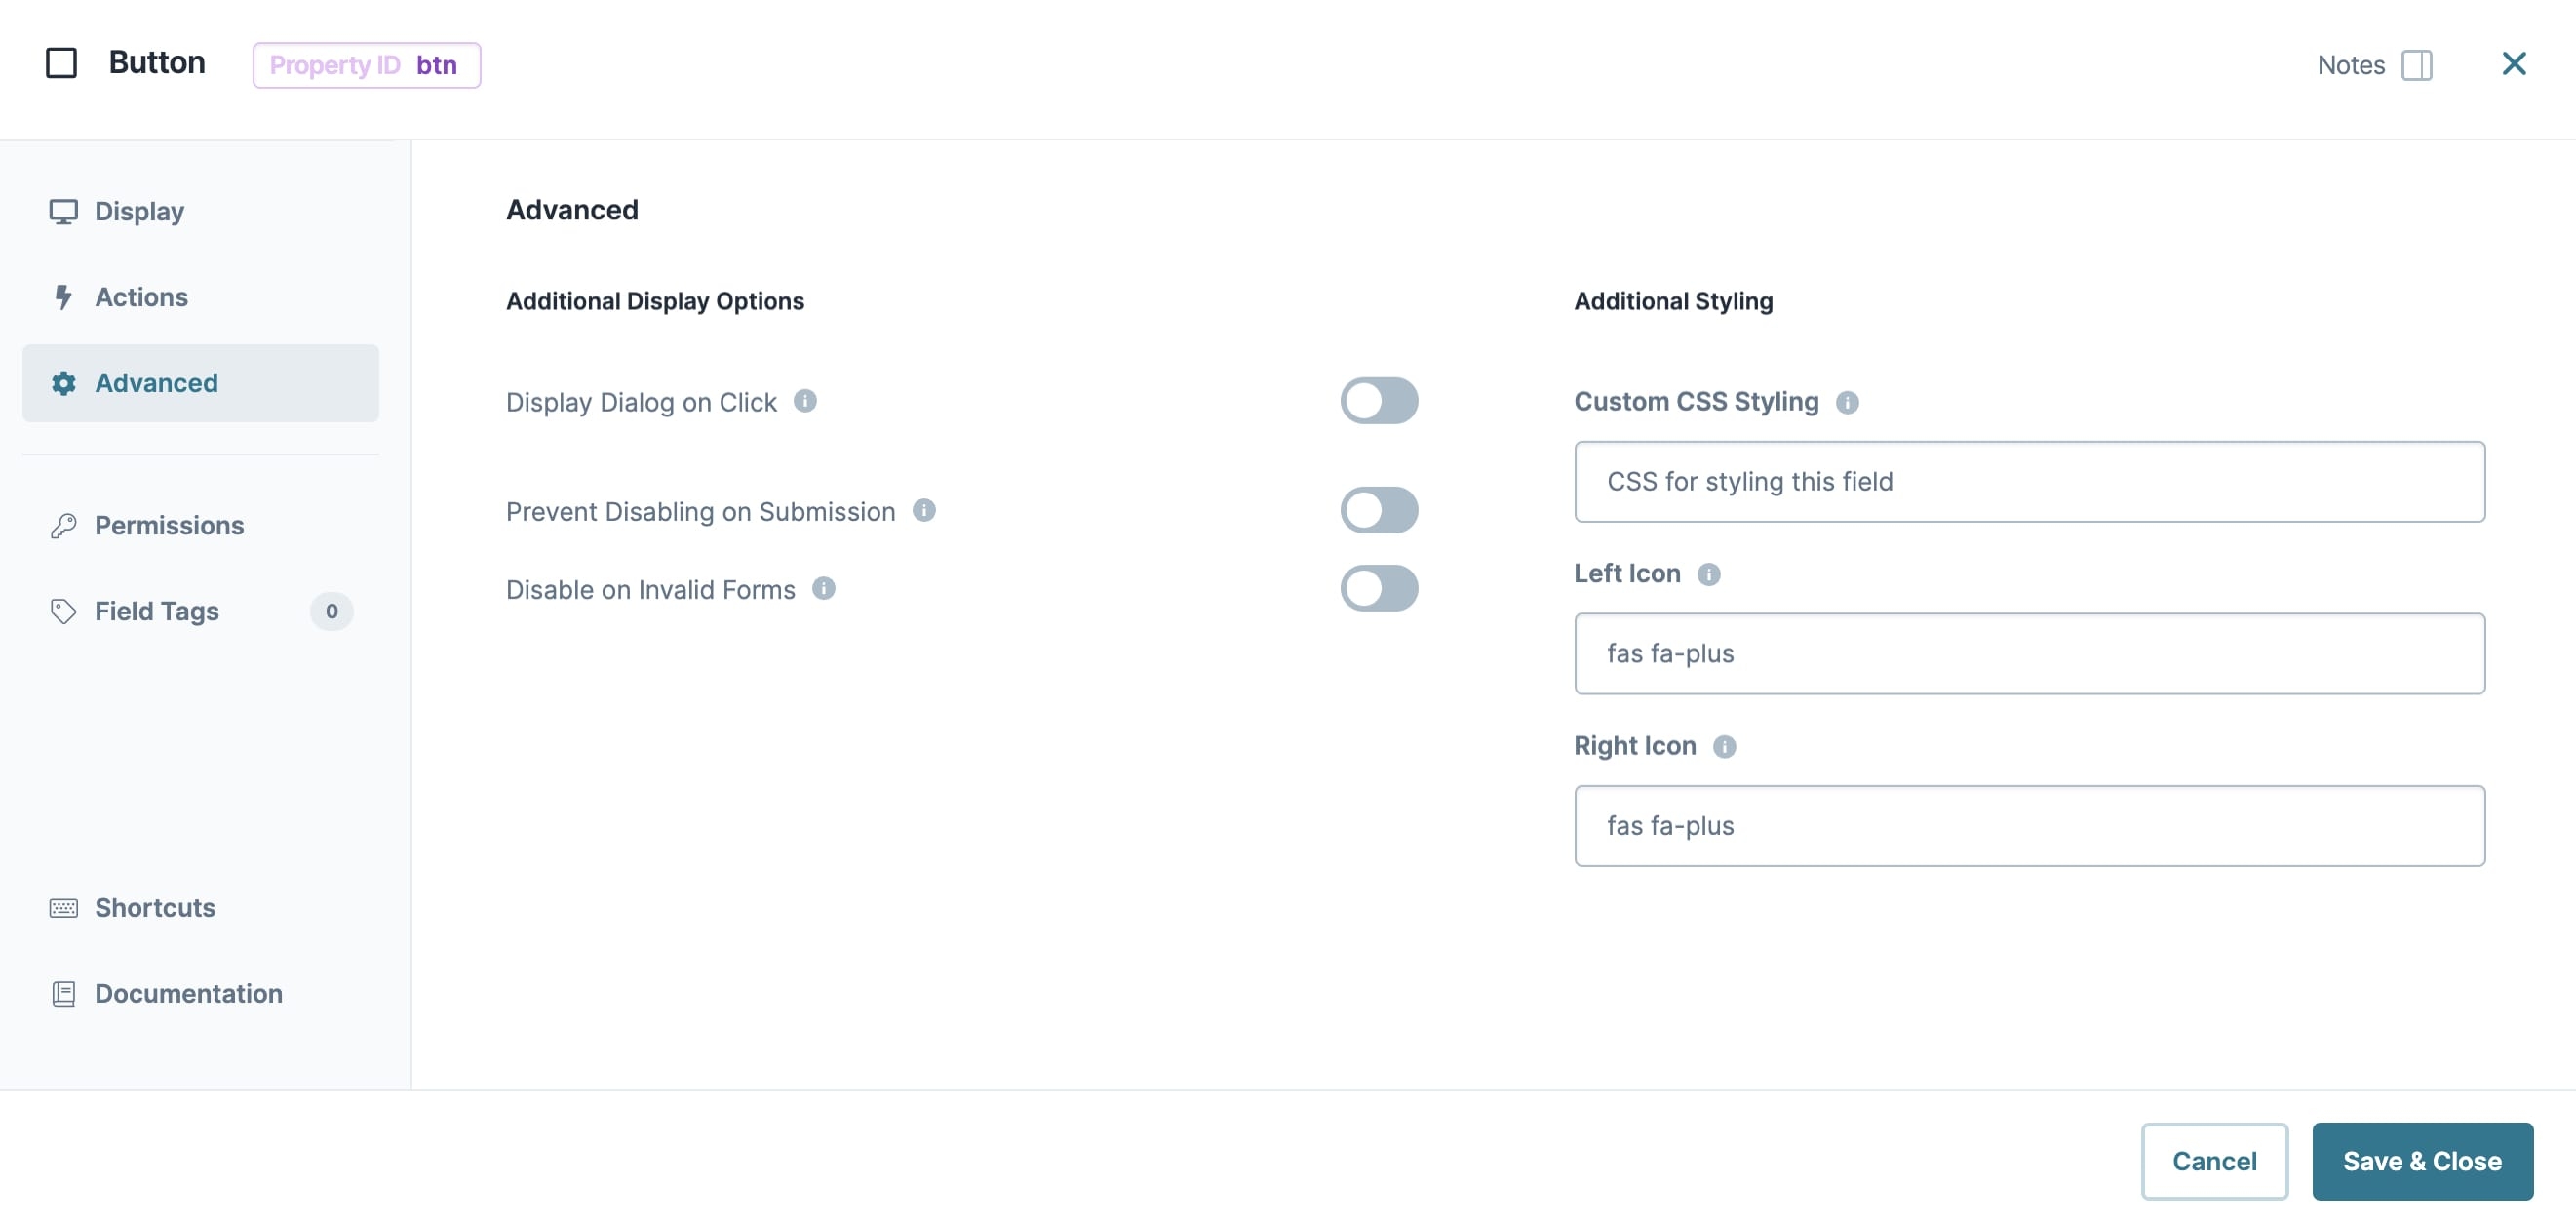
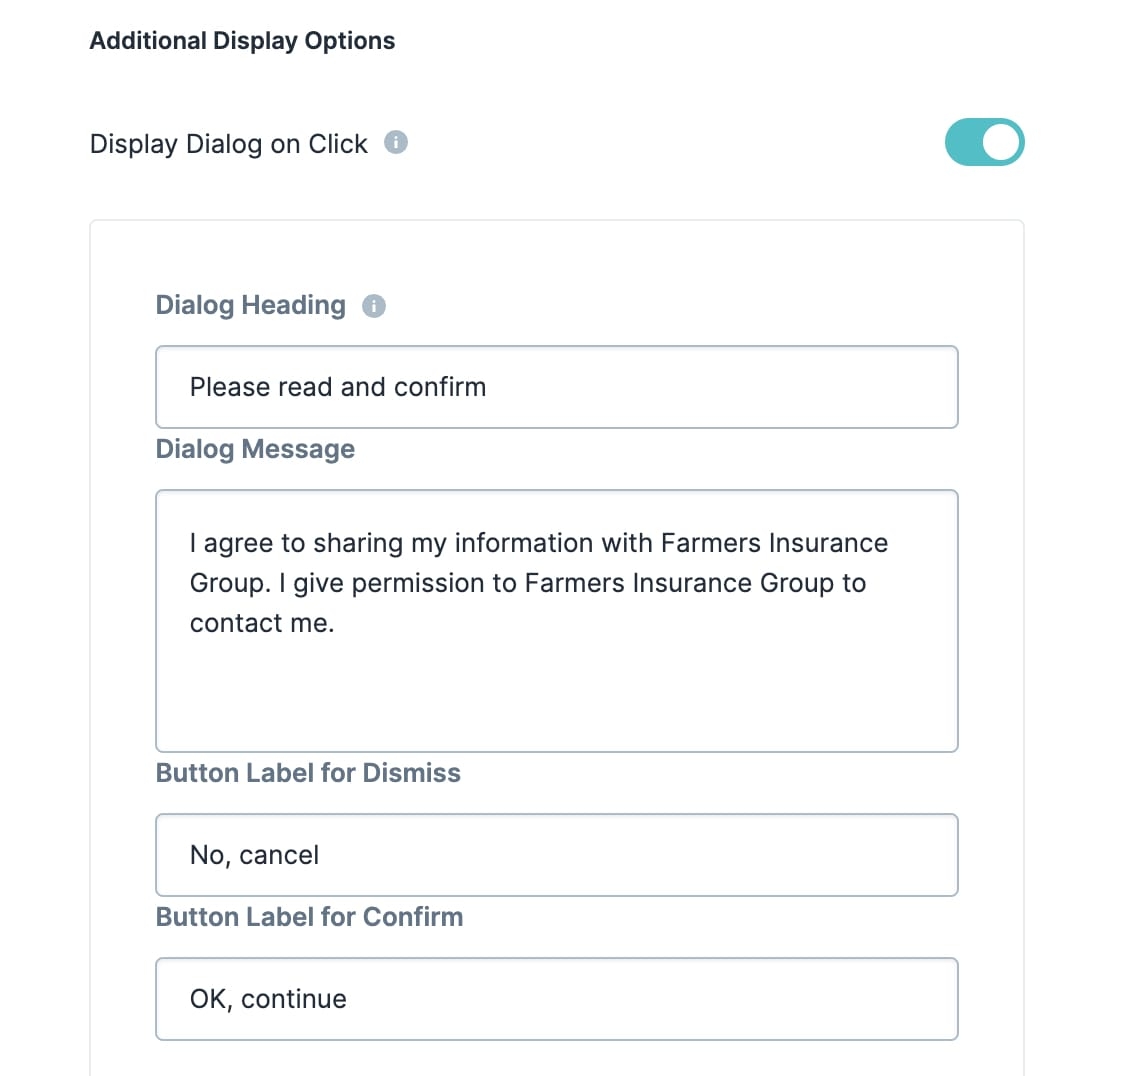
Display Dialog on Click | Displays or hides a confirmation dialog on button-click. The confirmation dialog also allows end-users to confirm their intention to complete the Button's associated action. Setting the toggle to By default, the Display Dialog on Click toggle is set to |
Dialog Heading | Enter a title for the confirmation dialog to display on button-click. |
Dialog Message | Enter a custom message for the confirmation dialog to display on button-click. |
Button Label for Dismiss | Enter a Label for the Button to dismiss the dialog message. Actions associated with the button-click will not continue. |
Button Label for Confirm | Enter a Label for the Button to confirm understanding of the dialog message. Actions associated with the button-click will continue. |
Prevent Disabling on Submission | When set to Restrict to Single Click, Prevent Disabling on Submission, and Disable on Invalid Forms are all guardrails. The Prevent Disabling on Submission setting only applies when your end-user creates a submission. By default, the Prevent Disabling on Submission toggle is set to |
Disable on Invalid Forms | When set to Restrict to Single Click, Prevent Disabling on Submission, and Disable on Invalid Forms are all guardrails. The Disable on Invalid Forms setting only applies when your end-user hasn't met the validation requirements set up in your module. By default, the Disable on Invalid Forms toggle is set to |
Additional Styling
Setting | Description |
|---|---|
Custom CSS Styling | Enter a Custom CSS Class to apply to your component. Custom CSS lets you maintain a consistent look and feel when the field or element is part of a template or multiple modules. Updated CSS styling applies to all components that reference this custom class name. |
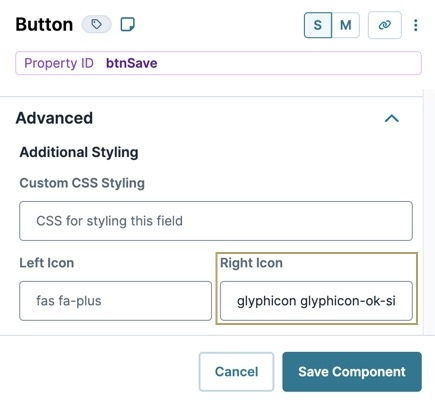
Left/Right Icon | Use these fields to add icons (glyphs) to the left or right of your Button's Label Text. For example, entering glyphicon glyphicon-pencil adds an icon of a pencil to your Button.
|
Accessibility Settings
ARIA
Setting | Description |
|---|---|
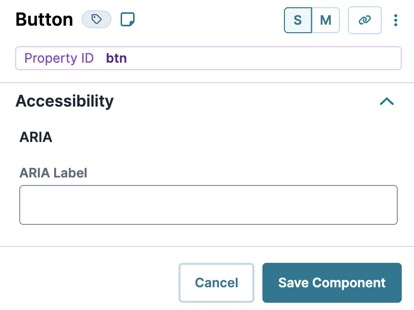
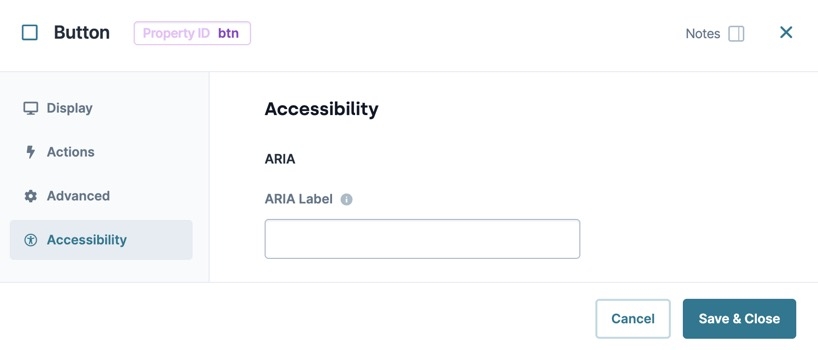
Aria | Use these settings to create ARIA (Accessible Rich Internet Applications) attributes to better support end-users that require screen readers to navigate your applications. |
Aria Label | Use this field to define the component when when a screen reader arrives at it in Express View. |
Adding a Button Component
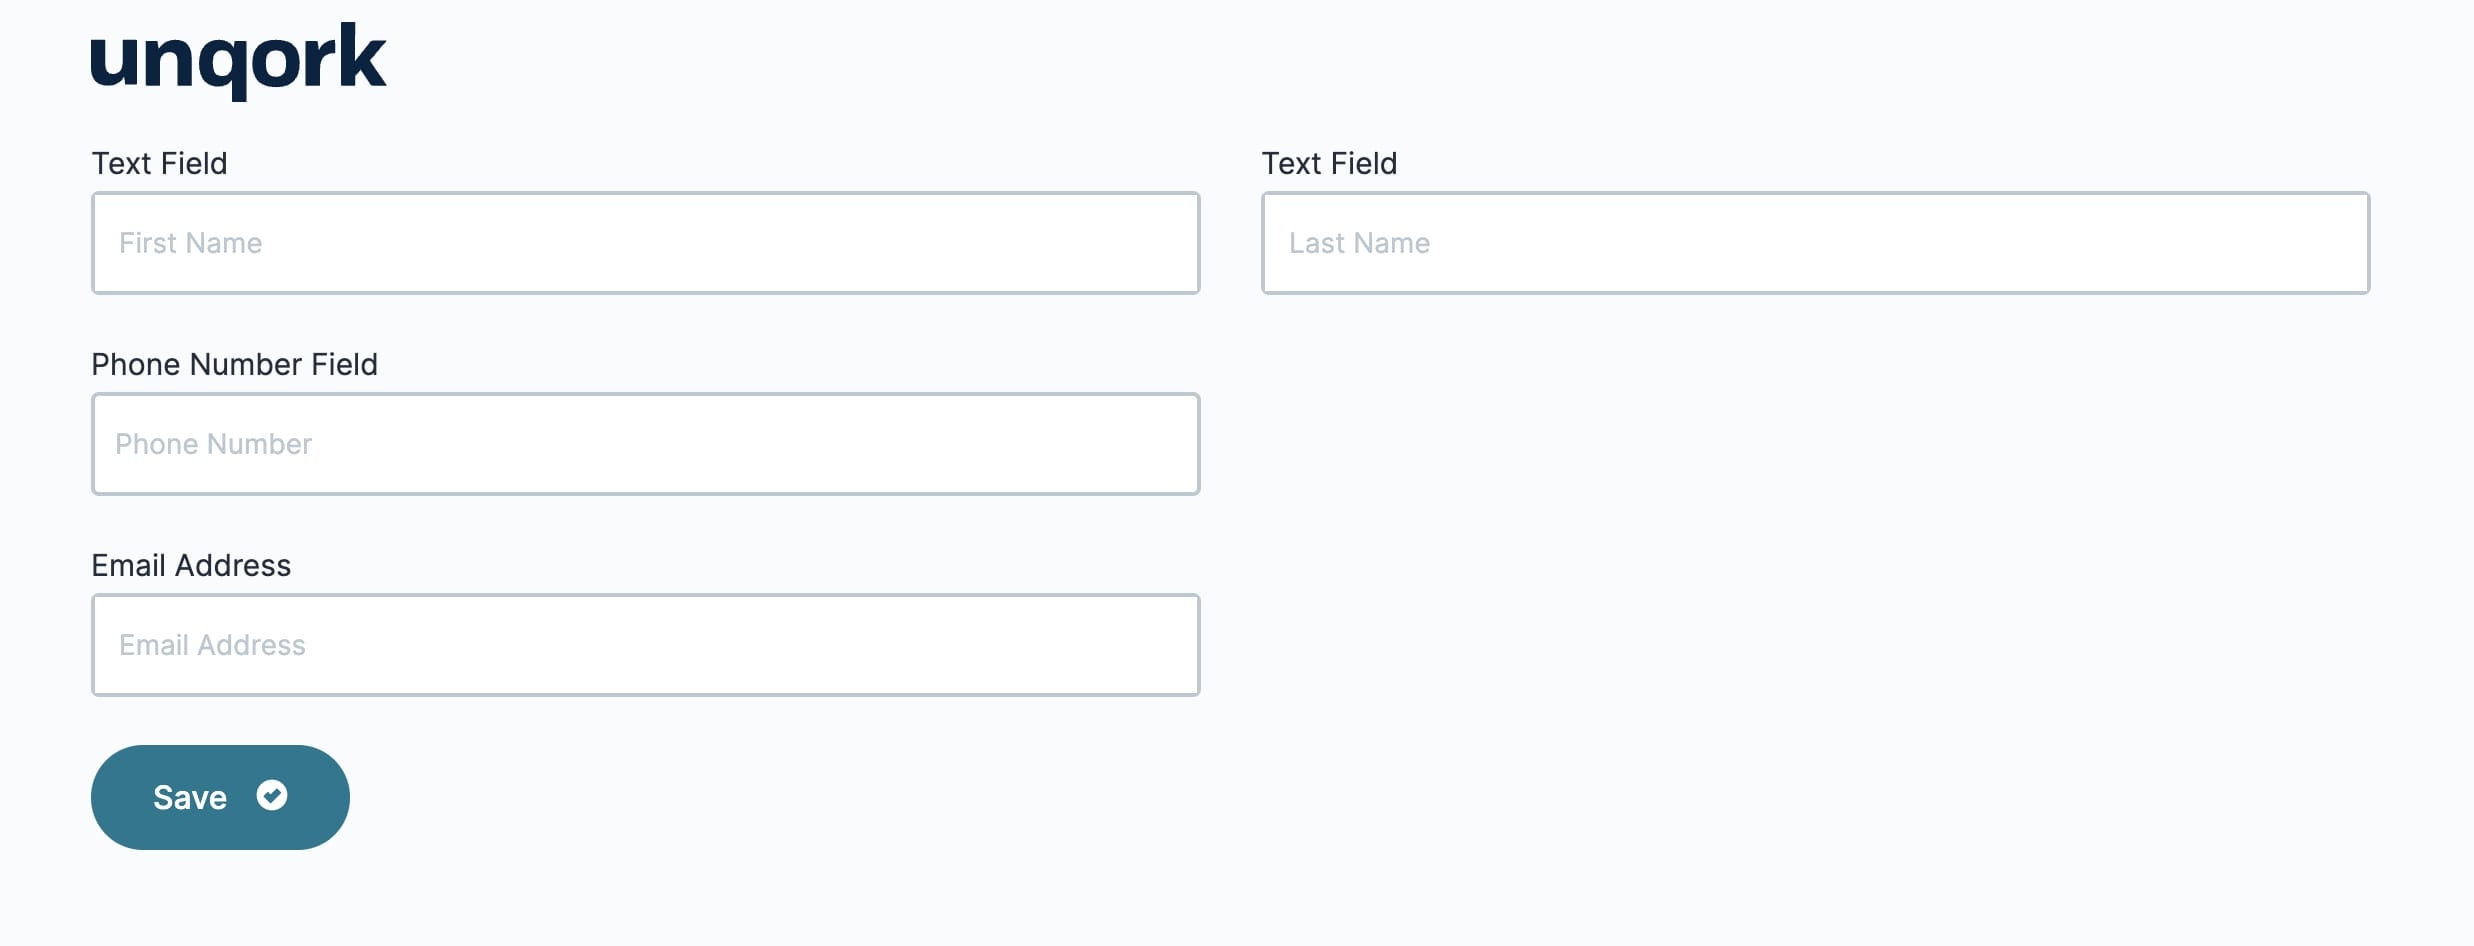
As an example, let's create a simple information intake module with a Save-action button. We'll customize the appearance of the Button component by adding an icon to it. We'll also set a custom confirmation dialog.
Configure the Columns Component
The .png) Columns component helps organize your module.
Columns component helps organize your module.
Drag and drop a
.png) Columns component onto your canvas.
Columns component onto your canvas.In the Property ID field, enter columns.
Under Formatting, click the icon displaying
 (two) evenly-spaced columns.
Click Save Component.
Configure the Text Field Components
Start the configuration with two Text Field components to capture the end-user's first and last names. By placing the Text Field components in the Columns component, the fields will appear next to each other.
Drag and drop two Text Field components onto your canvas. Place one component in each column of your columns
.png) Columns component.
Columns component.In the Property ID and Label Text fields, enter the following:
Property ID
Label Text
firstName
First Name
lastName
Last Name
Click Save Component for each component as you complete it.
Configure the Email Component
Next, an .png) Email component collects the end-user's email address.
Email component collects the end-user's email address.
Drag and drop an
.png) Email component onto your canvas, placing it in the first column of the columns
Email component onto your canvas, placing it in the first column of the columns .png) Columns component, below the firstName Text Field component.
Columns component, below the firstName Text Field component.In the Property ID field, enter emailAddress.
In the Label Text field, enter
Email Address.Click Save Component.
Configure the Phone Number Component
Use a dedicated Phone Number component to collect the end-user's phone number.
Drag and drop a Phone Number component onto your canvas, placing it in the first column of the columns
.png) Columns component, below the emailAddress
Columns component, below the emailAddress .png) Email component.
Email component.In the Property ID field, enter phoneNumber.
In the Label Text field, enter
Phone Number.Click Save Component.
Configure the Button Component
The ![]() Button component saves and creates a submission with the information on the page. After you customize your button's appearance, ask the end-user for permission to contact them.
Button component saves and creates a submission with the information on the page. After you customize your button's appearance, ask the end-user for permission to contact them.
Drag and drop a
.png) Button component onto your canvas, placing it in the first column of the columns
Button component onto your canvas, placing it in the first column of the columns .png) Columns component, below the phoneNumber Phone Number component.
Columns component, below the phoneNumber Phone Number component.In the Property ID field, enter btnSave.
In the Label Text field, enter
Save.Navigate to the
.png) Button component's Advanced settings.
Button component's Advanced settings.Under Additional Display Options, set the Display Dialog on Click toggle to
 (ON).
(ON).In the Dialog Heading field, enter
Please read and confirm.In the Dialog Message field, enter
I agree to share my information with Farmers Insurance Group. I give permission to Farmers Insurance Group to contact me..In the Button Label for Dismiss field, enter
No, cancel.In the Button Label for Confirm field, enter
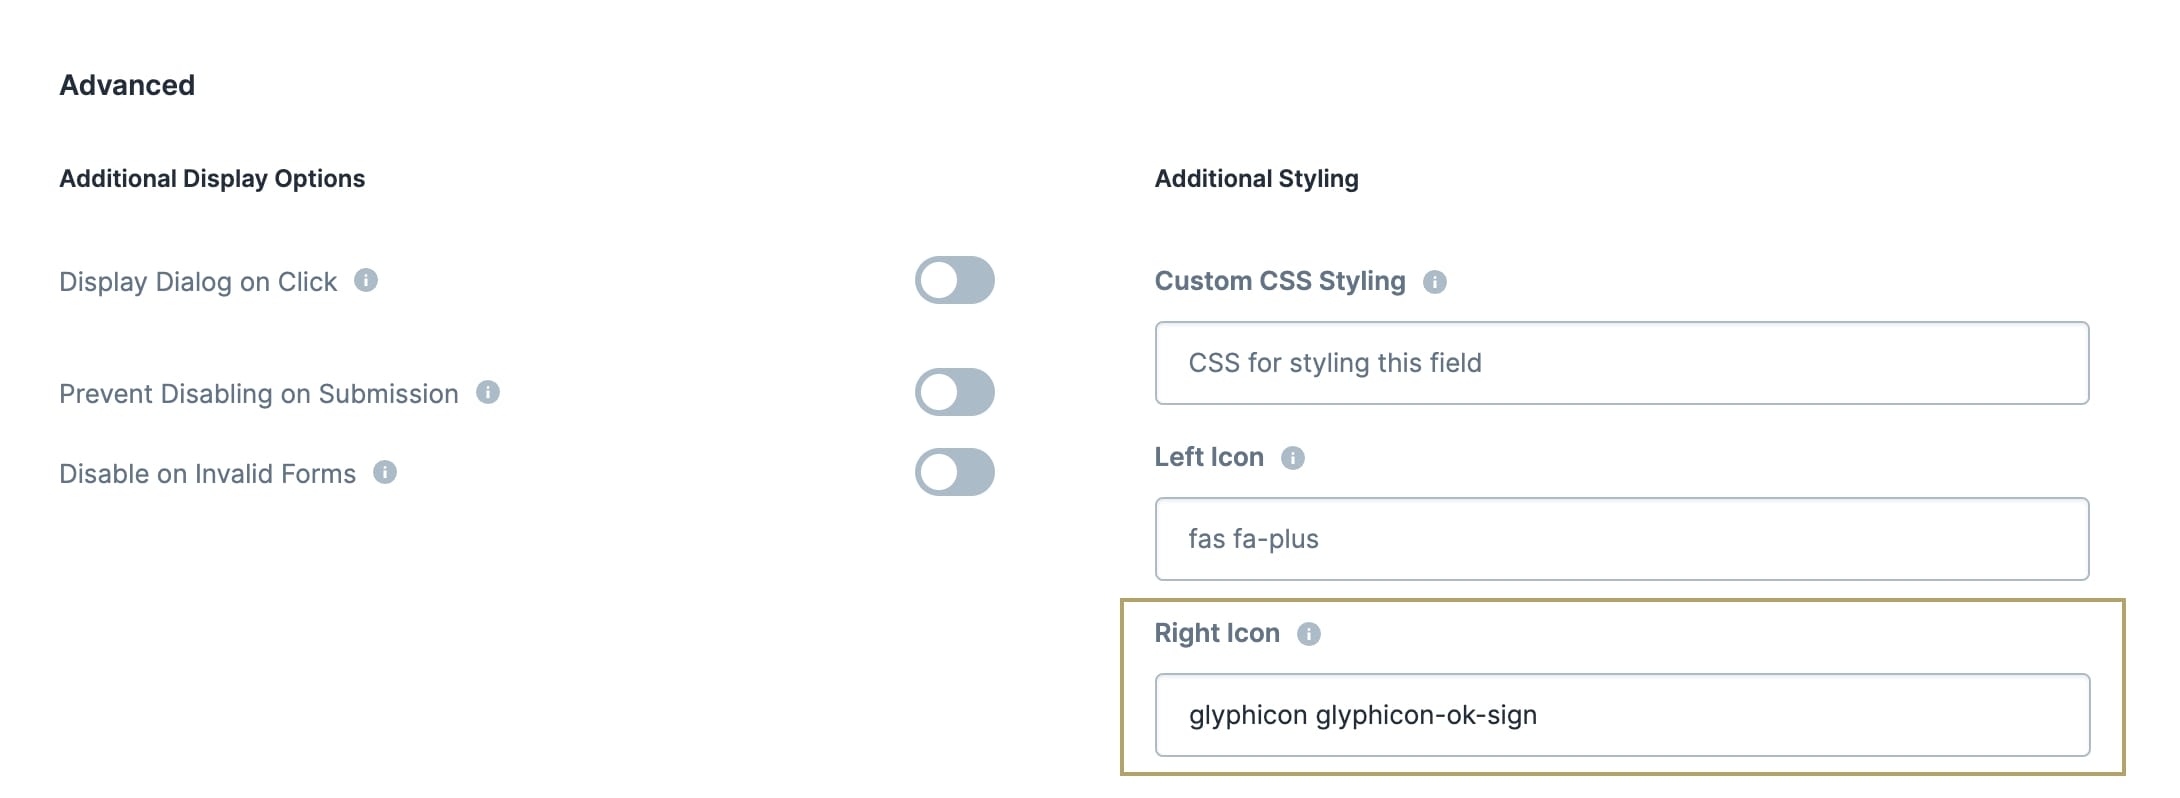
OK, continue.Under Additional Styling, in the Right Icon field, enter
glyphicon glyphicon-ok-sign. This adds a checkmark icon to your button.Click Save Component.
Save your module.
Preview your module in Express View. You'll see the following functionality:
The Button component adds an interactive, clickable element to your module. Buttons allow end-users to perform actions and make choices with a single button-click. As a , you can use Buttons to set custom actions or process flows based on your end-user's choices.
Some ways you might use the Button component include:
Saving, submitting, validating, or resetting a module.
Triggering another component, such as an Initializer, Decisions, or Data Workflow component.
Navigating between Panels.
Downloading a Managed Asset, such as a PDF or CSV file.
Labeling the Button-click event by giving it an Event ID. After setup, you can then reference that Event ID in different components, allowing you to create more complex logic-based configurations. For example, triggering several different components with a single button-click Event ID.
Using the Workflow Element Type, adding custom navigation buttons to a workflow.
You'll find the component under the Secondary Fields group to the left of the Module Builder.
What You'll Learn
After completing this article, you’ll know when to use a Button component, how to configure its settings, and how to use it in an Unqork application.
About the Configuration Window
To learn more about general component settings and those that display when a component is associated with Data Models, view our General Component Settings article.
Display Panel
Field Text
Setting | Description |
|---|---|
Label Text | Label Text conveys what the input component is and what information it displays. Enter the purpose of the corresponding component or field. User-friendly labels make your module more accessible. Keep labels short and descriptive (a word or two) using title case. For longer entries, use sentence case. |
Default State Options
Setting | Description |
|---|---|
Disable User Input | Stops the end-user from using the button. Your end-user sees the display as grayed out and the button as unclickable. By default, the Disable Button toggle is set to |
Hide Field | Displays or hides the Button from view. Setting the Hide Button toggle to ON hides the Button in Express View. Setting the toggle back to By default, the Hide Button toggle is set to |
Formatting
Setting | Description |
|---|---|
Button Style | Sets the visual appearance of the button. Options include: |
Button Width | Options for determining the width of the button:
|
Restrict to Single Click | When set to If you need to re-enable a disabled button, you can do so using a logic component. To re-enable, set up a logic component, like an Initializer, to send a disabled value of no to your Button component. This can be helpful if the action your Button triggers fails. Restrict to Single Click, Prevent Disabling on Submission, and Disable on Invalid Forms are all guardrails. The Restrict to Single Click option applies to every button-click, whether you create a submission or not. By default, the Restrict to Single Click toggle is set to |
Actions Panel
Element Type
A choice chip displaying the following options:
Module
Used for adding interactive buttons to a module.
Workflow
Used for adding custom navigation buttons to a module that's part of a workflow. Buttons added here replace the workflow's default navigation buttons.
Custom navigation buttons only display on the module they're added to. If your workflow has several Screen/Task nodes, you need to add custom navigation buttons to each module linked to a Screen/Task node. Or, you can add custom navigation buttons to select pages of your workflow.
When adding custom navigation Buttons to a workflow, disable the default navigation buttons. This avoids displaying two sets of navigation buttons. Set the Hide Express Navigation Buttons toggle to
(ON) for the Screen/Task node linked to your module.
Action Type
The Action Type choice chip varies based on the selected Element Type.
For the Module Element Type, the choice chip displays the following button-click actions:
Actions | Description |
|---|---|
Save | Saves, validates, and creates a submission to the database. |
Save Draft | Saves and creates a submission to the database but doesn't validate the page's information. |
Event | Trigger an event by specifying a Property ID in a Trigger field. Or, lets you create an Event ID to reference in another component to trigger that component on button-click. |
Validate | Validates the information on the page but doesn't create a submission. |
Reset | Clears data and resets the Disabled, Hidden, and Required settings for all components in the module. This setting is similar to using the Reset and Clear Output Types together in a logic component.
|
For the Workflow Element Type, the choice chip displays the following button-click actions:
Actions | Description |
|---|---|
Next | Takes your end-user to the next step in your workflow. |
Previous | Takes your end-user to the previous step in your workflow. |
Go to | Takes your end-user to the specified step in your workflow. You'll enter the appropriate step in the Step Path field. |
Workflow
Setting | Description |
|---|---|
Step Path | Displays when selecting the Go to Action Type, under the Workflow Element Type. Enter the Path of the workflow step where you want your button to lead. When your end-user clicks this button, they'll go to that step. |
Triggers
Setting | Description |
|---|---|
Before Save | Enter the Property ID of the component that you want to trigger on button-click. This trigger plays out before the submission saves. |
After Save | Enter the Property ID of the component that you want to trigger on button-click. This trigger plays out after the submission saves. |
Before Validation | Enter the Property ID of the component that you want to trigger on Button-click, but before the validation of the submission. |
For Valid Form | Enter the Property ID of the component that you want to trigger after successful validation. |
For Invalid Form | Enter the Property ID of the component that you want to trigger after validation errors. |
On Click | Enter the Property ID of the component that you want to trigger on each button-click. |
User Feedback
Setting | Description |
|---|---|
Hide Success Message | Displays or hides a success message on successful submission, validation, or saving of a draft. Setting the Hide Success Message toggle to By default, the Hide Success Message toggle is set to |
Success Message | Enter a custom success message to display on successful submission, validation, or saving of a draft. |
Click Event | Displays when selecting the Event Action Type under the Module Element Type. Enter an Event ID to assign the Button's designated event. You can then reference this Event ID in other components. |
Error Message
Setting | Description |
|---|---|
Hide Error Message | Displays or hides an error message on successful submission, validation, or saving of a draft. Setting the Hide Error Message toggle to By default, the Hide Error Message toggle is set to |
Error Title | Enter a title for the error message to display when there are validation issues. |
Error Message | Enter a custom error message to display when there are validation issues. |
Advanced Panel
Additional Display Options
Setting | Description |
|---|---|
Display Dialog on Click | Displays or hides a confirmation dialog on button-click. The confirmation dialog also allows end-users to confirm their intention to complete the Button's associated action. Setting the toggle to By default, the Display Dialog on Click toggle is set to (OFF). |
Dialog Heading | Enter a title for the confirmation dialog to display on button-click. |
Dialog Message | Enter a custom message for the confirmation dialog to display on button-click. |
Button Label for Dismiss | Enter a Label for the Button to dismiss the dialog message. Actions associated with the button-click will not continue. |
Button Label for Confirm | Enter a Label for the Button to confirm understanding of the dialog message. Actions associated with the button-click will continue. |
Prevent Disabling on Submission | When set to Restrict to Single Click, Prevent Disabling on Submission, and Disable on Invalid Forms are all guardrails. The Prevent Disabling on Submission setting only applies when your end-user creates a submission. By default, the Prevent Disabling on Submission toggle is set to |
Disable on Invalid Forms | When set to Restrict to Single Click, Prevent Disabling on Submission, and Disable on Invalid Forms are all guardrails. The Disable on Invalid Forms setting only applies when your end-user hasn't met the validation requirements set up in your module. By default, the Disable on Invalid Forms toggle is set to |
Additional Styling
Setting | Description |
|---|---|
Custom CSS Styling | Enter a Custom CSS Class to apply to your component. Custom CSS lets you maintain a consistent look and feel when the field or element is part of a template or multiple modules. Updated CSS styling applies to all components that reference this custom class name. |
Left/Right Icon | Use these fields to add icons (glyphs) to the left or right of your Button's Label Text. For example, entering glyphicon glyphicon-pencil adds an icon of a pencil to your Button.
|
Accessibility Panel
ARIA
Setting | Description |
|---|---|
Aria | Use these settings to create ARIA (Accessible Rich Internet Applications) attributes to better support end-users that require screen readers to navigate your applications. |
Aria Label | Use this field to define the component when when a screen reader arrives at it in Express View. |
Adding a Button Component
As an example, let's create a simple information intake module with a Save-action button. We'll customize the appearance of the Button component by adding an icon to it. We'll also set a custom confirmation dialog.
What You Need
For this configuration, you'll need the following components:
1 Columns component
2 Text Field components
1 Email component
1 Phone Number component
1 Button component
Configure the Columns Component
The Columns component helps organize your module.
Drag and drop a
.png) Columns component onto your canvas.
Columns component onto your canvas.In the Property ID field, enter columns.
Under Formatting, click the icon displaying
 (two) evenly-spaced columns.
Click Save & Close.
Configure the Text Field Components
Start the configuration with two Text Field components to capture the end-user's first and last names. By placing the Text Field components in the Columns component, the fields will appear next to each other.
Drag and drop two Text Field components onto your canvas. Place one component in each column of your columns
.png) Columns component.
Columns component.In the Property ID and Label Text fields, enter the following:
Property ID
Label Text
firstName
First Name
lastName
Last Name
Save & Close each component as you add it.
Configure the Email Component
Next, an Email component collects the end-user's email address.
Drag and drop an
.png) Email component onto your canvas, placing it in the first column of the columns
Email component onto your canvas, placing it in the first column of the columns .png) Columns component, below the Text Field components.
Columns component, below the Text Field components.In the Property ID field, enter emailAddress.
In the Label Text field, enter
Email Address.Click Save & Close.
Configure the Phone Number Component
Use a dedicated Phone Number component to collect the end-user's phone number.
Drag and drop a Phone Number component onto your canvas, placing it in the first column of the columns
.png) Columns component, below the
Columns component, below the .png) Email component.
Email component.In the Property ID field, enter phoneNumber.
In the Label Text field, enter
Phone Number.Click Save & Close.
Configure the Button Component
The ![]() Button component saves and creates a submission with the information on the page. After you customize your button's appearance, ask the end-user for permission to contact them.
Button component saves and creates a submission with the information on the page. After you customize your button's appearance, ask the end-user for permission to contact them.
Drag and drop a
.png) Button component onto your canvas, placing it in the first column of the columns
Button component onto your canvas, placing it in the first column of the columns.png) Columns component, below the phoneNumber Phone Number component.
Columns component, below the phoneNumber Phone Number component.In the Property ID field, enter btnSave.
In the Label Text field, enter
Save.Set the Action Type to Save.
In the Advanced Settings Right Icon field, enter
glyphicon glyphicon-ok-sign. Entering this adds a checkmark icon to your button.Set the Display Dialog on Click toggle to
 (ON).
(ON).In the Dialog Heading field, enter
Please read and confirm.In the Dialog Message field, enter
I agree to share my information with Farmers Insurance Group. I give permission to Farmers Insurance Group to contact me..In the Button Label for Dismiss field, enter
No, cancel.In the Button Label for Confirm field, enter
OK, continue.Click Save & Close.
Save your module.
Preview your module in Express View. You'll see the following functionality:
.jpg)
.jpg)
