The Create Field operator is a multi-purpose function that creates fields. Creators can also use the Create Field operator to:
Dynamically add key/value pairs based on your end-user's input.
Add key/value pairs with values based on the value of another field. For example, creating a field with a value calculated using the value from another field.
Add key/value pairs with a conditional value. For example, adding one of two possible values based on a conditional if/then expression.
Update existing fields in a Data Table component.
You'll find the Create Field operator in the Table group to the left of the Data Workflow canvas.
About the Info Window
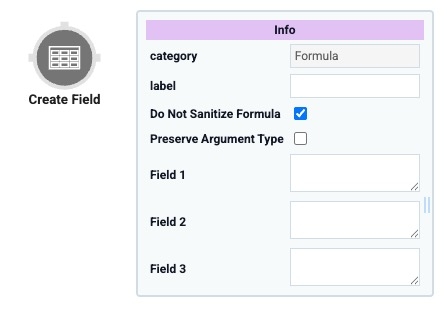
Learn more about each setting in the Create Field operator's Info window:
Setting | Description |
|---|---|
Category | Grayed out and non-adjustable setting indicating the operation type. |
Label | Sets the label for your operator, displaying below the operator on your Data Workflow canvas. This field is optional, but set a label if you use more than one of the same operator type. A label helps you identify your operators without opening any Info windows. |
Do Not Sanitize Formula | When this checkbox is clear, the operator cleans values coming into or defined in the operator. For example, removing special characters. Some of those special characters include Sanitizing improves performance. But it can also lead to unexpected data behavior. If your Create Field is not behaving as expected, try selecting this box. When selected, the operator uses your values and expressions as-is. This is best when working with complex values or values that should remain unchanged. By default, this setting is selected, which means the operator does not attempt to sanitize. |
Preserve Argument Type | When selected, this setting ensures the argument data type is respected when the operator executes. |
Field 1-5 | The Create Field operator has five different field options, letting Creators add multiple fields using a single operator. Define the field you want to create or update, using the following format: The value part of the Or this one, that includes a conditional expression, a reference to another field, and a calculation: How your data iterates through your Data Workflow depends on the type of key/value pairs you enter in these fields. This iteration order depends on the keys used:
|
Adding a Create Field Operator
In this example, you'll learn how to add the same key/value pairs to every row in a table.
These instructions assume that you have a new module open, saved, and with a title.
Configure the Data Table Component
First, add a Data Table component to contain your key/value pairs.
In the Module Builder, drag and drop a Data Table component onto your canvas.
In the Property ID field, enter
dtTable.In the data table, enter the following:
A
B
1
name
age
2
Cammy
32
3
Josephine
41
4
Ammie
22
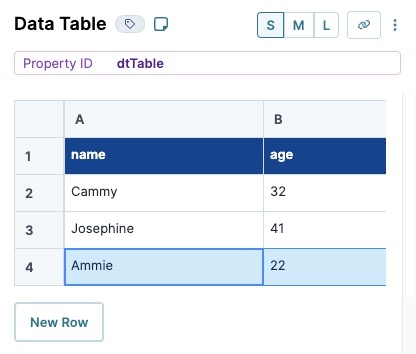
Click Save Component.
Configure the Data Workflow Component
With the Data Table component set up, use the Create Field operator to add two key/value pairs to each row.
Drag and drop a Data Workflow component onto your canvas, placing it below your dtTable Data Table component.
In the Property ID and Canvas Label Text fields, enter
dwfCreateField.
Configure the Input Operator
Begin by connecting your Data Table to the Data Workflow using an Input operator.
Drag and drop an Input operator onto your Data Workflow canvas.
Configure the operator's Info window as follows:
Info | |
|---|---|
Category | Input |
Component | dtTable |
Required | Yes |
Source | Default |
Configure the Create Field Operator
Next, set up the Create Field operator and add two key/value pairs to each row (object) of your table (array).
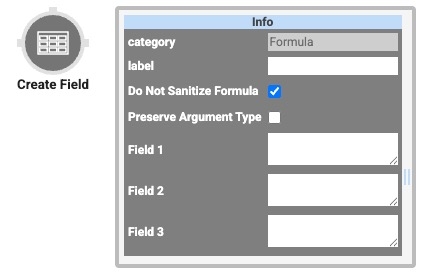
Drag and drop a Create Field operator onto your Data Workflow canvas.
Configure the operator's Info window as follows:
Info
Category
Create Field
Label
employment
Do Not Sanitize Formula
☐ (unchecked)
Preserve Argument Type
☐ (unchecked)
Field 1
insured="yes"
Field 2
renewalYear=2023
Field 3
Field 4
Field 5
Connect the output port (right) of the dtTable Input operator to the input port (left) of the employment Create Field operator.
Configure the First Console Operator
This Console operator shows your data before adding your key/value pairs.
Drag and drop a Console operator onto your Data Workflow canvas.
Configure the operator's Info window as follows:
Info
Category
Console
Label
Before Create Field
Connect the output port (right) of the dtTable Input operator to the input port (left) of the Before Create Field Console operator.
Configure the Second Console Operator
This Console operator shows your data after adding your key/value pairs.
Drag and drop another Console operator onto your Data Workflow canvas.
Configure the operator's Info window as follows:
Info
Category
Console
Label
After Create Field
Connect the output port (right) of the employment Create Field operator to the input port (left) of the After Create Field Console operator.
Click Save Component.
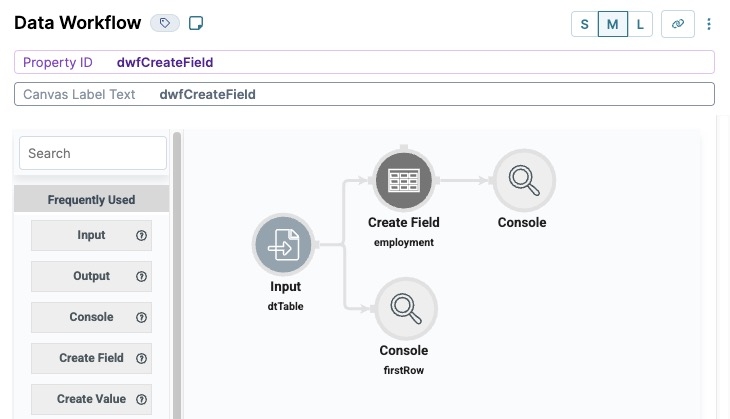
Here's how the completed Data Workflow looks:
Configure the Button Component
Lastly, add a Button to trigger your Data Workflow.
Drag and drop a Button component onto your canvas, placing it below your dwfCreateField Data Workflow.
In the Property ID field, enter
btnRunDWF.In the Label Text field, enter
Run Create Field.Navigate to the Actions settings.
From the Action Type drop-down, select Event.
In the On Click field, enter
dwfCreateField.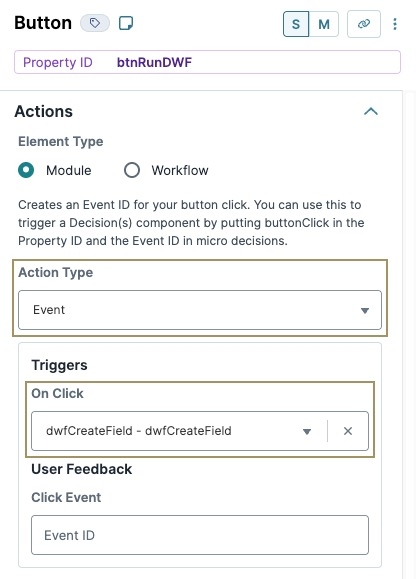
Click Save Component.
Save your module.
Your completed module looks like the following:
.png)
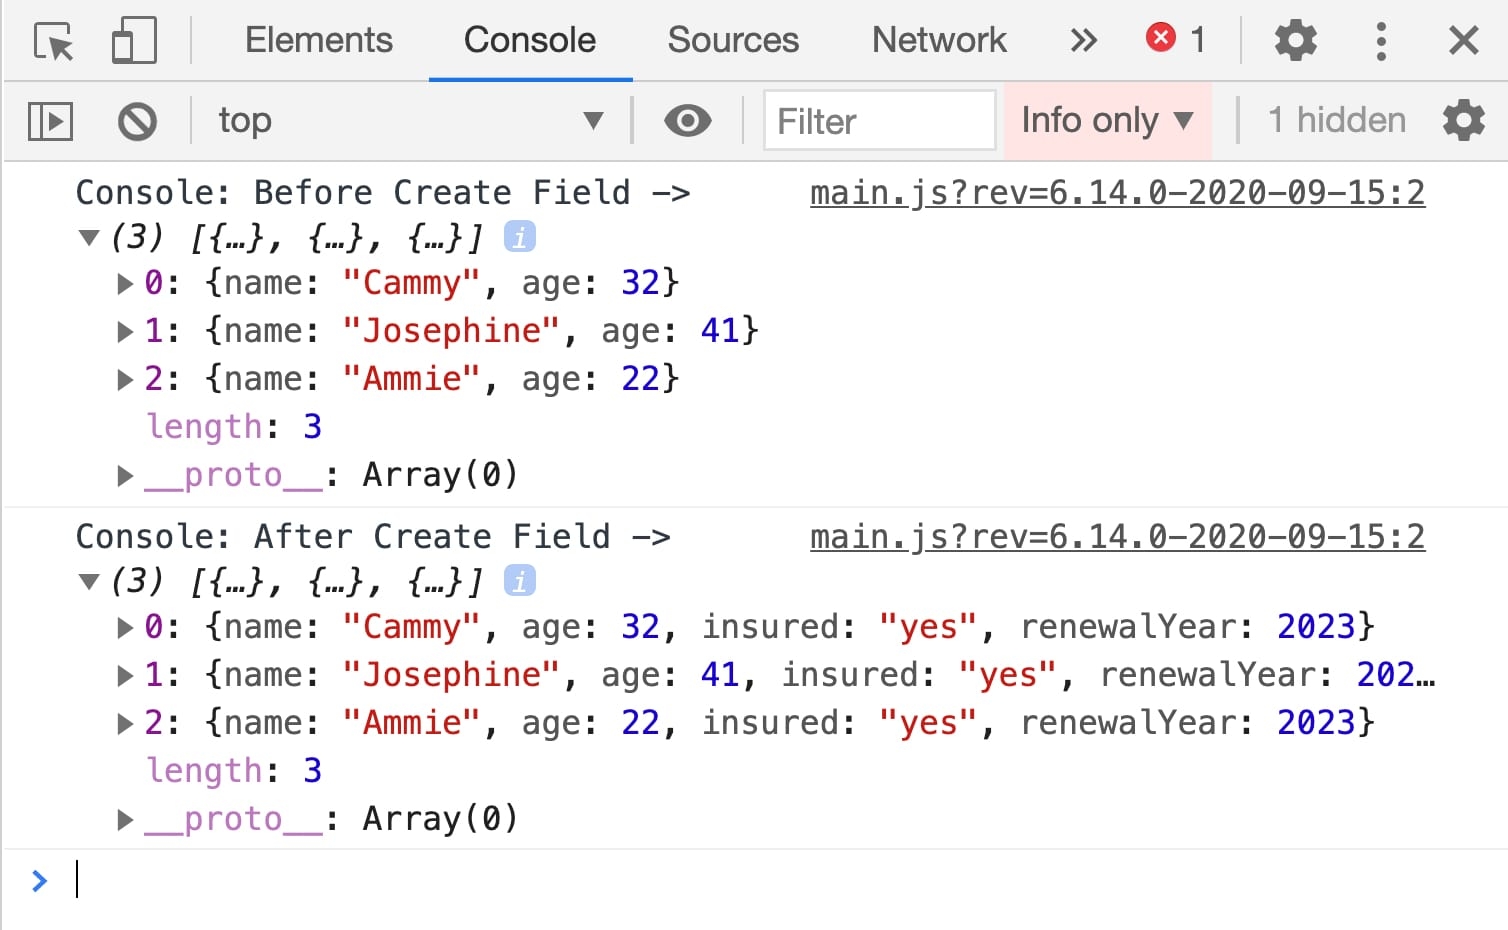
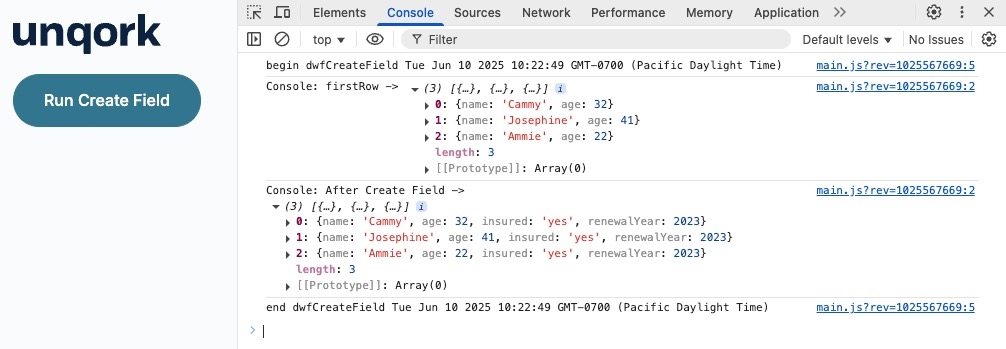
Preview your module in Express View. Open the DevTools Console and click Run Create Field to view what displays in the DevTools Console:
The Create Field operator is a multi-purpose function that creates fields. Creators can also use the Create Field operator to:
Dynamically add key/value pairs based on your end-user's input.
Add key/value pairs with values based on the value of another field. For example, creating a field with a value calculated using the value from another field.
Add key/value pairs with a conditional value. For example, adding one of two possible values based on a conditional if/then expression.
Update existing fields in a Data Table component.
You'll find the Create Field operator in the Table group to the left of the Data Workflow canvas.
About the Info Window
Learn more about each setting in the Create Field operator's Info window:
Setting | Description |
|---|---|
Category | Grayed out and non-adjustable setting indicating the operation type. |
Label | Sets the label for your operator, displaying below the operator on your Data Workflow canvas. This field is optional, but set a label if you use more than one of the same operator type. A label helps you identify your operators without opening any Info windows. |
Do Not Sanitize Formula | When this checkbox is clear, the operator cleans values coming into or defined in the operator. For example, removing special characters. Some of those special characters include Sanitizing improves performance. But it can also lead to unexpected data behavior. If your Create Field is not behaving as expected, try selecting this box. When selected, the operator uses your values and expressions as-is. This is best when working with complex values or values that should remain unchanged. By default, this setting is selected, which means the operator does not attempt to sanitize. |
Preserve Argument Type | When selected, this setting ensures the argument data type is respected when the operator executes. |
Field 1-5 | The Create Field operator has five different field options, letting Creators add multiple fields using a single operator. Define the field you want to create or update, using the following format: The value part of the Or this one, that includes a conditional expression, a reference to another field, and a calculation: How your data iterates through your Data Workflow depends on the type of key/value pairs you enter in these fields. This iteration order depends on the keys used:
|
Adding a Create Field Operator
In this example, you'll see how to add the same key/value pairs to every row in a table.
These instructions assume that you have a new module open, saved, and with a title.
Configure the Data Table Component
First, add a Data Table to contain your key/value pairs.
Drag and drop a Data Table component onto your canvas.
In the Property ID and Canvas Label Text fields, enter
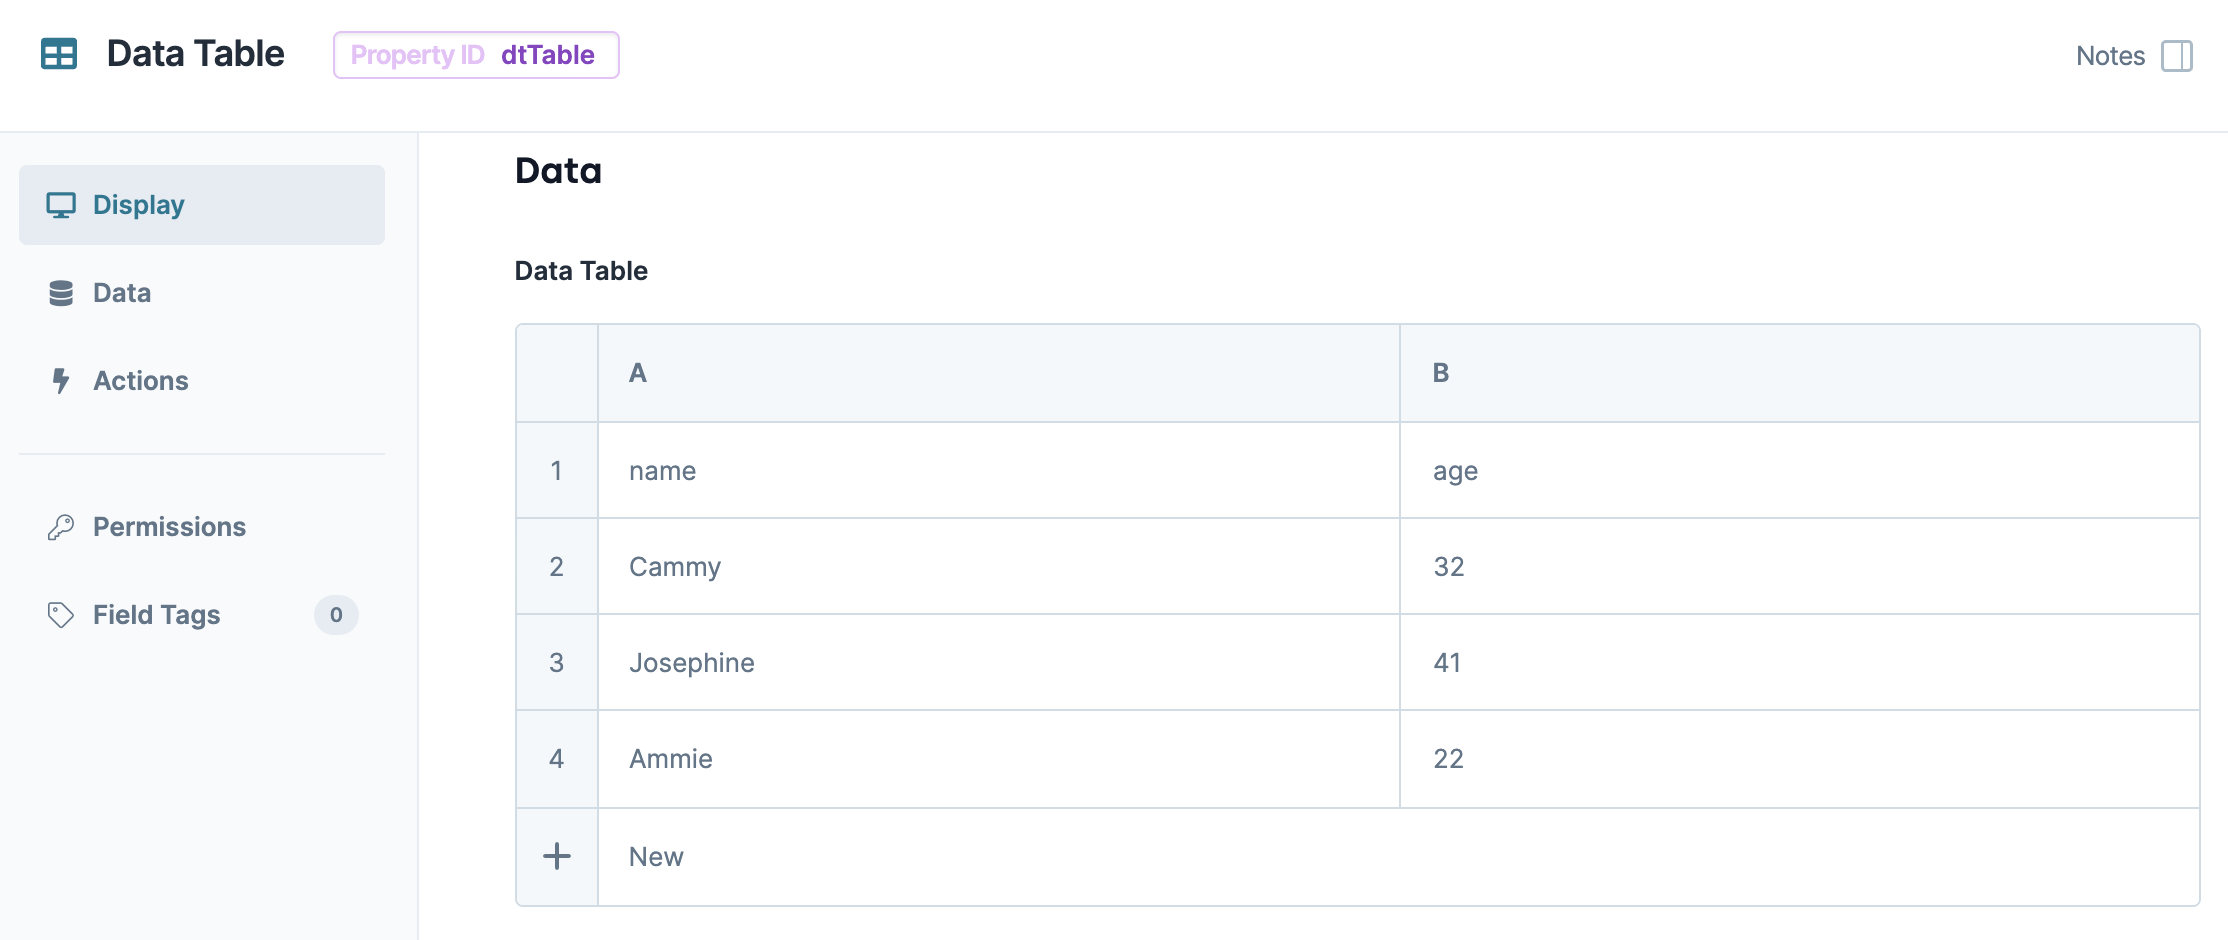
dtTable.In the data table, enter the following:
#
A
B
1
name
age
2
Cammy
32
3
Josephine
41
4
Ammie
22
Click Save & Close.
Configure the Data Workflow Component
With the Data Table component set up, use the Create Field operator to add two key/value pairs to each row.
Drag and drop a Data Workflow component onto your canvas, placing it below your dtTable Data Table component.
In the Canvas Label Text and Property Name fields, enter
dwfCreateField.
Configure the Input Operator
Begin by connecting your Data Table to the Data Workflow using an Input operator.
Drag and drop an Input operator onto your Data Workflow canvas.
Configure the operator's Info window as follows:
Setting
Value
Category
Input
Component
dtTable
Required
Yes
Source
Default
Configure the Create Field Operator
Next, set up the Create Field operator and add two key/value pairs to each row (object) of your table (array).
Drag and drop a Create Field operator onto your Data Workflow canvas.
Configure the operator's Info window as follows:
Setting
Value
Category
Create Field
Label
employment
Do Not Sanitize Formula
Unchecked (no)
Preserve Argument Type
Unchecked (no)
Field 1
insured="yes"
Field 2
renewalYear=2023
Connect the output port (right) of the dtTable Input operator to the input port (left) of the employment Create Field operator.
Configure the First Console Operator
This Console operator shows your data before adding your key/value pairs.
Drag and drop a Console operator onto your Data Workflow canvas.
Configure the operator's Info window as follows:
Setting
Value
Category
Console
Label
Before Create Field
Connect the output port (right) of the dtTable Input operator to the input port (left) of this first Before Create Field Console operator.
Configure the Second Console Operator
This Console operator shows your data after adding your key/value pairs.
Drag and drop another Console operator onto your Data Workflow canvas.
Configure the operator's Info window as follows:
Setting
Value
Category
Console
Label
After Create Field
Connect the output port (right) of the employment Create Field operator to the input port (left) of the After Create Field Console operator.
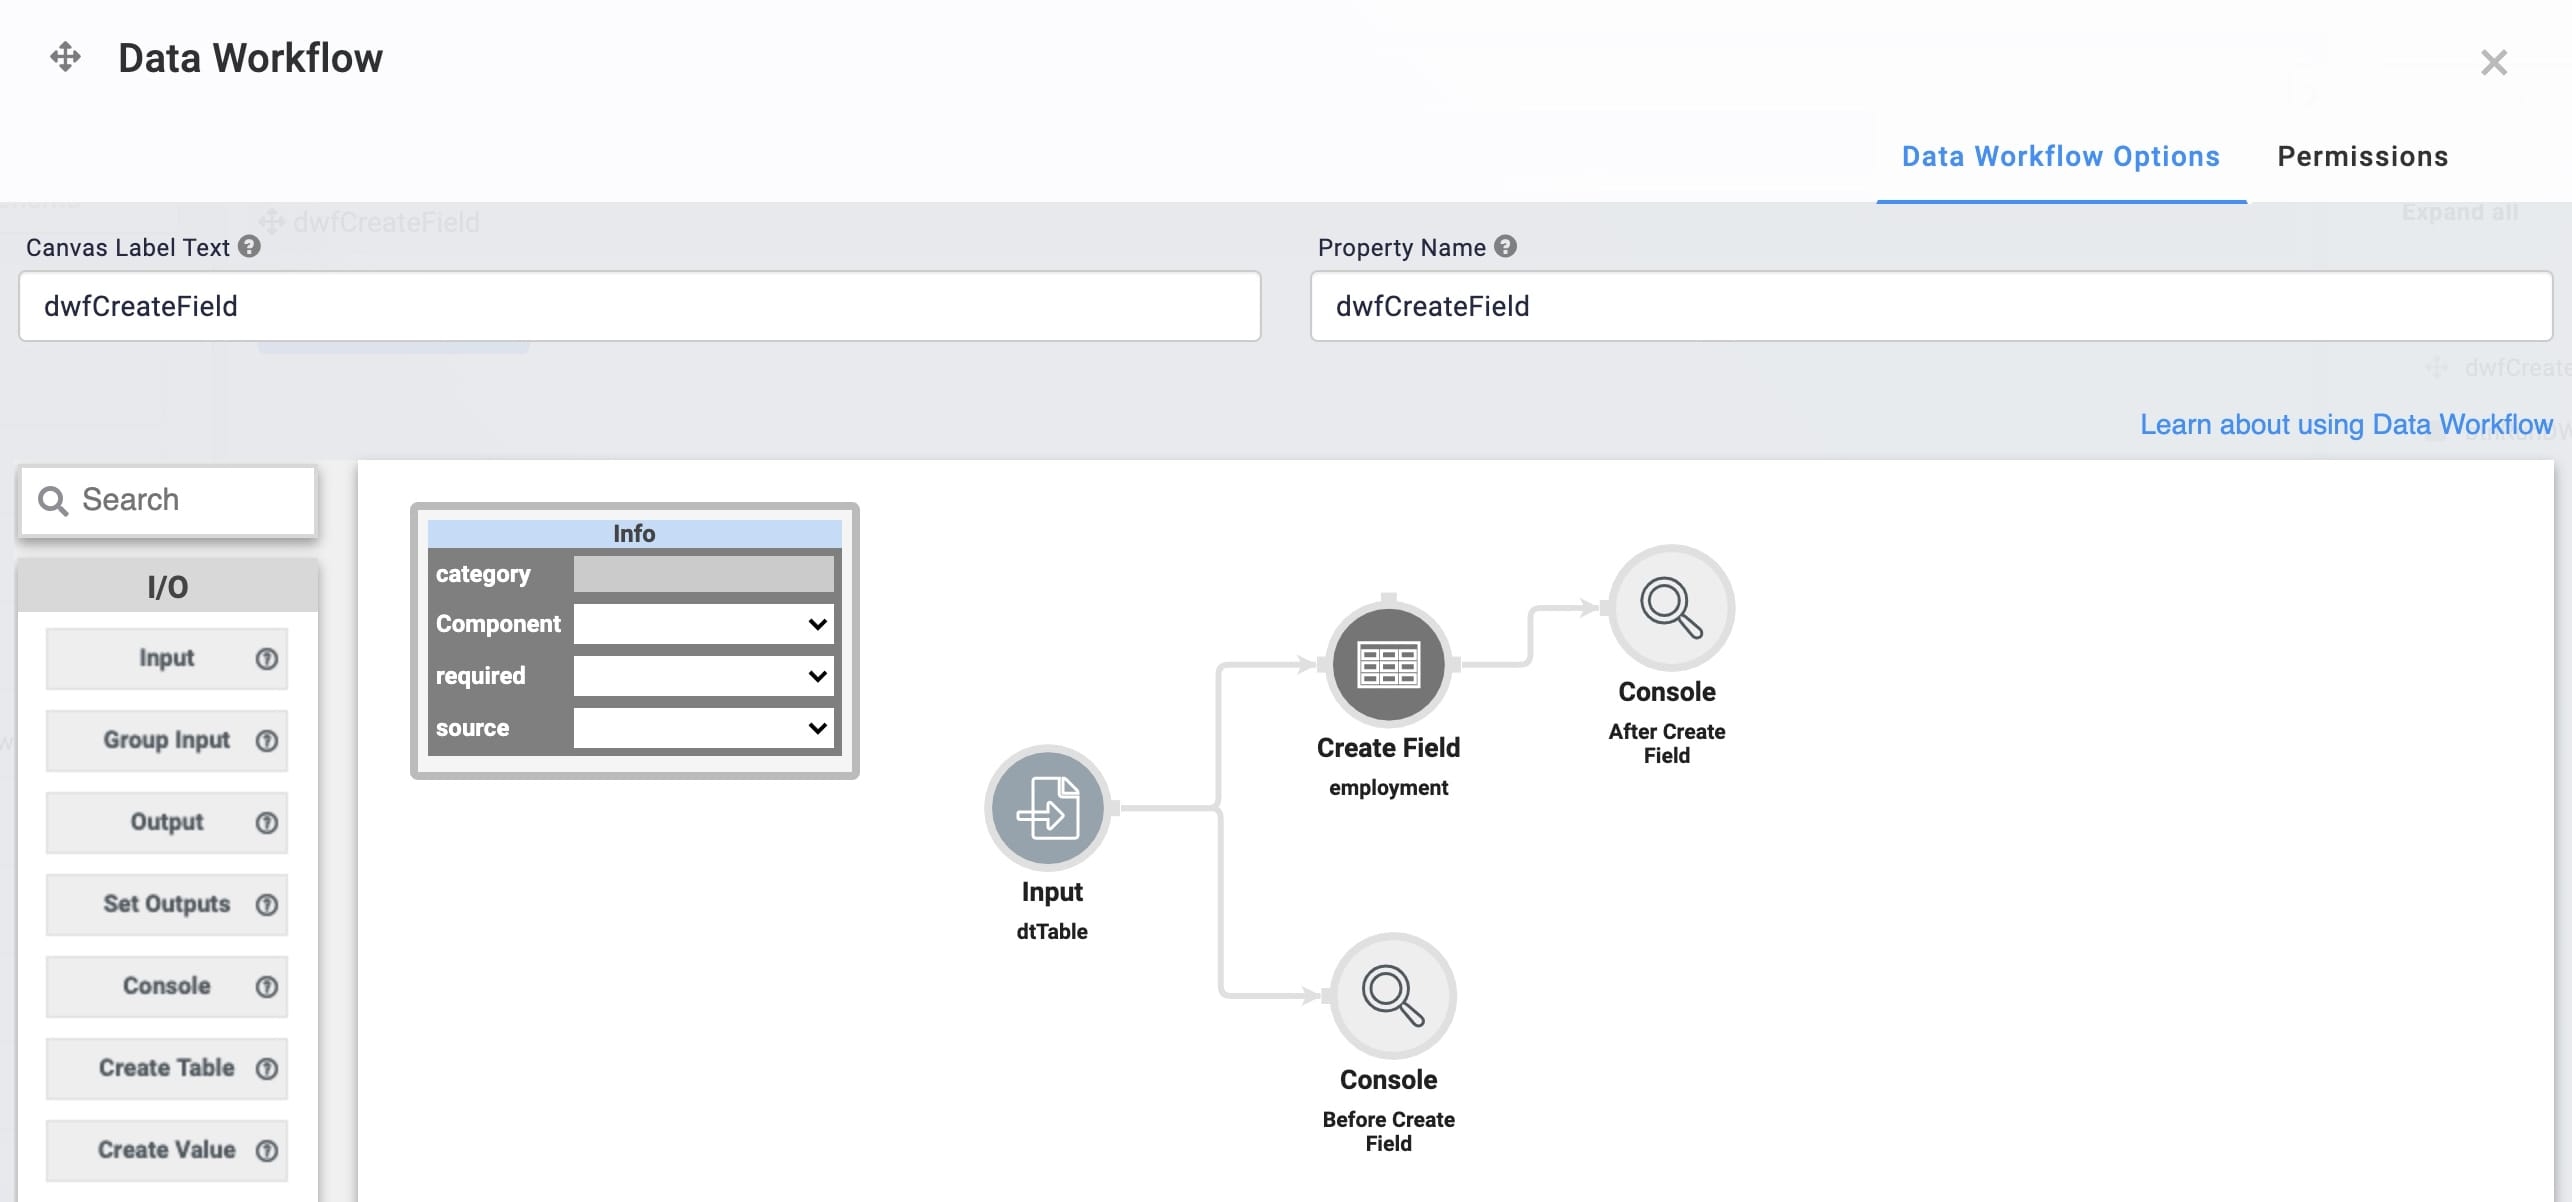
Click Save.
Configure the Button Component
Lastly, add a Button to trigger your Data Workflow.
Drag and drop a Button component onto your canvas, placing it below your dwfCreateField Data Workflow.
In the Property ID field, enter
btnRunDWF.In the Label Text field, enter
Run Create Field.Set the Action Type to Event.
In the On Click field, enter
dwfCreateField.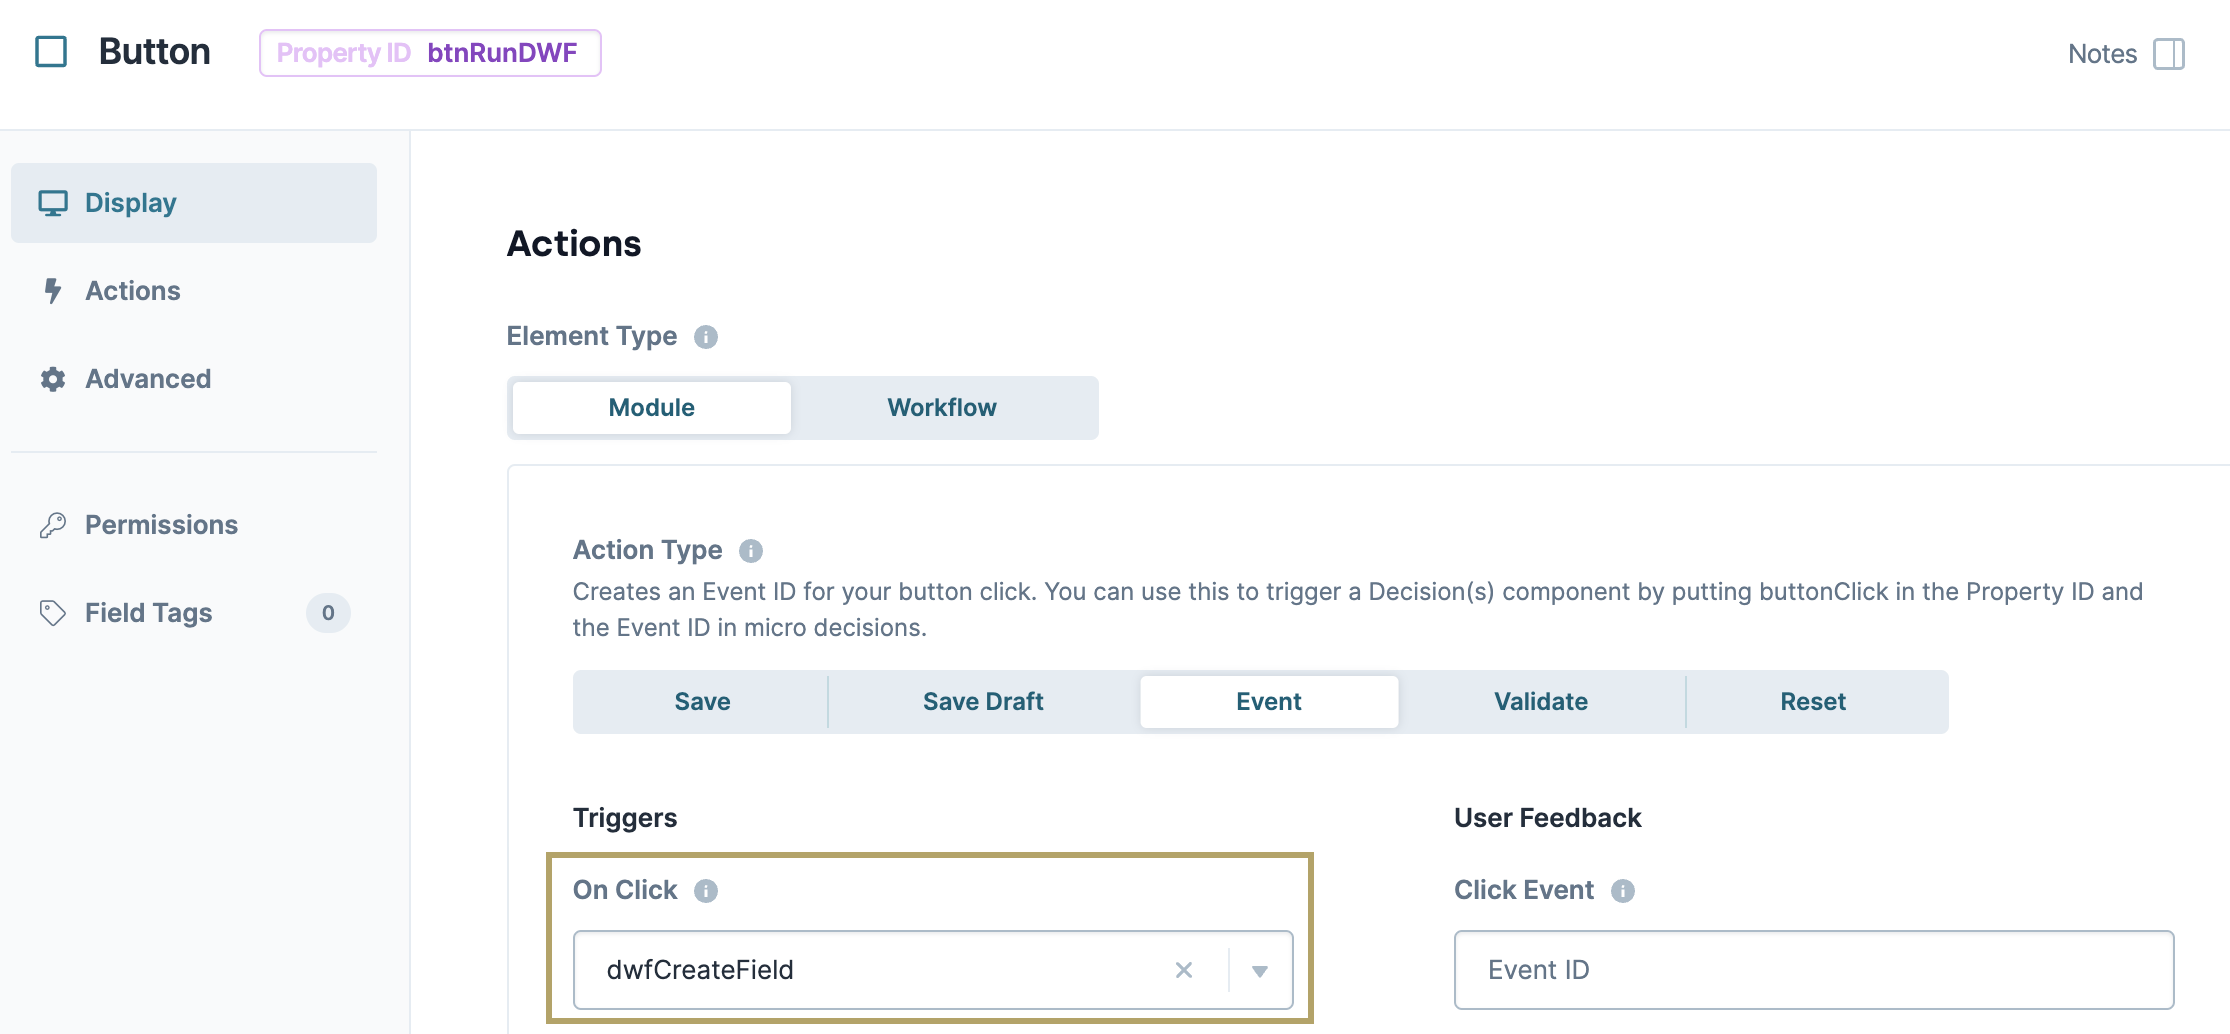
Click Save & Close.
Save your module.
Here's how the completed example looks in the Module Builder:
.png)
Preview your module in Express View and open the DevTools Console. Click Run Create Field to view what displays in the DevTools Console:
