Overview
The Unwind operator raises the values in a nested array to the next level.
For example, begin with the following array:
[
  {
    "key1": "A",
    "key2": "B",
    "key3": [
      "C"
    ]
  }
]
In Lines 5 and 6, the "key3" key contains an nested array as its value. After using the Unwind operator in a Data Workflow component, the value "C" in the "key3" nested array raises to the same level of the data structure as the values "A" and "B". The final array looks like the following:
[
  {
    "key1": "A",
    "key2": "B",
    "key3": "C"
  }
]
Now, all three values are at the same level of the data structure.
You'll find the Get operator under the Table group to the left of the Data Workflow canvas.
About the Info Window
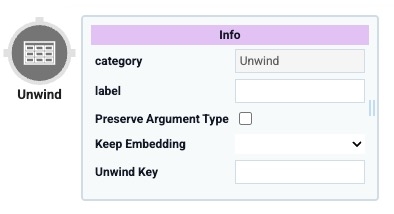
Learn more about each setting in the Unwind operator's Info window:
Setting | Description |
|---|---|
Category | Grayed out and non-adjustable setting indicating the operation type. |
Label | Sets the label for your operator, displaying below the operator on your Data Workflow canvas. This field is optional, but set a label if you use more than one of the same operator type. A label helps you identify your operators without opening any Info windows. |
Keep Embedding | Specifies whether to keep the original, nested key in the final, unwound array. When set to Yes, the value(s) in the nested array displays in the unwound array paired with the original nested key. When set to No, the values in the nested array separate out. Once separated, they index into the higher level array.
|
Unwind Key | Specifies which key contains the nested array you want to bring to a higher level of the data structure. Enter _arg in this field to sort by the value coming into the operator's argument port. For example, let's say you have the following array: You'll unwind "keyC" to bring the value in the nested "keyC" array to the same level as the original array. The final, unwound array looks like the following: |
Adding an Unwind Operator
In this example, use a Address Search component to collect and store information about an address. Then, use the Unwind operator in a Data Workflow component to extract values from the Address Search component's "address" data object.
The Unqork Training environment contains a preconfigured address service. If you are configuring in a non-Training environment, you might need to set up an address service.
The "address" data object includes commonly-referenced fields, like city or zip. But, each row of the array also has another nested array called "types". The "types" array indicates which category of address information is in that row. For example, the types array can contain the "street_number" or "postal_code_suffix" values. Unwinding the "types" array brings this category value to the same level as the address information itself.
Use the Filter and Get operators to retrieve the specific address information. The Filter operator filters information from the "address_components" array by a particular "types" value. For example, you can filter out the row with "types":"street_number". Then, use the Get operator to extract the street number.
Configure the Address Search Component
Configure an Address Search component to collect the end-user's location. This location stores in an "address" data object.
Drag and drop an Address Search component onto your canvas.
In the Property ID field, enter address.
In the Label Text field, enter
Address.Set Street, Street2, City, State, Zip, and Country to
 (ON).
(ON).Click Save Component.
Configure the Data Workflow Component
With the Address Search component configured, use your Unwind operator to retrieve specific values. In this example, your Data Workflow retrieves the two-letter state and country abbreviations.
Drag and drop a Data Workflow component onto your canvas, placing it below the address Address Search component.
In the Property ID and Canvas Label Text fields, enter
dwfUnwind.
Configure the Input Operator
Connect your Address Search component to the Data Workflow using an Input operator.
Drag and drop an Input operator onto your Data Workflow canvas.
Configure the operator's Info window as follows:
Info
Category
Input
Component
address
Required
Yes
Source
Default
Configure the Get Operator
Connect a Get operator to the "address_components" array in the "address" data object.
Drag and drop a Get operator onto your Data Workflow canvas.
Configure the operator's Info window as follows:
Info
Category
Get
Label
Get address_components array
Preserve Argument Type
☐ (unchecked)
Path
address_components
Connect the output port (right) of the Input operator to the input port (left) of the Get operator.
Configure the Unwind Operator
Use the Unwind operator to unwind the "types" key. Doing so brings the values in the nested "types" array to each row of the "address_components" array.
Drag and drop an Unwind operator onto your Data Workflow canvas.
Configure the operator's Info window as follows:
Info
Category
Unwind
Label
Unwind on types
Preserve Argument Type
☐ (unchecked)
Keep Embedding
Yes
Unwind Key
types
Connect the output port (right) of the Get operator to the input port (left) of the Unwind operator.
Configure the Filter Operators
Use two Filter operators to isolate the values you want. Each Filter operator filters according to a specific "types" value. After unwinding, there's now a "types" value in each row of the array. To determine which "types" value to use in the expression, look at the original "types" array. For example, the "types" value of "administrative_area_level_1" corresponds to the State row of information.
Drag and drop two Filter operators onto the Data Workflow canvas.
Configure the first Filter operator's Info window as follows:
Info
Category
Filter
Label
Filter State
Do Note Sanitize Formula
☐ (unchecked)
Preserve Argument Type
☐ (unchecked)
Expression
types="administrative_area_level_1"
Connect the output port (right) of the Unwind operator to the input port (left) of the Filter State Filter operator.
Configure the second Filter operator's Info window as follows:
Info
Category
Filter
Label
Filter Country
Do Note Sanitize Formula
☐ (unchecked)
Preserve Argument Type
☐ (unchecked)
Expression
types="country"
Connect the output port (right) of the Unwind operator to the input port (left) of the Filter Country Filter operator.
Configure Additional Get Operators
Use two more Get operators to retrieve a specific value from each filtered row. Each row contains both a "long_name" and "short_name" value. For example, if the State "long_name" value is New York, then the "short_name" is NY. For this example, you'll retrieve the "short_name" value for State and Country.
Drag and drop two Get operators onto the Data Workflow canvas.
Configure the first Get operator's Info window as follows:
Info
Category
Get
Label
Get State short_name
Preserve Argument Type
☐ (unchecked)
Path
[0].short_name
Connect the upper output port (right) of the Filter State Filter operator to the input port (left) of this Get State short_name Get operator.
Configure the second Get operator's Info window as follows:
Info
Category
Get
Label
Get Country short_name
Preserve Argument Type
☐ (unchecked)
Path
[0].short_name
Connect the upper output port (right) of the Filter Country Filter operator to the input port (left) of this Get Country short_name Get operator.
Configure the Console Operators
Add four Console operators to view the outcome of each step in the process. Connect one Console operator to the first Get operator to view the "address_components" array before unwinding. Then, connect another to the Unwind operator to view the "address_components" array after unwinding. Lastly, connect two Console operators to the second and third Get operators. These display exactly what values the Data Workflow retrieves from the address data object.
The second and third Get operators only output to Console operators. Use dedicated Output operators when creating applications. Then, you can connect those Output operators to Hidden components to store the final values for reference elsewhere in an application.
Drag and drop four Console operators onto the Data Workflow canvas.
Configure the first Console operator's Info window as follows:
Info
Category
Console
Label
Before Unwind
Connect the output port (right) of the Get address_components array Get operator to the input port (left) of this Before Unwind Console operator.
Configure the second Console operator's Info window as follows:
Info
Category
Console
Label
After Unwind
Connect the output port (right) of the Unwind on types Unwind operator to the input port (left) of this After Unwind Console operator.
Configure the third Console operator's Info window as follows:
Info
Category
Console
Label
State short_name
Connect the output port (right) of the Get State short_name Get operator to the input port (left) of this State short_name Console operator.
Configure the fourth Console operator's Info window as follows:
Info
Category
Console
Label
Country short_name
Connect the output port (right) of the Get Country short_name Get operator to the input port (left) of this Country short_name Console operator.
Click Save Component.
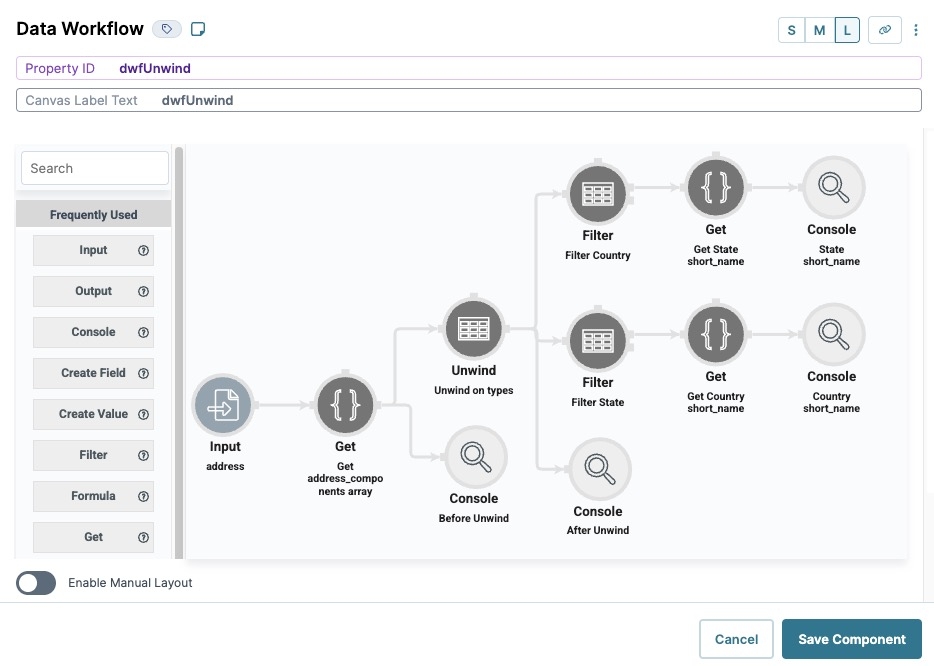
Here's how the completed Data Workflow looks:
Configure the Button Component
Create a button so end-users can click it in Express View and trigger the Data Workflow.
Drag and drop a Button component onto your canvas, placing it below the dwfUnwind Data Workflow component.
In the Property ID, enter btnRunDWF.
In the Label Text, enter
Run DWF Unwind.Navigate to the Actions settings.
From the Action Type drop-down, select Event.
From the On Click drop-down, enter or select dwfUnwind.
Click Save Component.
Save your module.
Here's how the completed example looks in the Module Builder:
.jpg)
Preview your module in Express View and open the DevTools Console. Enter an address in the Address field and click Run DWF Unwind.
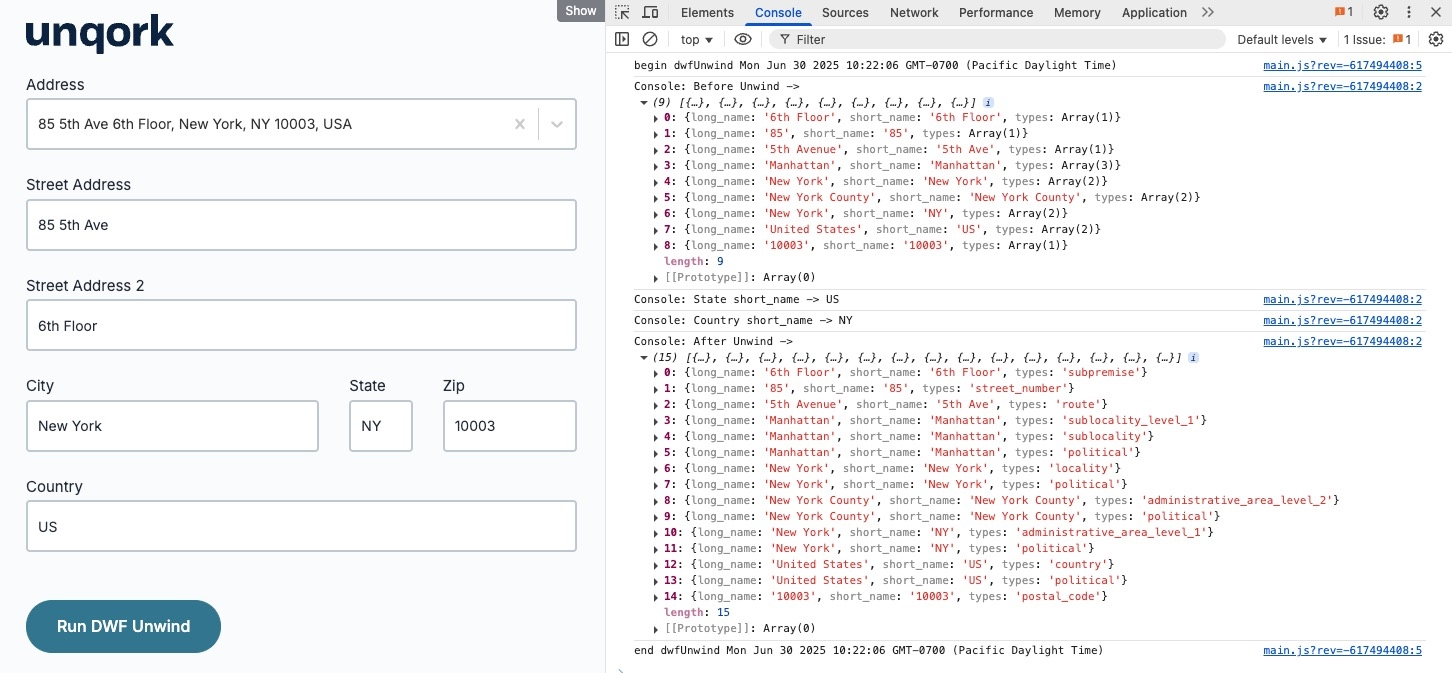
Notice that there are more rows in the After Unwind array than in the Before Unwind array. Some rows of the original array had two "types" values. For example, look at row two of the Before Unwind array "5th Avenue". Its "types" value is an array with two rows. After unwinding the data, the "types" array separates into row two and row three as displayed in the After Unwind array.
Overview
The Unwind operator raises the values in a nested array to the next level.
For example, begin with the following array:
[
  {
    "key1": "A",
    "key2": "B",
    "key3": [
      "C"
    ]
  }
]
In Lines 5 and 6, the "key3" key contains an nested array as its value. After using the Unwind operator in a Data Workflow component, the value "C" in the "key3" nested array raises to the same level of the data structure as the values "A" and "B". The final array looks like the following:
[
  {
    "key1": "A",
    "key2": "B",
    "key3": "C"
  }
]
Now, all three values are at the same level of the data structure.
You'll find the Get operator under the Table group to the left of the Data Workflow canvas.
About the Info Window
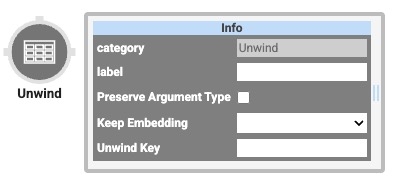
Learn more about each setting in the Unwind operator's Info window:
Setting | Description |
|---|---|
Category | Grayed out and non-adjustable setting indicating the operation type. |
Label | Sets the label for your operator, displaying below the operator on your Data Workflow canvas. This field is optional, but set a label if you use more than one of the same operator type. A label helps you identify your operators without opening any Info windows. |
Keep Embedding | Specifies whether to keep the original, nested key in the final, unwound array. When set to Yes, the value(s) in the nested array displays in the unwound array paired with the original nested key. When set to No, the values in the nested array separate out. Once separated, they index into the higher level array.
|
Unwind Key | Specifies which key contains the nested array you want to bring to a higher level of the data structure. Enter _arg in this field to sort by the value coming into the operator's argument port. For example, let's say you have the following array: You'll unwind "keyC" to bring the value in the nested "keyC" array to the same level as the original array. The final, unwound array looks like the following: |
Adding an Unwind Operator
In this example, use a Address Search component to collect and store information about an address. Then, use the Unwind operator in a Data Workflow component to extract values from the Address Search component's "address" data object.
The Unqork Training environment contains a preconfigured address service. If you are configuring in a non-Training environment, you might need to set up an address service.
The "address" data object includes commonly-referenced fields, like city or zip. But, each row of the array also has another nested array called "types". The "types" array indicates which category of address information is in that row. For example, the types array can contain the "street_number" or "postal_code_suffix" values. Unwinding the "types" array brings this category value to the same level as the address information itself.
Use the Filter and Get operators to retrieve the specific address information. The Filter operator filters information from the "address_components" array by a particular "types" value. For example, you can filter out the row with "types":"street_number". Then, use the Get operator to extract the street number.
Configure the Address Search Component
Configure an Address Search component to collect the end-user's location. This location stores in an "address" data object.
In the Module Builder, drag and drop an Address Search component onto your canvas.
In the Property ID field, enter address.
In the Label field, enter
Address.Set Street, Street2, City, State, Zip, and Country to
.png) (checked).
(checked).Click Save.
Configure the Data Workflow Component
With the Address Search component configured, use your Unwind operator to retrieve specific values. In this example, your Data Workflow retrieves the two-letter state and country abbreviations.
Drag and drop a Data Workflow component onto your canvas, placing it below the address Address Search component.
In the Canvas Label Text and Property Name fields, enter
dwfUnwind.
Configure the Input Operator
Connect your Address Search component to the Data Workflow using an Input operator.
Drag and drop an Input operator onto your Data Workflow canvas.
Configure the operator's Info window as follows:
Info
Category
Input
Component
address
Required
Yes
Source
Default
Configure the Get Operator
Connect a Get operator to the "address_components" array in the "address" data object.
Drag and drop a Get operator onto your Data Workflow canvas.
Configure the operator's Info window as follows:
Info
Category
Get
Label
Get address_components array
Preserve Argument Type
☐ (unchecked)
Path
address_components
Connect the output port (right) of the Input operator to the input port (left) of the Get operator.
Configure the Unwind Operator
Use the Unwind operator to unwind the "types" key. Doing so brings the values in the nested "types" array to each row of the "address_components" array.
Drag and drop an Unwind operator onto your Data Workflow canvas.
Configure the operator's Info window as follows:
Info
Category
Unwind
Label
Unwind on types
Preserve Argument Type
☐ (unchecked)
Keep Embedding
Yes
Unwind Key
types
Connect the output port (right) of the Get operator to the input port (left) of the Unwind operator.
Configure the Filter Operators
Use two Filter operators to isolate the values you want. Each Filter operator filters according to a specific "types" value. After unwinding, there's now a "types" value in each row of the array. To determine which "types" value to use in the expression, look at the original "types" array. For example, the "types" value of "administrative_area_level_1" corresponds to the State row of information.
Drag and drop two Filter operators onto the Data Workflow canvas.
Configure the first Filter operator's Info window as follows:
Setting
Value
Category
Filter
Label
Filter State
Do Note Sanitize Formula
☐ (unchecked)
Preserve Argument Type
☐ (unchecked)
Expression
types="administrative_area_level_1"
Connect the output port (right) of the Unwind on types Unwind operator to the input port (left) of this Filter State Filter operator.
Configure the second Filter operator's Info window as follows
Setting
Value
Category
Filter
Label
Filter Country
Do Note Sanitize Formula
☐ (unchecked)
Preserve Argument Type
☐ (unchecked)
Expression
types="country"
Connect the output port (right) of the Unwind on types Unwind operator to the input port (left) of this Filter Country Filter operator.
Configure Additional Get Operators
Use two more Get operators to retrieve a specific value from each filtered row. Each row contains both a "long_name" and "short_name" value. For example, if the State "long_name" value is New York, then the "short_name" is NY. For this example, you'll retrieve the "short_name" value for State and Country.
Drag and drop two Get operators onto the Data Workflow canvas.
Configure the first Get operator's Info window as follows:
Setting
Value
Category
Get
Label
Get State short_name
Preserve Argument Type
☐ (unchecked)
Path
[0].short_name
Connect the upper output port (right) of the Filter State Filter operator to the input port (left) of this Get State short_name Get operator.
Configure the second Get operator's Info window as follows:
Setting
Value
Category
Get
Label
Get Country short_name
Preserve Argument Type
☐ (unchecked)
Path
[0].short_name
Connect the upper output port (right) of the Filter Country Filter operator to the input port (left) of this Get Country short_name Get operator.
Configure the Console Operators
Add four Console operators to view the outcome of each step in the process. Connect one Console operator to the first Get operator to view the "address_components" array before unwinding. Then, connect another to the Unwind operator to view the "address_components" array after unwinding. Lastly, connect two Console operators to the second and third Get operators. These display exactly what values the Data Workflow retrieves from the address data object.
The second and third Get operators only output to Console operators. Use dedicated Output operators when creating applications. Then, you can connect those Output operators to Hidden components to store the final values for reference elsewhere in an application.
Drag and drop four Console operators onto the Data Workflow canvas.
Configure the first Console operator's Info window as follows:
Setting
Value
Category
Console
Label
Before Unwind
Connect the output port (right) of the Get address_components array Get operator to the input port (left) of thisBefore Unwind Console operator.
Configure the second Console operator's Info window as follows:
Setting
Value
Category
Console
Label
After Unwind
Connect the output port (right) of the Unwind on types Unwind operator to the input port (left) of this After Unwind Console operator.
Configure the third Console operator's Info window as follows:
Setting
Value
Category
Console
Label
State short_name
Connect the output port (right) of the Get State short_name Get operator to the input port (left) of this State short_name Console operator.
Configure the fourth Console operator's Info window as follows:
Setting
Value
Category
Console
Label
Country short_name
Connect the output port (right) of the Get Country short_name Get operator to the input port (left) of this Country short_name Console operator.
Click Save.
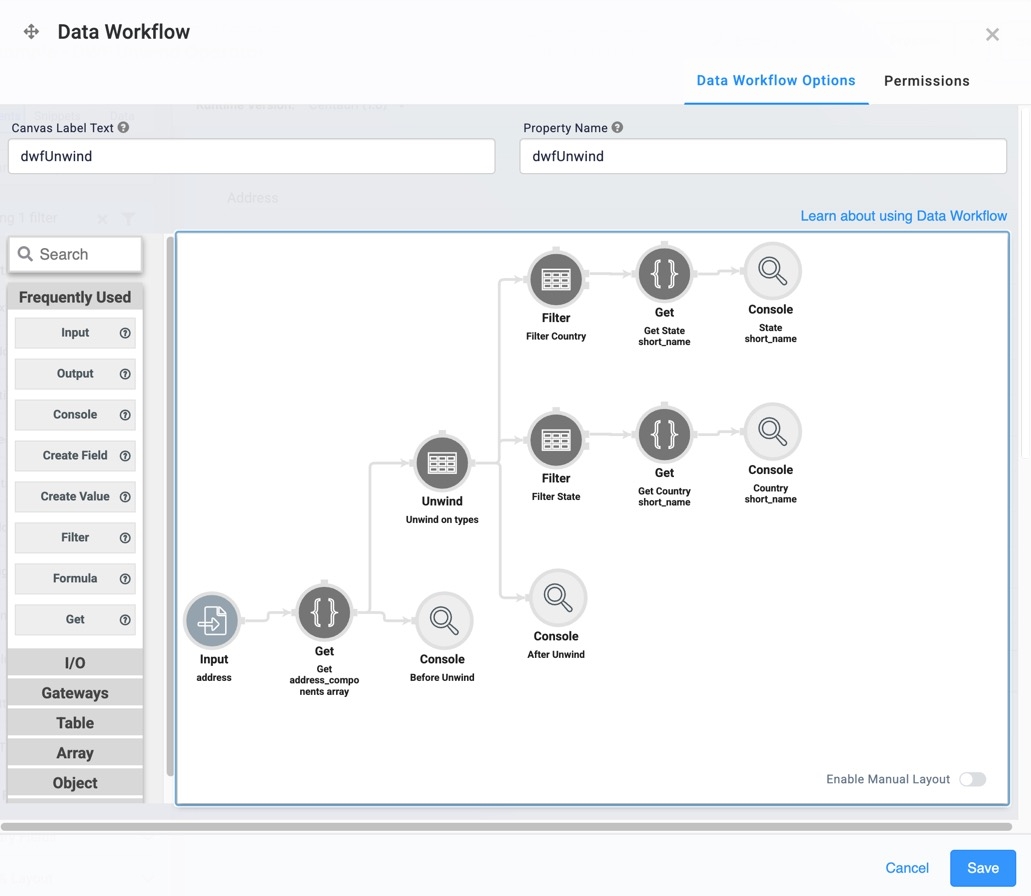
Here's how the completed Data Workflow looks:
Configure the Button Component
Create a button so end-users can click it in Express View and trigger the Data Workflow.
Drag and drop a Button component onto your canvas, placing it below the dwfUnwind Data Workflow component.
In the Property ID, enter btnRunDWF.
In the Label Text, enter
Run DWF Unwind.From the Action Type drop-down, select Event.
From the On Click drop-down, enter or select dwfUnwind.
Click Save & Close.
Save your module.
Here's how the completed example looks in the Module Builder:
.jpg)
Preview your module in Express View and open the DevTools Console. Enter an address in the Address field and click Run DWF Unwind.
.jpg)
Notice that there are more rows in the After Unwind array than in the Before Unwind array. Some rows of the original array had two "types" values. For example, look at row two of the Before Unwind array "5th Avenue". Its "types" value is an array with two rows. After unwinding the data, the "types" array separates into row two and row three as displayed in the After Unwind array.
How Unwind Works on Different Arrays
This section covers how the Unwind operator works on different types of arrays. Arrays of values are not the only types of arrays. Sometimes, you'll work with an array of objects instead.
You'll also see the effect of setting Keep Embedding to either Yes or No. So, take a moment to explore the following tables and compare and contrast each one.
To understand how Unwind works in different contexts, view the examples below:
Array with One Value
Use the following sample array:
[
  {
    "keyA": "A",
    "keyB": "B",
    "keyCDE": [
      "CDE"
    ]
  }
]
The value of "keyCDE" is an array with one value. So, unwind on keyCDE to un-nest the array.
This table displays the outcome of unwinding on the "keyCDE" key. In the first column, the Keep Embedding setting is set to Yes. In the second column, it's set to No.
Unwound on keyCDE, Keep Embedding set to Yes |
|---|
|
Unwound on keyCDE, Keep Embedding set to No |
|---|
|
Array with Multiple Values
This sample array has multiple values:
[
  {
    "keyA": "A",
    "keyB": "B",
    "keyADG": [
      "ABC",
      "DEF",
      "GHI"
    ]
  }
]
The value of "keyADG" is a nested array with three values. So, unwind on keyADG and check the results in the table below. Like before, the first column displays the effect of setting Keep Embedding to Yes. The second column displays the outcome of setting Keep Embedding to No.
Unwound on keyADG, Keep Embedding set to Yes |
|---|
|
Unwound on keyADG, Keep Embedding set to No |
|---|
|
With Keep Embedding set to Yes, the outcome displays three objects, and each object has a "keyADG" key with a different value. Each "keyADG" value comes from the original nested array. So, if the original nested array has five values, the outcome displays five objects.
With Keep Embedding set to No, the outcome displays three objects again. This time, there's no "keyADG" key in each object. Instead, each value from the original nested array gets separated into one of the objects.
Array of Objects
Now, look at how the Unwind operator works on an array of objects. Here's the sample array:
[
  {
    "keyA": "A",
    "keyB": "B",
    "keyADG": [
      {
        "value": "ABC"
      },
      {
        "value": "DEF"
      },
      {
        "value": "GHI"
      }
    ]
  }
]
The value of "keyADG" is an array of three objects: [{"value":"ABC"}, {"value":"DEF"}, {"value":"GHI"}]. So, see what happens when you unwind on keyADG. Like before, the table's left column displays the effect of setting Keep Embedding to Yes. The right column displays the effect of setting Keep Embedding to No.
Unwound on keyADG, Keep Embedding set to Yes |
|---|
|
Unwound on keyADG, Keep Embedding set to No |
|---|
|
The outcome displays an array of three objects whether you set Keep Embedding to Yes or No. But, notice how the "keyADG" key disappears when you set Keep Embedding to No.
When you set Keep Embedding to Yes, each object displays a "keyADG" key/value pair. The value is one of the objects in the original nested array.
When you set Keep Embedding to No, each object loses the "keyADG" key/value pair. Instead, contents of the objects in the original nested array move up a level to replace the "keyADG" key/value pair.