Address Services enables address-location searching using the Address Search component. End-Users enter a location's address, and results narrow as they type. Sometimes, your end-users might know the name of the location, but not the address. Address Services let your end-users look up a location instead. These services also let them search for the name of a business, building, or landmark.
The benefits of using the address service for the Address Search component include:
Security: API (keys are stored server-side and not exposed to end-users.
Performance: API service requests execute server-side, making them perform better.
Maintainability: Acts as a central place to maintain address API services, making it easier to update them.
When setting up a new service, it is the customer or Creator's responsibility to obtain an API key for the Google Places or Canada Post services. API keys are owned by the customer and should not be exposed to end-users.
Setting Up Address Services
To learn more about setting up an address service, click on the buttons below.
Setting Up a Google Places Service in Service Administration
The first step in using Google Places address look-up is adding the Google Place Details API service. You'll do this in Services Administration. You must have a Google Places API key to set up a Google Place Details Service.
To learn more about getting a Google Places API key, visit the following link: https://developers.google.com/places/web-service/get-api-key.
At the top right of the Unqork Designer Platform, click Administration.
Under Integration, click Services Administration.
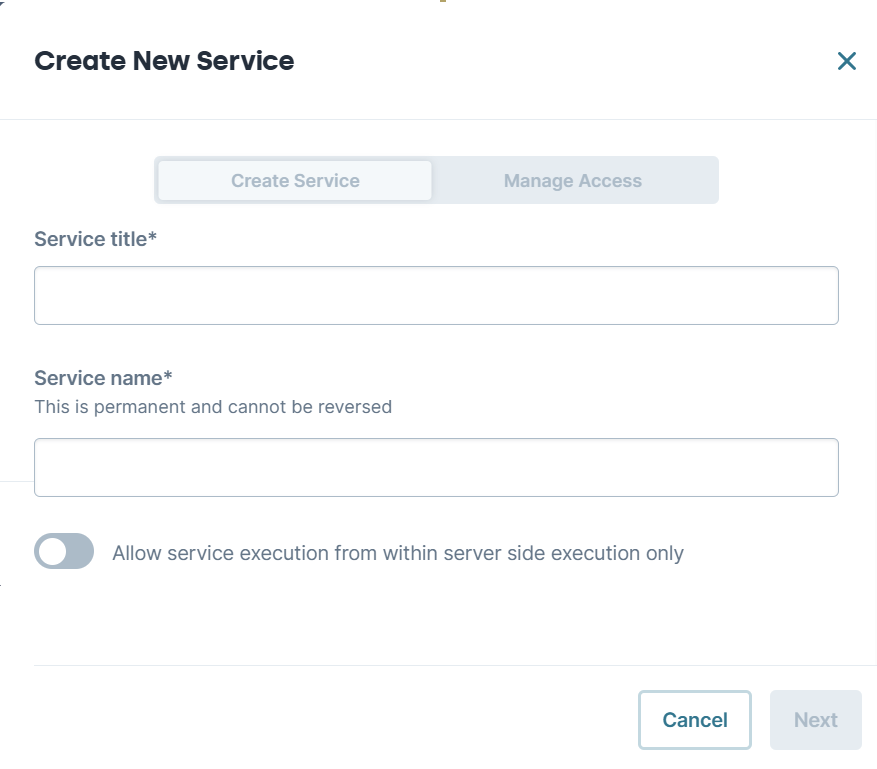
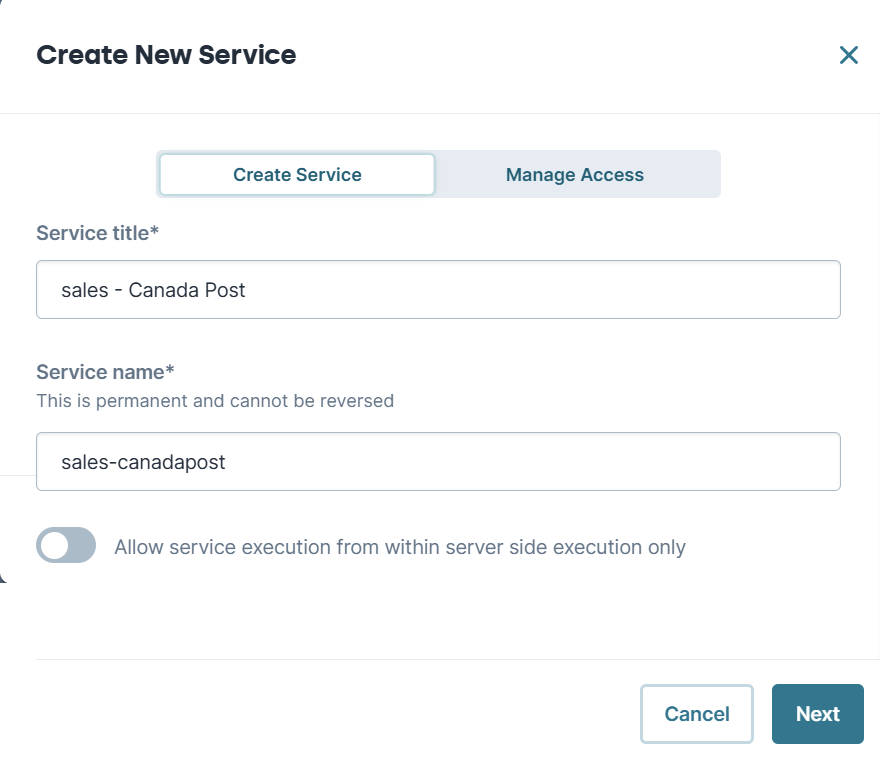
At the top right of the page, click + Add a Service. The Create New Service modal displays.
In the Service Title field, enter
{teamName} - Google Places. Replace {teamName} with your initials or the name of your application team. For example,Sales - Google Places.In the Service Name field, enter
{teamName}-google-places.Use lowercase alphanumeric characters along with a hyphen (
-). A Service Name cannot not start or end with a hyphen. There cannot be consecutive hyphens in a Service Name.Click Next. The Manage Access page displays.
From the Share To setting, choose to share with the environment or a specific workspace.
Click Create. The service's information page displays.
Click Edit.
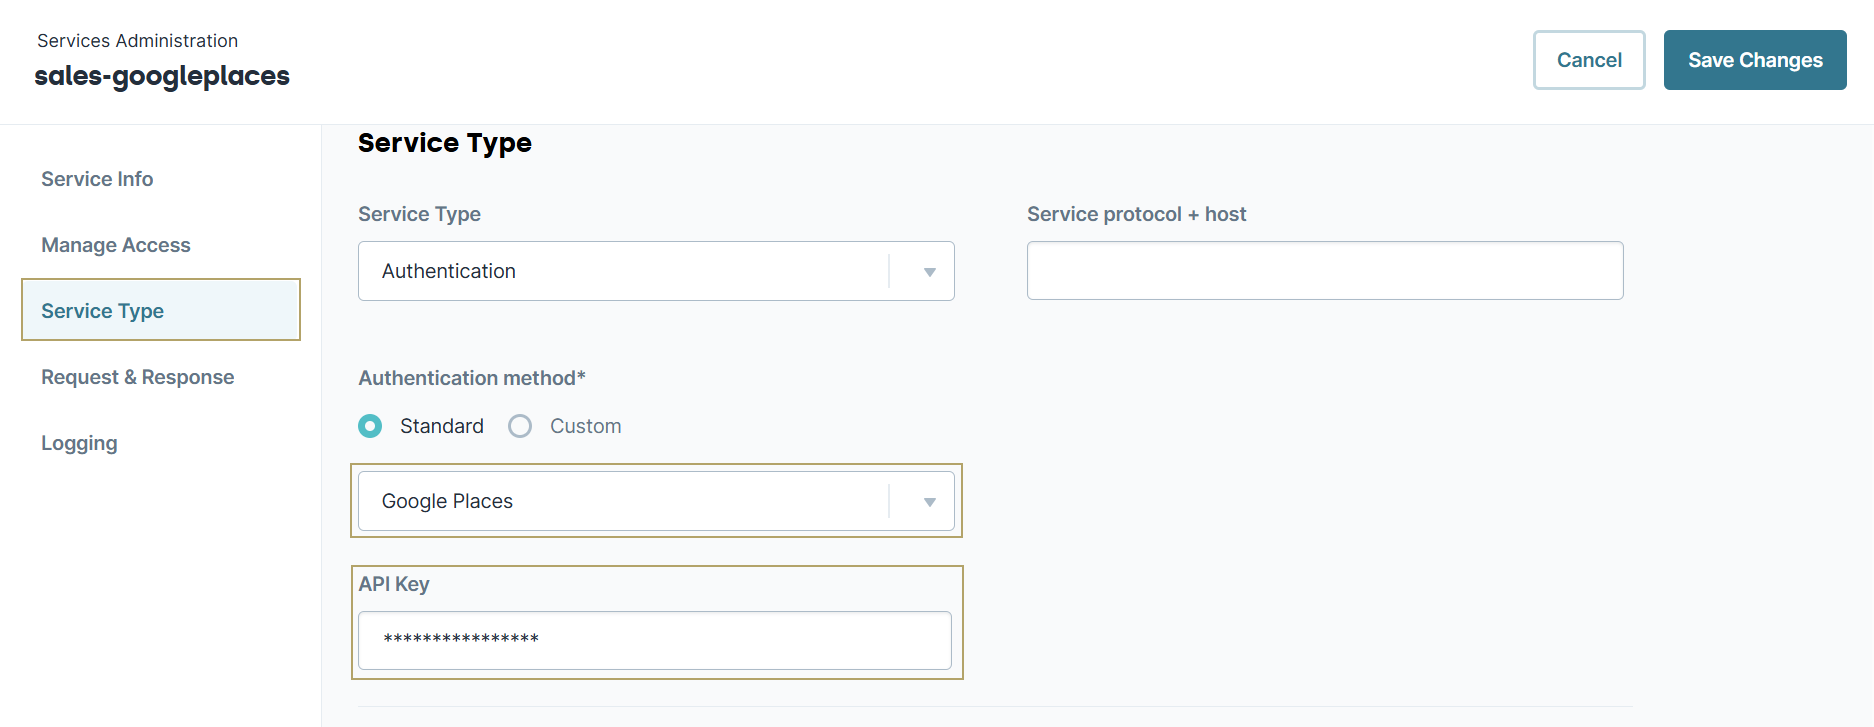
From the menu to the left, click Service Type
From the Authentication method drop-down, select Google Places.
In the API Key field, enter the Google Places API key.
Click Save Changes. The Services Administration page loads, displaying the new service in the list.
Configuring an Address Search Component to Use the Google Place Details Service
Configure an Address Search component to use the Google Place Details service. These instructions assume that you have an open module saved with a title.
In the Module Builder, drag and drop an
 Address Search component onto your canvas.
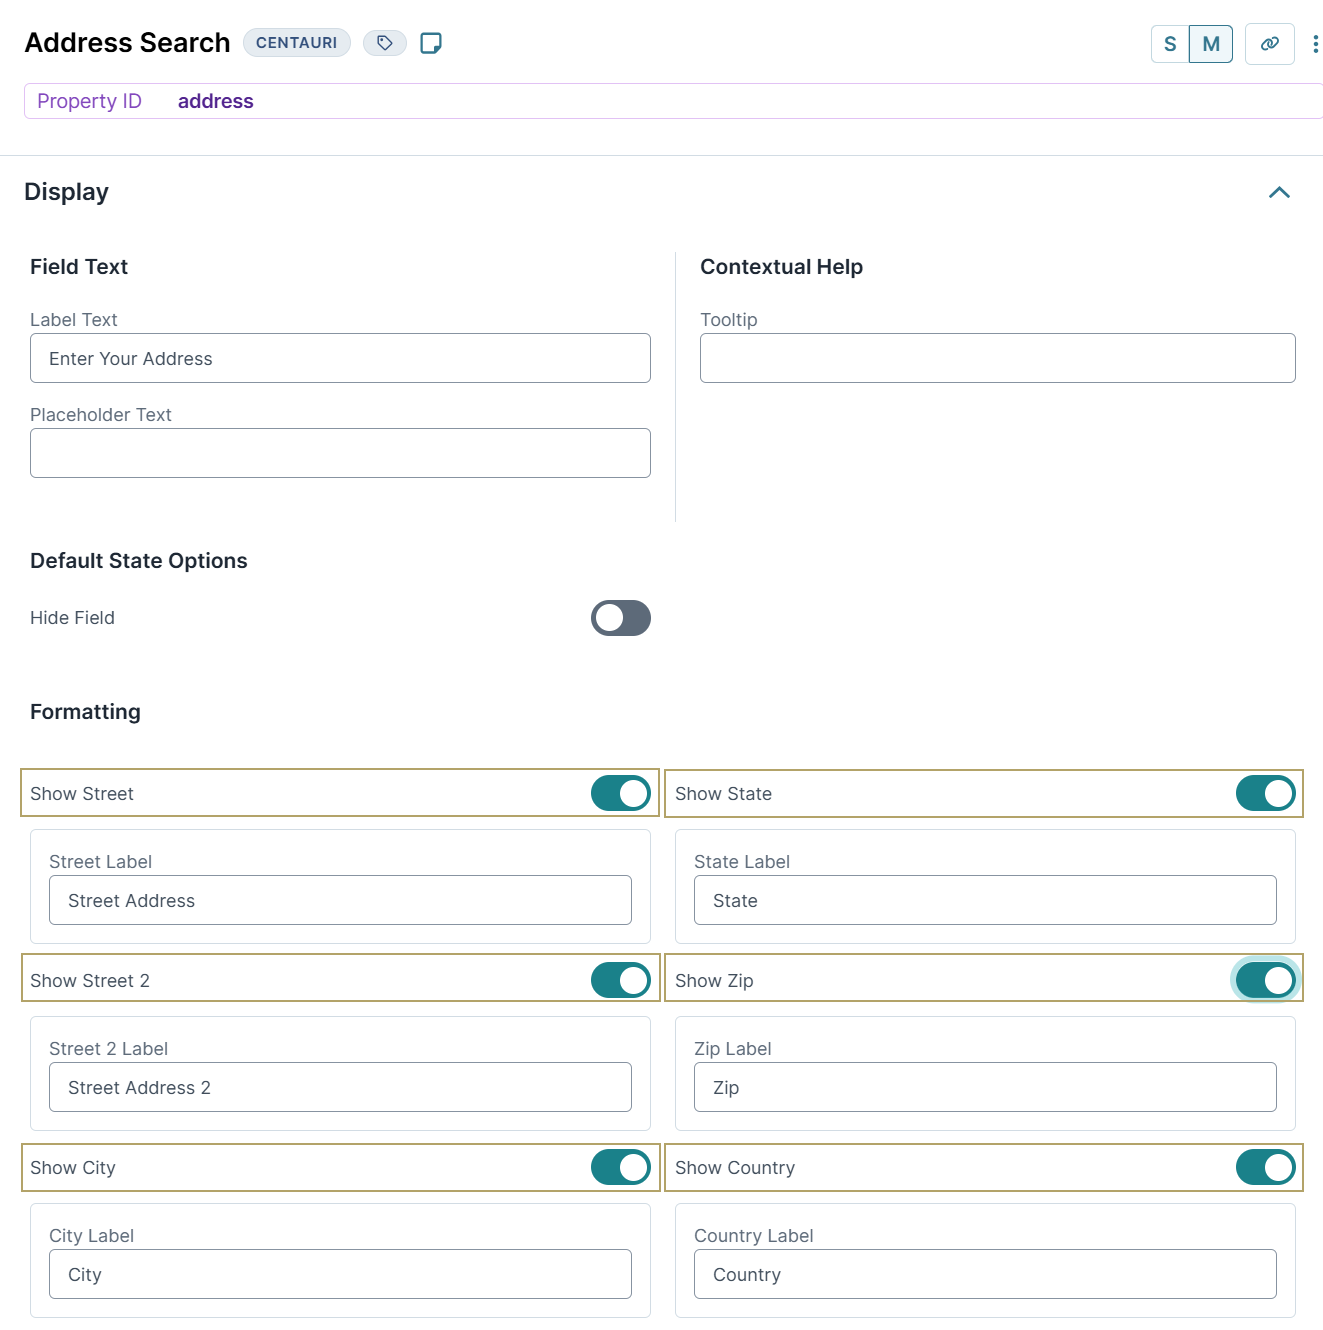
In the Property ID field, enter
address.In the Label Text field, enter
Enter Your Address:.Select any of the Show Street, Show Street 2, Show City, Show State, Show Zip, and Show Country options as desired. Selected fields display in Express View and populate with the data returned by the Google Places API.
All location data returned by the Google Places API stores in the submission data, even if you do not select the respective option.
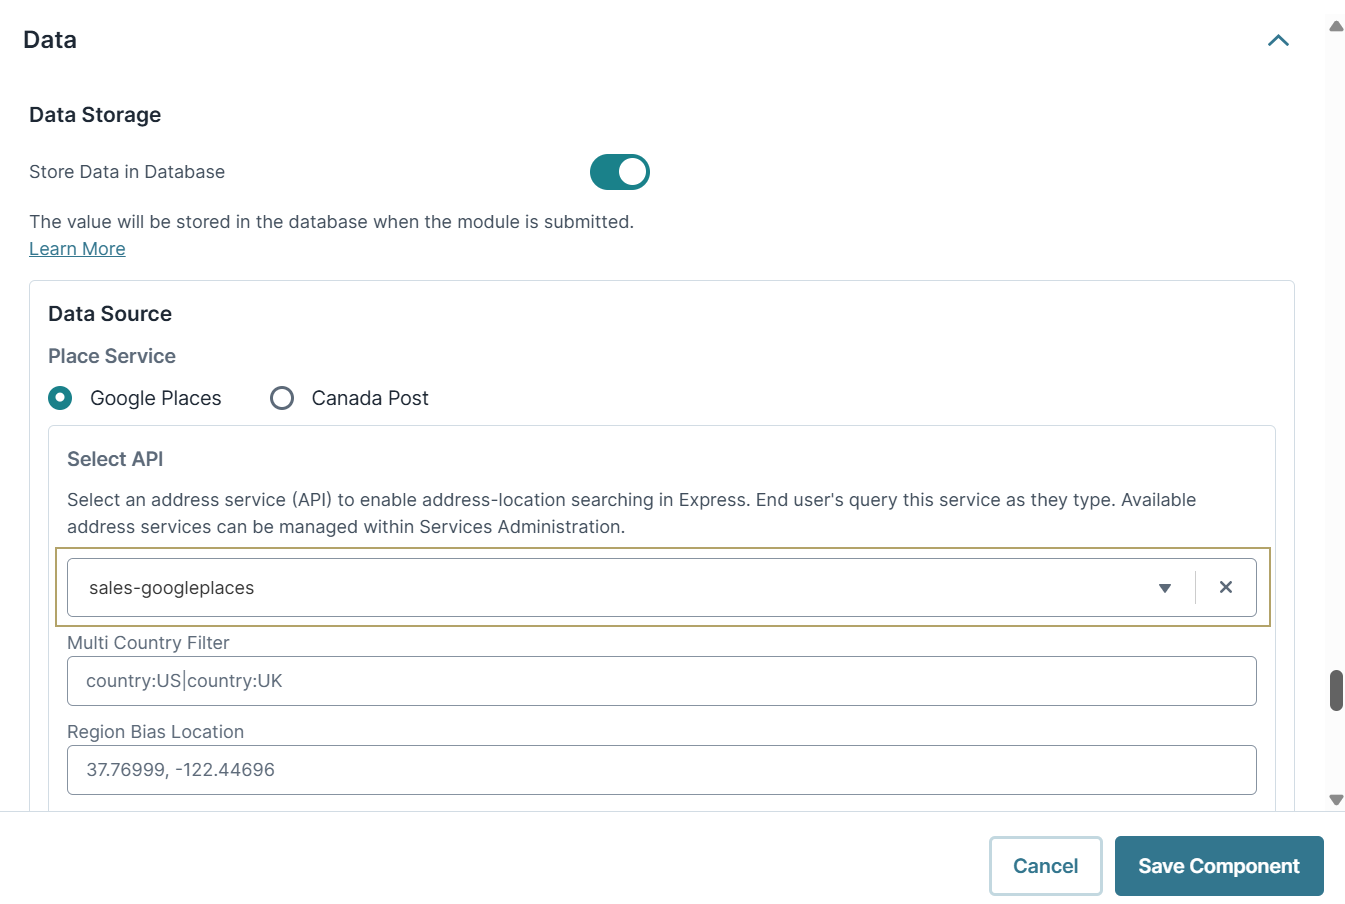
Navigate to the Data settings.
From the Select API drop-down, select the Address Service created in the previous section. In this case, sales-googleplaces. Doing so connects your Address Search component to the Google Places service you added in Services Administration.
If only one Address Service exists, it's selected by default.
Click Save Component.
Save your module.
You're now ready to use Google Places-enabled address search.
Setting Up a Canada Post Service in Service Administration
To use the Canada Post address look-up, you must configure the Canada Post service. You'll do this in Services Administration. You must have a Canada Post API key to set up a Canada Post Service.
To learn more about getting a Canada Post API key, visit the following link: https://www.canadapost-postescanada.ca/ac/support/setup-guides/#create-an-api-key.
At the top right of the Unqork Designer Platform, click Administration.
Under Integration, select Services Administration.
At the top right of the page, click + Add a Service.
In the Service Title field, enter
{teamName} - Canada Post. Replace {teamName} with your initials or the name of your application team. For example,Sales - Canada Post.In the Service Name field, enter
{teamName}-canada-post.Use lowercase alphanumeric characters along with a hyphen (-). A Service Name cannot start or end with a hyphen. There cannot be consecutive hyphens in a Service Name.
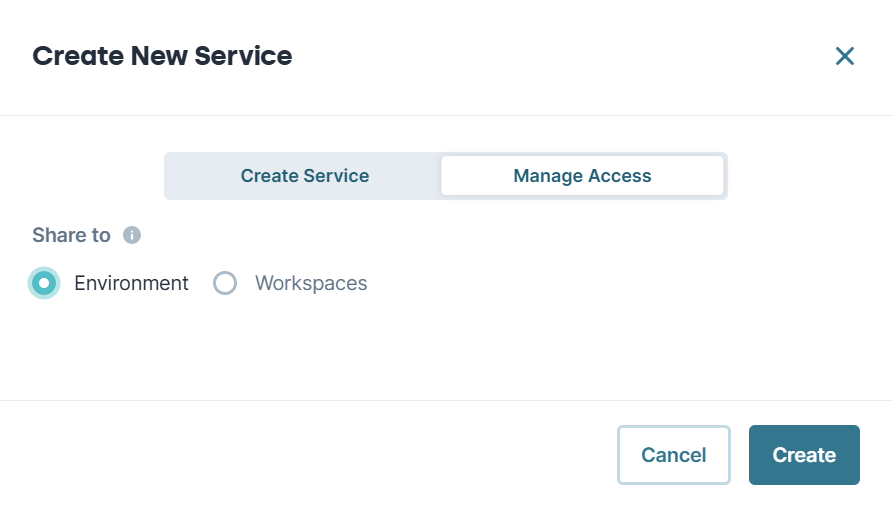
Click Next. The Manage Access page displays.
From the Share To setting, choose to share with the environment or a specific workspace.
Click Create. The service's information page displays.
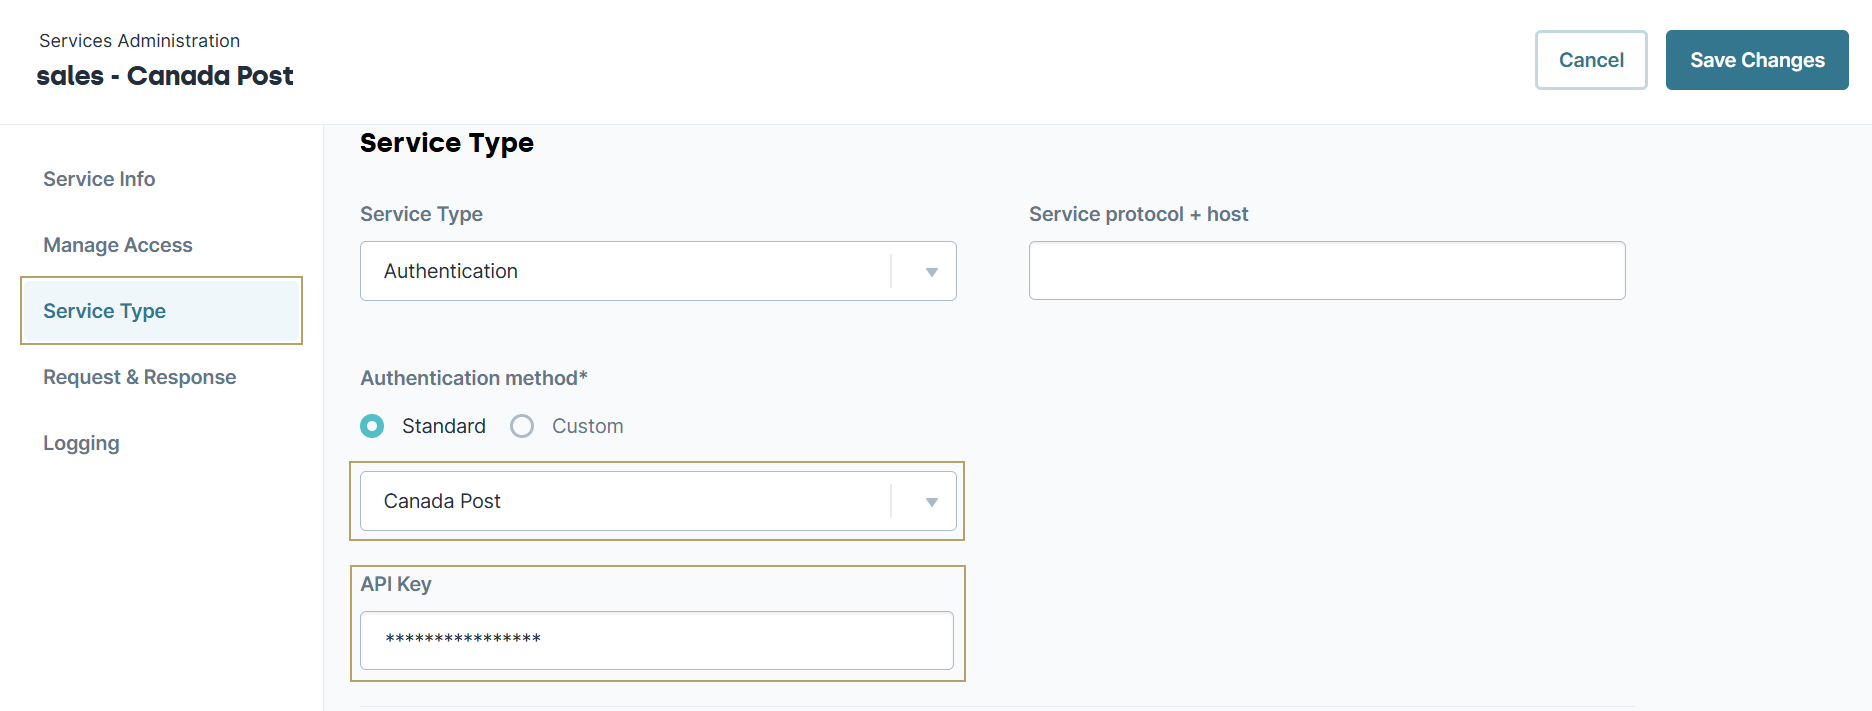
Click Edit.
From the menu to the left, click Service Type
From the Authentication method drop-down, select Canada Post.
In the API Key field, enter the Canada Post API key.
Click Save Changes. The Services Administration page loads, displaying the new service in the list.
Configuring an Address Search Component to Use the Canada Post Service
Configure an Address Search component to use the Canada Post service. These instructions assume that you have an open module saved with a title.
In the Module Builder, drag and drop an
 Address Search component onto your canvas.
In the Property ID field, enter
address.In the Label Text field, enter
Enter Your Address:.Select any of the Show Street, Show Street 2, Show City, Show State, Show Zip, and Show Country options as desired. Selected fields display in Express View and populate with the data returned by the Canada Post API.
All location data returned by the Canada Post API stores in the submission data, even if you do not select the respective option.
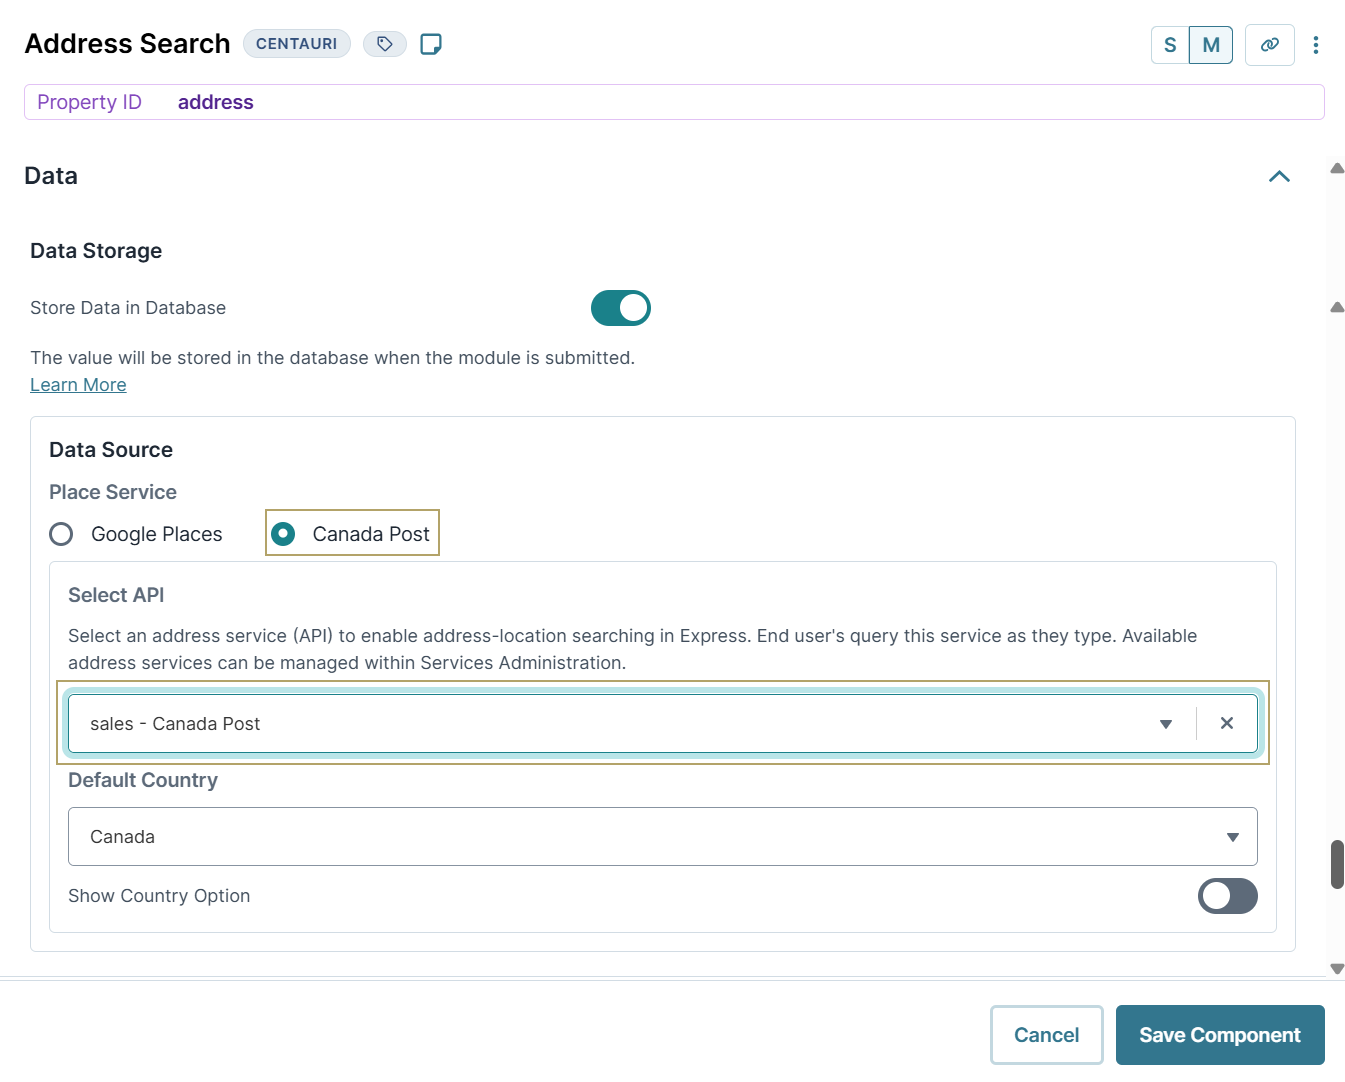
Navigate to the Data settings.
From the Select API drop-down, select the Address Service created in the previous section. In this case, sales-canadapost. Doing so connects your Address Search component to the Canada Post service you added in Services Administration.
If only one Address Service exists, it's selected by default.
Click Save Component.
Save your module.
You're now ready to use Canada Post-enabled address search.
Best Practices
When setting up a new service, it's the customer or Creator's responsibility to obtain an API key for the Google Places or Canada Post services. API keys are owned by the customer and should not be exposed to end-users.
When naming a new service, set the Service Title the same as the Service name, except with proper spacing and capitalization. For example,
Sales - Google Places.When creating a new service, set the team name and type of service in the Service name. Use lowercase alphanumeric letters and dashes for spaces. For example,
sales-google-places.Address Services must have the same Service name value when promoting Address Search configurations between environments.
Unqork recommends using separate API keys across multiple environments and environment levels (UAT, QA, Production). Separate API keys for Production environments allows for finer control and rate limiting, providing optimal service to end-users.
Resources
To learn more about the Google Places API, visit https://developers.google.com/maps/documentation/places/web-service/details.
To learn more about the Canada Post API, visit https://www.canadapost-postescanada.ca/ac/support/api/addresscomplete-interactive-find/
