The Create Table operator creates an array with one or more empty rows in a Data Workflow. These empty rows can be filled using other operators in the Data Workflow, or at a later time.

To set the number of rows in the array:
Hard-code them using the operator's Info window.
Use another component as an argument for the operator.
The Create Table operator serves as the start of your Data Workflow, and does not have an input port. It also includes an argument port for determining the value it creates. Connect another operator to the Create Table operator's argument port. Then, in the Expression/Value field, use the _arg value to reference that value.
You can find the Create Value operator under the I/O group to the left of your Data Workflow canvas.
About the Info Window
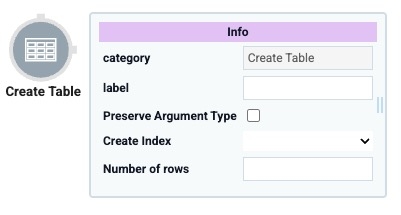
Learn more about each setting in the Create Table operator's Info window:
Setting | Description |
|---|---|
Category | Grayed out and non-adjustable setting indicating the operation type. |
Label | Sets the label for your operator, displaying below the operator on your Data Workflow canvas. This field is optional, but set a label if you use more than one of the same operator type. A label helps you identify your operators without opening any Info windows. |
Preserve Argument Type | When selected, this setting ensures the argument data type is respected when the operator executes. |
Create Index | When set to YES, the operator creates a When set to NO, your operator does not create an index. You might want an index if you plan to use the Merge or Append operators in your Data Workflow. |
Number of Rows | The number you enter here determines how many rows the operator creates. If you need two rows, enter To use another operator as an argument, connect its output port to the Create Table operator's argument port. Then, enter |
Adding a Create Table Operator
For this example, create an empty table with two rows using a Data Workflow component. Then, output this data to a Hidden component.
Configure the Hidden Component
Add a Hidden component to store the array you'll create using a Data Workflow.
In the Module Builder, drag and drop a Hidden component onto your canvas.
In the Property ID and Label Text fields, enter
tableOutput.Click Save Component.
Configure the Data Workflow Component
Next, you'll configure a Data Workflow component and use the Create Table operator.
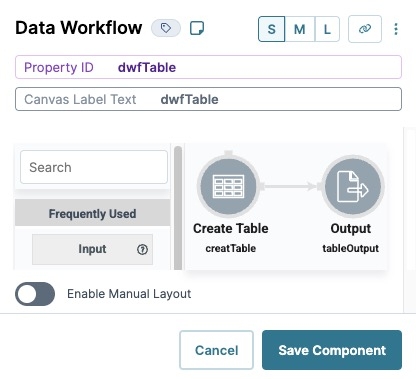
Drag and drop a Data Workflow component onto your canvas, placing it above the tableOutput Hidden component.
In the Property ID and Canvas Label Text fields, enter
dwfTable.
Configure the Create Table Operator
Drag and drop a Create Table operator onto your Data Workflow canvas.
Configure the operator's Info window as follows:
Info
Category
Create Table
Label
createTable
Preserve Argument Type
☐ (unchecked)
Create Index
Yes
Number of Rows
2
Configure the Output Operator
Drag and drop an Output operator onto your Data Workflow canvas.
Configure the operator's Info window as follows:
Info
Category
Output
Component
tableOutput
Action
Value
Connect the output port (right) of the Create Table operator to the input port (left) of the Output operator.
Click Save Component.
Here's how the completed Data Workflow looks:

Configure the Button Component
Lastly, configure a Button component to trigger the Data Workflow.
Drag and drop a Button component onto your canvas, placing it below the valueOutput Hidden component.
In the Property ID field, enter
btnTrigger.In the Label Text field, enter
Run DWF Create Table.Navigate to the Actions settings.
From the Action Type drop-down, select Event.
From the On Click drop-down, enter or select dwfTable.
Click Save Component.
Save your module.
Your completed module looks like the following:
.jpg)
Preview your module in Express View and click Run DWF Create Table. Then, open the DevTools Console and run the Angular Command. Expand the ▶ data: and tableOutput fields to see the empty array containing two rows.

The Create Table operator creates an array with one or more empty rows in a Data Workflow. These empty rows can be filled using other operators in the Data Workflow, or at a later time.

To set the number of rows in the array:
Hard-code them using the operator's Info window.
Use another component as an argument for the operator.
The Create Table operator serves as the start of your Data Workflow, and does not have an input port. It also includes an argument port for determining the value it creates. Connect another operator to the Create Table operator's argument port. Then, in the Expression/Value field, use the _arg value to reference that value.
You can find the Create Value operator under the I/O group to the left of your Data Workflow canvas.
About the Info Window
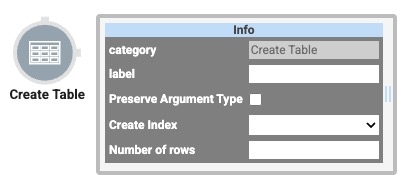
Learn more about each setting in the Create Table operator's Info window:
Setting | Description |
|---|---|
Category | Grayed out and non-adjustable setting indicating the operation type. |
Label | Sets the label for your operator, displaying below the operator on your Data Workflow canvas. This field is optional, but set a label if you use more than one of the same operator type. A label helps you identify your operators without opening any Info windows. |
Preserve Argument Type | When selected, this setting ensures the argument data type is respected when the operator executes. |
Number of Rows | The number you enter here determines how many rows the operator creates. If you need two rows, enter 2. To use another operator as an argument, connect its output port to the Create Table operator's argument port. Then, enter |
Adding a Create Table Operator
For this example, create an empty table with two rows using a Data Workflow component. Then, output this data to a Hidden component.
Configure the Hidden Component
Add a Hidden component to store the array you'll create using a Data Workflow.
Drag and drop a Hidden component onto your canvas.
In the Property ID and Label Text fields, enter
tableOutput.Click Save Component.
Configure the Data Workflow Component
Next, you'll configure a Data Workflow component and use the Create Table operator.
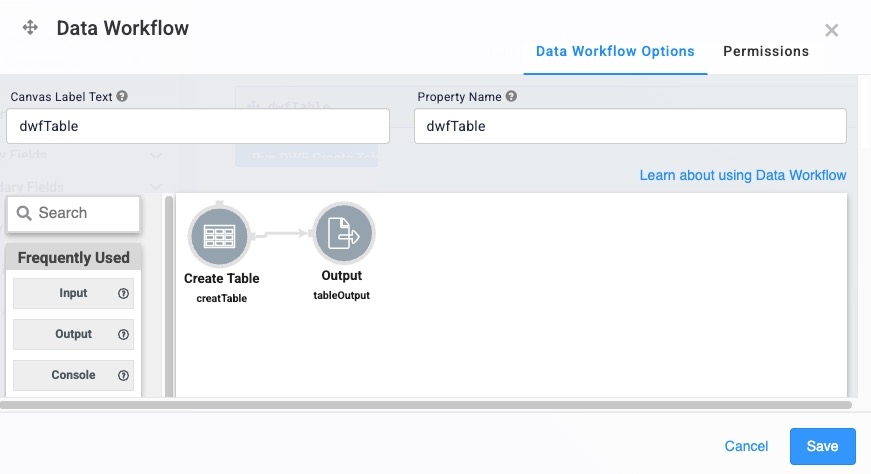
Drag and drop a Data Workflow component onto your canvas, placing it above the tableOutput Hidden component.
In the Property ID field, enter dwfTable.
In the Canvas Label Text field, enter dwfTable.
Configure the Create Table Operator
Drag and drop a Create Table operator onto your Data Workflow canvas.
Configure the operator's Info window as follows:
Setting
Value
Category
Create Table
Label
createTable
Preserve Argument Type
☐ (unchecked)
Create Index
Yes
Number of Rows
2
Configure the Output Operator
Drag and drop an Output operator onto your Data Workflow canvas.
Configure the operator's Info window as follows:
Setting
Value
Category
Output
Component
tableOutput
Action
Value
Connect the output port (right) of the Create Table operator to the input port (left) of the Output operator.
Click Save.
Here's how the completed Data Workflow looks:

Configure the Button Component
Lastly, configure a Button component to trigger the Data Workflow.
Drag and drop a Button component onto your canvas, placing it below the valueOutput Hidden component.
In the Property ID field, enter
btnTrigger.In the Label Text field, enter
Run DWF Create Table.Set the Action Type to Event.
From the On Click drop-down, enter or select dwfTable.
Click Save & Close.
Save your module.
Your completed module looks like the following:

Preview your module in Express View and click Run DWF Create Table. Then, open the DevTools Console and run the Angular Command. Expand the ▶ data: and tableOutput fields to see the empty array containing two rows.
.jpg)