Overview
The Map Keys operator lets you update the names of multiple keys in a table at once. Let's say you had a Data Table storing information about end-users' first names, last names, ages, and incomes. The table's column headers are name1, name2, age, and income. So, in your array, each object would have 4 key/value pairs, with the keys being "name1", "name2", "age", and "income".
Remember, tables store as an array of objects, with each object corresponding to one row of the table. Each column, and its associated value in that row, becomes a key/value pair in that row's object.
But what if you want to update the keys "name1" and "name2" to be more specific? For example, using "firstName" and "lastName" instead. With the Map Keys operator, you can easily update each "name1" and "name2" key across all objects in your array. All you need is a mapping table where you specify what keys you want to change, and what the new key names should be.
Common scenarios when you use the Map Keys operator include:
Removing spaces in key names to prevent errors down the line.
Updating keys in data from old or outside sources, to match your current naming conventions.
Renaming confusing keys when presenting table-based data to your end-user. For example, switching key names from camel case to title case before downloading the data as a CSV file.
Simplifying keys so they're easier to work with. For example, updating complex key names in data retrieved from an outside source via an API (application programming interface) call.
You’ll find the Map Keys operator under the Table group at the left of your canvas.
Similar Data Workflow Operators
The Map Keys operator is a sibling to the Map Values operator. The Map Values operator lets you update the values in a set of key/value pairs. By comparison, Map Keys lets you update the keys in a set of key/value pairs.
About the Info Window
Here's what the Map Keys operator looks like, along with its Info window:
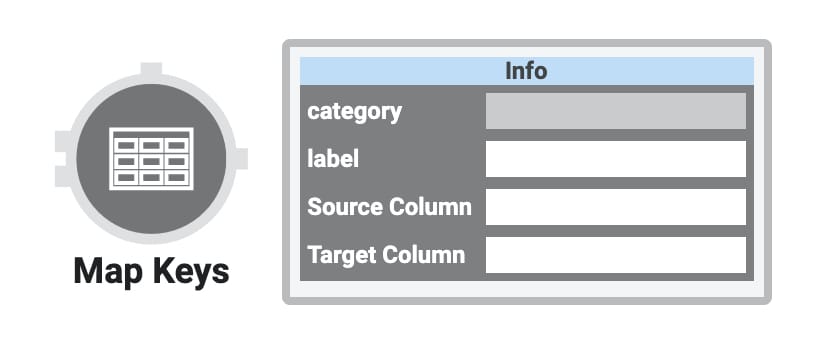
And here's a breakdown of each setting in the Info window:
Setting | Description |
|---|---|
Category | Grayed out and non-adjustable setting indicating the operation type. |
Label | Sets the label for your operator, displaying below the operator on your Data Workflow canvas. This field is optional, but set a label if you use more than one of the same operator type. A label helps you identify your operators without opening any Info windows. |
Source Column | Enter the name (column header) of the column in your mapping table that defines the original key names. |
Target Column | Enter the name (column header) of the column in your mapping table that defines the new key names. |
Adding a Map Keys Operator
In this use case, you'll see a simple example of how to use the Map Keys operator to update keys in a table. Or, in other words, to update the keys in key/value pairs in an array of objects. Since the Map Keys operator lets you update table-based data, let's start by creating a Data Table.
You can use the Map Keys operator with any table-based data, not just data from a Data Table component. For example, you can use Map Keys with data returned by the List Submissions for Dashboard API call. You can set up a Hidden component to store the data from the API call. Then, you'll use a simple Input-to-Output Data Workflow to move the data from Plug-In to Hidden component. The Hidden component is then used as the input in your Map Keys Data Workflow.
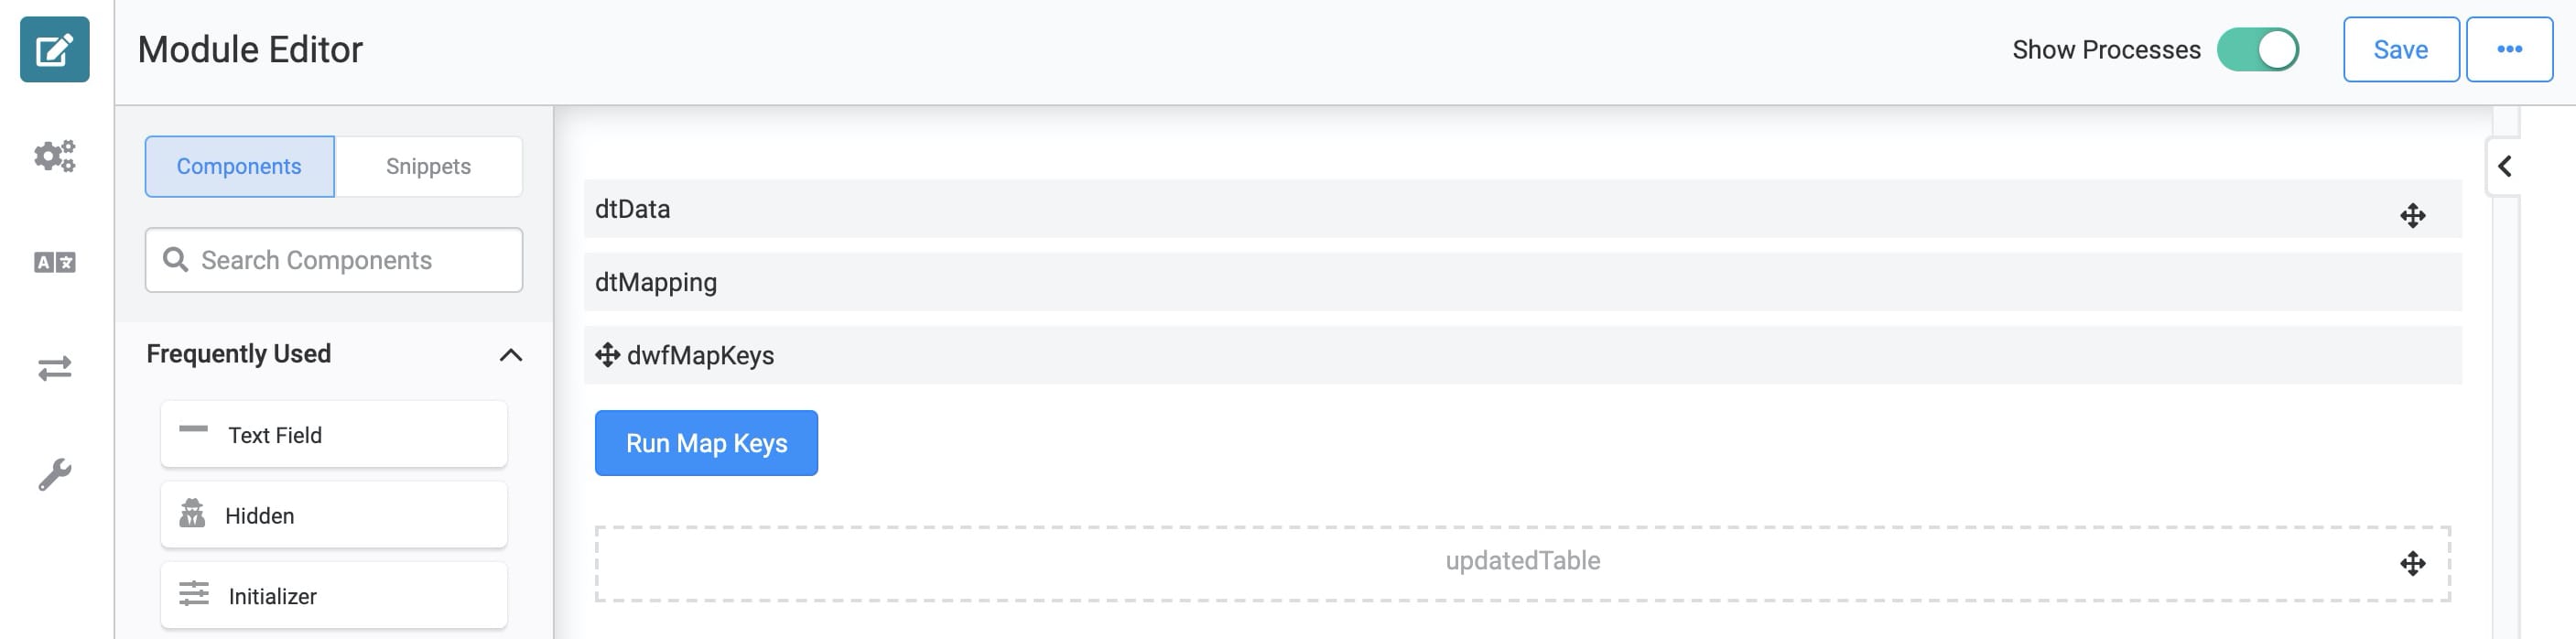
Here's how the completed use case will look in the Module Builder:
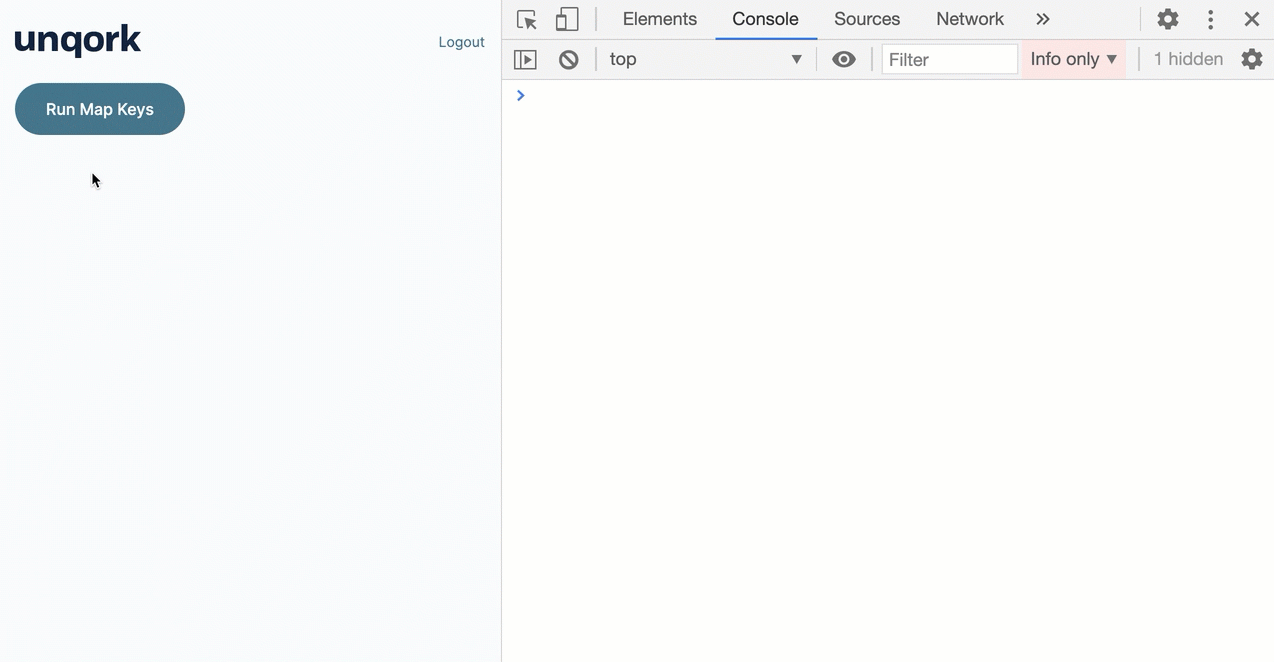
Here's how the completed use case will work in Express View, including a peek at the final table in the DevTools Console:
What You'll Need
To set up this use case, you'll need:
2 Data Table components
1 Data Workflow component
1 Button component
1 Hidden component
To set up your Data Workflow, you'll need:
2 Input operators
1 Map Keys operator
3 Console operators
1 Output operator
These instructions assume you have a new module open, saved, and with a title.
Configure the First Data Table Component
First up, let's create a Data Table you can use as a data source. You'll deliberately create some vague column headers, name1 and name2, that you'll update later.
In the Module Builder, drag and drop a Data Table component onto your canvas.
Enter dtData in the Label and Property Name fields.
In the data table, enter the following:
name1
name2
age
income
Minna
Amigon
34
77000
Mitsue
Tollner
46
102000
Abel
Maclead
31
65000
Sage
Wieser
49
121000
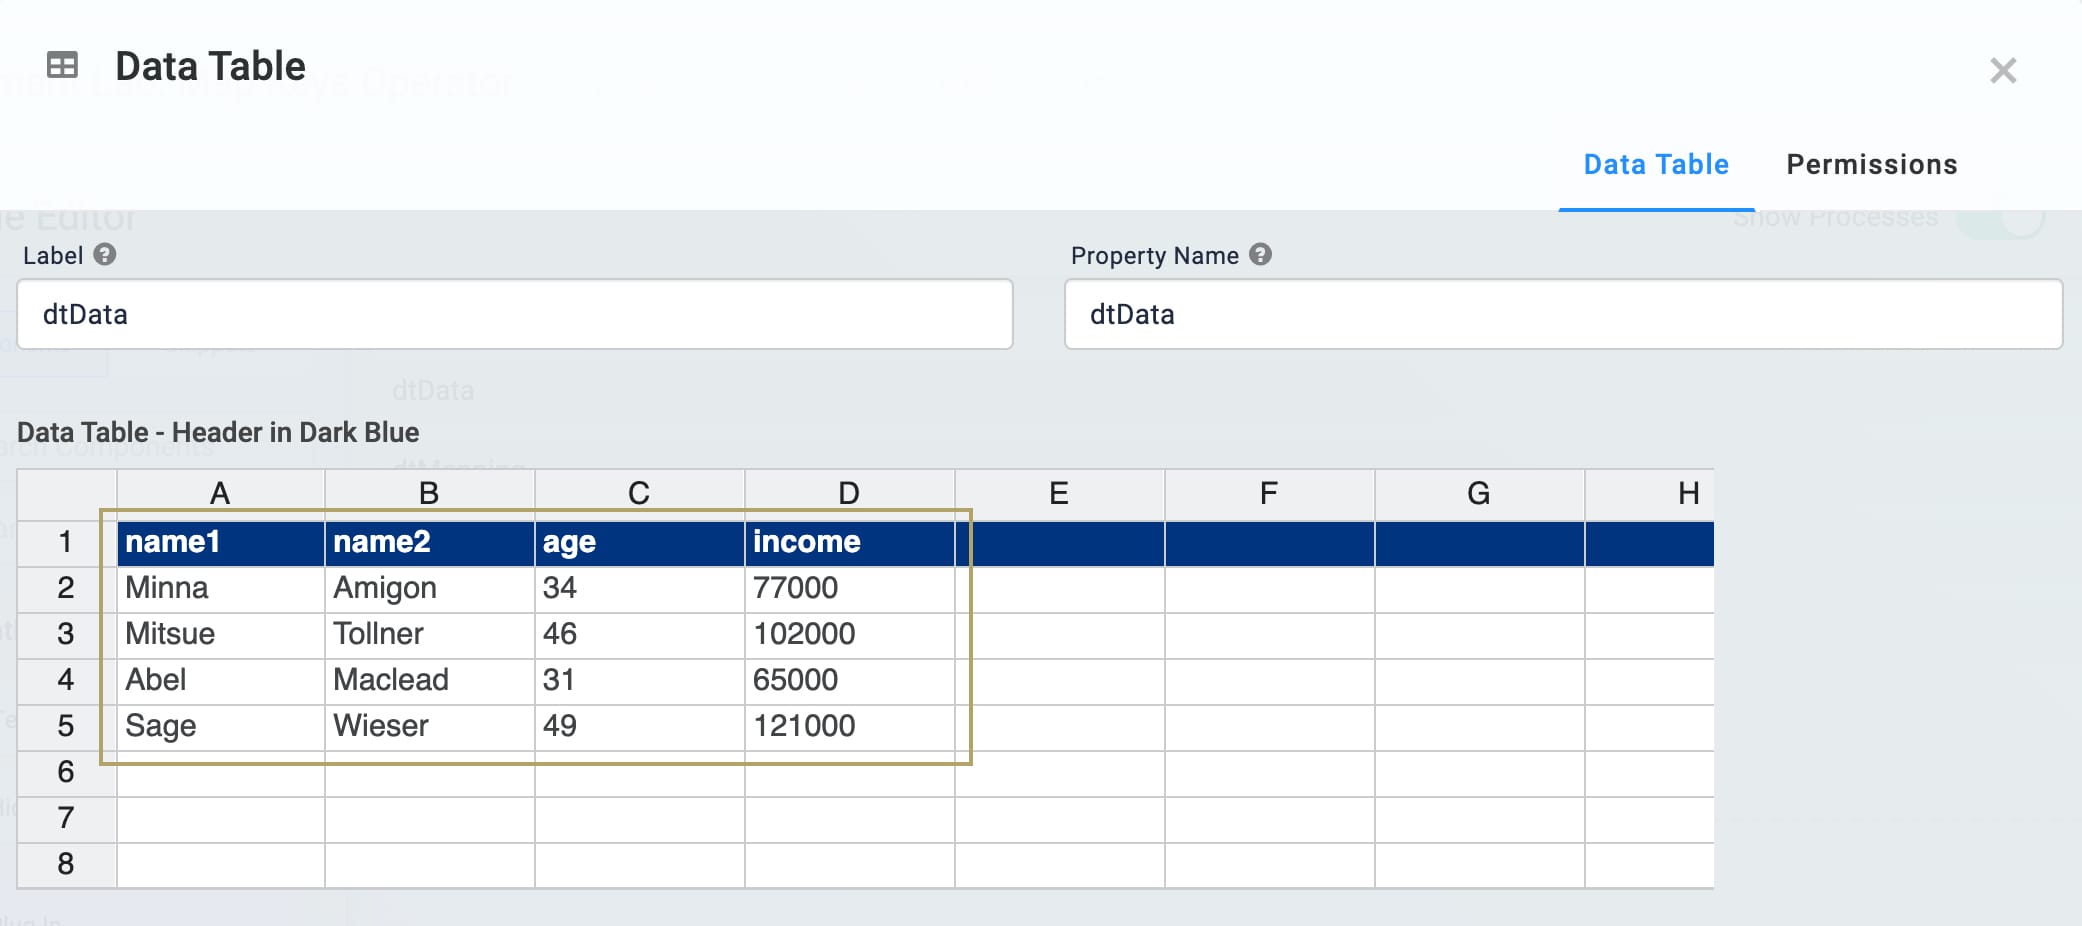
Click Save.
Configure the Second Data Table Component
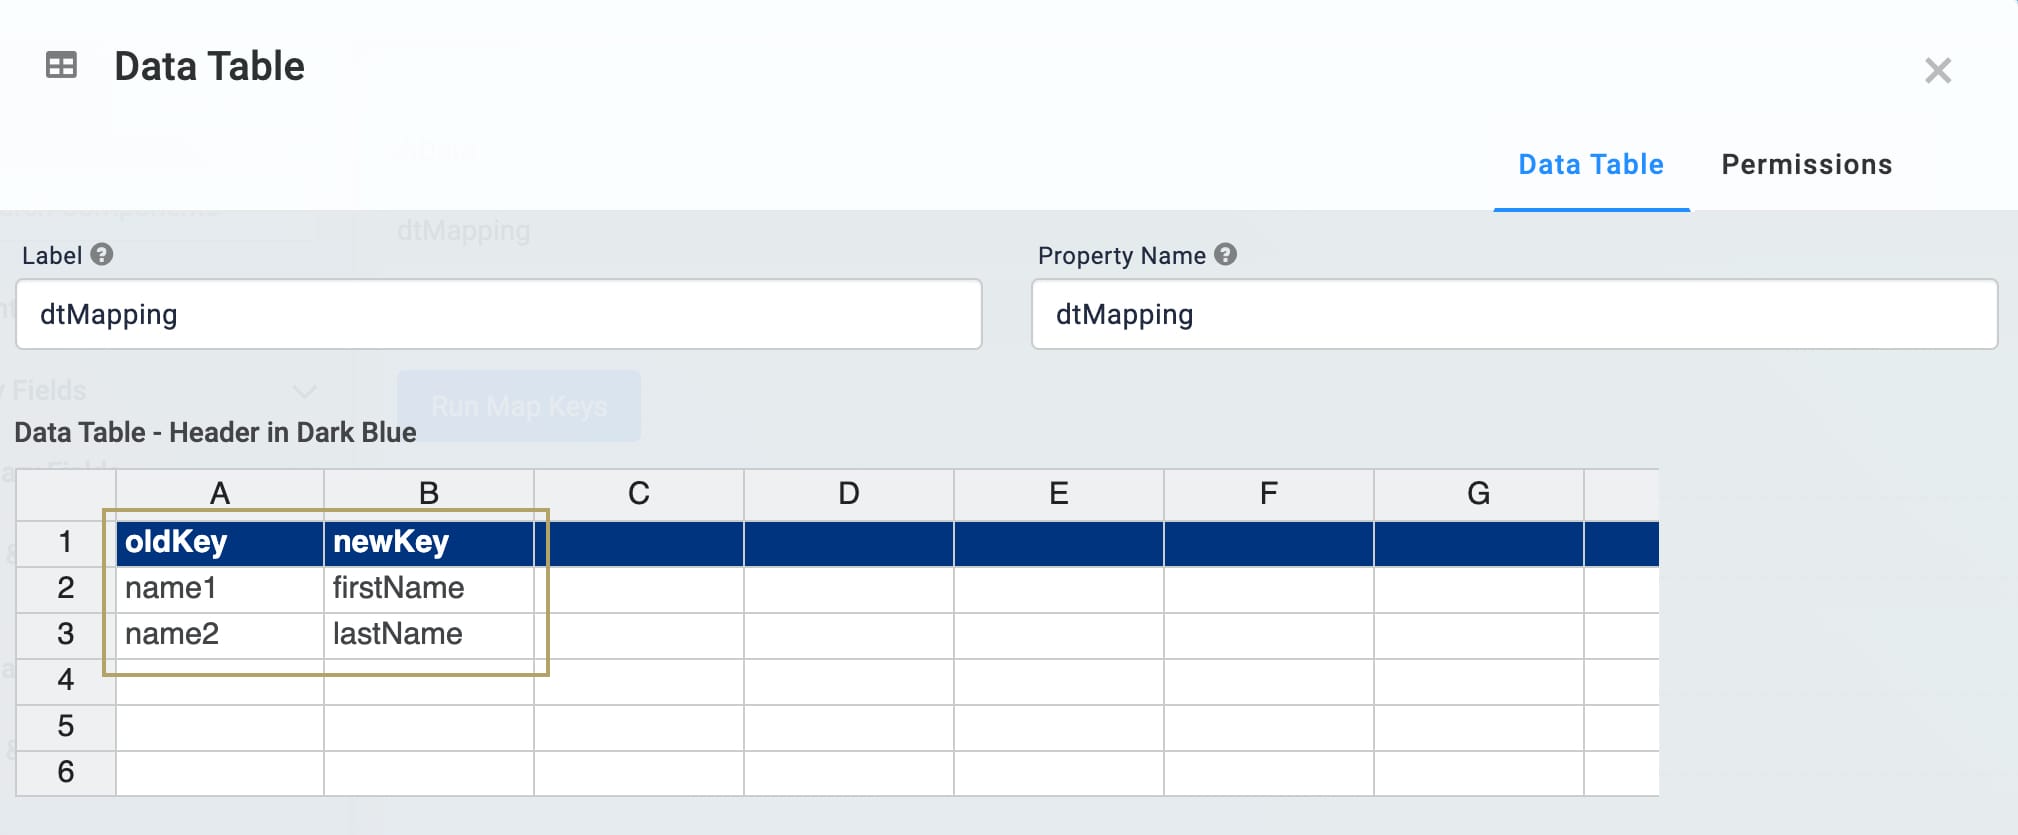
This second Data Table is an essential part of using the Map Keys operator. Here, you'll create a 2-column table that acts as a mapping table. In the first column, oldKey, you'll list all the keys you want the Map Keys operator to change. In the second column, newKey, you'll list what you want the new key names to be. Then, you'll reference the mapping table's column headers in the Map Keys operator's Info window.
Let's update the "name1" key to be "firstName" and the "name2" key to be "lastName".
Drag and drop a Data Table component onto your canvas, placing it below the first Data Table.
Enter dtMapping in the Label and Property Name fields.
In the data table, enter the following:
oldKey
newKey
name1
firstName
name2
lastName
You don't need to include quotation marks around your key names.
You can list the keys you want to change in any order in the oldKey column. As long as the keys exist in the data source, the Map Keys operator will know to update them.
Click Save.
Configure the Hidden Component
Here, you'll create a Hidden component to store your final table. You'll reference it in your Data Workflow, so let's set it up now.
Drag and drop a Hidden component onto your canvas, placing it below the Data Tables.
Enter updatedTable in the Canvas Label Text and Property ID fields.
Click Save.
Configure the Data Workflow Component
Next, let's create the Data Workflow. With the help of your mapping table, the Map Keys operator in the Data Workflow will update the "name1" and "name2" keys.
Drag and drop a Data Workflow component onto your canvas, placing it below the Data Tables.
Enter dwfMapKeys in the Canvas Label Text and Property Name fields.
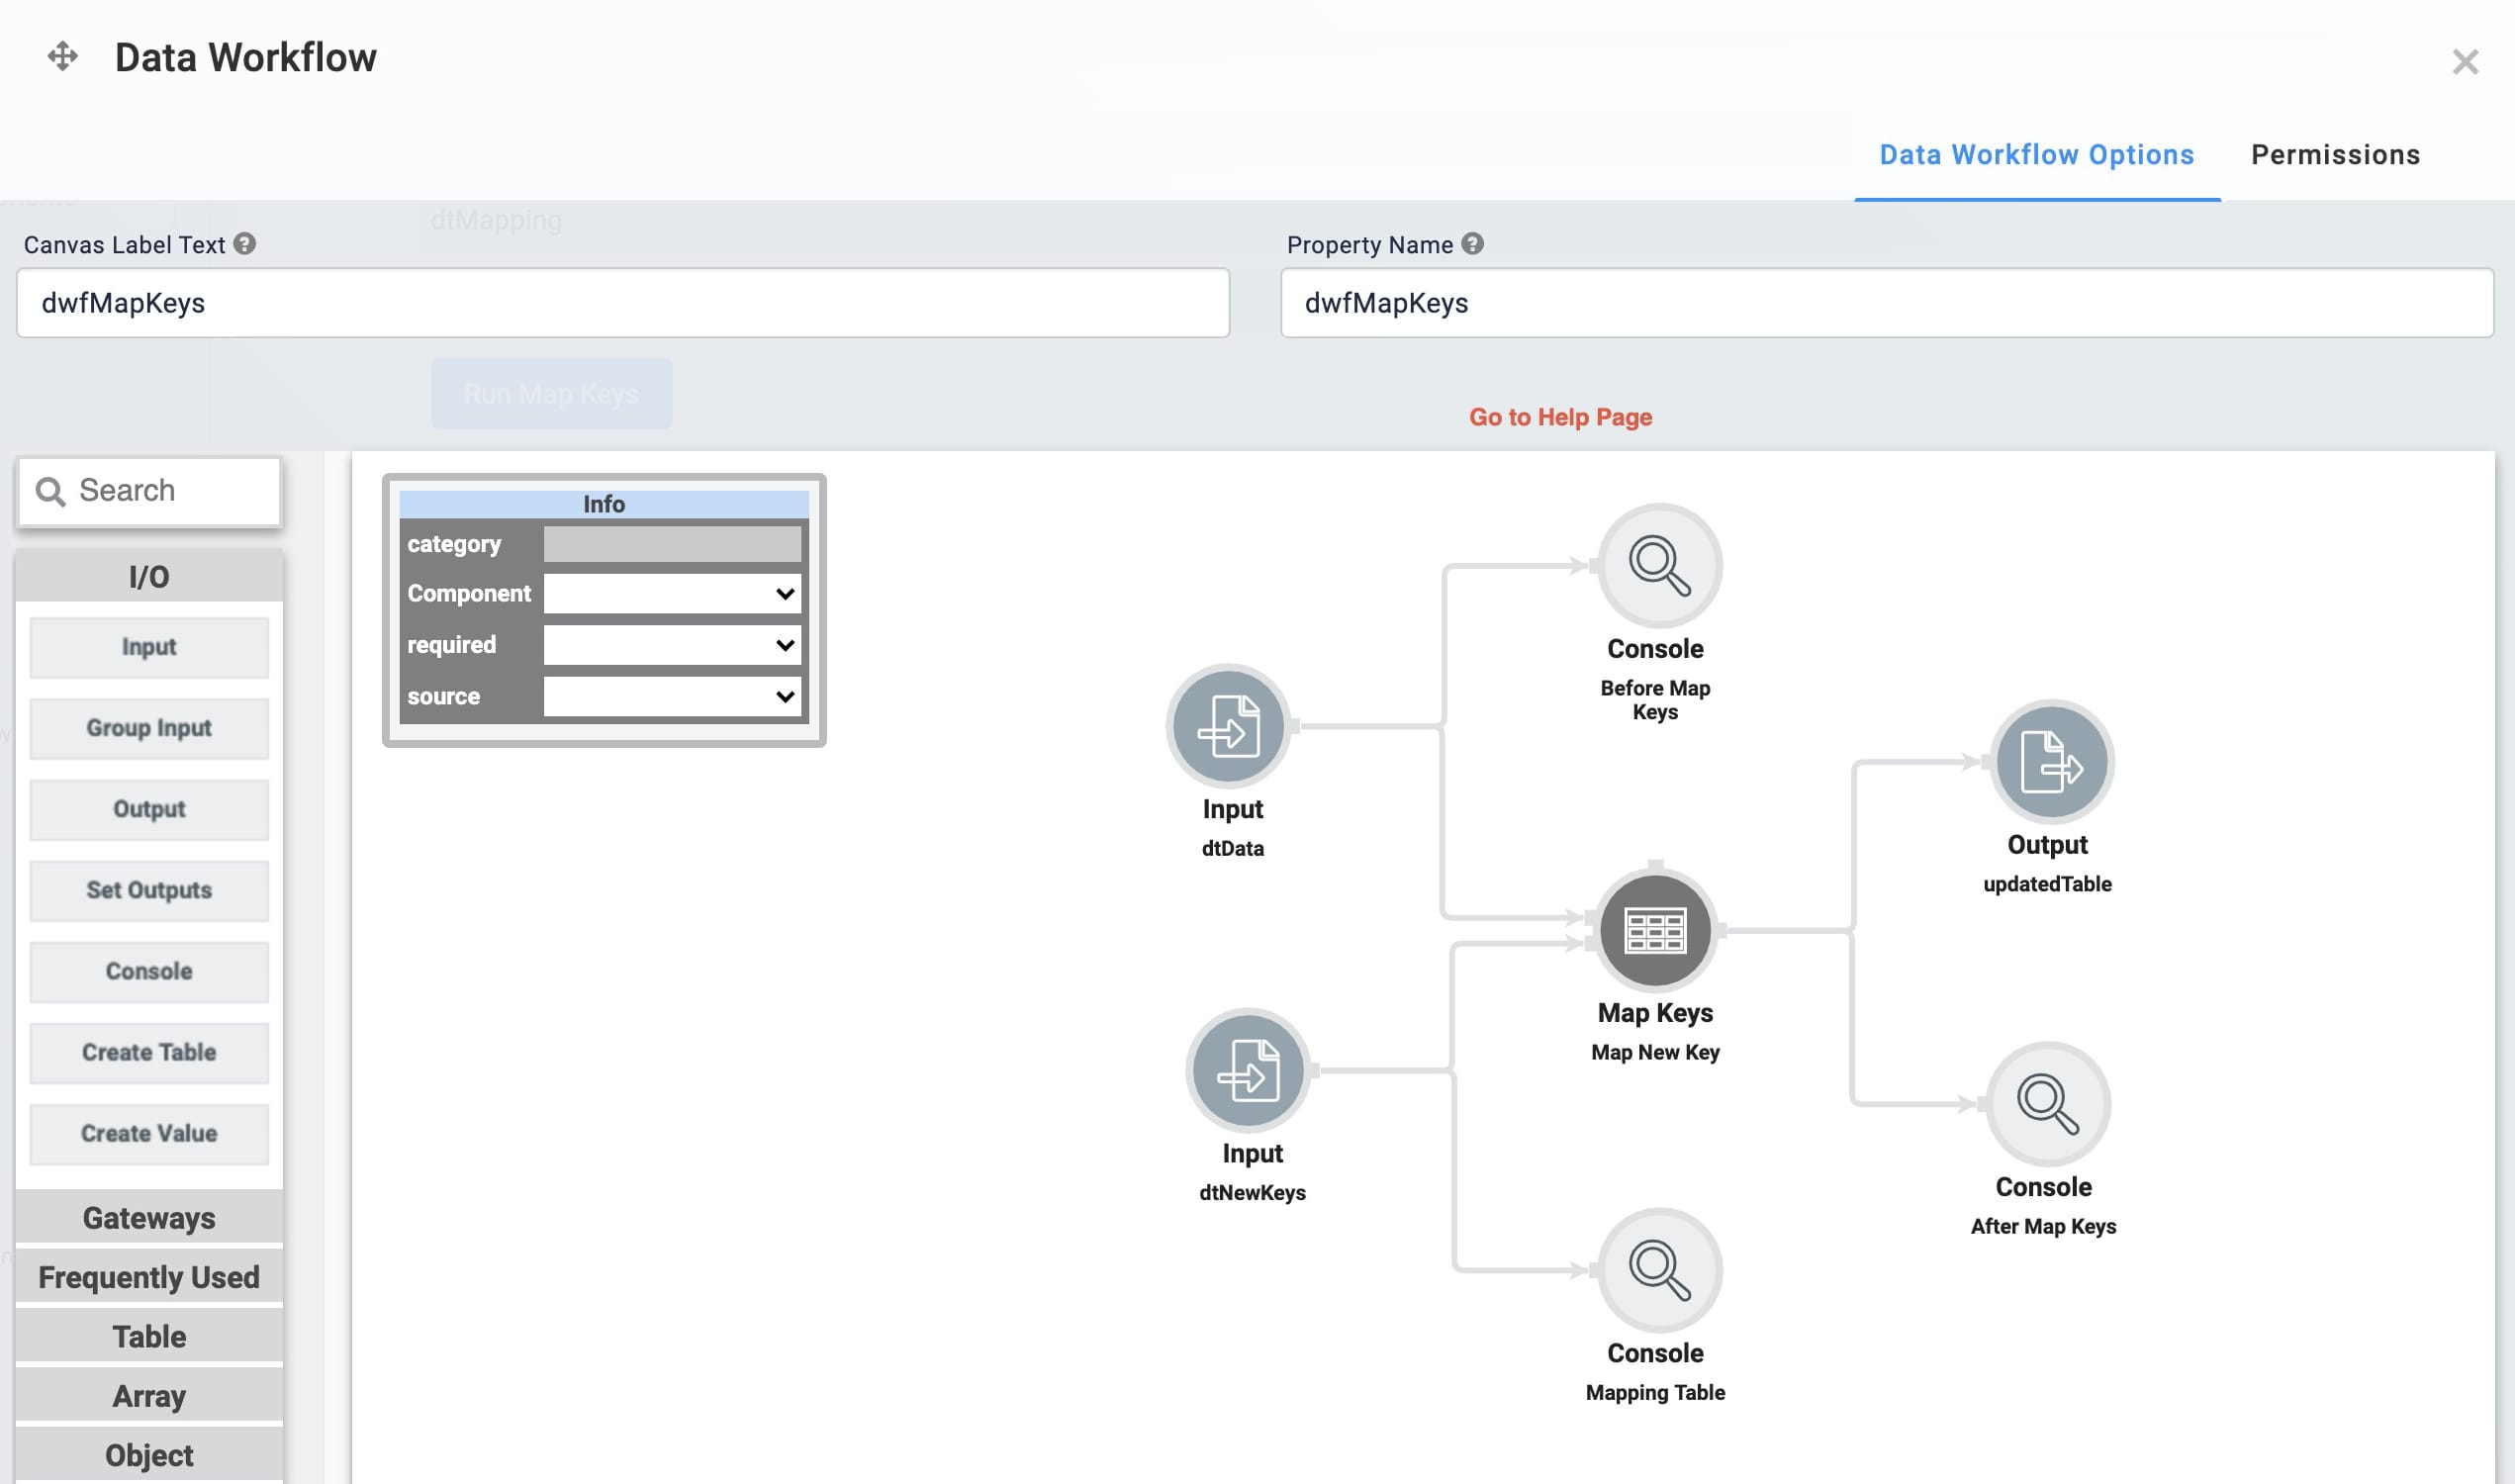
Configure the Input Operators
Drag and drop 2 Input operators onto your Data Workflow canvas.
Configure the first Input operator's Info window as follows:
Setting
Value
Category
Input
Component
dtData
Required
Yes
Source
Default
Configure the second Input operator's Info window as follows:
Setting
Value
Category
Input
Component
dtMapping
Required
Yes
Source
Default
Configure the Console Operators
Next, let's add a pair of Console operators. These will help you compare the before and after of the Data Workflow. One will show the data before using Map Keys. The other will serve as a reminder of how you set up your mapping table.
Drag and drop 2 Console operators onto your Data Workflow canvas.
Configure the first Console operator's Info window as follows:
Setting
Value
Category
Console
Label
Mapping Table
Connect the output port (right) of the dtMapping Input operator to the input port (left) of the Mapping Table Console operator.
Configure the second Console operator's Info window as follows:
Setting
Value
Category
Console
Label
Before Map Keys
Connect the output port (right) of the dtData Input operator to the input port (left) of the Before Map Keys Console operator.
Configure the Map Keys Operator
Now you're ready to set up the Map Keys operator. Notice the values you'll enter in the Info window's Source Column and Target Column fields. They match the column headers in the dtMapping Data Table, which is your mapping table.
The Map Keys operator has 2 input ports. Always connect the data source to the upper input port and the mapping table to the lower input port.
Drag and drop a Map Keys operator onto your Data Workflow canvas.
Complete the operator's Info window as follows:
Setting
Value
Category
Map Keys
Label
Map New Key
Source Column
oldKey
Target Column
newKey
Connect the output port (right) of the dtData Input operator to the upper input port (left) of the Map Keys operator.
Connect the output port (right) of the dtMapping Input operator to the lower input port (left) of the Map Keys operator.
Configure the Third Console Operator
Next, let's add another Console operator. This one will show the data after using Map Keys, helping you compare the before and after of your Data Workflow.
Drag and drop a Console operator onto your Data Workflow canvas.
Configure the operator's Info window as follows:
Setting
Value
Category
Console
Label
After Map Keys
Connect the output port (right) of the Map Keys operator to the input port (left) of the After Map Keys Console operator.
Configure the Output Operator
For the last step of the Data Workflow, let's output your updated table to the Hidden component you created earlier.
Drag and drop an Output operator onto your Data Workflow canvas.
Configure the operator's Info window as follows:
Setting
Value
Category
Output
Component
updatedTable
Action
value
Connect the output port (right) of the Map Keys operator to the input port (left) of the Output operator.
Click Save.
Configure the Button Component
Finally, let's create a button you can click in Express View to trigger your Data Workflow.
Drag and drop a Button component onto your canvas, placing it below the Data Workflow.
Enter btnRunDWF in the Property ID field.
Enter Run Map Keys in the Label Text field.
Select Event as the Button Action Type.
Enter dwfMapKeys in the Trigger on Click field.
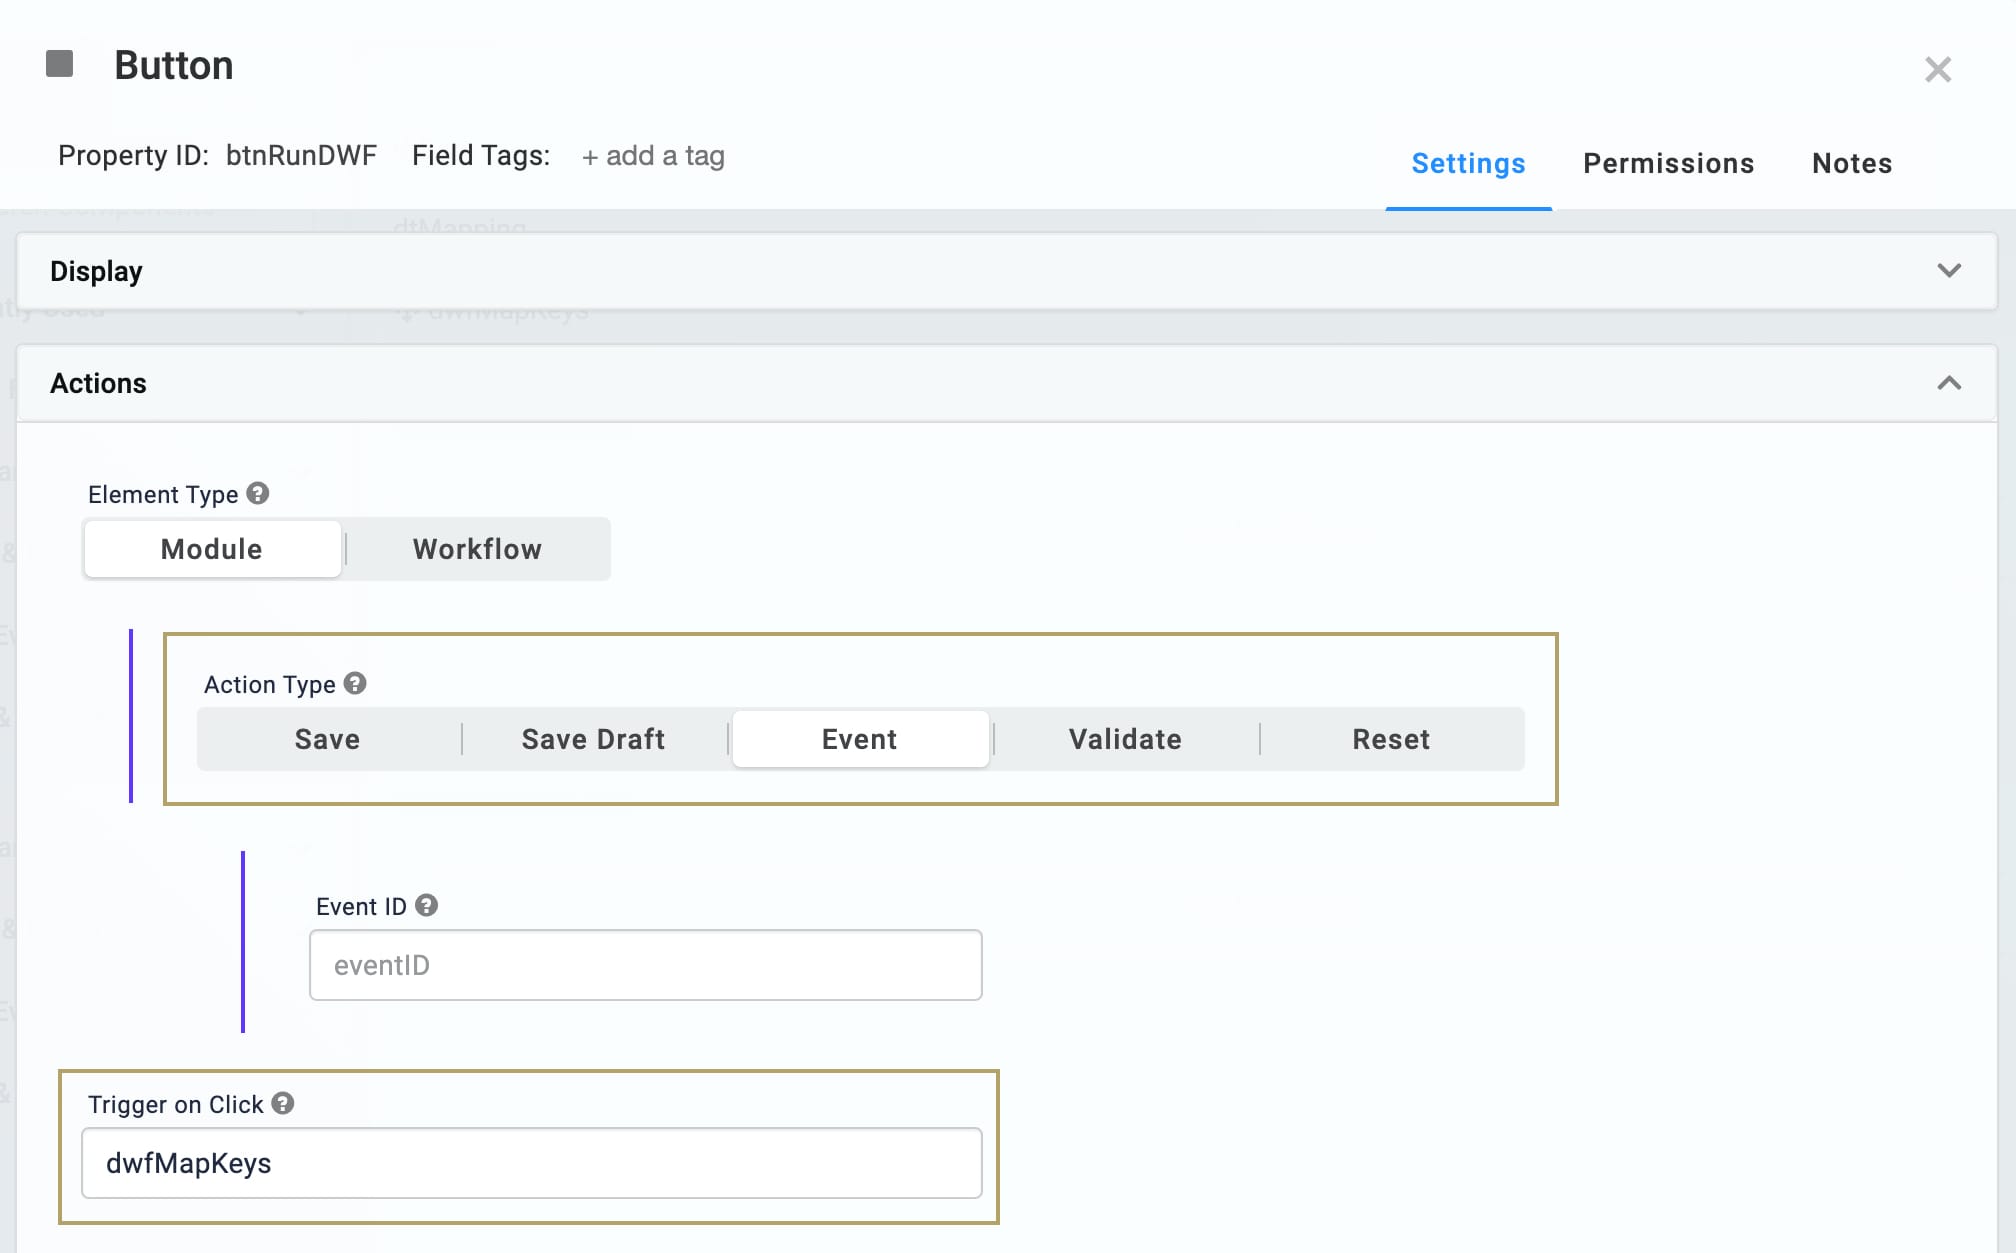
Click Save.
Save your module.
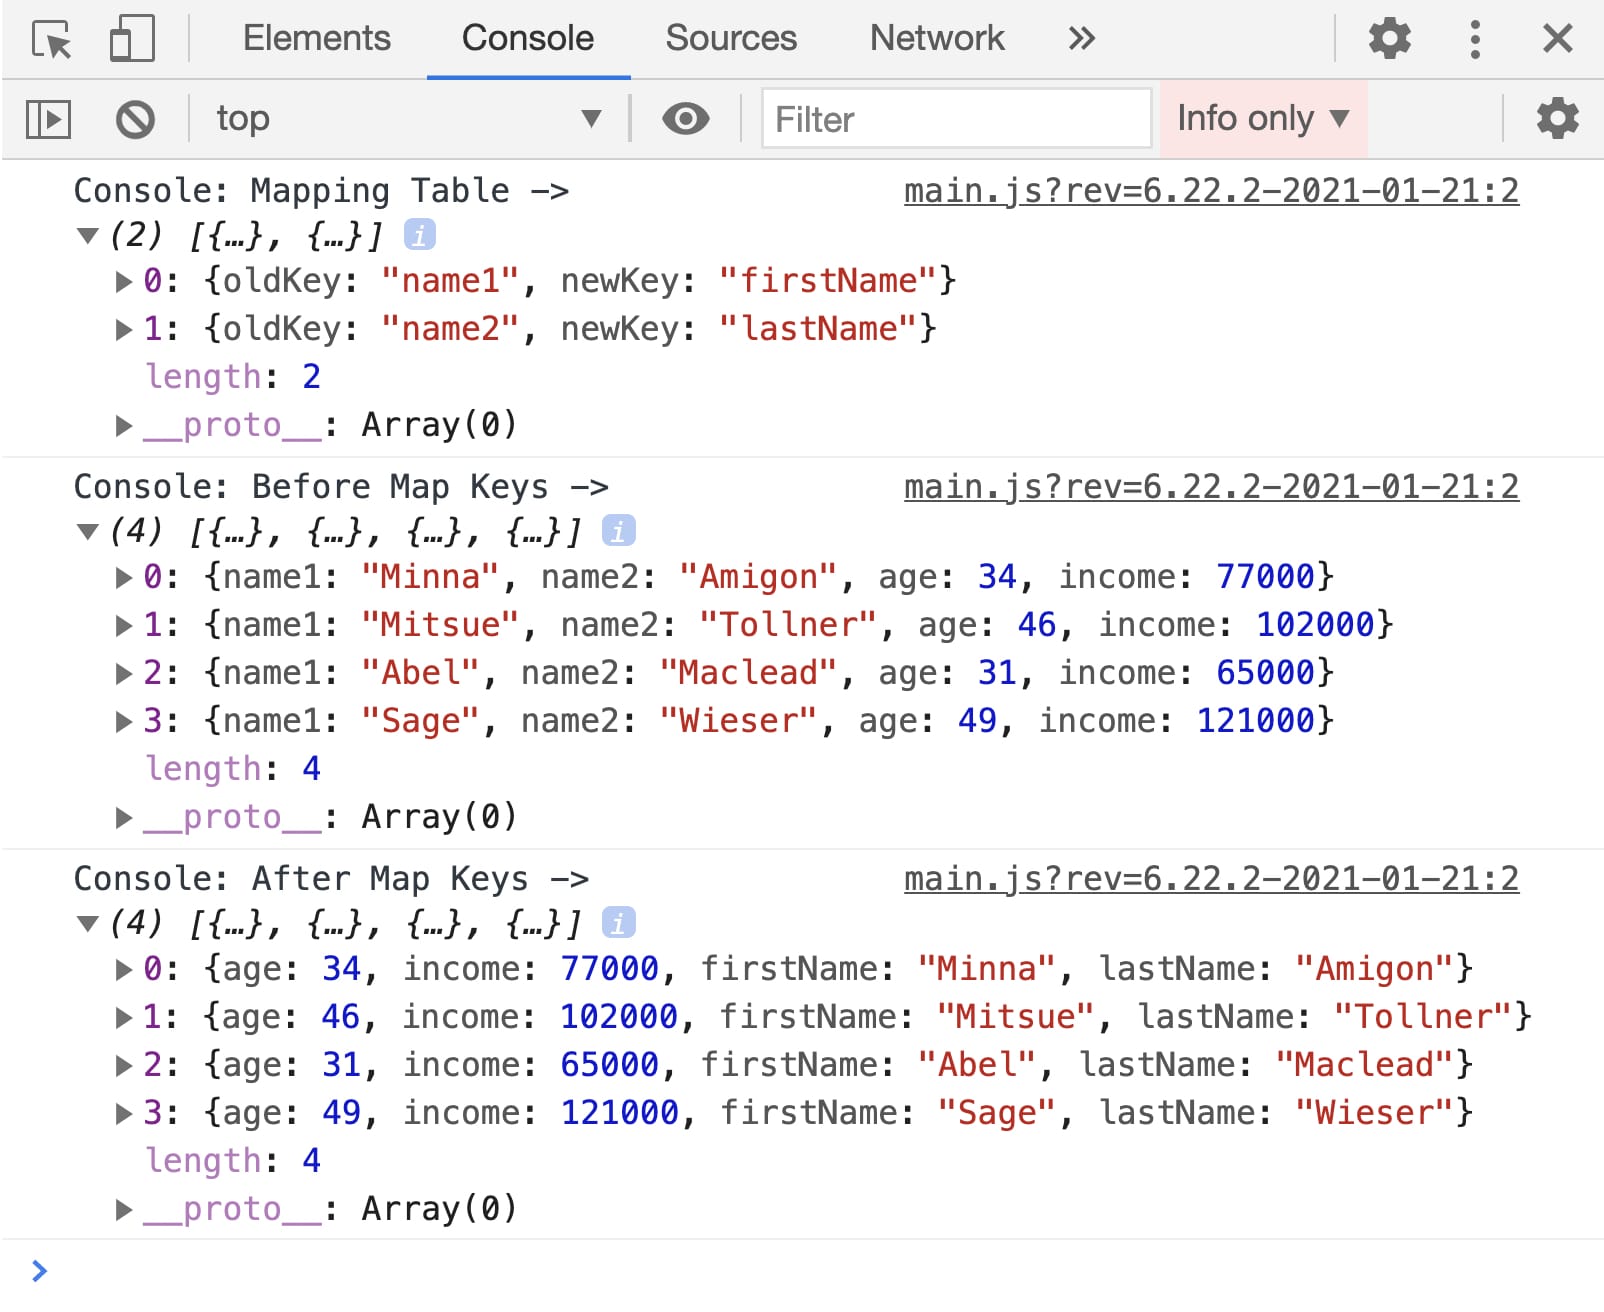
Now you're ready to test out your Map Keys operator. Preview your module in Express View and open the DevTools Console. Click the Run Map Keys button and check out what appears in the Console. It should look something like this:
Changing a Map Keys Operator's Settings
You can revisit and make changes to this operator.
Click the dwfValueData Workflow component.
A 5-button toolbar displays above the component on hover-over.
Click the
.png) (Settings) button to open the Data Workflow canvas.
(Settings) button to open the Data Workflow canvas.Click the operator to open its Info Window.
Make changes to the operator's settings as needed.
Click Save Component.
Save your module.
Copying a Map Keys Operator
You can make a copy of your operator using familiar keyboard settings. You can copy and paste an exact copy of your operator, matching all settings.
Hover over the dwfValueData Workflow component.
A 5-button toolbar displays above the component on hover-over.
Click the
(Settings) button to open the Data Workflow canvas.Click the operator you want to duplicate.
On your keyboard, press Command + C (Mac OS) or Ctrl + C (Windows/Linux) to copy the operator.
You can copy more than one operator at a time. Hold Command or Ctrl on your keyboard and click all the operators you want to copy. Follow the rest of the steps as usual.
On your keyboard, press Command + V (Mac OS) or Ctrl + V (Windows/Linux) to paste the copied operator(s) to the Data Workflow canvas.
Click Save Component
Save your module.
Did you know you can copy an operator and paste it into a different Data Workflow? You'll use the same steps outlined above.
Removing a Map Keys Operator
Lastly, you can delete this operator from your Data Workflow canvas. You can also use these same steps to delete a connection between two operators.
Hover over the dwfValueData Workflow component.
A 5-button toolbar displays above the component on hover-over.
Click the
(Settings) button to open the Data Workflow canvas.Click the operator you want to delete.
On your keyboard, press Delete.
Once you delete this operator, make sure to connect your remaining operators. If your Data Workflow path doesn't end with an Output or Console operator, your Data Workflow won't work. So, once you delete an operator, make sure to update any remaining paths to end at an Output or Console operator.
Click Save Component.
Save your module.
Lab
You can view the complete Map Keys use case here: https://training.unqork.io/#/form/60109769209ec1025c95bcef/edit.