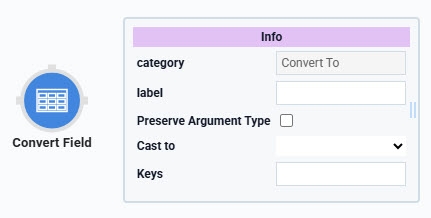
The Convert Field operator lets you change the data type of values stored in specific fields of a data set. You can convert these values into numbers, integers, or strings.
The operator only works on fields in objects. If you pass an entire object, the returned result is
[object, object].
Before understanding the operator in detail, here's an overview of these three data types:
Number: This data type represents numerical values, including decimals. If the original value contains non-numeric characters, the result displays as NaN (Not a Number). To avoid lost data, ensure your original data excludes non-numerical characters.
Integer: This data type represents numerical values, but it does not allow decimals. If the original value contains non-numeric characters, the result defaults to 0. Use integers when you need clean, whole-number results.
String: This data type represents text, but can include numbers, letters, symbols, and spaces. You'll sometimes see strings referred to as text that can be as short as a few letters or contain entire paragraphs.
The Unqork Designer Platform handles each data type differently. At times, you'll need to convert the data collected in a field from one type to another. The Convert Field operator lets you convert entire columns of a data table or fields into an array simultaneously.
You’ll find the Convert Field operator under the Table group to the left of the Data Workflow canvas.
Similar Data Workflow Operators
The Convert Field operator is similar to the Convert Value operator.
Convert Value operator: Converts a single value passed to it. This operator is best used when you're only working with a single key/value pair of data.
About the Info Window
Here's a breakdown of each setting in the Info window:
Info | |
|---|---|
Category | Grayed out and non-adjustable setting indicating the operation type. |
Label | Sets the label for your operator, displaying below the operator on your Data Workflow canvas. This field is optional, but set a label if you use more than one of the same operator type. A label helps you identify your operators without opening any Info windows. |
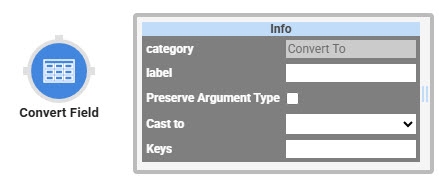
Preserve Argument Type | When selected, this setting ensures the argument data type is respected when the operator executes. |
Cast To | The final data type you want after the operator performs its conversion. Here, you'll find a drop-down with the following options:
|
Keys | Enter the key for any data you want the operator to convert. When working with a data table, the key is the header name of the column you want converted. You can convert more than one key using a single operator. Separate each new key in this field by a comma. You can also set your keys using an argument. Connect an Input operator to the operator's argument port. Then, enter |
Adding a Convert Field Operator
In this example, you'll configure a Data Table component to store the account information as a string data type. Then, you'll configure a Data Workflow that converts your Account Value column into a number data type.
These instructions assume you have a new module open and saved with a title.
Configure the Data Table Component
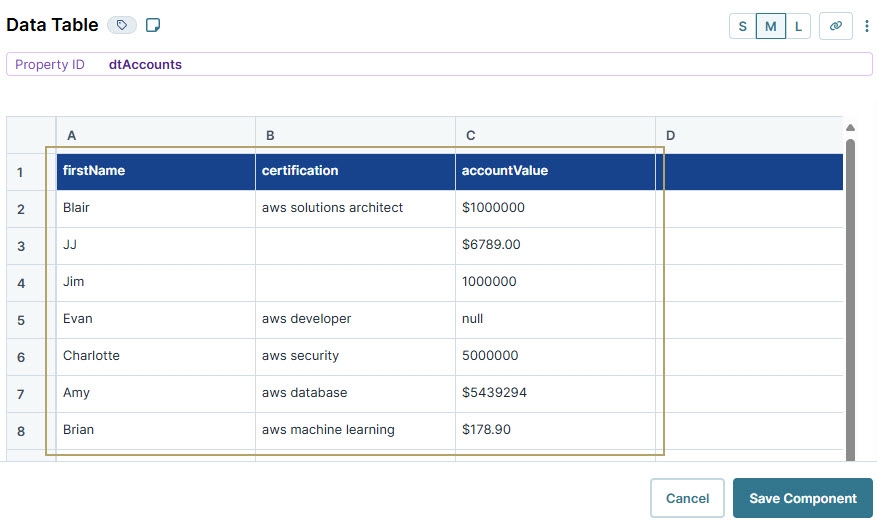
First, you'll configure a Data Table component to store your account data and input it later into a Data Workflow component.
In the Module Builder, drag and drop a Data Table component onto your canvas.
In the Property ID field, enter
dtAccounts.In the data table, enter the following:
#
A
B
C
1
firstName
certification
accountValue
2
Blair
aws solutions architect
$1000000
3
JJ
$6789.00
4
Jim
1000000
5
Evan
aws developer
null
6
Charlotte
aws security
5000000
7
Amy
aws database
$5439294
8
Brian
aws machine learning
$178.90
9
Rupert
null
195.78
10
Emily
aws networking specialty
nine hundred thousand
Click Save Component.
Configure the Data Workflow Component
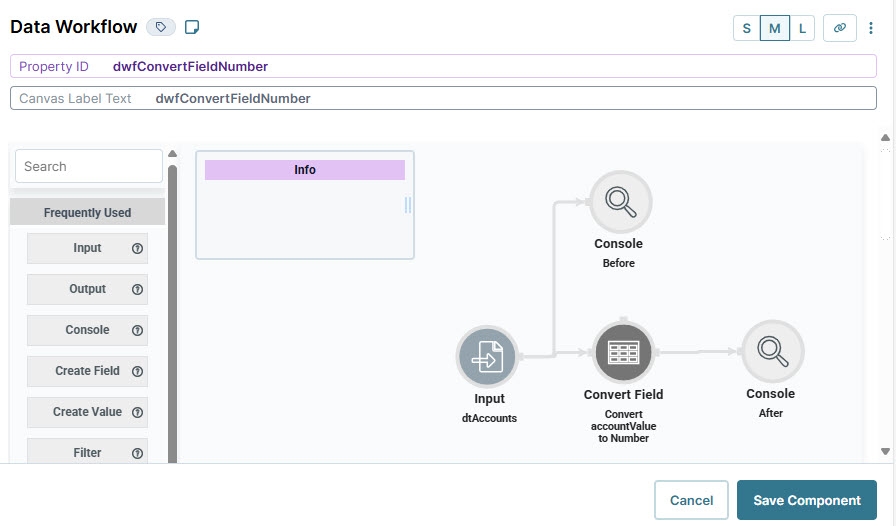
Next, configure a Data Workflow component to convert the accountValue column into a number data type. First, use an Input operator to bring in the data. Then, use a Convert Field operator with the Cast To field set to Number. Later you'll include two Console operators so you can view what your data looks like before and after the conversion.
Drag and drop a Data Workflow onto your canvas, placing it below the Data Table component.
In the Property ID and Canvas Label Text fields, enter
dwfConvertFieldNumber.
Configure the Input Operator
Drag and drop an Input operator onto your Data Workflow canvas.
Configure the operator's Info window as follows:
Info
Category
Input
Component
dtAccounts
Required
Yes
Source
Default
Configure the First Console Operator
Drag and drop a Console operator onto your Data Workflow canvas.
Configure the operator's Info window as follows:
Info
Category
Console
Label
Before
Connect the output port (right) of the dtAccounts Input operator to the input port (left) of the Before Console operator.
Configure the Convert Field Operator
Drag and drop a Convert Field operator onto your Data Workflow canvas.
Configure the operator's Info window as follows:
Info
Category
Convert To
Label
Convert accountValue to Number
Cast To
Number
Keys
accountValue
Connect the output port (right) of the dtAccounts Input operator to the input port (left) of the Convert accountValue to Number Convert Field operator.
Configure the Second Console Operator
Drag and drop another Console operator onto your Data Workflow canvas.
Configure the operator's Info window as follows:
Info
Category
Console
Label
After
Connect the output port (right) of the Convert accountValue to Number Convert Field operator to the input port (left) of the After Console operator.
Click Save Component.
Configure the Button Component
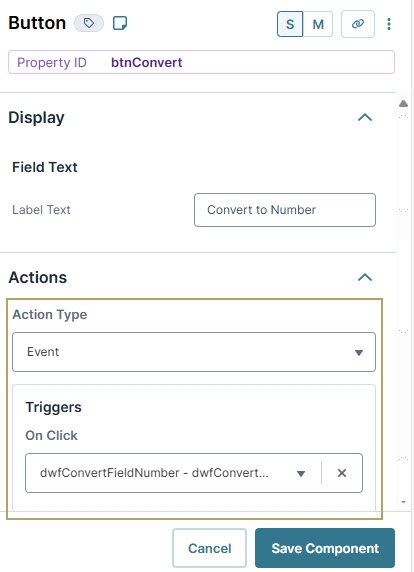
Lastly, add a Button component to trigger the Data Workflow and convert the data type of accountValue column.
Drag and drop a Button component onto your canvas, placing it between your Data Table and Data Workflow components.
In the Property ID field, enter
btnConvert.In the Label Text field, enter
Convert to Number.From the Action Type drop-down, select Event.
From the On Click drop-down, select dwfConvertFieldNumber.
Click Save Component.
Save your module.
Here's how the completed example looks in the Module Builder:

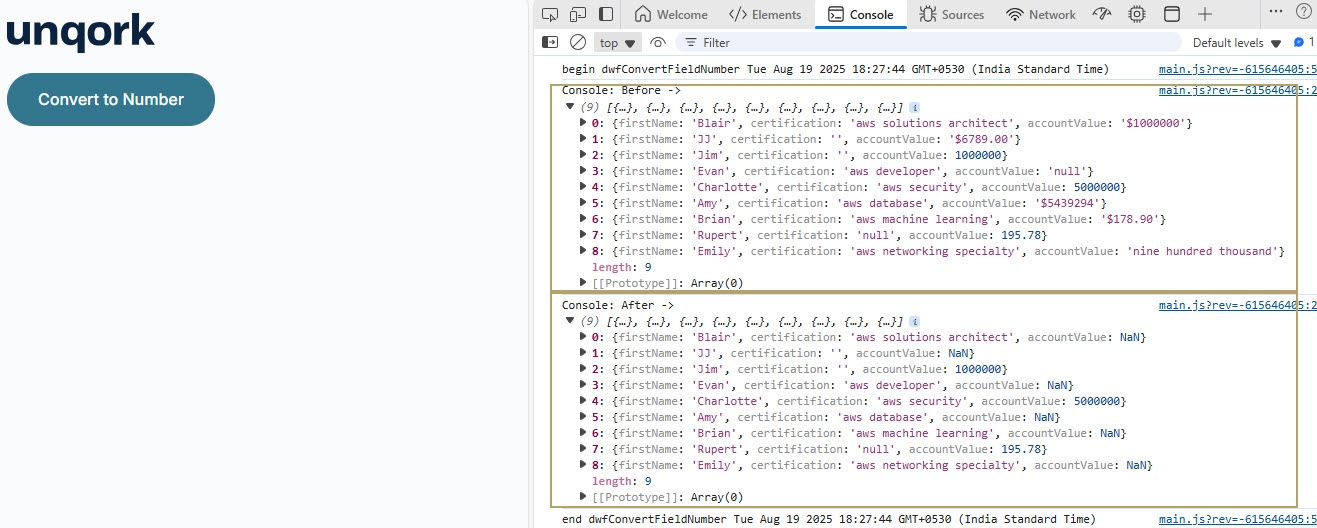
Preview your module in Express View and open the DevTools Console. Click the button and run the Angular command. Now, expand the data in your Before Console operator, and you'll see the data as you entered it into your Data Table component. Expand the data in your After Console operator, and you'll see that your account values have been converted to numbers. Remember, NaN means Not a Number, and you'll see this anywhere your original data included non-numeric characters.
The Convert Field operator lets you change the data type of values stored in specific fields of a data set. You can convert these values into numbers, integers, or strings.
The operator only works on fields in objects. If you pass an entire object, the returned result is [object, object].
Before understanding the operator in detail, here's an overview of these three data types:
Number: This data type represents numerical values, including decimals. If the original value contains non-numeric characters, the result displays as NaN (Not a Number). To avoid lost data, ensure your original data excludes non-numerical characters.
Integer: This data type represents numerical values, but it does not allow decimals. If the original value contains non-numeric characters, the result defaults to 0. Use integers when you need clean, whole-number results.
String: This data type represents text, but can include numbers, letters, symbols, and spaces. You'll sometimes see strings referred to as text that can be as short as a few letters or contain entire paragraphs.
The Unqork Designer Platform handles each data type differently. At times, you'll need to convert the data collected in a field from one type to another. The Convert Field operator lets you convert entire columns of a data table or fields into an array simultaneously.
You’ll find the Convert Field operator under the Table group to the left of the Data Workflow canvas.
Similar Data Workflow Operators
The Convert Field operator is similar to the Convert Value operator.
Convert Value operator: Converts a single value passed to it. This operator is best used when you're only working with a single key/value pair of data.
About the Info Window
Here's a breakdown of each setting in the Info window:
Setting | Description |
|---|---|
Category | Grayed out and non-adjustable setting indicating the operation type. |
Label | Sets the label for your operator, displaying below the operator on your Data Workflow canvas. This field is optional, but set a label if you use more than one of the same operator type. A label helps you identify your operators without opening any Info windows. |
Preserve Argument Type | When selected, this setting ensures the argument data type is respected when the operator executes. |
Cast To | The final data type you want after the operator performs its conversion. Here, you'll find a drop-down with the following options:
|
Keys | Enter the key for any data you want the operator to convert. When working with a data table, the key is the header name of the column you want converted. You can convert more than one key using a single operator. Separate each new key in this field by a comma. You can also set your keys using an argument. Connect an Input operator to the operator's argument port. Then, enter _arg in this field. Remember, the value passed using an argument must match a key in your data set. |
Adding a Convert Field Operator
In this example, you'll configure a Data Table component to store the account information as a string data type. Then, you'll configure a Data Workflow that converts your Account Value column into a number data type.
These instructions assume you have a new module open and saved with a title.
Configure the Data Table Component
In the Module Builder, drag and drop a Data Table component onto your canvas.
In the Property ID and Canvas Label Text fields, enter
dtAccounts.To the left of the component's configuration window, click Data.
In the data table, enter the following:
A
B
C
firstName
certification
accountValue
Blair
aws solutions architect
$1000000
JJ
$6789.00
Jim
1000000
Evan
aws developer
null
Charlotte
aws security
5000000
Amy
aws database
$5439294
Brian
aws machine learning
$178.90
Rupert
null
195.78
Emily
aws networking specialty
nine hundred thousand
Click Save & Close.
Configure the Data Workflow Component
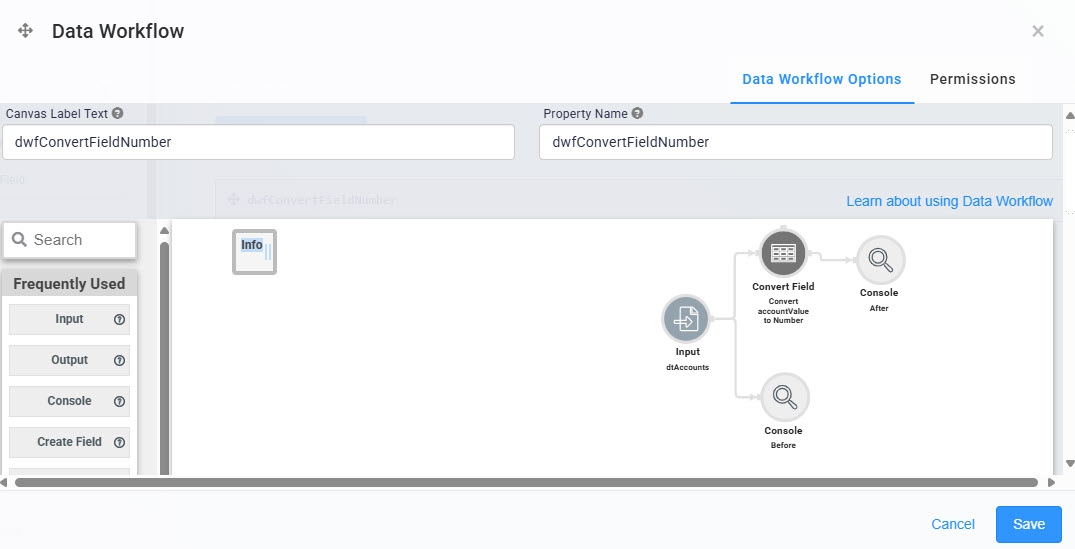
Next, configure a Data Workflow component to convert the accountValue column into a number data type. First, use an Input operator to bring in the data. Then, use a Convert Field operator with the Cast To field set to Number. Later, you'll include two Console operators so you can view what your data looks like before and after the conversion.
Drag and drop a Data Workflow onto your canvas, placing it below the Data Table component.
In the Canvas Label Text and Property ID fields, enter
dwfConvertFieldNumber.
Configure the Input Operator
Drag and drop an Input operator onto your Data Workflow canvas.
Configure the operator's Info window as follows:
Setting
Value
Category
Input
Component
dtAccounts
Required
Yes
Source
Default
Configure the First Console Operator
Drag and drop a Console operator onto your Data Workflow canvas.
Configure the operator's Info window as follows:
Setting
Value
Category
Console
Label
Before
Connect the output port (right) of the dtAccounts Input operator to the input port (left) of the Before Console operator.
Configure the Convert Field Operator
Drag and drop a Convert Field operator onto your Data Workflow canvas.
Configure the operator's Info window as follows:
Setting
Value
Category
Convert To
Label
Convert accountValue to Number
Cast To
Number
Keys
accountValue
Connect the output port (right) of the dtAccounts Input operator to the input port (left) of the Convert accountValue to Number Convert Field operator.
Configure the Second Console Operator
Drag and drop another Console operator onto your Data Workflow canvas.
Configure the operator's Info window as follows:
Setting
Value
Category
Console
Label
After
Connect the output port (right) of the Convert accountValue to Number Convert Field operator to the input port (left) of the After Console operator.
Click Save.
Here's how the completed Data Workflow looks:
Configure the Button Component
Lastly, add a Button component to trigger the Data Workflow and convert the data type of accountValue column.
Drag and drop a Button component onto your canvas, placing it between your Data Table and Data Workflow components.
In the Property ID field, enter
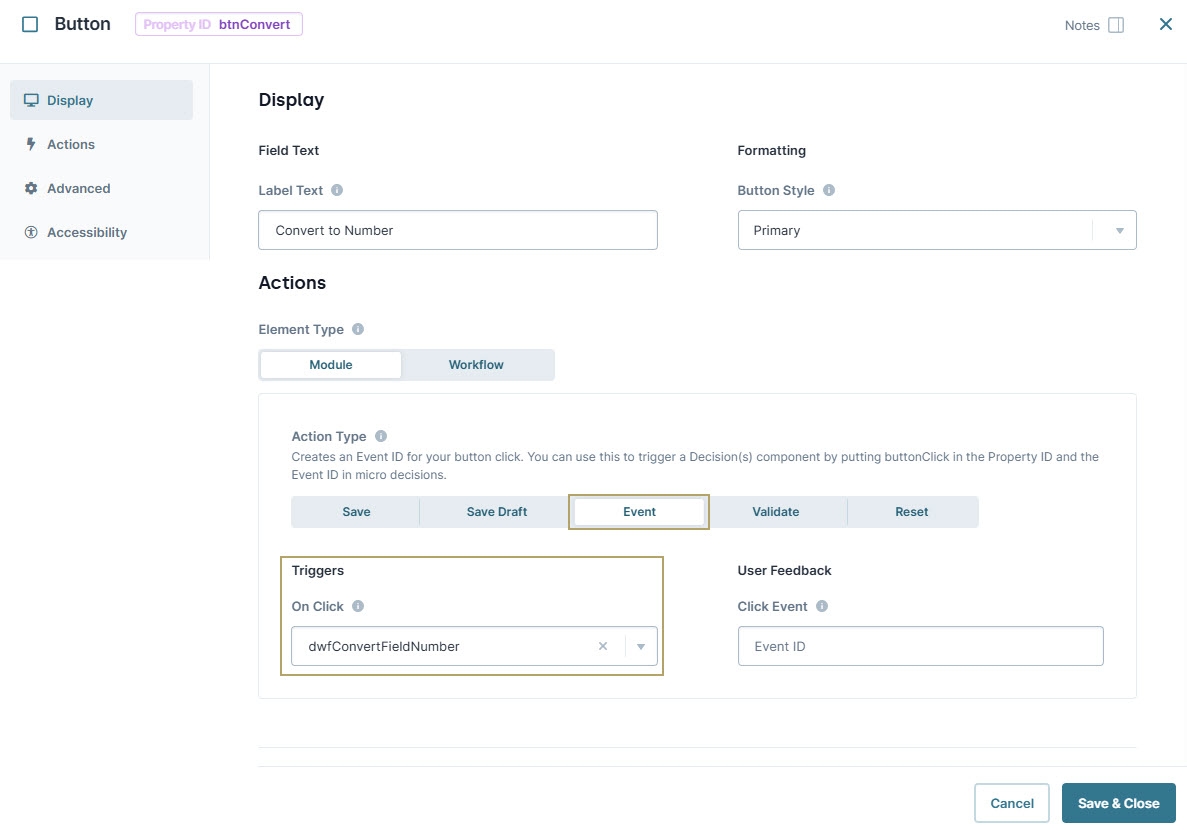
btnConvert.In the Label Text field, enter
Convert to Number.To the left of the component's configuration window, click Actions.
Set the Action Type as Event.
From the On Click drop-down, select dwfConvertFieldNumber.
Click Save & Close.
Save your module.
Below is the completed configuration in the Module Builder:

Preview your module in Express View and open the DevTools Console. Click the button and run the Angular command. Now, expand the data in your Before Console operator, and you'll see the data as you entered it into your Data Table component. Expand the data in your After Console operator, and you'll see that your account values have been converted to numbers. Remember, NaN means Not a Number, and you'll see this anywhere your original data included non-numeric characters.
.jpg)