Where the Input operator is the starting point for your Data Workflow, the Output operator is the ending point.
The Output operator contains a single input port to output data from the Data Workflow to a component in your module. The Output operator can do more than just transfer a piece of data to a new component. You can also configure the operator to trigger an action.
You'll find the Output operator under the I/O group to the left of the Data Workflow canvas.
About the Info Window
Here's a breakdown of each setting in the Info window:
Setting | Description |
|---|---|
Category | Grayed out and non-adjustable setting indicating the operation type. |
Component | Your output destination or the component where you want the output value sent. Select the component you want to reference from the drop-down menu. Your selection displays as the operator's label.
|
Action | The action you want to output in your Data Workflow. The most common action is value, which outputs the value of your data to another component in your module. You can also choose an action to perform when the Data Workflow ends. For actions like clear, reset, visible, and disable, you'll use a Create Value operator as the input. In the Create Value's Expression/Value field, add |
Manually-Defined Outputs
In some cases, you might want to reference an input that does not display in the Info window's Component drop-down. For example, the Property ID of components in imported modules.
To reference an input that does not display in the Component drop-down:
Select your Output operator.
In the operator's Info window, select any Property ID from the Component drop-down. The Property ID displays below the Output operator as a label.
On the Data Workflow canvas, double-click the Output operator's label. The field becomes editable.
Enter the Property ID to use as an output.
Click outside the field to save your manually-defined output.
Reopening the Data Workflow component might not display your manually-defined output on the canvas, though the connection still exists. Consider using the Data Workflow component's Comment field to note the output.
Adding an Output Operator
To demonstrate an Output operator, take data from a Data Table component and output it to a Hidden component.
These instructions assume you have a new module open, saved, and with a title.
Configure the Data Table Component
First, add a Data Table component to store some sample data that includes US States and their capitals.
In the Module Builder, drag and drop a Data Table component onto your canvas.
In the Property ID and Label Text fields, enter
dtStates.In the data table, enter the following:
#
A
B
1
state
capital
2
California
Sacramento
3
New York
Albany
4
Texas
Austin
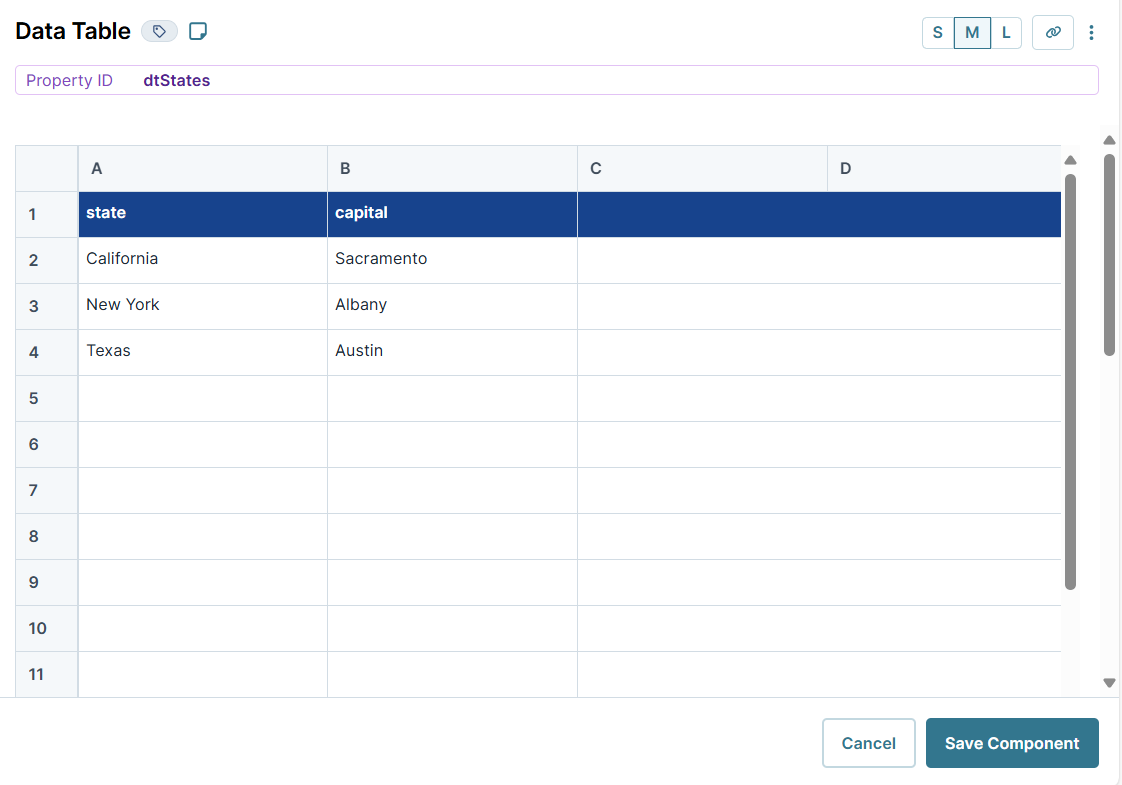
Click Save Component
Configure the Hidden Component
Next, add a Hidden component to store the output from your Data Workflow.
Drag and drop a Hidden component onto your canvas, placing it below your Data Table component.
In the Property ID and Label Text fields, enter
dwfOutput.Click Save Component.
Configure the Data Workflow Component
Lastly, configure a Data Workflow component to process the data.
Drag and drop a Data Workflow component onto your canvas, placing it between your Data Table and Hidden components.
In the Property ID and Canvas Label Text fields, enter
dwfStates.
Configure the Input Operator
Drag and drop an Input operator onto your Data Workflow canvas.
Configure the operator's Info window as follows:
Info
Category
Input
Component
dtStates
Required
Yes
Source
Default
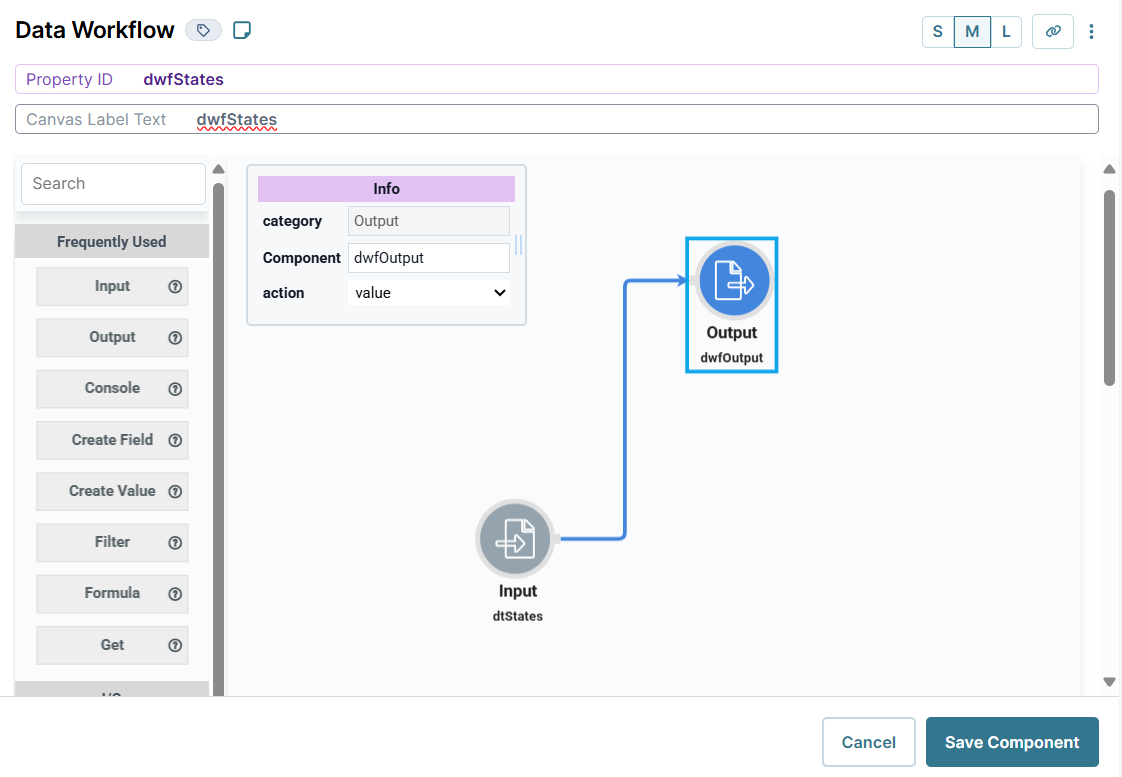
Configure the Output Operator
Drag and drop an Output operator onto your Data Workflow canvas.
Configure the operator's Info window as follows:
Info
Category
Output
Component
dwfOutput
Action
Value
Connect the output port (right) of the Input operator to the input port (left) of the Output operator.
Click Save Component.
Save your module.
Here's how the completed Data Workflow looks:
Your completed module looks like the following:

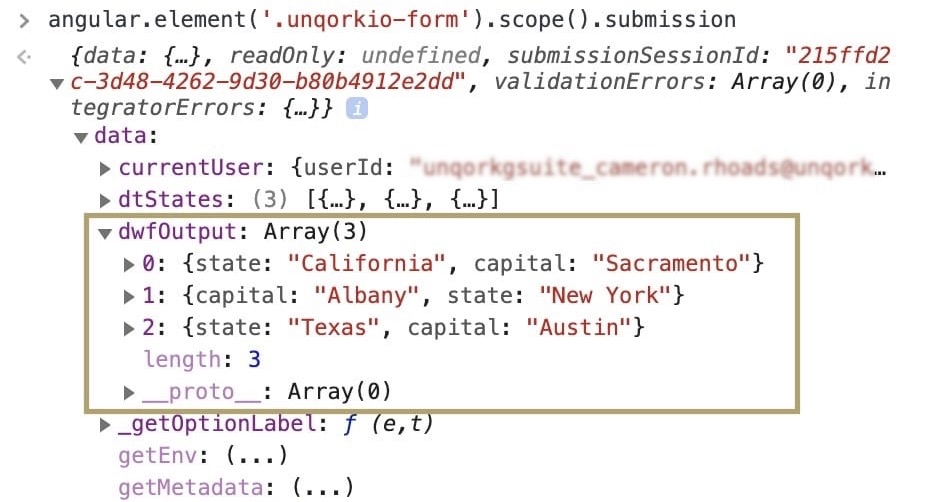
Preview your module in Express View and open the DevTools Console. Run the Angular command. Expand the ▶ data: tab and the ▶ dwfOutput to view the output data stored in the Hidden component.
Where the Input operator is the starting point for your Data Workflow, the Output operator is the ending point.
The Output operator contains a single input port to output data from the Data Workflow to a component in your module. The Output operator can do more than just transfer a piece of data to a new component. You can also configure the operator to trigger an action.
You'll find the Output operator under the I/O group to the left of the Data Workflow canvas.
About the Info Window
And here's a breakdown of each setting in the Info window:
Setting | Description |
|---|---|
Category | Grayed out and non-adjustable setting indicating the operation type. |
Component | Your output destination or the component where you want the output value sent. Select the component you want to reference from the drop-down menu. Your selection displays as the operator's label.
|
Action | The action you want to output in your Data Workflow. The most common action is value, which outputs the value of your data to another component in your module. You can also choose an action to perform when the Data Workflow ends. For actions like clear, reset, visible, and disable, you'll use a Create Value operator as the input. In the Create Value's Expression/Value field, add |
Manually-Defined Outputs
In some cases, you might want to reference an input that does not display in the Info window's Component drop-down. For example, the Property ID of components in imported modules.
To reference an input that does not display in the Component drop-down:
Select your Output operator.
In the operator's Info window, select any Property ID from the Component drop-down. The Property ID displays below the Output operator as a label.
On the Data Workflow canvas, double-click the Output operator's label. The field becomes editable.
Enter the Property ID to use as an output.
Click outside the field to save your manually-defined output.
Reopening the Data Workflow component might not display your manually-defined output on the canvas, though the connection still exists. Consider using the Data Workflow component's Comment field to note the output.
Adding an Output Operator
To demonstrate an Output operator, take data from a Data Table component and output it to a Hidden component.
These instructions assume you have a new module open, saved, and with a title.
Configure the Data Table Component
First, add a Data Table component to store some sample data that includes US States and their capitals.
In the Module Builder, drag and drop a Data Table component onto your canvas.
In the Property ID and Label Text fields, enter
dtStates.In the data table, enter the following:
#
A
B
1
state
capital
2
California
Sacramento
3
New York
Albany
4
Texas
Austin
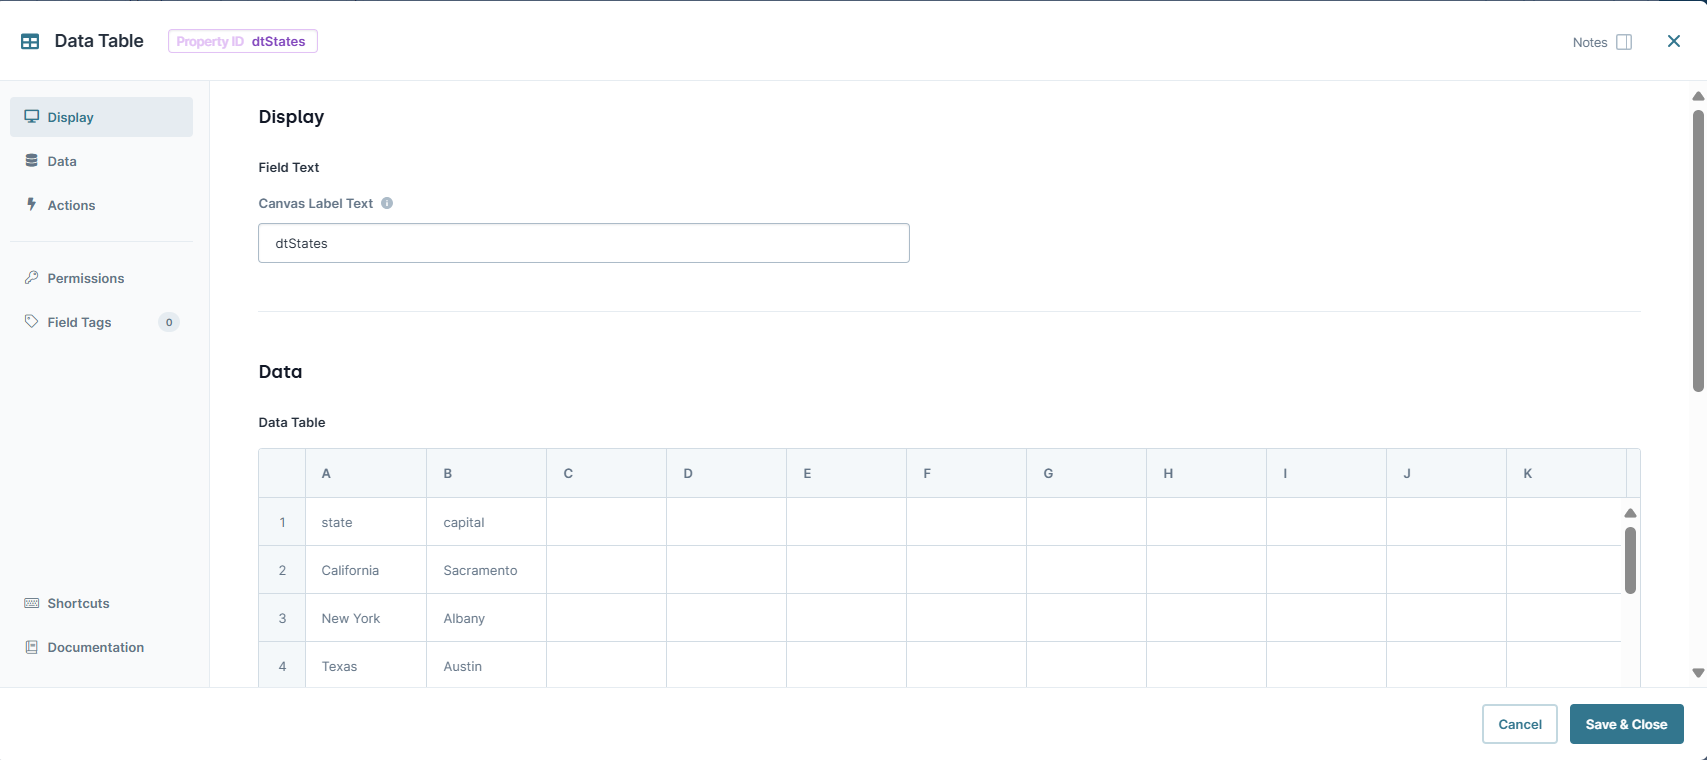
Click Save & Close.
Configure the Hidden Component
Next, add a Hidden component to store the output from your Data Workflow.
Drag and drop a Hidden component onto your canvas, placing it below your Data Table component.
In the Property ID and Label Text fields, enter
dwfOutput.Click Save & Close.
Configure the Data Workflow Component
Lastly, configure a Data Workflow component to process the data.
Drag and drop a Data Workflow component onto your canvas, placing it between your Data Table and Hidden components.
In the Property ID and Canvas Label Text fields, enter
dwfStates.
Configure the Input Operator
Drag and drop an Input operator onto your Data Workflow canvas.
Configure the operator's Info window as follows:
Setting
Value
Category
Input
Component
dtStates
Required
Yes
Source
Default
Configure the Output Operator
Drag and drop an Output operator onto your Data Workflow canvas.
Configure the operator's Info window as follows:
Setting
Value
Category
Output
Component
dwfOutput
Action
value
Connect the output port (right) of the Input operator to the input port (left) of the Output operator.
Click Save.
Save your module.
The completed data workflow looks like the following:
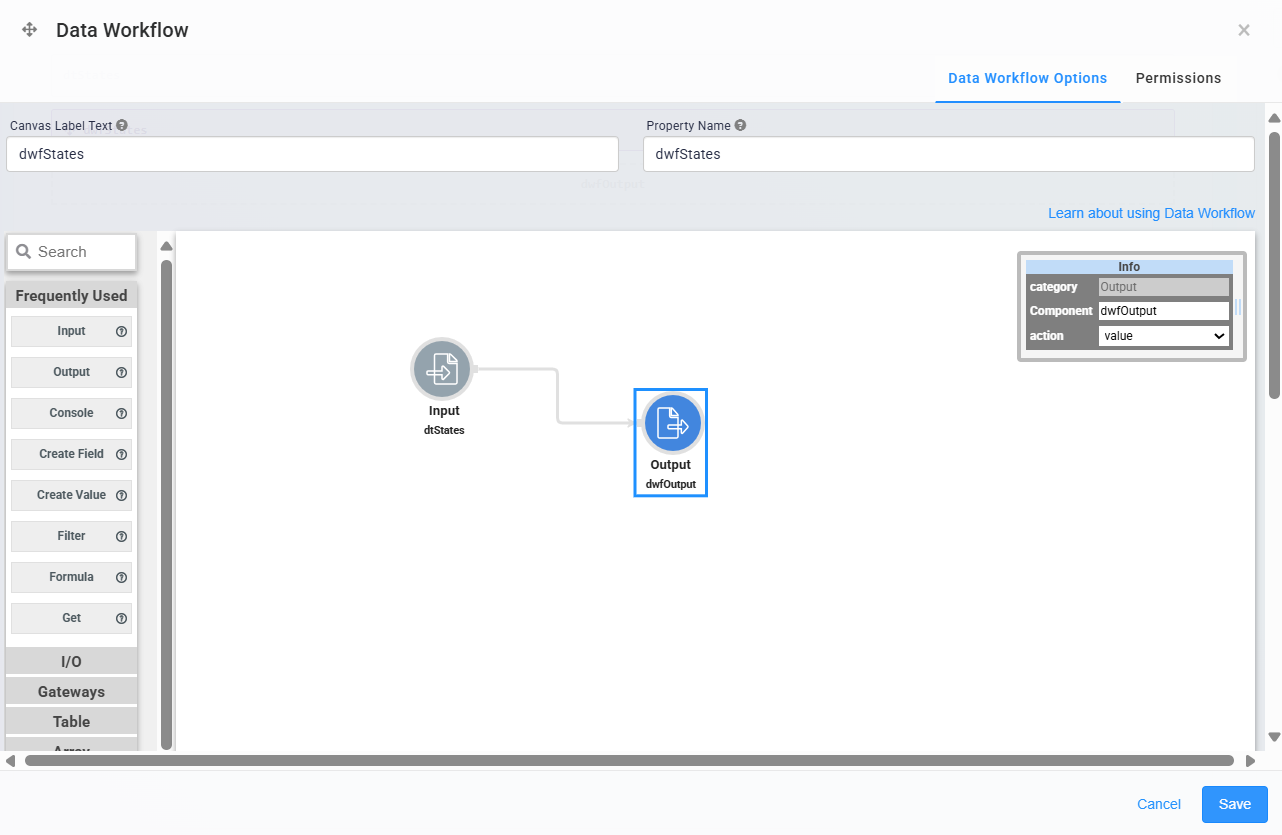
Your completed module looks like the following:

Preview your module in Express View and open the DevTools Console. Run the Angular command. Expand the ▶ data: tab and the ▶ dwfOutput to view the output data stored in the Hidden component.
.jpg)