The Data Workflow component processes and manipulates data in your Unqork applications. The Data Workflow component has broader functionality than any other component in Unqork. It's an ETL (Extract, Transform, Load) tool that lets you transform, manipulate, and move data.
Below are a few examples for using the Data Workflow component:
Display form submission data in a dashboard.
Convert an end-user's quiz answers into a grade.
Transfer data to other components.
Isolate an area code from a phone number.
You'll find the Data Workflow component under the Data & Event Processing group to the left of the Module Builder.
About the Configuration Window
To learn more about general component settings and those that display when a component is associated with Data Models, view our General Component Settings article.
Display Panel
Field Text
Setting | Description |
|---|---|
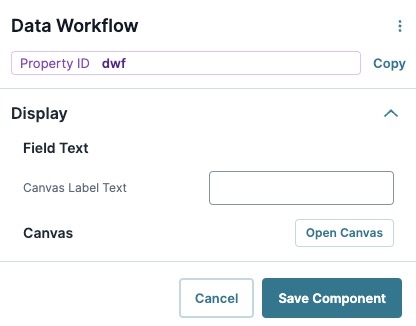
Canvas Label Text | Label Text conveys what the input component is and what information it displays. Enter the purpose of the corresponding component or field. User-friendly labels make your module more accessible. Keep labels short and descriptive (a word or two) using title case. For longer entries, use sentence case. |
Canvas
Setting | Description |
|---|---|
Open Canvas | Opens the Data Workflow canvas. |
Data Workflow Canvas
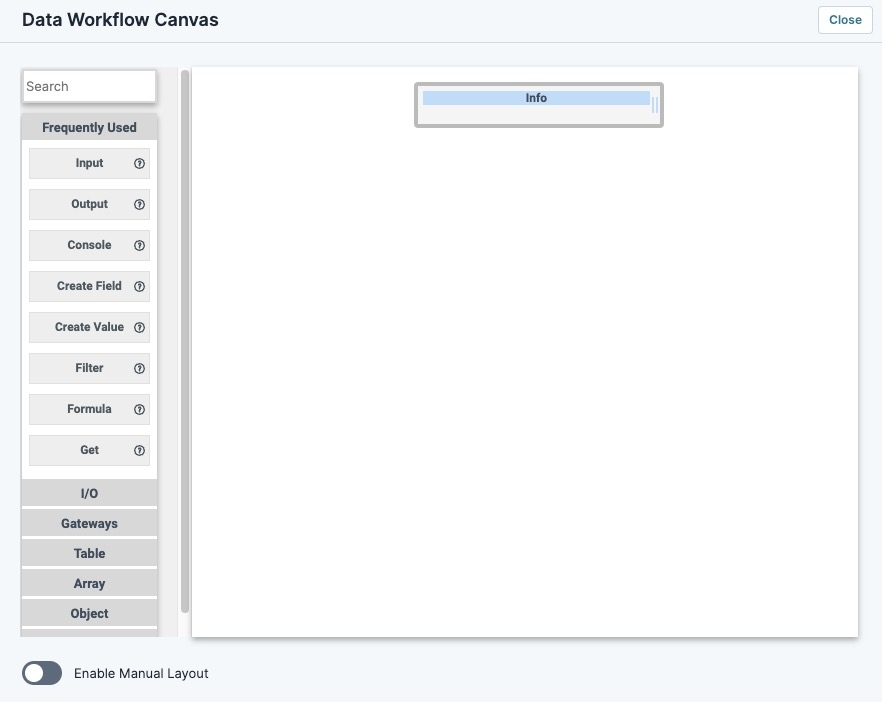
The Data Workflow canvas lets you add, arrange, and connect Data Workflow operators. Operators are the individual parts of your Data Workflow. They let you manipulate large and complex data structures from multiple sources, and you'll connect them to complete your operations.
Operator List and Canvas Settings
The Data Workflow canvas contains a list of operators on the left side, and the canvas on the right. To add an operator, drag and drop it onto the canvas.
Category | Description |
|---|---|
Search | Lets you quickly search for an operator by name. |
Frequently Used | A list of frequently-used operators in Unqork. |
I/O | A list of Input/Output operators. These operators let you input data, create tables and values, and output data to components. They include the Input, Create Table, Output, and Console operators.
|
Gateways | A list of Gateways operators. These operators let you introduce decision logic, control Data Workflow pathways, and merge and split branches. They include the Branch Split and Branch Merge, Decision, and Input Switch operators.
|
Table | A list of Table operators. These operators let you append and merge tables, create a nested table, and output data as a string or an object. They include the Append, Create Field, Merge, Nest By, and Table2Object operators.
|
Array | A list of Array operators. These operators let you retrieve data from a data set, add values to a data structure, and join an array of values. They include the Array2Col, Get, Join, and Set operators.
|
Object | A list of Object operators. These operators let you remove null values, create a table into an object, and merge two objects into one. They include the Clean Object, Diff, Extend, and Has operators.
|
Value/String | A list of Value/String operators. These operators let you convert Excel files into JSON, convert a JSON string to a JSON object, and find matching values in a table. They include the Convert Value, Formula, NLP, and Split String operators.
|
Enable Manual Layout | Set to By default, this toggle is set to |
Inputs

Setting | Description |
|---|---|
Inputs Table | Displays every Property ID, Label, Requirement, and Source configured in the Data Workflow's Input operators. You can make changes to these values and they'll be reflected in the operator settings. |
Outputs

Setting | Description |
|---|---|
Outputs Table | Displays every Property ID, Label, and Action configured in the Data Workflow's Output operators. You can make changes to these values and they'll be reflected in the operator settings. |
Data Workflow Configuration

Setting | Description |
|---|---|
Data Workflow Configuration Table | Displays every other operation in the Data Workflow, in the order than they fire. You can see each operator's Label and Opt 1-5. Opt columns represent fields in each operator. For example, in the Clean Keys operator, Opt 1, Opt 2, and Opt 3 represent the Keys, Fill If, and Fill With fields, respectively. |
Actions Panel
Triggers
Setting | Description |
|---|---|
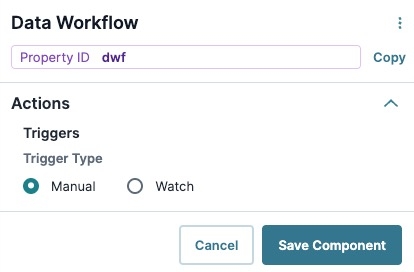
Trigger Type | A drop-down menu that lets you decide how to trigger your Data Workflow. The options include:
By default, this drop-down is set to Manual. |
Advanced Panel
Set Execution
Setting | Description |
|---|---|
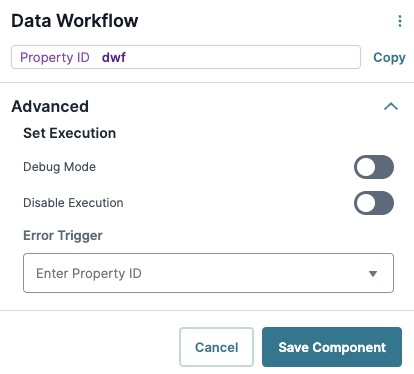
Debug Mode | Selecting this checkbox outputs the inputs and outputs from each operator. You can view every execution, operation, and data manipulation occurring in the Data Workflow. This setting lets you open the DevTools Console while in the Module Builder to troubleshoot, without having to preview the module in Express View.
|
Disable Execution | If Disable Execution is set to By default, this setting is set to |
Error Trigger | Enter the Property ID of a component to trigger if the Data Workflow fails. |
Adding a Data Workflow Component
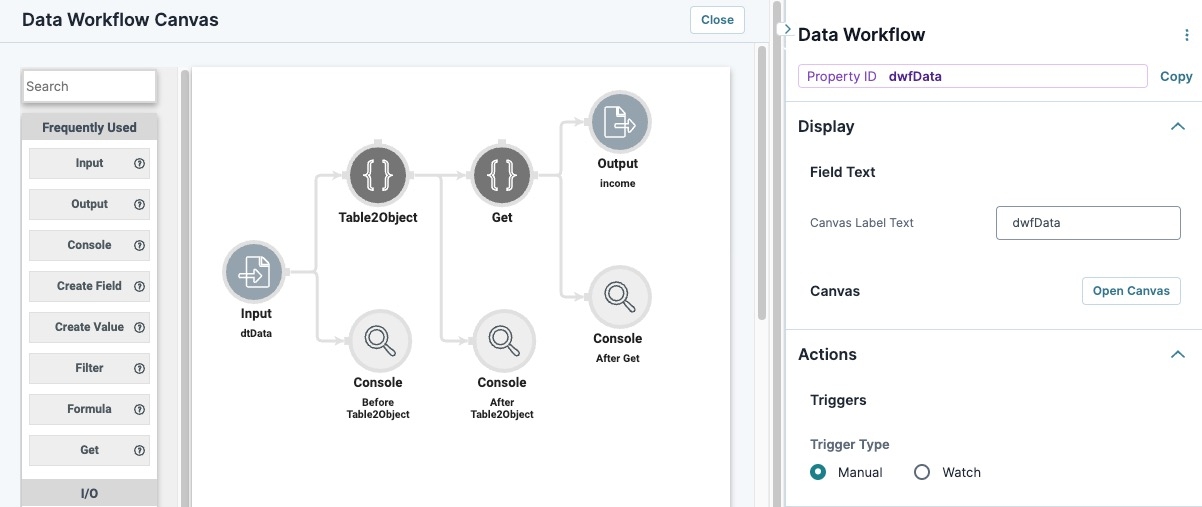
This article will help you set up a simple Data Workflow that does the following:
Brings data from a Data Table component into your Data Workflow, using the Input operator.
Turns the table data structure into an object, using the Table2Object operator.
Pulls out a single value from the object, using the Get operator.
Outputs the value to a Hidden component, using the Output operator.
You'll also include Console operators at each step so you can visualize what the Data Workflow component does.
These instructions assume that you have an open module saved with a title.
Configure the Data Table Component
First, you'll configure a Data Table component with two columns of field and value with a simple annual income value.

1.In the Module Builder, drag and drop a Data Table component onto your canvas.
In the Property ID and Canvas Label Text fields, enter
dtData.In the Inputs table, enter the following:
A
B
1
field
value
2
incomeAnnual
68000
Click Save Component.
Configure the Hidden Component
Configure a Hidden component to store the Data Workflow component's output.
Drag and drop a Hidden component onto your canvas, placing it below your Data Table component.
In the Property ID and Canvas Label Text fields, enter
income.Click Save Component.
Configure the Data Workflow Component
Next, you'll configure the Data Workflow component's settings and operators.
Drag and drop a Data Workflow component onto your canvas, placing it above your Hidden component.
In the Canvas Label Text and Property Name fields, enter
dwfData.
Configure the Input Operator
You'll configure an Input operator to retrieve the Data Table component data and input it into the Data Workflow.
Drag and drop an Input operator onto your Data Workflow canvas.
Configure the Input operator's Info window as follows:
Setting
Value
Component
dtData
Required
Yes
Source
Default

Configure the Table2Object Operator
The Table2Object operator converts the table data structure into an object.
Drag and drop a Table2Object operator onto your Data Workflow canvas.
Configure the Table2Object operator's Info window as follows:
Setting
Value
Key Column Name
field
Value Column Name
value
Connect the output port (right) of the Input operator to the input port (left) of the Table2Object operator.
Configure the Get Operator
Use a Get operator to retrieve the incomeAnnual value from the object.
Drag and drop a Get operator onto your Data Workflow canvas.
Configure the Get operator's Info window as follows:
Setting
Value
Path
incomeAnnual
Connect the output port (right) of the Table2Object operator to the input port (left) of the Get operator.
Configure the Output Operator
Next, let's output the incomeAnnual value to the income Hidden component.
Drag and drop an Output operator onto your Data Workflow canvas.
Configure the Output operator's Info window as follows:
Setting
Value
Component
income
action
value
Connect the output port (right) of the Get operator to the input port (left) of the Output operator.
Configure the Console Operators
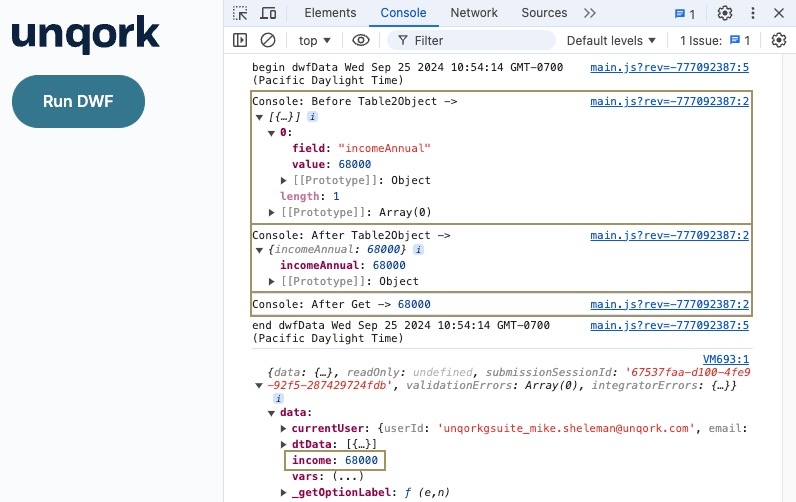
Add three Console operators at the end of each step of your Data Workflow. Console operators let you view how your data is manipulated in the DevTools Console.
Drag and drop three Console operators onto your Data Workflow canvas.
Complete the first Console operator's Info window as follows:
Setting
Value
Category
Console
Label
Before Table2Object
Connect the output port (right) of the Input operator to the input port (left) of the first Console operator.
Complete the second Console operator's Info window as follows:
Setting
Value
Category
Console
Label
After Table2Object
Connect the output port (right) of the Table2Object operator to the input port (left) of the second Console operator.
Complete the third Console operator's Info window as follows:
Setting
Value
Category
Console
Label
After Get
Connect the output port (right) of the Get operator to the input port (left) of the third Console operator.
Click Save Component.
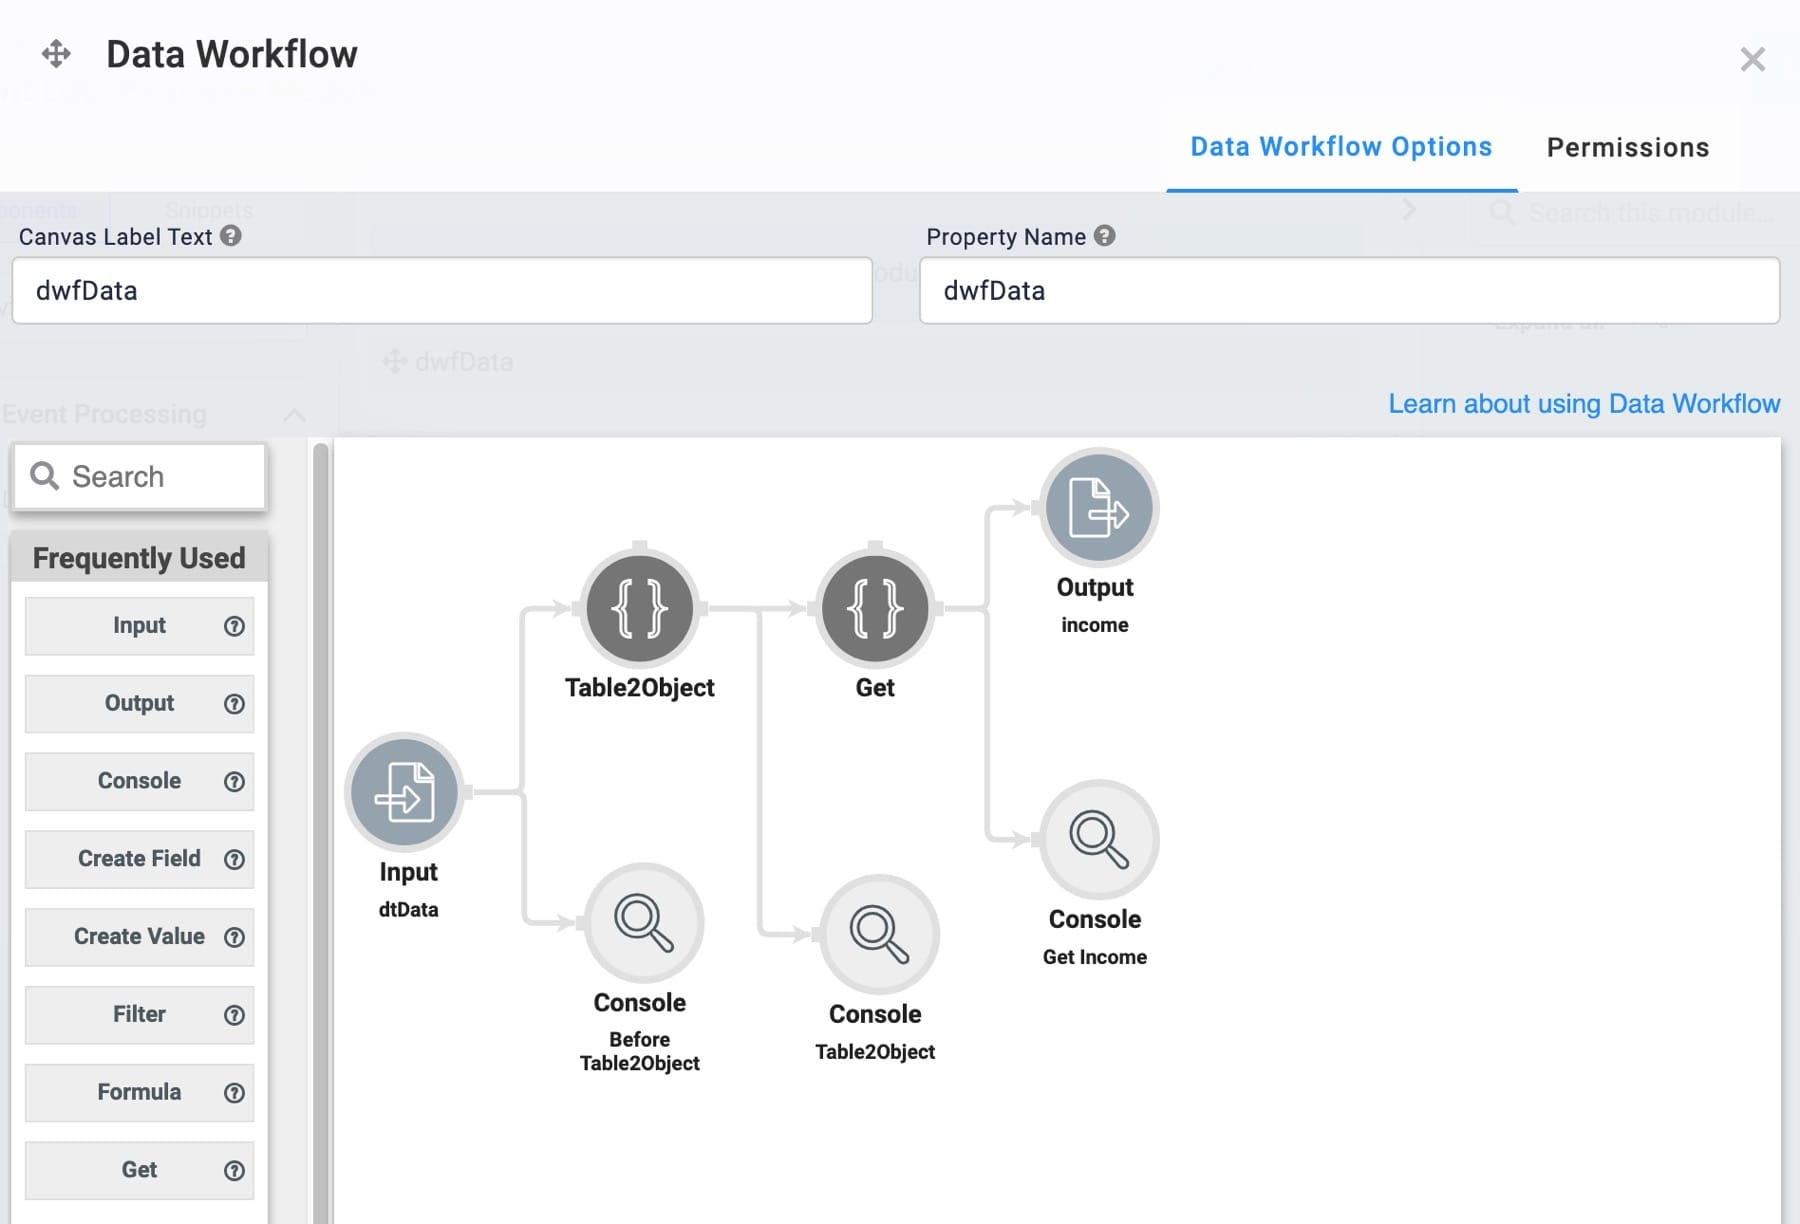
Your completed Data Workflow looks like the following:
Configure the Button Component
Lastly, trigger the Data Workflow with a Button component.
Drag and drop a Button component onto your canvas, placing it below your Hidden component.
In the Property ID field, enter btnRunDWF.
In the Label Text field, enter
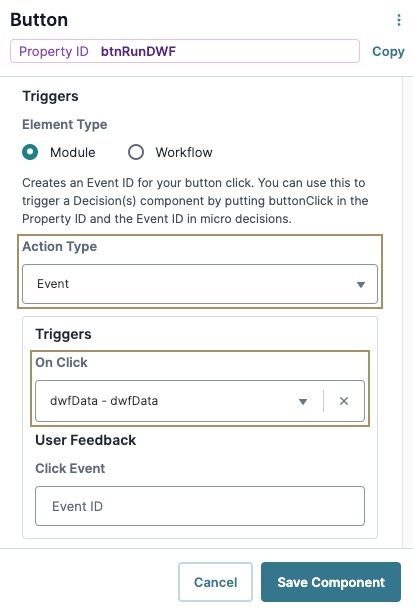
Run DWF.Navigate to the Actions settings.
From the Action Type drop-down, select Event.
From the On Click field, enter or select dwfData .
Click Save Component.
Save your module.
Preview your Data Workflow in Express View and click Run DWF. Open the DevTools Console to view each step of the Data Workflow's data manipulation. The Data Workflow converts the Data Table to an object, retrieves a single value, and sends the value to the incomeHidden component.
The Data Workflow component processes and manipulates data in your Unqork applications. The Data Workflow component has broader functionality than any other component in Unqork. It's an ETL (Extract, Transform, Load) tool that lets you transform, manipulate, and move data.
Below are a few examples for using the Data Workflow component:
Display form submission data in a dashboard.
Convert an end-user's quiz answers into a grade.
Transfer data to other components.
Isolate an area code from a phone number.
You'll find the Data Workflow component under the Data & Event Processing group to the left of the Module Builder.
About the Configuration Window
To learn more about general component settings and those that display when a component is associated with Data Models, view our General Component Settings article.
General Settings Panel

Setting | Description |
|---|---|
Canvas Label Text | A Data Workflow component's Canvas Label Text conveys what the component is and what information it displays. You can only see it in the Module Builder canvas. User-friendly labels make your module more accessible. Keep labels short and descriptive (a word or two) using title case. For longer entries, use sentence case. |
Property Name | A Property Name (Property ID) is the unique field ID used by Unqork to track and link your module components. The Property Name is how the software identifies your component. Using Property Names lets you link components, creating logic-based configurations and API (application programming interface) calls. Property Names should use camel case (stylized as camelCase) without spaces or punctuation. |
Permissions Tab | Select this tab to see the RBAC settings of the component. |
Learn About Using Data Workflow | This link takes you to the Introduction to Data Workflowarticle on the Documentation Hub. |
Cancel | Cancels any recent configuration changes and returns you to the Module Builder canvas. |
Save | Saves all settings as configured and returns you to the Module Builder canvas. |
Data Workflow Canvas
The Data Workflow component also has its own canvas. You'll use this canvas to add, arrange, and connect Data Workflow operators. Operators are the individual parts of your Data Workflow. They let you manipulate large and complex data structures from multiple sources and you'll connect them to complete your operations.
In this section, you'll explore the Data Workflow operator categories to the left of the Data Workflow canvas.
Category | Description |
|---|---|
Search | Lets you quickly search for an operator by name. |
Frequently Used | A list of frequently-used operators in Unqork. |
I/O | A list of Input/Output operators. These operators let you input data, create tables and values, and output data to components. They include the Input, Create Table, Output, and Console operators.
|
Gateways | A list of Gateways operators. These operators let you introduce decision logic, control Data Workflow pathways, and merge and split branches. They include the Branch Split and Branch Merge, Decision, and Input Switch operators.
|
Table | A list of Table operators. These operators let you append and merge tables, create a nested table, and output data as a string or an object. They include the Append, Create Field, Merge, Nest By, and Table2Object operators.
|
Array | A list of Array operators. These operators let you retrieve data from a data set, add values to a data structure, and join an array of values. They include the Array2Col, Get, Join, and Set operators.
|
Object | A list of Object operators. These operators let you remove null values, create a table into an object, and merge two objects into one. They include the Clean Object, Diff, Extend, and Has operators.
|
Value/String | A list of Value/String operators. These operators let you convert Excel files into JSON, convert a JSON string to a JSON object, and find matching values in a table. They include the Convert Value, Formula, NLP, and Split String operators.
|
Enable Manual Layout | Lets you place operators anywhere on the canvas without them organizing by default. By default, this toggle is set to |
Show Table Settings
Now that we've explored the Data Workflow canvas, let's scroll down and explore the settings. Clicking the Show Table button displays the table representation of your Data Workflow. This table is helpful because placing one operator in front of another on the canvas does not always represent the triggering order. The Data Workflow Configuration table lists your operators in the order they fire. When you add, remove, or reorder operators on the Data Workflow canvas, it's represented in the table. However, if you reorder the table rows, it does not affect how your operators display on the canvas. But, you can reorder operators in the table to adjust the order of operations. For example, if one path leads to two outputs (one value and one trigger), the order in which they display in the table is the order they execute.
Below is a description of the various configuration tables that display after clicking Show Table.
Setting | Description |
|---|---|
Inputs Table | Displays every Property ID, Label, Requirement, and Source configured in the Data Workflow's Input operators. You can make changes to these values and they'll be reflected in the operator settings. |
Outputs Table | Displays every Property ID, Label, and Action configured in the Data Workflow's Output operators. You can make changes to these values and they'll be reflected in the operator settings. |
Data Workflow Configuration Table | Displays every other operation in the Data Workflow, in the order than they fire. You can see each operator's Label and Opt 1-5. Opt columns represent fields in each operator. For example, in the Clean Keys operator, Opt 1, Opt 2, and Opt 3 represent the Keys, Fill If, and Fill With fields, respectively. |
Additional Settings
Below the configuration windows, there are other actions you can configure in your Data Workflow component. These actions determine how your Data Workflow runs and collects data.
Setting | Description |
|---|---|
Trigger Type | A drop-down menu that lets you decide how to trigger your Data Workflow. The options include:
By default, this drop-down is set to Manual. |
Disable Execution | If Disable Execution is set to By default, this setting is set to |
Debug | Selecting this checkbox outputs the inputs and outputs from each operator. You can view every execution, operation, and data manipulation occurring in the Data Workflow. This setting lets you open the DevTools Console while in the Module Builder to troubleshoot, without having to preview the module in Express View.
|
Error Trigger | Enter the Property ID of a component to trigger if the Data Workflow fails. |
Field Tags | Assign components one-word labels to help organize, identify, and group the components in your application. Consider an example from the API Specification Snippet: Field Tags are applied to Hidden components in the panelRequest and panelResponse Panel components. The Field Tags identify the data type of parameters included in the API request and response. The API Docs Dashboard tool populates with information about each parameter’s data type, identified by the Field Tag. Field Tags act as a type of Property ID group and let you group components for configuration purposes. Field Tags let you target two or more components using a simple logic component. For example, add the Field Tag tagForDecision to multiple components in your module. Open the Inputs table of a Decisions component and reference the tagForDecision Field Tag as the input of the Decisions component. The output of the Decisions component then affects all components with the tagForDecision Field Tag. Save your Field Tags by pressing Enter (Return) or adding a comma after each entry. |
Comment | Add comments in your Data Workflow to help team member's understand its functionality. |
Unit Testing
It's important to ensure all operators work as intended. So, you can run a test of your configuration before finalizing the Data Workflow component. Just enter the data you want to test in the Inputs table, and the results of the test display in the Outputs table. Console operators output to the DevTools Console when running a unit test. Doing so makes configuring more efficient and is a good way to catch logic errors early.
At the bottom of the Settings modal, click Open Unit Testing and click + Add Test to create a new test.
Setting | Description |
|---|---|
Close Unit Testing | Collapses the Unit Testing section. When collapsed, the button text changes to "Open Unit Testing." Clicking this button again expands the Unit Testing section. |
Refresh Fields | Updates all Input fields to reflect changes on the canvas. |
Run All Tests | Runs all added tests with the Input values entered. |
Input Table | Use this table to enter the information you want to test. If you have multiple inputs and want to skip testing certain inputs, just leave the Value column blank.
|
Input | Automatically populates all components in your Data Workflow synced with an Input operator. |
Label | Automatically populates the label of your connected Input component. |
Value | Enter example data in this column that you want to test.
|
JSON | Select this checkbox when you enter a Value that's written in JSON. This can be an object, array, number, or Boolean (true/false) value. |
Output Table | This table displays the results of your test. |
Output | Automatically populates all components listed in the Calculator's Outputs table. |
Label | Automatically populates with the label of your connected Output component. |
Expected | Enter the outcome you expect from the test you're running. You can use this to compare the result you expected with the actual result side-by-side.
|
Actual | The result from the test you ran. |
JSON | Select this checkbox when your result must display in JSON. This can be an array, string, or object. |
Delete Test | Removes an existing test. |
Duplicate | Makes a copy of an existing test. |
Run Test | Runs the test with the Input values entered. |
Adding a Data Workflow Component
This article will help you set up a simple Data Workflow that does the following:
Brings data from a Data Table component into your Data Workflow, using the Input operator.
Turns the table data structure into an object, using the Table2Object operator.
Pulls out a single value from the object, using the Get operator.
Outputs the value to a Hidden component, using the Output operator.
You'll also include Console operators at each step so you can visualize what the Data Workflow component does.
These instructions assume that you have an open module saved with a title.
Configure the Data Table Component
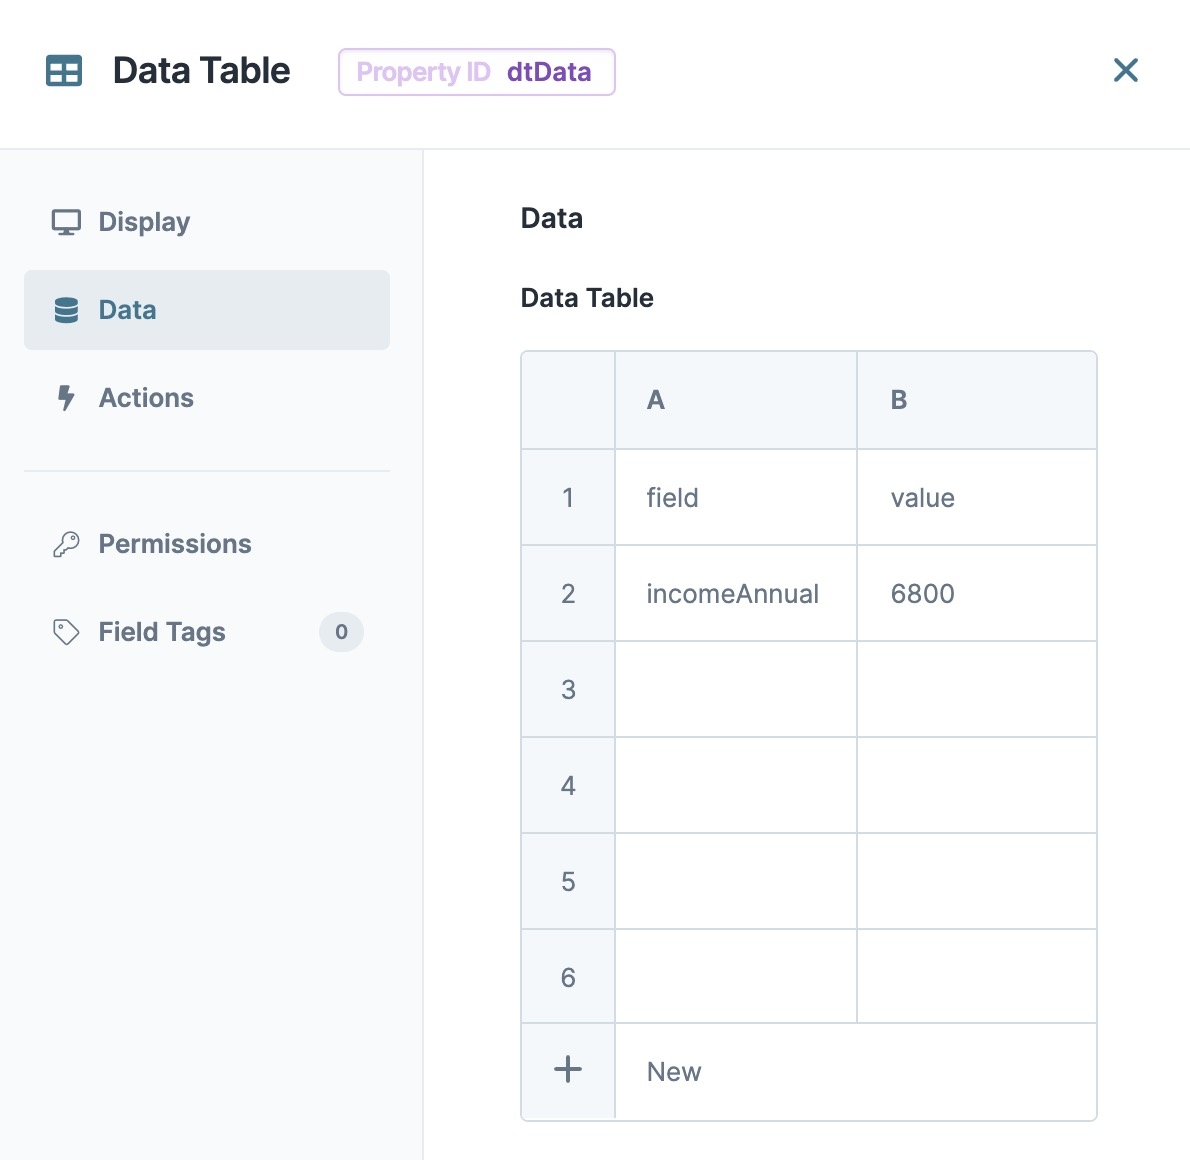
First, you'll configure a Data Table component with two columns of field and value with a simple annual income value.
In the Module Builder, drag and drop a Data Table component onto your canvas.
2.In the Property ID and Canvas Label Text fields, enter
dtData.To the left of the component's configuration window, select Data.
In the data table, enter the following:
A
B
1
field
value
2
incomeAnnual
68000
As a best practice, enter column titles in lowercase, with no breaks or special characters.
Click Save & Close.
Configure the Hidden Component
Configure a Hidden component to store the Data Workflow component's output.
Drag and drop a Hidden component onto your canvas, placing it below your Data Table component.
In the Property ID and Canvas Label Text fields, enter
income.Click Save & Close.
Configure the Data Workflow Component
Next, you'll configure the Data Workflow component's settings and operators.
Drag and drop a Data Workflow component onto your canvas, placing it above your Hidden component.
In the Canvas Label Text and Property Name fields, enter
dwfData.
Configure the Input Operator
The Input operator brings the data from the Data Table component into the Data Workflow.
Drag and drop an Input operator onto your Data Workflow canvas.
Configure the Input operator's Info window as follows:
Setting
Value
Component
dtData
Required
Yes
Source
Default
Configure the Table2Object Operator
Next, the Table2Object operator converts the table data structure into an object.
Drag and drop a Table2Object operator onto your Data Workflow canvas.
Configure the Table2Object operator's Info window as follows:
Setting
Value
Key Column Name
field
Value Column Name
value
Connect the output port (right) of the Input operator to the input port (left) of the Table2Object operator.
Configure the Get Operator
Now you'll use a Get operator to retrieve the incomeAnnual value from the object.
Drag and drop a Get operator onto your Data Workflow canvas.
Configure the Get operator's Info window as follows:
Setting
Value
Path
incomeAnnual
Connect the output port (right) of the Table2Object operator to the input port (left) of the Get operator.
Configure the Output Operator
Next, let's output the incomeAnnual value to the income Hidden component.
Drag and drop an Output operator onto your Data Workflow canvas.
Configure the Output operator's Info window as follows:
Setting
Value
Component
income
action
value
Connect the output port (right) of the Get operator to the input port (left) of the Output operator.
Configure the Console Operators
Add three Console operators at the end of each step of your Data Workflow. Console operators let you view how your data is manipulated in the DevTools Console.
Drag and drop three Console operators onto your Data Workflow canvas.
Complete the first Console operator's Info window as follows:
Setting
Value
Category
Console
Label
Before Table2Object
Connect the output port (right) of the Input operator to the input port (left) of the first Console operator.
Complete the second Console operator's Info window as follows:
Setting
Value
Category
Console
Label
After Table2Object
Connect the output port (right) of the Table2Object operator to the input port (left) of the second Console operator.
Complete the third Console operator's Info window as follows:
Setting
Value
Category
Console
Label
After Get
Connect the output port (right) of the Get operator to the input port (left) of the third Console operator.
Click Save.
Your completed Data Workflow looks like the following:
Configure the Button Component
Lastly, trigger the Data Workflow suing a Button component.
Drag and drop a Button component onto your canvas, placing it below your Hidden component.
In the Property ID field, enter btnRunDWF.
In the Label Text field, enter
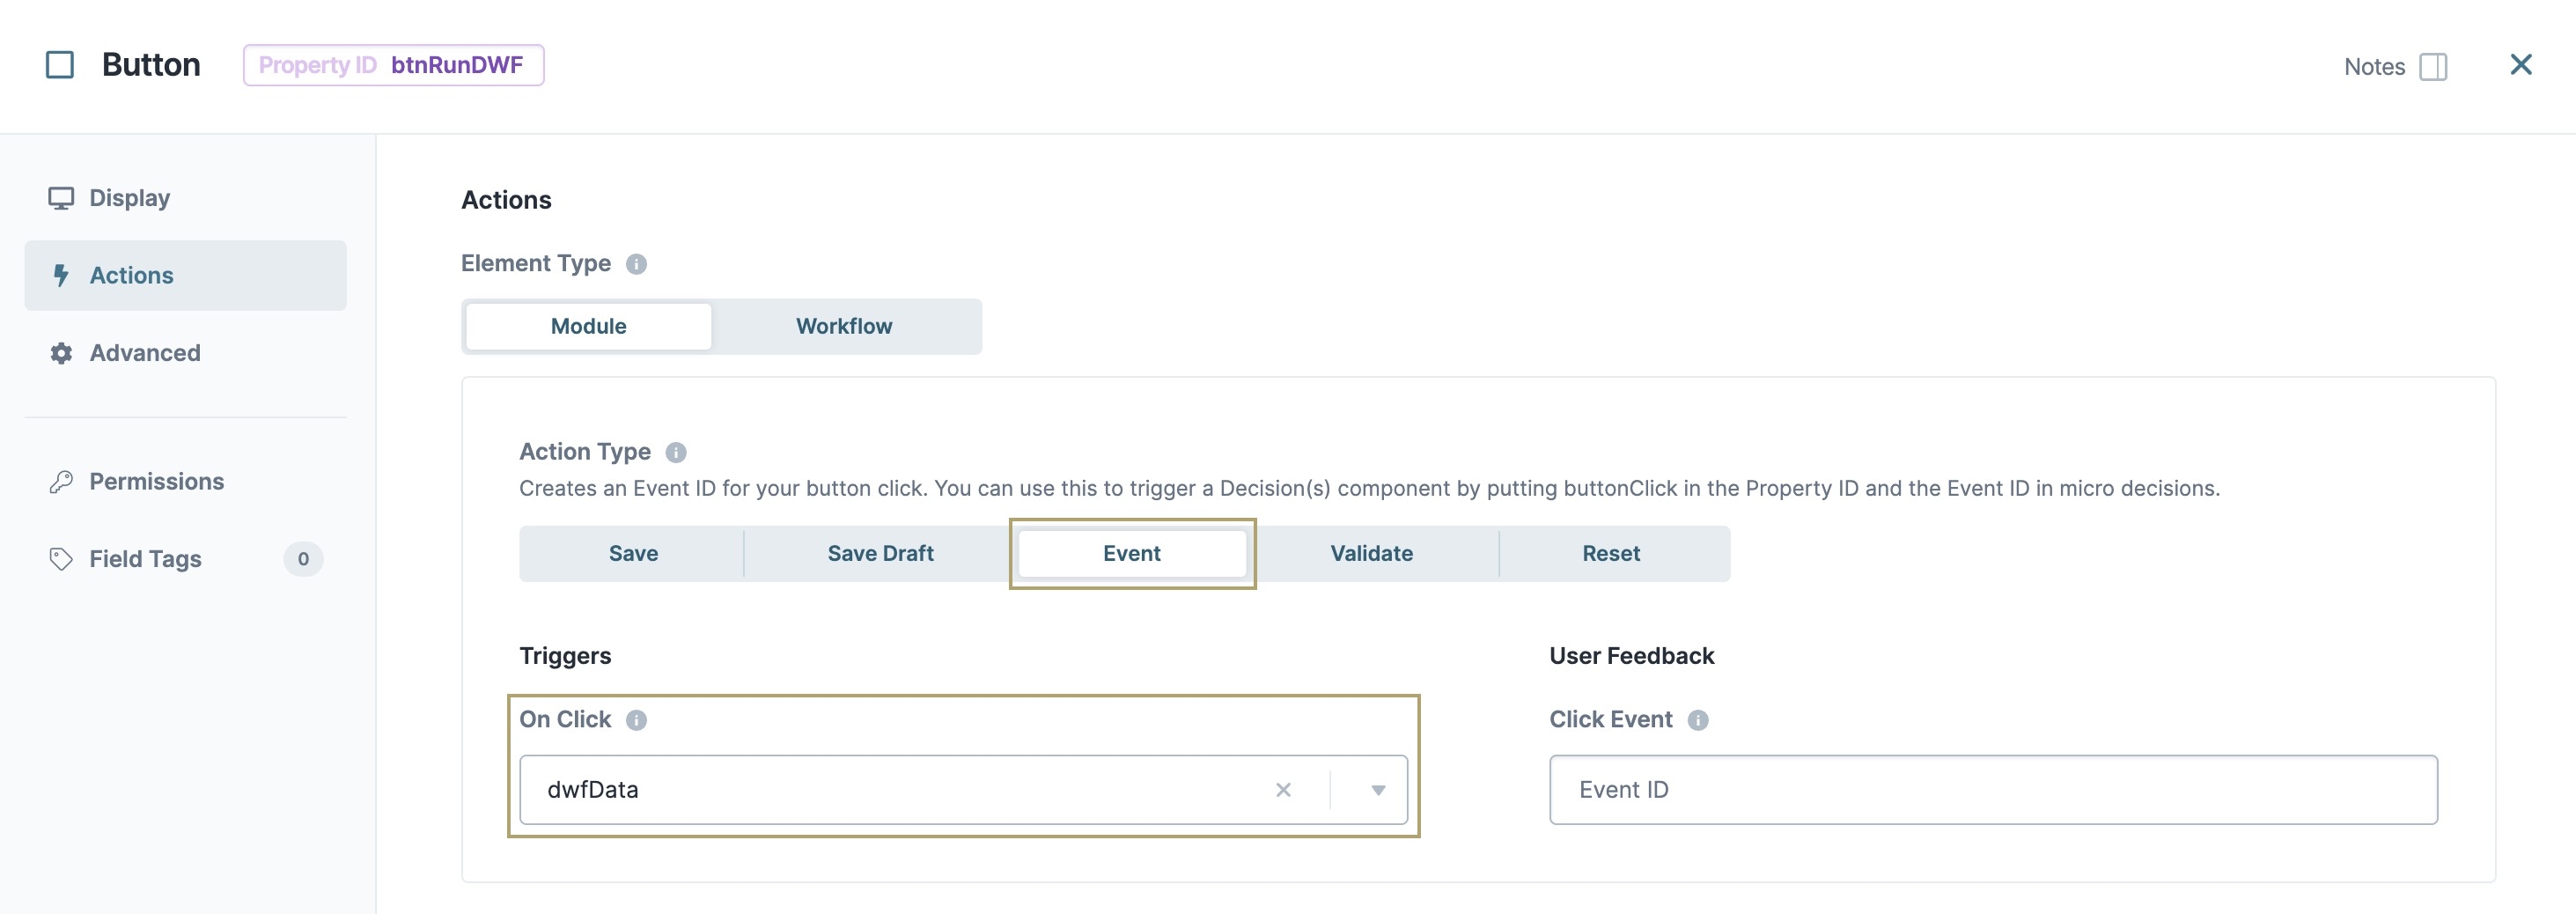
Run DWF.To the left of the component's configuration, select Actions.
Select Event as the Action Type.
From the On Click field, enter or select dwfData.
Click Save & Close.
Save your module.
Preview your Data Workflow in Express View and click Run DWF. Opening the DevTools Console, you can see each step of the Data Workflow's data manipulation. The Data Workflow converts the Data Table to an object, retrieve a single value, and sends the value to the Hidden component.
