Filter Operator
Overview

The Filter operator filters data based on a formula provided by the Creator Also known as Unqork Users, or Designer Users; is anyone who is inside the Unqork platform.. When the Data Workflow runs, the operator retrieves all matching data in the data set. For example, if an application asks an end-user End-users, also known as Express Users, are the individuals accessing an application through Express View. In most cases, end-users are the customers using the product. a Yes or No question, the Filter operator can filter the data to only display Yes responses.
The Filter operator has two output ports. The upper output port outputs the data matching the criteria. The lower output port outputs data that does not match the criteria.
You can also connect an argument to the argument port of a Filter operator. Doing so lets you sort data based on a dynamic variable. For example, you might have a list of products in a Data Table component. The list of available products may depend on whether your client smokes or not. So, you can add a Dropdown component that offers Yes or No responses. With the Dropdown set as an argument, the operator filters based on the selection.
You’ll find the Filter operator under the Table group to the left of the Data Workflow canvas.
About the Info Window
Learn more about each setting in the Filter operator's Info window:
|
Setting |
Description |
|---|---|
|
Category |
Grayed out and non-adjustable setting indicating the operation type. |
|
Label |
Sets the label for your operator, displaying below the operator on your Data Workflow canvas. This field is optional, but set a label if you use more than one of the same operator type. A label helps you identify your operators without opening any Info windows. |
|
Do Not Sanitize Formula |
When unchecked, the operator will do its best to clean up special characters in your formula. Those special characters include ', $, #, &. In other words, the operator will sanitize your formula. Sanitizing can improve performance. But, when using a complex formula, it can also lead to unexpected data behavior. When checked, the operator uses your formula as-is. This is your safest bet when working with a complex formula. By default, this setting is unchecked, meaning the operator will attempt to sanitize the formula. |
|
Preserve Argument Type |
When selected, this setting ensures the argument data type is respected when the operator executes. |
|
Expression |
Here, you'll enter the criteria you want to filter your data by. The expression can be a single number, a string, an argument, or a full formula. For example, to find Yes data for the Do you smoke? expression, you'd use this formula: doYouSmoke="Yes". Matched data goes through the upper output port. Unmatched data goes through the lower output port. You can also add conditions to a formula. Conditioning your Expression filters your data using AND or OR. AND returns data that's true for all criteria listed. OR checks if any one of the conditions you list is true. Let's say you're retrieving data for citizenship from different countries. You want to identify citizens from the United States of America and Mexico. By using AND, you'll only include those who have citizenship in all of the countries you list. To only accept dual citizens as an input, use this formula: =AND(citizen=‘Mexico’, citizen=‘USA’). By using OR, you'll filter citizens from either country in your list. To include citizens from either country as an Input, use this formula: =OR(citizen=‘Mexico’, citizen=‘USA’). |
Adding a Filter Operator
In this example, you'll create a Data Table component that contains a list of countries. You'll include a column displaying whether a country is part of the EU. Then, you'll set up a Data Workflow to separate out countries that are part of the EU from those that are not.
Configure the Data Table Component
First, you'll set up your Data Table component with a list of countries, capitals, and whether they are part of the EU.
| 1. | In the Module Builder, drag and drop a  Data Table component onto your canvas. Data Table component onto your canvas. |
| 2. | In the Property ID A Property ID is the unique field ID used by Unqork to track and link components in your module. field, enter dtCountries. |
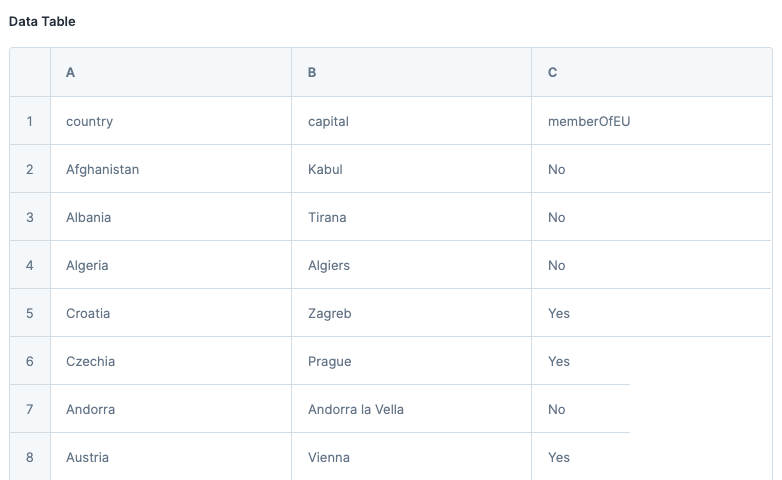
| 3. | In the data table, enter the following: |
|
|
A |
B |
C |
|---|---|---|---|
|
1 |
country |
capital |
memberOfEU |
|
2 |
Afghanistan |
Kabul |
No |
|
3 |
Albania |
Tirana |
No |
|
4 |
Algeria |
Algiers |
No |
|
5 |
Cambodia |
Phnom Penh |
|
|
6 |
Czechia |
Prague |
|
|
7 |
Andorra |
Andorra la Vella |
No |
|
8 |
Austria |
Vienna |
Yes |

| 4. | Click Save Component. |
Configure the Hidden Components
Before you can add your Data Workflow, add two Hidden components to store the Data Workflow results. Your filterTrue Hidden component contains countries that are part of the EU and your filterFalse Hidden component contains countries that are not part of the EU.
| 1. | Drag and drop two Hidden components onto your canvas, placing then below the dtCountries Data Table component. |
|
Property ID |
Label Text |
|
|---|---|---|
|
1 |
filterTrue |
filterTrue |
|
2 |
filterFalse |
filterFalse |
| 3. | After configuring each component, click Save Component. |
Configure the Data Workflow Component
| 1. | Drag and drop a Data Workflow component onto your canvas, placing it between the dtCountries Data Table and Hidden components. |
Configure the Input Data Operator
| 1. | Drag and drop an Input operator onto your Data Workflow canvas. |
| 2. | Configure the operator's Info window as follows: |
| Info | |
|---|---|
|
Category |
Input |
|
Component |
dtCountries |
|
Required |
Yes |
|
Source |
Default |
Configure the Filter Operator
| 1. | Drag and drop a Filter operator onto your Data Workflow canvas. |
| 2. | Configure the operator's Info window as follows: |
| Info | |
|---|---|
|
Category |
Filter |
|
Label |
Filter Members of the EU |
|
Do Not Sanitize Formula |
(checked) |
|
Preserve Argument Type |
☐ (unchecked) |
|
Expression |
memberOfEU="Yes" |
| 3. | Connect the output port (right) of the dtCountries Input operator to the input port (left) of the Filter Members of the EU Filter operator. |
Configure the First Output Operator
| 1. | Drag and drop an Output operator onto your Data Workflow canvas. |
| 2. | Configure the operator's Info window as follows: |
| Info | |
|---|---|
|
Category |
Output |
|
Component |
filterTrue |
|
Action |
value |
| 3. | Connect the upper output port (right) of the Filter Members of the EU Filter operator to the input port (left) of the filterTrue Output operator. |
Configure the Second Output Operator
| 1. | Drag and drop a second Output operator onto your Data Workflow canvas. |
| 2. | Configure the operator's Info window as follows: |
| Info | |
|---|---|
|
Category |
Output |
|
Component |
filterFalse |
|
Action |
value |
| 3. | Connect the lower output port (right) of the Filter Members of the EU Filter operator to the input port (left) of the filterFalse Output operator. |
| 4. | Click Save Component. |
Here's how the completed Data Workflow looks:

Configure the Button Component
Lastly, create a button the end-user End-users, also known as Express Users, are the individuals accessing an application through Express View. In most cases, end-users are the customers using the product. clicks in Express View Express View is how your end-user views your application. Express View also lets you preview your applications to test your configuration and view the styling. This is also the view your end-users will see when interacting with your application. After configuring a module, click Preview in the Module Builder to interact with the module in Express View. to trigger your Data Workflow.
| 1. | Drag and drop a |
| 2. | In the Property ID A Property ID is the unique field ID used by Unqork to track and link components in your module. field, enter btwRunDWF. |
| 3. | In the Label Text Label Text conveys what the input component is and what information it displays. Enter the purpose of the corresponding component or field. field, enter Run DWF Filter. |
| 4. | Navigate to the Actions settings. |
| 5. | From the Action Type drop-down, select Event. |
| 6. | From the On Click drop-down, enter or select dwfFilter. |
| 7. | Click Save Component. |
| 8. | Save your module. |
Here's how the completed example looks in the Module Builder:

Preview your module in Express View Express View is how your end-user views your application. Express View also lets you preview your applications to test your configuration and view the styling. This is also the view your end-users will see when interacting with your application. After configuring a module, click Preview in the Module Builder to interact with the module in Express View. and click Run DWF Filter. The Data Workflow filters for data using the memberOfEU="Yes" argument. Data that matches the argument is sent to the filterTrueHidden component. The data that does not match the argument is sent to the filterFalseHidden component. The DevTools Console The DevTools Console helps you securely store, build, test, and deploy your software. displays the following:

Overview

The Filter operator filters data based on a formula provided by the Creator Also known as Unqork Users, or Designer Users; is anyone who is inside the Unqork platform.. When the Data Workflow runs, the operator retrieves all matching data in the data set. For example, if an application asks an end-user End-users, also known as Express Users, are the individuals accessing an application through Express View. In most cases, end-users are the customers using the product. a Yes or No question, the Filter operator can filter the data to only display Yes responses.
The Filter operator has two output ports. The upper output port outputs the data matching the criteria. The lower output port outputs data that does not match the criteria.
You can also connect an argument to the argument port of a Filter operator. Doing so lets you sort data based on a dynamic variable. For example, you might have a list of products in a Data Table component. The list of available products may depend on whether your client smokes or not. So, you can add a Dropdown component that offers Yes or No responses. With the Dropdown set as an argument, the operator filters based on the selection.
You’ll find the Filter operator under the Table group to the left of the Data Workflow canvas.
About the Info Window
Learn more about each setting in the Filter operator's Info window:
|
Setting |
Description |
|---|---|
|
Label |
Sets the label for your operator, displaying below the operator on your Data Workflow canvas. This field is optional, but set a label if you use more than one of the same operator type. A label helps you identify your operators without opening any Info windows. |
|
Do Not Sanitize Formula |
When unchecked, the operator will do its best to clean up special characters in your formula. Those special characters include ', $, #, &. In other words, the operator will sanitize your formula. Sanitizing can improve performance. But, when using a complex formula, it can also lead to unexpected data behavior. When checked, the operator uses your formula as-is. This is your safest bet when working with a complex formula. By default, this setting is unchecked, meaning the operator will attempt to sanitize the formula. |
|
Preserve Argument Type |
When selected, this setting ensures the argument data type is respected when the operator executes. |
|
Expression |
Here, you'll enter the criteria you want to filter your data by. The expression can be a single number, a string, an argument, or a full formula. For example, to find Yes data for the Do you smoke? expression, you'd use this formula: doYouSmoke="Yes". Matched data goes through the upper output port. Unmatched data goes through the lower output port. You can also add conditions to a formula. Conditioning your Expression filters your data using AND or OR. AND returns data that's true for all criteria listed. OR checks if any one of the conditions you list is true. Let's say you're retrieving data for citizenship from different countries. You want to identify citizens from the United States of America and Mexico. By using AND, you'll only include those who have citizenship in all of the countries you list. To only accept dual citizens as an input, use this formula: =AND(citizen=‘Mexico’, citizen=‘USA’). By using OR, you'll filter citizens from either country in your list. To include citizens from either country as an Input, use this formula: =OR(citizen=‘Mexico’, citizen=‘USA’). |
Adding a Filter Operator
Adding a Filter Operator
In this example, you'll create a Data Table component that contains a list of countries. You'll include a column displaying whether a country is part of the EU. Then, you'll set up a Data Workflow to separate out countries that are part of the EU from those that are not.
Configure the Data Table Component
First, you'll set up your Data Table component with a list of countries, capitals, and whether they are part of the EU.
| 1. | Drag and drop a Data Table component onto your canvas. |
| 3. | In the data table, enter the following: |
|
|
A |
B |
C |
|---|---|---|---|
|
1 |
country |
capital |
memberOfEU |
|
2 |
Afghanistan |
Kabul |
No |
|
3 |
Albania |
Tirana |
No |
|
4 |
Algeria |
Algiers |
No |
|
5 |
Cambodia |
Phnom Penh |
|
|
6 |
Czechia |
Prague |
|
|
7 |
Andorra |
Andorra la Vella |
No |
|
8 |
Austria |
Vienna |
Yes |
| 4. | Click Save & Close. |
Configure the Hidden Components
Before you can add your Data Workflow, add two Hidden components to store the Data Workflow results. Your filterTrue Hidden component contains countries that are part of the EU and your filterFalse Hidden component contains countries that are not part of the EU.
| 1. | Drag and drop two Hidden components onto your canvas, placing them below your dtCountries Data Table component. |
| 2. | In each component's Property ID A Property ID is the unique field ID used by Unqork to track and link components in your module. and Label Text fields, enter the following: |
|
Property ID |
Label Text |
|
|---|---|---|
|
1 |
filterTrue |
filterTrue |
|
2 |
filterFalse |
filterFalse |
| 3. | Save & Close each component as you add it. |
Configure the Data Workflow Component
| 1. | Drag and drop a Data Workflow component onto your canvas, placing it above your Hidden components. |
| 2. | In the Canvas Label Text and Property Name fields, enter dwfFilter. |
Configure the Input Data Operator
| 1. | Drag and drop an Input operator onto your Data Workflow canvas. |
| 2. | Configure the operator's Info window as follows: |
|
Setting |
Value |
|---|---|
|
Category |
Input |
|
Component |
dtCountries |
|
Required |
Yes |
|
Source |
Default |
Configure the Filter Operator
| 1. | Drag and drop a Filter operator onto your Data Workflow canvas. |
| 2. | Configure the operator's Info window as follows: |
|
Setting |
Value |
|---|---|
|
Category |
Filter |
|
Label |
Filter Members of the EU |
|
Do Not Sanitize Formula |
Yes (checked) |
|
Preserve Argument Type |
Unchecked (no) |
|
Expression |
memberOfEU="Yes" |
| 3. | Connect the output port (right) of the dtCountries Input operator to the input port (left) of the Filter Members of the EU Filter operator. |
Configure the First Output Operator
| 1. | Drag and drop an Output operator onto your Data Workflow canvas. |
| 2. | Configure the Output operator's Info window as follows: |
|
Setting |
Value |
|---|---|
|
Category |
Output |
|
Component |
filterTrue |
|
Action |
value |
| 3. | Connect the upper output port (right) of the Filter Members of the EU Filter operator to the input port (left) of the filterTrue Output operator. |
Configure the Second Output Operator
| 1. | Drag and drop a second Output operator onto your Data Workflow canvas. |
| 2. | Configure the operator's Info window as follows: |
|
Setting |
Value |
|---|---|
|
Category |
Output |
|
Component |
filterFalse |
|
Action |
value |
| 3. | Connect the lower output port (right) of the Filter Members of the EU Filter operator to the input port (left) of the filterFalse Output operator. |
| 4. | Click Save. |
Here's how the completed Data Workflow looks:

Configure the Button Component
Lastly, create a button the end-user End-users, also known as Express Users, are the individuals accessing an application through Express View. In most cases, end-users are the customers using the product. clicks in Express View Express View is how your end-user views your application. Express View also lets you preview your applications to test your configuration and view the styling. This is also the view your end-users will see when interacting with your application. After configuring a module, click Preview in the Module Builder to interact with the module in Express View. to trigger your Data Workflow.
| 1. | Drag and drop a |
| 2. | In the Property ID A Property ID is the unique field ID used by Unqork to track and link components in your module. field, enter btwRunDWF. |
| 3. | In the Label Text Label Text conveys what the input component is and what information it displays. Enter the purpose of the corresponding component or field. field, enter Run DWF Filter. |
| 4. | Navigate to the Actions settings. |
| 5. | From the Action Type drop-down, select Event. |
| 6. | From the On Click drop-down, enter or select dwfFilter. |
| 7. | Click Save Component. |
| 8. | Save your module. |
Here's how the completed example looks in the Module Builder:

Preview your module in Express View Express View is how your end-user views your application. Express View also lets you preview your applications to test your configuration and view the styling. This is also the view your end-users will see when interacting with your application. After configuring a module, click Preview in the Module Builder to interact with the module in Express View. and click Run DWF Filter. The Data Workflow filters for data using the memberOfEU="Yes" argument. Data that matches the argument is sent to the filterTrueHidden component. The data that does not match the argument is sent to the filterFalseHidden component. The DevTools Console The DevTools Console helps you securely store, build, test, and deploy your software. displays the following:
