Overview
Workflows streamline and organize your business processes by separating complex logic across a series of modules. With Workflows, you can achieve the same result as including everything in one module, but with a smoother end-user experience. Workflows also let you see what step of the process your end-user completed.
Here are some additional benefits of using a workflow:
Automated execution of workflows and processes.
Linked modules for collecting data and creating a single submission.
Seamless orchestration, routing, rules, and dynamic flow, achieving full flexibility in your applications.
The ability to quickly and easily apply role-based security.
Creation of any number of unique user journeys by using multiple Workflow nodes.
URL redirects to lead your end-users from one workflow to another, saving the data and offering the option to continue a submission later.
One agent can complete part of a submission before handing it off to another agent. Then, your second agent can return the submission to the original agent. This process is called multi-party support and happens automatically. Workflow processes can also be completed in parallel, with multiple end-users interacting with a workflow at the same time.
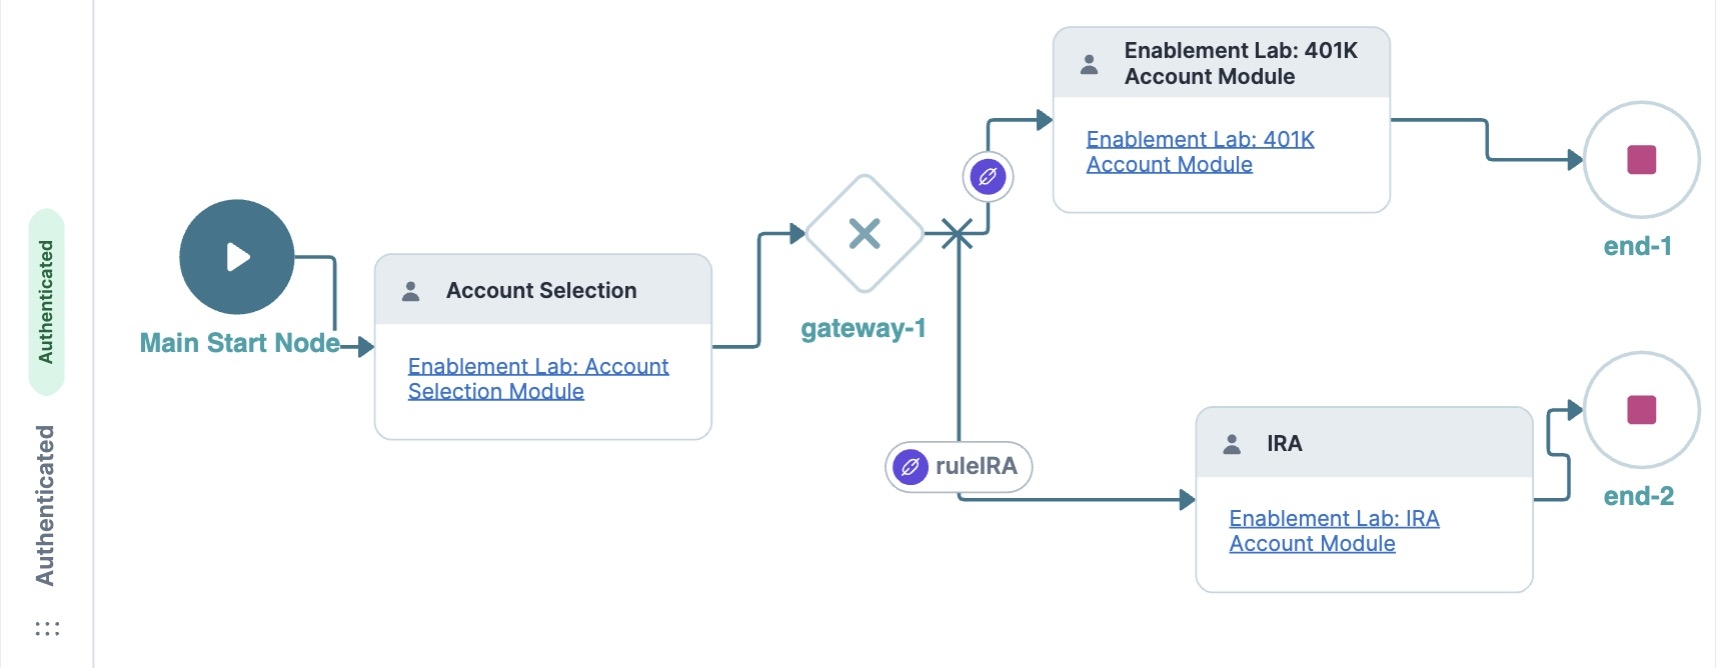
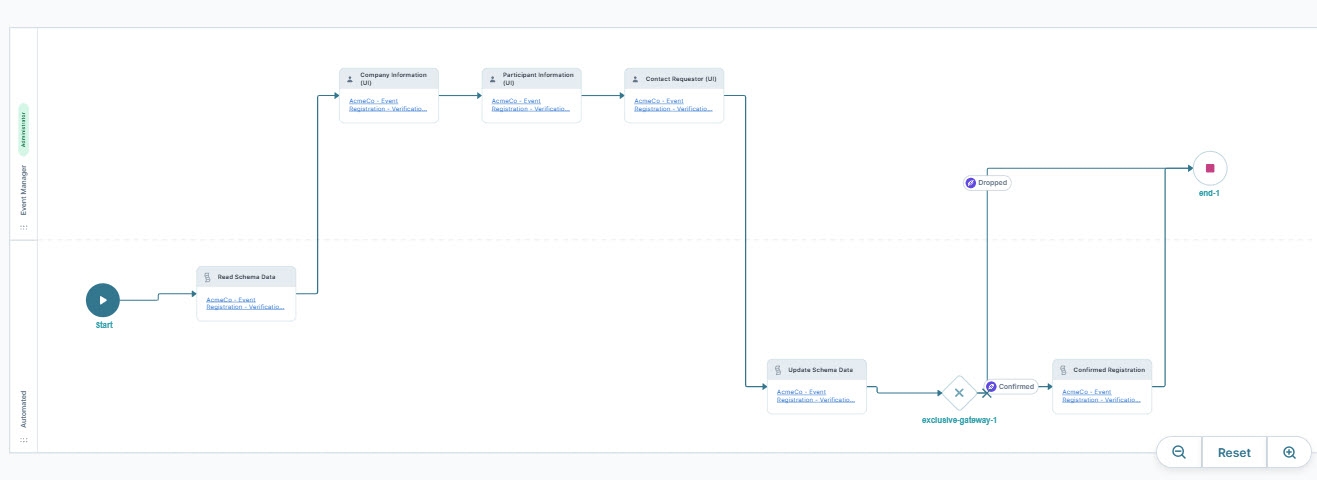
Here is a preview of a completed workflow in the Workflow Builder:
Learn more about setting up and using Workflows by clicking on the tabs below:
Creating a Workflow-Type Application
If you don't have an existing application, create one from your workspace environment.
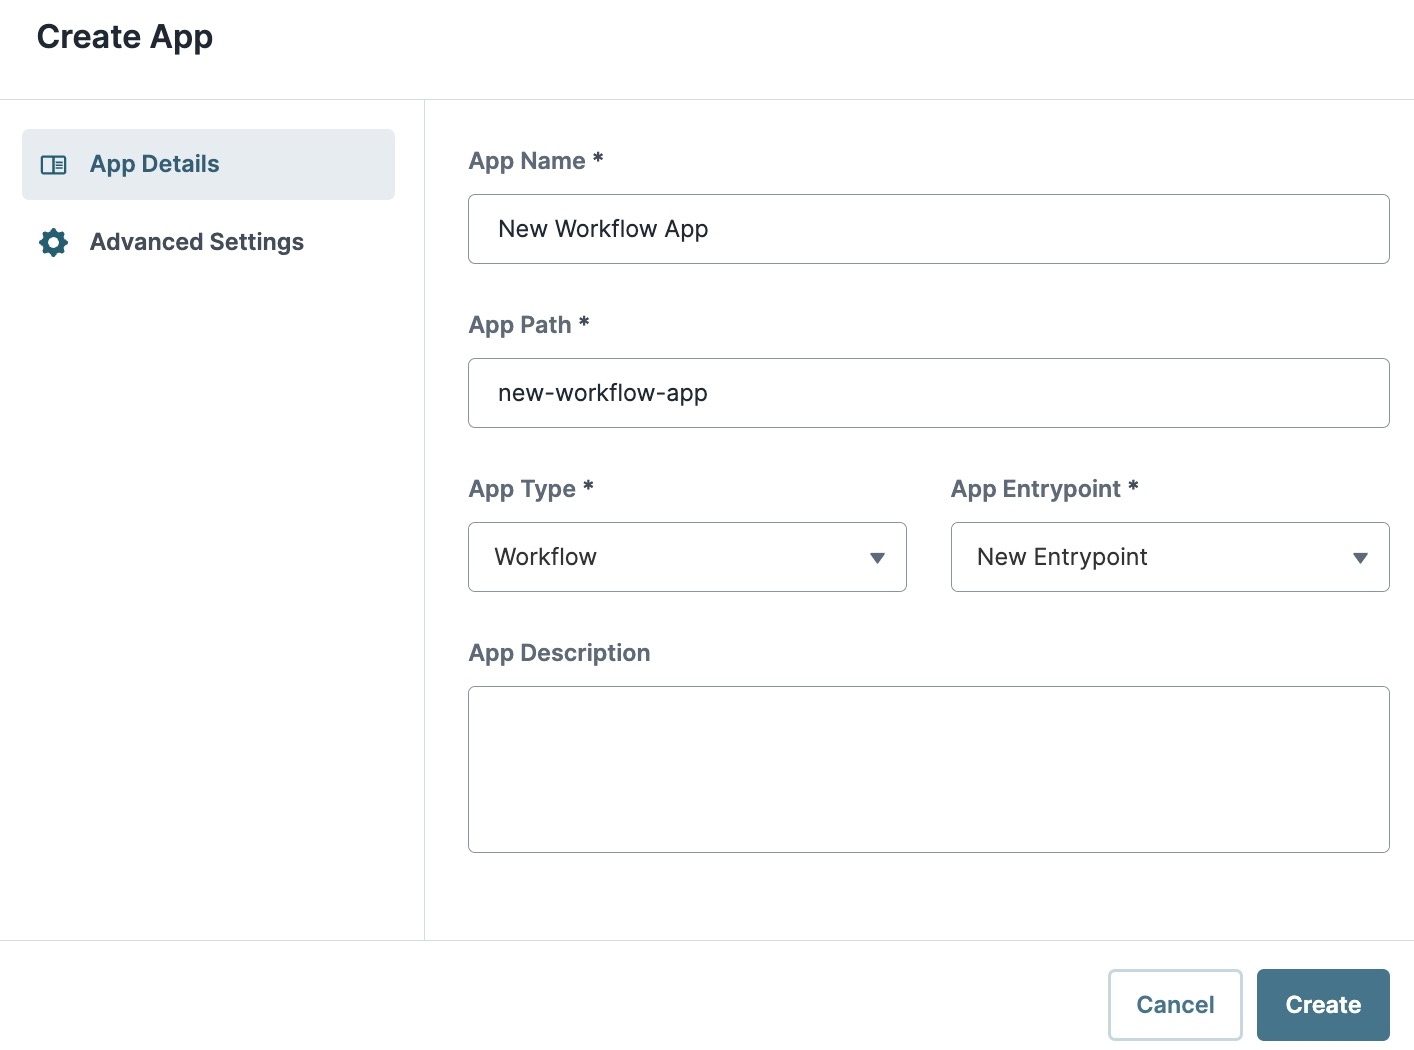
To create a workflow-type application in your workspace:
From the Workspace page, click + Create App.
Enter a unique App Name*. The App Path populates using the App Name value.
From the App Type* drop-down, select Workflow.
From the App Entrypoint* drop-down, select New Entrypoint.
In the App Description field, add a brief description of your workflow application.
Click Create.
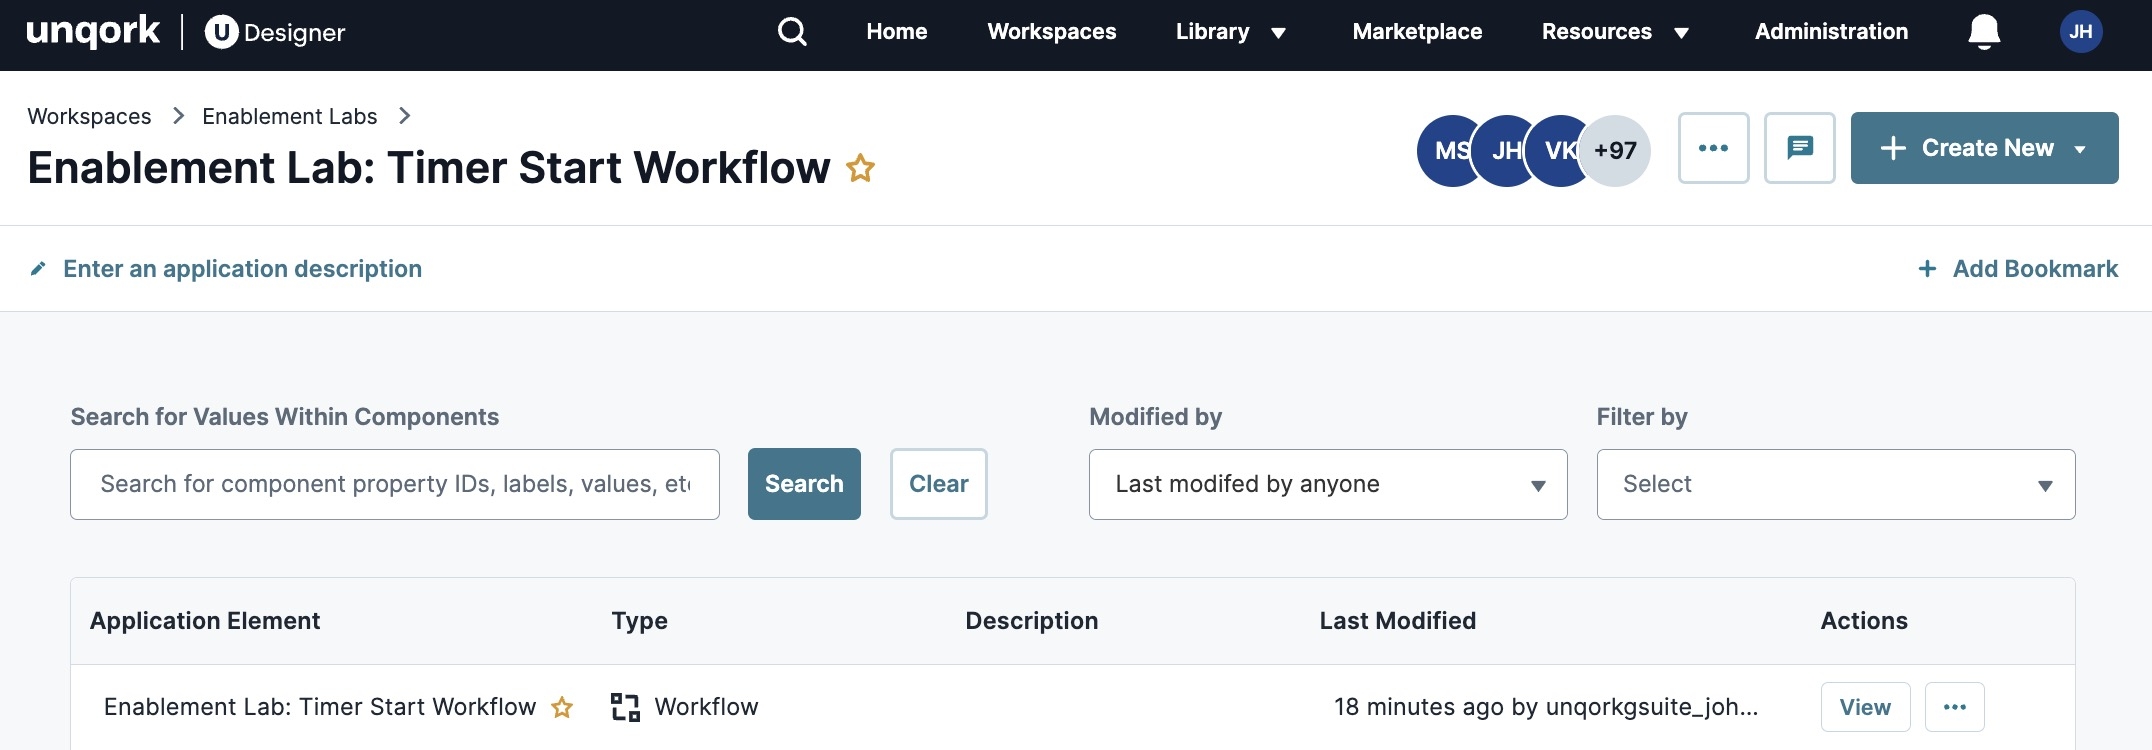
The Workflow application is now available in your workspace. In the application, element list, find your workflow and click View. Here's an example of a Workflow application landing page:
Navigating the Workflow Builder
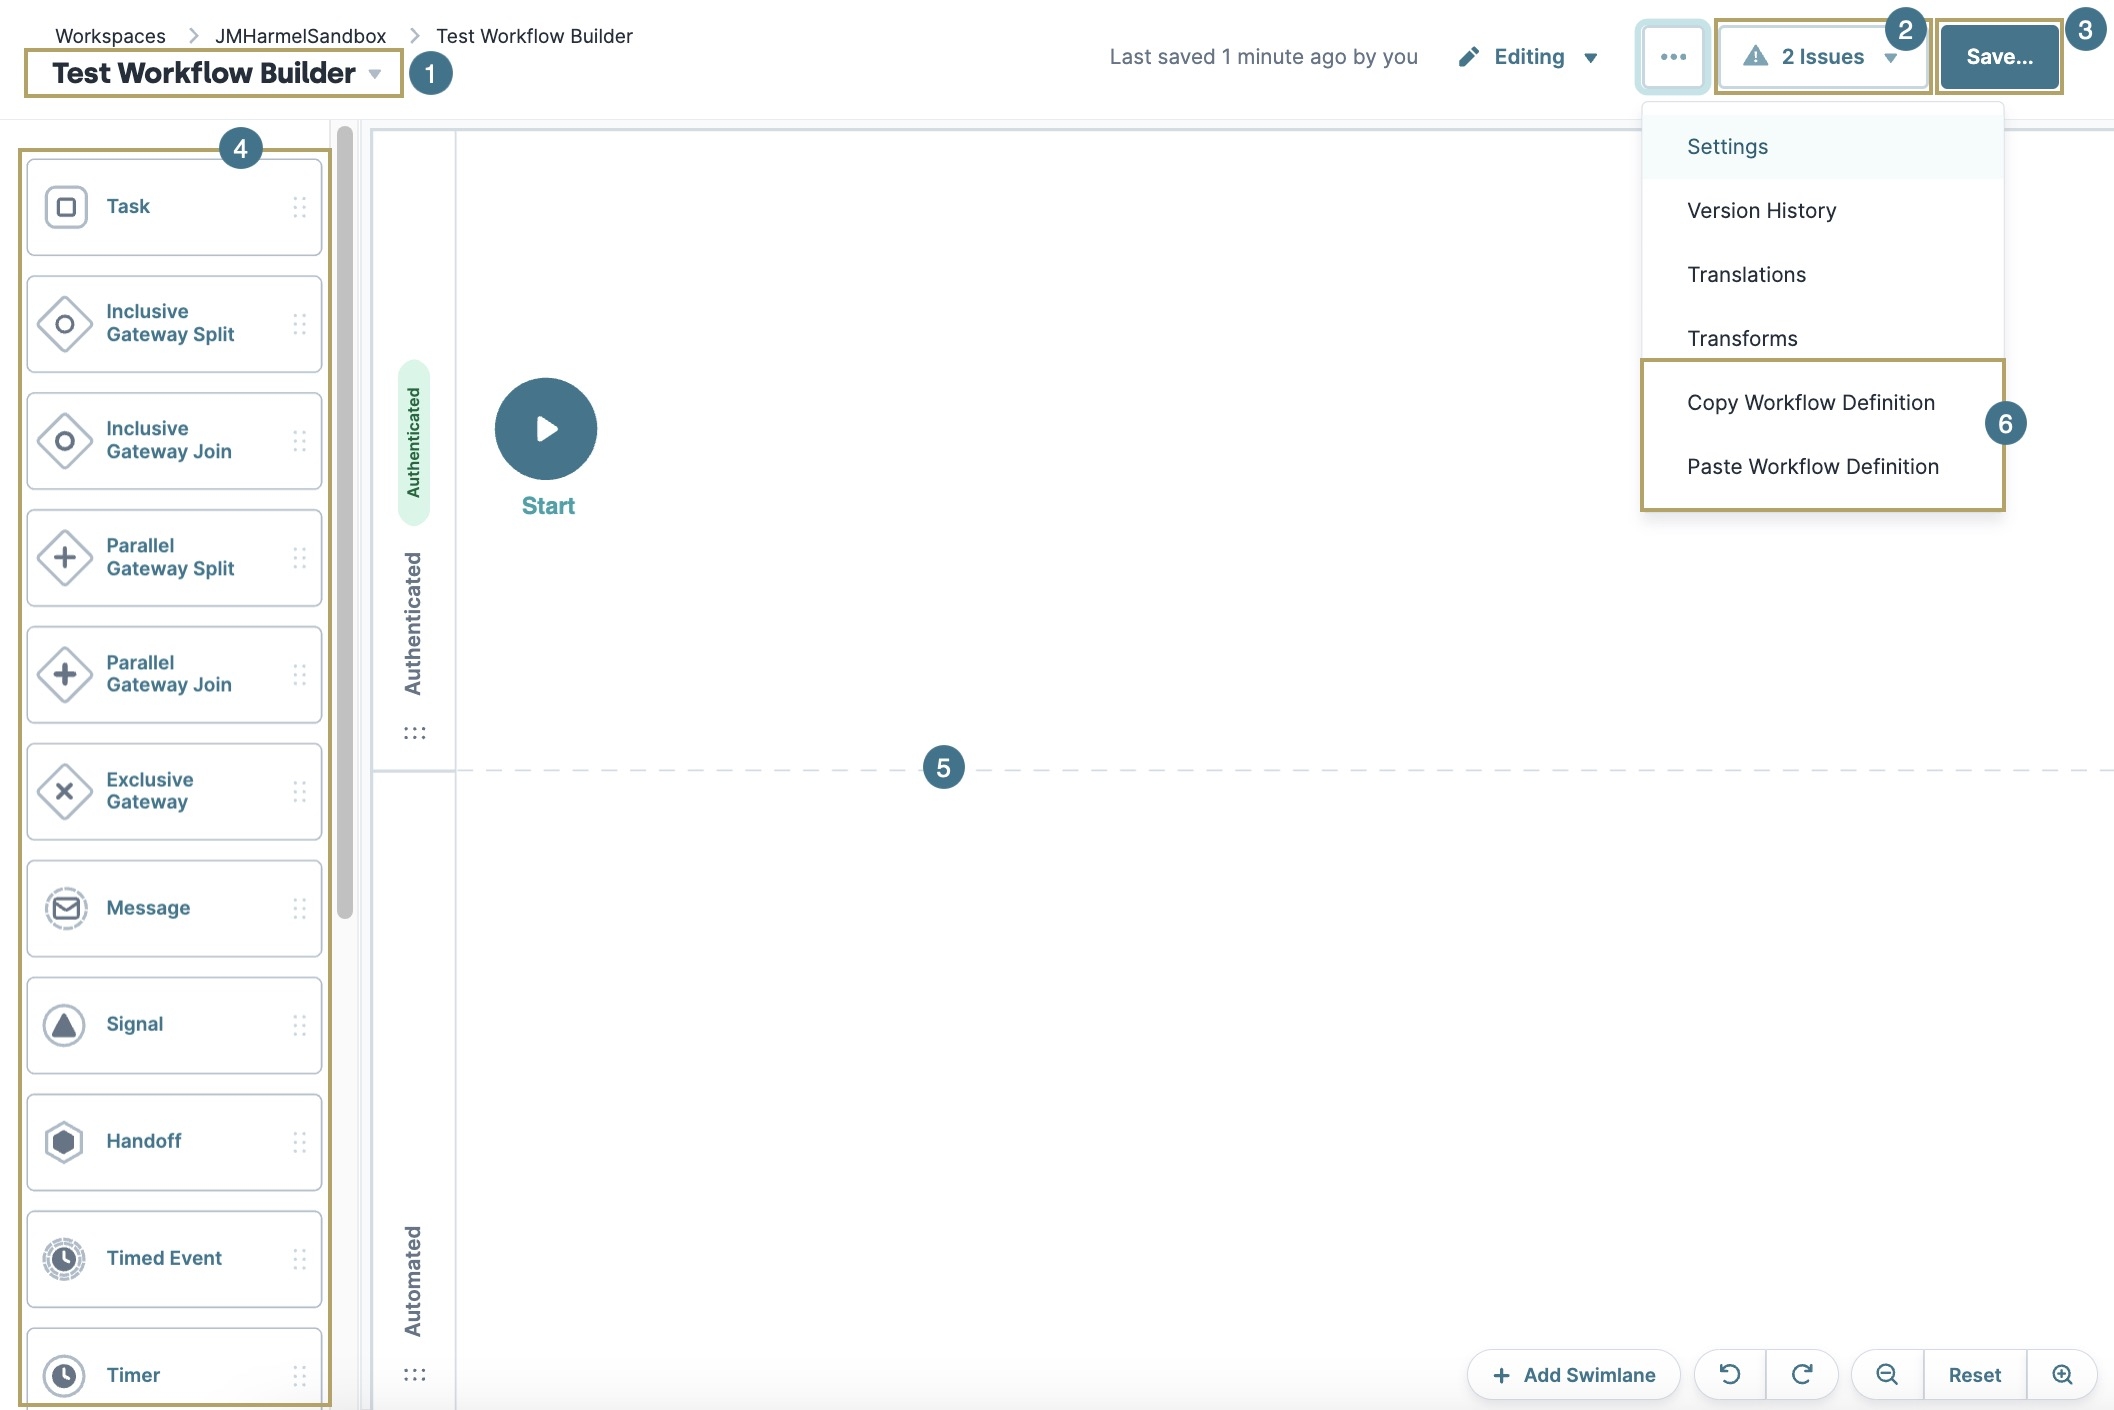
Unqork's workflow tool is loosely based on the Business Process Model & Notation (BPMN) model. Therefore, workflows let you reinvent your business process using graphical notation. After locating your workflow, click View to open it in the Workflow Builder. The highlighted settings are the frequently used settings when configuring in Unqork.
To learn more about the options you can find in the Workflow Header (ellipsis) button, see our Workflow Settings, Workflow Transforms, and Workflow Version Historyarticles.
Here are frequently used features in the Workflow Builder:
# | Feature | Description |
|---|---|---|
1 | Workflow Title | The name you choose for your module. A module's title must be unique to an individual environment. Click the ▾(drop-down arrow) to display other modules in the application. |
2 | Preview / Issues | There are two options that can display for this button:
|
3 | Save... | This button lets you save any recent configuration changes. When you save your workflow for the first time, Unqork assigns a unique workflow ID to your module. Clicking this button displays a modal that lets you create a save event in the Workflow Version History.
|
4 | Nodes | Each step in your process is represented by a node. Sometimes nodes need interaction. At other times, they are fully automated. You can add nodes from the menu at the left of your workflow lanes.
|
5 | Canvas | A swimlane is a sub-partition in a process, extending the entire length of the process. These lanes organize and categorize your tasks and activities based on end-user permissions. These lanes determine who has access to certain tasks and at what point they access those tasks. Here, you get a visual representation of each task given to a particular end-user role. Your workflow consists of two or more self-contained swimlanes, which provide clarity in your workflow. When you first enter a workflow, you have an Authenticated and an Automated swimlane by default:
You can only have one Automated lane in a workflow, but you can add additional lanes and assign them to roles based on your environment roles.
|
6 | Copy and Paste Workflow Definition | Click the
|
Workflow Swimlanes
Swimlanes set the responsibilities in your business process. Swimlanes are always contained by your pool (or workflow), representing one parallel of a process. Each swimlane communicates with other swimlanes in the same workflow. However, there are RBAC restrictions, so if you have invalid permissions for another swimlane, the submission ends. Typically, your swimlanes represent the different roles executing your process. Your swimlanes show the tasks and responsibilities of each department and the interplay between them. So, your company (workflow) can have multiple departments (swimlanes) collaborating on a business process. You can have separate workflows for different departments, or you can use swimlanes. However, as you set up your workflow, remember that each workflow should only contain one process.
Explore workflow swimlanes in our Swimlane Management aricle.
Workflow Nodes
Workflows look a lot like flow diagrams. But, instead of showing logical stages, they show business-specific actions. Workflows are comprised of elements called nodes, assembled and connected from end-to-end. To understand how nodes work together, organize them in the following way:
Activity type: Any work that must be performed in the business process. Activity-type nodes include the Task and Sub-Process nodes.
Event type: Anything that must occur during the course of your business process. Event-type nodes include End, Error, Handoff, Message, Signal, Start, Timer, Conditional Event, Signal Start, and Timer Start nodes.
Exclusive Gateway type: Controls the divergence and convergence of sequential flows in your business process, including logic and decisions. Gateway-type nodes include the Exclusive Gateway, Inclusive Gateway Split and Inclusive Gateway Join, and Parallel Gateway Split and Parallel Gateway Join nodes.
Here's a simple workflow, displaying connected nodes:
Connecting Nodes
You connect nodes by clicking and dragging connections from one node's output port (right) to the input port (left). However, you can only connect nodes that are in the same workflow. For workflows that hand-off to other workflows, you need to create new connections using a Handoff node.
Each node has ports on the side to connect one node to the next. Once connected, each port displays an arrow indicating the order of steps in your workflow. Some nodes have only one port, such as Start and End nodes. These nodes only need one connection for their roles.
Creating Sub-Processes
To help keep things organized, you can use a sub-process node. Let's say you have a three-step process for a loan application. A sub-process can group the validation of these steps together before continuing the workflow.
To learn more about the Sub-Process node, see our Sub-Process Node article.
Saving a Workflow
Saving a workflow is required to see workflow changes in Express View. But, ensure all issues are resolved before doing so. Saved workflows can be accessed at any time using the Workflow Version History tool.
To learn more about Workflow Version History, visit our Workflow Version History article.
To save a workflow:
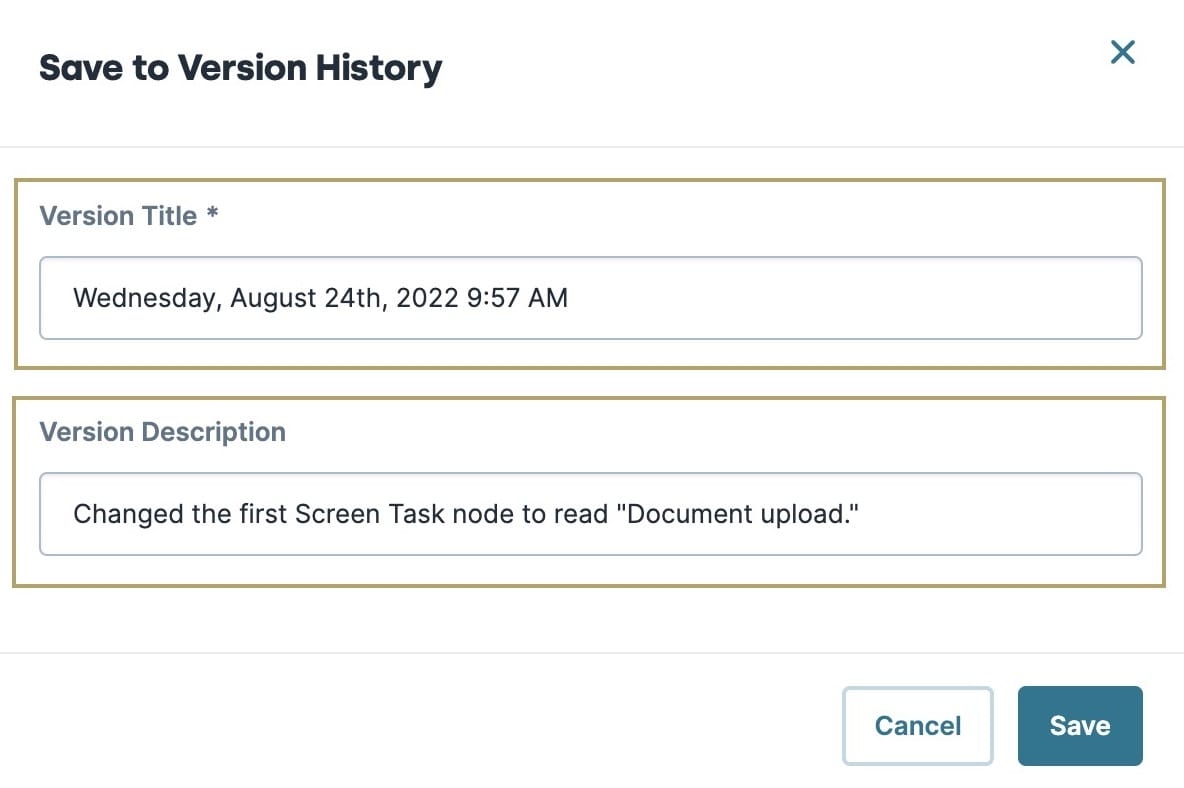
At the top right corner of the Workflow Builder, click Save. A modal displays.
In the Version Title* field, enter a name for your save.
The Version Title description defaults to the date and time of saving.
In the Version Description field, enter a description of the changes made before it was last saved.
Click Save.
Copying and Pasting a Workflow
When you copy a workflow definition, only the node layout, node references (to modules, services, and user roles), node settings, and swimlanes are copied. So, the destination workflow must have access to the assets referenced by the workflow that is being copied. For example, modules, reference data, services, user roles, and so on. Only the Enable Manual Layout Workflow setting copies over.
It's important to note that pasting a workflow definition to a new destination overwrites and replacing all existing workflow configuration in that destination.
Copying a Workflow
To copy a workflow:
In the Workflow Builder, open your workflow.
Click the
.png) (ellipsis) button.
(ellipsis) button.Select Copy Workflow Definition.
Pasting a Workflow
To paste a workflow:
Open the workflow where you want to paste the copied workflow.
Click the
.png) (ellipsis) button.
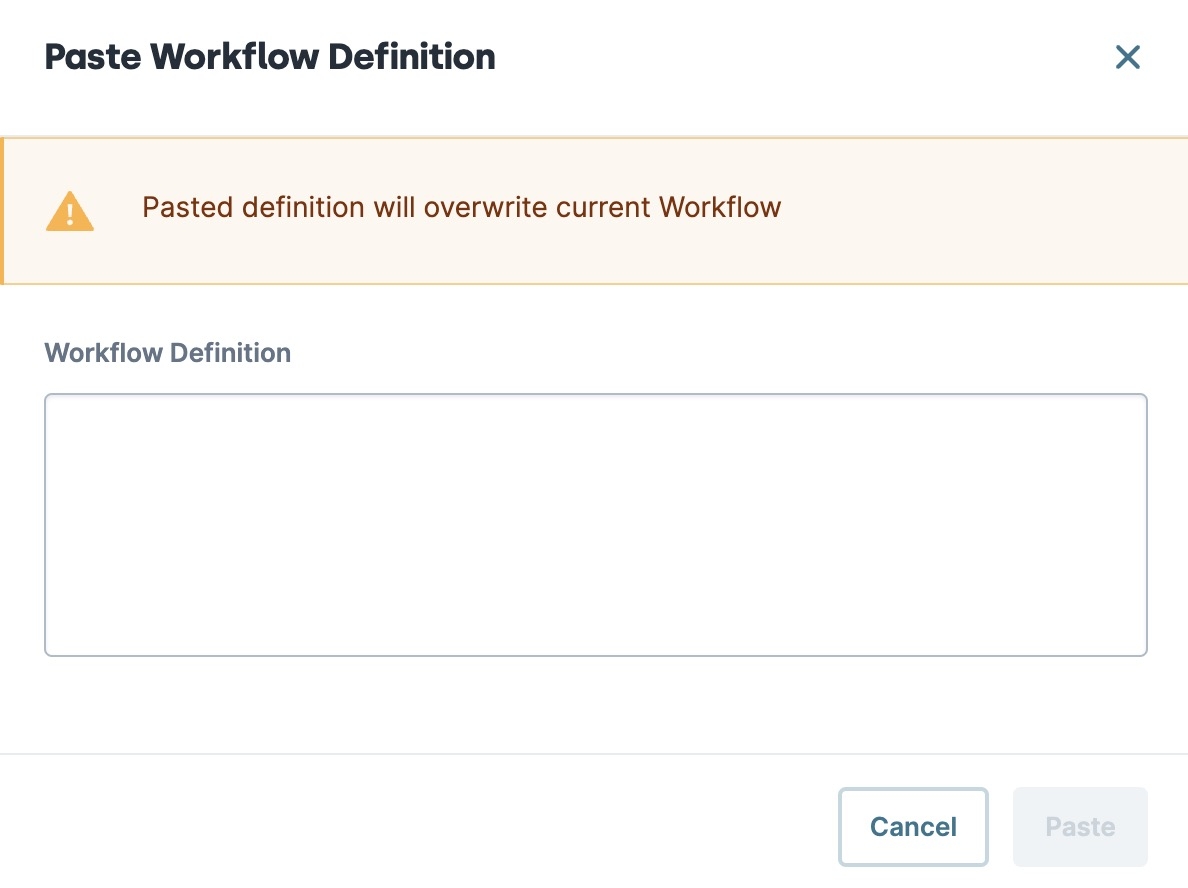
(ellipsis) button.Select Paste Workflow Definition. A displays.
Press the Ctrl + V keys (PC) or Cmd + V keys (Mac) to paste the workflow definition from the clipboard to the text field in the modal.
Click Paste.
You can only paste valid Unqork JSON. An error occurs if the format is incorrect.
Overview
Workflows streamline and organize your business processes by separating complex logic across a series of modules. With Workflows, you can achieve the same result as including everything in one module, but with a smoother end-user experience. Workflows also let you see what step of the process your end-user completed.
Here are some additional benefits of using a workflow:
Automated execution of workflows and processes.
Linked modules for collecting data and creating a single submission.
Seamless orchestration, routing, rules, and dynamic flow, achieving full flexibility in your applications.
The ability to quickly and easily apply role-based security.
Creation of any number of unique user journeys by using multiple Workflow nodes.
URL redirects to lead your end-users from one workflow to another, saving the data and offering the option to continue a submission later.
One agent can complete part of a submission before handing it off to another agent. Then, your second agent can return the submission to the original agent. This process is called multi-party support and happens automatically. Workflow processes can also be completed in parallel, with multiple end-users interacting with a workflow at the same time.
Here is a preview of a completed workflow in the Workflow Builder:
Learn more about setting up and using Workflows by clicking on the tabs below:
Creating a Workflow-Type Application
If you don't have an existing application, create one from your workspace environment.
To create a workflow-type application from the Workspaces page:
From your Workspace page, click +Create App.
Enter a unique App Name*. The App Path field populates automatically.
From the App Type* drop-down, select
Workflow.From the App Entrypoint* drop-down, select
New Entrypoint.In the App Description field, add a brief description of your workflow application.
Click Create.
The Workflow application is now available in your workspace. In the application, element list, find your workflow and click View. Here's an example of a Workflow application landing page:
.jpg)
Navigating the Workflow Builder
Unqork's workflow tool is loosely based on the Business Process Model & Notation (BPMN) model. Therefore, workflows let you reinvent your business process using graphical notation. After locating your workflow, click View the tile to open it in the Workflow Builder. The highlighted settings are the frequently used settings when configuring in Unqork.
To learn more about the options you can find in the Workflow Header
(ellipsis) button, see our Workflow Settings, Workflow Transforms, and Workflow Version History articles.
Here are frequently used features in the Workflow Builder:
# | Feature | Description |
|---|---|---|
1 | Workflow Title | The name you choose for your module. A module's title must be unique to an individual environment. Click the ▾(drop-down arrow) to display other modules in the application. |
2 | Preview / Issues | There are two options that can display for this button:
|
3 | Save... | This button lets you save any recent configuration changes. When you save your workflow for the first time, Unqork assigns a unique workflow ID to your module. Clicking this button displays a modal that lets you create a save event in the Workflow Version History.
|
4 | Nodes | Each step in your process is represented by a node. Sometimes nodes need interaction. At other times, they are fully automated. You can add nodes from the menu at the left of your workflow lanes.
|
5 | Canvas | A swimlane is a sub-partition in a process, extending the entire length of the process. These lanes organize and categorize your tasks and activities based on end-user permissions. These lanes determine who has access to certain tasks and at what point they access those tasks. Here, you get a visual representation of each task given to a particular end-user role. Your workflow consists of two or more self-contained swimlanes, which provide clarity in your workflow. When you first enter a workflow, you have an Authenticated and an Automated swimlane by default:
You can only have one Automated lane in a workflow, but you can add additional lanes and assign them to roles based on your environment roles.
|
6 | Copy and Paste Workflow Definition | Click the
|
Workflow Swimlanes
Swimlanes set the responsibilities in your business process. Swimlanes are always contained by your pool (or workflow), representing one parallel of a process. Each swimlane communicates with other swimlanes in the same workflow. However, there are RBAC restrictions, so if you have invalid permissions for another swimlane, the submission ends. Typically, your swimlanes represent the different roles executing your process. Your swimlanes show the tasks and responsibilities each department has and the interplay between them. So, your company (workflow) can have multiple departments (swimlanes) collaborating on a business process. You can have separate workflows for different departments, or you can use swimlanes. However, as you set up your workflow, remember that each workflow should only contain one process.
Explore workflow swimlanes in our Swimlane Management aricle.
Workflow Nodes
Workflows look a lot like flow diagrams. But instead of showing logical stages, they show business-specific actions. Workflows are comprised of elements called nodes, assembled and connected from end-to-end. To understand how nodes come together, you can place them in these buckets:
Activity type: Any work that must be performed in the business process. Activity-type nodes include the Task and Sub-Process nodes.
Event type: Anything that must occur during the course of your business process. Event-type nodes include End, Error, Handoff, Message, Signal, Start, Timer, Conditional Event, Signal Start, and Timer Start nodes.
Exclusive Gateway type: Controls the divergence and convergence of sequential flows in your business process. They also deal with logic and decisions. Gateway-type nodes include the Exclusive Gateway, Inclusive Gateway Split and Inclusive Gateway Join, and Parallel Gateway Split and Parallel Gateway Join nodes.
Here's a simple workflow, showing nodes as you connect them:
Connecting Nodes
You connect nodes by clicking and dragging from one node's output port (right) to the input port (left) of another. However, you can only connect nodes that are in the same workflow. For workflows that hand-off to other workflows, you need to create new connections using a Handoff node.
Each node has ports on the side to connect one node to the next. Once connected, each port displays an arrow indicating the order of steps in your workflow. Some nodes have only one port, such as Start and End nodes. These nodes only need one connection for their roles.
Creating Sub-Processes
To help keep things organized, you can use a sub-process node. Let's say you have a three-step process for a loan application. A sub-process can group the validation of these steps together before continuing the workflow.
To learn more about the Sub-Process node, see our Sub-Process Node article.
Saving a Workflow
Saving a workflow is required to see workflow changes in Express View. But, ensure all issues are resolved before doing so. Saved workflows can be accessed at any time using the Workflow Version History tool.
To learn more about Workflow Version History, visit our Workflow Version History article.
To save a workflow:
At the top right corner of the Workflow Builder, click Save. A modal displays.
In the Version Title* field, enter a name for your save.
The Version Title description defaults to the date and time of saving.
In the Version Description field, enter a description of the changes made before it was last saved.
Click Save.
Copying and Pasting a Workflow
When you copy a workflow definition, only the node layout, node references (to modules, services, and user roles), node settings, and swimlanes are copied. So, the destination workflow must have access to the assets referenced by the Workflow that is being copied. For example, modules, reference data, services, user roles, and so on. Only the Enable Manual Layout Workflow setting copies over.
It's important to note that pasting a workflow definition to a new destination overwrites and replacing all existing workflow configuration in that destination.
Copying a Workflow
To copy a workflow:
In the Workflow Builder, open your workflow.
Click the
.png) (ellipsis) button
(ellipsis) buttonSelect Copy Workflow Definition.
Pasting a Workflow
To paste a workflow:
Open the workflow where you want to paste the copied workflow.
Click the
.png) (ellipsis) button.
(ellipsis) button.Select Paste Workflow Definition. A pop-up modal displays.
Press the Ctrl + V keys (PC) or Cmd + V keys (Mac) to paste the workflow definition from the clipboard to the text field in the window.
Click Paste.
You can only paste valid Unqork JSON. An error occurs if the format is incorrect.
Best Practices
Build automated lane tasks to complete operations in five minutes to prevent timeouts. User input modules can complete operations as long as needed. The five-minute limitation does not apply to QA or Staging environments. However, workflows promoted to the Production environment are affected by the five-minute operation limit.
Create modules in the Automated Workflow lane with the following settings:
Enable Server-side Execution Only in module settings for external API service endpoints that are configured in server administration. SSE prevents external services from seeing sensitive information such as financial data or PII (Personal Identifiable Information).
Enable Customize RBAC for this Module in the module permissions.
.jpg)