Overview
The Inclusive Gateway Split node is one half of the Inclusive Gateway set of nodes, along with the Inclusive Gateway Join node.
The Inclusive Gateway Split node lets you split a single flow of your business process into multiple flows. Unlike the Exclusive Gateway node, though, with the Inclusive Gateway set of nodes, multiple flows can run concurrently. You can even use decision logic to define which parallel processes will run in a given scenario. When the submission splits at the Inclusive Gateway Split node, your workflow creates one or more states of the workflow submission. Another key difference between the Inclusive and Exclusive Gateway is that there isn't a single, defined default path. Instead, you'll use logic expressions and link ordering to control which path the end-user follows.
Situations when you might use the Inclusive Gateway set of nodes include:
Executing two or more automated tasks at the same time, before the end-user progresses to the next task in the workflow.
Allowing multiple team members to work on different tasks in a workflow at the same time.
Executing automated tasks at the same time as end-user tasks.
When you use an Inclusive Gateway Split node in your workflow, you must also use an Inclusive Gateway Join node. The Inclusive Gateway Join node has two jobs:
Pausing the workflow until all parallel tasks that split from the Inclusive Gateway Split node are complete.
Merging together each state of the submission before the submission can progress through the rest of the workflow.
To learn more about the Inclusive Gateway Join node, search Inclusive Gateway Join Node in our In-Product Help.
It's important that all paths that split from a given Inclusive Gateway Split node reconnect at the same Inclusive Gateway Join node. For example, you can't connect a Handoff or End node to a task or path that splits from an Inclusive Gateway Split node. You also can't connect paths that split from the same Inclusive Gateway Split node to several Inclusive Gateway Join nodes. These rules ensure your workflow can't reach an endpoint while multiple states of the same submission exist.
Inclusive Gateway Split Node Settings
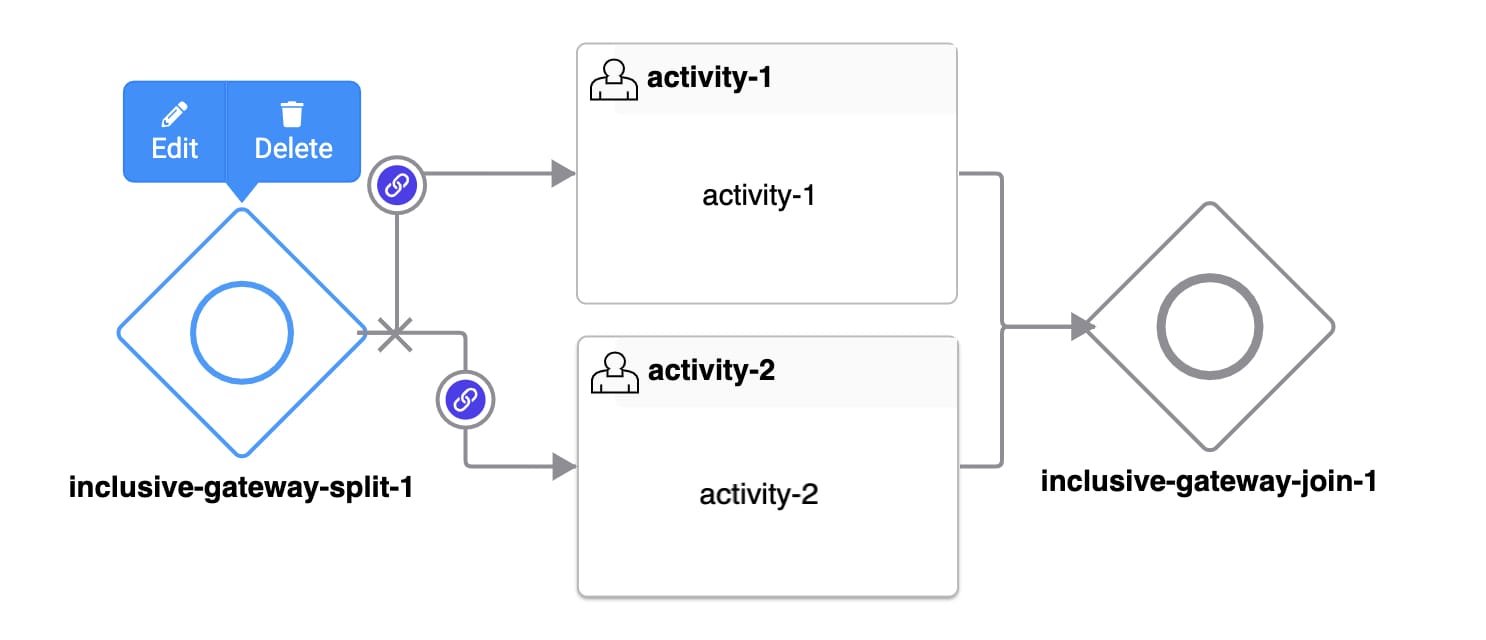
After adding an Inclusive Gateway Split node to your workflow, select it to open a Settings Menu. This menu displays as a blue menu bar, either above or below the node itself. The menu has the following options:
Setting | Description |
|---|---|
Edit Button | Opens the Edit Inclusive Gateway Split window. From there, you can configure settings relating to the Inclusive Gateway Split node. |
Delete Button | Removes the node from the workflow. |
Edit Inclusive Gateway Split Window Description
Clicking the Edit button displays the Edit Inclusive Gateway Split window.
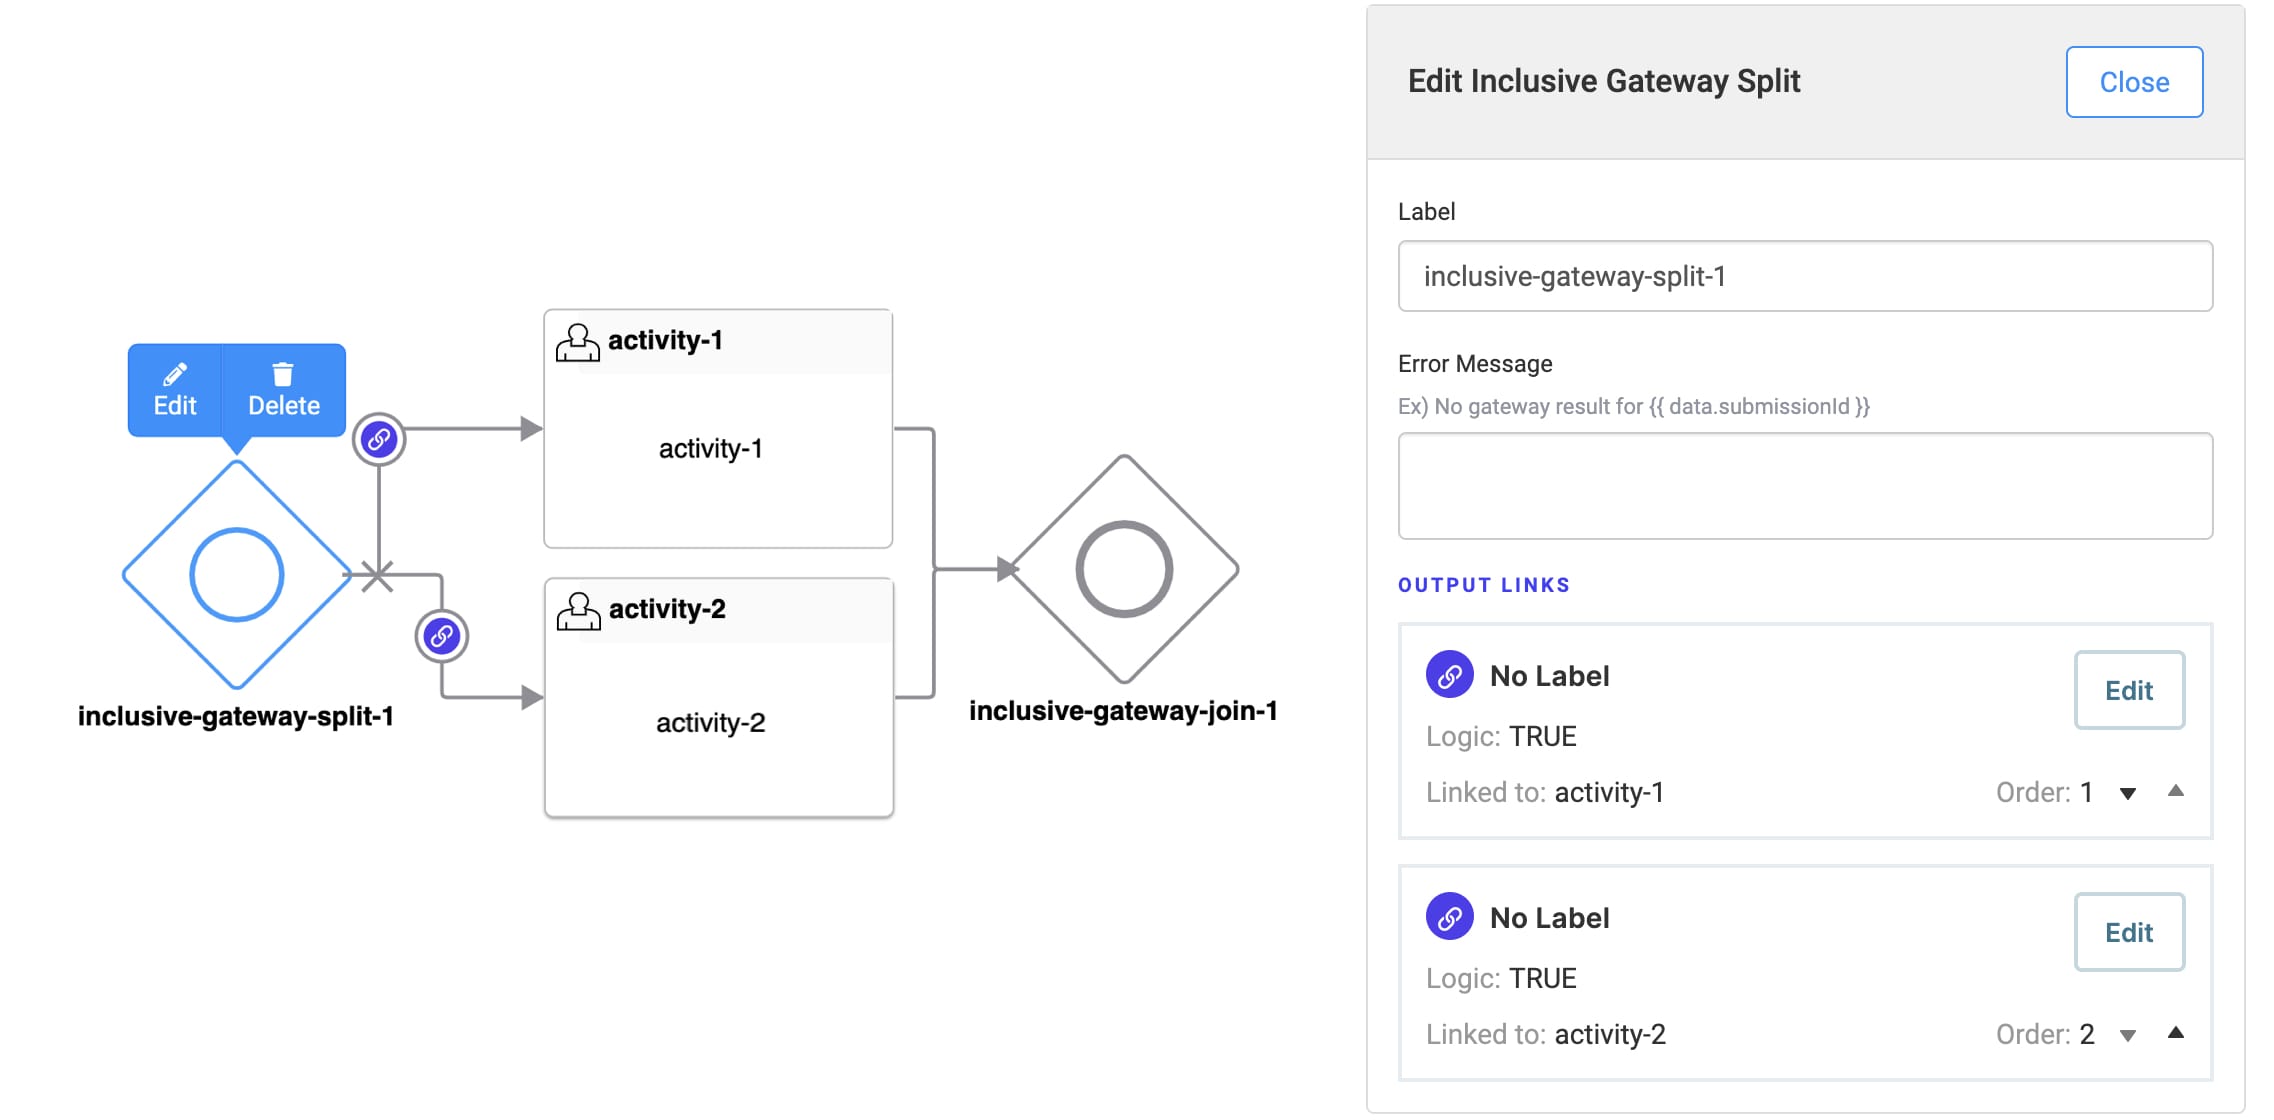
The following settings are available in the Edit Inclusive Gateway Split window:
Setting | Description |
|---|---|
Label | The name applied to the node. By default, the Label displays as inclusive-gateway-split-1. This label is optional and displays below the node once set. Labels should be user-friendly and well associated with the role of the node. |
Error Message | Enter a custom error message to display when one or more paths that split from the Inclusive Gateway Split node can't proceed. |
Output Links | Lists all Inclusive Gateway Split Links that split from the Inclusive Gateway Split node. Each listed output link shows the link's name, logic, the name of the linked node, and the link's order. Clicking Edit in a listed output link opens the link's Edit Inclusive Gateway Link window. |
Link Order | Upon linking other nodes to your Inclusive Gateway Split node, the Output Links section populates. By default, links display in the order they were added. You can also manually reorder links using the Order selector. Click the up and down arrow icons to change a link's order. Link ordering helps determine which task your end-user encounters when workflow progresses through the Inclusive Gateway Split node. This is useful when an end-user could potentially access multiple parallel processes. By default, the end-user progresses along the order 1 link.
|
Close Button | Closes the Edit Inclusive Gateway Split window. |
Inclusive Gateway Split Links
Your Inclusive Gateway Split node splits the workflow submission's path, depending on simple logic. When you connect an Inclusive Gateway Split node's output port to another node, the connector becomes an Inclusive Gateway Split link. Inclusive Gateway Split links look like a directional arrow with a link indicator.
In the Workflow Builder, the link indicator is red when logic isn't defined. After defining a logic expression, the link indicator is purple.
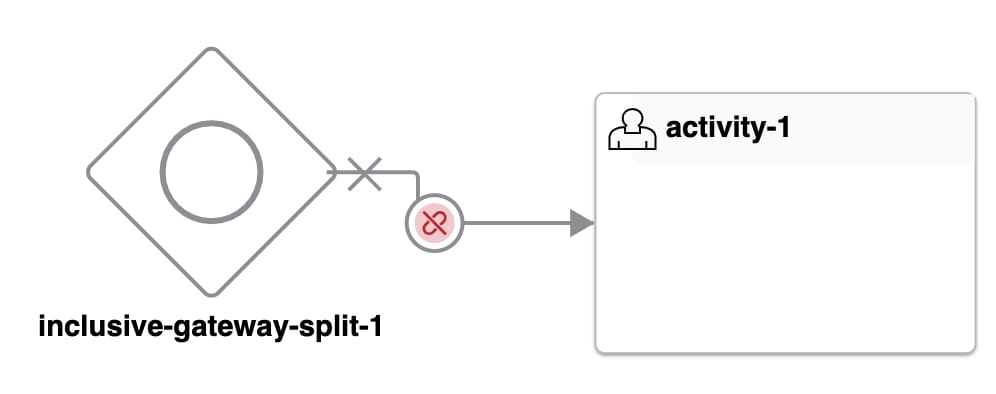
You'll notice that the Inclusive Gateway Split link has an X icon along the link. This icon represents the navigation restrictions related to a parallel process. When your end-user proceeds down an Inclusive Gateway Split link, they're entering a parallel process. End-users can't exit that parallel process or enter a new parallel process using the Previous button or Direct Navigation. This helps maintain the integrity of the workflow submission while multiple states exist.
Output links from an Inclusive Gateway Join node also has an X icon. Inclusive Gateway Join links have similar navigation restrictions. After all parallel processes are complete, end-users can't navigate back to a task that was part of a parallel process.
An Inclusive Gateway Split node should connect to at least two nodes before merging at an Inclusive Gateway Join node. This creates at least two possible workflow paths. But, your workflow won't necessarily progress along each of those paths. You can control which link path the workflow progresses along using simple logic statements. You'll set up logic statements in the Edit Inclusive Gateway Split Link window.
In some cases, your end-user will have permissions that grant access to several paths. To control which link path your end-user follows in Express View, you can use link ordering. See the Link Order setting description, under Edit Inclusive Gateway Split Window Description, to learn more.
Logic and Error Handling
When a workflow reaches an Inclusive Gateway Split node, the workflow reviews the logic for all connected Inclusive Gateway Split links. All links that evaluate as true (logic match) proceed concurrently, assuming the associated tasks are in different swimlanes.
But what happens when one or more link paths encounter an error in between the Inclusive Gateway Split and Join nodes? Let's explore some error handling scenarios and see how the workflow behaves.
Error Handling with Only Automated Tasks
You might want to use the Inclusive Gateway nodes to run multiple automated tasks in parallel, with no user tasks involved. If one or more automated tasks fail, the workflow returns to its state before the split occurred. The end-user stays on the task before the Inclusive Gateway Split node.
Error Handling with Automated Tasks Before User Tasks
How about if after your Inclusive Gateway Split node you have automated tasks followed by user tasks? If one or more automated tasks fail, the workflow again returns to its state before the split occurred. This prevents user tasks in one swimlane from being completed while another swimlane is experiencing an error.
Inclusive Gateway Split Link Settings Menu
Selecting an Inclusive Gateway Split link opens a Settings Menu. This menu displays as a blue menu bar, above the link indicator. The menu has the following options:
Setting | Description |
|---|---|
Edit Button | Opens the Edit Inclusive Gateway Split Link window. From there, you can configure settings relating to the Inclusive Gateway Split link. |
Delete Button | Removes the link from the workflow. |
Edit Inclusive Gateway Split Link Window Description
Clicking the Edit button displays the Edit Inclusive Gateway Split Link window.
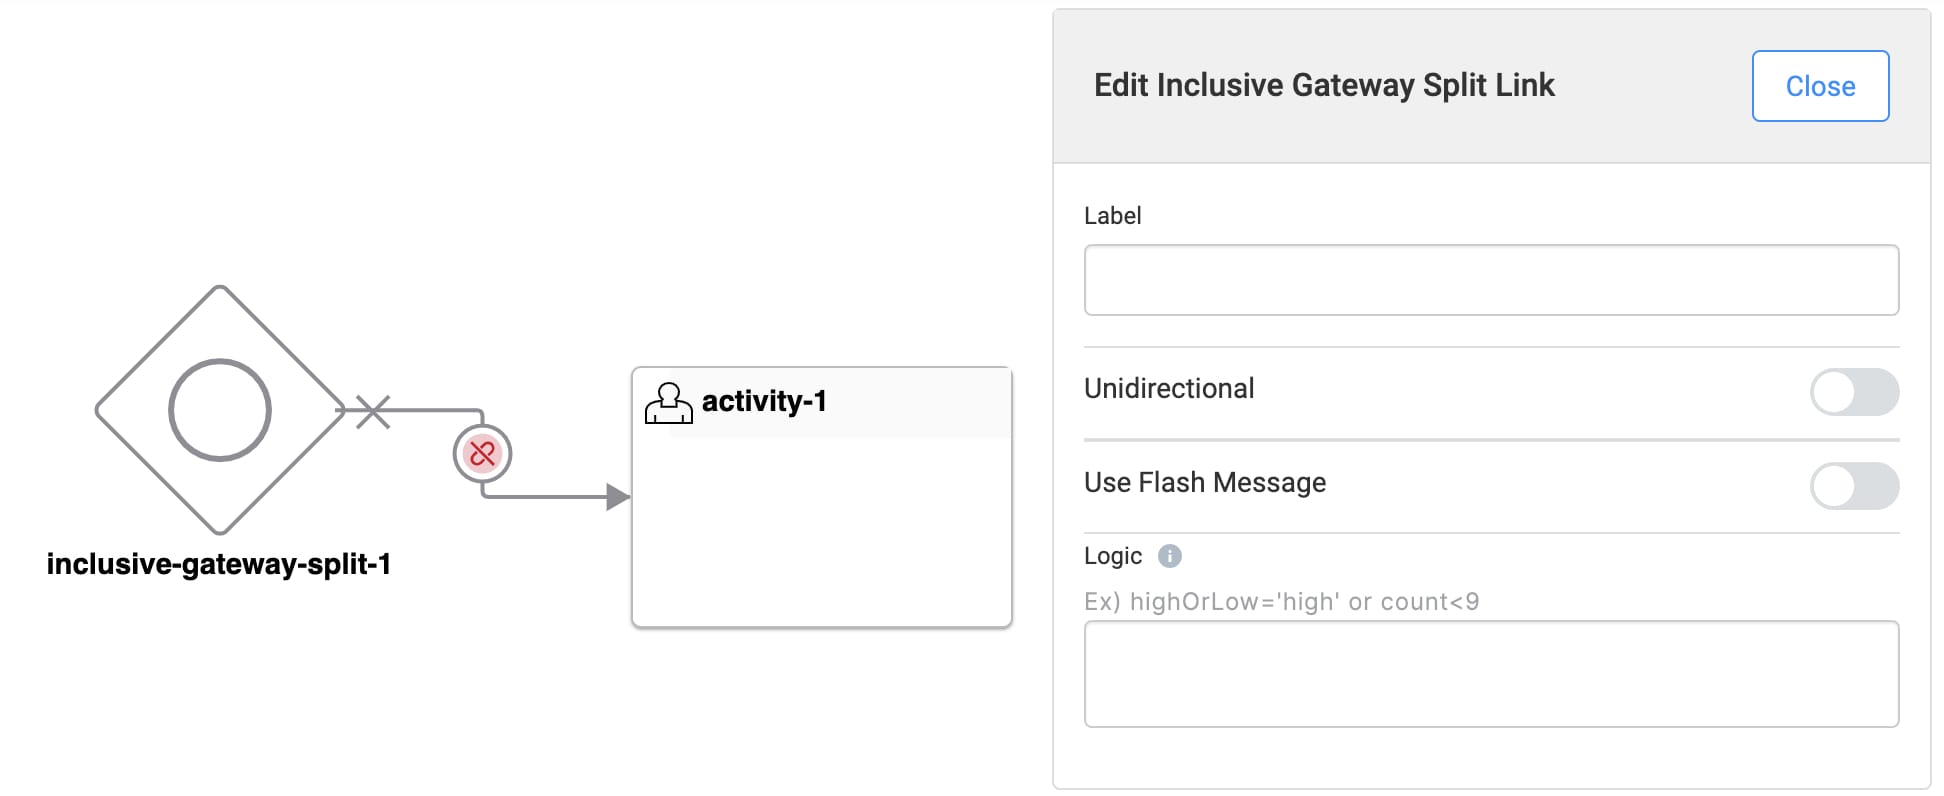
The following settings are available in the Edit Inclusive Gateway Split Link window:
Setting | Description |
|---|---|
Label | The name applied to the link. This label is optional and displays below the link once set. Labels should be user-friendly and well-associated with the role of the node. |
Unidirectional | Sets the link one-way. End-users can't navigate back through a unidirectional link. The link has a double arrowhead when the Unidirectional setting is The link has a single arrowhead when the Unidirectional setting is By default, the Unidirectional setting is |
Use Flash Message | When set to ON, you can create a flash message for this link. Flash Messages are alerts that display at the top of the workflow in Express View. They show when an end-user navigates past a link that has a Flash Message enabled. By default, the Use Flash Message setting is |
Flash Message | This setting displays when the Use Flash Message setting is (ON). Enter a custom flash message for the alert. |
Make Flash Message Dismissible | This setting displays when the Use Flash Message setting is (ON). When set to
|
Message Status | This setting displays when the Use Flash Message setting is (ON). Select a message status for your flash message. The message status affects the styling of your flash message. The drop-down options are:
|
Logic | Sets the logic for the Inclusive Gateway Split link. All links with logic that evaluate as true proceed concurrently. The expression typically consists of a Property ID, an operator, and criteria (value) for matching. For example:
The Logic field also supports Excel formulas. For example:
The Property ID should reference a field accessible to your workflow. For example, a field present in the workflow submission. The Logic field autopopulates Property ID values as you enter text.
Logic expressions support the following operators: When entering the criteria (value) the formula matches against, you can use a string, integer, or Boolean value. You must wrap strings in single ( |
Adding an Inclusive Gateway Split Node
Let's set up a workflow that includes an Inclusive Gateway Split node and an accompanying Inclusive Gateway Join node. The scenario for this workflow is as follows:
The end-users are all involved in helping review and approve a life insurance policy application. The workflow has four different swimlanes with four different roles:
Underwriter
Broker
Doctor
Automated
The Broker begins the workflow. The first task is to start a life insurance policy application on behalf of a client. When filling out the application, the Broker notes if the application needs one of two optional tasks:
If the client has previous life insurance records on file, an Underwriter must review the records.
If the client needs a health assessment, a Doctor must approve the application.
In addition to these optional tasks, there are two required tasks that always occur:
The Underwriter notes the client's income range.
A Script-type task in the Automated swimlane runs a credit score check.
After all roles complete the required and optional tasks, the Broker reviews the policy application results. Here's what the workflow looks like in the Workflow Builder:
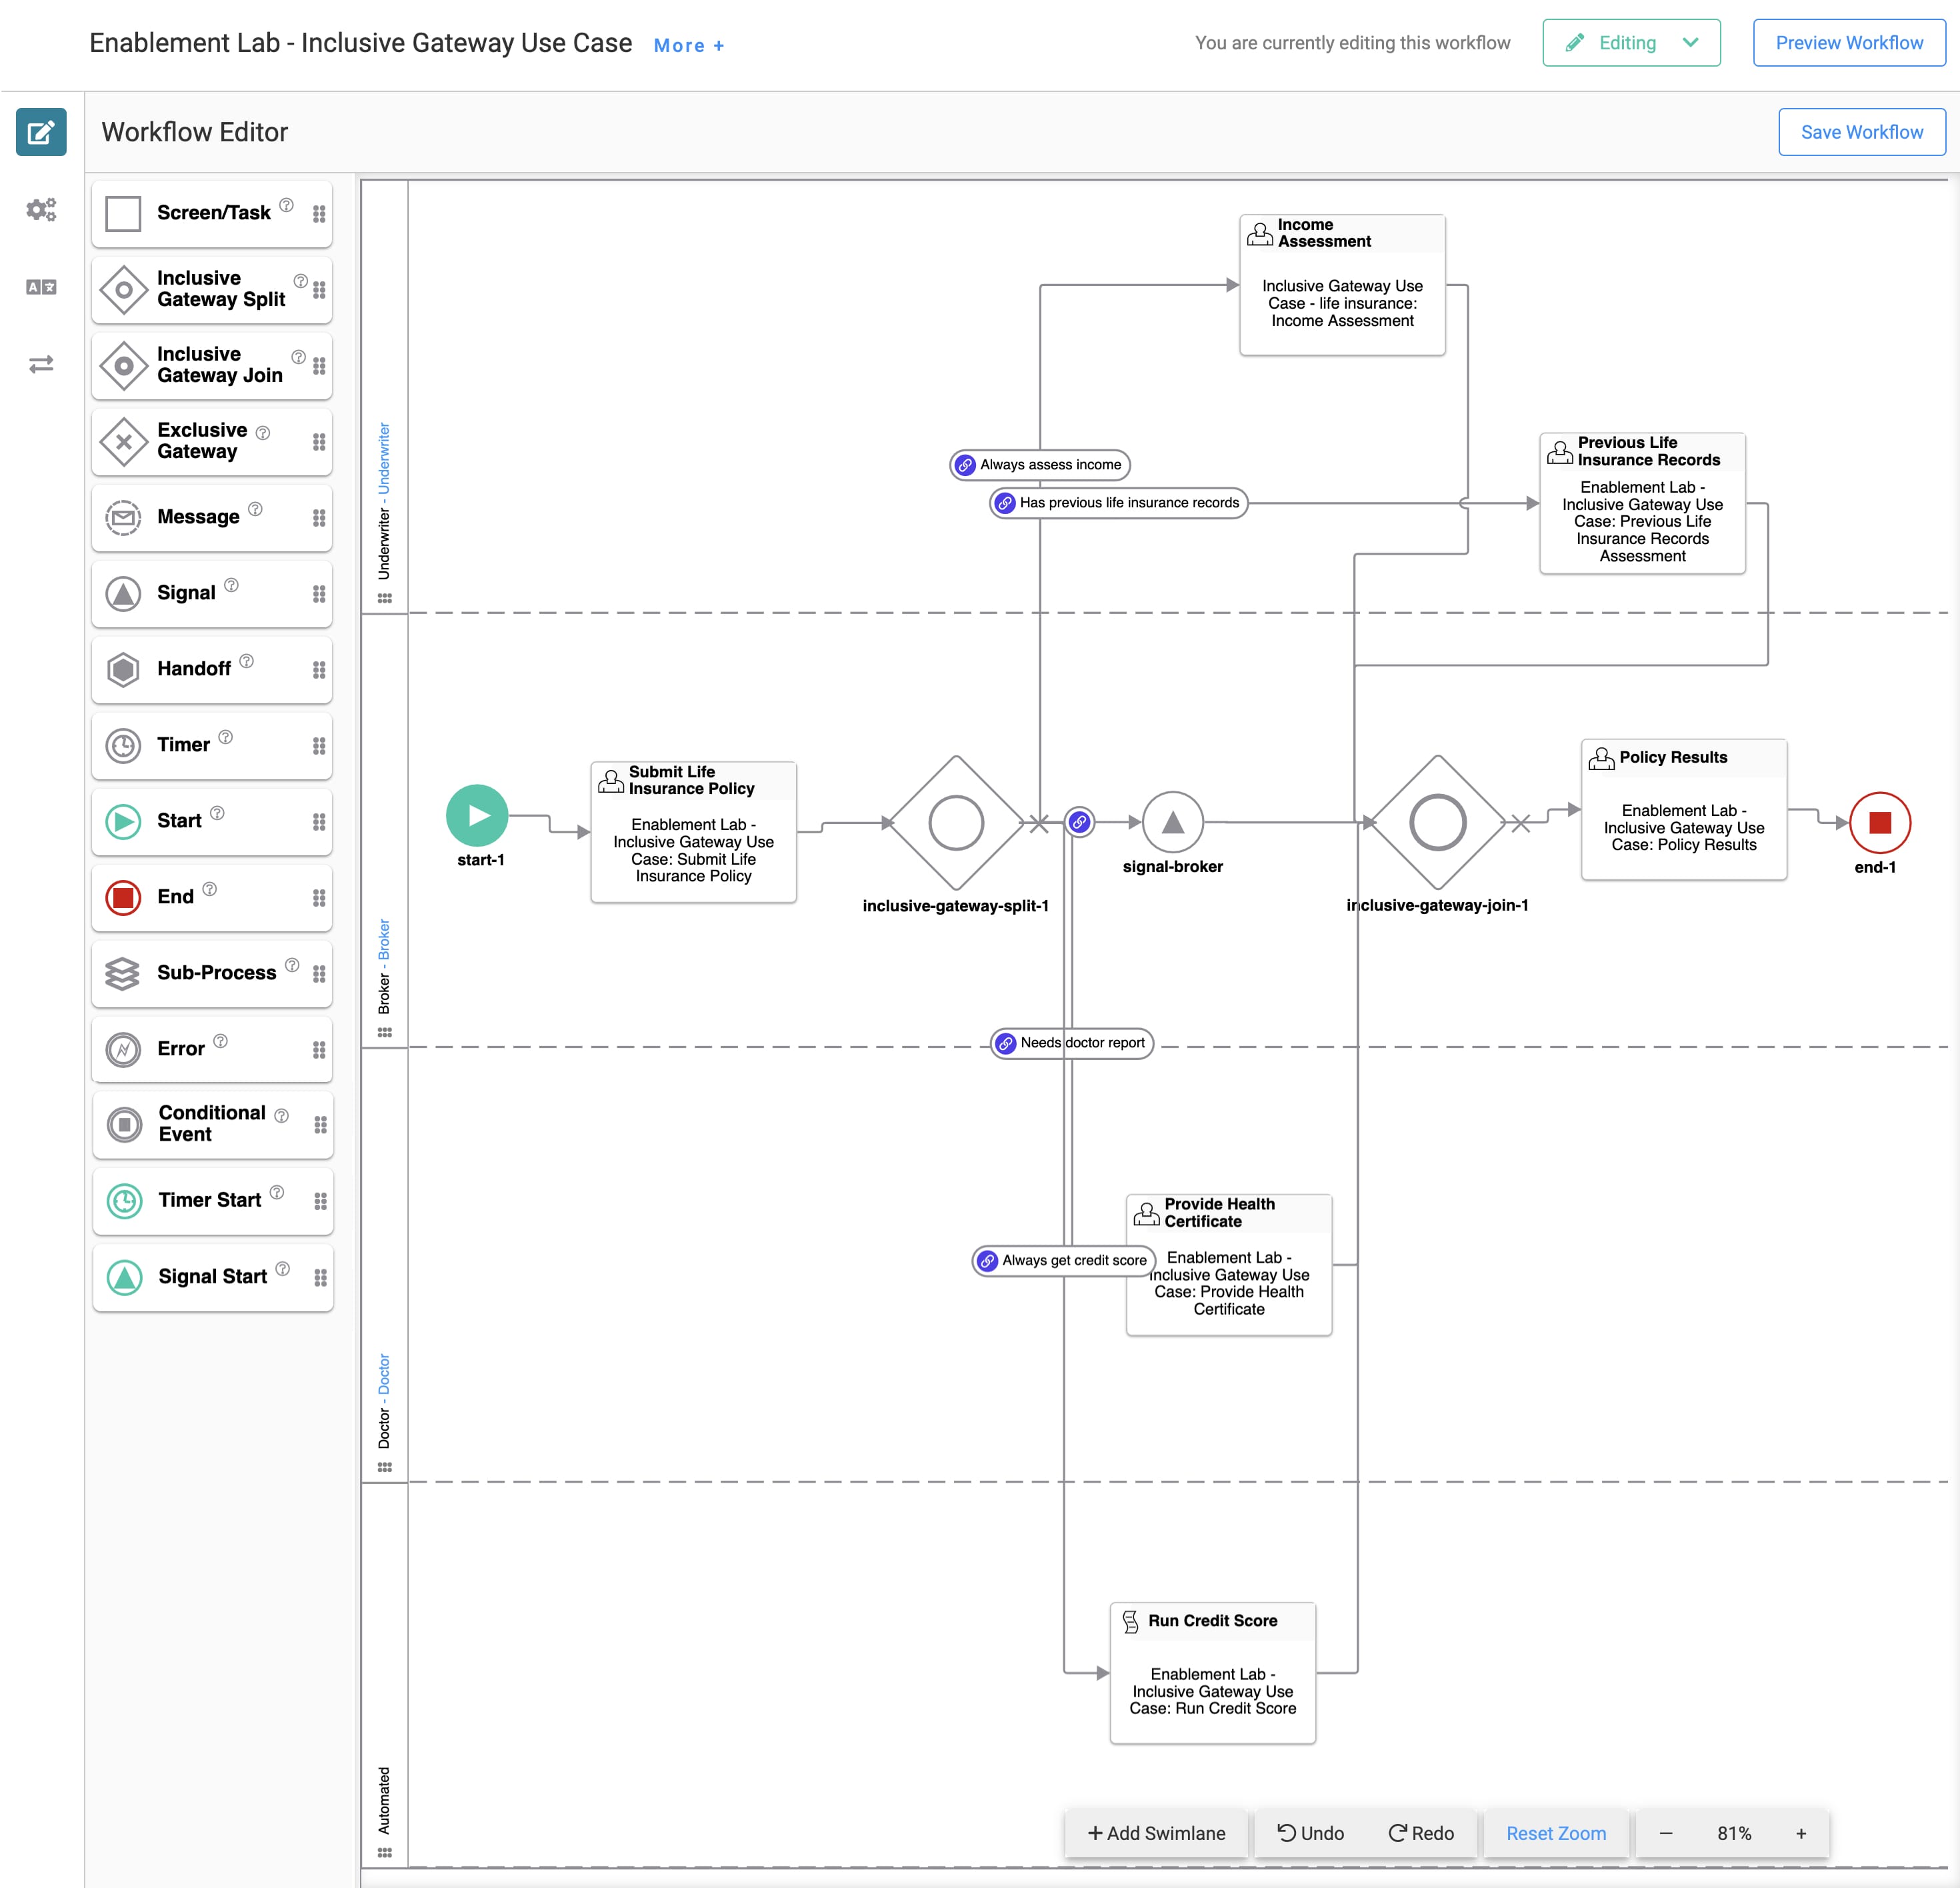
As you can see, the tasks assigned to the Underwriter, Doctor, and Automated roles take place after the Inclusive Gateway Split node. This means the Doctor, Underwriter, and Automated swimlane tasks can happen in parallel. Once complete, the workflow merges at the Inclusive Gateway Join node.
What You'll Need
To set up this use case, you'll need:
1 Start node
Workflows include a Start node by default. The Start node doesn't need any additional configuration.
6 Screen/Task nodes
We provide links to pre-built modules you can connect to your Screen/Task nodes. Because the focus of this use case is using the Inclusive Gateway Split and Join nodes, these modules have very simple fields. You can create your own modules with additional fields for more complex functionality.
1 Inclusive Gateway Split node
1 Signal node
1 Inclusive Gateway Join node
1 End node
This use case highlights how to use the Inclusive Gateway Split and Join nodes. You can add additional nodes for more complex functionality.
You'll also need to set up the following swimlanes:
Swimlane Row | Assigned Role |
|---|---|
1 | Underwriter |
2 | Broker |
3 | Doctor |
4 | Automated |
Configure the First Screen/Task Node
This first Screen/Task node is where the Broker inputs some information on behalf of the client.
For this Screen/Task node, you can connect the following pre-built module: Enablement Lab - Inclusive Gateway Use Case: Submit Life Insurance Policy. You can find the module in the Training Environment here: https://training.unqork.io/#/form/60f9aa68409b1e38ea28bca0/edit.
Drag and drop a Screen/Task node into the workflow, placing it in the Broker swimlane.
Click Edit to open the Edit User Task window.
Enter Submit life insurance policy in the Label field.
Enter submitlifeinsurancepolicy in the Path field.
Select Enablement Lab - Inclusive Gateway Use Case: Submit life insurance policy from the Add a Module drop-down.
Close the Edit User Task window.
Configure the Inclusive Gateway Split Node
Next, you'll add the Inclusive Gateway Split node.
Drag and drop an Inclusive Gateway Split node into the workflow, placing it in the Broker swimlane.
Configure the Signal Node
This Signal node lets the Broker know they've completed their tasks for now. Before the Broker can proceed, the tasks in the Underwriter, Doctor, and Automated swimlanes must be complete. So, you'll set a custom message that tells the Broker exactly that.
Drag and drop a Signal node into the workflow, placing it in the Broker swimlane.
Click Edit to open the Edit Signal Event window.
Enter signal-broker in the Label field.
Set the Use Template toggle to ON.
Enter Please wait for all other parties to complete their review of the application. in the Template field.
Close the Edit Signal Event window.
Configure the First Inclusive Gateway Split Link
Next, let's connect the Inclusive Gateway Split node to the Signal node. Because the Signal node's message should always show, you'll set the logic expression to TRUE. This means the link's logic always evaluates as true, so the workflow always proceeds along this path.
Connect the input port (left) of the Signal node to the output port (right) of the Inclusive Gateway Split node.
Click Edit to open the Edit Inclusive Gateway Split Link window.
Enter TRUE in the Logic field.
Close the Edit Inclusive Gateway Split Link window.
Configure the Second Screen/Task Node
For this Screen/Task node, you can connect the following pre-built module: Enablement Lab - Inclusive Gateway Use Case: Income Assessment. You can find the module in the Training Environment here: https://training.unqork.io/#/form/60f9abcb716e1174071eba7d/edit.
Drag and drop a Screen/Task node into the workflow, placing it in the Underwriter swimlane.
Click Edit to open the Edit User Task window.
Enter Income Assessment in the Label field.
Enter incomeassessment in the Path field.
Select Enablement Lab - Inclusive Gateway Use Case: Income Assessment from the Add a Module drop-down.
Close the Edit User Task window.
Configure the Second Inclusive Gateway Split Link
This link uses the logic TRUE because the application process should always include an income assessment.
Connect the input port (left) of the Income Assessment Screen/Task node to the output port (right) of the Inclusive Gateway Split node.
Click Edit to open the Edit Inclusive Gateway Split Link window.
Enter Always assess income in the Label field.
Enter TRUE in the Logic field.
Close the Edit Inclusive Gateway Split Link window.
Configure the Third Screen/Task Node
For this Screen/Task node, you can connect the following pre-built module: Enablement Lab - Inclusive Gateway Use Case: Previous Life Insurance Records Assessment. You can find the module in the Training Environment here: https://training.unqork.io/#/form/60f9abe7409b1e38ea28bd32/edit.
Drag and drop a Screen/Task node into the workflow, placing it in the Underwriter swimlane.
Click Edit to open the Edit User Task window.
Enter Previous Life Insurance Records Assessment in the Label field.
Enter previouslifeinsurancerecordsassessment in the Path field.
Select Enablement Lab - Inclusive Gateway Use Case: Previous Life Insurance Records Assessment from the Add a Module drop-down.
Close the Edit User Task window.
Configure the Third Inclusive Gateway Split Link
This link uses the logic hasPreviousRecords='TRUE'. hasPreviousRecords is the Property ID of a Dropdown component in the Submit Life Insurance Policy module. The Dropdown component asks the question "Does the policy holder have previous life insurance records?" TRUE is the value stored in the database when the Broker answers Yes to the question. So, if the client has previous life insurance records, the workflow proceeds along this path.
Connect the input port (left) of the Previous Life Insurance Records Assessment Screen/Task node to the output port (right) of the Inclusive Gateway Split node.
Click Edit to open the Edit Inclusive Gateway Split Link window.
Enter Has previous life insurance records in the Label field.
Enter hasPreviousRecords='TRUE' in the Logic field.
Close the Edit Inclusive Gateway Split Link window.
Configure the Fourth Screen/Task Node
For this Screen/Task node, you can connect the following pre-built module: Enablement Lab - Inclusive Gateway Use Case: Provide Health Certificate. You can find the module in the Training Environment here: https://training.unqork.io/#/form/60f9ac3bd39a5973ffbe5c4b/edit.
Drag and drop a Screen/Task node into the workflow, placing it in the Doctor swimlane.
Click Edit to open the Edit User Task window.
Enter Provide Health Certificate in the Label field.
Enter providehealthcertificate in the Path field.
Select Enablement Lab - Inclusive Gateway Use Case: Previous Life Insurance Records Assessment from the Add a Module drop-down.
Close the Edit User Task window.
Configure the Fourth Inclusive Gateway Split Link
This link uses the logic needsDoctorReport='TRUE'. needsDoctorReport is the Property ID of a Dropdown component in the Submit Life Insurance Policy module. The Dropdown component asks the question "Does the policy holder need a health review?" TRUE is the value stored in the database when the Broker answers Yes to the question. So, if the client needs a health review, the workflow proceeds along this path.
Connect the input port (left) of the Provide Health Certificate Screen/Task node to the output port (right) of the Inclusive Gateway Split node.
Click Edit to open the Edit Inclusive Gateway Split Link window.
Enter Needs doctor report in the Label field.
Enter needsDoctorReport='TRUE' in the Logic field.
Close the Edit Inclusive Gateway Split Link window.
Configure the Fifth Screen/Task Node
For this Screen/Task node, you can connect the following pre-built module: Enablement Lab - Inclusive Gateway Use Case: Run Credit Score. You can find the module in the Training Environment here: https://training.unqork.io/#/form/60f9ae43409b1e38ea28bde0/edit.
Drag and drop a Screen/Task node into the workflow, placing it in the Automated swimlane.
Click Edit to open the Edit Script Task window.
Enter Get credit score in the Label field.
Enter getcreditscore in the Path field.
Select Enablement Lab - Inclusive Gateway Use Case: Run Credit Score from the Add a Module drop-down.
Close the Edit Script Task window.
Configure the Fifth Inclusive Gateway Split Link
This link uses the logic TRUE because the application process should always include running a credit score check.
Connect the input port (left) of the Get credit score Screen/Task node to the output port (right) of the Inclusive Gateway Split node.
Click Edit to open the Edit Inclusive Gateway Split Link window.
Enter Always get credit score in the Label field.
Enter TRUE in the Logic field.
Close the Edit Inclusive Gateway Split Link window.
Update the Inclusive Gateway Split Node
Before moving on to the Inclusive Gateway Join node, let's revisit the Inclusive Gateway Split node. If the client has existing records, it makes sense for the Underwriter role to review those records before continuing with the new application. So, let's use the link ordering feature to adjust what task the Underwriter sees first. By changing the link order, the Underwriter proceeds to the Previous Life Insurance Records Assessment task before the Income Assessment task.
All tasks that branch from an Inclusive Gateway Split node exist in parallel. So, an Underwriter can still access the Income Assessment task before the Previous Life Insurance Records Assessment task is complete. Link ordering only affects the default workflow path.
The order in which you add Inclusive Gateway Split Links determines the link ordering. But, you can manually adjust the link ordering in the Edit Inclusive Gateway Split window.
Select the Inclusive Gateway Split node.
Click Edit to open the Edit Inclusive Gateway Split window.
Locate the Has previous life insurance records Inclusive Gateway Split Link. Its Order should show as 3.
Using the Order selector, set the link's order to 2.
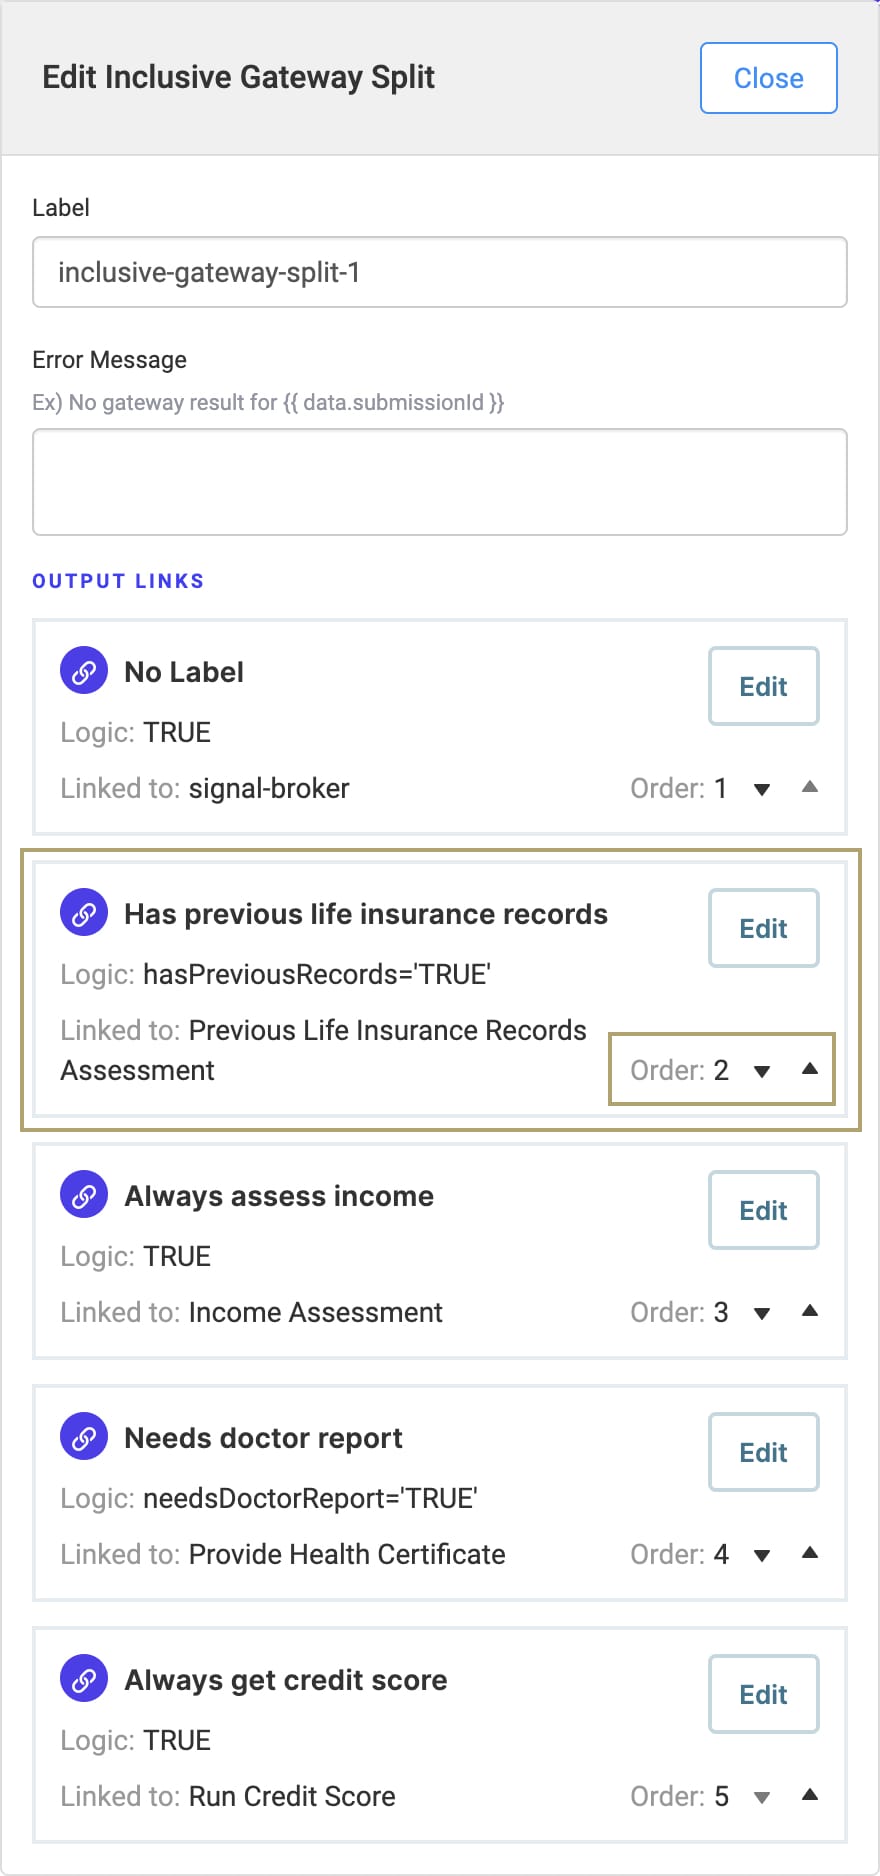
Close the Edit Inclusive Gateway Split window.
Configure the Inclusive Gateway Join Node
Drag and drop an Inclusive Gateway Join node into the workflow, placing it in the Broker swimlane.
Connect the output port (right) of the Signal node to the input port (left) of the Inclusive Gateway Join node.
Connect the output port (right) of the Previous Life Insurance Records Assessment Screen/Task node to the input port (left) of the Inclusive Gateway Join node.
Connect the output port (right) of the Income Assessment Screen/Task node to the input port (left) of the Inclusive Gateway Join node.
Connect the output port (right) of the Provide Health Certificate Screen/Task node to the input port (left) of the Inclusive Gateway Join node.
Connect the output port (right) of the Run Credit Score Screen/Task node to the input port (left) of the Inclusive Gateway Join node.
Configure the Sixth Screen/Task Node
For this Screen/Task node, you can connect the following pre-built module: Enablement Lab - Inclusive Gateway Use Case: Policy Results. You can find the module in the Training Environment here: https://training.unqork.io/#/form/60f9aea521eac738a537be5b/edit.
Drag and drop a Screen/Task node into the workflow, placing it in the Broker swimlane.
Click Edit to open the Edit User Task window.
Enter Policy Results in the Label field.
Enter policyresults in the Path field.
Select Enablement Lab - Inclusive Gateway Use Case: Policy Results from the Add a Module drop-down.
Close the Edit User Task window.
Connect the input port (left) of the Policy Results Screen/Task node to the output port (right) of the Inclusive Gateway Join node.
Configure the End Node
Drag and drop an End node into the workflow, placing it in the Broker swimlane.
Connect the output port (right) of the Policy Results Screen/Task node to the input port (left) of the End node.
Save your workflow.
You're now ready to test out your workflow. Click Preview Workflow to open your workflow in Express View.
Because this workflow contains several roles with concurrent tasks, you'll need to use the Preview As drop-down to change your preview role as you move through the workflow.
Changing an Inclusive Gateway Split Node's Settings
Let's revisit and make changes to your saved Inclusive Gateway Split node.
Select your Inclusive Gateway Split node.
Click the Edit button.
Using the Edit Inclusive Gateway Split window, make changes to the node's settings as needed.
Click Save Workflow.
Deleting an Inclusive Gateway Split Node
It's simple to delete an Inclusive Gateway Split node from your workflow. Remember to also remove any associated Inclusive Gateway Join node.
Select your Inclusive Gateway Split node.
Click the Delete button.
Click Save Workflow.