The Timer Start node enables automation by triggering the start of a workflow on a preset schedule. For example, a Timer Start node can create integration and cron jobs, which are a time-based scheduler utility that automates system maintenance or administration.
You can use this node to achieve tasks like exporting data or sending emails at regular intervals. The Timer Start node can trigger at an exact time (Tuesdays at 15:30) or a relative time (every 11 hours) using UTC (Coordinated Universal Time).
You'll find the Timer Start node in the list of nodes to the left of the Workflow Builder.
Settings Menu Description
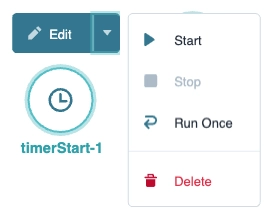
Let's explore the node's Settings Menu. This menu displays as a blue menu bar, either above or below the node, when you select the node itself. This node has these Settings Menu options:

Setting | Description | |
|---|---|---|
Edit | Takes you to the Edit Timer Start Event drawer. Use the drop-down to access additional actions. | |
↳ | Start | Activates the workflow, placing it into a running state. Once you start the node, the workflow repeats at the relative or exact time. The workflow runs on that interval until you click Stop. |
Stop | Deactivates a running workflow and places it into a stopped state. | |
Run Once | Performs a test run of your workflow in a separate instance from the standard Run/Stop state of the workflow. You should always test your workflow to ensure it works correctly. The test runs until the workflow completes one cycle. | |
Delete | Removes the node from the workflow. | |
Starting and Stopping a Workflow's Run State
After adding a Timer Start node and completing your workflow, you can set its run state. In a run state, your workflow waits for the Timer Start node to begin. When it reaches the start time, the workflow runs from start to finish. Your workflow continues to run according to the defined schedule, repeating until stopped.
Stop any Timer Start nodes before removing the swimlane where they exist. You cannot remove a swimlane if it contains a running Timer Start node.
Starting Your Workflow's Run State
To start your workflow's run state:
Select your Timer Start node.
Click the Edit drop-down.
Select Start.
Stopping Your Workflow's Run State
To stop your workflow's run state:
Select your Timer Start node.
Click the Edit drop-down.
Select Stop.
You can also use Start Node Administration to sort, start, and stop any Timer Start node in your environment. To learn more about this process, view our Start Node Administration article.
Edit Timer Start Event Drawer
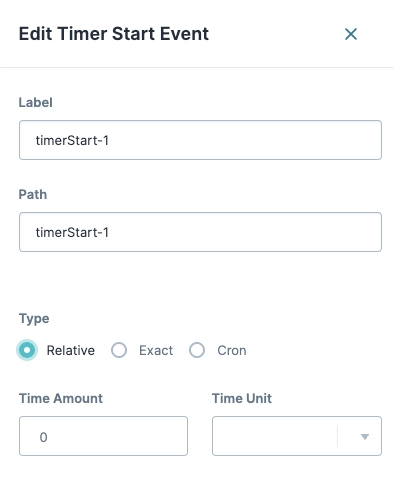
Clicking the Edit button displays the Edit Timer Start Event panel with the following settings:
Setting | Description | ||
|---|---|---|---|
Label | The name of the node. By default, the Label displays as Define your labels by associating them with the role of the node. | ||
Path | The path of the node. By default, the Path displays as A path is a unique identifier that other components can reference. | ||
Type | The timer type you can select. | ||
↳ | Relative | Toggles the timer start time to Relative. A relative Timer Event repeats when an amount of time passes. For example, a relative Timer Event runs one time after a relative amount of time passes.
| |
↳ | Time Amount | Enter the amount of time. Time length is determined by the Time Unit setting. | |
Time Unit | Specify the Time Amount value’s unit type. Units include:
| ||
Exact | Toggles the timer start time to Exact. An exact Timer Event repeats at a precise time of day on a frequency of daily, weekly, monthly, or yearly. For example, an exact time of a Weekly event at 15:50 starts every seven days at 15:50. | ||
↳ | Frequency | Specify how often the event should trigger. Frequency units include:
| |
Cron | Toggles the timer to use a cron expression. Cron expressions can run tasks periodically at fixed times, dates, or intervals.
| ||
Close | Closes the Edit Timer Event drawer, returning your focus to the pool. | ||
Using Multiple Timer Start Nodes
Creators can use multiple Timer Start nodes to trigger a workflow at specific times. For example, the following workflow must trigger at the following times:
Mondays at 08:00 UTC.
Tuesdays at 10:00 UTC.
Every 2 hours.
To achieve this process, configure each time in a separate Timer Start node. You can use multiple Timer Start nodes in a workflow, but it's a best practice to limit them to 20 Timer Start nodes per workflow. This limit ensures high performance and reduces server load.
Demonstration of a Timer Start Node
For this example, you'll configure a simple workflow that includes a Timer Start, Task, and End node. The workflow will run every Friday at 12 pm and generate an Excel report of submission data from an insurance application form. This example assumes you've set up your module in advance and have created a workflow-type application.
This demonstration is for illustrative purposes only and cannot be replicated due to Training environment security.
Preconfiguration
When you create a new workflow, a Start node is automatically included. A workflow must have a Start or Timer Start node to function. For this example, delete the Start node.
Select the Start node.
Click the Edit drop-down.
Select Delete.
Configure the Timer Start Node
Drag and drop a Timer Start node in the Automated swimlane.
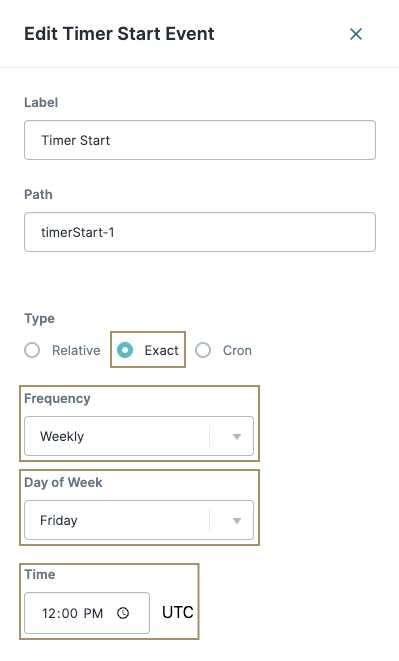
Click the Edit button. The Edit Timer Start Event panel opens to the right.
In the Label field, enter
Timer Start.Set the Type to Exact.
From the Frequency drop-down, select Weekly.
From the Day of Week drop-down, select Friday.
In the Time field, enter
12:00 PM.
Click X (Close).
Configure the Task Node
You’ll link this node to a dashboard module to access the submission data.
Drag and drop a Task node in the Automated swimlane.
Task nodes added to the Automated swimlane operate as Script-type tasks.
Click the Edit button. The Edit Script Task panel opens to the right.
In the Label field, enter
Enablement Lab: Dashboard.From the Module drop-down, enter or select Enablement Lab: Timer Start Dashboard. This module displays an example dashboard that refreshes every time the workflow starts.
Click X (Close).
Configure the End Node
Drag and drop an End node in the Automated swimlane.
Click the Edit button. The Edit End Event panel opens to the right.
In the Label field, enter
End.Click X (Close).
Click Save....
Click Save.
Promoting a Workflow With a Timer Start Node
Timer Start nodes are unique during a workflow promotion. Before promoting your workflow, you must stop all Timer Start nodes. After promotion, you must manually start them again. You can change the run status in the Workflow Builder or by using Start Node Administration.