The Timer node pauses a workflow for a set amount of time. When the timer ends, the workflow resumes. For example, you can add a Timer node to resume your workflow two minutes after a message is sent. After two minutes pass, the workflow resumes and continues to the next node in the workflow.
Here are some examples of when to use Timer node automation:
Ingesting papers.
Restarting a workflow following a submission failure.
Sending an email confirmation receipt.
Delaying a submission approval.
You'll find the Timer node in the list of nodes to the left of the Workflow Builder.
Settings Menu Description
After adding a Timer node to your workflow, select it to open a Settings Menu. This menu displays as a blue menu bar, either above or below the node itself. The menu has the following options:
Setting | Description |
|---|---|
Edit | Takes you to the Edit Timer Event window, where you can configure related settings. |
Delete (Down Arrow) | This button removes the node from the workflow. |
Edit Timer Event Drawer Description
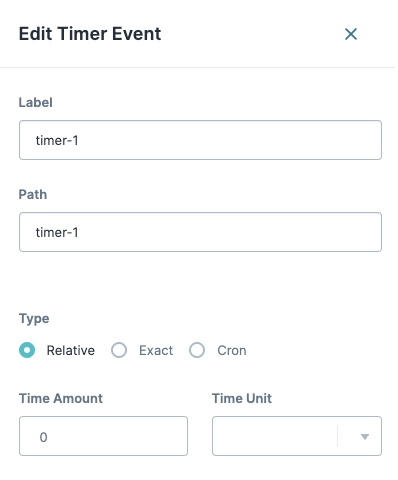
The following settings are available in the Edit Timer Event drawer:
Setting | Description | ||
|---|---|---|---|
Label | The name of the node. By default, the Label displays as Define your labels by associating them with the role of the node. | ||
Path | The path of the node. By default, the Path displays as A path is a unique identifier that other components can reference. | ||
Type | The timer type you can select. | ||
↳ | Relative | Toggles the timer start time to Relative. A relative Timer Event repeats when an amount of time passes. For example, a relative Timer Event runs one time after a relative amount of time passes.
| |
↳ | Time Amount | Enter the amount of time. Time length is determined by the Time Unit setting. | |
Time Unit | Specify the Time Amount value’s unit type. Units include:
| ||
Exact | Toggles the timer start time to Exact. An exact Timer Event repeats at a precise time of day on a frequency of daily, weekly, monthly, or yearly. For example, an exact time of a Weekly event at 15:50 starts every seven days at 15:50. | ||
↳ | Frequency | Specify how often the event should trigger. Frequency units include:
| |
Cron | Toggles the timer to use a cron expression. Cron expressions can run tasks periodically at fixed times, dates, or intervals.
| ||
Close | Closes the Edit Timer Event drawer, returning your focus to the pool. | ||
Demonstration of a Timer Node
In this example, set up a workflow to call modules related to credit score checks and rechecks. Using these modules, your end-user can submit their data. Add the Timer node to begin a task that sends a final recheck credit score.
This demonstration is for illustrative purposes only and cannot be replicated due to Training environment security.
Configure the Task Nodes
First, add four Task nodes to the Authenticated swimlane. You can connect the Task nodes to your own modules as needed.
Drag and drop four Task nodes into the Authenticated swimlane.
Click Edit and configure each Task node as follows:
Label
Path
Module
Credit Check
enablementlabcreditscorecheck
Enablement Lab: Credit Score Check
Recheck Credit Score
enablementlabcreditscorecheck
Enablement Lab: Credit Score Recheck
Reviewed Score
enablementlabfinalrecheckscore
Enablement Lab: Final Recheck Score
Final Score
enablementlabfinalresults
Enablement Lab: Final Results
After editing each Task node, click X (Close).
Connect the output port (right) of the Start node to the input port (left) of the
Credit CheckTask node.Connect the output port (right) of the
Recheck Credit ScoreTask node to the input port (left) of theCredit CheckTask node.You'll connect your remaining Task nodes at a later time.
Configure the Exclusive Gateway Node
Add an Exclusive Gateway node to split your workflow for end-users checking their credit score. The workflow continues for your end-users who want to wait to recheck their score. The workflow ends for end-users who want their final score only.
Drag and drop an Exclusive Gateway node in the Authenticated swimlane.
Click Edit.
In the Label field, enter
Recheck?.Click X (Close).
Connect the output port (right) of the
Recheck Credit ScoreTask node to the input port (left) of theRecheck?Exclusive Gateway node.
Configure the Timer Node
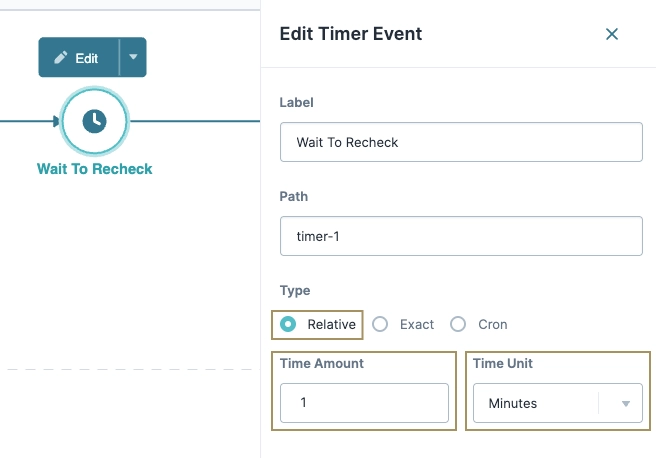
Add a Timer node to send a final recheck of your end-user's credit score. In this case, you'll set up the Timer node to recheck your end-user's credit score after one minute.
Drag and drop a Timer node in the Authenticated swimlane.
Click Edit.
In the Label field, enter
Wait To Recheck.In the Path field, enter
timer-1.From the Type selection, select Relative.
In the Time Amount field, enter
1.Click X (Close).
Configure the Exclusive Gateway Node With Gateway Links
When you connect an Exclusive Gateway node to another node, the connector becomes a Gateway link. This link is where you enter the logic. So, if your end-user answers Yes in the Recheck Credit Score module, they are directed to re-enter their information and recheck their score. When your end-user clicks Next to resubmit, the submission pauses for one minute and then displays the final credit score.
When the workflow resumes, your end-user sees the Reviewed Score Task module to view their score. If your end-user answers No, they proceed to the Final Score Task node. There, they see their final credit score.
Add and configure the Exclusive Gateway node:
Drag and drop an Exclusive Gateway node in the Authenticated swimlane. Position the node after the
Recheck Credit ScoreTask node.Click Edit.
In the Label field, enter
Yes.Click X (Close).
Connect the output port (right) of the
Recheck?Exclusive Gateway node to the input port (left) of theWait To RecheckTimer node. This connector becomes a Gateway Link.Connect the output port (right) of the
Recheck?Exclusive Gateway node to the input port (left) of theFinal ScoreTask node. This connector becomes a Gateway Link.Edit your Gateway Links as follows:
Gateway Link
Label
Default
Logic
Recheck? Gateway to Wait To Recheck
Yes
Off
recheckCreditScore="yes"Recheck? Gateway to Final Score
No
On
Click X (Close) after editing each Exclusive Gateway link.
Connect the output port (right) of the
Wait To RecheckTimer node to the input port (left) of theReviewed ScoreTask node.
Configure the End Nodes
Drag and drop two End nodes into the Authenticated swimlane.
Select the first End node.
Click Edit.
In the Label field, enter
End-1.Click X (Close).
Connect the output port (right) of the
Reviewed ScoreTask node to the input port (left) of theEnd-1End node.Select the second End node.
Click Edit.
In the Label field, enter
End-2.Connect the output port (right) of the
Final ScoreTask node to the input port (left) of theEnd-2End node.Click X (Close).
Click Save....
Click Save.
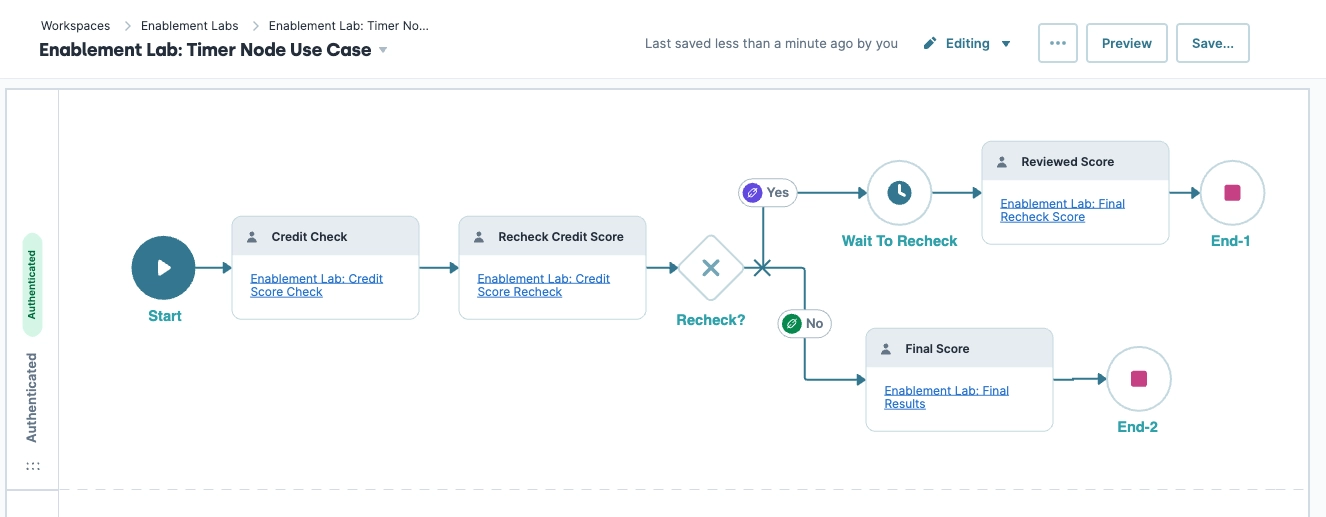
Your completed workflow looks like the following:
Preview your workflow. Navigate the workflow using the pathway that contains the Timer node. Express view displays a screen similar to the image below:
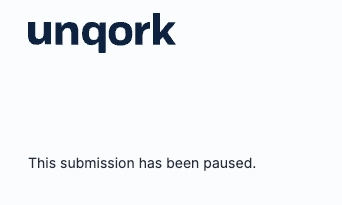
After the Timer node completes, the next node in the workflow triggers.
