 The Task node, previously known as the Screen/Task node, represents a task in a workflow. The functionality of the Task node varies based on the swimlane it’s placed in. The Task node primarily serves three functions:
User: For a user-type task, add the Task node to the Authenticated swimlane, which is accessed by end-users. You can have multiple user-type tasks in a workflow, such as entering contact information, selecting reservation dates, or providing credit card details.
Script: For a script-type task, add the Task node to the Automated swimlane. A script-type task runs automatically on the server and does not involve end-user interaction. If successful, the workflow moves to the next node. Script-type tasks execute the underlying module using server-side execution.
If there's no Error node in the workflow and a script-type task runs into an error in execution, the workflow displays an error.
Service: For a service-type task, add the Task node to the Automated swimlane. Click Edit and select a service from the drop-down. This task pauses the workflow and requires an API call to resume. It’s important to note that it does not involve end-user interaction and runs using server-side execution.
You'll find the Task node in the list of nodes to the left of the Workflow Builder.
Settings Menu Description
Let's explore the node's Settings Menu. This menu displays as a blue menu bar, either above or below the node, when you select the node itself. This node has these Settings Menu options:
Setting | Description |
|---|---|
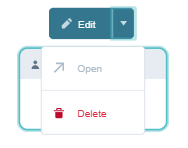
Edit | Depending on which swimlane you place your Task node, you'll see the following:
|
Open | Opens the connected module. This button becomes active and available once you connect a module to the Task node. |
Delete | Removes the node from the workflow. |
Different task windows display based on the swimlane. Editing a user-type task displays the Edit User Task settings drawer, a script-type task displays the Edit Script Task settings drawer, and a service-type task displays the Edit Service Task settings drawer.
Edit User Task Window Description
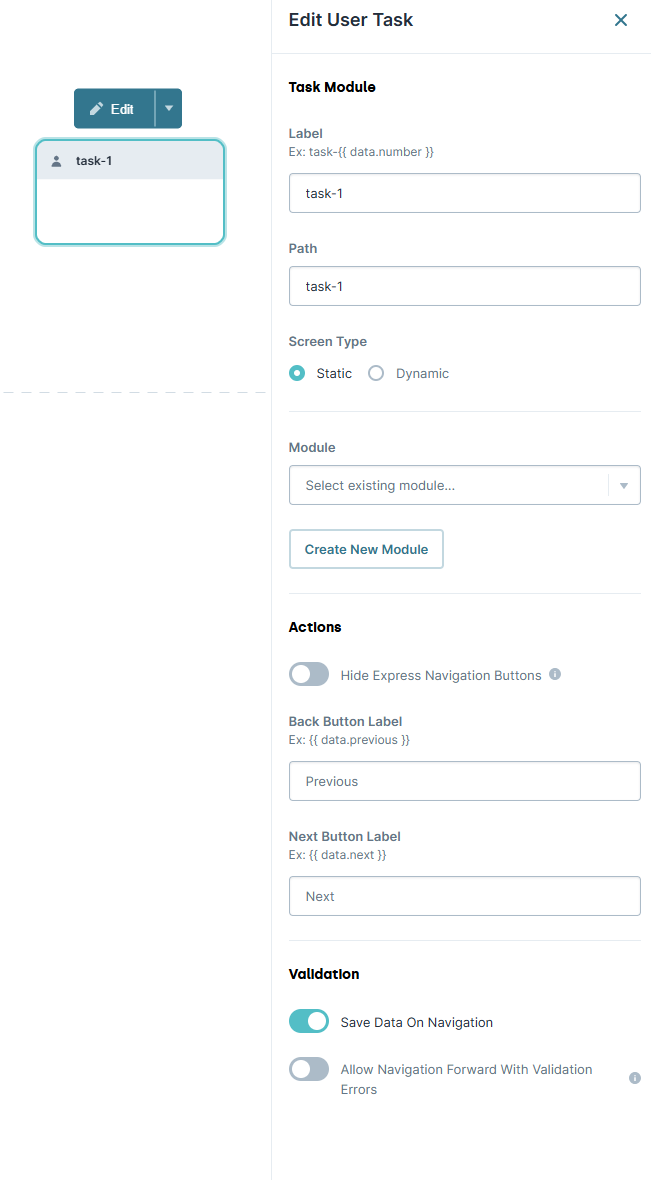
Click the Edit button to display the Edit User Task settings window.
Setting | Description |
|---|---|
Label | Sets the name of your node. By default, the Label displays as
|
Path | The path of the node. By default, the Path displays as A path is a unique identifier that other components can reference. As a best practice, name your path with a structure that fits your application. |
Screen Type | Select whether to display a static or dynamically-defined module when the workflow proceeds to the Task node. Options include:
|
Module | Displays when Screen Type is set to Select an existing module to associate with the Task node. The drop-down displays any of the following modules:
|
Create New Module | Displays when Screen Type is set to Lets you create a new module to associate with the Task node. |
Module Title* | Displays when clicking Create New Module. Enter a title for the new module. The default Module Title references your workflow's name and the Task node's label. |
Module Path* | Displays when clicking Create New Module. Enter a path for the new module. The default Module Path references your workflow's name and the Task node's Label. |
Module Type* | When creating a module, you can now determine its module type. Depending on the selected module type, it’ll include preconfigured components and settings:
|
Cancel | Cancels the creation of the module and returns your focus to the Edit User Task drawer. |
Create | Creates the module and returns your focus to the Edit User Task drawer. |
Edit Module | Displays when Screen Type is set to Opens the module associated with the Task node in a new tab. |
X (Close) | Closes the Edit drawer, returning your focus to the pool. |
Edit Script/Service Task
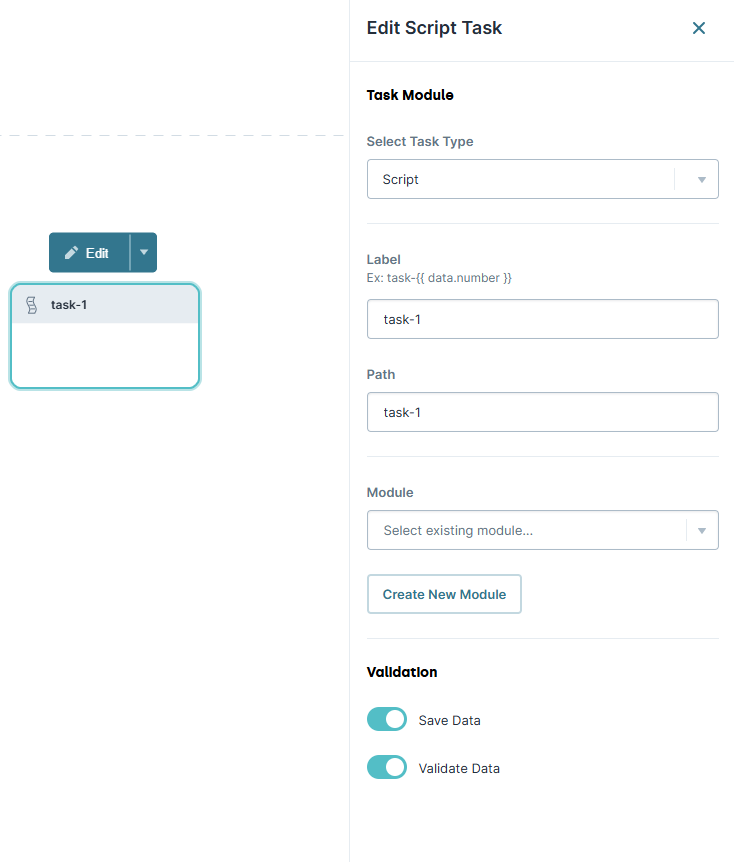
The Edit Script or Service task settings display when a Task node is placed in the Automated swimlane. Task nodes acting as a Script or Service Task have the same settings as Edit User Tasks. The only difference is the Action Settings.
Setting | Description |
|---|---|
Select Task Type | Displays on adding a Task node to the Automated swimlane. Using this drop-down, you can set the task type as Script or Service.
|
Actions (User Tasks Only)
Setting | Description |
|---|---|
Hide Express Navigation Buttons | Displays on adding a Task node to the Authenticated swimlane. When set to
By default, this toggle is set to |
Back Button Label | Displays when adding a Task node to the Authenticated swimlane. The label is applied to the Back button. By default, the Back button label shows as Previous. |
Next Button Label | Displays when adding a Task node to the Authenticated swimlane. The label is applied to the Next button. By default, the Next button label shows as Next. |
Validation
Setting | Description |
|---|---|
Save Data on Navigation | Displays when adding a Task node to the Authenticated swimlane. When set to By default, Save Data on Navigation is set to |
Allow Navigation with Validation Errors | Displays when adding a Task node to the Authenticated swimlane. When set to By default, Allow Navigation with Validation Errors is set to
|
Adding a Task Node
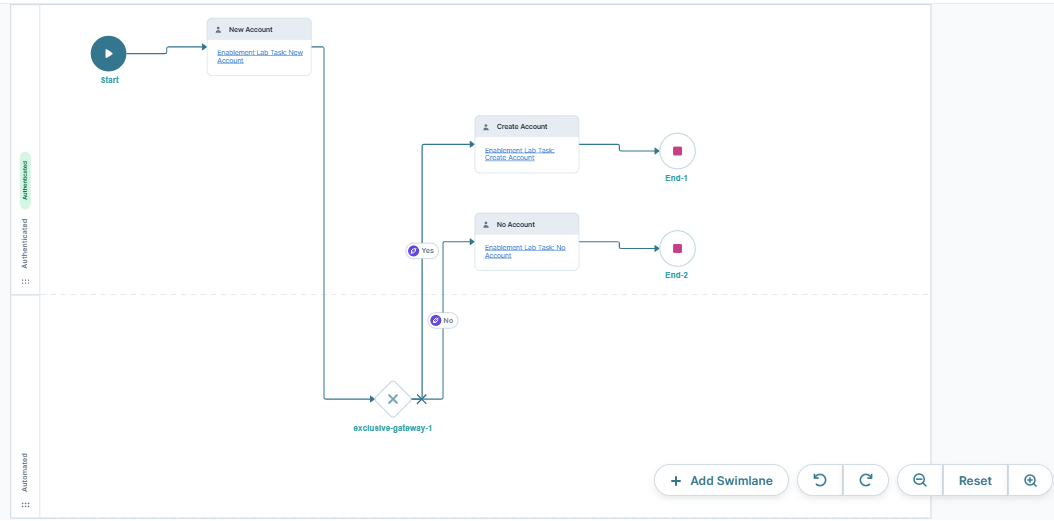
This example outlines a workflow using Task nodes that direct the end-user to a specific Task node based on their response, indicating whether they wish to create a new account or skip the process.
This demonstration is for illustrative purposes only and cannot be replicated in the Training environment due to module RBAC limitations.
Configure the Task Nodes
Begin by adding three Task nodes to your workflow. These nodes all act as user-type tasks.
Drag and drop three Task nodes into the Authenticated swimlane.
Select the first Task node and click Edit.
In the Label field, enter
New Account. The Path field updates with a new path based on the Label field value.From the Module drop-down, enter or select
Enablement Lab Task: New Account.Click X (Close).
Repeat this process for the other Task nodes using the following information:
#
Label
Module
1
Create Account
Enablement Lab Task: Create Account
2
No Account
Enablement Lab Task: No Account
Connect the output port (right) of the Start node to the input port (left) of the
New AccountTask node.You'll connect the remaining Task nodes at a later stage.
Configure the Exclusive Gateway Node
Drag and drop an Exclusive Gateway node into the Automated swimlane.
Connect the output port (right) of the
New AccountTask node to the input port (left) of theexclusive-gateway-1Exclusive Gateway node.
Configure the First Exclusive Gateway Link
Next, set up the logic that decides which path your end-user follows. In the Logic field, you'll enter radioAccount='yes'. This tells the workflow that if the value stored under the radioAccount key is yes, the workflow should follow the Yes path.
Connect the output port (right) of the
exclusive-gateway-1Exclusive Gateway node to the input port (left) of theCreate AccountTask node.Select the Exclusive Gateway Link and click Edit.
In the Label field, enter
Yes.In the Logic field, enter
radioAccount='yes'.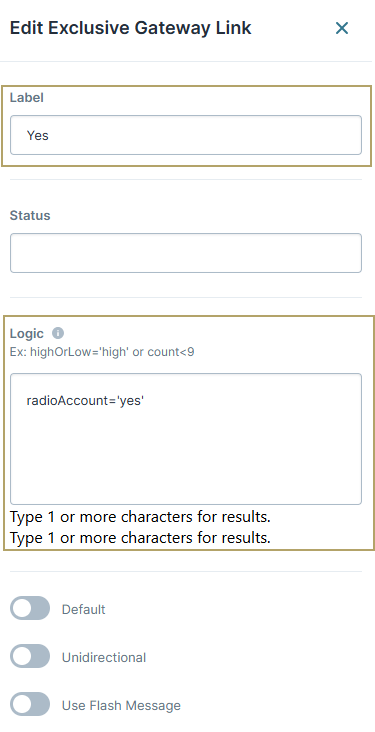
Click X (Close).
Configure the Second Exclusive Gateway Link
Next, set up the logic to check if the value under the radioAccount key is No.
Connect the output port (right) of the
exclusive-gateway-1Exclusive Gateway node to the input port (left) of theNo AccountTask node.Select the Exclusive Gateway Link and click Edit.
In the Label field, enter
No.In the Logic field, enter
radioAccount='no'.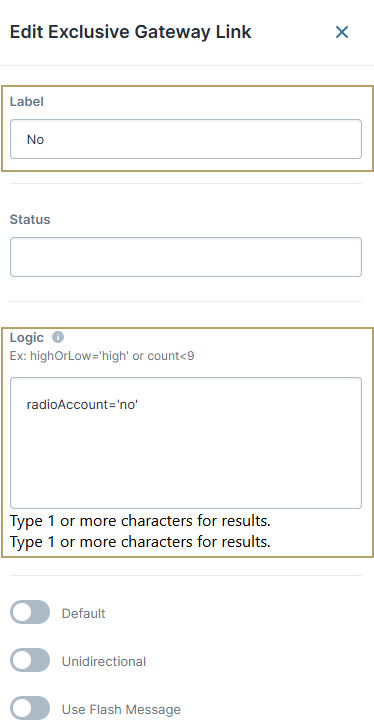
Click X (Close).
Configure the First End Node
Drag and drop an End node into the Authenticated swimlane.
Click Edit.
In the Label field, enter
End-1.Click X (Close).
Connect the output port (right) of the
Create AccountTask node to the input port (left) of theEnd-1End node.
Configure the Second End Node
Drag and drop a second End node into the Authenticated swimlane.
Click Edit.
In the Label field, enter
End-2.Click X (Close).
Connect the output port (right) of the
No AccountTask node to the input port (left) of theEnd-2End node.Click Save….
Click Save.
This is how the workflow looks when completed:
