Excel Fill Template Administration enables uploading Excel templates to your environment. For example, if you have a dashboard of submission data that you want to download as an Excel (.xlsx, .xlsm) file, using a sheet of your design. You can configure your application to populate your template with submission data. After the template populates, you can download it as an Excel file.
Creating an Excel Template
When you configure your application to download Excel data, you'll download the entire array of submission data. Along with your data, you'll also download:
The module ID.
The submission ID.
The user ID.
The timestamp for the creation of the submission data.
The timestamp for the last modification of the submission data.
Here's an example of how submission data looks in an Excel template:

Typically, you don't want all the submission data cluttering your Excel sheet. The easiest way to select the desired information is to create two spreadsheets. You can title these spreadsheets in your template:
All Data: This is the spreadsheet you'll configure to collect all the submission data from your application.
Selected Data: This is the spreadsheet you'll use to select and populate only the data you want from the All Data spreadsheet. You'll use the spreadsheet's calculations and rules to do this.
Here's how your Selected Data spreadsheet might look after it filters the All Data spreadsheet:

You'll notice that the Selected Data spreadsheet omits the previously mentioned submission data details. After you've created your template, save it on your computer where it's easy to find. Then, upload it to Excel Fill Template Administration.
Uploading an Excel Template
When you upload an Excel template using Excel Fill Template Administration, you can use it anywhere in your environment. We'll talk about how to configure it into your modules later in this article.
You can upload any size file to Excel Fill Template Administration. But, this administration page only supports .xlsx and .xlsm file types.
To upload your Excel template to your environment:
At the top right of the Unqork Designer Platform, click the Settings ▾ drop-down.
Click Administration.
Under Integration, select Excel Fill Template Administration.
Click the
 (Upload) button.
From your computer's folder, select your template file.

Click Open.
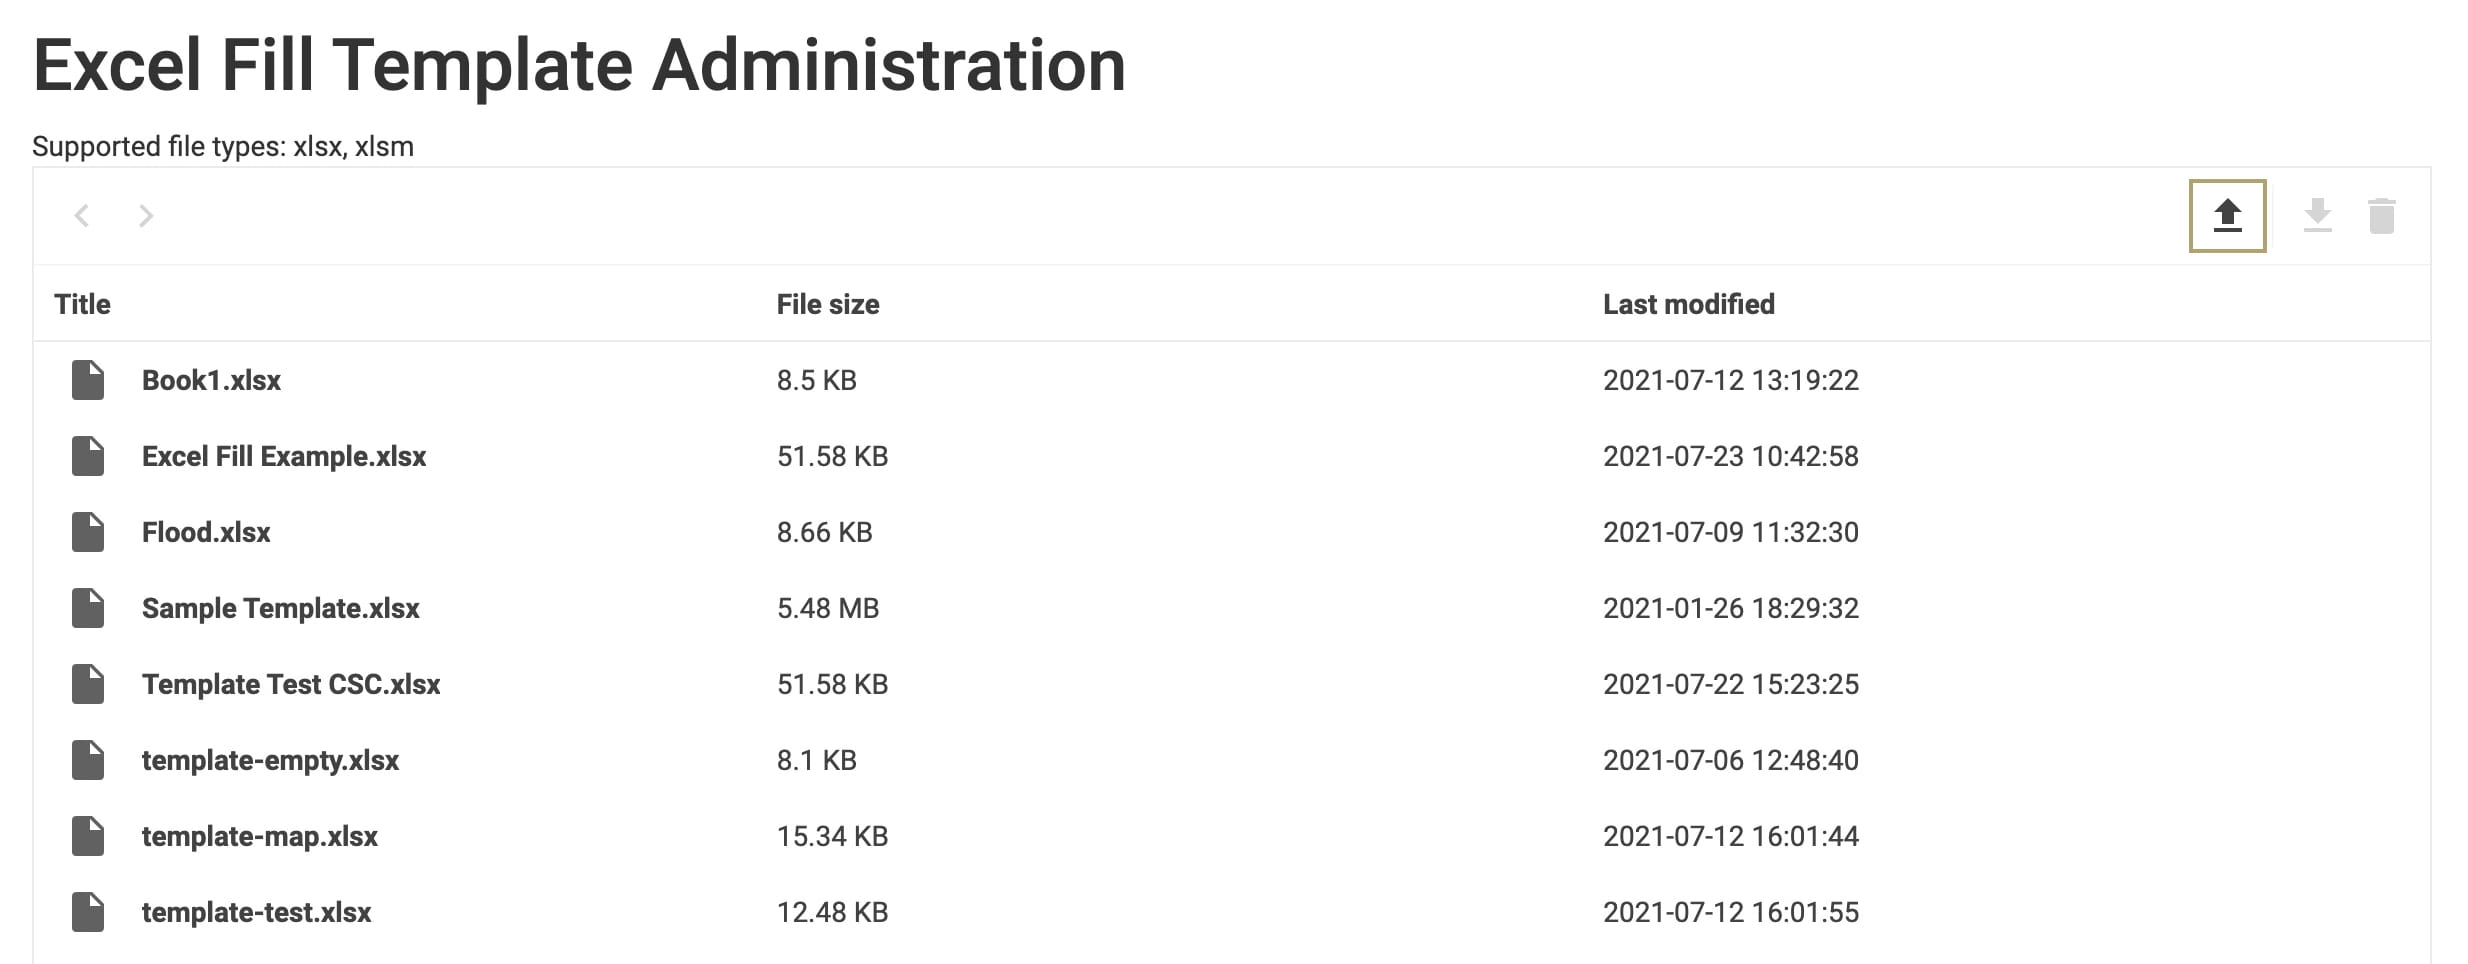
Your uploaded file displays in the Excel Fill Template Administration list. You'll see that this administration page sorts files alphabetically.
Replacing an Excel Template
If you make any changes to your template, you can easily upload it again. Uploading files with the same name automatically replaces the previous version. After you've uploaded the updated template, you'll see its Last Modified timestamp changes.
To replace your Excel template:
Navigate to the Excel Fill Template Administration page.
Click the
(Upload) button.From your computer's folder, select your template file.
Click Open.
In the File Exists pop-up, click Confirm.
Removing an Excel Template
You can also remove a template from your environment.
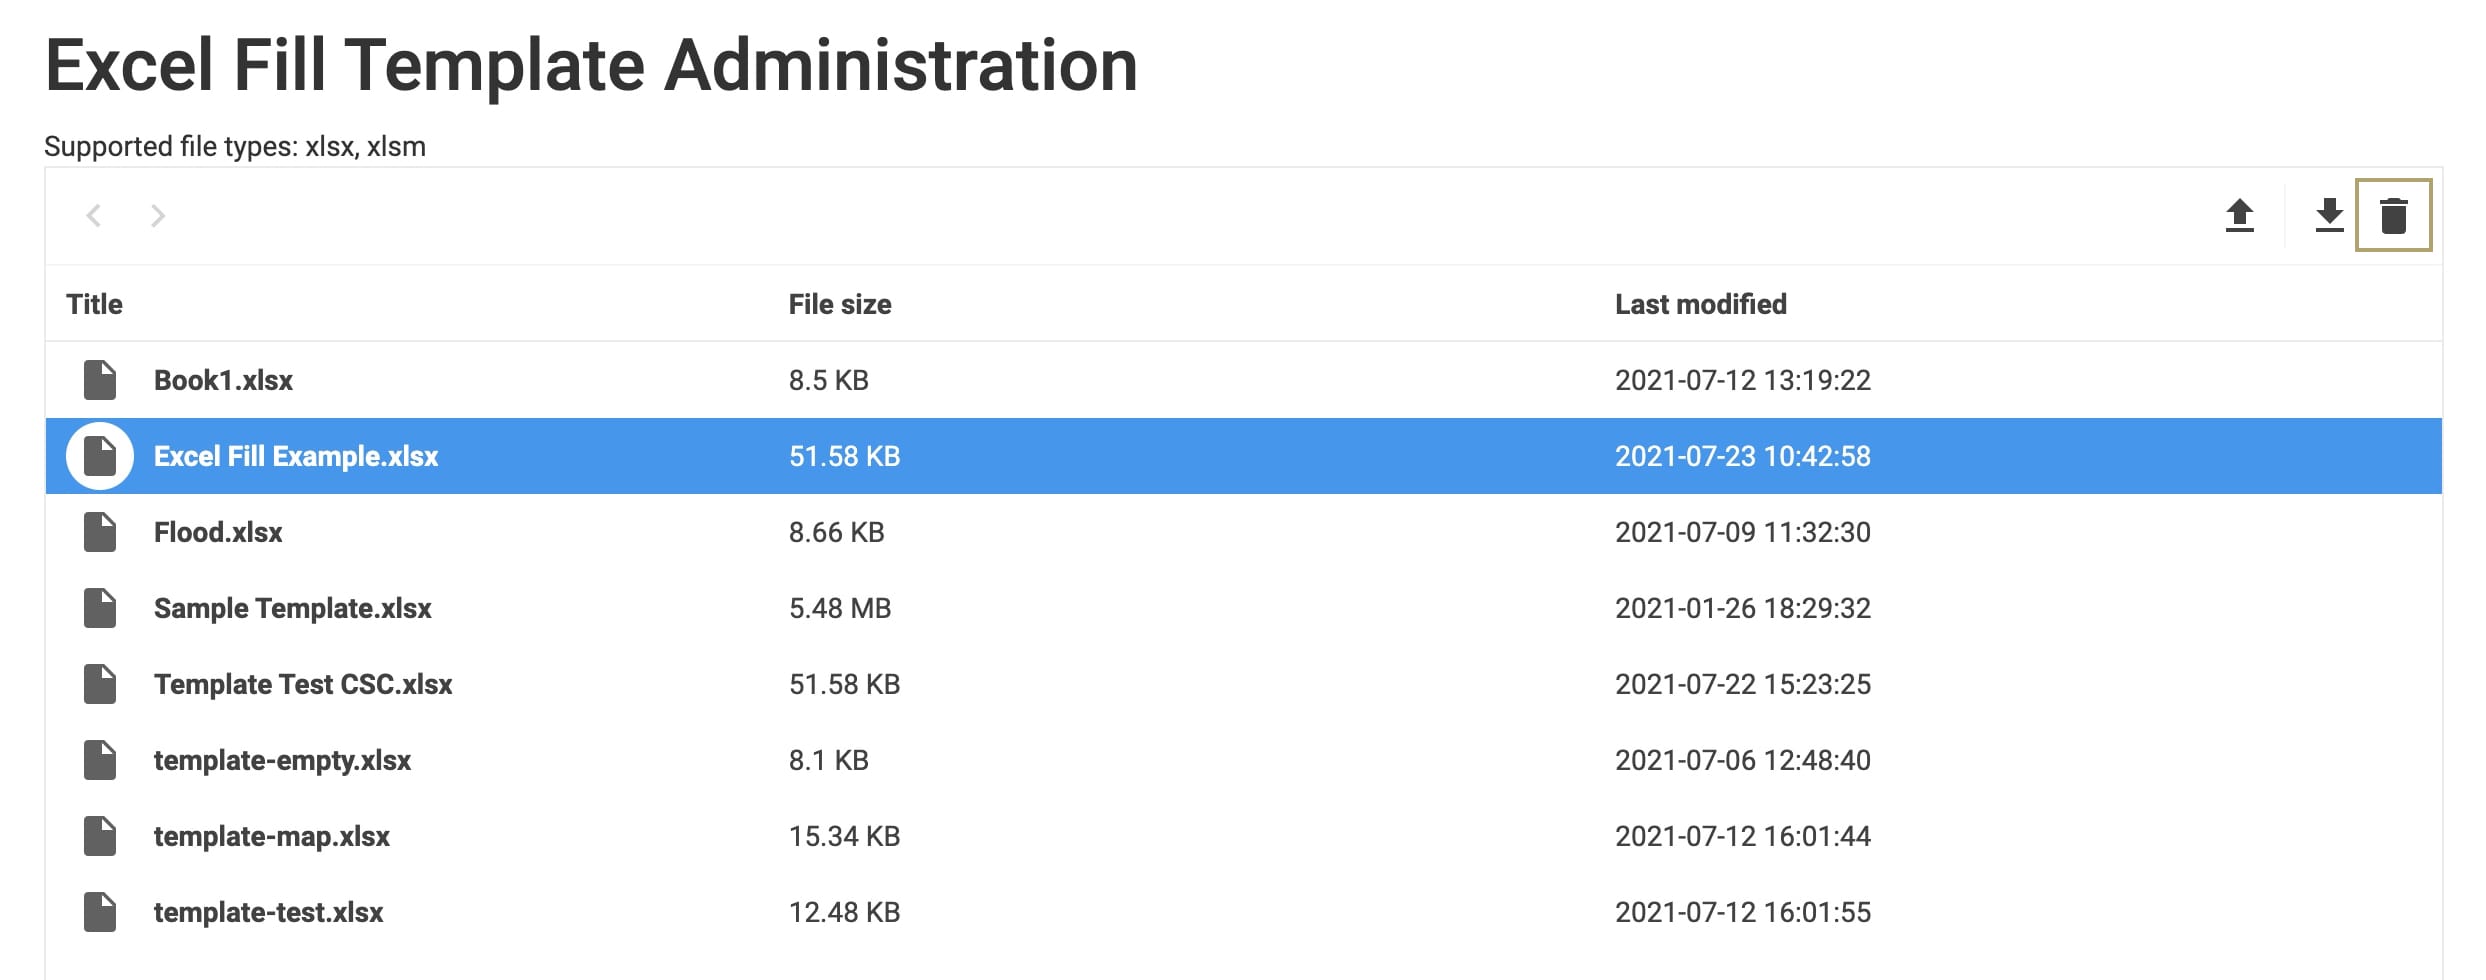
To remove your Excel template:
Navigate to the Excel Fill Template Administration page.
Select the template file to delete.
Click the
 (Remove) button in the top-right corner.
Click Confirm. The file no longer displays in the Excel Fill Template Administration list.
Downloading an Excel Template
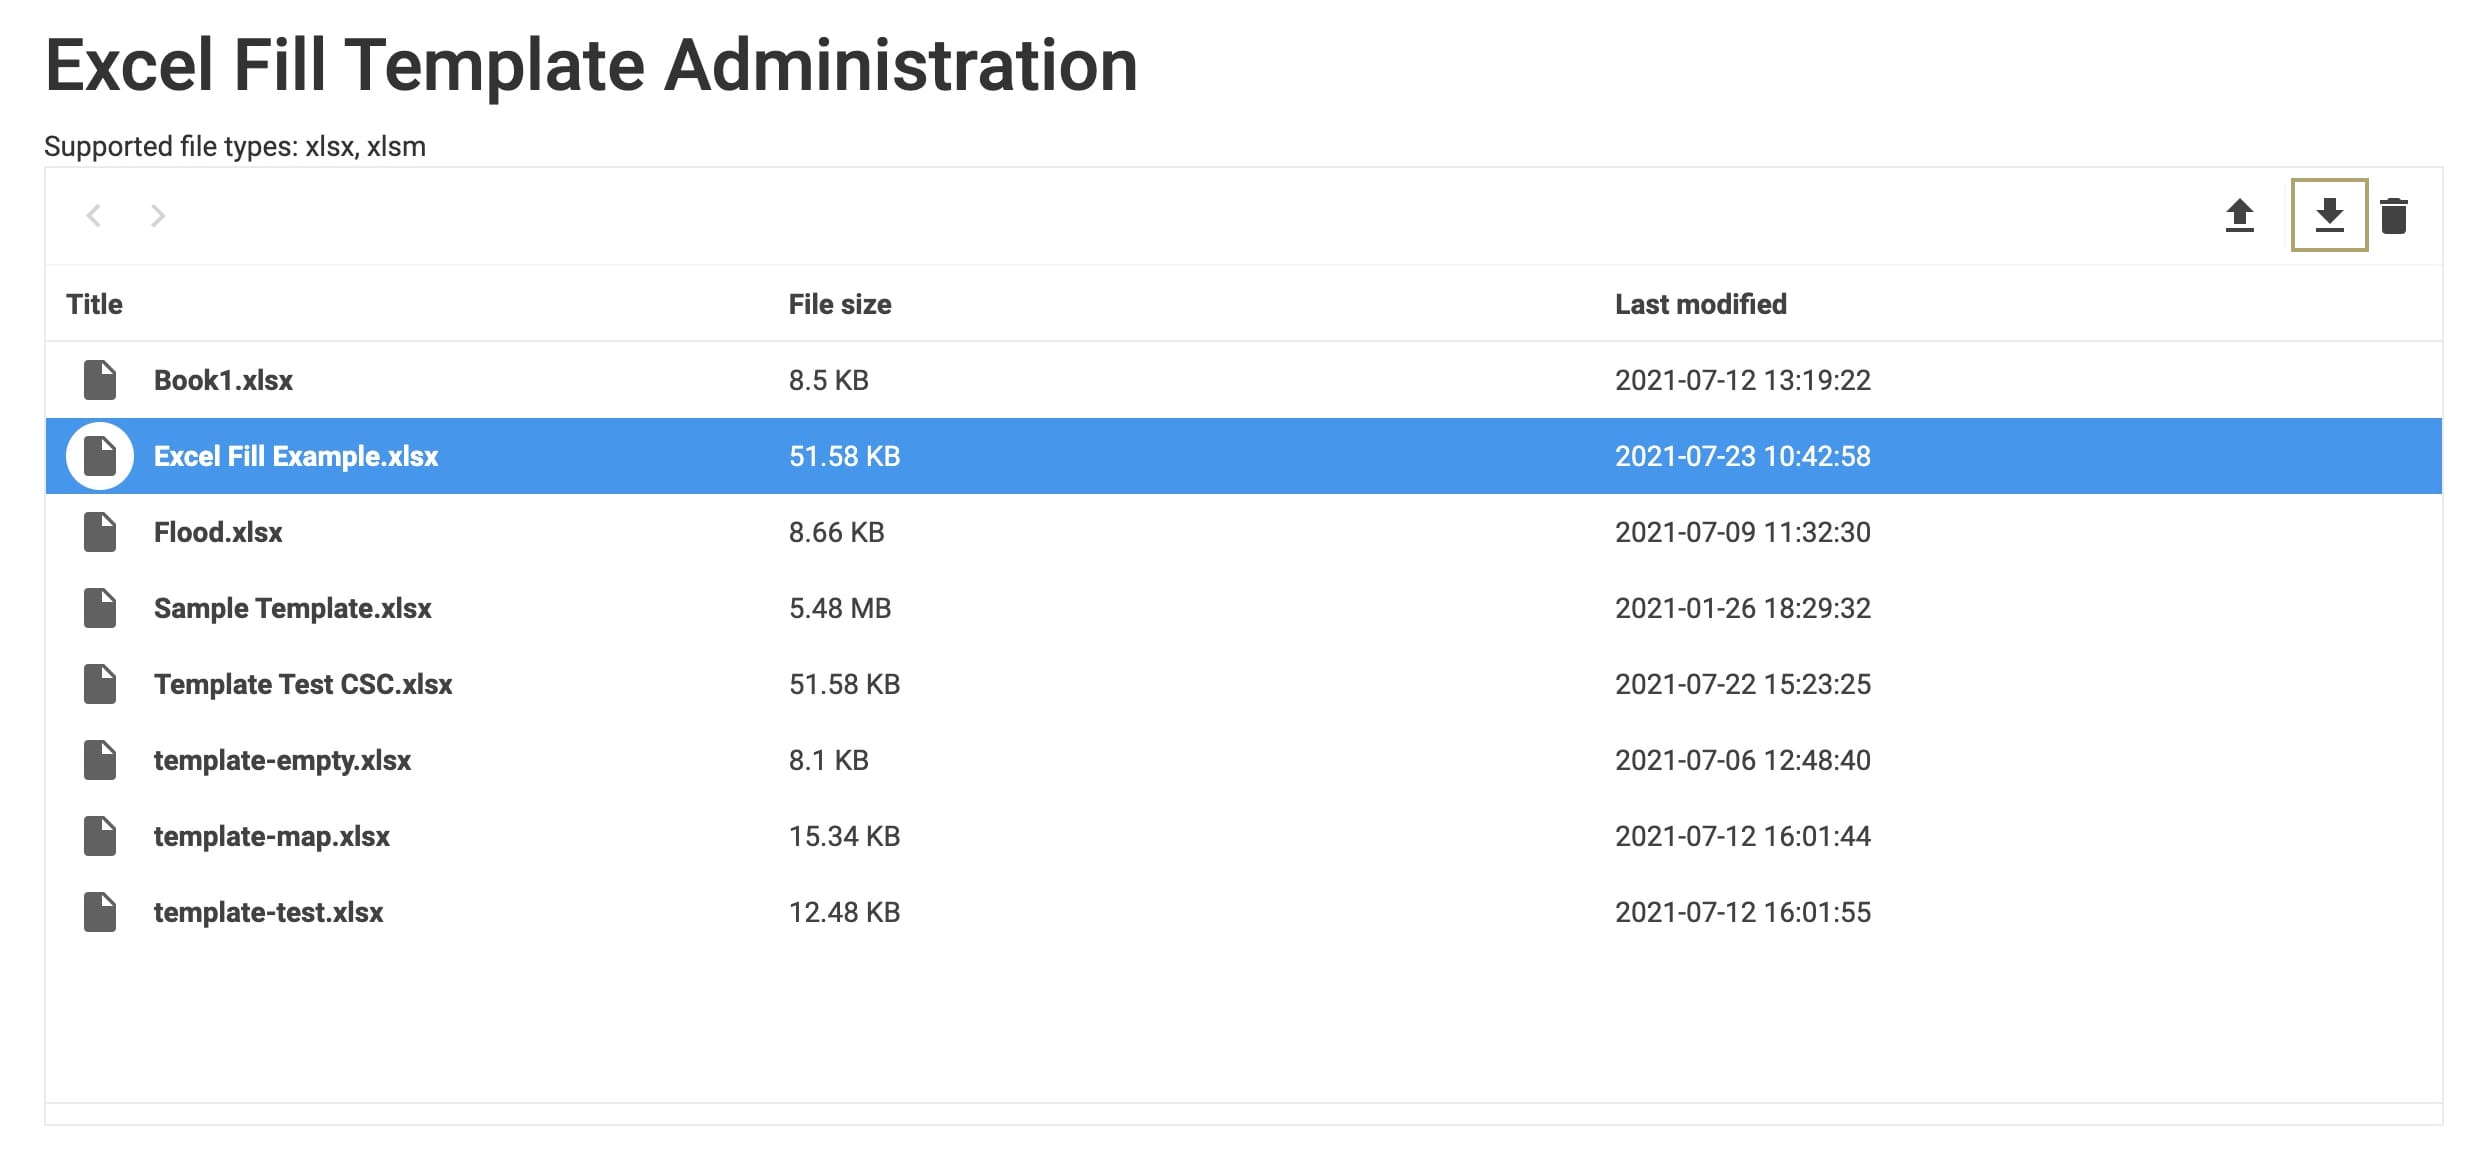
When you promote your applications to another environment level, your Excel templates won't promote with them. This administration page allows you to download your environment's Excel templates. That way, you can access the Excel Fill Template Administration page from other environment levels and upload your template(s) again.
To download an Excel template file from Excel Fill Template Administration:
Navigate to the Excel Fill Template Administration page.
Select the file to download.
Click the
 (Download) button. The file downloads to your computer's Downloads folder.
Referencing an Excel Template
Now that you have an Excel template uploaded, reference it in a module. For this example, use a Plug-In component to get your submission data from a schema module. Then, you'll set up a separate Plug-In to generate the .xlsx file. When you open that file in your spreadsheet program, you'll see the data in your template.
The more data you export, the longer it takes to download the .xlsx file.
For this example, use the following module for collecting submission data: https://training.unqork.io/#/form/60f892a5b07b3064183cb94e/edit.
Submissions in this module stored in a schema module: https://training.unqork.io/#/form/60f8941bb07b3064183cb994/edit.
Now, create the module that generates your Excel file from the data submissions stored in the schema module.
You don't need to do anything with the above links. There is already submission data in the schema module that you can reference in your Excel template.
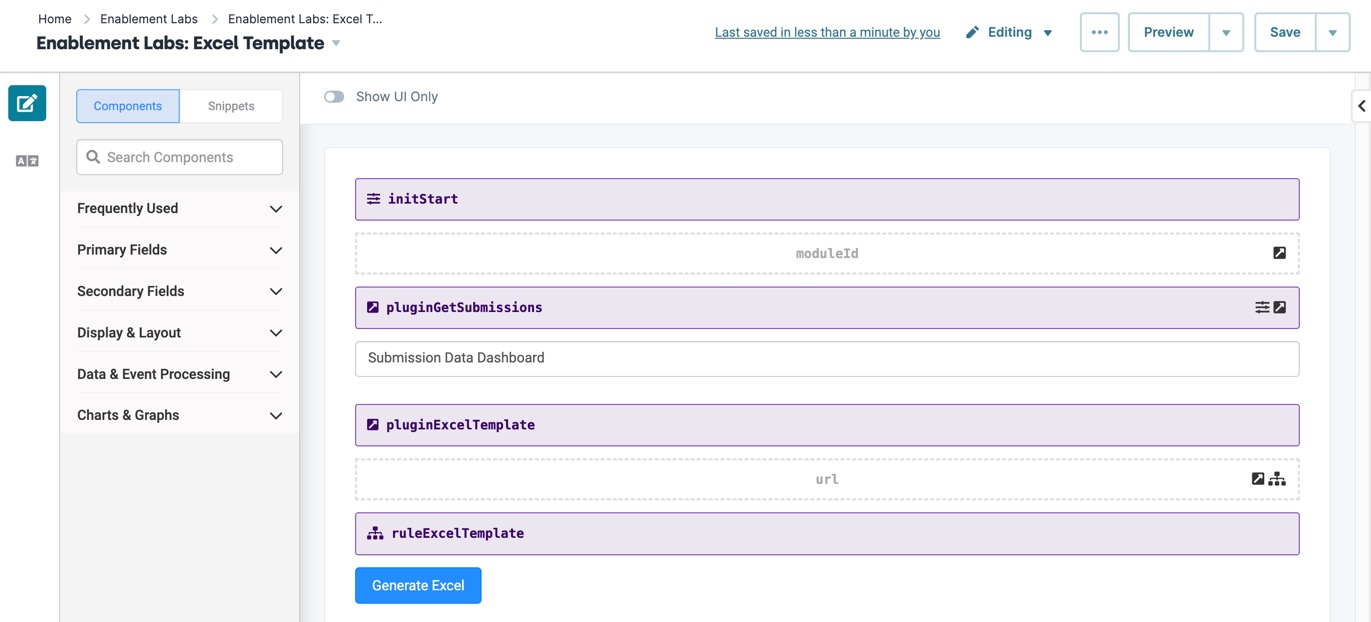
Here's how the completed use case looks in the Module Builder:
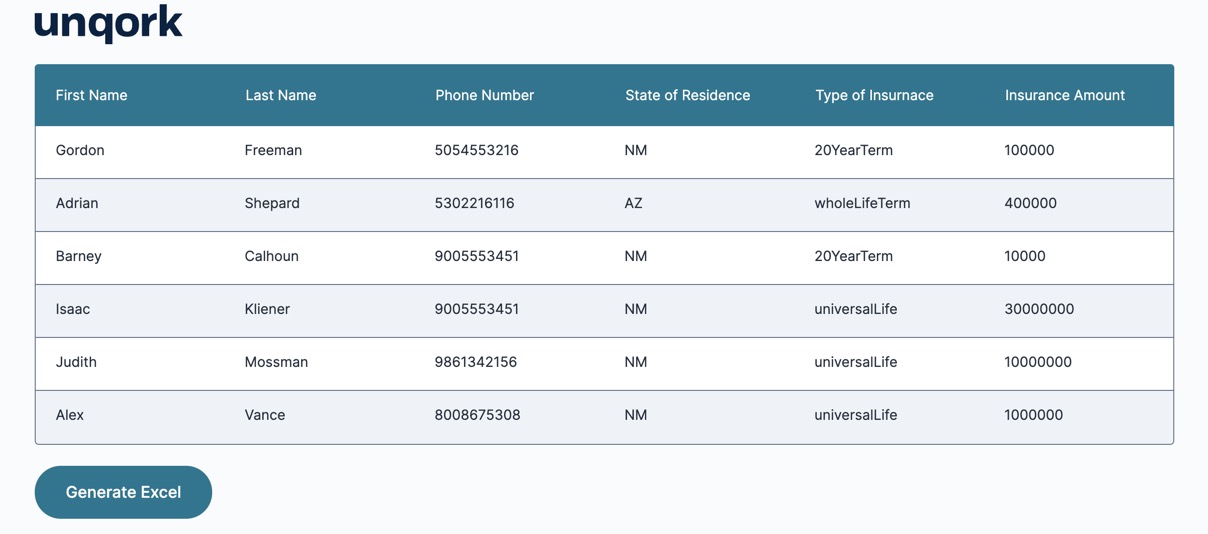
Here's how the completed use case looks in Express View:
Configure the Initializer Component
First, set up an Initializer component to trigger a Plug-In component to retrieve submission data from the schema module.
In the Module Builder, drag and drop an
 Initializer component onto your canvas.
In the Property ID, enter initStart.
In the Canvas Label Text field, enter initStart.
On the left side of the configuration window, click
.png) Actions.
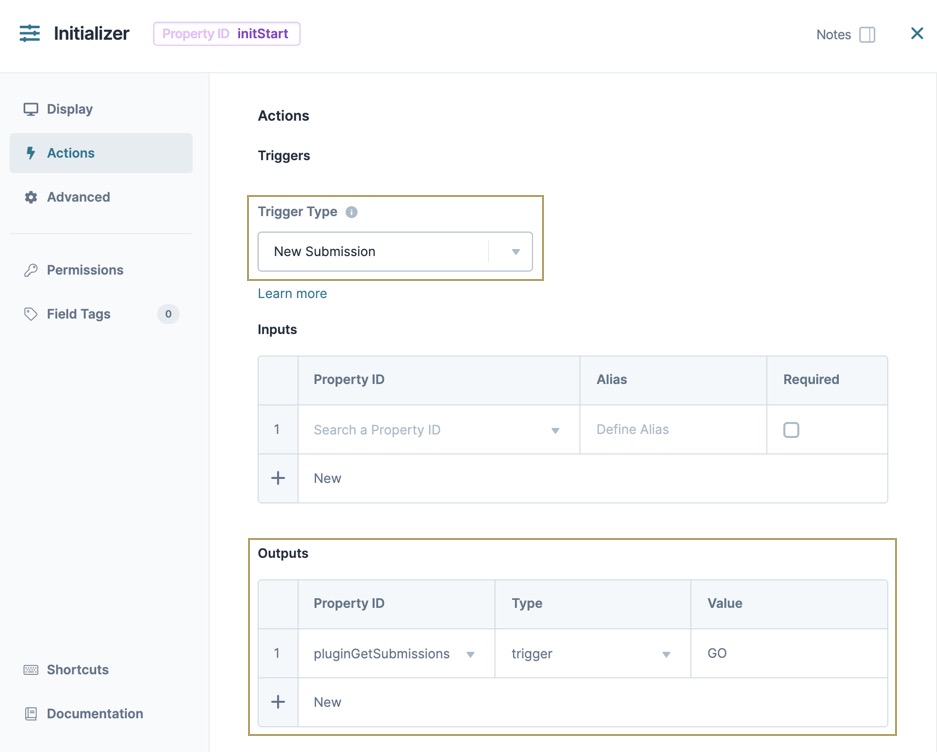
Actions.From the Trigger Type drop-down, select New Submission.
In the Outputs table, enter the following:
Property ID
Type
Value
pluginGetSubmissions
trigger
GO

Click Save & Close.
Configure the moduleId Hidden Component
The moduleId ![]() Hidden component holds the module ID of your schema module so your pluginGetSubmissions
Hidden component holds the module ID of your schema module so your pluginGetSubmissions  Plug-In component can reference the module's submission data.
Drag and drop a
 Hidden component onto your canvas, placing it below the initStart Initializer component.
In the Property ID field, enter moduleID.
In the Canvas Label Text field, enter moduleId.
In the Default Value field, enter 60f8941bb07b3064183cb994. This is the module ID of your schema module.
Click Save & Close.
Configure the pluginGetSubmissions Component
Next, set up a Plug-In component to retrieve the submission data from your schema module. You'll also configure the component to display the submission data in a dashboard.
Drag and drop a
Plug-In component onto the canvas, placing it below the moduleId Hidden component.In the Property ID and Canvas Label Text fields, enter pluginGetSubmissions.
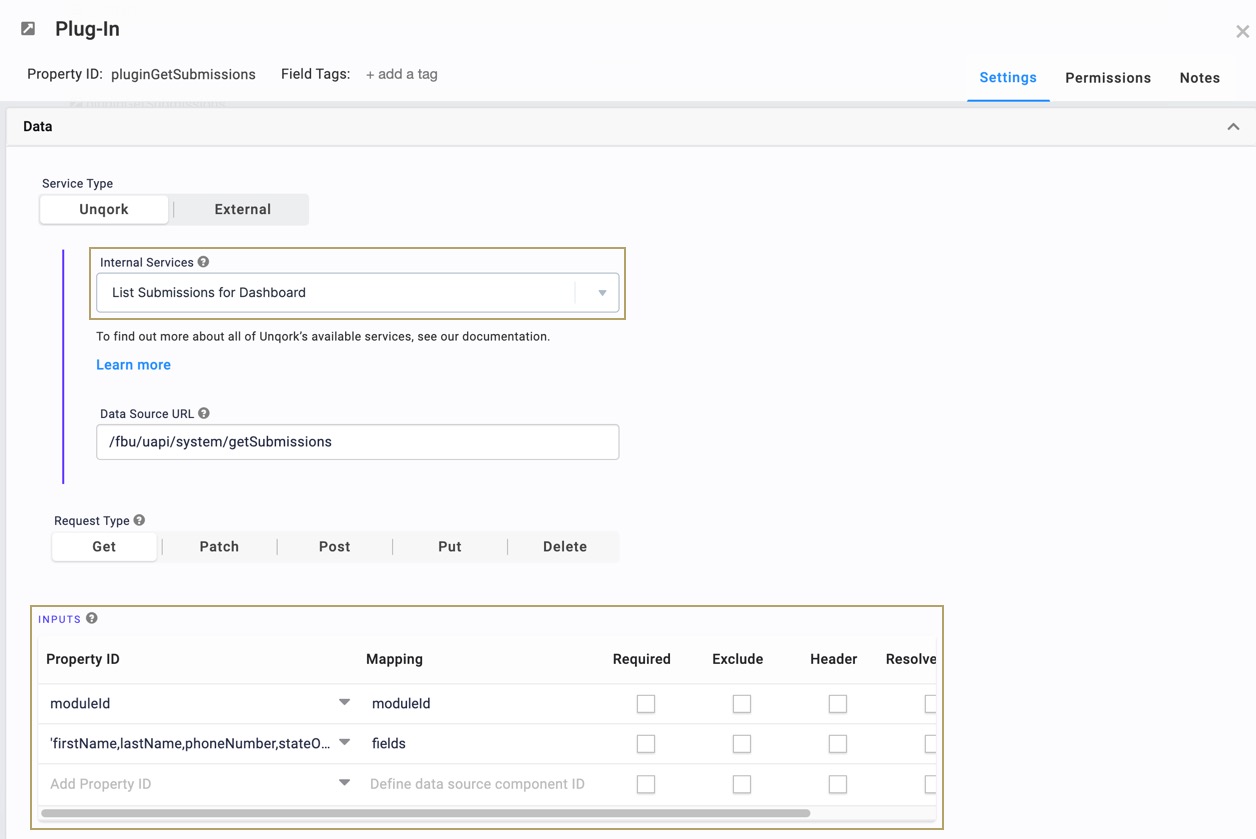
From the Internal Services drop-down, select List Submissions for Dashboard.
In the Inputs table, enter the following:
Property ID
Mapping
moduleId
moduleId
'firstName,lastName,phoneNumber,stateOfResidence,typeOfInsurance,insuranceAmount'
fields

Click Save.
Configure the ViewGrid Component
Now, set up a dashboard to view your submission data. When configured, you'll see the same information in the dashboard as your Excel file.
Drag and drop a
 ViewGrid component onto your canvas, placing it below your pluginGetSubmissions Plug-In component.
In the Label field, enter Submission Data Dashboard.
In the Property Name field, enter vgSubmissions.
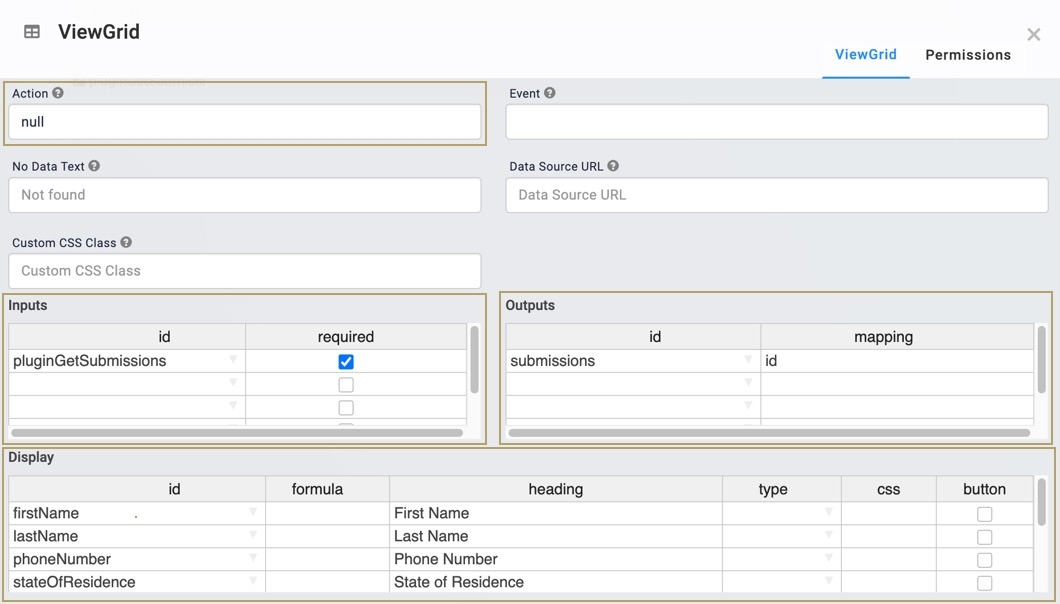
In the Action field, enter null.
In the Inputs table, enter the following:
ID
Required
pluginGetSubmissions
.png) (checked)
(checked)In the Outputs table, enter the following:
ID
Mapping
submissions
id
In the Display table, enter the following:
ID
Formula
Heading
Type
CSS
Button
firstName
First Name
☐ (Unchecked)
lastName
Last Name
☐ (Unchecked)
phoneNumber
Phone Number
☐ (Unchecked)
stateOfResidence
State of Residence
☐ (Unchecked)
typeOfInsurance
Type of Insurance
☐ (Unchecked)
insuranceAmount
Insurance Amount
☐ (Unchecked)
Click Save.

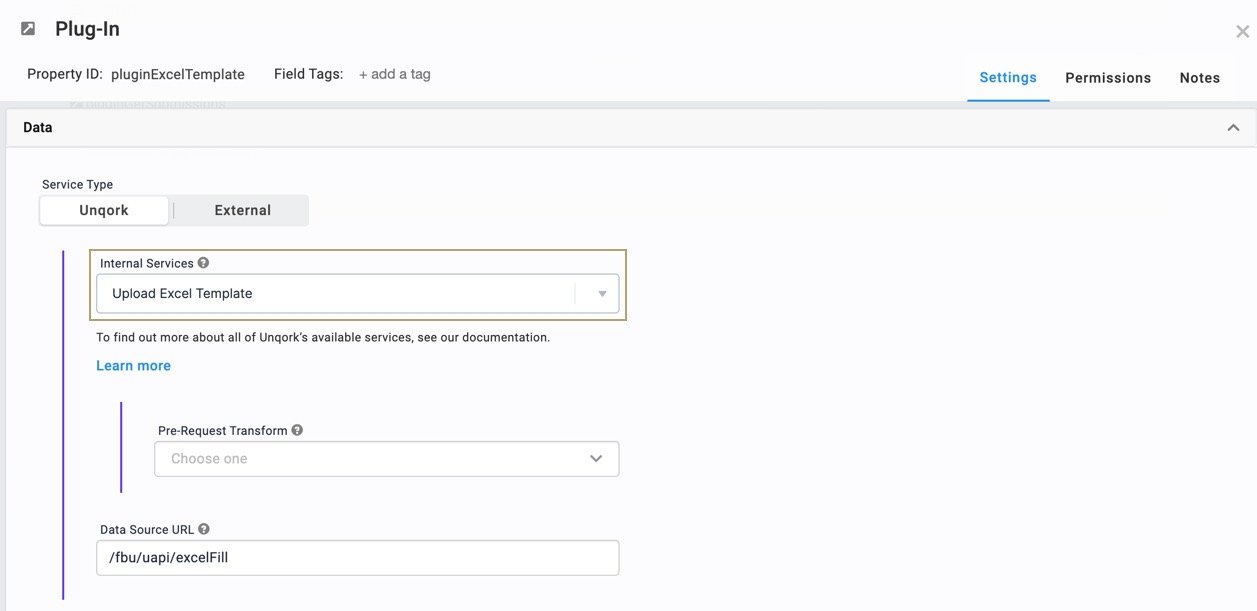
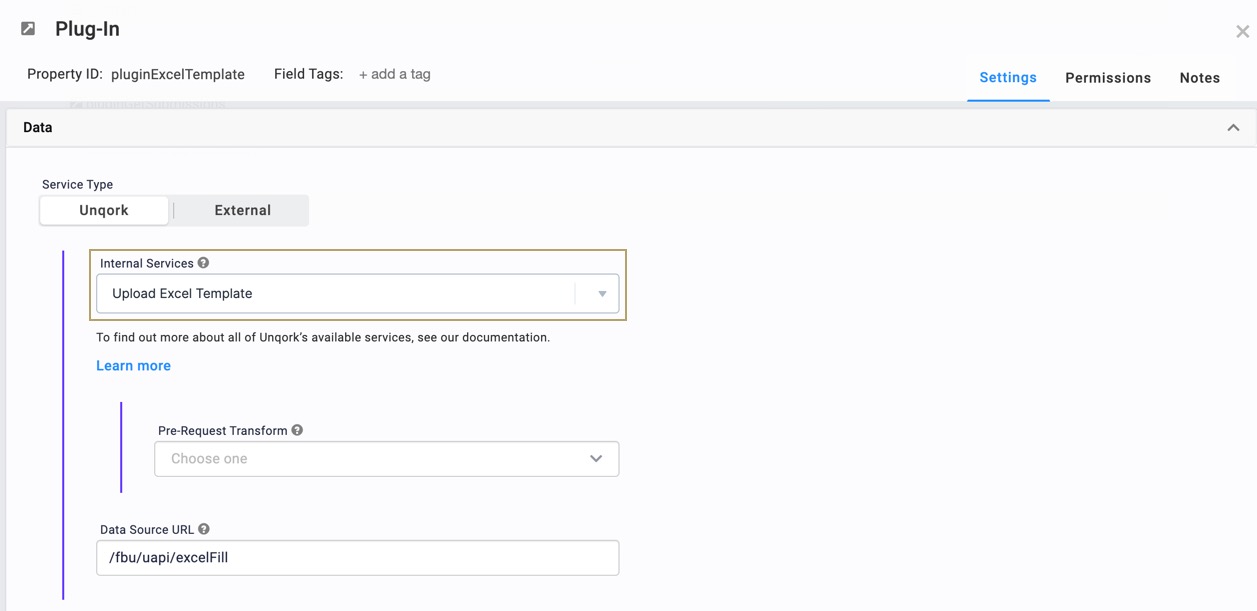
Configure the pluginExcelTemplate Component
Next, set up a Plug-In component to insert your submission data into your Excel template. You'll configure it to place the data into a specific spreadsheet.
Recall our previous Excel file example. We created an Excel template with All Data and Selected Data spreadsheets. You'll configure the Plug-In component to add submission data to the All Data spreadsheet. The Selected Data spreadsheet automatically populates based on the spreadsheet's calculations. We also titled the template file as Excel Fill Example.xlsx. You'll input this template into the Plug-In component, and the Plug-In component outputs the submission data into a new Hidden component called url.
Drag and drop a
Plug-In component onto your canvas, placing it below your vgSubmissions ViewGrid component.In the Property ID and Canvas Label Text fields, enter pluginExcelTemplate.
From the Internal Services drop-down, select Upload Excel Template.
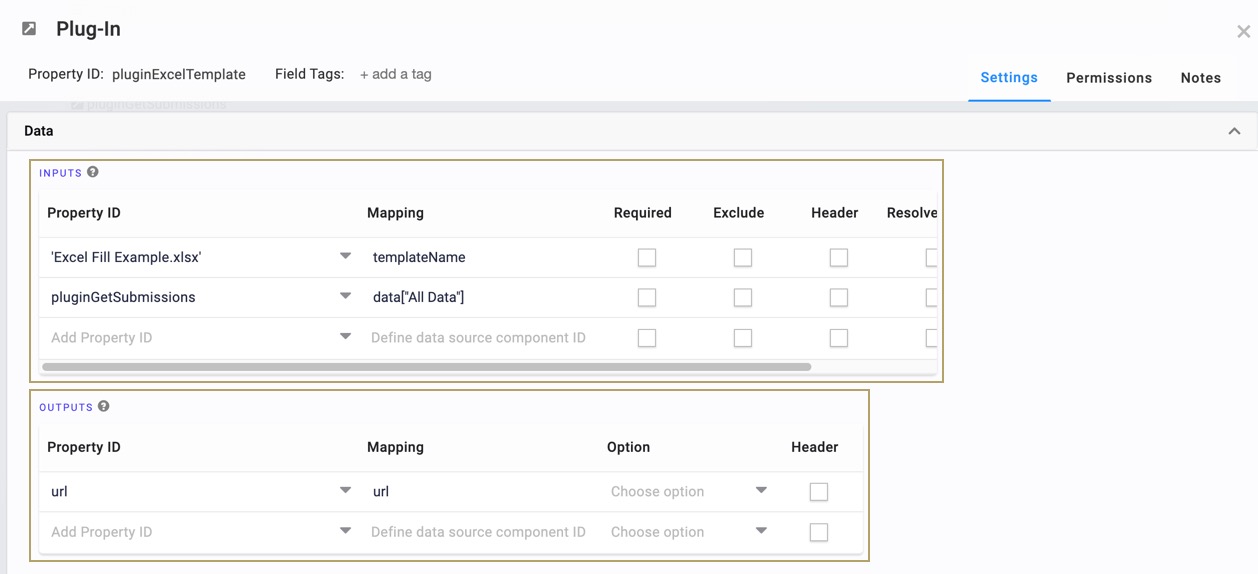
In the Inputs table, enter the following:
Property ID
Mapping
'Excel Fill Example.xlsx'
templateName
pluginGetSubmissions
data["All Data"]
In the Outputs table, enter the following:
Property ID
Mapping
url
url

Click Save.
Configure the url Hidden Component
This Hidden component holds the generated Excel file.
Drag and drop a
Hidden component onto your canvas, placing it below your pluginExcelTemplate Plug-In component.In the Property ID field, enter url.
In the Label Text field, enter url.
Click Save & Close.
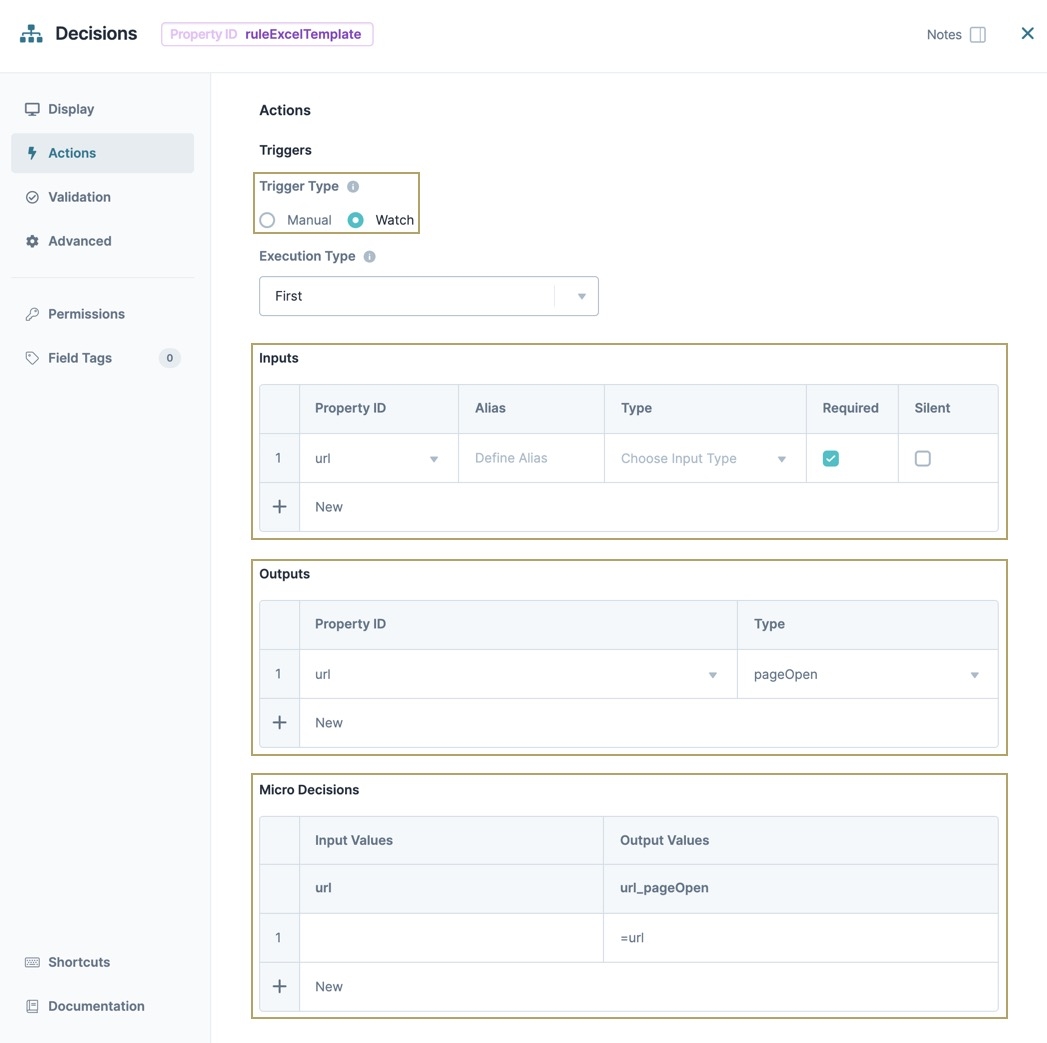
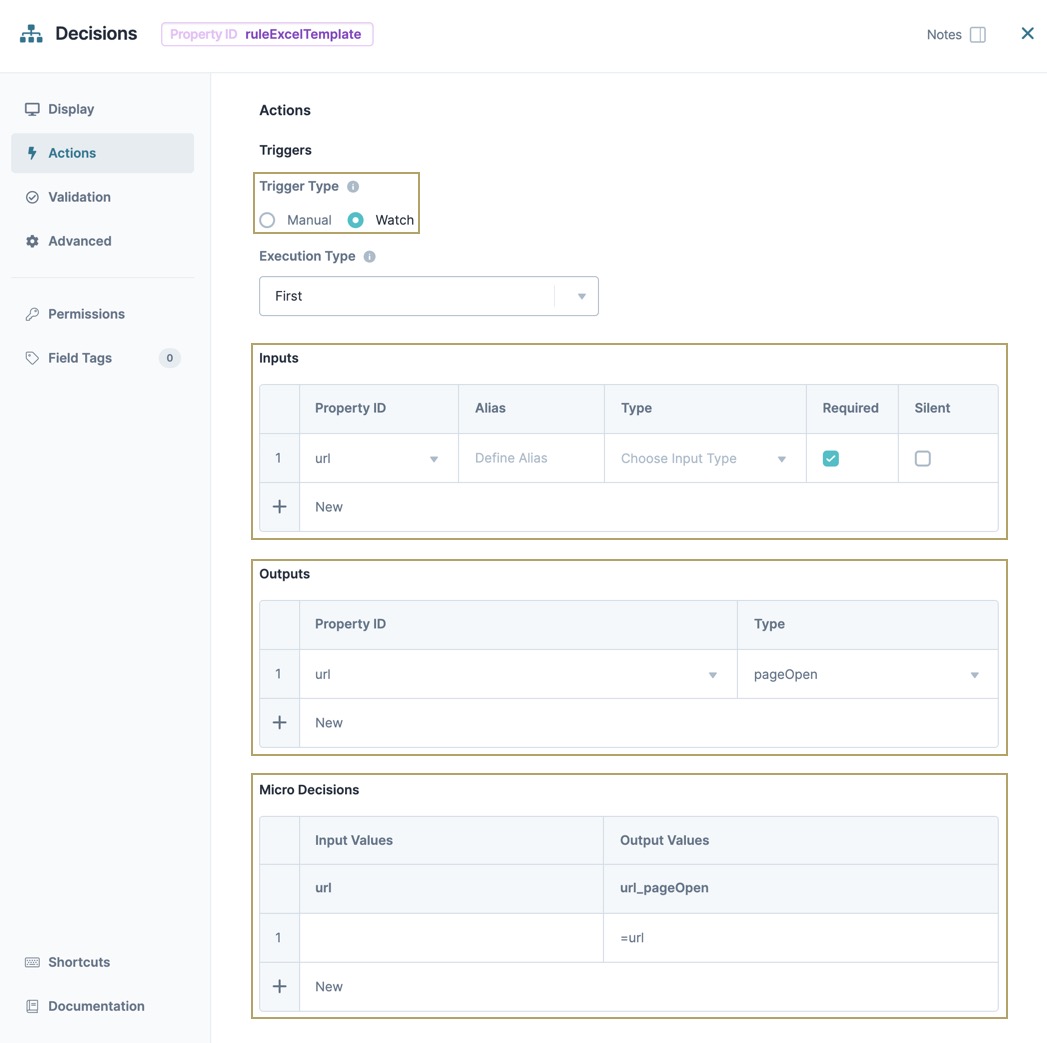
Configure the Decisions Component
Configure a Decisions component to automatically download the Excel file. After the pluginExcelTemplate Plug-In generates the Excel file, the Decisions component outputs a pageOpen function. The file downloads to your default browser.
Drag and drop a
 Decisions component onto your canvas, placing it below your url Hidden component.
In the Property ID field, enter ruleExcelTemplate.
In the Canvas Label Text * field, enter ruleExcelTemplate.
On the left side of the configuration window, click
Actions.Under Trigger Type, select Watch.
In the Inputs table, enter the following:
Property ID
Alias
Type
Required
Silent
url
(checked)☐ (Unchecked)
In the Outputs table, enter the following:
Property ID
Type
url
pageOpen
In the Micro Decisions table, enter the following:
Input Values
Output Values
url
url_pageOpen
=url
Click Save & Close.
Configure the Button Component
Lastly, you’ll configure a Button component to trigger the whole process.
Drag and drop a
 Button component onto your canvas, placing it below your ruleExcelTemplate Decisions component.
In the Property ID field, enter btnExcelTemplate.
In the Canvas Label Text * field, enter Generate Excel.
On the left side of the configuration window, click
Actions.Under Action Type, select Event.
Under Triggers, in the On Click field, enter pluginExcelTemplate.

Click Save & Close.
Save your module.

Preview your module in Express View. Submission data displays on the dashboard. Click Generate Template, and an Excel file displays in your browser. Open the Excel file and view the details. Using our example, all submission details display in the All Data spreadsheet. Only the specific information from your dashboard displays in your template's Selected Data spreadsheet.