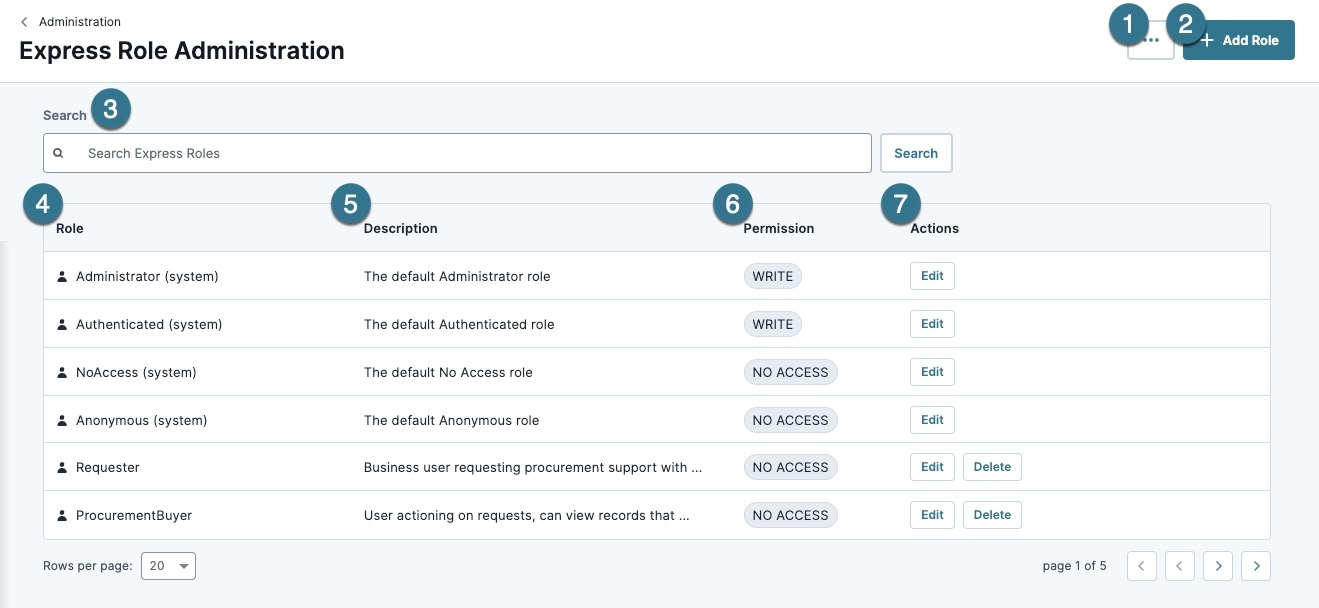
The Express Role Administration page lets administrators create Express roles and set their hierarchy. To manage permissions, Unqork classifies users by roles and groups. Groups and roles work together to determine what submissions users can view and edit. Creators can use roles to regulate access to modules or components and to decide how users interact with data.
Administrators manage users and roles separately for Express and for Designer. Express Role Administration, Express User Administration, and Express Group Administration apply to Express users. These end-users are the ones interacting with your application on the front-end.
Administrators can also set up users and roles for the Designer side of Unqork. These Creator users and roles let you manage who can edit your application. You can set up these permissions using Creator (User) Administration and Creator Role Administration.
Access the Express Roles Administration Page
To access the Express Roles Administration page:
At the top right of the Unqork Designer Platform, click Administration. The Administration page displays.
Under Express Permissions, click Express Role Administration. The Express Role Administration page displays.
Understanding Express Roles Administration
# | Setting | Description |
|---|---|---|
1 |
| Displays the following options:
|
2 | + Add Role | Click this button to add an Express role. |
3 | Search | Enter a value to search for, then click Search. |
4 | Role | The name of the role.
|
5 | Description | The description of the role entered by an administrator. |
6 | Permission | The assigned permission. Click the Edit button to change the permission value. Displays one of the following permission types:
|
7 | Actions | Modify or delete a role. View the Edit Role Settings section for more setting descriptions.
|
Edit Role Settings
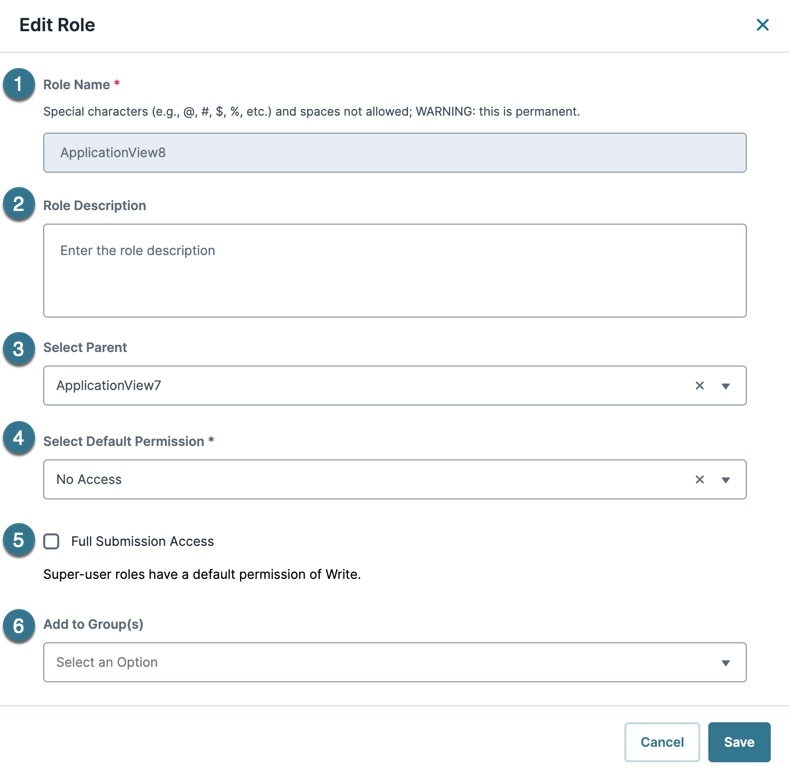
Click the Edit button to display a role's settings. After editing a role's settings, click Save to implement the changes.
# | Setting | Description |
|---|---|---|
1 | Role Name | The name of the role.
|
2 | Role Description | Enter a description of the role. This value displays in the Description column of the Express Role list. |
3 | Select Parent | Select a parent role from the drop-down list. The parent-child relationship defines the hierarchy in groups. The role you are creating is the child. The parent you select has access to the modules and workflows the child role can access.
|
4 | Select Default Permission | Select the default permission type. Default permissions let you decide how this Express role interacts with data.
|
5 | Full Submission Access | When set to
|
6 | Add to Group(s) | Organize Express users into groups to limit or grant permissions to specific roles. Each group has a set of rules for its users. These rules outline what data a group member can view. You can assign groups to an Express user, or you can assign groups to an Express role. When you assign a role to an Express user, the user is automatically included in that role's groups. |
Adding, Editing, or Promoting Express Roles
Adding an Express Role
To manage module-level permissions in Express View, Unqork classifies Express users by roles and groups. Each Express user has an Express role. You can use roles to regulate access to a module or component, and to choose how Express users interact with data. For example, will Express users with this role be able to write submissions or will they have read-only access?
To add a new Express role from the Express Role Administration page:
At the top right of the page, click + Add Role. The Add Role modal displays.
In the Role Name* field, enter a value. Role Names are permanent and cannot be changed.
Create your Role Name without using spaces between words. If you're adding an Express role named Human Capital Management, enter
Human-Capital-ManagementorHumanCapitalManagement. You'll remove the segmentation by deleting the space between the words or by using a hyphen..In the Role Description field, describe the purpose of the role.
(Optional) From the Select Parent drop-down, select an existing role. The parent-child relationship defines the hierarchy in groups. The role created is the child. The parent you select has access to modules and workflows the child role can access.
From the Select Default Permission* drop-down, select a permission type.. Default permissions let you decide how this Express role interacts with data. If the role has Full Submission Access, skip this step.
There are three default permissions:
No Access: The express user role has no access to the application.
Read-Only: The express user role can view but not modify the application.
Write: The express user role can view and modify the application.
(Optional) Set Full Submission Access to
.png) (checked) to give the Express role full access to all submission data. Full Submission Access supersedes role hierarchy, group membership, and field-level permissions.
(checked) to give the Express role full access to all submission data. Full Submission Access supersedes role hierarchy, group membership, and field-level permissions.This setting will provide users with this role Write access to every submission in every application in the entire environment. Use with caution.
Under the Groups section, you'll see the different groups in your platform. Click the checkbox next to the group(s) that you want for your role.
An Express user with this new role gets enrolled in the group(s) you select on this page.
Click Add Role. The role displays in the Express Roles list.
Editing or Deleting an Express Role
Edit or delete Express Roles using the Express Role Administration list's Actions column.
Editing an Express Role
Modify an existing role's purpose. Role names and certain default roles cannot be modified.
To edit an Express role from the Express Role Administration page:
In the Express Role list, navigate to the role you want to edit.
In the Actions column of the role, click Edit .
Update the role's settings as needed.
Click Save..
Deleting an Express Role
If a role is no longer required for an environment, remove it from the list. Reducing unused roles improves security.
Deleting a role is permanent.
To delete an Express role from the Express Role Administration page:
In the Express Role list, navigate to the role you want to delete.
In the Actions column of the role, click Delete.
Click Yes, Delete.. The role is removed from the list.
Promoting All Express Roles
When promoting an application to the next environment, you must also promote roles. This action applies to Express and Creator roles.
You can share roles between more than one application. Be mindful when promoting an application and all its features. Consider how promoting an Express role might affect other applications in the target environment.
Promoting a role overwrites any previous versions in the target environment.
Environments in Unqork support each phase of building and rendering applications. By default, Unqork recommends the following environment levels:
# | Environment Level | Description | Codebase |
|---|---|---|---|
1 | Staging | Where Unqork Creators configure applications. This non-production environment level is meant for test data only. This level is where you create and update configurations before promoting to QA for testing. Staging is an internal environment level and part of Unqork's cloud infrastructure. Staging offers both a Designer and Express View interface.
| Staging |
2 | Quality Assurance (QA) | Where Unqork Creators test and verify processes, artifacts, and ensure applications are built using best practices. QA is an internal environment level and part of Unqork's cloud infrastructure. QA offers both a Designer and Express View interface.
| QA |
3 | User Acceptance Testing (UAT) | Where the Creators and end-users can view the latest build. Use this environment level to test your application's end-user experience. This non-production environment hosts test data only. UAT is an internal environment level and part of Unqork's cloud infrastructure. UAT offers both a Designer and Express View interface.
| UAT |
4 | Production | This is the live application and the only environment level where end-users can access it. This level is also the only environment level to store live client data.
| Production |
Additional environments can also include Pre-Production (Pre-Prod) environment levels. Pre-Prod environments use the Production codebase. The progression order is Staging, QA, UAT, Pre-prod, and Production. Client leads decide the number of environments to use when developing a customer application.
To promote all Express roles:
At the top right of the page, click the
.png) (ellipsis) button.
(ellipsis) button.Click Promote All Roles. The Promote Roles modal displays.
From the Select a Target drop-down, choose an environment.
Click Promote.
The above instructions only apply if you're promoting all your active roles. To promote a single role or specific roles, you must add each of them to the new environment.
Viewing Role Hierarchy
Access Role Hierarchy
Understanding Role Hierarchy
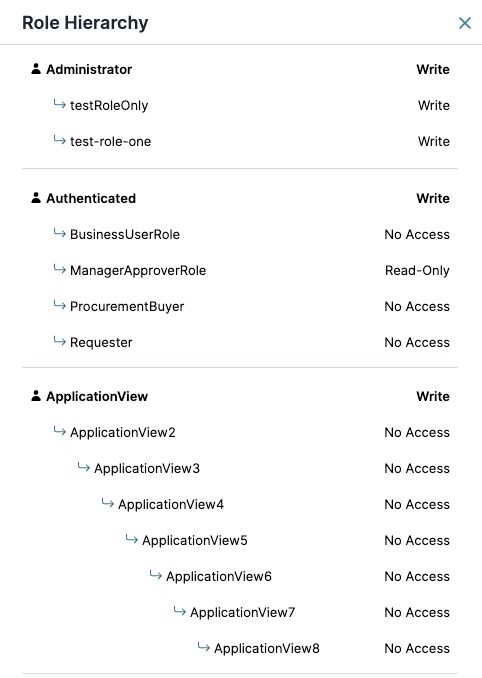
Role Hierarchy is the parent-child relationship between Express roles. Parent roles inherit the access type of the child roles, determining what roles have access to modules and workflows.
In the image below, the Parent role is in bold and displayed at the top of the list. Each child role and child-of-child role is listed underneath the parent role:

.png)

.png)

