Administrators can use the API Access Management page to create secure API access credentials for Unqork’s Creator and Express APIs. Each credential set contains a unique Client ID and Secret and authenticates with Unqork using the OAuth 2.0 Client Credentials Grant. Customers can use these credentials wherever they want to provide secure access to Unqork when using external APIs.
The OAuth 2.0 Client Credentials Grant is the preferred authentication method. Older methods, such as Password Grant, are no longer best practice and might increase vulnerability to bad actors.To learn why the OAuth 2.0 Password Grant is not recommended, view this article: https://oauth.net/2/grant-types/password/
Administrators can also use the API Access Management page to:
View credentials.
Revoke credentials.
Delete credentials.
Generate new Secrets if a user loses them.
Generate new Secrets to comply with password rotation schedules.
Accessing the API Access Management Page
API Access Management contains the Express and Creator API Access Credential pages. The Express page displays a list of Express API credentials, and the Creator page provides a list of Creator API credentials. Administrators can create new credentials for either API type by using the + Create New ▾ button.
Service-users previously set up in Express User Administration now display in the Express API Access Credentials list.×
To access the API Access Management Page from the Workspaces view:
At the top right of the Unqork Designer Platform, click the Settings ▾ drop-down.
Click Administration.
Under Integration, select API Access Management.
Navigating the Create New Access Credential Modals
To explore the API Access Management page, you must have Express or Creator API credentials. Click the + Create New ▾ drop-down button to display the Express Access Credential or Creator Access Credential options. These options open the Create New Express Access Credential and Create New Creator Access Credential modals.
Create New Express Access Credential Modal
To create client credentials for Express-specific APIs, you'll select the Express Access Credential option. The Create New Express Access Credential modal contains the following settings:
Setting | Description |
|---|---|
Credential Details | Enter the required information in the Credential Details tab to create a new Access Credential. |
Name* | Enter a name for the access credential. *The name field is required to create a new credential. |
Description | In this field, provide additional information about the credential. |
Select Express Role(s)* | Click the Select an Option ▾ drop-down to display Express Roles created in Express Role Administration. Selecting a role adds it to the field. Click the drop-down button again to add another role. *At least one Express Role is required to create a new credential. |
Select Group(s) | Click the Select an Option ▾ drop-down to display Express Groups created in Express Group Administration. |
Expiration Date (Days)* | Enter a custom expiration date. *The expiration date can be a minimum of one day and a maximum of 730 days (2 years). |
+ Add Custom Attribute | Click to add a custom attribute to the credential. Clicking this button adds the Custom Attribute Name* and Attribute* value fields. *Values are required if you choose to add custom attributes to your credential.
|
Cancel | Clears entered data and exits the Create New Express Access Credential modal. |
Generate Credential | Click to create a new Express Access credential. Clicking this button displays the Client ID & Secret tab and adds the credential to the Express Credentials List. |
Client ID & Secret | The Client ID & Secret tab displays after creating a new credential. The Administrator can copy the credentials’ Client ID and Client Secret from this tab. |
Client ID | The Client ID is a unique hash value. When creating a new Access Credential, the Client ID is given to the end-user or Service-user account for accessing APIs in Express View. |
Client Secret | The Client Secret is similar to a password. When creating a new Access Credential, the Client Secret is given to the end-user or Service-user account for accessing APIs in Express View.
|
Copy Client ID & Secret | Copies the Client ID and Client Secret values as an object key/value string, separated by a comma. For example, |
Create New Creator Access Credential Modal
To create client credentials for Designer-specific APIs, you'll select the Creator Access Credential option. The Create New Creator Access Credential modal contains the following settings:
Setting | Description |
|---|---|
Credential Details | Enter the required information in the Credential Details tab to create a new Access Credential. |
Name* | Enter a name for the access credential. *The name field is required to create a new credential. |
Description | In this field, provide additional information about the credential |
Select Creator Role(s)* | Click the Select an Option ▾ drop-down to display Creator Roles created in Creator Role Administration. Selecting a role adds it to the field. Click the drop-down button again to add another role. *At least one Creator Role is required to create a new credential. |
Expiration Date (Days)* | Enter a custom expiration date. *The expiration date can be a minimum of one day and a maximum of 730 days (2 years). |
+ Add Custom Attribute | Click to add a custom attribute to the credential. Clicking this button adds the Custom Attribute Name* and Attribute* value fields. *Values are required if you choose to add custom attributes to your credential.
|
Cancel | Clears entered data and exits the Create New Creator Access Credential modal. |
Generate Credential | Click to create a new Express Access credential. Clicking this button displays the Client ID & Secret tab and adds the credential to the Express Credentials List. |
Client ID & Secret | The Client ID & Secret tab displays after creating a new credential. The Administrator can copy the credentials’ Client ID and Client Secret from this tab. |
Client ID | The Client ID is a unique hash value. When creating a new Access Credential, the Client ID is given to the end-user or Service-user account for accessing APIs in Express View. |
Client Secret | The Client Secret is similar to a password. When creating a new Access Credential, the Client Secret is given to the end-user or Service-user account for accessing APIs in Express View.
|
Copy Client ID & Secret | Copies the Client ID and Client Secret values as an object key/value string, separated by a comma. For example, |
Navigating the Express and Creator Access Credential Lists
The Express and Creator Credential Lists display active, expired, and revoked credentials for the environment.
Description | Settings |
|---|---|
Name | The name of the credential set during creation. |
Client ID | The unique ID of the credential. Users must apply the Client ID and the Client Secret to access Express or Creator APIs. |
Created | The date and time the credential was created. |
Expires | The date and time the credential is set to expire. Credentials are only valid for 90 days. |
Last Used | The last time the credential was used to access an Express or Creator API. If the credential has not been used, this field displays the date and time of the credential's creation. |
Role(s) | Displays the roles assigned to the credential. To see what permissions are assigned to the role, click the Action ▾ button drop-down. Then, click View. |
Status | Displays the current status of the credential. Statuses include:
|
Action ▾ | The Action button drop-down contains the following options:
|
View an Access Credential's Details
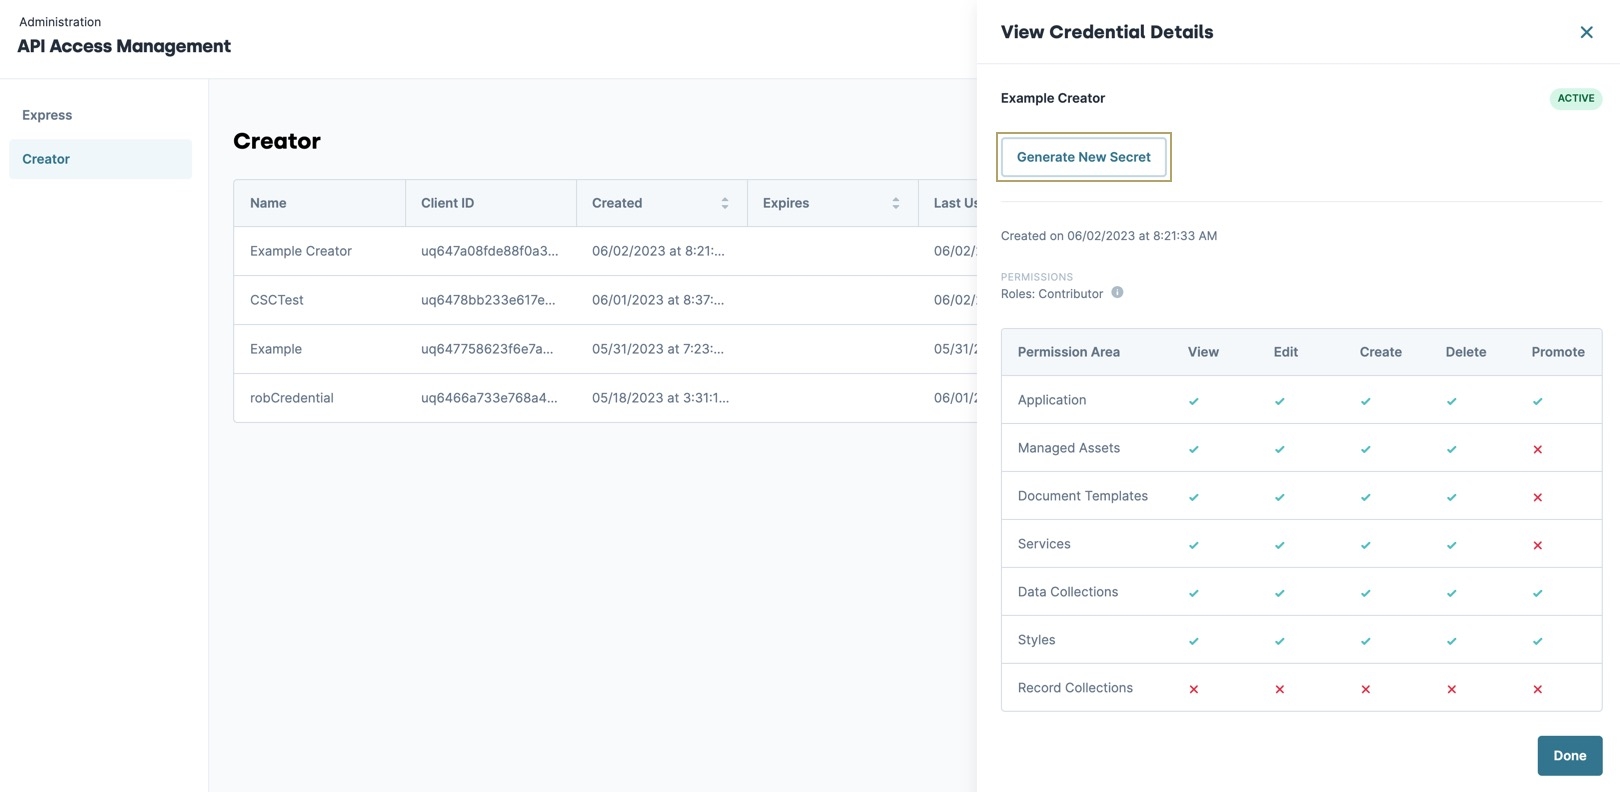
Viewing an access credential opens the View Credential Details panel. From this panel, Administrators can see what permissions are available or generate a new secret for a credential.
To view the details of an access credential from the Express or API credential pages:
Locate the Access Credential in the list and click Action ▾.
Click View. The View Credential Details panel displays.
Delete an Access Credential
Deleting an access credential permanently removes it from the environment. Deleted credentials cannot be recovered.
To delete an access credential from the environment:
Locate the access credential in the Express or Creator credential lists and click Action ▾.
From the Action ▾ drop-down, select Delete. The Delete Access confirmation modal displays.
Click Yes, Delete Access. The confirmation window closes, and a text box displays at the bottom of the browser window confirming that the access credential has been removed. The access credential is also removed from the list.
Revoke a Creator Access Credential
If Administrators need to remove API access from a credential, they can revoke it. Revoked credentials can be viewed in the Access Credentials lists but cannot be restored.
To restore credential access, you must create a new set of access credentials using the + Create New ▾ button.
To revoke a Creator's access credential from the environment:
Locate the access credential in the Express or Creator credential lists and click Action ▾.
From the Action ▾ drop-down, select Revoke. The Revoke Access confirmation modal displays.
Click Yes, Revoke Access. The Access Credential's Status changes to REVOKED.
Generate a New Access Credential Client Secret
To generate a new Client Secret for an access credential:
Locate the access credential in the Express or Creator credential lists and click Action ▾.
Click View. The View Credential Details panel displays.
Click Generate New Secret. The New Client ID & Secret modal displays.
Only the Client Secret value is generated. The previous Client ID value is retained.
Click Copy Client ID & Secret. The Client ID and Client Secret values are copied as an object key/value string separated by a comma. For example,
{"clientId":"uq6478a3a52300ff7cf8ac55fc","clientSecret":"n9*uc1}S&%~r^z4N4a$xdApKzz^=ODzp"}.The Client Secret field cannot be viewed once the modal is closed. If the Client Secret is lost, the Administrator can generate a new secret to replace it.
Test Client Credentials Using Postman
After creating your Express or Creator credentials, you can test them using an API testing tool. For this article, you'll learn how to test your credentials using Postman.
These instructions assume you have a postman account.
The only difference between testing an Express credential versus a Creator credential is the subdomain in your Callback URL. For example, if you are testing client credentials created in the Training environment, the required Callback URLs are the following (take note of the x in the Express URL):
Express:
https://trainingx.unqork.io/api/1.0/oauth2/access_tokenCreator:
https://training.unqork.io/api/1.0/oauth2/access_token
There are two steps involved in testing your Express and Creator credentials:
Generating a Bearer Token.
Using the Bearer Token to authenticate an endpoint.
Let's take a closer look at testing your Express and Creator client credentials.
Testing Express Credentials
Before we begin, create your Express credential in API Access Management. Copy the credentials’ Client ID and Client Secret so you can use them to request a Bearer Token.
Generating a Bearer Token
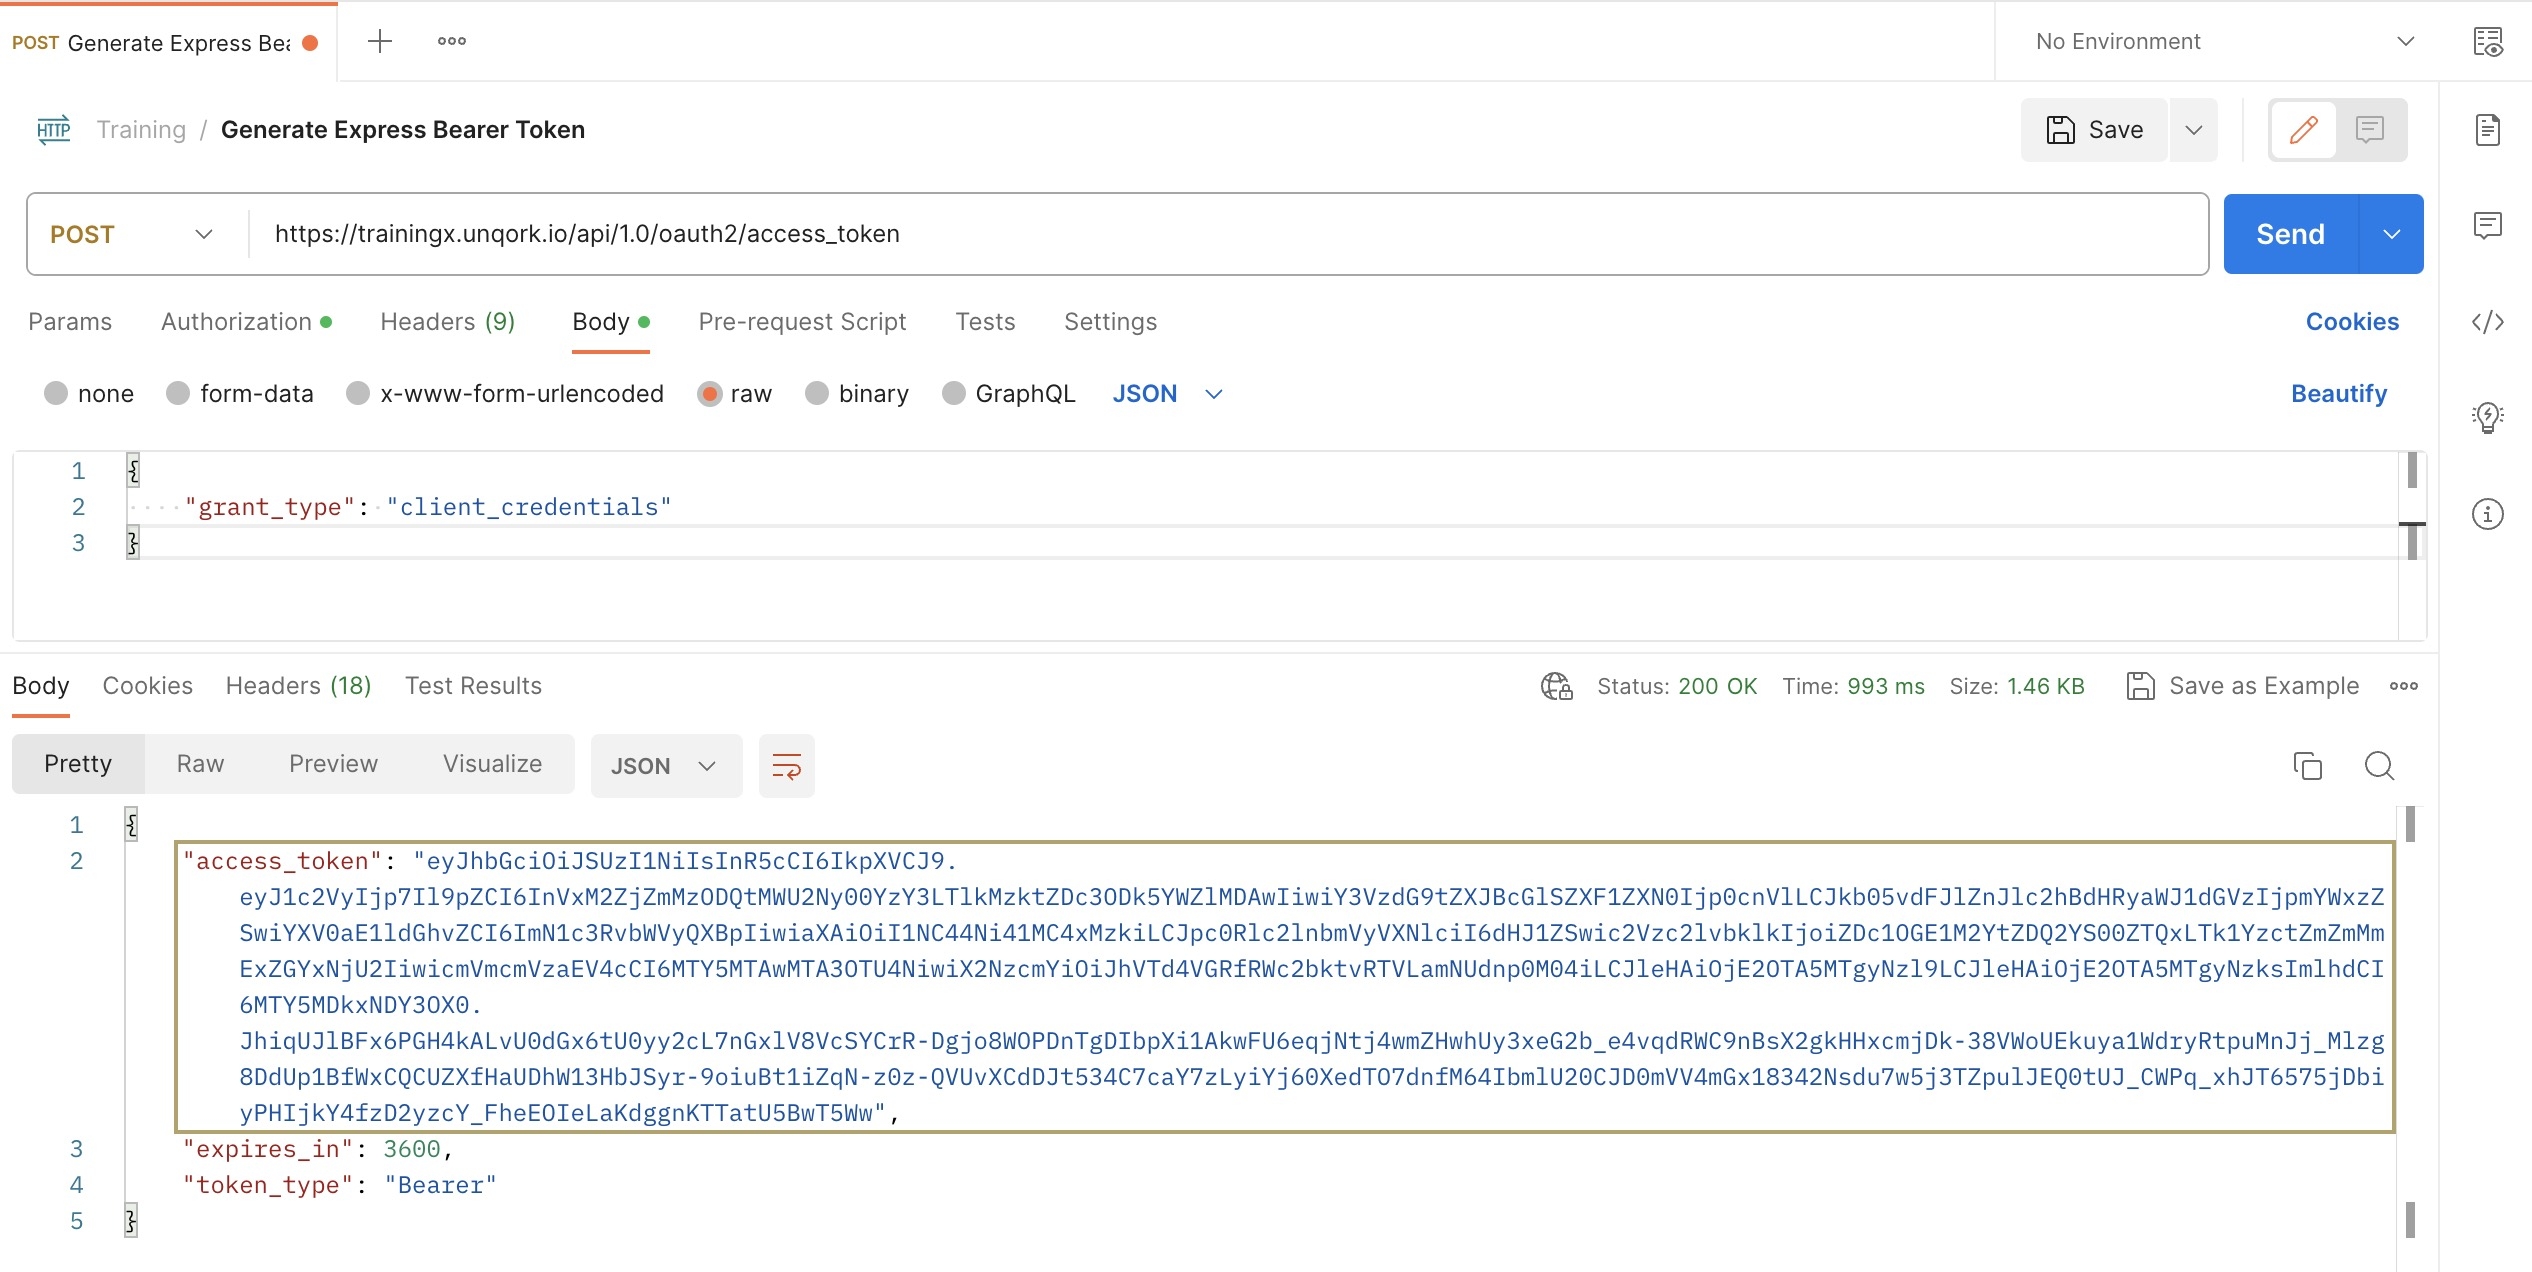
The first step is to generate a Bearer Token, so you can use it to authenticate an Express endpoint.
To generate a Bearer Token:
In your browser, open Postman.
In the top left, click New.
From the modal, select
 .
.In the Untitled Request field, enter a name for your request.
From the Method drop-down, select POST.
In the Callback URL field, enter
https://{environment}x.unqork.io/api/1.0/oauth2/access_token.Replace{environment}with the Unqork environment where you created your Express credential.Click the Authorization tab.
From the Type drop-down, select Basic Auth.
In the Username field, enter your Client ID.
In the Password field, enter your Client Secret.
Click the Headers tab.
In the Key field, enter Content-Type.
In the Value field, enter application/json.
Click the Body tab.
Select
 raw.
raw.In the Body field, enter the following syntax:
{
    "grant_type": "client_credentials"
}
At the top right, click Save.
Click Send
.png) .
.
If the request was successful, you should generate an access token in the Response body. Copy this access token to authenticate an Express endpoint.
Authenticating an Express Endpoint
Before you begin, open the module whose endpoint you want to authenticate. Preview your module in Express View and copy its module ID for use in the request. For example, if you are authenticating an Express module endpoint in the Training environment, you can find the module ID in the browser URL: https://trainingx.unqork.io/#/display/64550867e46f34549b1e333e.
In your browser, open Postman.
In the top left, click New.
From the modal, select
 .
.In the Untitled Request field, enter a name for your request.
From the Method drop-down, select GET.
In the Callback URL field, enter
https://{environment}x.unqork.io/fbu/form/{moduleId}. Replace{environment}with the Unqork environment where you created your Express credential. Replace{moduleId}with the module ID of the module endpoint you want to authenticate.Click the Authorization tab.
From the Type drop-down, select Bearer Token.
In the Token field, enter the access token you obtained in the previous section of this article.
At the top right, click Save.
Click Send
.png) .
.
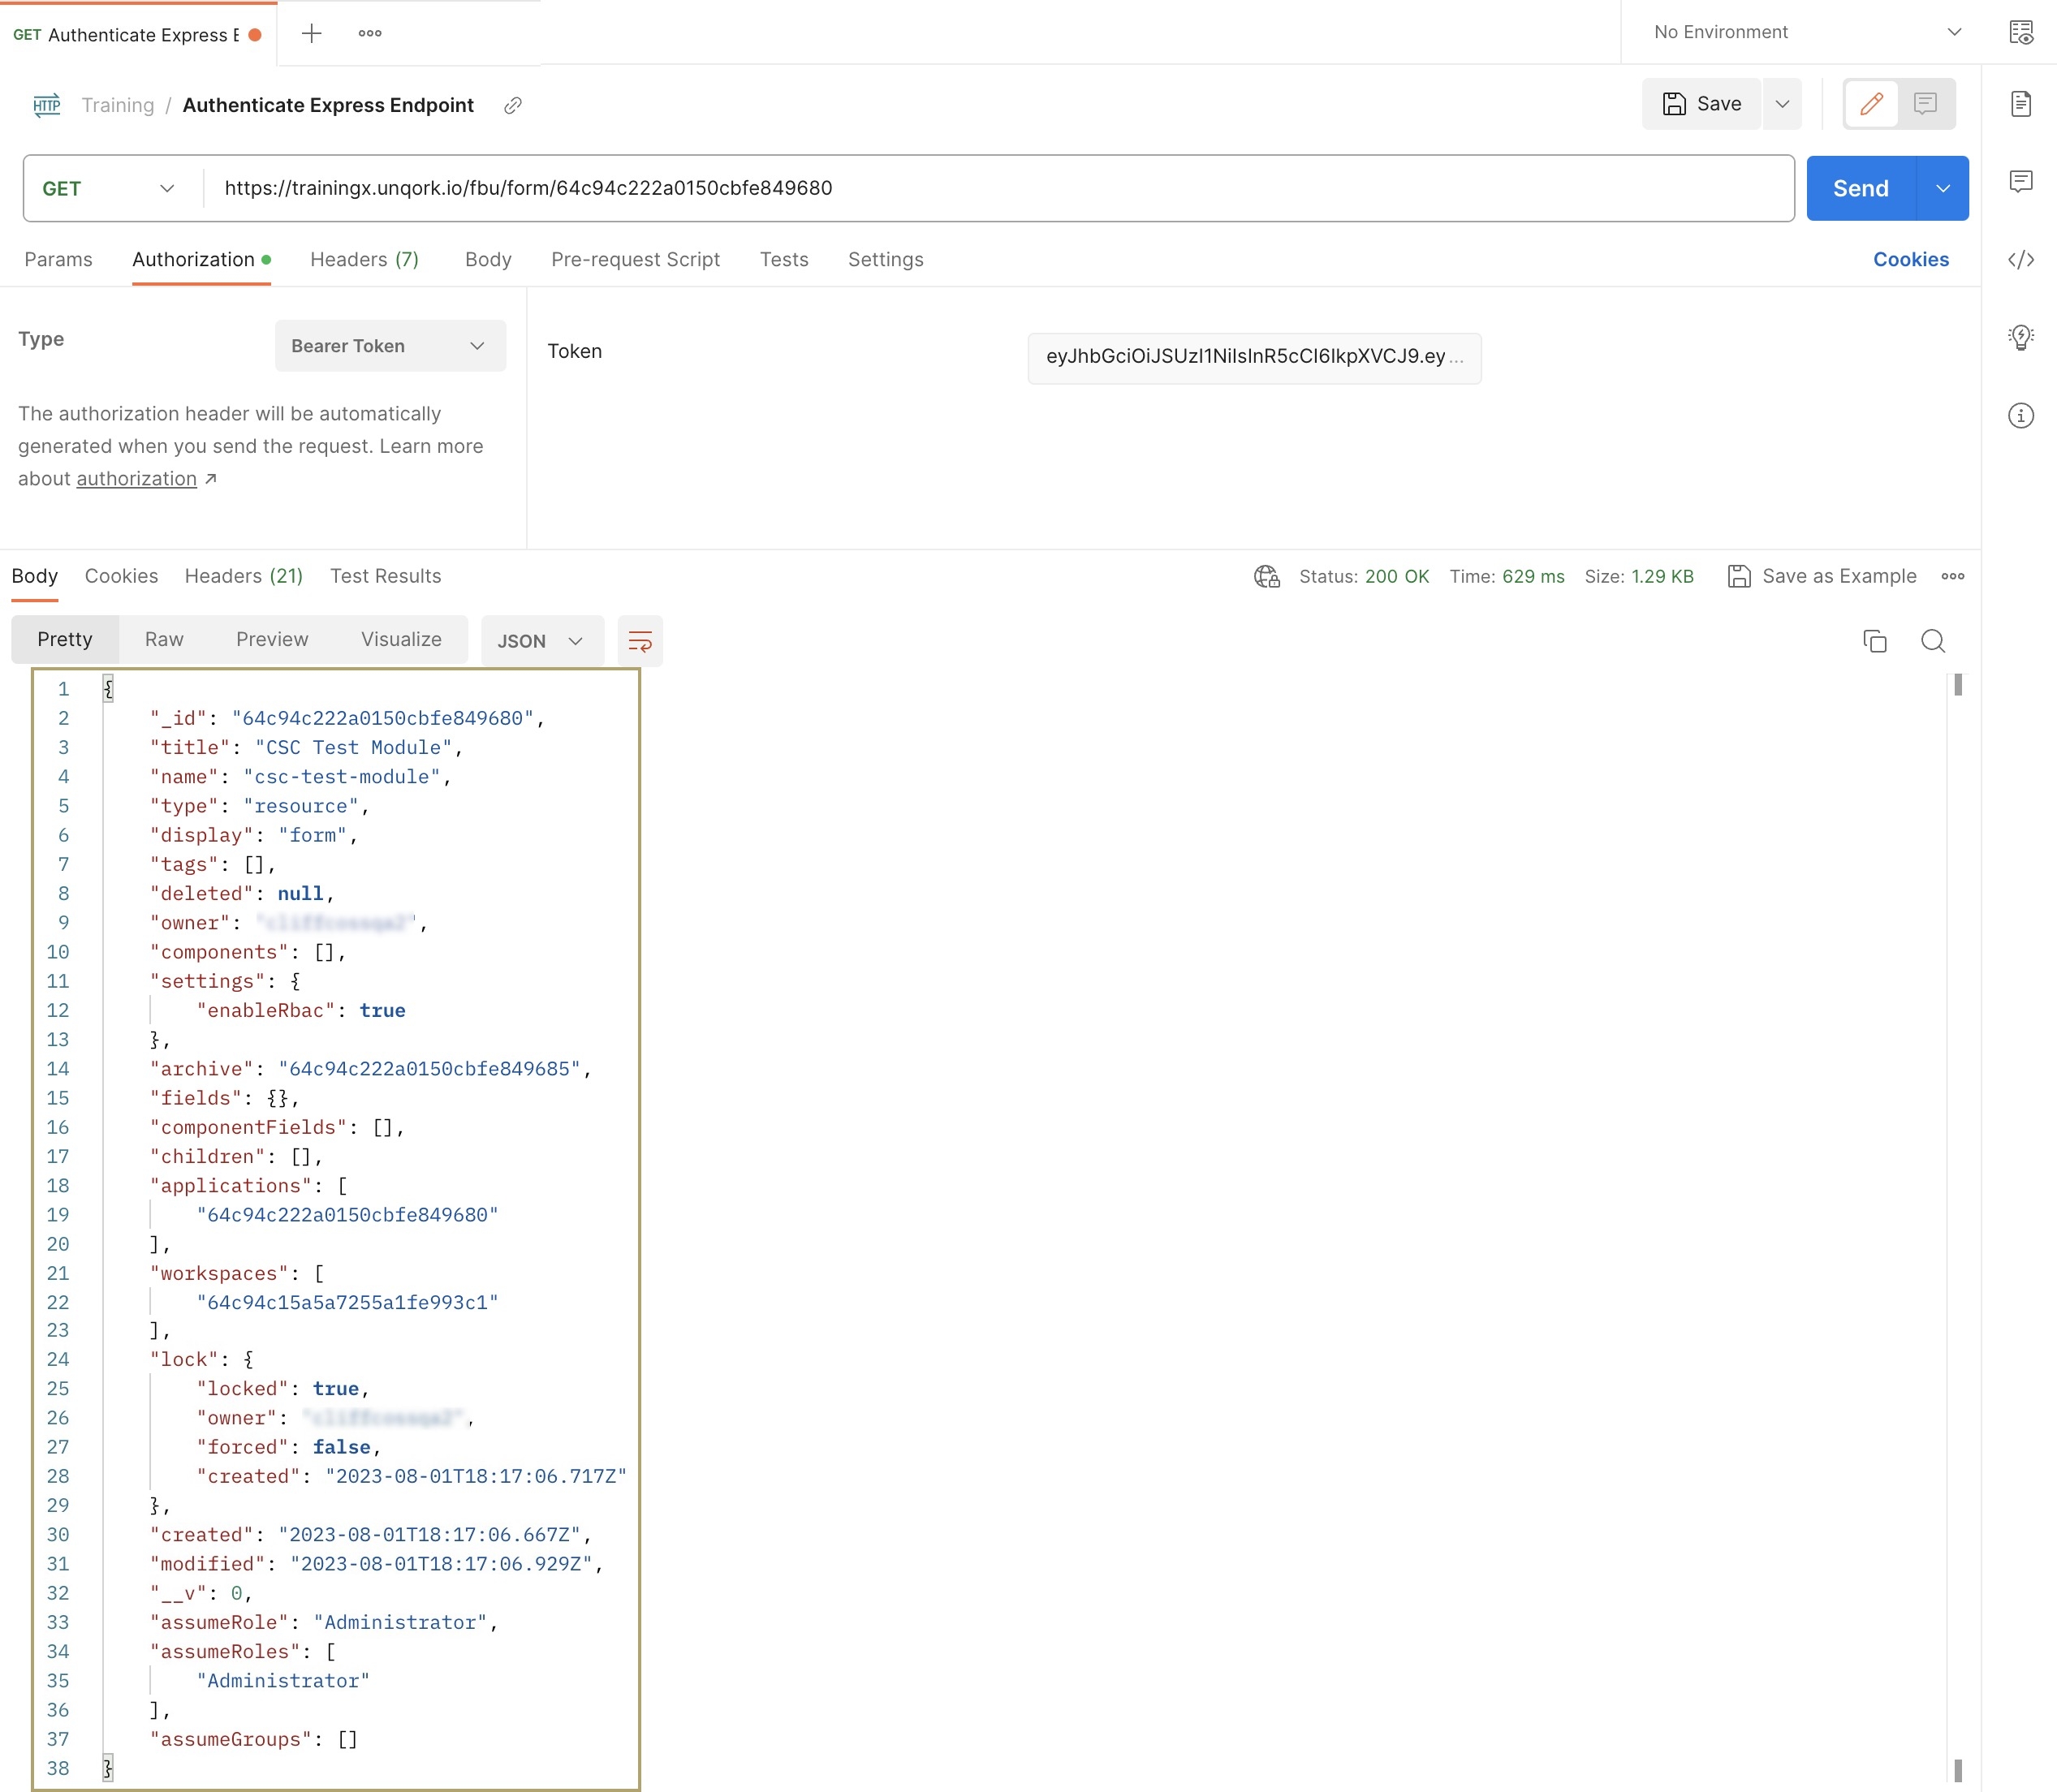
If the Response body includes details about the module and the user who created it, you have successfully authenticated that Express endpoint.
Testing Creator Credentials
Before we begin, create your Creator credential in API Access Management. Copy the credentials’ Client ID and Client Secret, so you can use them to request a Bearer Token.
Generating a Bearer Token
The first step is to generate a Bearer Token, so you can use it to authenticate the Creator endpoint.
To generate a Bearer Token:
In your browser, open Postman.
In the top left, click New.
From the modal, select
 .
.In the Untitled Request field, enter a name for your request.
From the Method drop-down, select POST.
In the Callback URL field, enter
https://{environment}.unqork.io/api/1.0/oauth2/access_token. Replace{environment}with the Unqork environment where you created your Creator credential.Click the Authorization tab.
From the Type drop-down, select Basic Auth.
In the Username field, enter your Client ID.
In the Password field, enter your Client Secret.
Click the Headers tab.
In the Key field, enter Content-Type.
In the Value field, enter application/json.
Click the Body tab.
Select
 raw.
raw.In the Body field, enter the following syntax:
{
    "grant_type": "client_credentials"
}
At the top right, click Save.
Click Send
.png) .
.
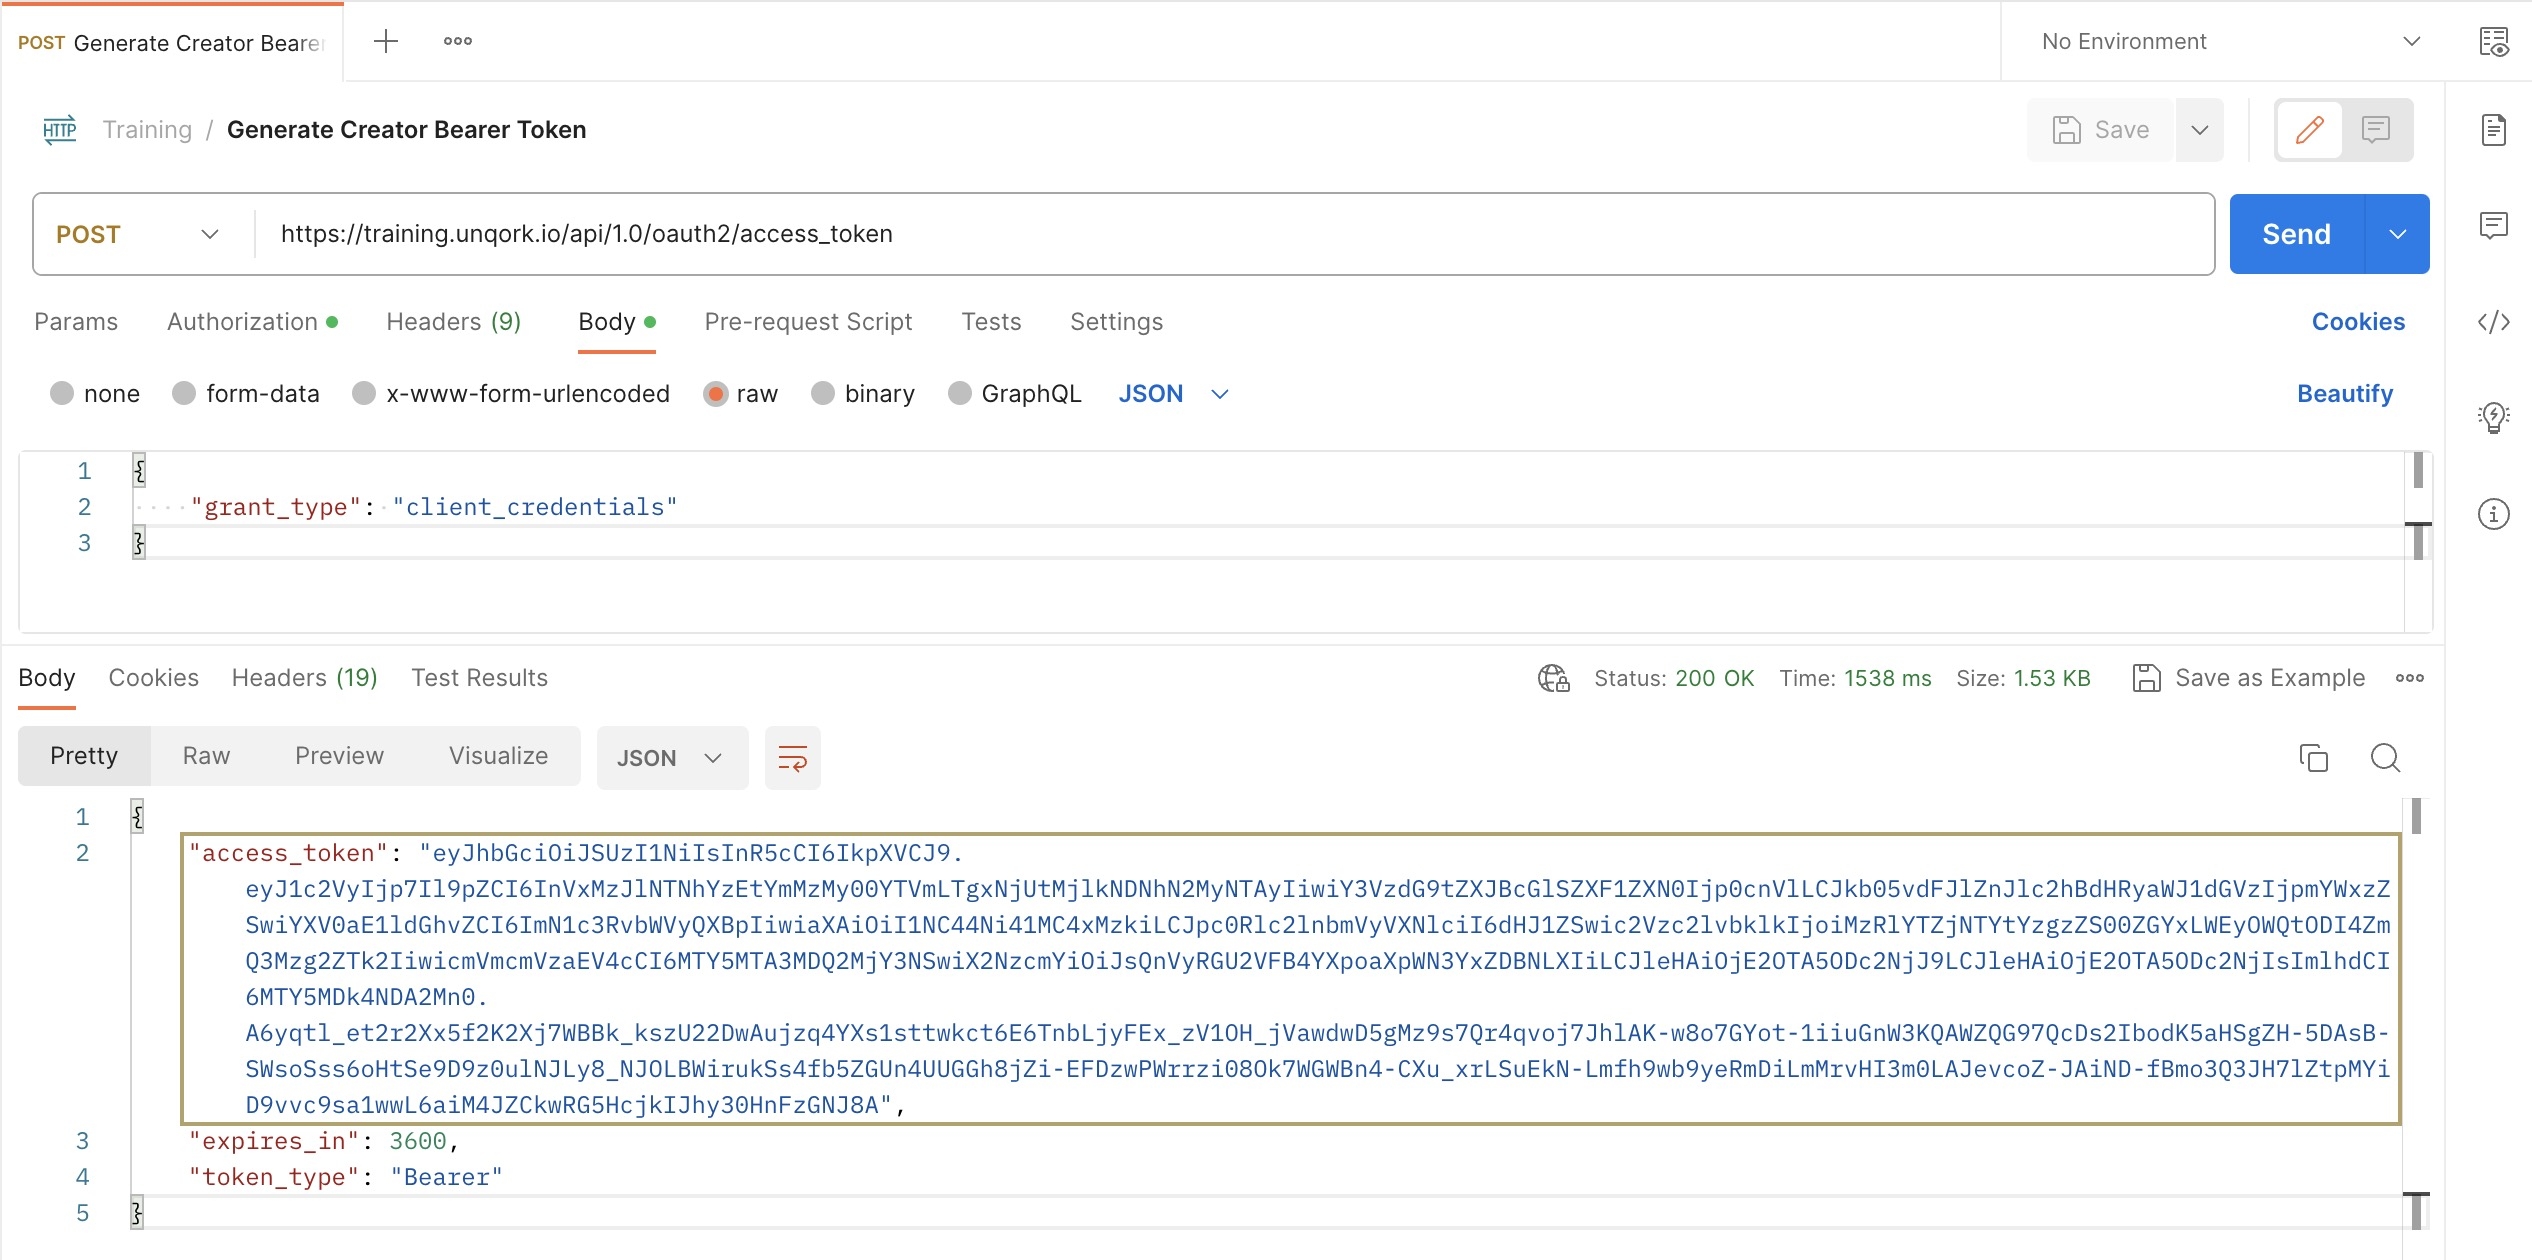
If the request was successful, you should generate an access token in the Response body. Copy this access token to authenticate a Creator endpoint.
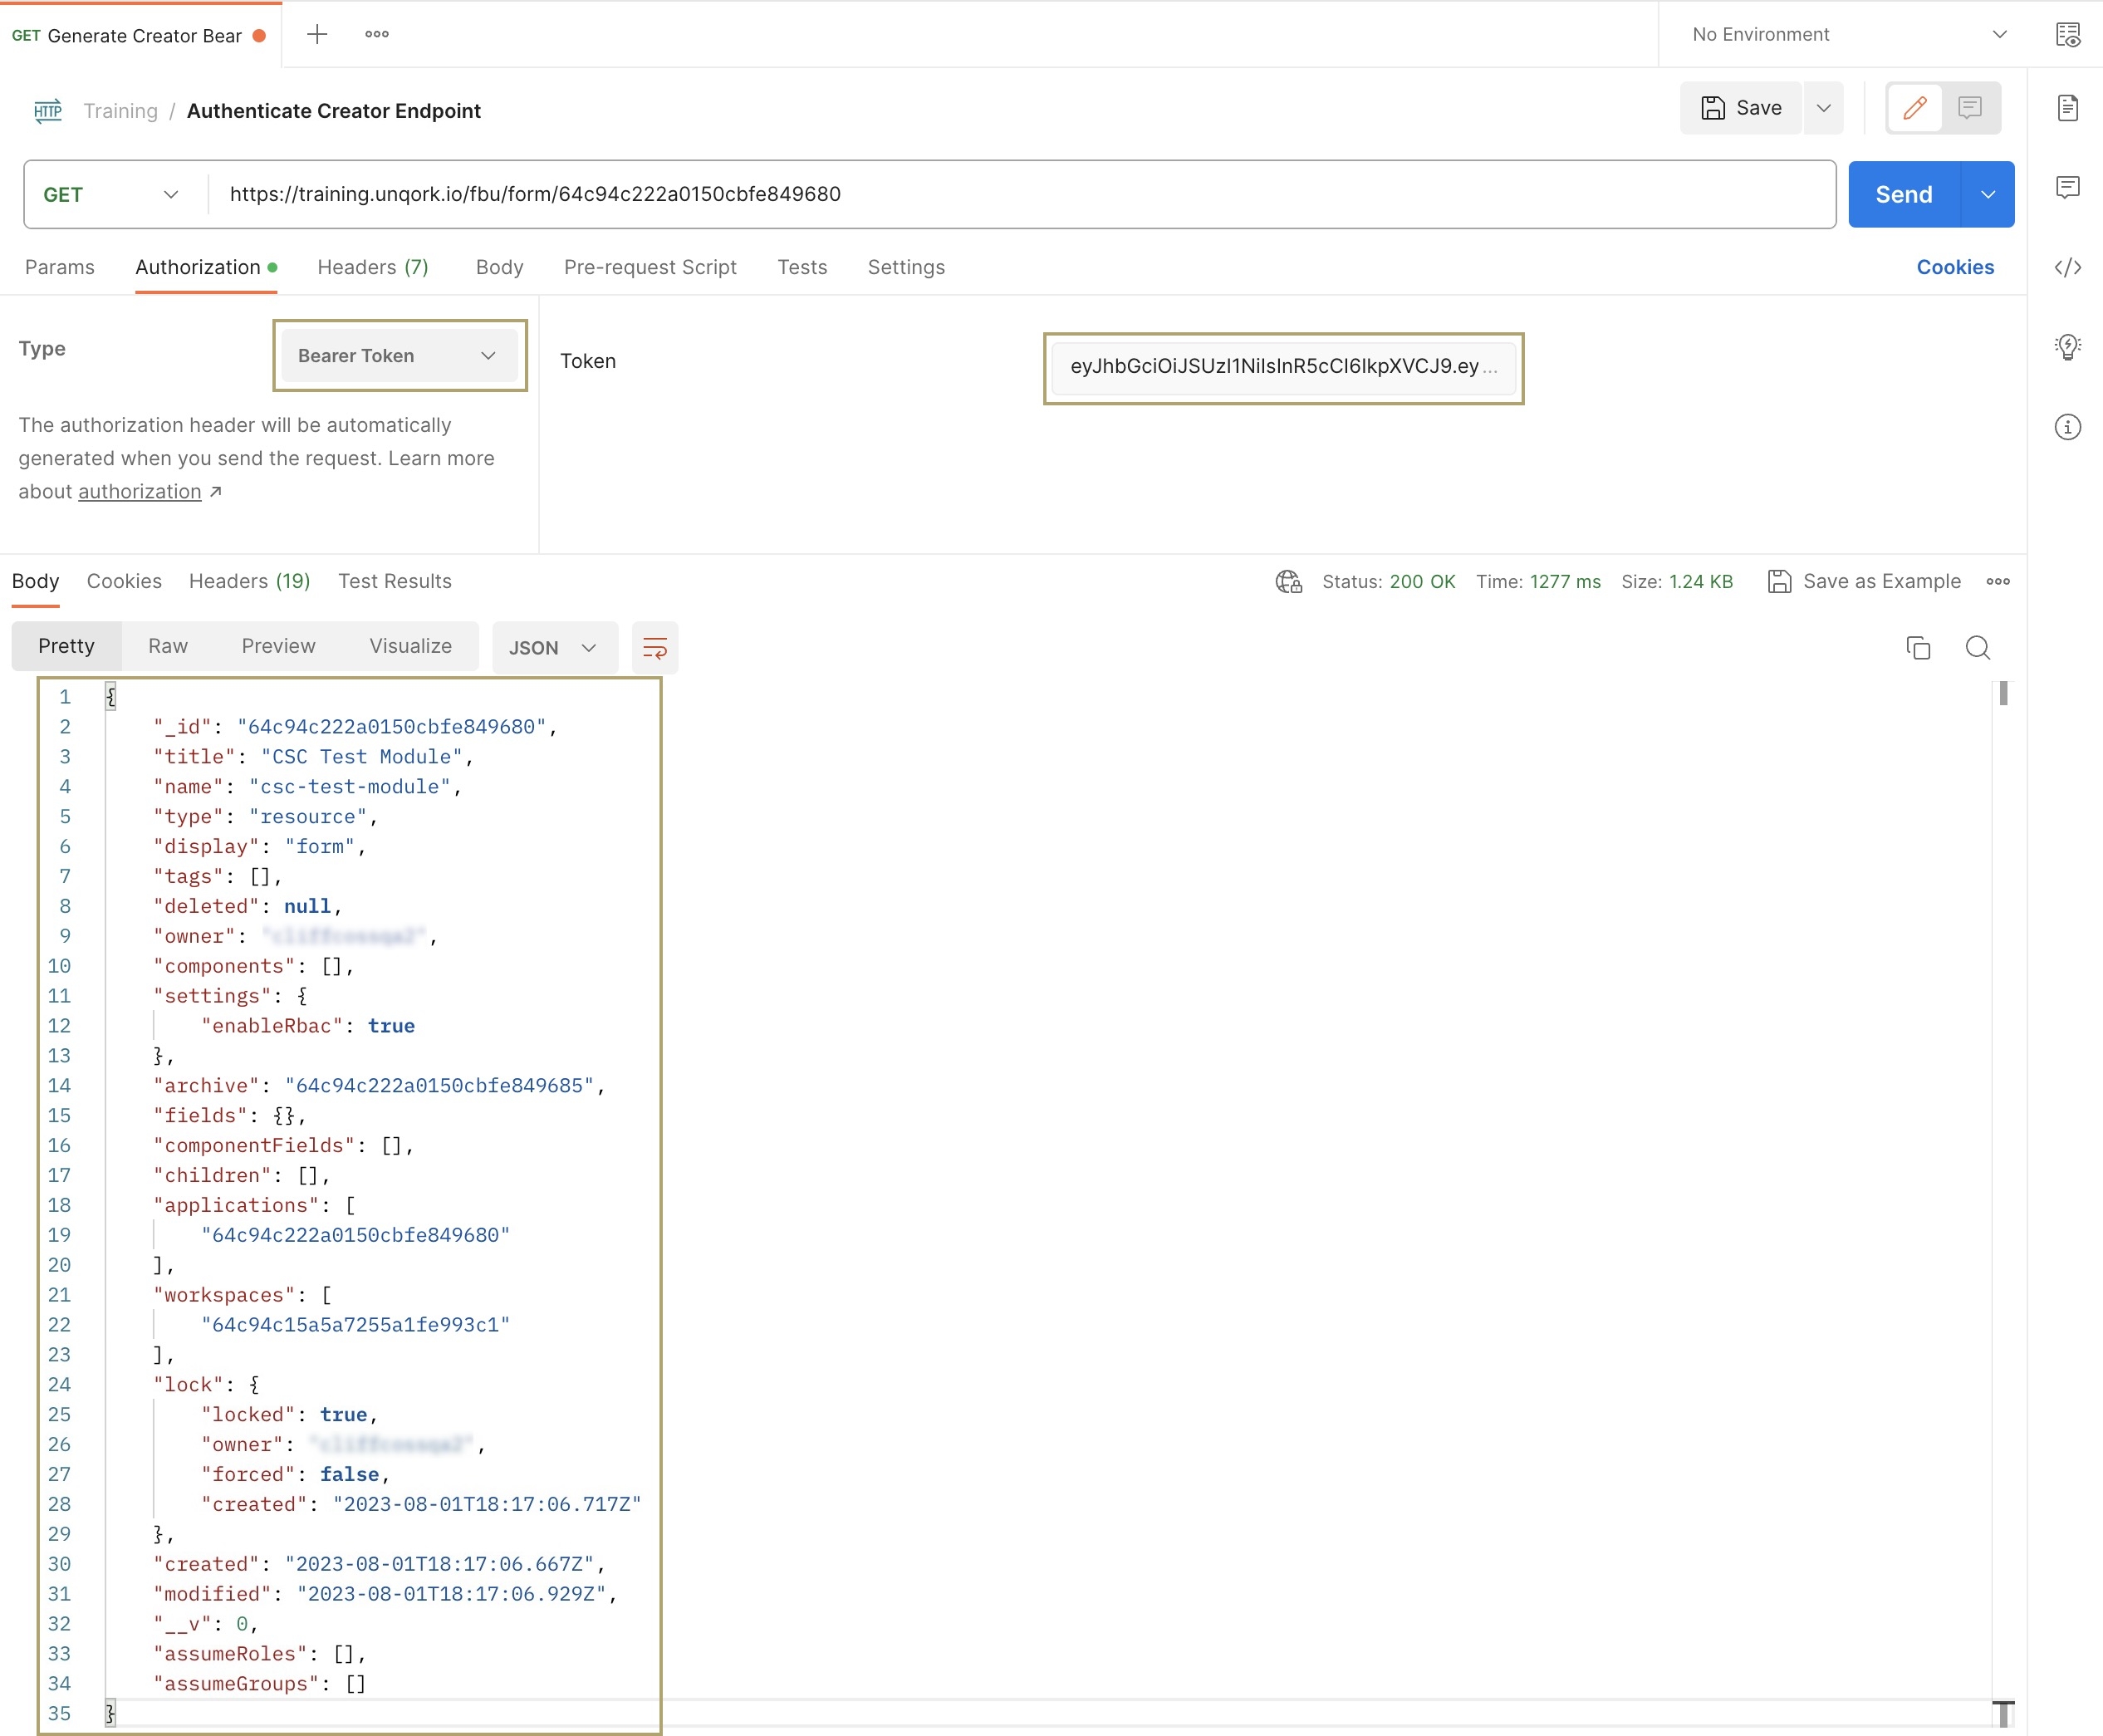
Authenticating a Creator Endpoint
Before you begin, open the module whose endpoint you want to authenticate. Open your module in the Module Builder and copy its module ID for use in the request. For example, if you are authenticating a Creator module endpoint in the Training environment, you can find the module ID in the browser URL: https://training.unqork.io/#/display/64550867e46f34549b1e333e.
In your browser, open Postman.
In the top left, click New.
From the modal, select
 .
.In the Untitled Request field, enter a name for your request.
From the Method drop-down, select GET.
In the Callback URL field, enter
https://{environment}.unqork.io/fbu/form/{moduleId}. Replace{environment}with the Unqork environment where you created your Creator credential. Replace{moduleId}with the module ID of the module endpoint you want to authenticate.Click the Authorization tab.
From the Type drop-down, select Bearer Token.
In the Token field, enter the access token you obtained in the previous section of this article.
At the top right, click Save.
Click Send
.png) .
.
If the Response body includes details about the module and the user who created it, you have successfully authenticated that Creator endpoint.


