Overview
The Release Management Dashboard tool helps you promote releases across Unqork environments. You can move your application between environments, like staging to QA or pre-production to production. Before you begin, let's take a closer look at the tool's features:
The tool lets you create releases with one or more applications, including their modules and Data Collections. That way, you can group releases and save time.
Detailed release information makes it easier to search for releases. With the Release Management Dashboard tool, you can keep your promotions organized.
If your application breaks, the tool lets you roll back to a previous release. That way, you can troubleshoot an issue without removing a working application from production.
The UDLC Toolkit provides a powerful set of application life cycle tools. By default, these tools are available automatically in Staging, QA, and UAT environment levels. Customers may optionally promote UDLC tools to their Pre-Production and Production environment levels. If promoted, clients are responsible for repromoting new versions of the UDLC Toolkit when released to lower environment levels. Before doing so, we strongly recommend obtaining approval from your information security team. A tool, like the Flexible Data Manager, enables end-users to access and modify submission data, which might include sensitive data or PII (personally identifiable information). Unqork recommends following the principle of least privilege for all roles, especially Designer and Express administration, and monitoring admin account activity.
You cannot promote an empty application. The application must include modules and/or workflows with entry points to promote.
Access the Release Management Dashboard Tool
This tool requires Creators to have specific role access in Environment Role RBAC (Role-Based Access Control) or WSRBAC (Workspaces Role-Based Access Control).
When using Environment Roles (not using WSRBAC):
Creator roles can view all data in this tool.
When using WSRBAC:
At a minimum, Creators must have Can View permissions to access this tool.
Creators must have Can Manage permissions for the appropriate workspaces.
Understanding the Release Management Dashboard Tool
Click on the tabs below to learn more about the Release Management Dashboard tool:
Navigating the Release Dashboard
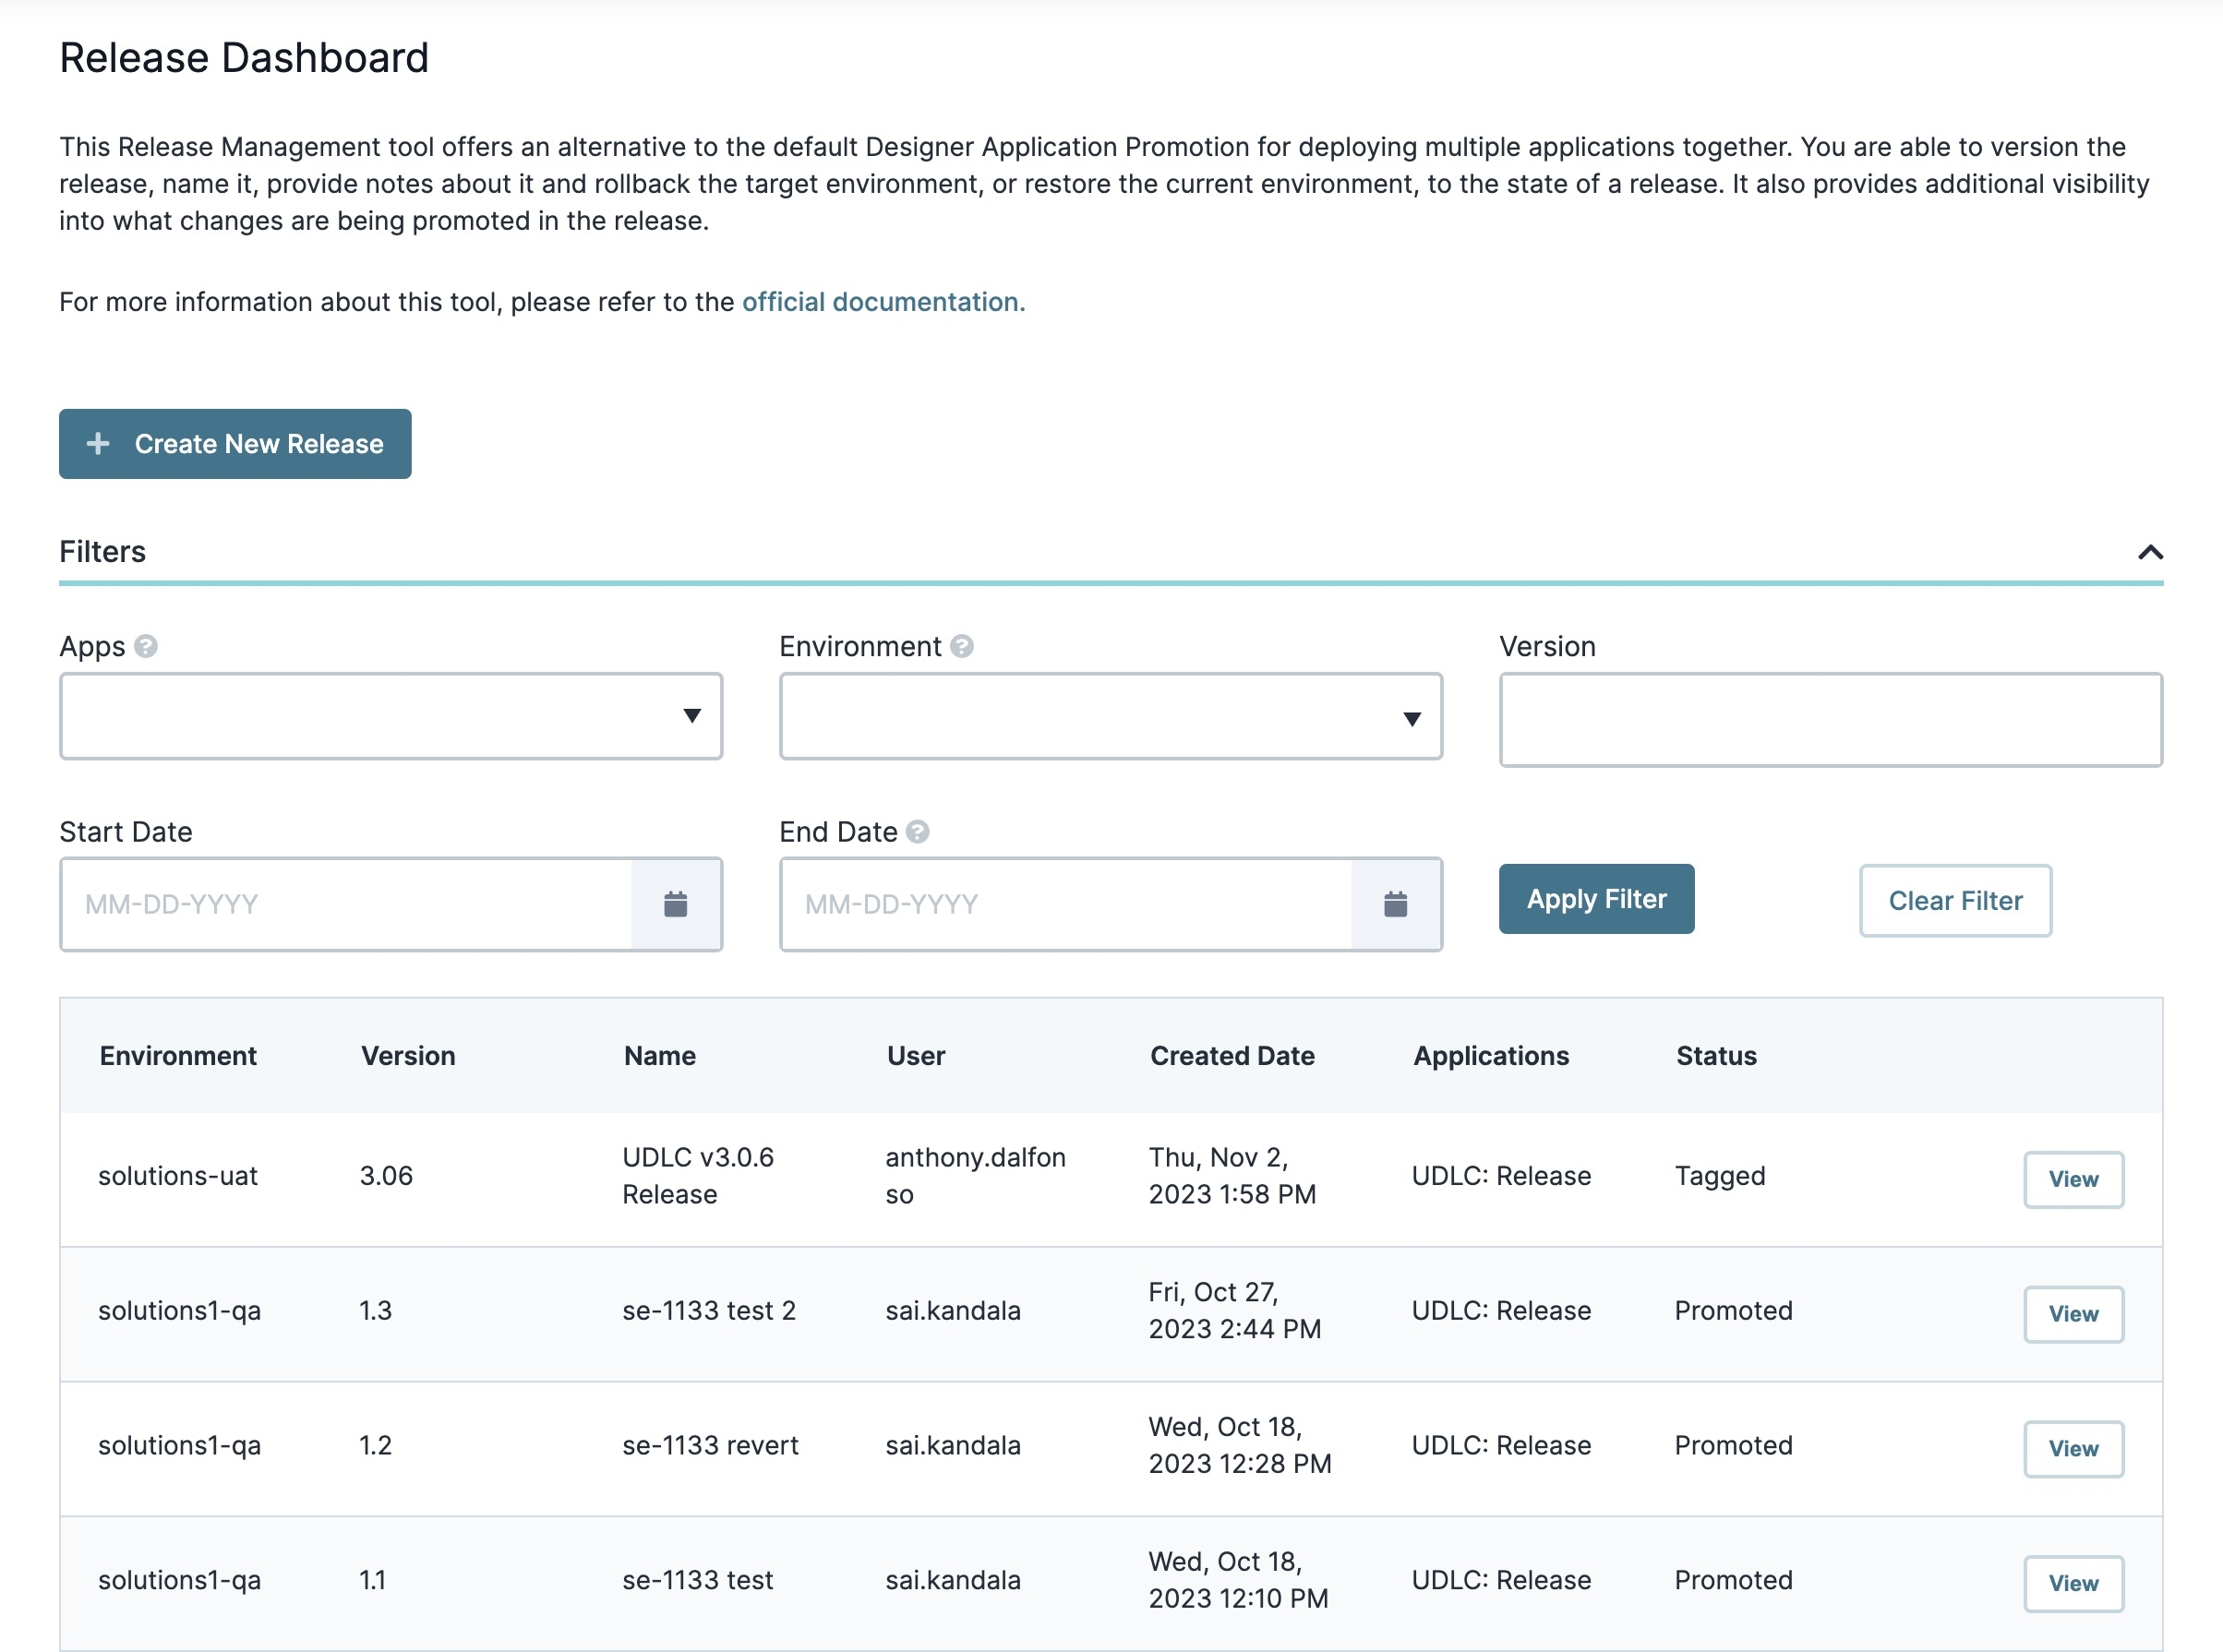
After accessing the tool, you can view release details on the Release Dashboard. This table displays a maximum of ten entries at a time. Click the pagination buttons below the table to see more entries.
The table is organized by the date the release was created, with the most-recent release displayed at the top of the table. It also includes helpful information, like the environment where the promoted release exists, the version number, and the application that was promoted.
Using the Release Dashboard's Filters
The dashboard has various filters to help you find a release. You can use any or all these filters, depending on how specific you want to be. As you enter text into the fields, the results display automatically. The filters section includes the following features:
Filter | Description |
|---|---|
Apps | Use this drop-down to select an application(s) to filter by. |
Environment | Use this drop-down to select an environment(s) to filter by. |
Version | Enter a release version number to filter by. |
Start Date | Enter a start date to filter a range of dates. |
End Date | Enter an end date to filter a range of dates. If left empty, the field defaults to the current date. |
Apply Filter | Click this button to apply your filters. |
Clear Filter | Click this button to clear all filters. |
Once you locate your release, click the View button to the right of the release to display all release details, its application, and promote, restore, or roll back the release.
Here's an example of what you'll see when you view your release details:
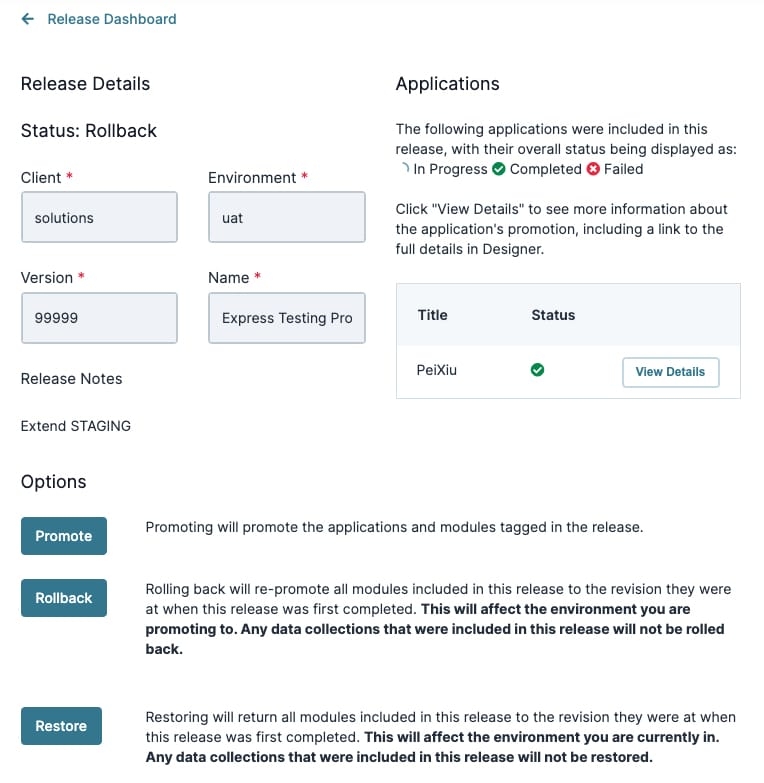
Each application in your release has a View Details button associated with it. Clicking it displays a pop-up modal. At the top of the modal, you'll see the name of your release and its path in brackets. The modal consists of three tables:
Table | Description1 | |
|---|---|---|
1 | Modules | This table displays all modules in the release. |
2 | Data Collections | This table displays all Data Collections in the release. |
3 | Previous Version Modules | This table displays modules of a previous release that were not included in the current one. It also displays the release version where they currently exist. |
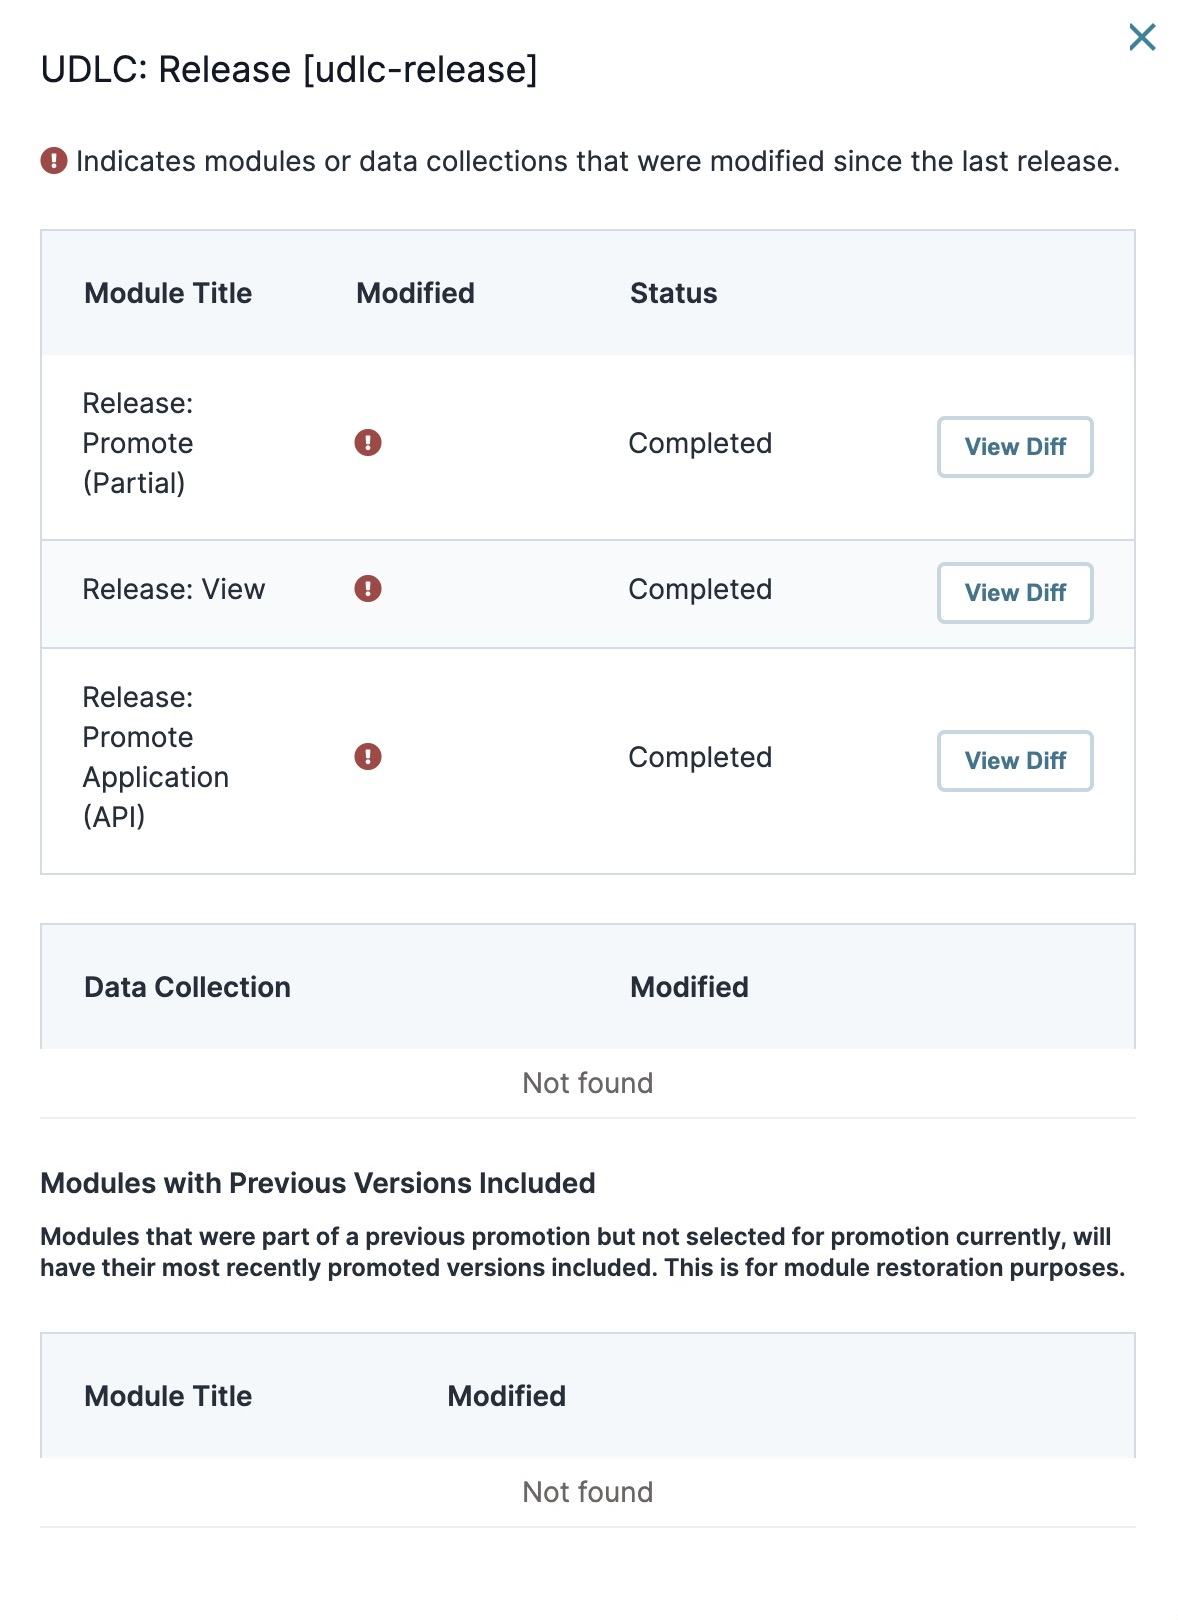
Each table displays a maximum of 15 entries. Click the pagination buttons below the table to see more entries. An ![]() (exclamation point) icon displays for those modules or Data Collection that were modified since the last release.
(exclamation point) icon displays for those modules or Data Collection that were modified since the last release.
For each module and Data Collection, you can click View Diff to review its revisions in the Module Revisions Dashboard tool.
To learn more about the Module Revisions Dashboard tool, view our Module Revisions Dashboard Tool article.
Creating a Release
When creating a release, you can select the applications, workflows, or Data Collection you want to promote. You can promote as many applications as you want in a release. You can also promote an application's individual modules or Data Collections.
Creating a release is also referred to as tagging a release.
When you create a release, there are four steps that you must complete:
Add release information.
Select your applications and Data Collection .
Finalize the release.
Promote the release.
Let's explore each step of the process.
Adding Release Information
For this example, you'll promote a new release from staging to the UAT environment level. This means your target environment is UAT.
Promoting an environment is client specific. Only the next immediate environment level is available for promotion.
To create a release:
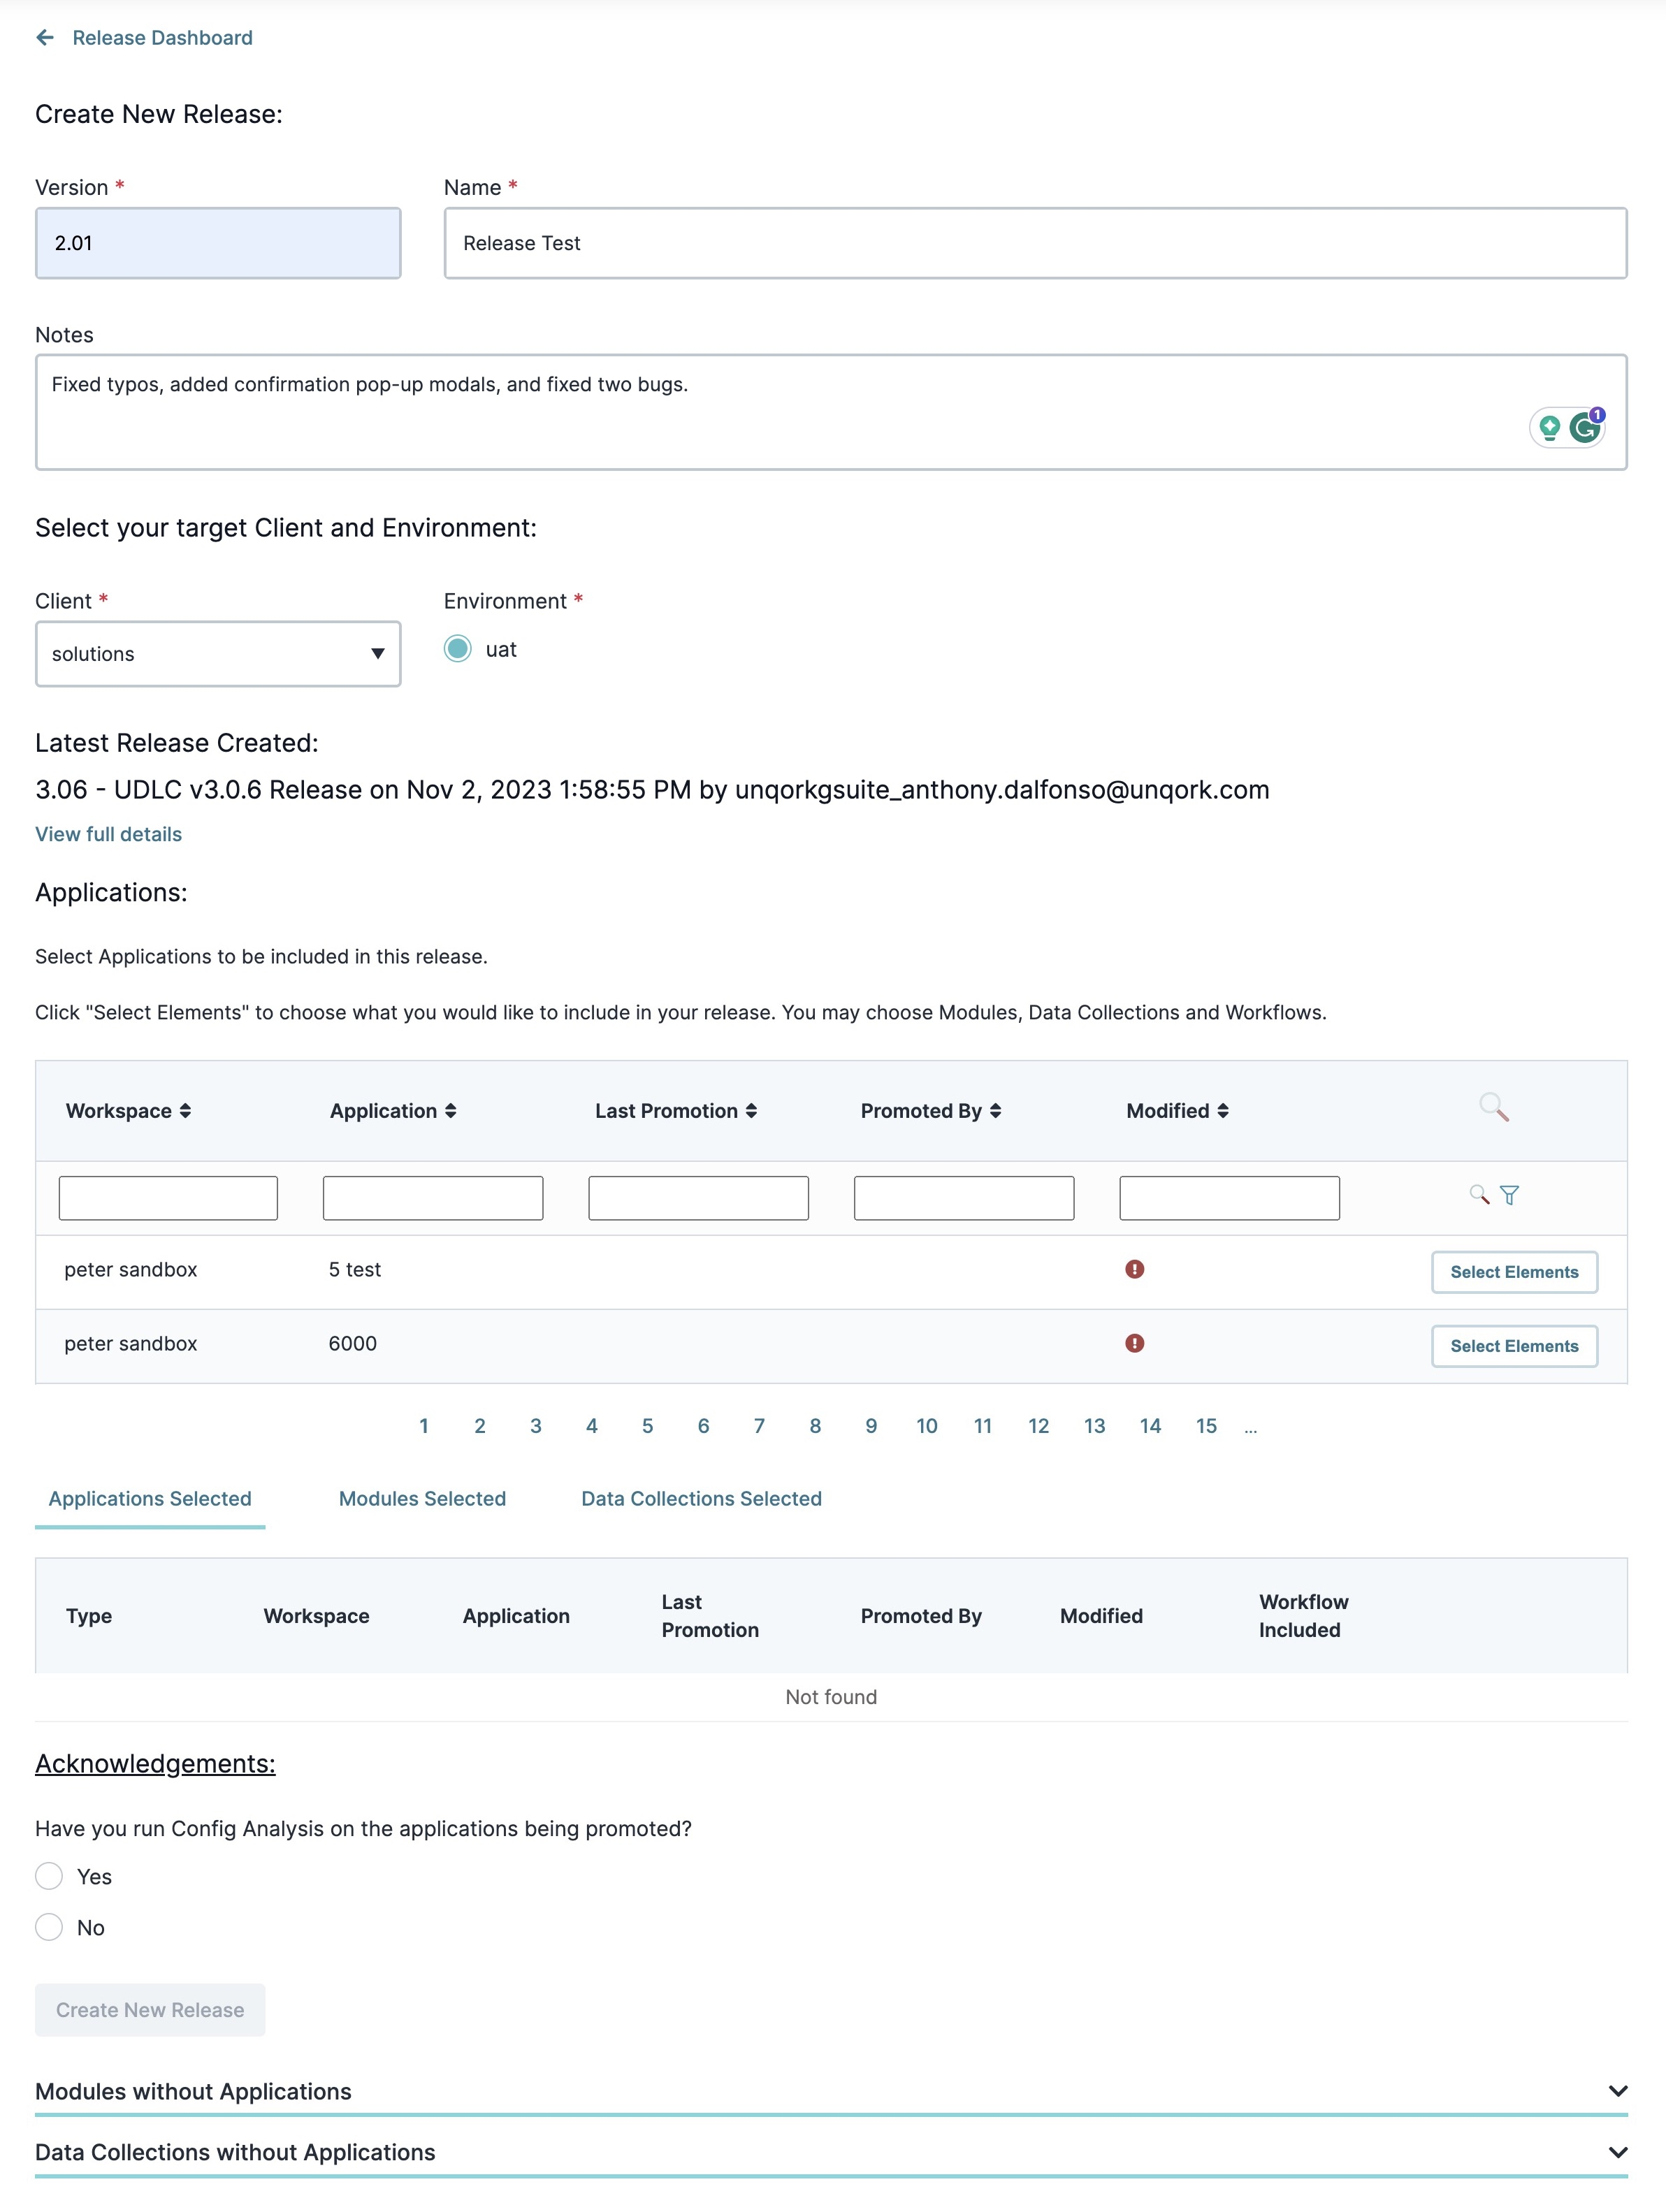
Click + Create New Release.
In the Version* field, enter a version number. You can follow any format that you want.
In the Name* field, enter a release name. Again, use a format that works best for you.
In the Notes field, enter any notes or comments.
From the Client* drop-down, select your environment. The Environment drop-down displays with the next available environment level.
From the Environment* drop-down, select UAT. This sets the target environment level where you'll promote your application.
After making your selections, a new section of the page displays the last release created in that environment, and all the environment's app elements.
Selecting Applications and Data Collections
Next, select the applications and Data Collection you want to promote in this release. While the Release Management Dashboard tool promotes all modules, the tool only promotes the newest version of the ones selected.
If there are more than 125 modules in your application, a warning displays. It is a best practice to reorganize your promotion into smaller applications. Applications with more than 125 modules can cause timeouts and promotion failures.
The table shows a maximum of 10 entries. Click the pagination buttons below the table to see more entries. You can also search the Applications table using the following fields:
Filter | Description |
|---|---|
Workspace | Enter a workspace name to locate it. |
Application | Enter an application name to locate it. |
Last Promotion | Enter a time or date to filter by. |
Promoted By | Enter the name of a team member to filter app elements by. |
Modified | Enter the full word |
After locating specific applications and Data Collection from the Applications table, you can select them for the release.
Use the Applications table to locate applications and Data Collections you want in this release.
For each application or Data Collection, click
Select Elements.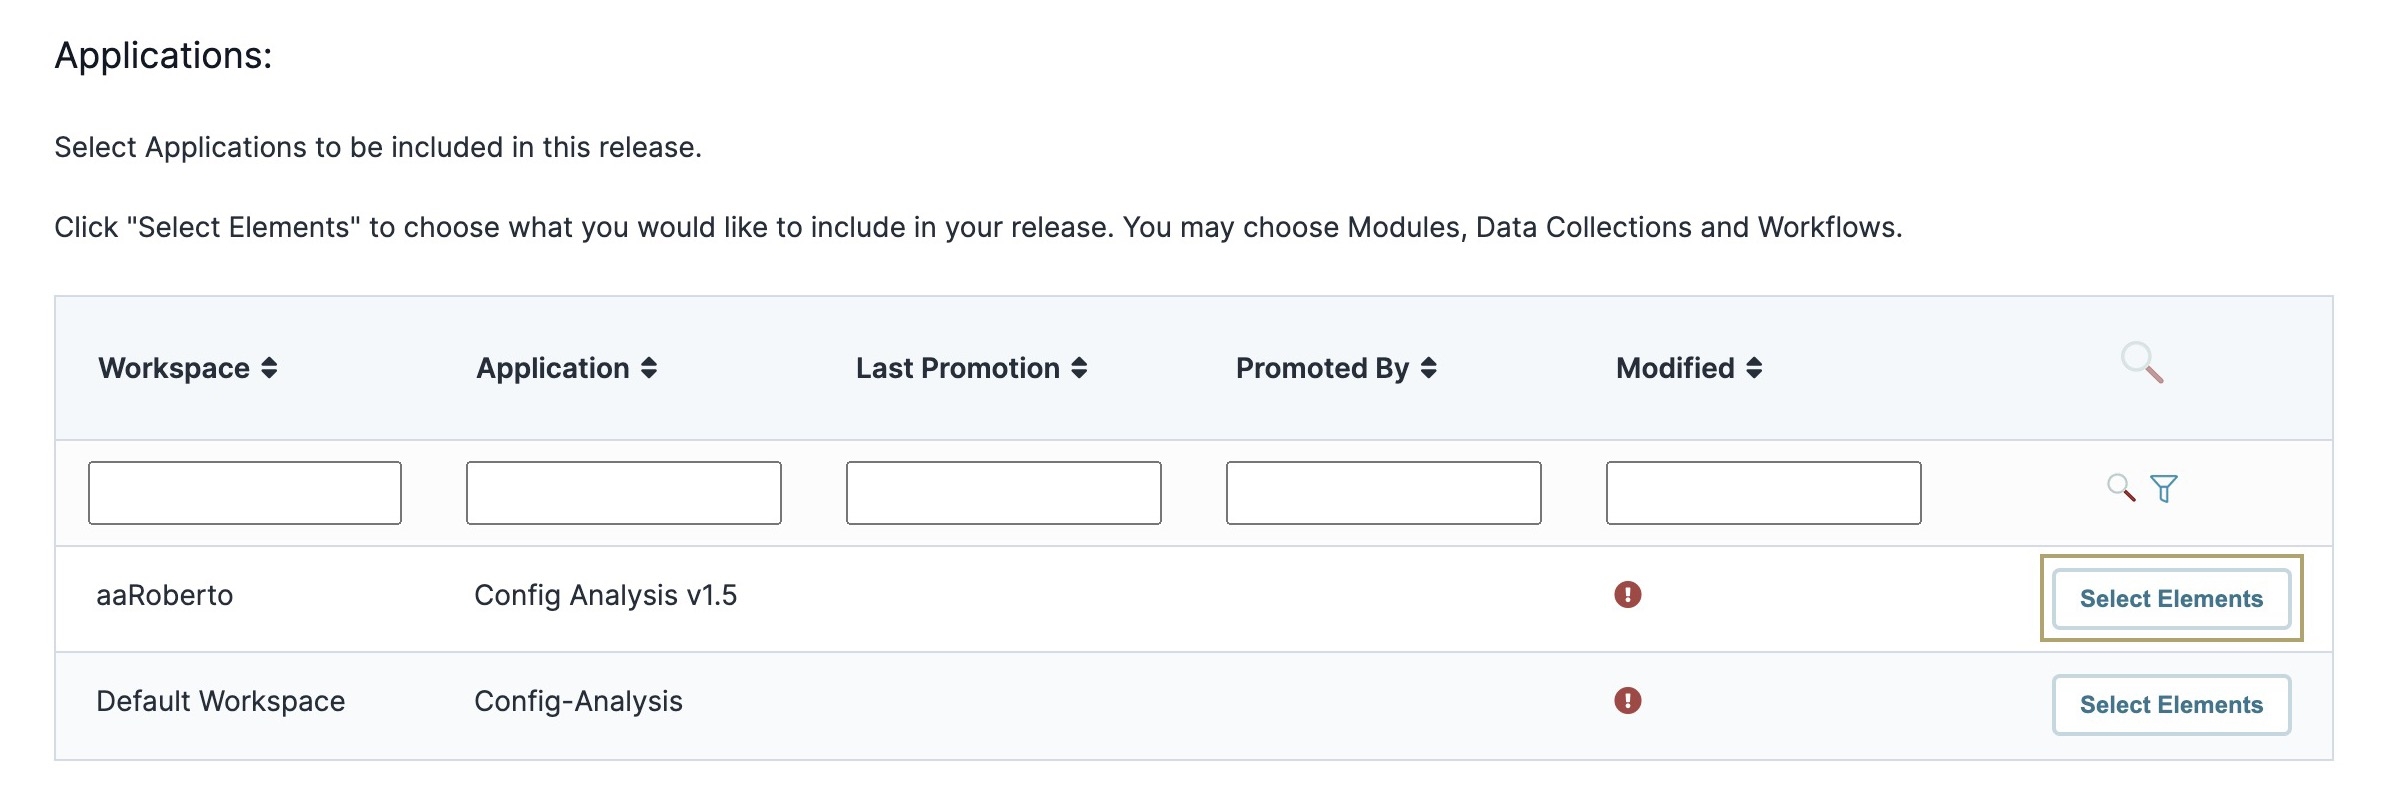
A pop-up modal displays that lets you select specific modules to promote. You can also click View Diff to view the details about the module in the Module Revisions Diff Dashboard.
To learn more about the Module Revisions Dashboard tool, view our Module Revisions Dashboard Tool article.
From this modal , you can select or deselect specific modules you want in the release.
To select modules for your release:
Select the module(s) you want to add to your release.
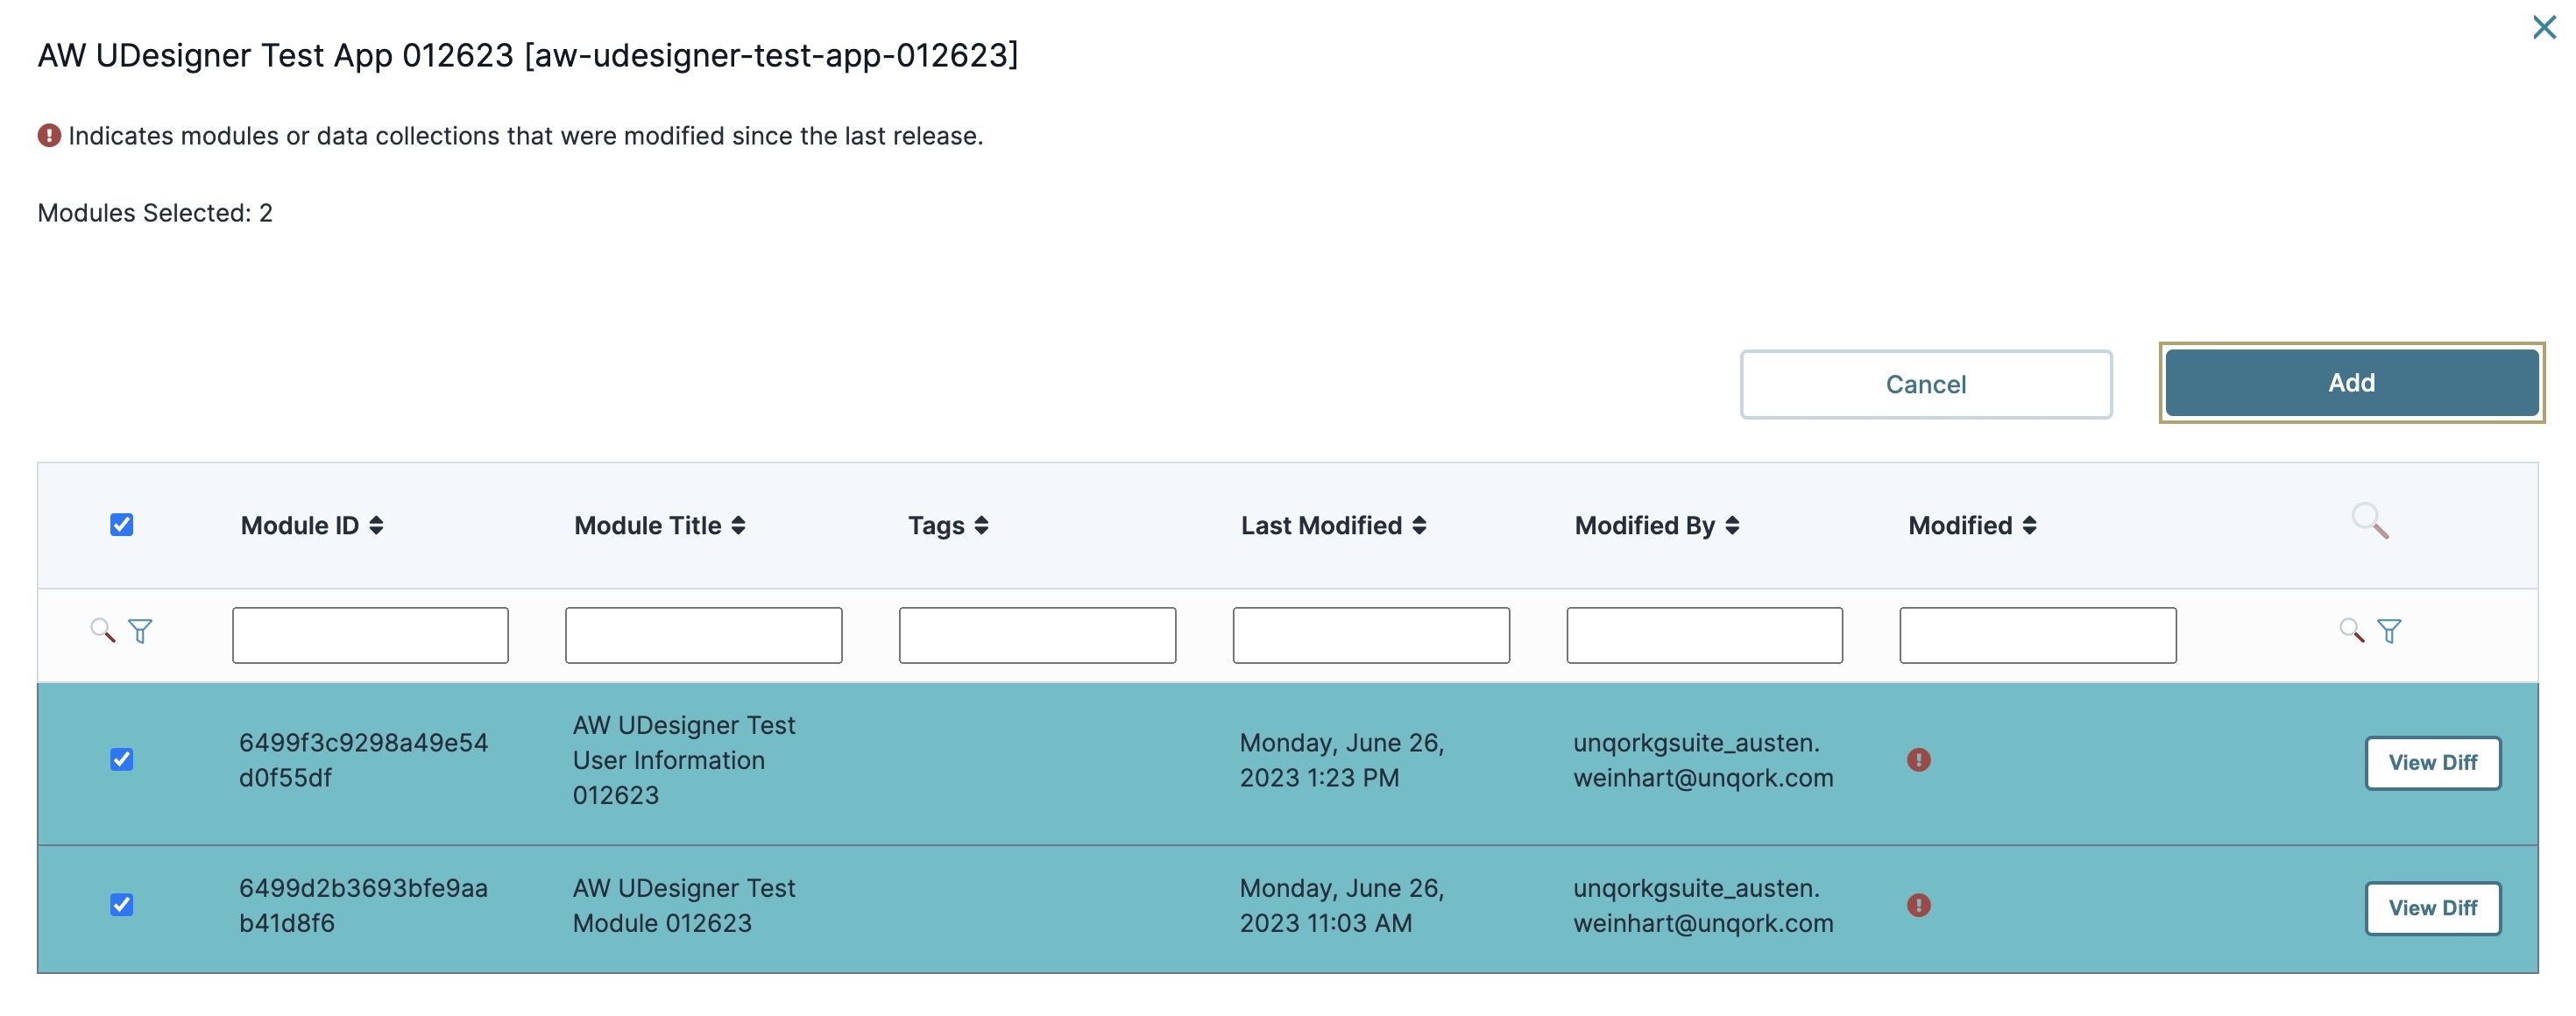
Click Add.
After making your selections, you can view them using the Applications Selected, Modules Selected, and Data Collections Selected tabs. If you select all modules in the application, this is considered a Full release. If you only selected specific modules, this is considered a Partial release.

Before you finalize your release, scroll down to the bottom of the page to view these two panels:
Modules Without Applications
Data Collections Without Applications
Open these panels to view a list of modules and Data Collections that will not be part of your release. These panels are a final check before you complete the release.

Finalizing the Release
At the end of the checklist, confirm that you've submitted your applications for a configuration analysis. It's a best practice to submit your applications for analysis before promoting them to avoid issues in production. You can use our Config Analysis Dashboard tool to submit a request to our Data Analytics team.
To learn more about config analysis, view our Config Analysis Dashboard Tool article.
Now, finalize your release:
Click Create New Release. A pop-up modal displays.
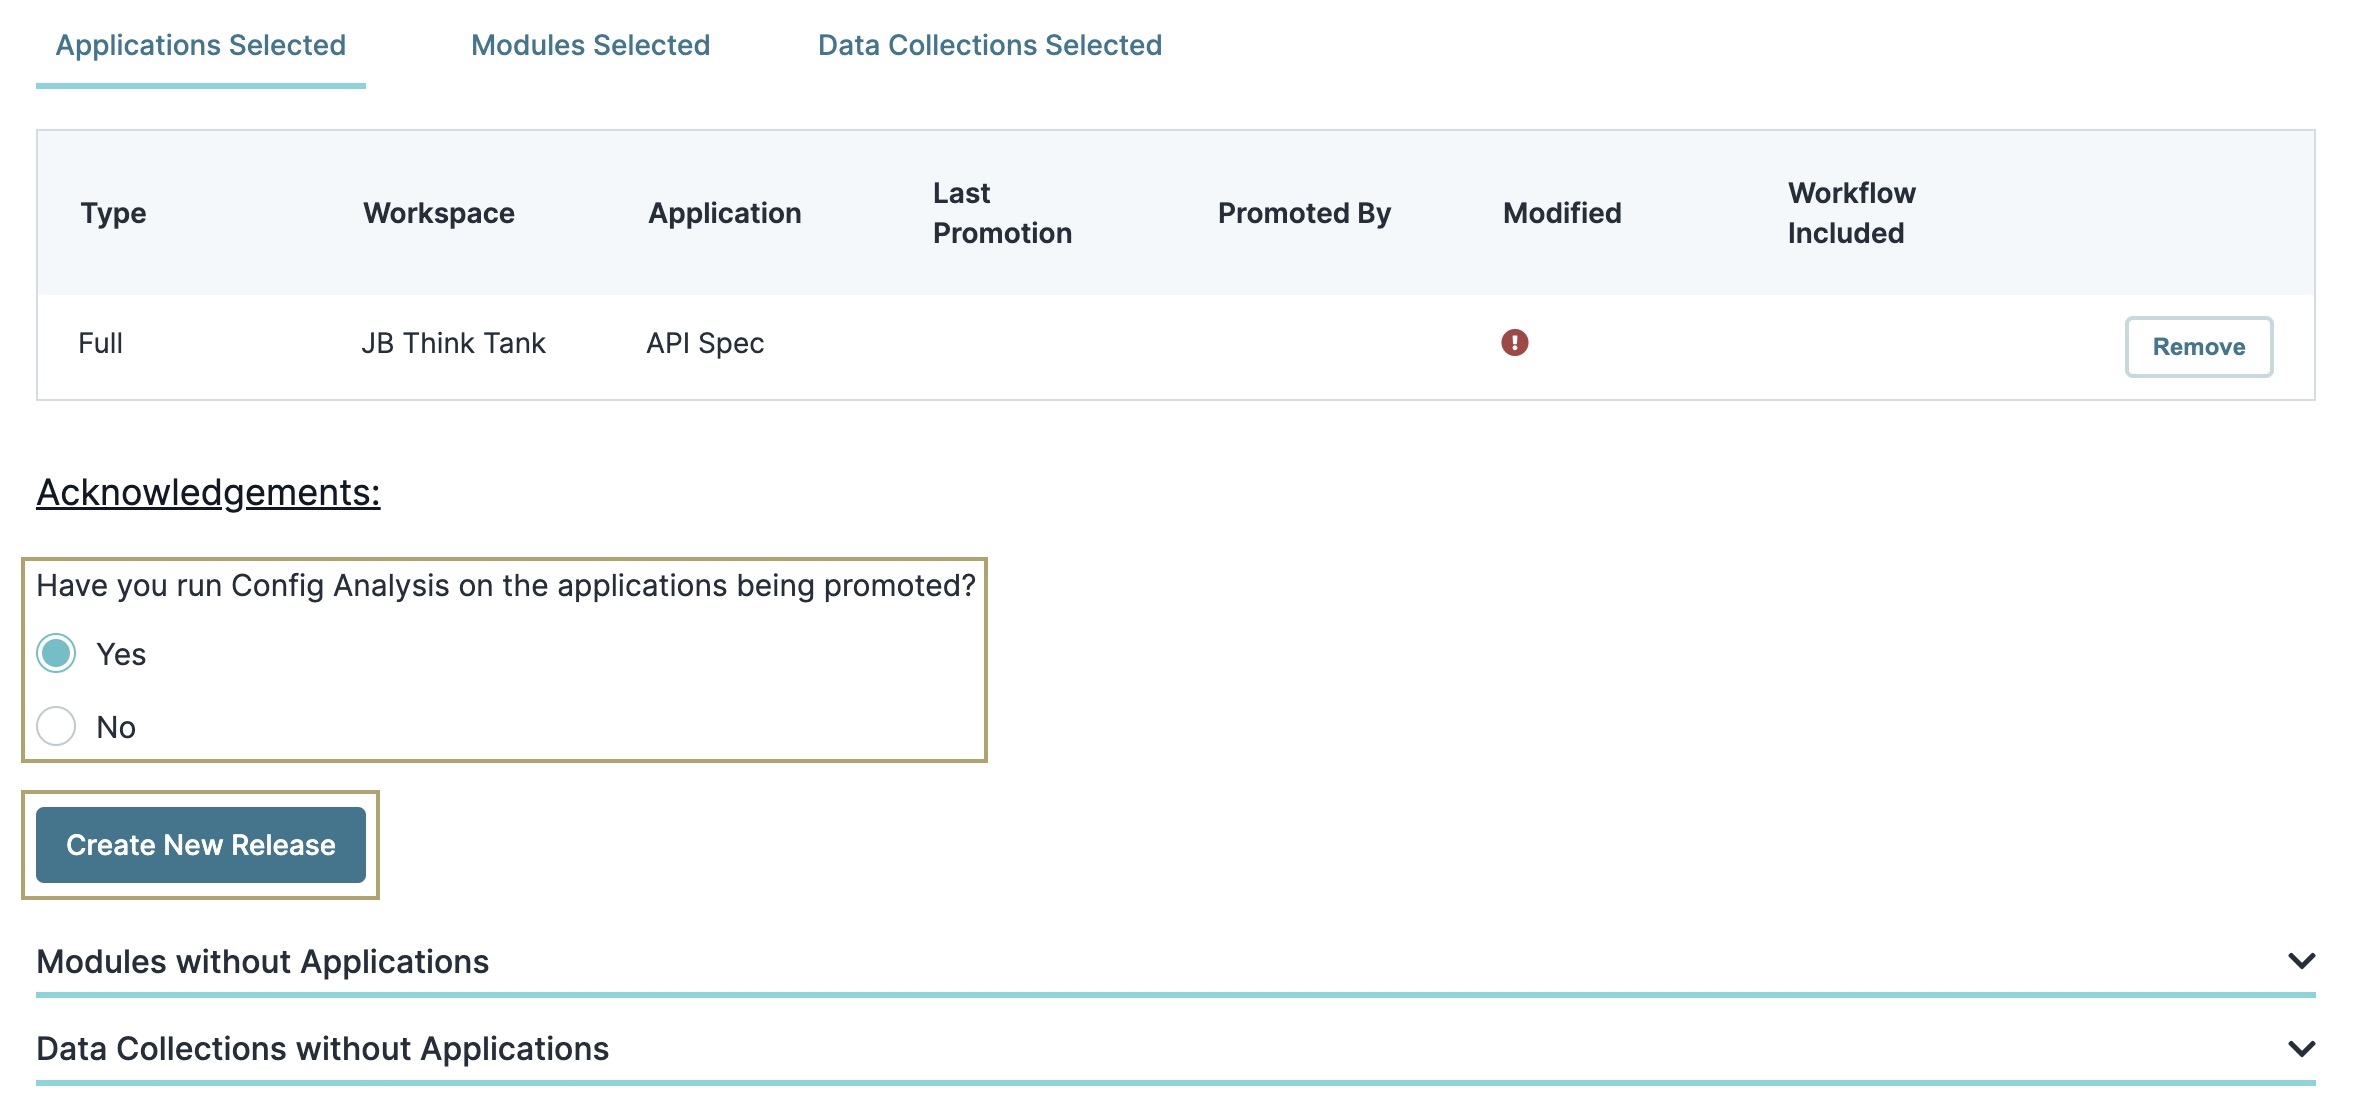
Click OK to create your release in preparation for promoting it to your target environment level.
Promoting a Release
After creating your release, you return to the Release Dashboard. You can see your new release at the top of the table. Once you're certain your release is ready, you can promote it.
The versioned applications cannot be promoted using this tool. For more information, view our Application Versioning article.
To promote your release:
To the right of your release, click the View button.
In the Options section, click Promote. A pop-up modal displays.
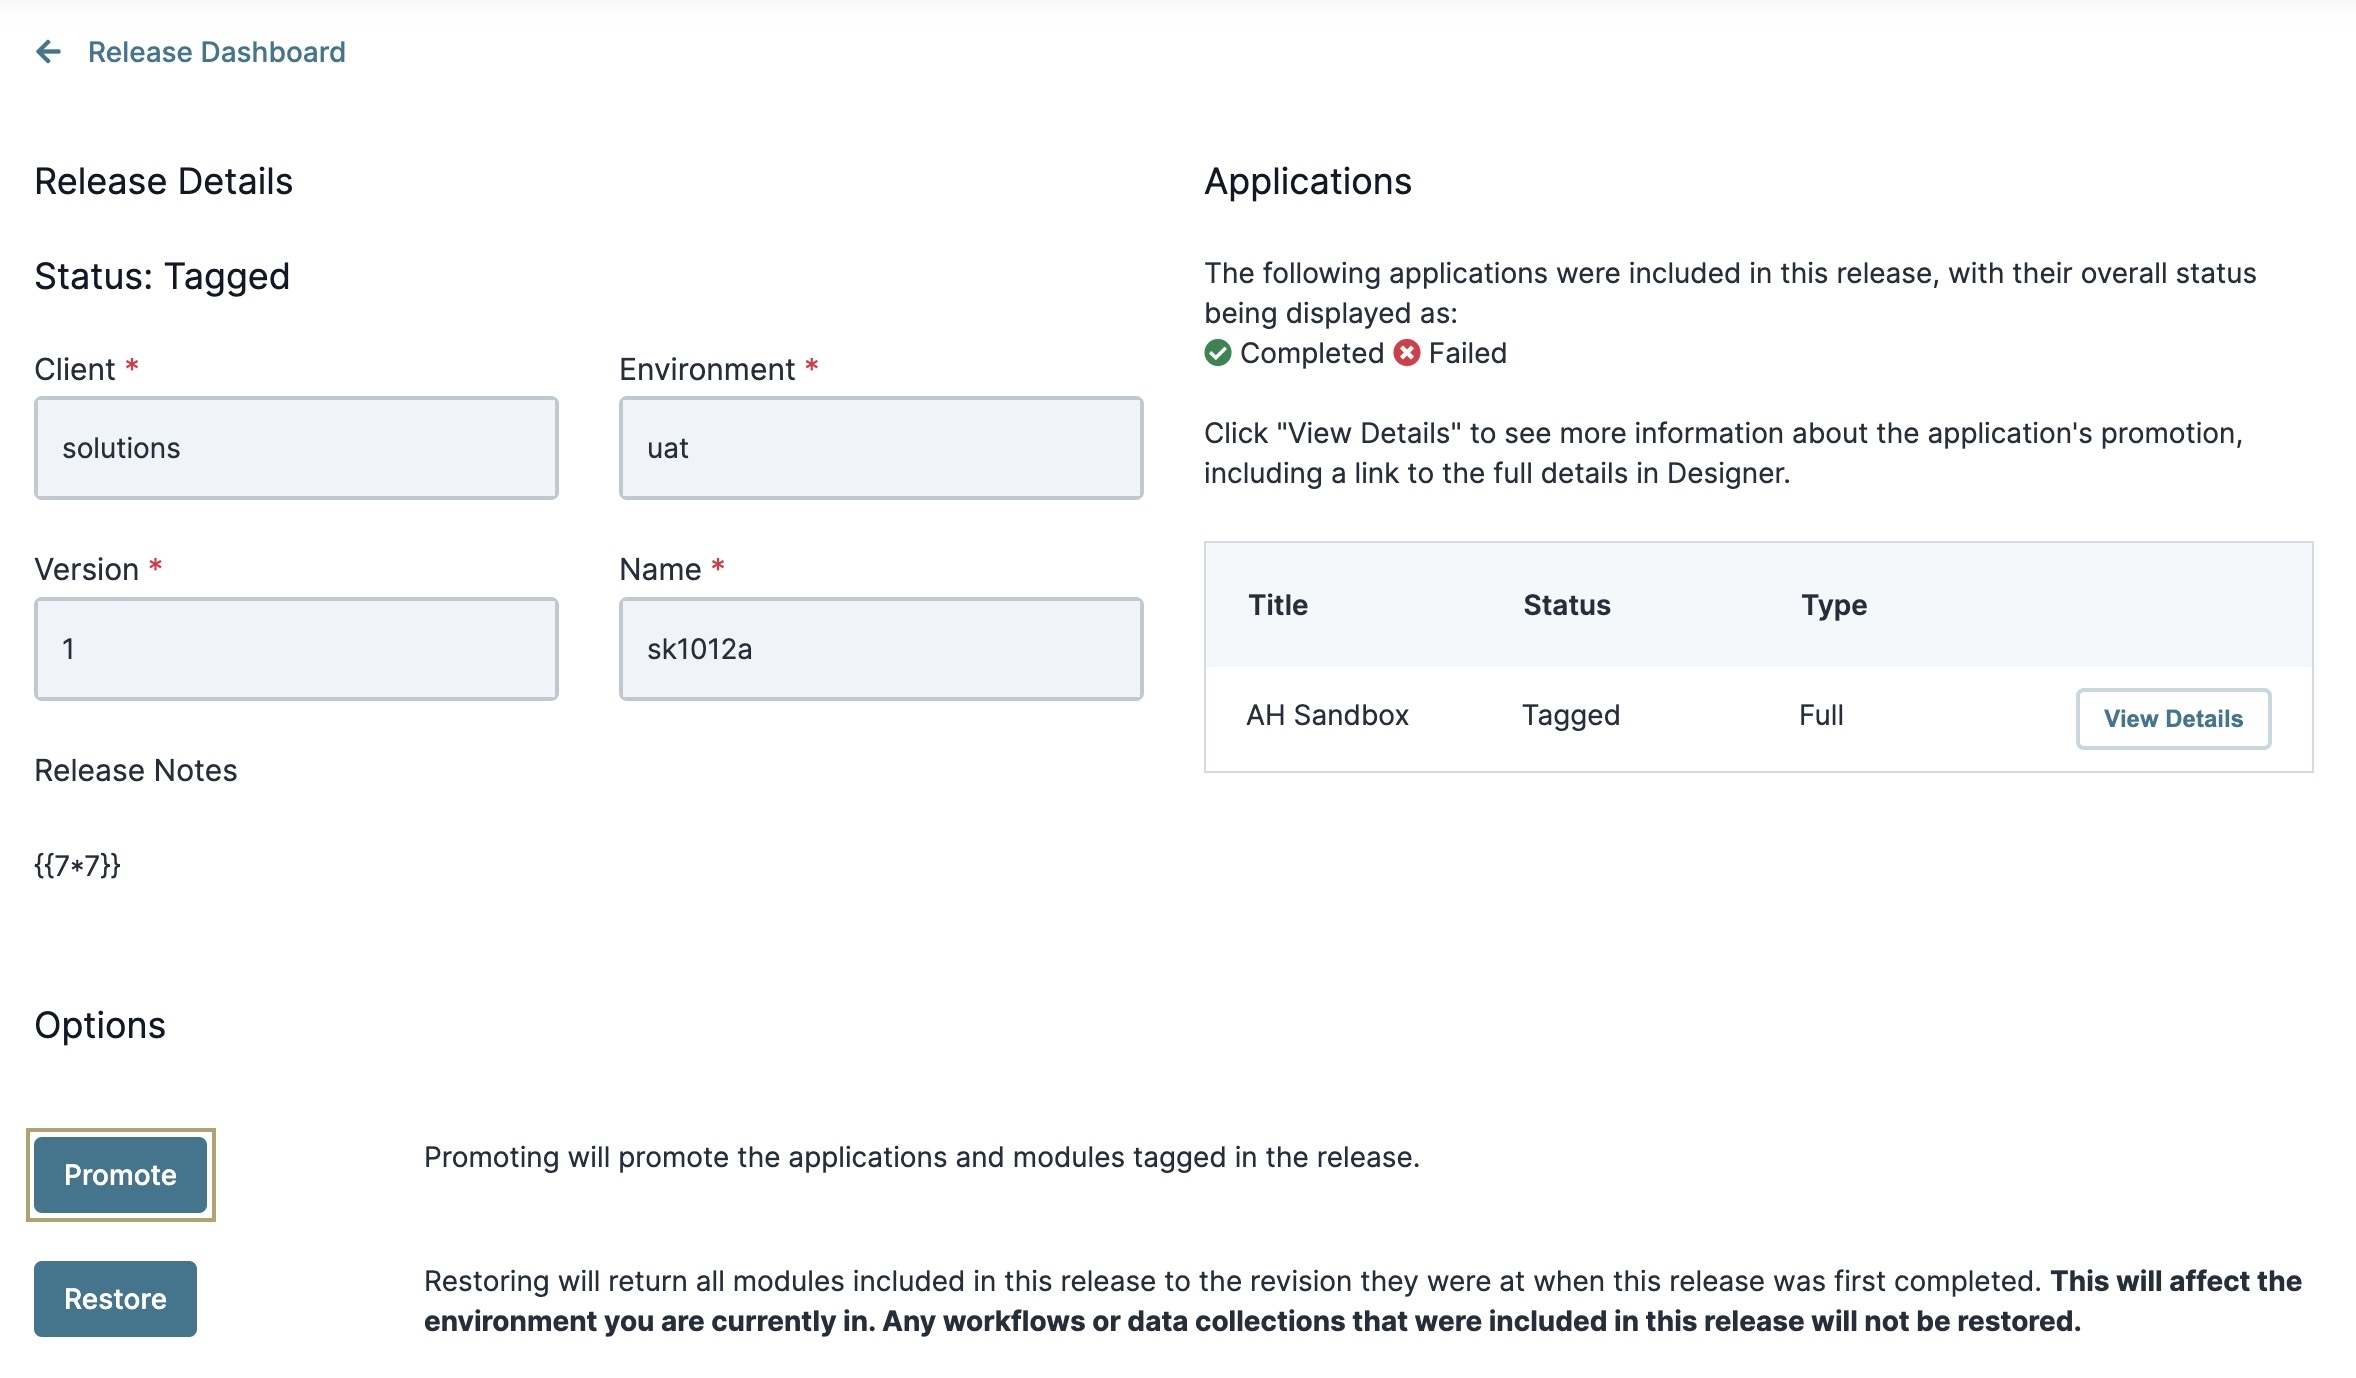
Click OK. Another pop-up modal displays to confirm you want to promote this release.
Click Finish.
If you promote your release beyond the UAT environment, the procedure is the same. The only way to promote through Unqork environments is in sequential order. With each new release, you only have one available target environment level. As you promote your release further, keep the release and version the same. That way, you save yourself the confusion when updating versions.
After promoting applications and app elements, ensure they are the same in the previous and target environment levels. This is especially important for login, logout, header, and footer modules. If not promoted, your application might break.
Making Changes to a Release
You can always find your promoted release in your Staging environment, regardless of the environment level you promote it to. Doing so lets you continue refining your application without affecting the Production environment.
When you're ready to promote a new version to UAT, follow the same steps. The only difference is that you’ll assign a new version number and include release notes.
To promote changes to your release:
Click + Create New Release.
In the Version* field, enter a version number. You can follow any format that you want.
We recommend a new version number. Avoid using the same version number you used in a previous release.
In the Name* field, enter a release name. Again, use a format that works best for you.
For organizational purposes, you might want to keep the file name the same as the previous version.
In the Notes field, enter any notes or comments.
From the Client* drop-down, select your environment. The Environment drop-down displays with the next available environment level.
From the Environment* drop-down, select UAT. This sets the target environment level where you'll promote your application.
From the Applications table, locate the application(s) you want to promote in this release.
Click
Select Elementsfor each. A pop-up modal displays to select your modules.Select the module(s) to promote and click Add.
Confirm that you've completed a Config Analysis of your application(s).
Click Create New Release.
Click OK in the modal to create your release in that target environment.
After creating your release, you can follow the same steps in the Promoting a Release section of this article.
Rolling Back a Release
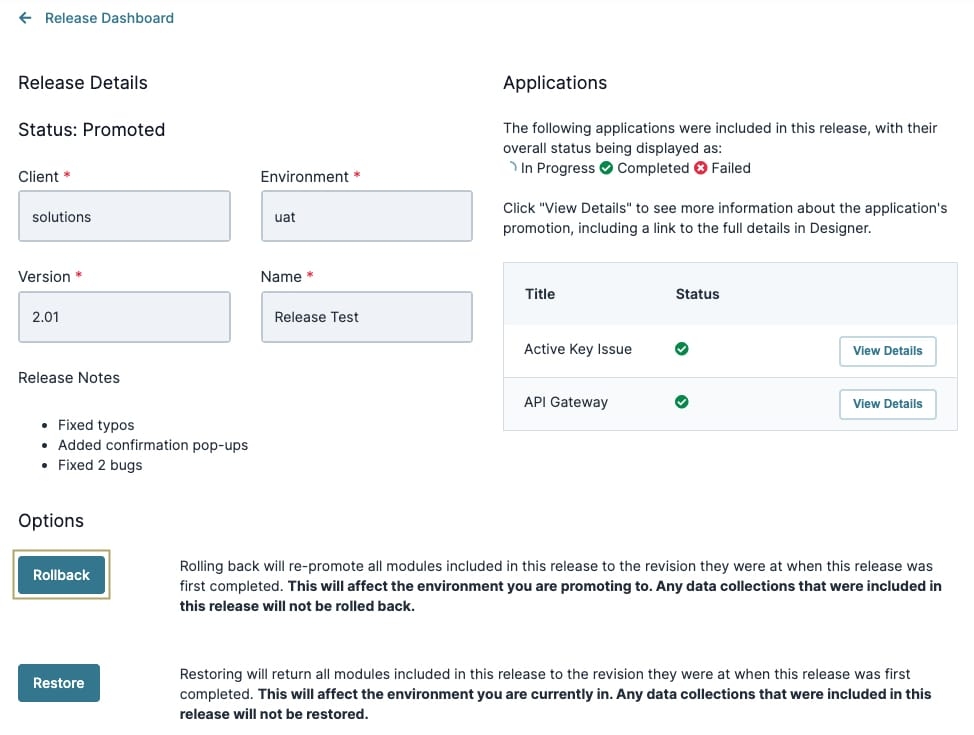
If your application breaks in Production, your end-users might not be able to access it, which means you need to act fast. Fortunately, you know the previous version worked. The best solution is to roll back to that release. Doing so keeps your application available to end-users while you fix the issue.
Only complete applications can be rolled back. A warning message displays if modules associated with the application are not selected. Unqork Workflows or Data Collection cannot roll back.
To roll back a release:
Use the Release Dashboard's filters to locate the release.
To the right of your release, click View .
Click Rollback. A pop-up modal displays to confirm the roll back.
Click OK.
Now, you can troubleshoot and repromote your fixes when you're ready.
Restoring a Release
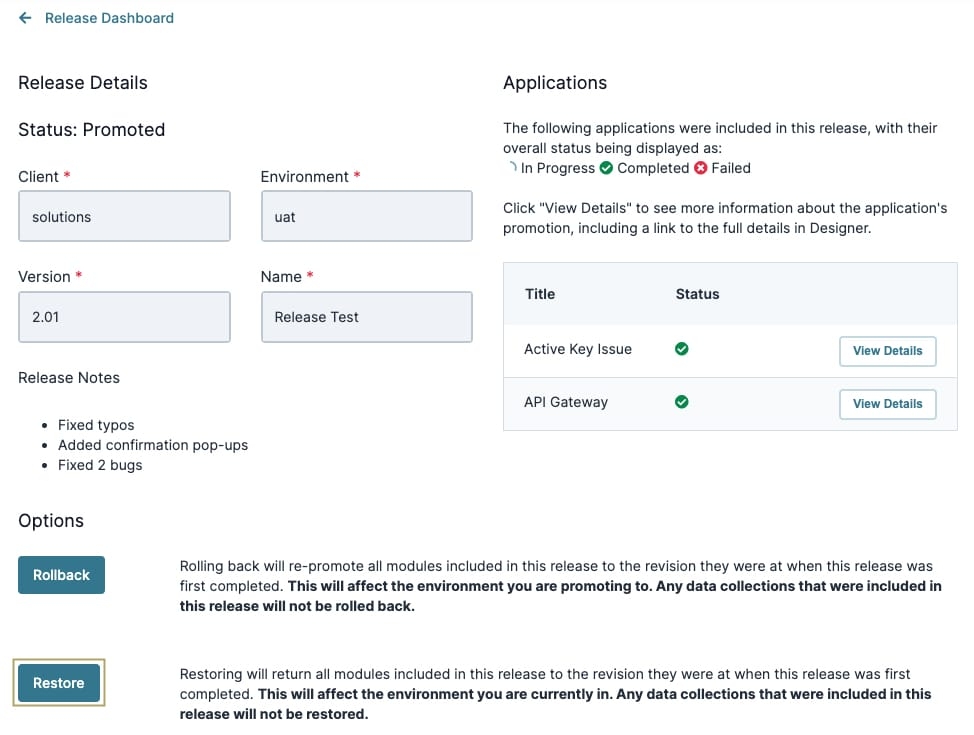
The restore feature is another way to return to a previous release version. The difference being that you'll restore a previous version in your current environment level. It's best to treat this feature as a last resort when a serious issue occurs. Typically, rolling back is the preferred route.
After you make updates or fixes, you can repromote your changes back to Production.
Only applications restore to a previous release version. You cannot roll back Data Collections.
Restoring the Application
To restore a previous release in your current environment level:
Use the Release Dashboard's filters to locate the release.
To the right of your release, click View .
Click Restore. A pop-up modal displays to confirm the restore.
Click OK.
After the restore is complete, click Finish.