Overview
The Flexible Data Manager tool lets you locate and change schema module information. This tool lets you update information in a single submission or make bulk changes. It also lets you pick a field to update and change its value or data type. Lastly, you can also update the submission's owner, which is helpful for RBAC purposes.
Creators must have the Administrator Environment Role to access this tool.
To learn more about the Flexible Data Manger Tool, click on each of the tabs below:
Filtering by a Schema Module
To locate a schema module in your environment, the module must have a schema tag. Then, use the Choose Schema drop-down to access its data.
To learn more about adding the schema tag to your modules, view our Schema Docs Dashboard Tool article.

If you know the module ID for your schema module, you can enter it rather than scrolling through the drop-down menu.
After you select a module, a few actions display:
Import Submissions from File
Update Single Submission
Update Bulk Submissions
Create Bulk Submissions
Importing Submissions From a File
This action lets you import submissions from a file on your computer.
To import files:
Click Import Submissions from File. The Import Submissions panel displays.
Drag and drop the file from your computer or click browse to locate it.
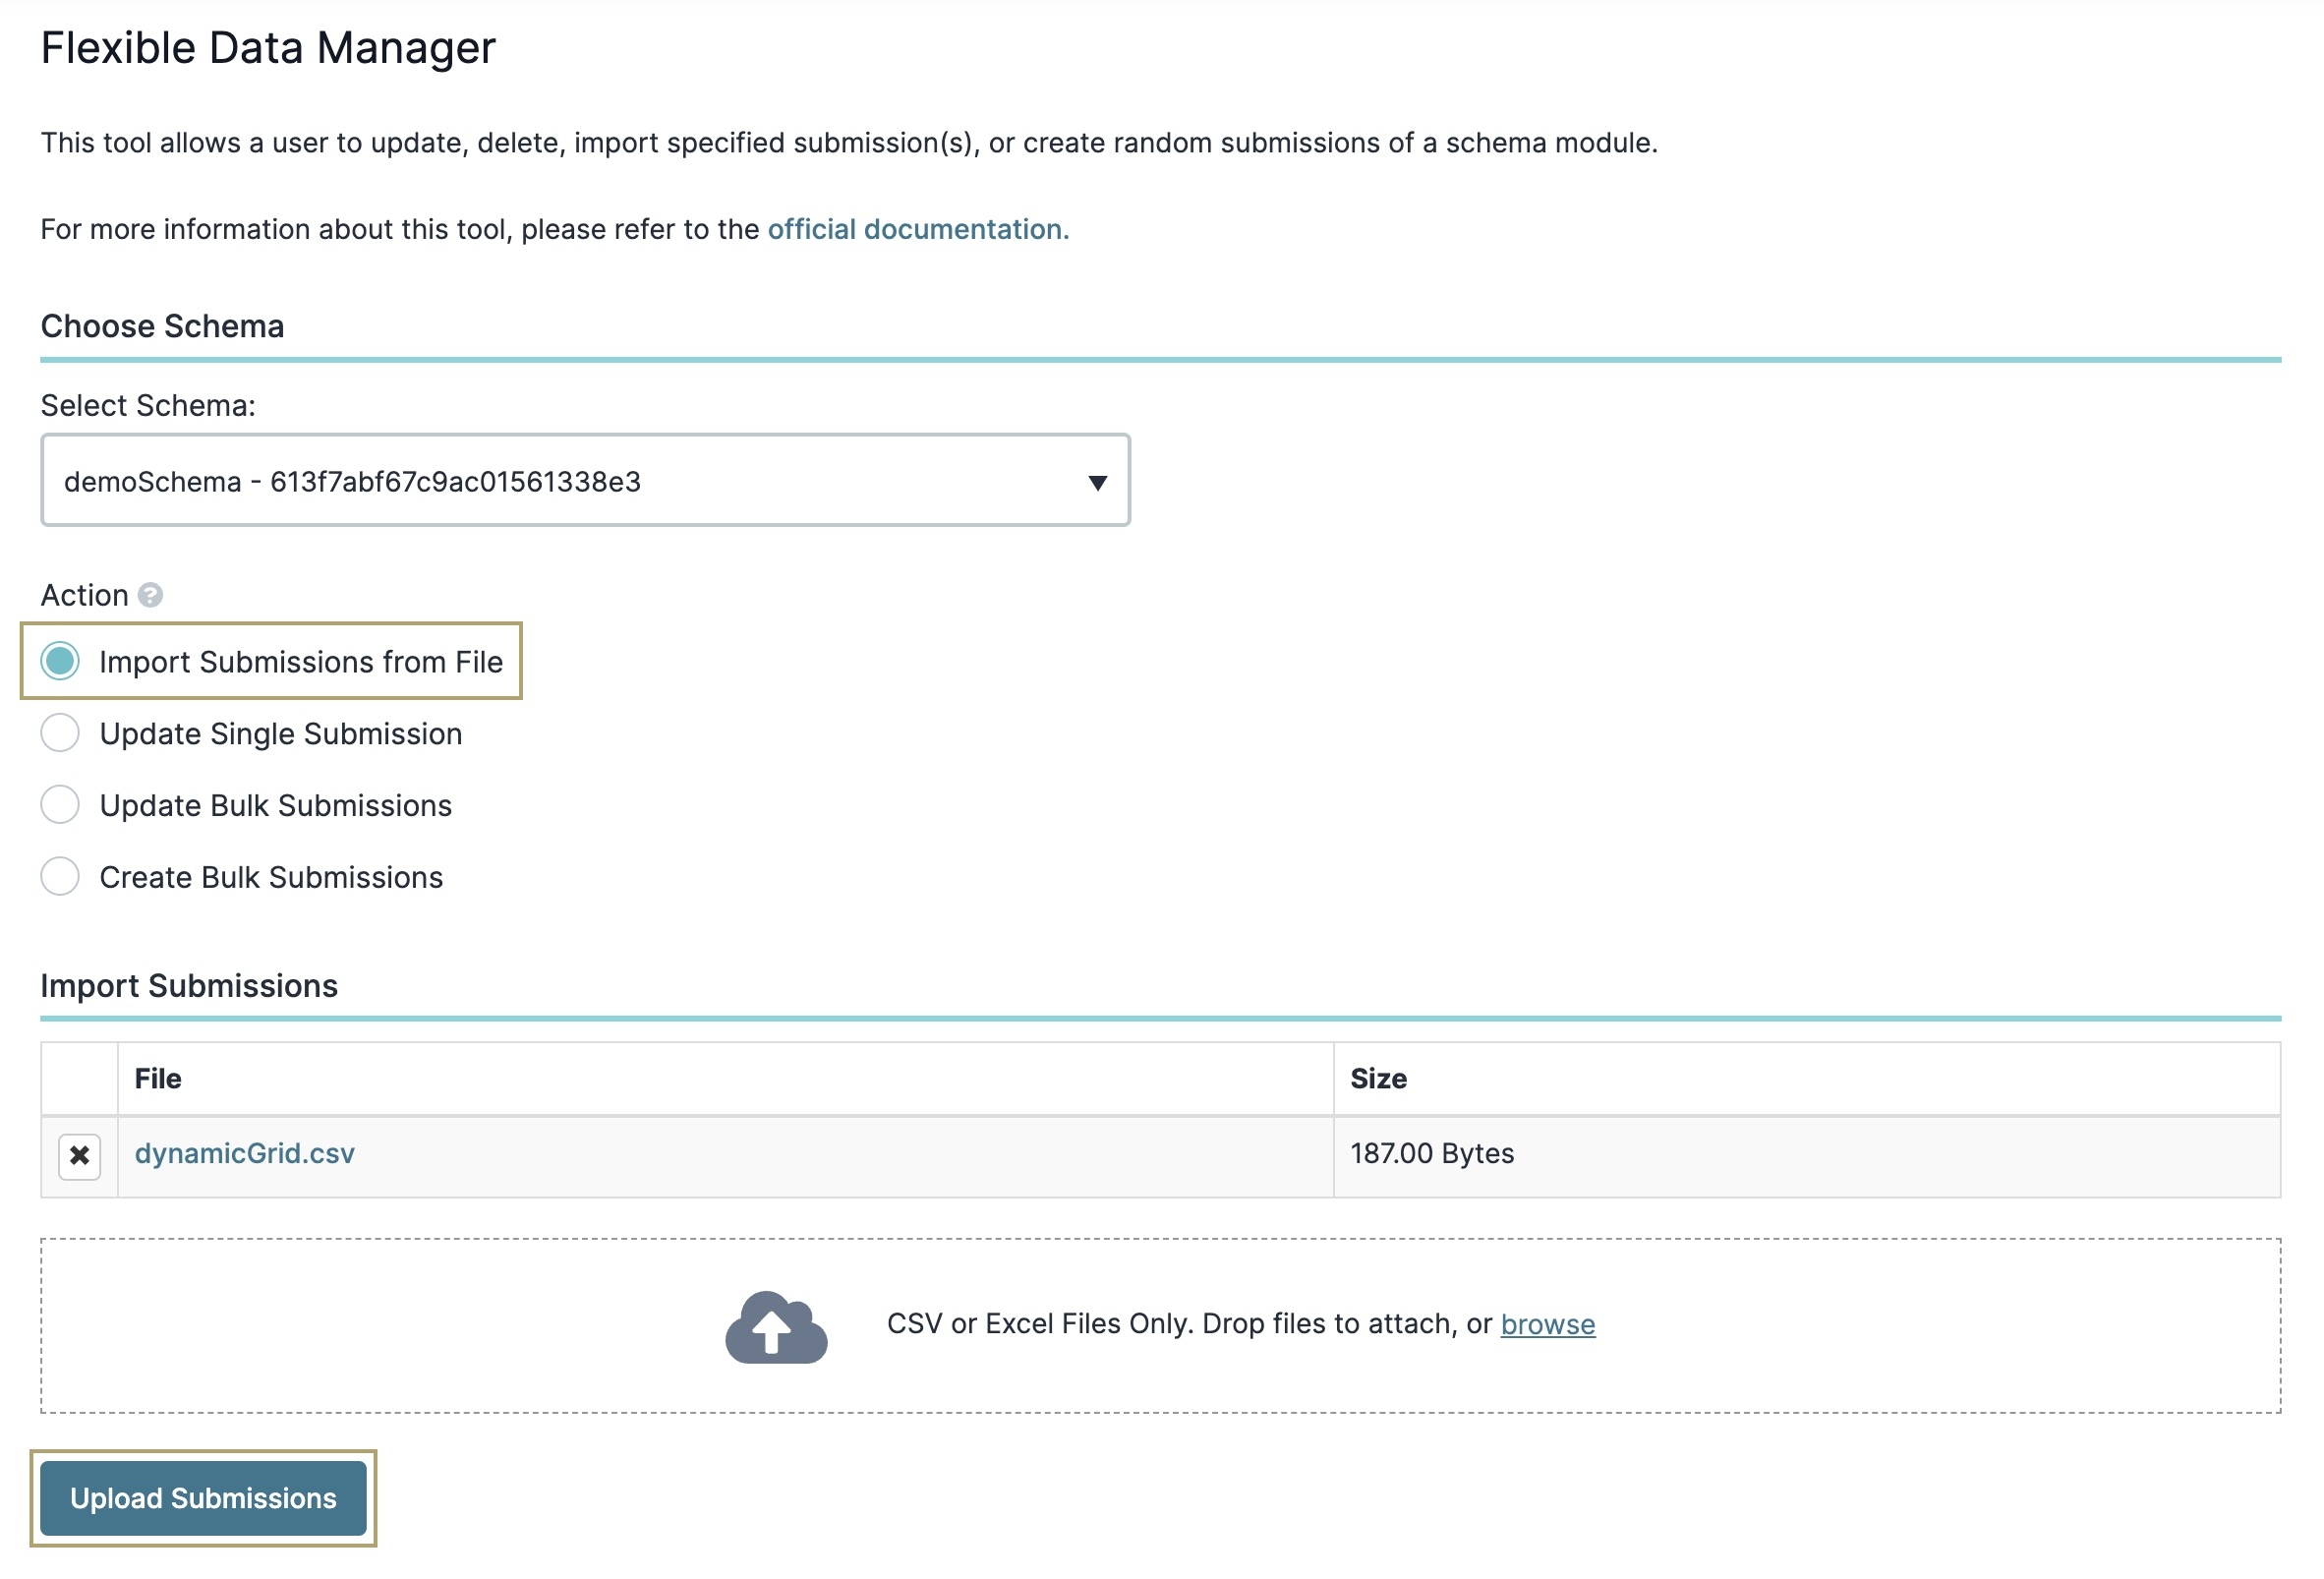
Click Upload Submissions.

Updating a Single Submission
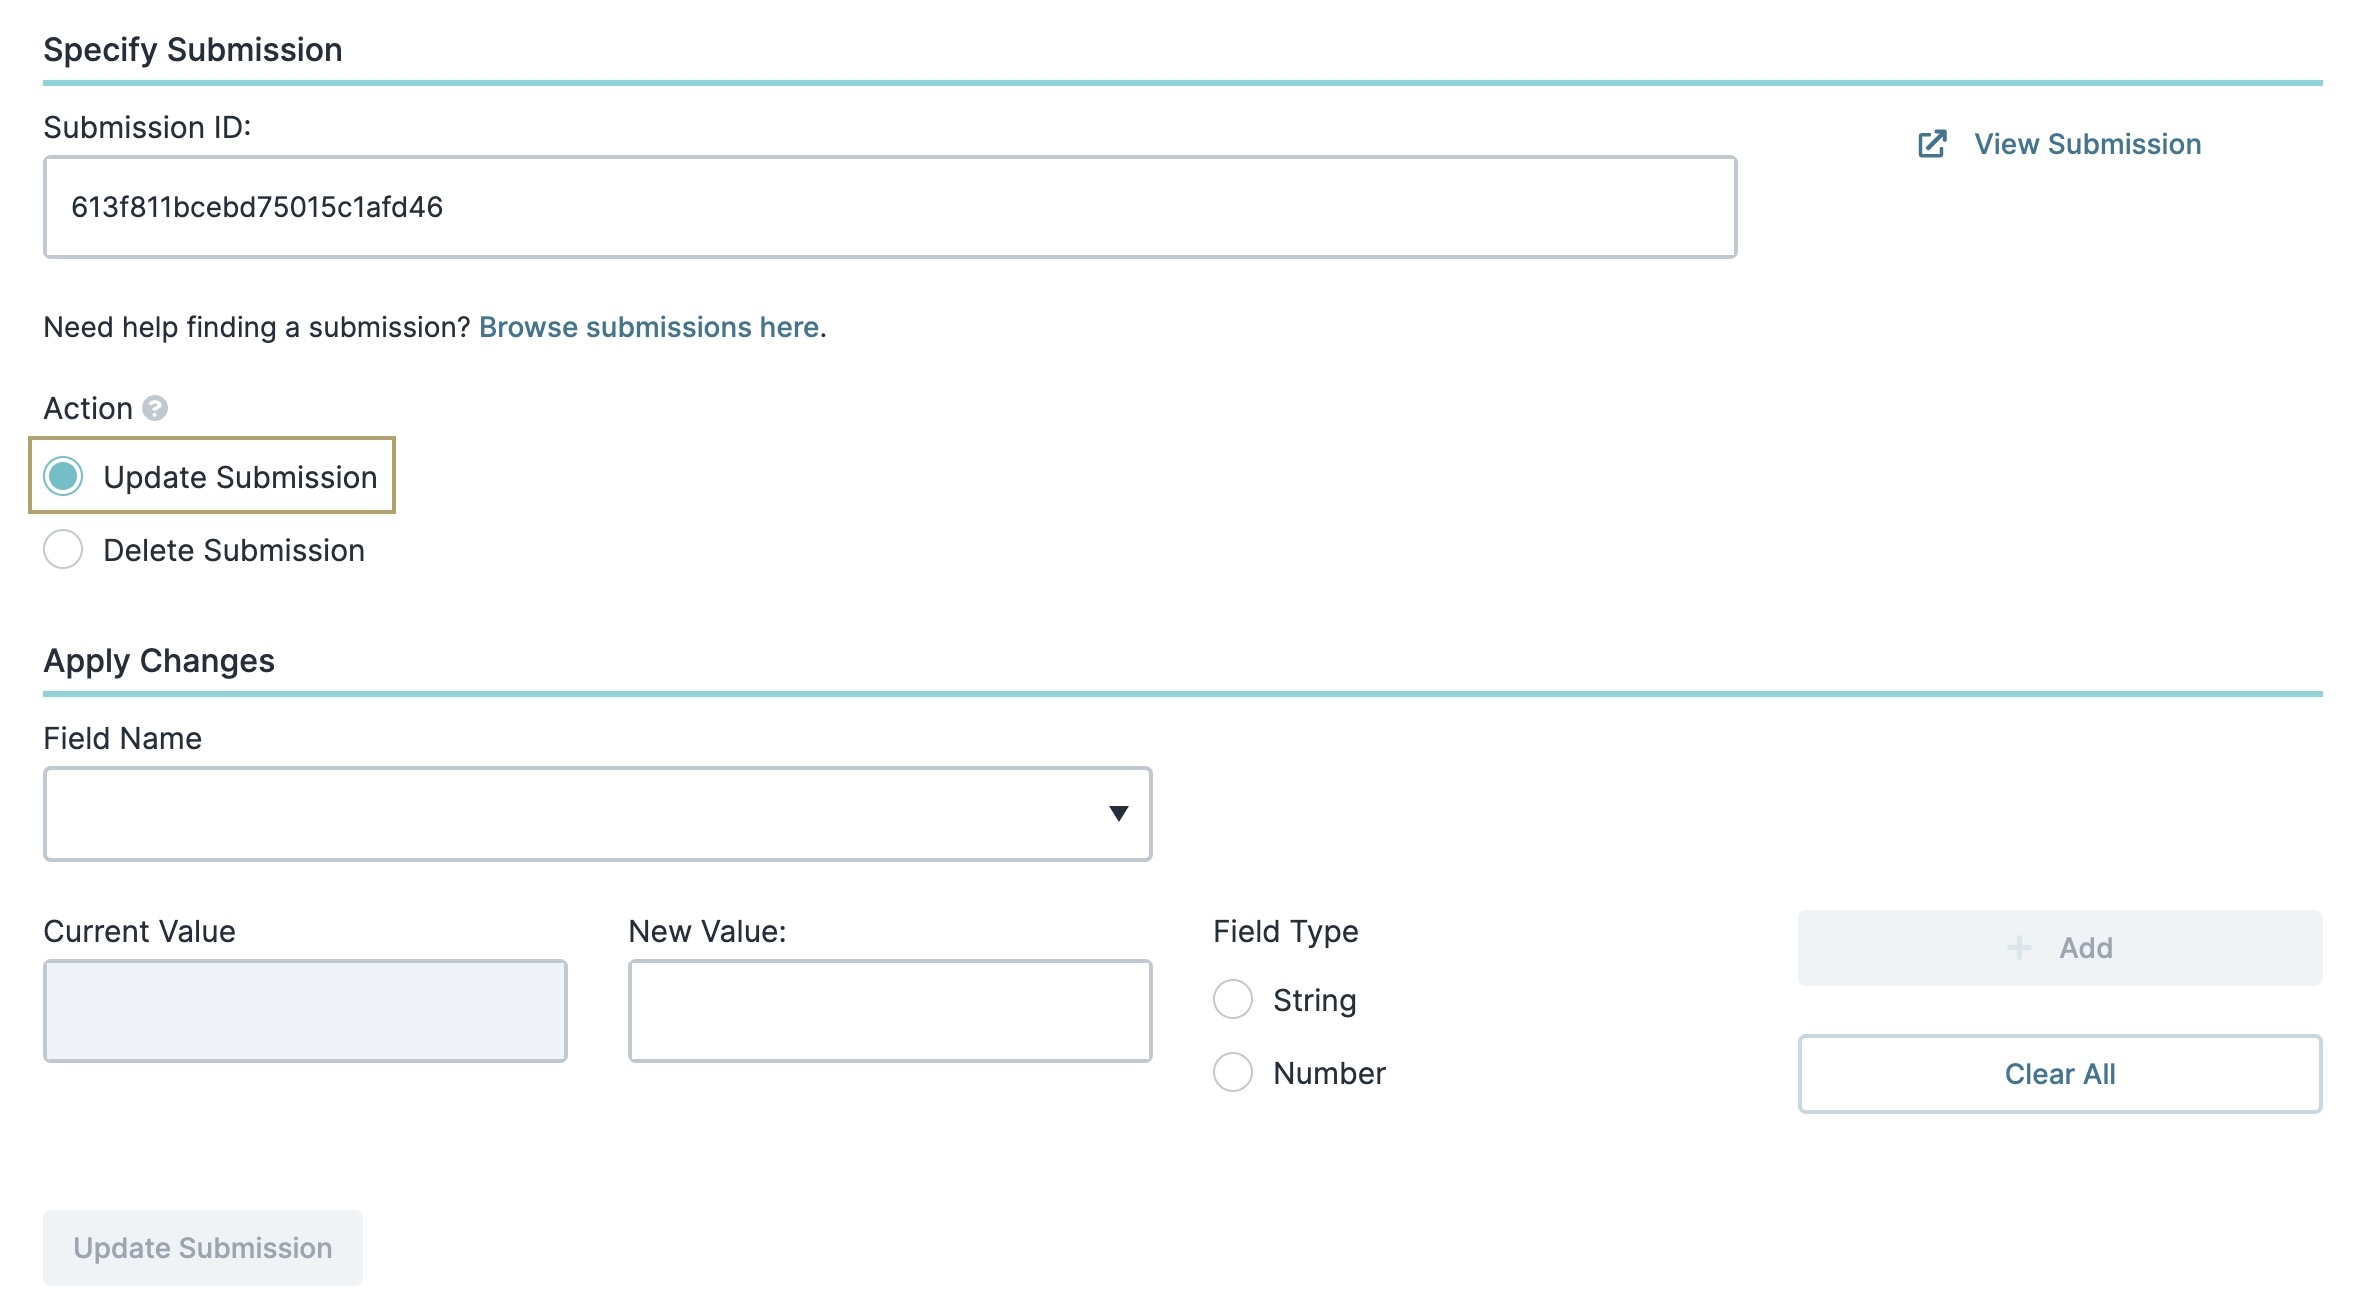
When you select the Update Single Submission option, the Specify Submission panel displays. Using the Submission ID field, enter the submission ID for the schema module you want to update. Click the ![]() View Submission link to display your submission in a new tab.
View Submission link to display your submission in a new tab.
If you do not know the submission ID, click Browse submissions here to open all submission data in a new tab. Clicking the link displays the last 50 submissions in the schema module as raw JSON. We recommended you install a JSON Formatter extension in your browser to parse the data. Once you’ve located your submission ID, copy and paste it into the Submission ID field.

Actions
You can select one of two actions to perform on your submission:
Update Submission
Delete Submission
Depending on which action you select, further options display.
Update Submission
To update the submission:
Select Update Submissions. The Apply Changes panel displays.
In the Apply Changes panel, enter details for the submission data you want to update.

The various settings available in this panel include:
Setting | Description |
|---|---|
Field Name | Select the submission field you want to update. |
Current Value | The current value of the field you selected. This field is disabled and cannot be changed. |
New Value | Enter the new value you want to use to update the field. For example, let's say you select the Field Name of data.firstName. The original value is |
Field Type | Because schema module's are storage vessels for your data, the only field types to choose from are:
You must have fields in your schema module. A schema module cannot include Calculator, Decisions, Initializer, or any other logic components. Choose the appropriate option depending on the data type you chose in the Field Name.
|
+ Add | After selecting your Field Name, Data Type, and Value, click this button to add these changes to the Specific Submission table. You can add as many changes as you want to update simultaneously. The Specific Submission table lets you review your selections before updating them. It includes the following:
|
Clear All | Click this button to clear all the fields. |
Update Submissions | After add your change(s) to the Specific Submission table, click this button to update them based on your criteria. |
Delete Submission
The other action you can perform is deleting that submission.
Deleting a submission is permanent. Once a submission's deleted, you cannot recover it.
To delete a submission:
Select Delete Submission. A Delete Submission button displays.
Click the Delete Submission button. A pop-up modal displays.
Click Yes to permanently remove your submission.
Updating Bulk Submissions
When you select the Update Bulk Submissions action, a Specify Submission(s) panel displays. This panel lets you filter and select the specific submission data you want to update. After you've added your attributes, you can choose to update or delete the submissions.

The various settings available in this panel include:
Setting | Description |
|---|---|
Field Name | Select the submission field you want to update. |
Condition | This drop-down lets you select how to compare the Field Name and Value. The drop-down includes:
|
Value | The value you're filtering by based on your Condition. For example, let's say the Field Name is
|
Data Type | Because schema module's are storage vessels for your data, the only field types to choose from are:
You must have fields in your schema module. A schema module cannot include Calculator, Decisions, Initializer, or any other logic components. Choose the appropriate option depending on the data type you chose in the Field Name.
|
Clear All | Click this button to clear all the fields. |
+ Add | After selecting your Field Name, Data Type, and Value, click this button to add these changes to the Specific Submission(s) table. You can add as many changes as you want to update simultaneously. The Specific Submission(s) table lets you review your selections before updating them. It includes the following:
|
Conditional Logic
When you add more than one row of data to the Specify Submission(s) table, you must select the Conditional Logic. You have two options:
AND: Select this option if you have attributes and values from the same submission(s).
OR: Select this option if you want to change values that are not from the same submission(s).
When you make your selection, the Total Submissions value provides the total number of submissions affected by your selections. To the right, a ![]() View Query Submissions link displays to view the submissions where your selected data exists.
View Query Submissions link displays to view the submissions where your selected data exists.

Actions
After adding information to the Specify Submission(s) fields, the following actions display as radio buttons:
Update Submissions
Delete Submissions
Depending on which action you select, further options display.
Update Submissions
To update the submission:
Select Update Submissions. The Apply Changes panel displays.
In the Apply Changes panel, enter details for the submission data you want to update.
The various settings available in this panel include:

Setting | Description |
|---|---|
Field Name | Select the submission field you want to update. |
New Value | Enter the new value you want to use to update the field. For example, let's say you select the Field Name of |
Field Type | Because schema module's are storage vessels for your data, the only field types to choose from are:
You must only have fields in your schema module. A schema module cannot include Calculator, Decisions, Initializer, or any other logic components. Choose the appropriate option depending on the data type you chose in the Field Name.
|
+ Add | After selecting your Field Name, Data Type, and Value, click this button to add these changes to the Apply Changes table. You can add as many changes as you want to update simultaneously. The Apply Changes table lets you review your selections before updating them. It includes the following:
|
Clear All | Click this button to clear all the fields. |
Update Submissions | After add your change(s) to the Apply Changes table, click this button to update them based on your criteria. |
Delete Submissions
Deleting a submission is permanent. Once a submission's deleted, you cannot recover it.
To delete a submission:
Select Delete Submission. A Delete Submission button displays.
Click the Delete Submission button. A pop-up modal displays.
Click Yes to permanently remove your submission.
Creating Bulk Submissions
This option lets you create bulk submissions for testing purposes. Bulk submissions are created in multiples of five with a maximum of 25 submissions. Use the slider bar to select the number of submissions you want to create. After making your selection, the schema loads with options to create random submissions.

Click the Value Settings button to create random submissions based on criteria different from your selected schema. This modal lets you create static values, use commonly used ranges, and set custom number, integer, or float point ranges.
To add static values:

Expand the Add Static Values panel.
In the Static Field for Data Point* field, enter your JSON values.
Click Add Static Field. The modal closes and the static field displays in the schema table.
Click Create Random Submissions.
You must create static values in JSON. You can create any valid JSON data type like strings, Booleans, or objects. You must use quotes when creating strings.
To add commonly used ranges:
Expand the Commonly Used Ranges panel.
From the Select Value of Randomization drop-down, select the appropriate value. The modal closes and the random value displays in the schema table.
Click Create Random Submissions.
To add a custom data range:
Expand the Set Custom Range panel.
In the Start Value field, enter the start value.
In the End Value field, enter the end value.
Click Add Custom Data Range. The modal closes and the custom data range displays in the schema table.
Click Create Random Submissions.