User Permissions, also known as Workspaces RBAC (role-based access control), control Creator access to specific workspaces in your environment. Administrators assign Creators to a workspace and set their level of access for that workspace.
It’s important to note that, while WSRBAC (Workspace Role-Based Access Control) restricts what elements are available in the UI, it does not restrict how Creators can customize their application’s behavior or what the application has access to.
The benefits of User Permissions include:
Preventing Creators from editing elements in other workspaces.
Setting a user to manage a single workspace, so they can only reference or review specific configurations.
Allowing a Service Administrator to view specific workspaces.
Sharing only specific modules with other workspaces or the environment.
To learn more about Workspace permissions and their roles, visit our Creator Role Administration article.
Accessing User Permissions
User Permissions are accessed from the environment's Workspace page.
To access the Workspace Roles drawer:
From the workspace page, click the (ellipsis) button.
Click User Permissions. The User Permissions drawer displays

Assigning User Permissions
You assign a user to a role at the same time as assigning them to a workspace. It's important to note that administrators have access to all Workspaces actions, so you cannot assign them a role.
To assign a user to a workspace and permission from the User Permissions drawer:
From the Select User(s) drop-down, enter or select the name of a user. Repeat this step for each additional user.
(Optional) To send an email to recently assigned users, set Notify Users by Email to
.png) (checked).
(checked).Underneath the Select User(s) drop-down, in the Select drop-down, enter or select a role to assign to the user(s).
All users selected in the first step are assigned this role.
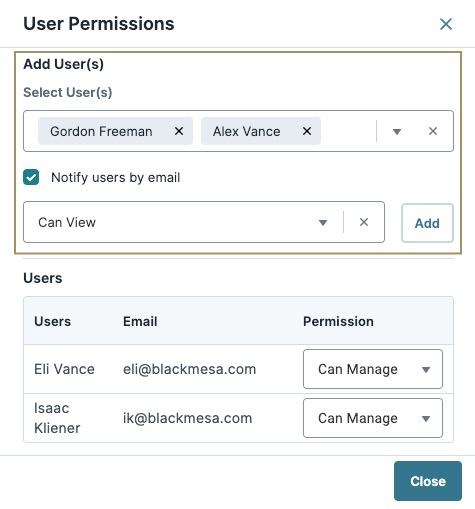
Click Add. The new users display in the Users list.
Click Close.
After adding a user, their email and permission level displays in the Users table. If the Notify Users by Email setting is checked, the user also receives an email notification when they're added or removed from a workspace.
Changing a User's Workspace Role
Users with Can Manage permissions can change the permissions of other users, or remove them from the workspace.
To discover what each workspace permission type allows a user to do, view our Creator Role Administration article.
To change a user's workspace permission from the User Permissionsdrawer:
Navigate to the Users table.
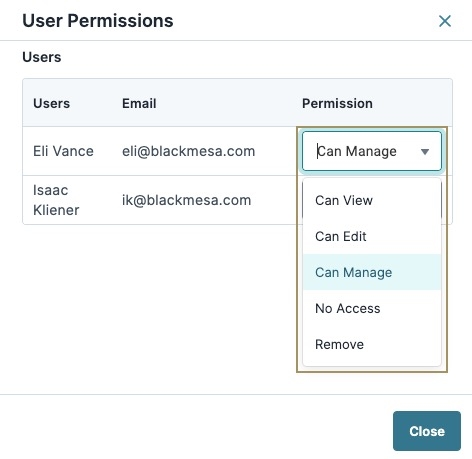
In the Permission column, select a permission level from the drop-down. Options include Can View, Can Edit, Can Manage, No Access and Remove.
Creators assigned to the Administrator environment role can only be assigned the Can Manage permission.
Click Close.
Removing a User From a Workspace
To change a user's workspace permission from the User Permissions drawer:
Navigate to the Users table.
In the Permission column, from the drop-down, enter or select
Remove. The user is removed from the workspace immediately.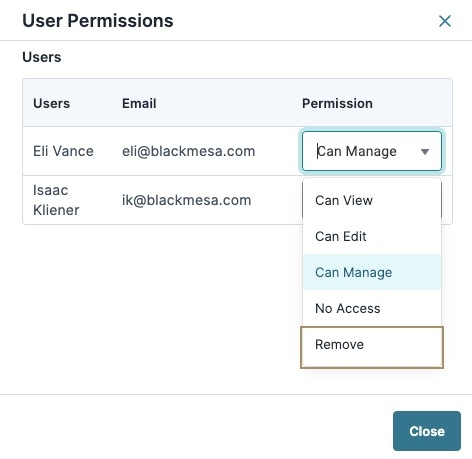
Click Close.
Workspaces RBAC (role-based access control), also known as User Permissions, is the best way to securely ensure users only have access to specific workspaces in your environment. Administrators do this by assigning users to a workspace and setting their level of access for that workspace.
It’s important to note that, while WSRBAC (Workspace Role-Based Access Control) restricts what elements are available in the UI, it does not restrict how Creators can customize their application’s behavior or what the application has access to.
To learn more about modules and workflows in workspaces, visit our Workspaces: Working with Module-Type Apps and Workspaces: Working with Workflow-Type Apps articles.
To learn more about sharing modules and Data Collections, view our Workspaces Role-Based Access Control (WSRBAC) With Shared Elements article.
The benefits of Workspaces RBAC include:
Preventing Creators from editing elements in other workspaces.
Setting a user to manage a single workspace, so they can only reference or review specific configurations.
Allowing a Service Administrator to view specific workspaces.
Sharing only specific modules with other workspaces or the environment.
To learn more about Workspace permissions and their roles, visit our Creator Role Administration article.
Learn about User Permissions by clicking on the tabs below:
Accessing Workspace Roles
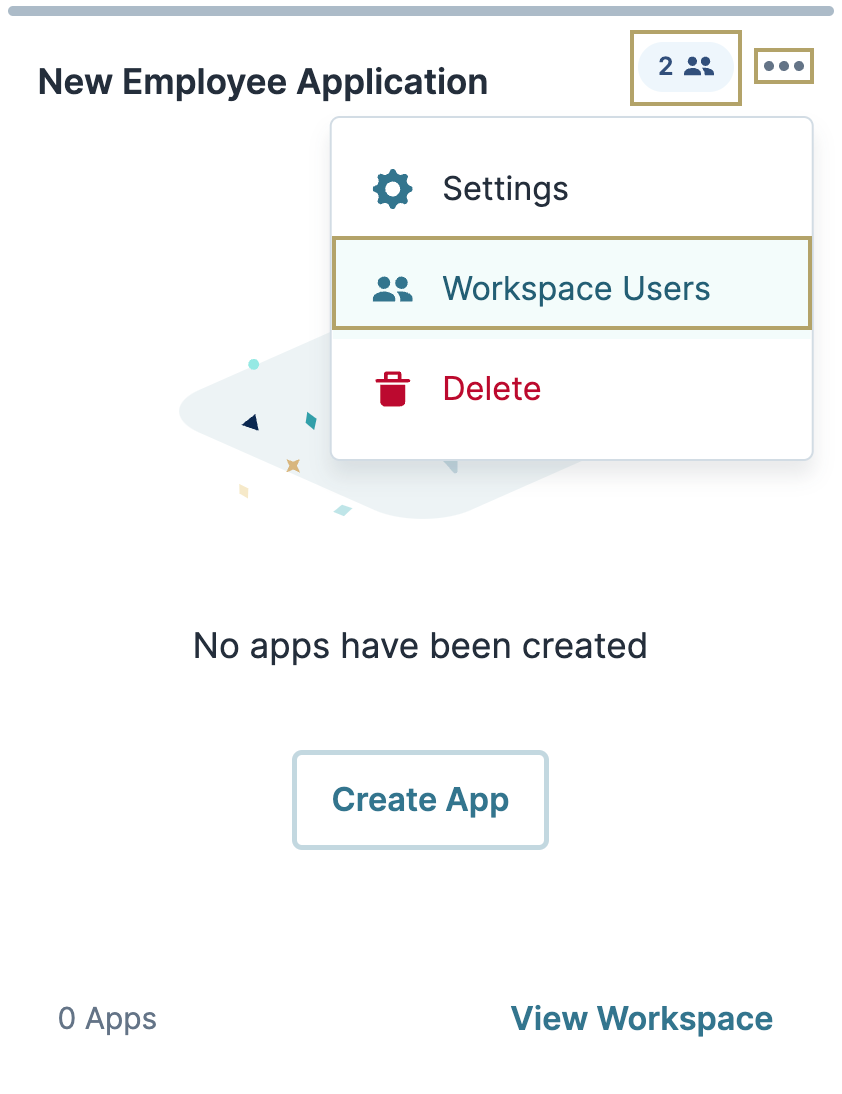
From a workspace tile, use one of the following options:
Click the Workspace Users button.
Click the
…(ellipsis) button, then click Workspace Users.
Assigning Users to a Workspace and Role
You assign a user to a role at the same time as assigning them to a workspace. It's important to note that administrators have access to all Workspaces actions, so you cannot assign them a role.
To assign a user to a workspace and a role from the Workspace Users modal:
In the Select User(s) field, enter the user's name. Or, select a user from the drop-down.
You can select multiple users in this step. They'll be assigned the same Workspaces role when added.
Next to the user name, select a Workspaces role from the drop-down. The default is Can View.
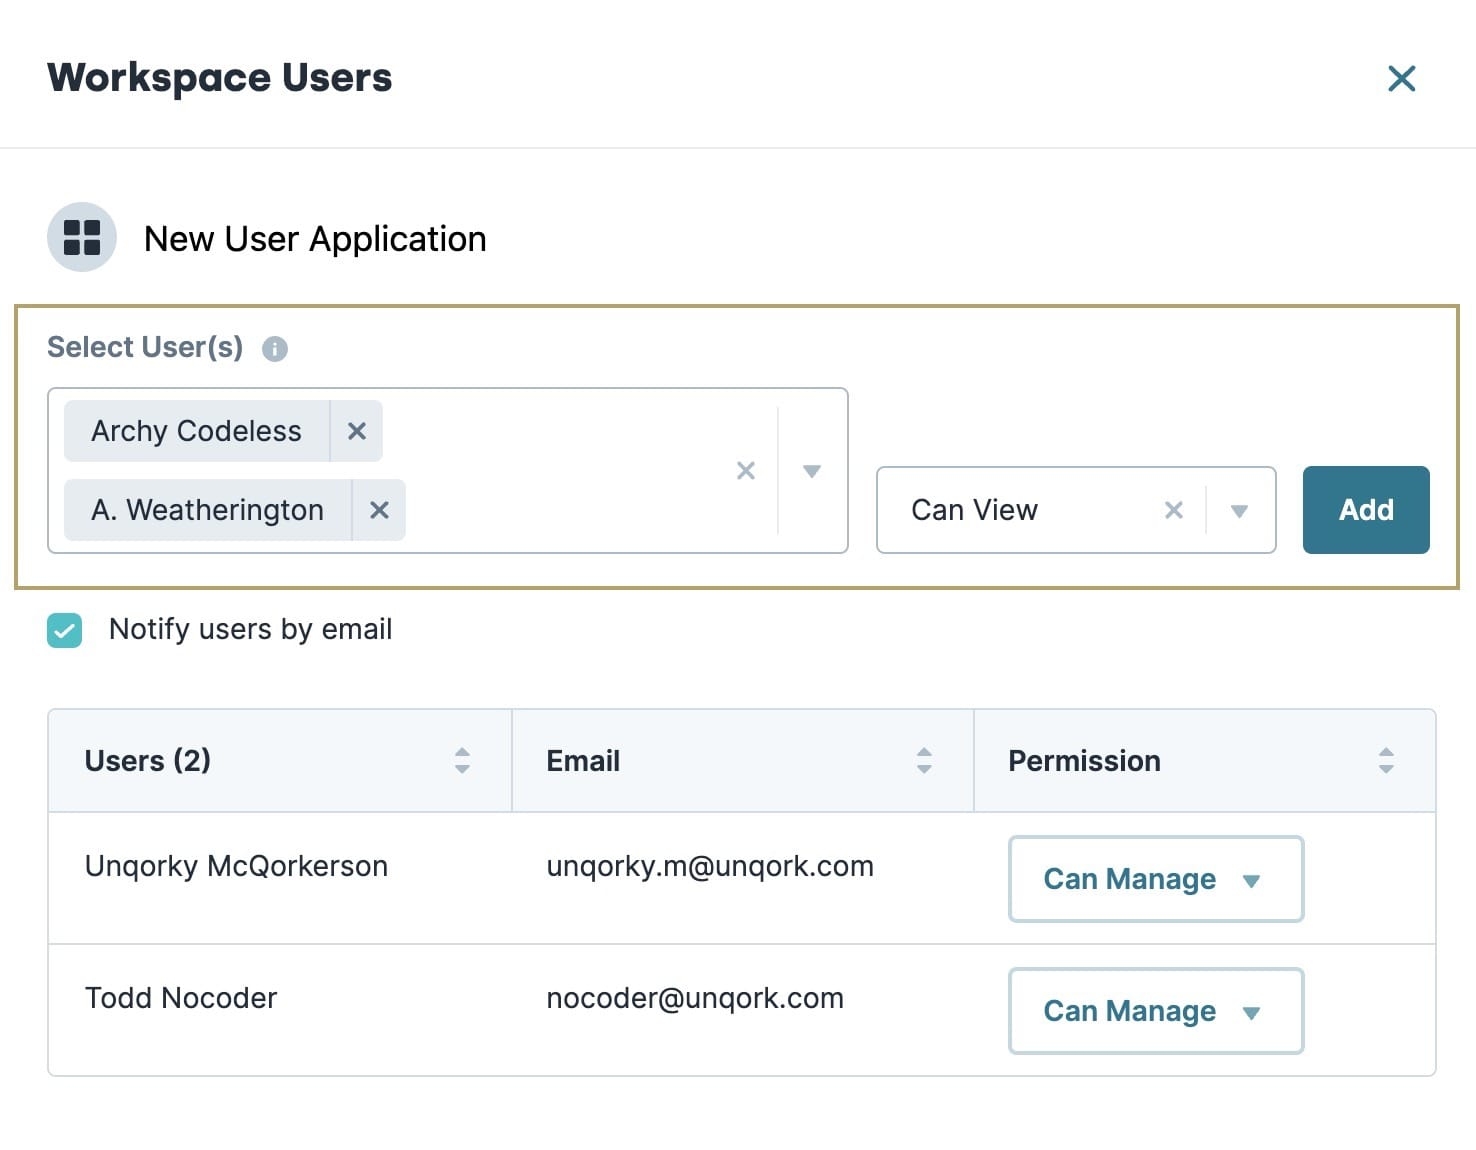
Click Add.
Once added, the selected users, their email addresses, and their permission levels display in the table. Users also receive an email notification when they're added or removed from a workspace.
Changing a User's Workspace Role
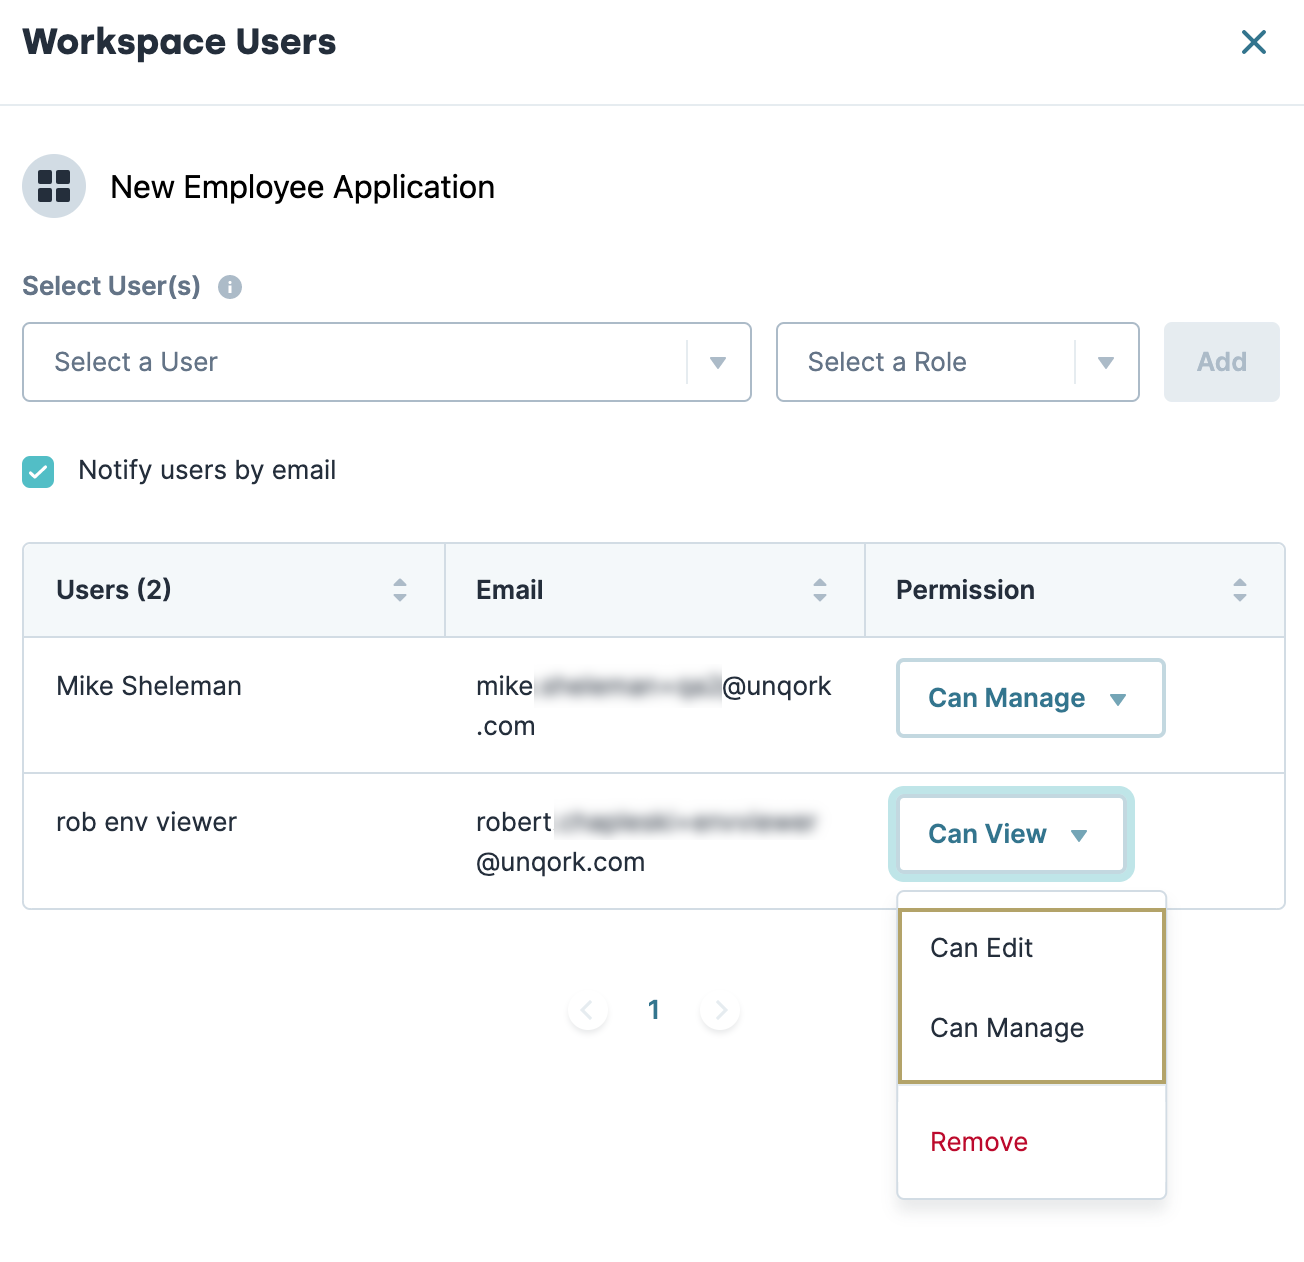
To change a user's workspace role from the Workspace Users modal:
In the Permission column of the table, select a permission level from the drop-down for a specific user. Your options are Can View, Can Edit, Can Manage, and Remove.
Removing a User From a Workspace
To remove a user from a workspace using the Workspace Users modal:
In the Permission column, select Remove from the drop-down.
Users can remove themselves from a workspace role. In this case, they see Leave instead of Remove in the permissions column.