Use Component Configuration best practices to improve your module and application performance. The sections below provide best practices for module and component configurations.
Module Configuration
Build a data dictionary before beginning your configuration. Doing so lets you capture all data requirements for your application. Once built, this data dictionary serves as your configuration guide.
Arrange the components in your module logically and procedurally. For example, place input components above the components that use them. Likewise, put output components below the components that use them.
Arrange components chronologically. The first component in your module is the component that triggers on New Submission.
Add tags to organize related modules. Module tags provide details about your module and make it easy to locate modules with the same tag. Tags help you filter the Modules list.
Login and Logout Modules
In Login/Logout Module Permissions, set Allow Access to Anonymous Users to (ON) to provide Read-Only access to Anonymous Users. This enables end-users to view login and logout pages before authentication.
Header and Footer Modules
If the application is using Login/Logout modules, Set Header and Footer module RBAC permissions to allow anonymous access. In Module Permissions, set Allow Access to Anonymous Users to
 (ON) to provide Read-Only access to Anonymous Users. This enables end-users to view header and footer pages prior to authentication.
To improve security in Header/Footer modules with anonymous access enabled, apply Component RBAC to individual components.
Component Naming
Keep your Property IDs unique in each module and throughout your workflows.
Develop a component-naming convention and use it throughout your building process.
Use camel case (stylized as camelCase) without spaces or punctuation for Property IDs. For example, use firstName, middleName, and lastName.
Use descriptive Property IDs rather than generic IDs. For example, use addressHome or addressWork, rather than addressA or addressB.
For some components, use standard prefix abbreviations. For example, setting the Property ID for an Advanced Datagrid to enter beneficiaries as adgBeneficiaries.
Prefix the Property IDs of logic-type components (Calculator, Initializer, and so on) with the component type. For example, calcCommission for a Calculator component that determines a sales commission.
Keep Property IDs short for a cleaner display and smaller JSON payloads.
Use the Property ID as the Label Text when naming non-visual components.
Add labels (Label Text and Canvas Label Text) to all components that display for your end-user.
Enter api and schema Field Tags to API (application programming interface) and schema modules. That way, they display in the API Docs Dashboard and the Schema Docs Dashboard Life Cycle tools.
Component Configuration
Below is a glossary of components and best practices when using them.
Advanced Datagrid Component
Button click events in the Advanced Datagrid component execute in a read-only data grid.
Browser Storage Component
It's best practice to use your module's unique module ID in the Browser Storage component's Namespace. For example, inspections5ffddf6ae336b802494437c8, where 5ffddf6ae336b802494437c8 is the module ID of the front-end source module. The Namespace is where the source module stores its data on the browser.
Only use Property IDs or grid syntax in Input and Output tables, unless referring to nested data in a Plug-In component.
Button Component
Use the Event Action type instead of Save or Validate. You can use a rule-specific trigger on button-click. Or, create a button to save a module submission.
Keep Button labels clear, concise, and descriptive. For example,
Add a Doctorinstead ofAdd.Aim for no more than one Primary themed action button on a module screen. For example, an Add or Next button.
Aim for no more than one secondary-themed action button on a module screen. For example, a Save or Exit button.
Use Button Links or Button Link Classes for tertiary actions. For example, Next or Previous.
Multiple button clicks by an end-user might affect performance or break its logic. Use the Restrict to Single Click setting to avoid these issues.
Calculator Component
It's best practice to use aliases that denote the input. Keep them short but avoid using aliases of A, B, C, and so on.
Calculator components don't store data. Your module's performance improves if you store the Calculator component's outputs in other components.
If you don't plan to use disabled components in your application, remove them to ensure optimal performance. Remember to check all active components that connect to disabled components. Ensure active components still function properly after you remove the disabled ones.
Use the component's Notes tab to comment on complex data processes. Add notes to explain what components are being triggered, trigger types, and the importance of each component.
Only use Property IDs or grid syntax in Input and Output tables, unless referring to nested data in a Plug-In component.
Checkboxes Component
Use Checkboxes when your end-user must select more than one predefined option.
Arrange Checkboxes in a single column. Consider breaking the boxes into two or more columns if the list is long or the associated text is short.
Consider using a Dropdown or Multi-Select Dropdown component if there are too many selection options.
Columns Component
For applications that need four or more responsive columns, consider using a Field Group component with CSS Flex Properties. CSS Flex allows for more control over the layout and responsiveness of the content in a column format.
Data Table Component
Data Table components don't store data. Your module's performance improves if you store the Data Table component's outputs in other components.
If you don't plan on using disabled components in your application, remove them to ensure optimal performance. Remember to check all active components that connect to disabled components. Ensure active components still function properly after you remove the disabled ones.
Date Input Component
Use a date picker when your end-user must select a specific date in the recent past or immediate future. Date pickers are especially helpful when the calendar context lets your end-user make a decision. For example, if your end-user selects a policy start date.
Avoid date pickers when your end-user knows the date and doesn't need a calendar. For example, a birthdate or expiration date.
Unqork recommends applying YYYY-MM-DD formats when using MomentJS formulas. This maintains data integrity when sorting due to the platform’s default sorting.
When using MomentJS, update the delimiter to a dash (-) instead of a forward slash (/) to ensure validation is correct.
Data Mapper Component
It's best practice to build a data table with a spreadsheet tool (like Excel) when you populate the Data Mapper. Then, you can copy and paste from the spreadsheet tool into Unqork.
Ensure there isn't any sensitive data in the table.
Data Workflow Component
For operators that require fields, like the Formula operator, it is best practice to avoid using symbols and numerical values in the fields. For example, instead of using
Test1Key="value", useTestOneKey="value".Data Workflows timeout after five minutes in all environments. Build Data Workflows to complete operations in five minutes to prevent timeouts.
If you don't plan to use disabled components in your application, remove them to ensure optimal performance. Remember to check all active components that connect to disabled components. Ensure active components still function properly after you remove the disabled ones.
Add labels to all Data Workflow operators to describe their function. These labels make it easier to know the purpose of an operator without having to open the Info window.
Select the Do Not Sanitize setting in all your operators to improve application performance.
Organize Data Workflow components based on their function in your application.
Use the component's Notes tab to comment on complex data processes. Add notes to explain what components are being triggered, trigger types, and the importance of each component.
Inputting Arguments that End with a $ Symbol
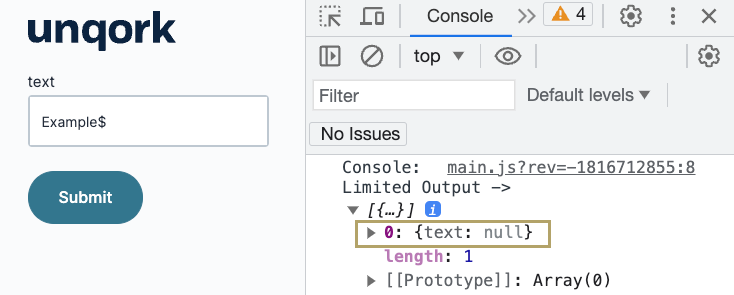
When using Data Workflow input operator that connects to another operator port, the _arg returns null if the input value contains a $ at the end of the input. This error occurs regardless of the operator used.
In this example, a Data Workflow component uses the text box input as the argument for another operator. In Express View, the DevTools Console displays the result of the Data Workflow configuration. Because the input ends with a $ symbol, the output returns as null.
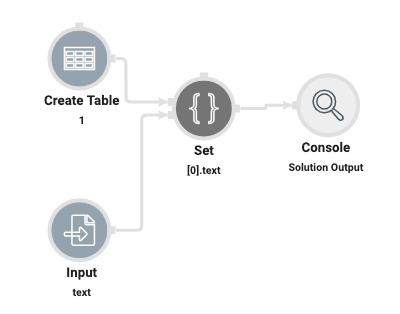
To resolve this error, use a Set operator in a new Data Workflow. Configure your Data Workflow using the following steps:
Drag and drop a Data Workflow component onto your canvas.
Add the same inputs you used for your original Data Workflow that returned the null error.
Drag and drop a Set operator onto your Data Workflow canvas.
Configure the operator's Info window as follows:
Setting
Value
Category
Set
Label
[0].text
Path
[0].text
Value
Connect the output port (right) of your input operators to the input ports (left) of the Set operator.
Drag and drop a Console operator onto your Data Workflow canvas. This will allow you to see the result of this Data Workflow configuration in your DevTools Console.
Connect the output port (right) of your Set operator to the input port (left) of the Console operator.
Save your Data Workflow.
Save your module.
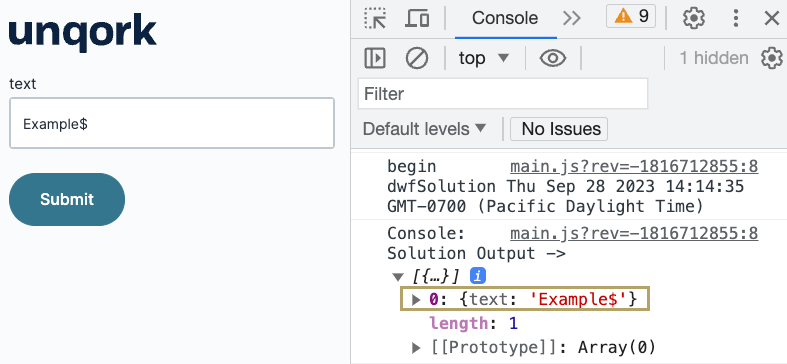
In Express View, when you open the DevTools Console and enter an input that ends with a $ symbol, the Data Workflow you created will display the text correctly.
Inputting Data into Rows Using the Clean Keys Operator
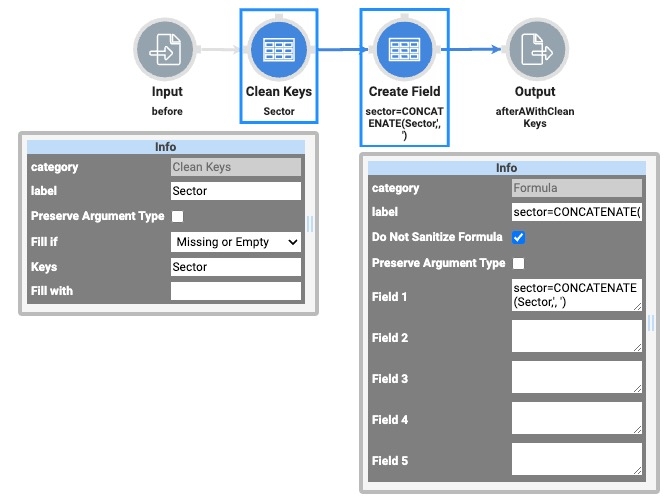
If workflow data returns a null value, use the Clean Keys Operator to replace the null value with an empty value before running other operators that manipulate the data.
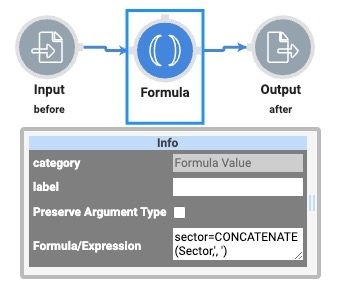
In the example images below, a Formula operator concatenates the sector key without cleaning keys. This creates inaccurate values for keys that contain null values:
To resolve this issue, add a Clean Keys operator to remove null values, then concatenate fields using the Create Field Operator.
In the example images below, the Clean Keys operator replaces the sector key's null values with empty values. Then the Create Field operator concatenates the sector key:
To see an example of how the Data Workflow manipulates data using a Formula operator vs a Clean Key operator, click the following link: https://training.unqork.io/#/form/66980e26ac7c4b3c7261fef6/edit
Decisions Component
Decisions components don't store data. Your module's performance improves if you store the Decisions component's outputs in other components.
It's best practice to use aliases that denote the input. Keep them short but avoid using aliases of A, B, C, and so on.
If you don't plan on using disabled components in your application, remove them to ensure optimal performance. Remember to check all active components that connect to disabled components. Ensure active components still function properly after you remove the disabled ones.
Use the component's Notes tab to comment on complex data processes. Add notes to explain what components are being triggered, trigger types, and the importance of each component.
When using the Range type in the Inputs table, the Micro Decisions table does not support a value of
.length. Instead, use the Input type Exact because it sets the value as a string.Only use Property IDs or grid syntax in Input and Output tables, unless referring to nested data in a Plug-In component.
Dropdown and Multi-Select Dropdown Components
Avoid using Dropdown components when possible. Use Radio Button components if you have less than 5 options. It's best practice to use a Dropdown component when you have more than 5 options.
Only use the Multi-Select Dropdown component when applying multi-select or autocomplete functionality to your application. Otherwise, use the Dropdown component. These best practices enhance performance.
Email Component
Amazon SES Service Limitations:
If sending more than 3,000 emails daily, inform your CSM (customer success manager) of this requirement.
If sending more than 6,000 emails daily, discuss best practices with your CSM.
File Component
Never augment, extend, or otherwise modify file objects in submission data. These file objects represent an Unqork file and altering them can cause issues with file uploads and downloads.
Using logic components to trigger a file download using the page or pageOpen Output Types is supported. But the value used with these Output Types must be a valid URL. Ideally this is the Cloud Storage Delivery URL.
The following are some helpful formulas when dealing with file data:
Formula
Description
Syntax
BASE64
Transforms a binary value into a Base64 encoded string.
BASE64(value)
TOBASE64
Transforms a binary value into a Base64 encoded string.
TOBASE64(value)
FROMBASE64
Converts the Base64 encoded string into a binary value.
FROMBASE64(value)
Hidden Component
Use the Hidden setting to hide any component in Express View. Use the Hidden component for all non-visual fields.
The Hidden component is unique in that it holds any data structure. Other components only allow a single data structure.
It's best practice to use Hidden components when storing non-primitive data types, like arrays and objects. Using other components to store non-primitives, like an array in a Text Field component, can lead to unpredictable and non-deterministic behavior.
Hidden components are invisible in Express View. This invisibility makes Hidden components great for moving information in the back-end of your module. Your information is useable elsewhere, but it isn't directly visible to your end-user. Use other components to change and reference the Hidden component's stored values.
If a module isn't set to Server Side Execution Only, end-users see the Hidden component's values in the HTML.
HTML Element Component vs Content Component
Use the HTML Element component to add text to your module. All the text entered in the content area displays with the HTML tags applied. The HTML Element component lets you create unlimited HTML tags.
Use a Content component when adding a custom HTML block to your module. Unlike the HTML Element, Content components let you format text using any number of HTML tags.
If you need only one HTML tag, it's best practice to use an HTML Element component, not a Content component.
Delete empty HTML Elements or Content components. Keeping them unnecessarily bloats your module.
If you use an open tag in your HTML code, like <h1>, use a closing tag, like </h1>, as well.
Avoid writing JavaScript in a Content component. Not only can JavaScript conflict with the code-base, but it leaves your application vulnerable to malicious attacks.
Avoid using a URL with src attributes. The src attribute specifies the URL of an external JavaScript file.
Use the Content component to create styles on a small scale. To introduce styles on a large scale, use Style Administration.
To learn more about Style Administration, view our Style Administration article.
Iframe Component
Avoid using iframes when possible. Iframes have the following drawbacks:
Iframes are susceptible to XSS (cross-site scripting) attacks. Bad actors can perform XSS attacks and change the source site URL, install malware, steal information, or hijack clicks and keystrokes.
Many search engines do not index or rank Iframe content, which reduces your page's rank position in search results.
Page load time is slower and resource costs increase when using Iframes.
Image Component
For browser applications, improve user accessibility and the SEO results of your application by applying the following standards to images:
Include alternative text for all images to improve the experience of customers using screen readers.
Improve web page load speed by using appropriate image sizes and optimized formats. Unqork supports modern formats such as WEBP and AVIF.
When possible, specify image dimensions in the component or CSS to reduce CLS and improve customer experience.
To learn more about CLS, view the following article: https://web.dev/articles/cls
Initializer Component
Initializer components don't store data. Your module's performance improves if you store the Initializer component's outputs in other components.
It's best practice to use aliases that denote the input. Keep them short but avoid using aliases of A, B, C, and so on.
If you don't plan on using disabled components in your application, remove them to ensure optimal performance. Remember to check all active components that connect to disabled components. Ensure active components still function properly after you remove the disabled ones.
Use the component's Notes tab to comment on complex data processes. Add notes to explain what components are being triggered, trigger types, and the importance of each component.
Only use Property IDs or grid syntax in Input and Output tables, unless referring to nested data in a Plug-In component.
Navigation Component
The Stagger Load for Performance setting displays only the displayed Panel and loads only its contents. If you have logic components in a different Panel in your module, you can't access or use them properly. This setting also improves application performance and prevents long load times for larger modules.
Improve end-user navigation by including a title for every page.
Numbers Component
Numbers component values cannot be 17 or more digits. This applies to decimal and whole number values.
Panel Component
If importing a module doesn't work, it's likely because the Import Module setting isn't selected in your Panel's settings.
It's best practice to select the Reference Import Type. The Copy Import Type saves all the components from the imported module(s) into the module. The Copy Import Type bloats the module while the Reference Import Type stores a reference to the module and its components. The Reference Import Type minimizes the size of the data object.
It's best practice to keep a component and its triggering Initializer component together inside or outside the Panel. For example, you have an Initializer that triggers a Data Workflow component to execute. If the Initializer is inside the Panel and the Data Workflow component is outside the Panel, the Data Workflow fails to execute. The same issue occurs if the Data Workflow is inside the Panel and the Initializer is outside the Panel.
To maintain optimal performance, limit the amount of refresh components to 250 at once. Limit the total size of component definitions to 2.5MB.
Creators can pre-fetch component definitions into submission data and dynamically refresh them in at a later time.
Creators can sequence multiple dynamic refreshes in a row by using the Post Refresh trigger setting.
Dynamic Refresh can refresh more than the recommended amount. However, fetch and render times increase according to the load.
Plug-In Component
It's best practice to remote execute all Plug-In components to avoid malicious attacks on your data.
Plug-in components process data asynchronously. To guarantee that a manually-triggered component doesn't run until it receives the necessary input, enter that component as the Plug-in component's Post Trigger.
Apply custom RBAC to the module. RBAC helps control who can execute the API call. Another best practice is to create a proxy module between your API module and Express View module.
The Flatten to Single Record Result setting formats the data into an object instead of an array.
The Look for 'Data' Key in Response setting prohibits how you manipulate that data in your application. Avoid this setting to control your data format.
The Assign All Values Returned to Form setting takes everything from your API response and adds it to the submission data. The result is a slow call and a bad submission.
Plug-In components don't store data. Your module's performance improves if you store the Plug-In component's outputs in other components.
Modules might perform poorly if the List Submissions for Dashboard service returns a large number of submissions and server-side paginations isn't enabled.
If you don't plan on using disabled components in your application, remove them to ensure optimal performance. Remember to check all active components that connect to disabled components. Ensure active components still function properly after you remove the disabled ones.
If getSubmission Plug-In components don't enforce limits, they might fetch more data than the module can handle.
Use the component's Notes tab to comment on complex data processes. Add notes to explain what components are being triggered, trigger types, and the importance of each component.
Only use Property IDs or grid syntax in Input and Output tables, unless referring to nested data in a Plug-In component.
Protected Field Component
Use a Protected Field component to protect the field from being viewed in real-time by someone other than your end-user. Using a Protected Field helps prevent shoulder surfing. Shoulder surfing occurs when someone watches the end-user's screen to collect information.
Set password requirements in Environment Administration. Strong password requirements prevent attacks against an application's end-users.
Use the component to store sensitive data in the database. The Protected Field component doesn't have a Store Data in Database setting.
Radio Buttons Component
Use a Radio Buttons component when you have 5 or fewer options for selection. Use a Dropdown component for anything larger. Each option must show as visible to your end-user.
Consider using the Select Boxes setting if your end-user must select multiple options, because radio buttons let end-users select one predefined option.
Text Field Component vs Text Area Component
Use Text Field components for text inputs of only a few characters or words. Use a Text Area component for longer text entries.
Keep your modules neat by keeping field widths consistent. Only widen fields when the input needs more space. Exceptions include input fields for City, State, or Zip.
Text Link Component
When linking out to external websites, consider matching the values of Content and Destination fields. This lets end-users know they are leaving your domain if they click on the link.
Timer Component
To reset a Timer component's duration, use a Decisions component with the formula =MOMENT(MOMENT(),'format','[5.]x'). In the formula, the 5 represents 5 seconds and the x outputs a unix timestamp in milliseconds. This unique timestamp ensures the Timer component's Set Timer Duration property can fire again. Resetting a Timer component using a simple static number only works once.
Uniform and Freeform Grid Components
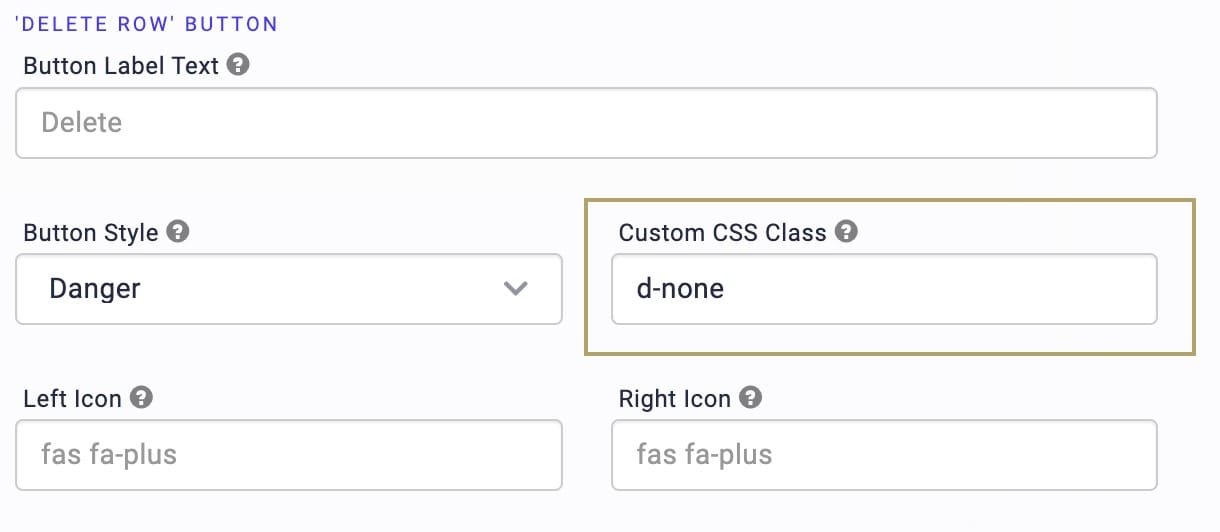
To hide a button in Express View, enable Customized Button Styling.Then, in the Custom CSS Class field, enter d-none.
Formulas
Use simple quotation marks in formulas, rather than curly or formatted quotes. Curly quotes occur when you copy and paste formulas into Unqork. After pasting your formula, delete the curly quotation marks and replace them with simple quotations marks.
ViewGrid Formulas
Avoid using ViewGrid formulas as often as possible. This is imperative for the performance and functionality of your application.
Using a ViewGrid formula is equivalent to configuring a create field in a Data Workflow, then outputting the data back to the object. Instead, all data manipulation must be done in business rule components such as the Calculator and Data Workflow, instead of directly in a ViewGrid component.
ViewGrid formulas overload a UI component, compromising its ability to perform business rules. It also transforms the underlying data with unexpected consequences, creating infinite loops.
Component Values
Keep the Value and Label the same if the Value displays to the end-user. This applies to components with preset values, like Radio Buttons and Dropdown components.
Use the default value of the component only on new submissions, and where the component is not persistent. Use an Initializer component with new and edit submissions for all other default values.
Use a proxy pattern to avoid mass assignments or accidental data updates with edit submissions.
Only persist the values you need to persist.
Don't store values in operational components such as a Calculator or Data Workflow component. Instead, output these values to other components.
Transforms
Use Transforms to construct complex requests for Plug-In components.
Avoid hard coding sensitive data in transforms.
Performance
Limit the use of Panels to avoid slow application performance. When using Panels in Navigation, it's best practice to use at least 3 sections. Avoid using more than 7 sections.
Use a Field Group component instead of a Panel to group components together.
Enable the Stagger Load setting when you use Navigation. This setting lets components load on the page one at a time.
Force the server to filter as much as possible when you query submissions.
Select the Manual Trigger Type as often as possible when you trigger components. Reducing the use of the Watch Trigger Type improves performance and stability. When you set up an excessive number of components with the Watch Trigger Type, the components execute whenever the page loads. This adds to processing overhead and results in delays as the pages load. You have other options to manually chain events in your configuration. Try button-click events, the completion of Data Workflows, New Submission Initializers, Pre-Triggers, and Post-Triggers.
Reduce the number of components with the Hidden setting set to ON. If these hidden components aren't logic components, remove them to improve application performance.
It's important that your module executes in the proper sequence to ensure efficiency and performance. Correct ordering helps prevent accessing or referencing components before they're initialized.
It's best practice to avoid hardcoded environment references. Hardcoded references break your application when you promote it to a new environment. As an alternative, use getENV.
To improve module performance, avoid using too many Rich Text Editor components in a single Panel component.
Compress images to avoid potential performance issues.
Always use API specifications when building API modules to ensure higher performance.
For more information about API specifications, search API Specification Snippet in our In-Product Help.
Don't ignore error responses from API calls to external services or remote executes. The module should put in place logic to account for cases in which the API call fails.
Timing
Always set component values before triggering the components that rely on them.
Select the Manual Trigger Type for Decision, Initializer, Data Workflow, and Plug-in components.
Initializer components execute outputs as blocking steps, so steps process one at a time. While the current step processes, other steps remain blocked.
Use a post-trigger to sequence Plug-In components.
Security
Remote execute all API calls. It isn't secure to run API calls in the browser. If the call happens in the browser, anyone can access the DevTools Console and Network tab. Malicious attackers can access PII (personally identifiable information) and inject malicious values. You prevent malicious attacks to sensitive data when you create remote executes. Sensitive data is hidden and processed exclusively in the remote execute module.
Create a proxy module between your API module and Express View module
Remote execute all proprietary logic—for example, the Rater.
Use RBAC (role-based access control) to ensure Least Privileges. Least Privileges grants end-users the minimum privileges required to complete their job.
Use RBAC on any module that creates submissions.
Inventory all submission data for data governance and compliance.
Avoid using Full Submission Access. Full Submission Access grants the Express role full access to all submission data. It supersedes role hierarchy, group membership, and field-level permissions. This setting provides end-users with Write access to every submission in every application in the entire environment.
Troubleshooting
Use Module Outline to diagnose common issues with configurations. To learn more, visit our Real-Time Configuration Analysis Tool article.
Discuss in detail the needs of your client. This determines the best application configuration.
Add Console logs to all Data Workflow operations. Set up every step of your Data Workflow to output a piece of information. Then, when you fire the module, your Console operator displays your current step in the Data Workflow.
Keep the DevTools Network tab open to track network activity as you test your module. In Express View, the DevTools Network tab displays the calls made to various endpoints.
Use the Ctrl + Shift + J (Windows/Linux) or Option + Command + J (Mac OS) shortcut to open the Console in Google Chrome.
Use the Angular command in the DevTools Console tab to check submission data saved to the browser.
Enter the following Angular command in the prompt: angular.element('.unqorkio-form').scope().submission.
Enable Client Tracker for all environments, especially your Production environment. You can enable Client Tracker under Environment Administration. Client Tracker is for official integrations with monitoring and performance-tracking tools.
Disable Client Tracker after troubleshooting. It continues to track sensitive data if it remains enabled.
Enable HTTP status codes for all API modules using remote execute. These status codes provide improved error handling for developers when testing or monitoring API calls.
To learn more about HTTP status code outputs in API modules, visit our HTTP Status Codes article.

