Introduction to Application Versioning
Overview
Application Versioning is an important process in software development. Because many team members contribute to the creation of an application, versioning ensures team members are building and testing the correct application version at the correct environment level. Application Versioning also lets you easily add enhancements, test functionality, troubleshoot issues, and roll back an application to a working version. When enabled, you can create unique, uneditable copies of the application at any time, retain versions for stability, and view previous versions.
Design Versus Run-Time Versions
Currently, when you make changes to an application, they display automatically in Express View. Application Versioning introduces a distinct separation between Design-time and Run-time applications. These distinctions are the following:
-
Design-time: Applications you edit and configure in Designer View.
-
Run-time: Applications your end-users interact with in Express View.
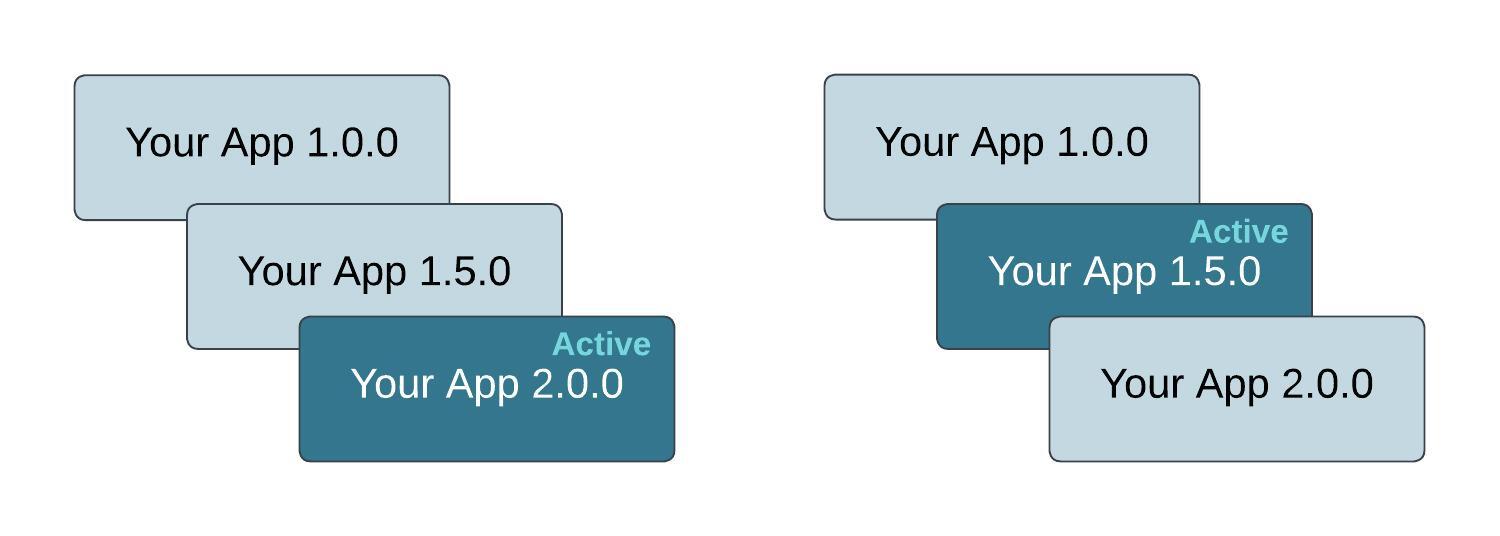
This separation lets you select any of your Run-time application versions and make it the default one. Default application versions are those that you promote to your Production environment so your end-users can interact with it.
Prerequisites and Supported Elements
With the 7.10.0 release, Application Versioning is available for configuring versioned applications, creating branches for updating configuration, publishing branches a new version, and merging changes into another version. This feature will continue to be enhanced in the coming releases. In this section you can learn about some prerequisites when using Application Versioning and what to expect in upcoming releases.
To learn more about the 7.10.0 release, view our 7.10.0 Platform Release Notes.
Prerequisites
There are a few considerations to make when using Unqork's Application Versioning:
| 1. | Application Versioning for the 7.10.0 release only supports module-type applications. It does not currently support workflow-type applications. |
| 2. | Once an application is converted to a versioned application, it cannot be reverted back into an unversioned application. |
| 3. | Library modules or dependencies from unversioned applications are not supported with versioned applications. Any shared modules must be added into another versioned application and reshared if needed in your application. |
| 4. | Application versioning can be enabled on an application-by-application basis. |
Supported Elements
Below are the core features of Unqork's Application Versioning feature and when you should expect to use them in your applications:
| Core Feature | Description | Supported Elements |
|---|---|---|
|
Published Application Versioning |
Create and run multiple versions of the same application in parallel, without disruption. |
|
|
Create, edit, and test multiple versions of the same application in parallel, without disruption. |
|
|
|
Merge multiple versions of applications into one another, as well as merge changes from one version to another. |
|
Enabling Application Versioning
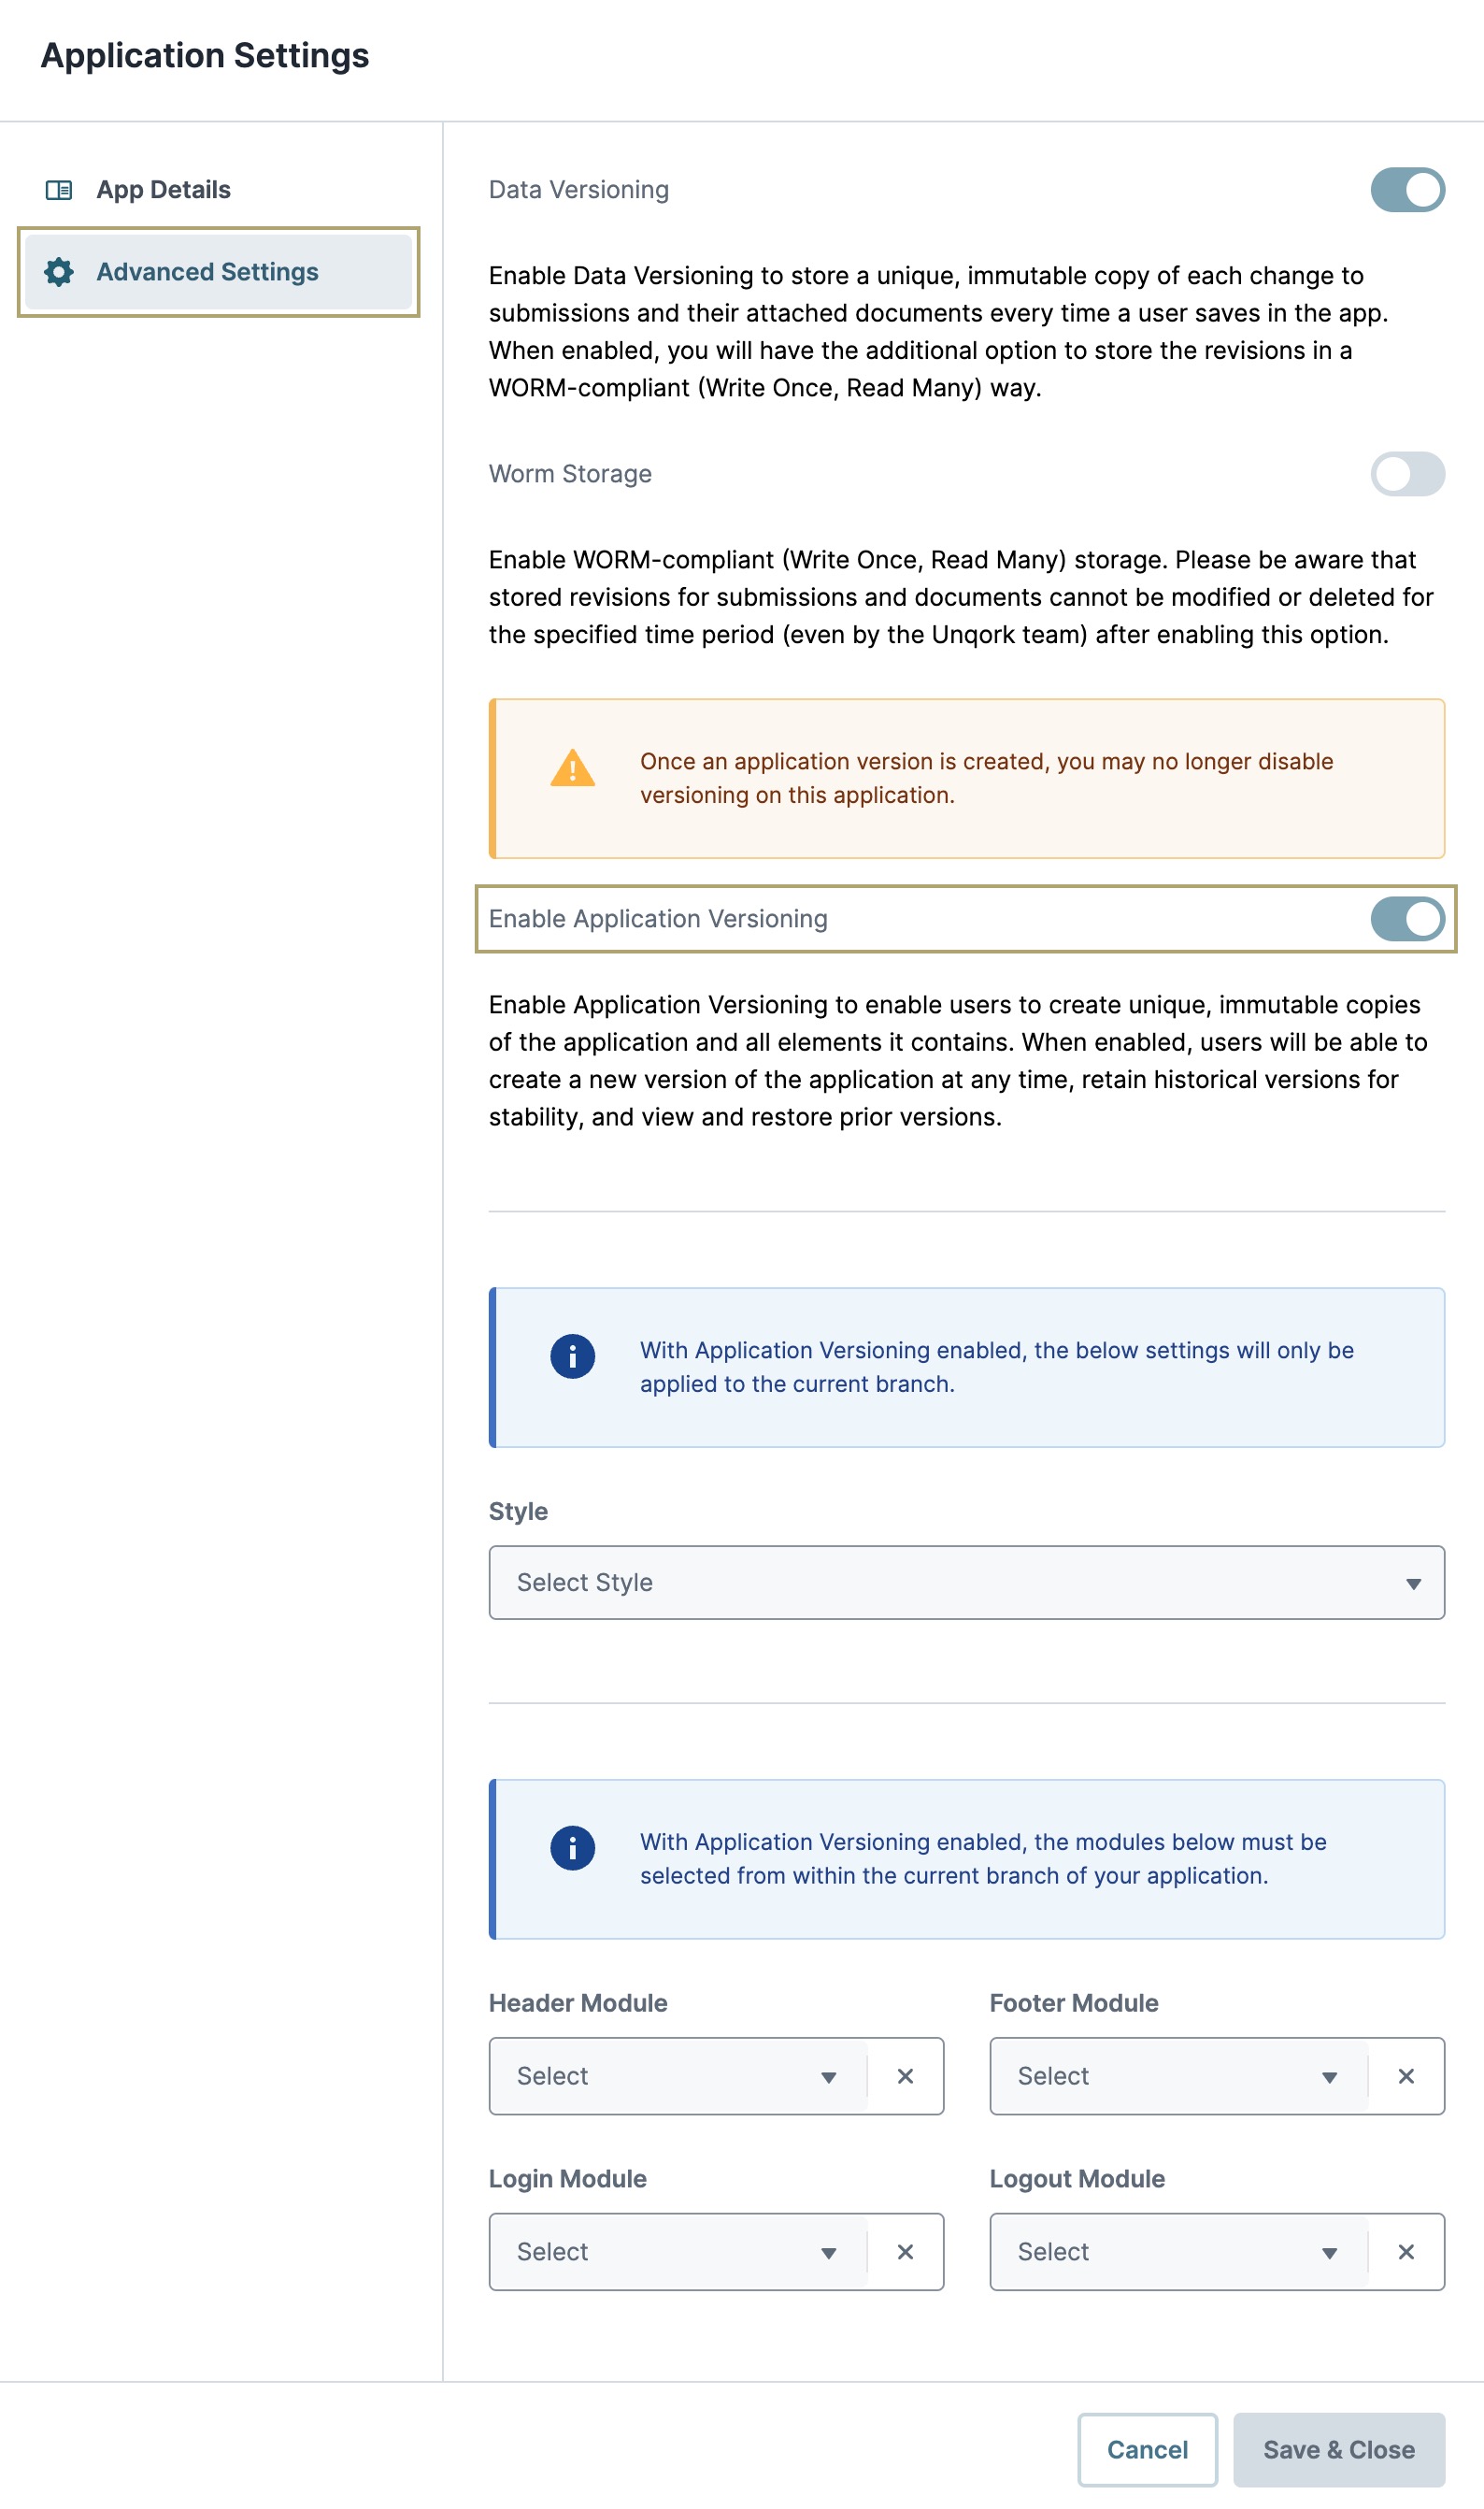
You can enable Application Versioning when creating a new application, or from the Application Settings of an existing one.
Once Application Versioning is enabled, you cannot disable it. And, the environment style and header, footer, login, and logout modules configured for a versioned application are only applied to the current branch.
Enabling Application Versioning for a New Application
|
To enable Application Versioning when creating a new application:
Enabling Application Versioning for an Existing ApplicationTo enable Application Versioning for your existing applications:
|
|
Application Dependencies
When enabling Application Versioning in an existing application, modules must not be available to the application as shared elements. All shared modules must be unshared and moved to a new application that acts as the sole owner of those modules. You can think of this new application as the child application. The child application can then be a dependency for the main (or parent) application, so it can access the child application's modules. Repeat this process until a child application exists without any dependencies. Once achieved, the lowest child application in the dependency tree can be versioned and act as a dependency by the parent application.
This model ensures that a given element executing in an application runs as the same version each time. For example, consider the image below. In this example, Applications A, B, C, and D are linked. So, Application A can only access elements of Application B. Application B can only access the elements of Application C. And, Application C can only access the elements of Application D.

Below are some other considerations when using dependencies:
Application Settings
|
Module Builder
|
Workflow Builder
|
Adding a Dependency
Once your child module is set, you can use it as a dependency in your parent module. To add or manage dependencies, you'll access the Manage Dependencies page of your parent application.
Both parent and child applications must have Application Versioning enabled, so you can select a child dependency in your parent application.
To add a dependency:
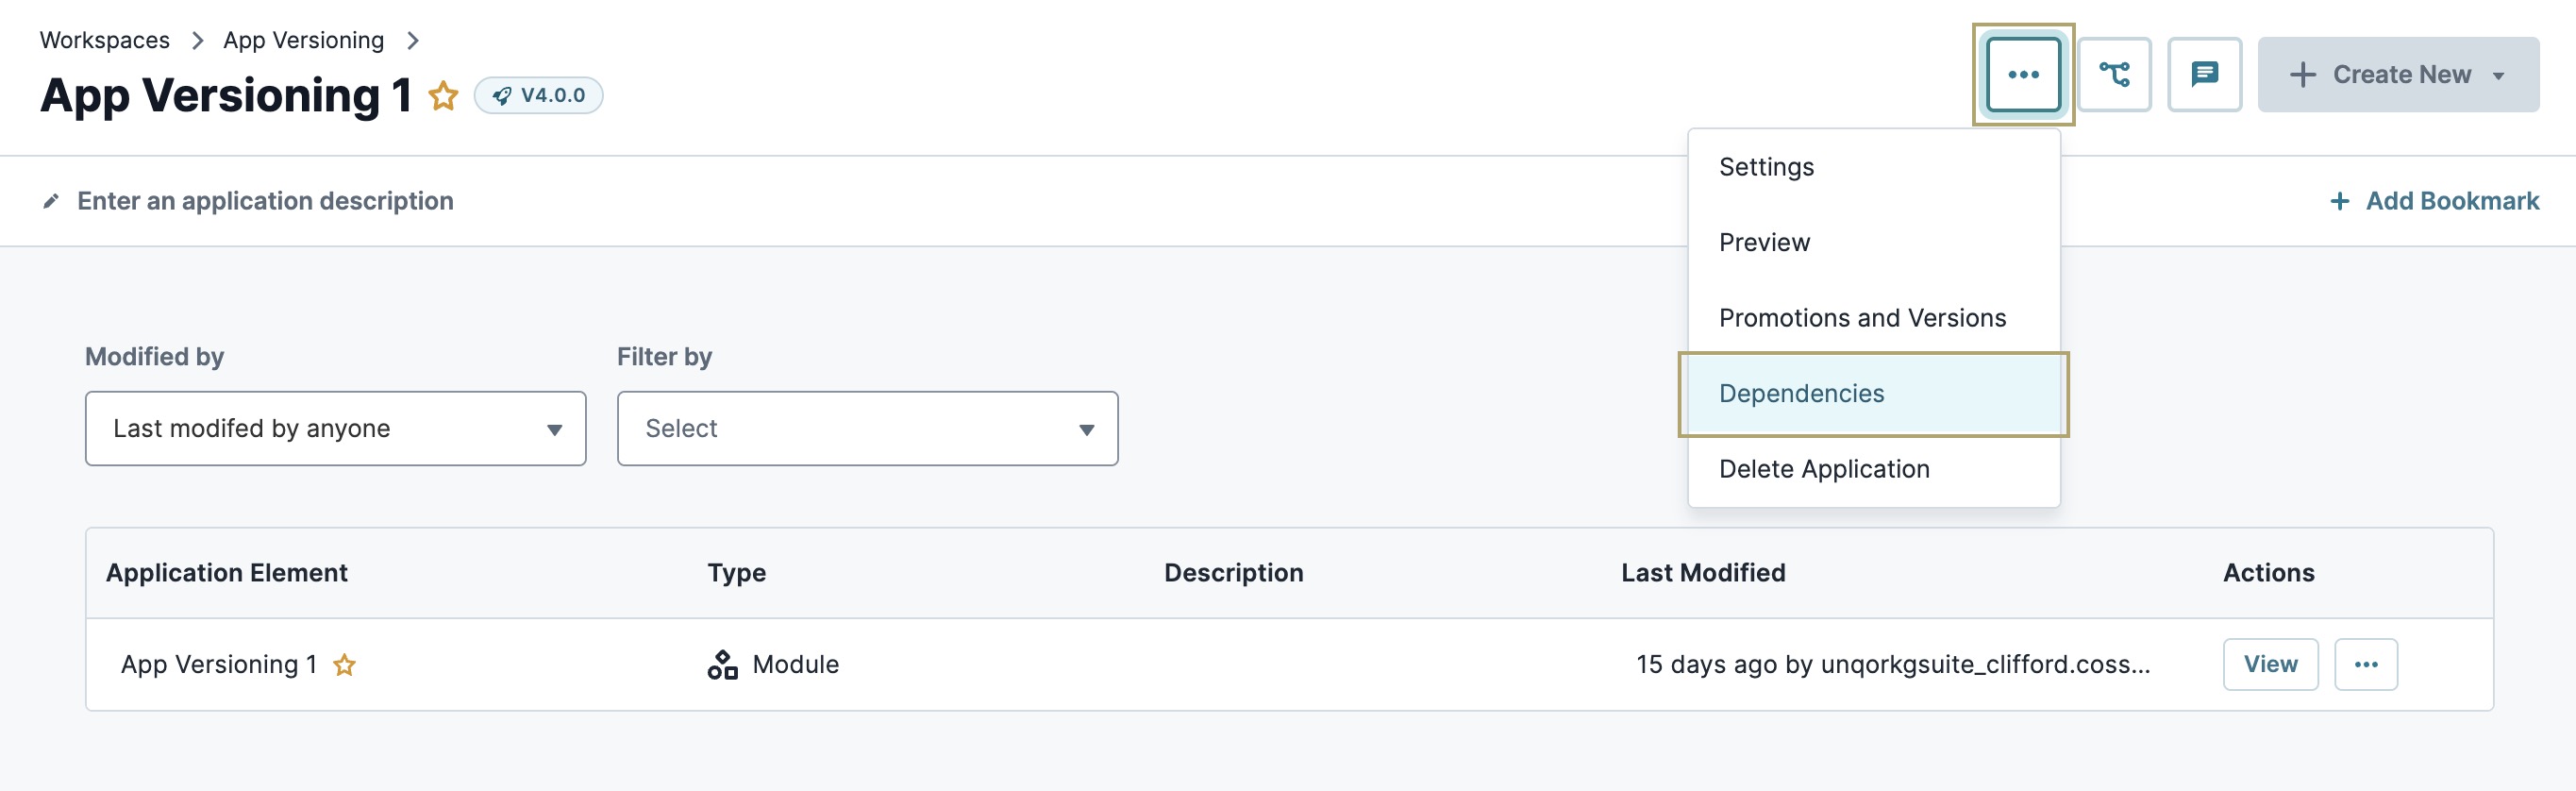
| 1. | Navigate your parent application. |
| 2. | At the top right of the page, click ··· (ellipsis). |
| 3. | Select Dependencies. You'll navigate to the Manage Dependencies page. |
| 4. | At the top right of the page, click + Add Dependencies. The Add Dependencies modal displays. |
| 5. | Click Select Version for the dependency you want to add. |
Only applications with Application Versioning enabled display in this modal. You can only select one dependency at a time.

| 6. | From the Select an Application Version drop-down, select the version of the dependency application you want to use. |
The most recent version is selected by default.
| 7. | Click Confirm Add Dependency. The browser returns to the Manage Dependencies page. |
| 8. | Repeat the process to add more dependencies to your parent application. |
Manage Dependencies
After adding dependencies to your parent application, use the Manage Dependencies page to view, update, and remove them. On this page, you'll see a table displaying the following information about the parent application's dependencies:
| Attribute | Description |
|---|---|
|
Name |
The name of the dependency application. |
|
Last Modified |
The date and time the dependency application was last modified. |
|
Version |
The selected version of the dependency application. |
|
Actions |
This column displays the available actions you can take on the dependency application. |
|
View App |
Lets you view the dependency application at the Application level. |
|
Update Version |
Lets you update which version of the dependency application you want to use. |
|
Remove |
Removes the dependency application from the parent application. |
Promotions and Versions
App Versioning allows promoting applications across environments. Do not promote to environments that have not received the 7.10 Unqork Designer Platform release.
Another crucial aspect of Application Versioning is viewing, managing, and promoting application versions. You'll manage these details using the Promotions and Versions page.
To access the Promotions and Versions page:
| 1. | Navigate to your versioned application. |
| 2. | At the top right of the page, click ··· (ellipsis). |
| 3. | Select Promotions & Versions. You'll navigate to the Promotions and Versions page. |
To the left of the page, you'll find three tabs:
| Tab | Description |
|---|---|
|
Promotion History |
Use this tab to promote application versions to another environment level and view your promotion history. |
|
Version History |
Use this tab to view and manage all branches and published versions for this application. |
|
Set Default Version |
Use this tab to adjust the default application version. This tab is useful when an issue occurs in your current default application version and you need to return to a previous one. |
Promotion History
Select the Promotion History tab to the left of the Promotions and Versions page to promote your application versions and view promotion history.
When promoting versioned applications, you must use this Application Versioning Promotion feature. Versioned applications cannot be promoted using the Release Management Dashboard tool.
To promote an application version:
| 1. | At the top right of the Promotion History page, click + Create New Promotion. The Create Promotion modal displays. |
| 2. | From the Select Application Version to Promote* drop-down, select an application version to promote. |
| 3. | From the Select Target Environment* drop-down, select the environment level where you want to promote the application version. |
Only the next sequential environment level is available.
To learn more about Unqork environment levels, view our Unqork Promotions Order article.
| 4. | (Optional) Set Make promoted application version(s) the default version(s) on the target environment. to (checked) to make this application version the default version at the promoted environment level. |
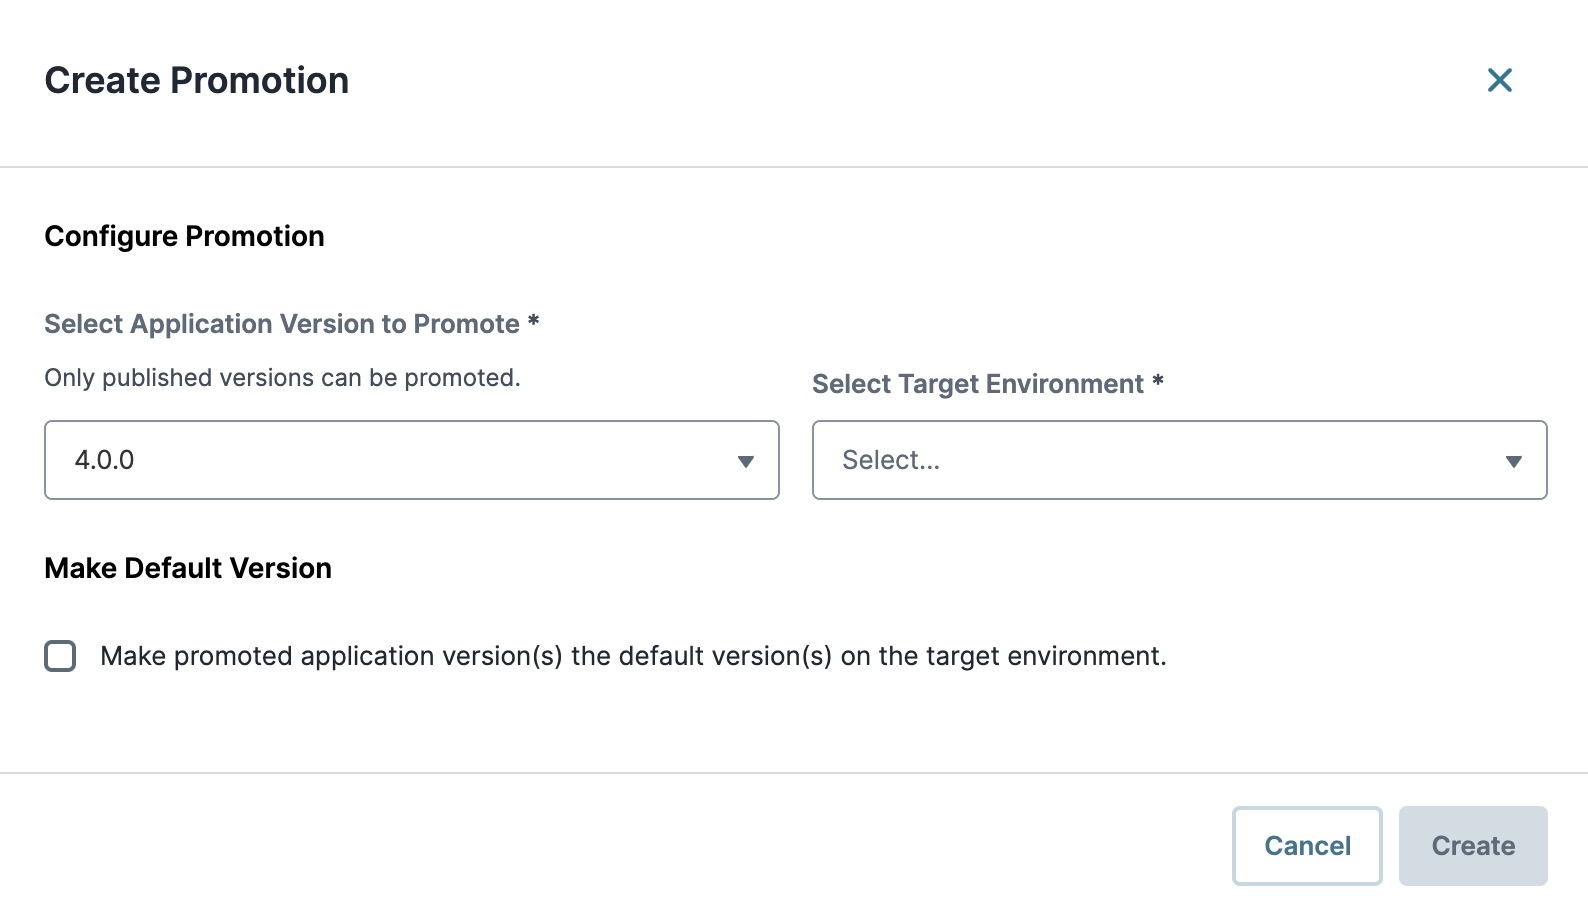
| 5. | Click Create. |
If you attach a Data Model to a module, that Data Model will also be promoted.
Version History
Select the Version History tab to view details about all branches and published application versions. This page includes two tabs that let you manage application versions and branches, and view them.
Published
The Published tab of the Version History page is where you can view all published application versions. You can search for a specific version number, view details about the version, or view it at the Application level.
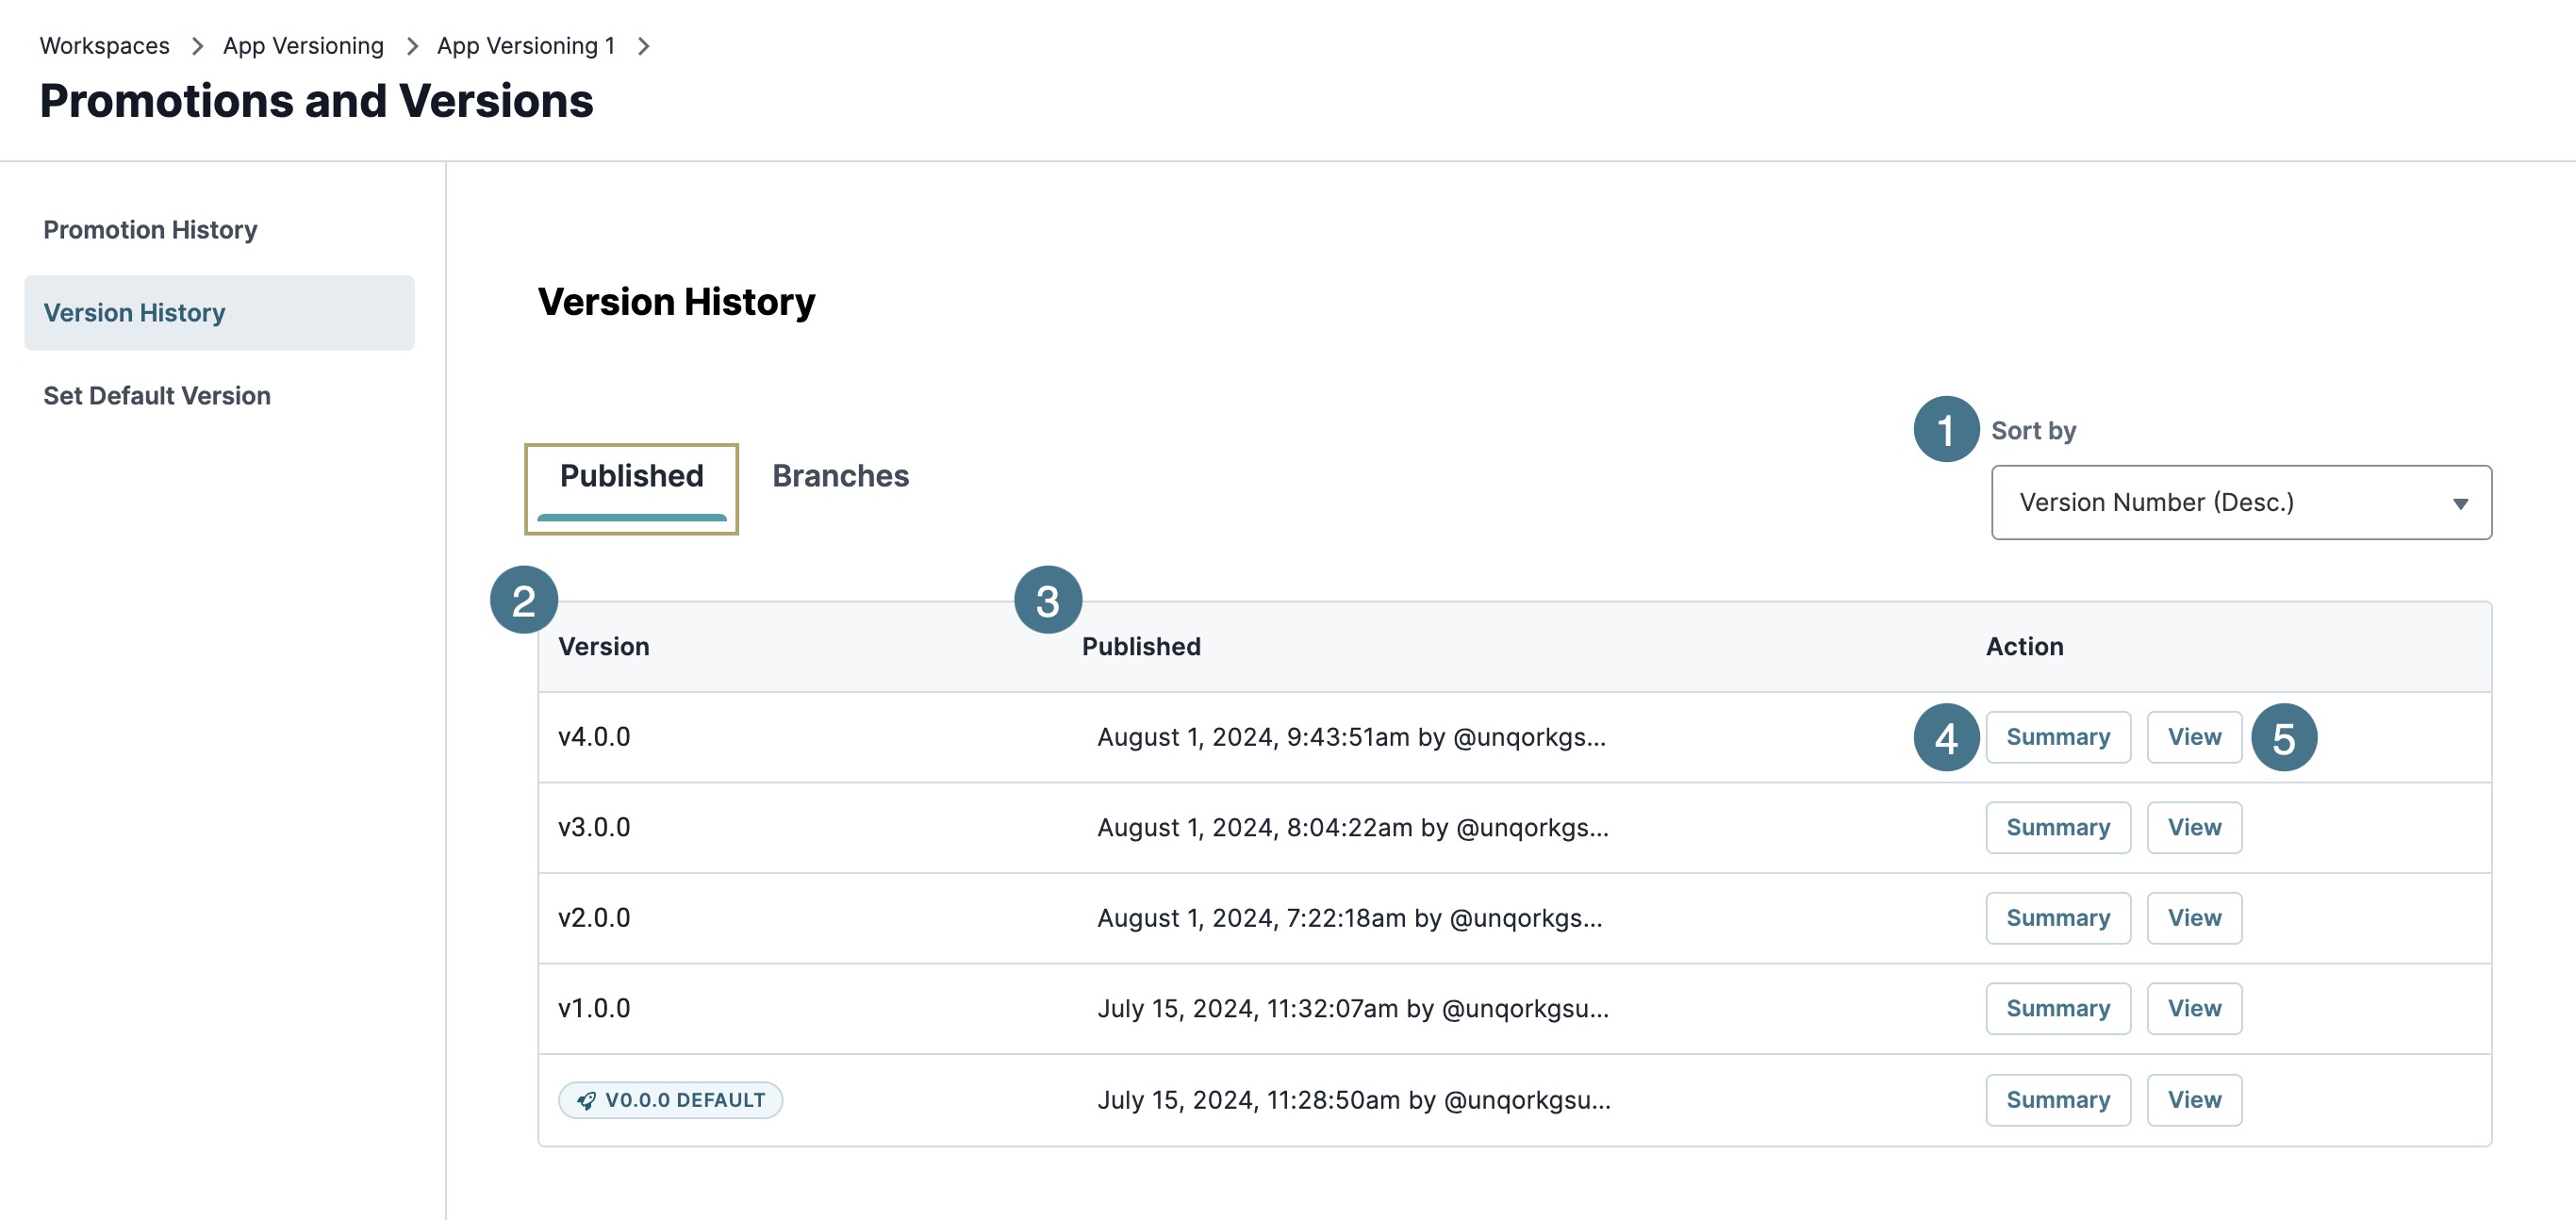
| Attribute | Description | |
|---|---|---|
|
1 |
Sort By |
Use this drop-down to sort Published application versions. You can sort the table in the following ways:
|
|
2 |
Version |
The application version's number. |
|
3 |
Published |
The date and time the version was published, and the user that published it. |
|
4 |
Summary |
Click this button to review details about the application version in a modal. Click Close after reviewing the details. Summary details include:
|
|
5 |
View |
Click the View button to open the application version at the Application level. |
Branches
The Branches tab of Version History is where you can view all branches for this application. You can search for a specific version number the branch is based on, view details about the branch, or choose to use it.

| Attribute | Description | |
|---|---|---|
|
1 |
Search |
Enter or select a version number to search for a specific branch that it's based on. |
|
2 |
Sort By |
Use this drop-down to sort branches. You can sort the table in the following ways:
|
|
3 |
Branch Name |
The branch's name. |
|
4 |
Based on Version |
The application version number that the branch is based on. |
|
5 |
Last Modified |
The date and time the branch was last modified, and the user that modified it. |
|
6 |
Summary |
Click this button to review details about the branch in a modal. Click Close after reviewing the details. Summary details include:
|
Set Default Version
Select the Set Default Version tab to view the current default version and select a different version to act as the new default. Default application versions are those that you promote to your Production environment so your end-users can interact with it.
This option is useful in the following ways:
-
When an issue occurs in your current default application version and you need to return to a previous one to avoid disrupting the end-user experience.
-
When an issue was corrected and published as a new version. You can set that corrected application version as the default version to ensure the end-user is interacting with the fixed application version.
To learn more about creating and publishing application versions, view our How to: Create and Publish an Application Branch article. To learn more about merging fixes to an application version, view our How to: Merge an Application Branch article.
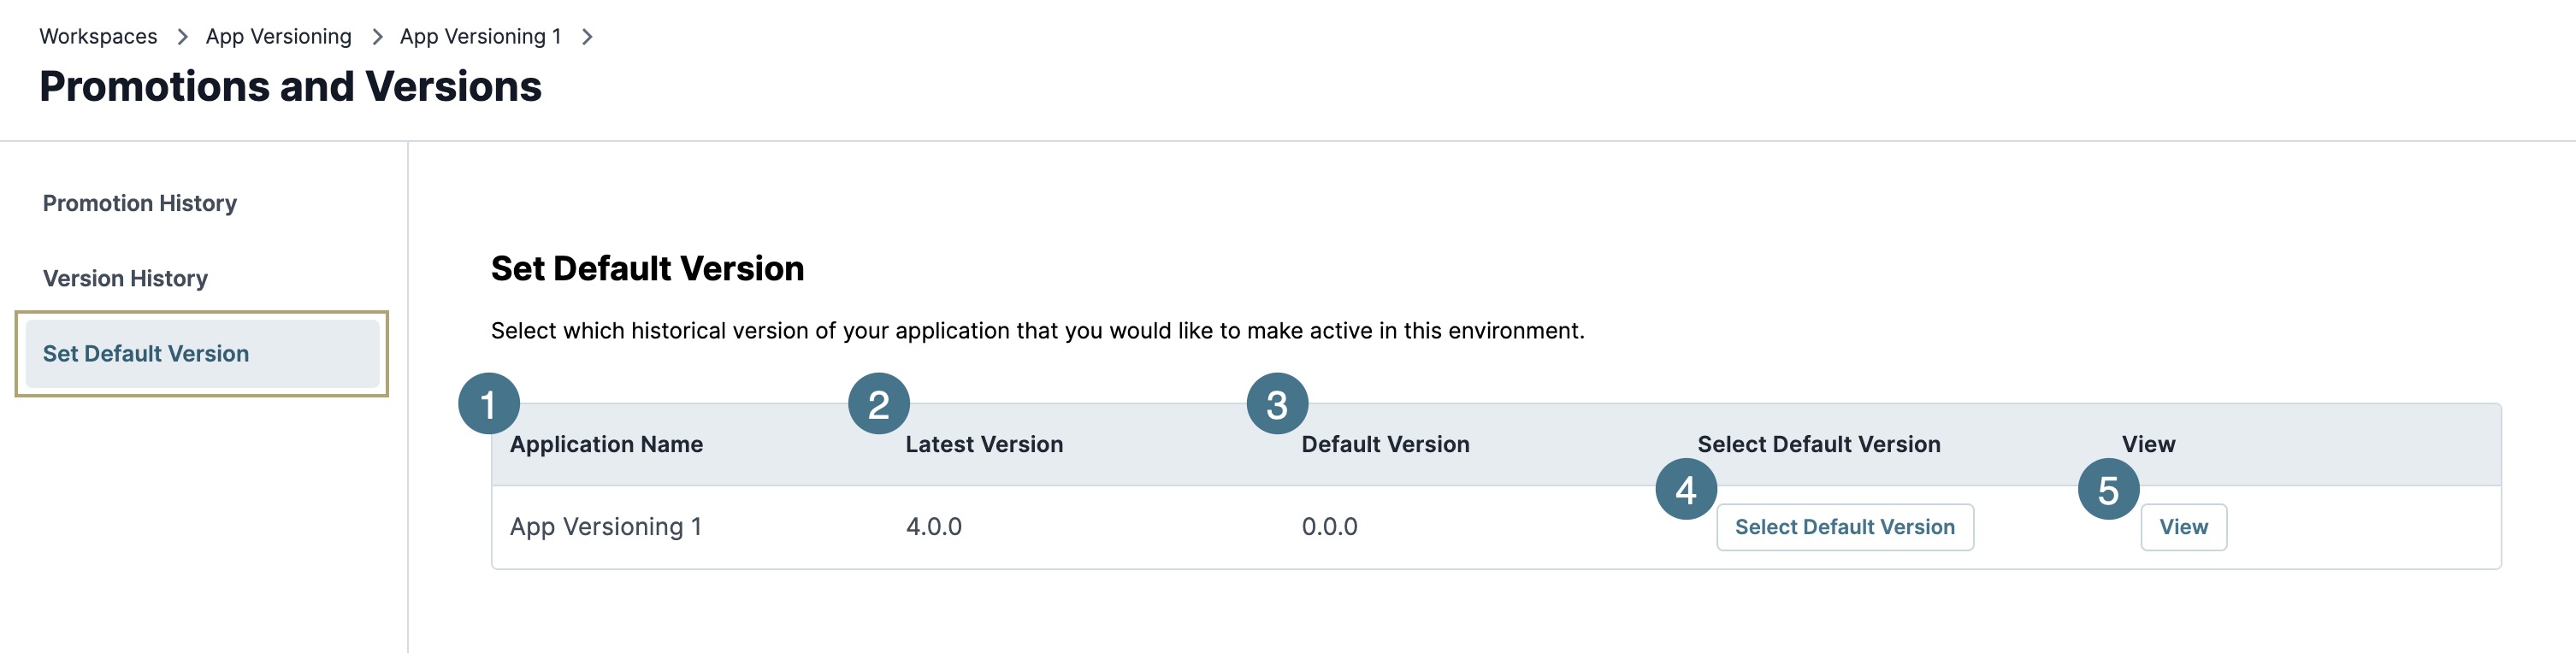
| Attribute | Description | |
|---|---|---|
|
1 |
Application Name |
The versioned application's name. |
|
2 |
Latest Version |
The version number of the most recent application version. |
|
3 |
Default Version |
The current default application version. |
|
4 |
Set Default Version |
Click this button to select a different default application version in a modal. After selecting a new version from the Select an Application Version drop-down, click Confirm. |
|
6 |
View |
Click the View button to open the application version at the Application level. |
Best Practices
The following best practices help you to understand the versioning processes for new applications in your Staging environment and those in your Production environment.
Creating Your First Application Version
It's important to always create application versions in your Staging environment. That way, you can take advantage of Unqork's environment levels to standardize an efficient software development life cycle. After configuring an application in Staging, create a version that you can test in your UAT and QA environments. Then, promote it to your Production environment level.
Below is a general scenario illustrating the best practices when using Application Versioning with environment promotions:
Making Changes to an Existing Production Release
When you update an application that already exists in your Production environment, you must always begin with that version in Staging. Application Versioning makes it easy to create an updated version of the application and retain the older versions simultaneously. Create a new version of the application in Staging and follow the normal promotion processes.
Below is a general scenario illustrating the best practices for updating an application and promoting it:
Hotfixes and Patches
Let's say you have a module in your versioned application that includes a Vega Table component that displays a Market Summary spreadsheet for vehicle insurance. It includes sorting and filtering logic that lets end-users easily locate relevant information.
Your team recently added the ability for end-users to add a new row to the table, so they can dynamically enter values. The functionality was built in your Staging environment and tested in QA and UAT. After promoting to your Production environment, the button doesn't work. To prevent disruption and multiple support tickets for a known issue, revert the Production application version to the previous one. That way, end-users won't see the nonfunctional button and your development team can explore the issue.
To learn more about promotion orders at Unqork, view our Unqork Promotions Order article.
Access your versioned application in your Production environment level and set a previous version, or one that you know functions correctly, as the default version. Your end-users can automatically begin using the functioning application version without any repromotions required. Following typical SDLC standards, your team can return to the new functionality created in the Staging environment, create a new branch, fix the issue, publish, test, and promote it to Production.
To learn more about setting default application versions, view the Set Default Version section of this article.
Styles and Managed Assets
Styles and managed assets are stored in an S3 bucket. Each time you create a new application version, a new S3 bucket is created to store styles and managed assets for that version. That way, when you use a different application version, the correct styles and managed assets are used. Only the styles and managed assets that are part of the application are versioned. If the application uses styles and managed assets outside the application version, they will not be versioned.
Enabling Application Versioning on Existing Applications
Before enabling Application Versioning on existing applications, there are a few considerations to keep in mind:
| 1. | Ensure you understand the technical considerations outlined in this article. Also, please explore the demo videos and frequently asked questions provided on the Community Hub. |
| 2. | If your environment is on the 7.10.x release, you cannot enable Application Versioning on workflow-type applications. Support for workflow-type applications will be available in the 7.12.0 release. |
| 3. | Test Application Versioning on a new application before enabling it on an existing one. |
| 4. | As a team, discuss how your development flow will change with Application Versioning. |
| a. | Choose a branching strategy. |
| b. | Determine who is responsible for releases and promotions. |
| c. | Determine how you want to release and promote applications. For example, using a primary application for the entire workspace, multiple applications, and so on. |
| 5. | Ensure you modify your applications in the following ways: |
| a. | Add all dependencies for any imported application elements to your versioned application. |
| b. | Copy all Library module definitions into a new versioned application called Library, and add it as a dependency. |
| 6. | When promoting versioned applications, you must use the Application Versioning Promotion feature. Versioned applications cannot be promoted using the Release Management Dashboard tool. |
Previewing a Branch or Version in Express View
When previewing a module in Express View, do not use specific query parameters in the browser. For example, ?hello=hi.
Supported query parameters are the following:
-
context: This query parameter is used by many platform APIs to provide information about the branch or version where the API applies.
-
previewContext: Creators use this query parameter to help control the state of a versioned application.
