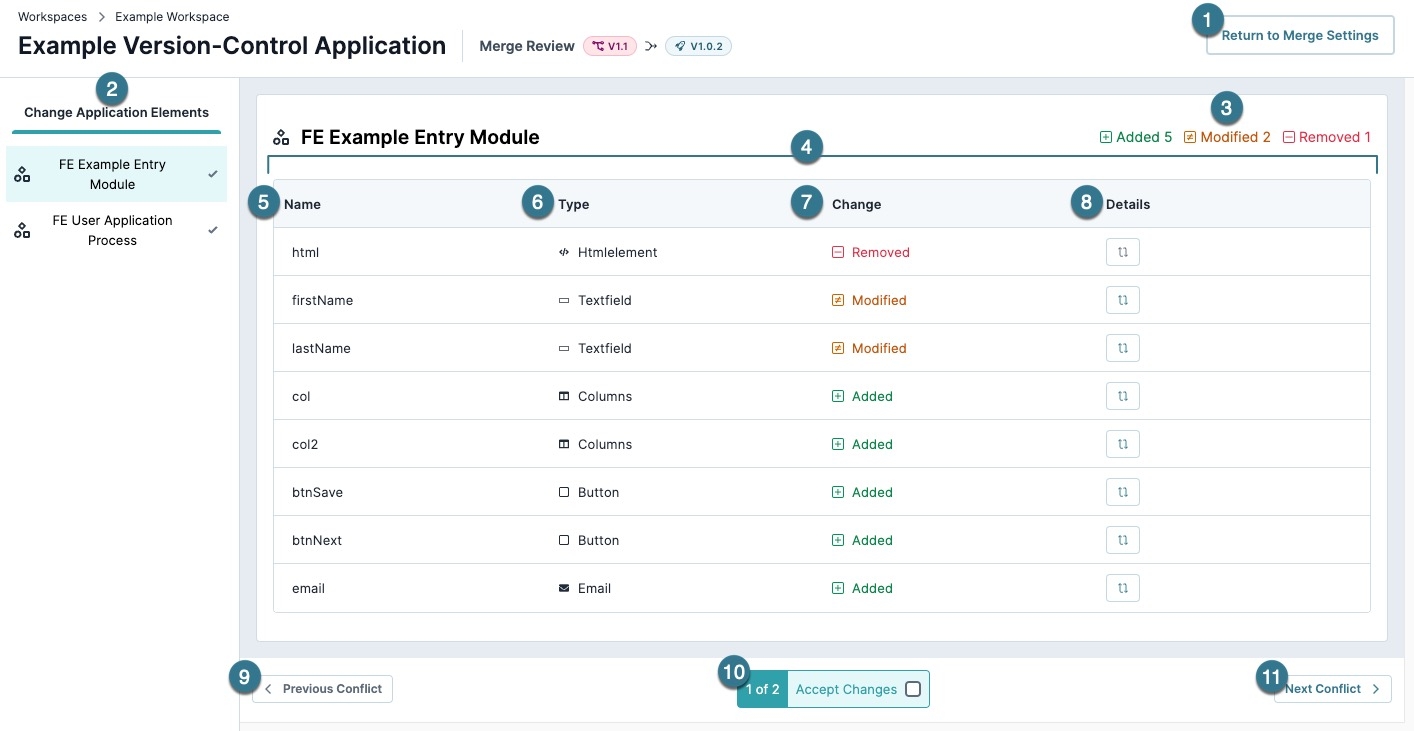
Merge Review is the process of reviewing changes of a branch using Unqork's Application Versioning tool. Creators use the Merge Review tool to see a detailed change list of application elements, and then accept or reject the changes. Once all changes are reviewed, Creators return to the Merge Tool page.
To learn more about the Merge Review page and how to review and accept changes, click the tabs below.
Understanding the Merge Settings Page
# | Setting | Description |
|---|---|---|
1 | Return to Merge Settings | Click to return to the Merge Tool page. Any changes accepted on the Merge Review page display in the Merge Tool page's Proposed Changes Accept column. |
2 | Change Application Elements List | This list displays all application elements that have changed in the branch. After reviewing an element, a checkmark displays next to the application element's name.
|
3 | Total Modified Elements | Displays the total elements changed and the type of change made. The following types include:
|
4 | Element Review List | Displays a list of elements changed in the branch. |
5 | Name | Displays the element's Property ID. |
6 | Type | Displays the element type. If the application element is a module, then this is typically a component. |
7 | Change | The change column indicates how the element was modified. Change types include:
|
8 | Details | Click the (View Diff) button to display a list of changes to the element. This button is disabled for Removed elements. The change list includes the following attributes:
|
9 | < Previous Conflict | Navigate to the previously changed application element. This button is disabled when the first element in the Changed Application Elements list is selected. |
10 | x of x Accept Changes ☐ | This button displays the current Application Element value and the total Application Elements that changed. For example, if two modules were changed in the branch, then the first half of the button displays as 1 of 2. To approve the changes to the application element, set Accept Changes ☐ to |
11 | Next Conflict > | Navigate to the next changed application element. This button is disabled when the last element in the Changed Application Elements list is selected. |
Reviewing and Accepting Changes
Use the Merge Review tool to inspect each element changed between the branch and target module. After all modified elements are inspected, accept the changes. Or, return to the Merge Settings page.
To access the Merge Review page, you must start the application merge process. Learn how in our Merge an Application Branch article.
To review changes on the Merge Review page:
In the Change Application Elements list, select a module for review. If the module exists in the branch and the target, then the Element Review list displays.
Application elements, like modules, do not display an Element Review list if they are added or removed in the branch.
In the Element Review list, review each row and verify each element's change meets your requirements.
(Optional) Inspect individual changes to Modified or Added elements by clicking the (View Diff) button.
To approve all changes to the application element, set x of x Accept Changes ☐ to
.png) (checked). If the application element does not meet your requirements, leave the box ☐ (unchecked).
(checked). If the application element does not meet your requirements, leave the box ☐ (unchecked).Unchecked application elements are not included in the merge. Verify all other changes will not affect the unchecked application element.
Click Next Conflict > to move onto the next application element and repeat the process.
After reviewing all application elements, click Return to Merge Settings.
The Merge Settings page displays, and elements with accepted changes display the
.png) (checked) symbol in the Proposed Changes list's Accept column.
(checked) symbol in the Proposed Changes list's Accept column.Continue the merge process detailed in our How to: Merge an Application Branch article.
