Library Elements are shared modules and Data Collections available to one or more applications in an environment. Creators assign access and usage to a shared element by specifying if it's available to the entire environment, a specific workspace, or application.
Library elements are not available with versioned applications.
To learn more about Library Elements, click on the buttons below:
Accessing and Navigating the Library Element Ellipsis Menus
Accessing the Library
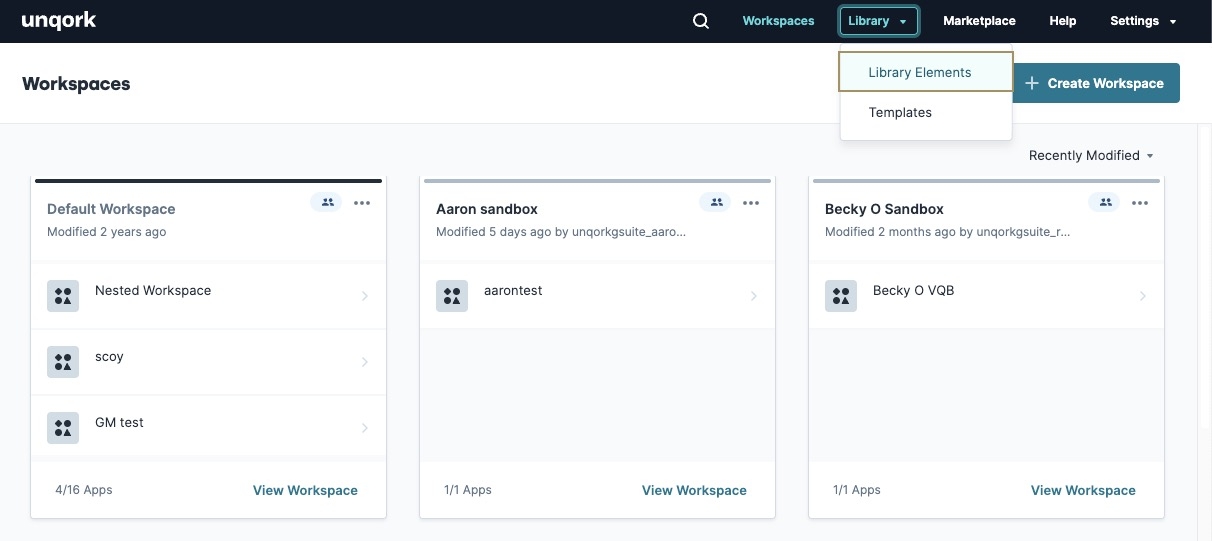
You can access the Library from any page of your Unqork environment. Click the Library link in the top menu bar and click Library Elements.
Navigating the Library
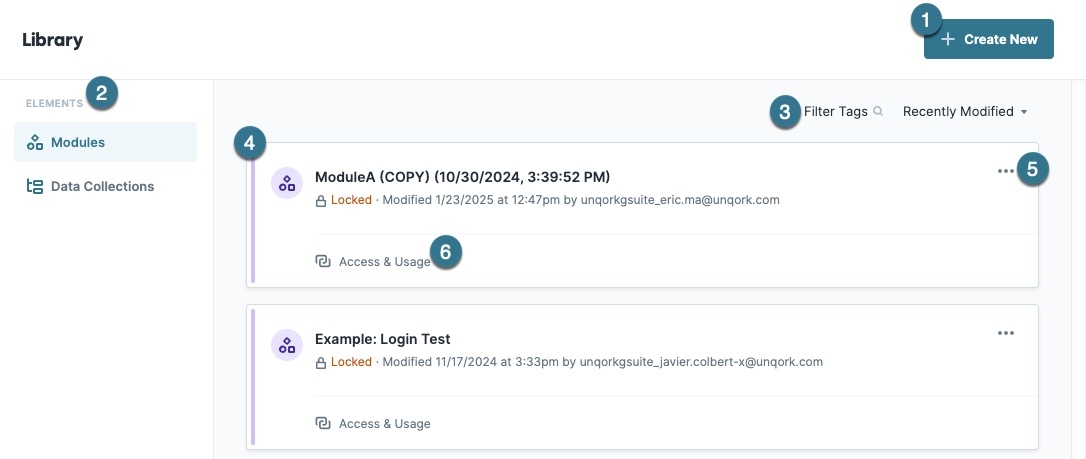
The Library Elements page displays a list of elements shared in the environment. From this page, Creators can view shared modules or Data Collections, and access each shared element's settings.
Library Elements have purple tiles, versus the traditional gray.
# | Setting | Description |
|---|---|---|
1 | + Create New | Create a shared module or Data Collection. Learn how to create shared elements in the Creating and Sharing a New Element section. |
2 | Elements | Displays elements of the chosen type. Elements include:
|
3 | Filter Tags & Recently Modified | Click Filter Tags to display a search field. Enter a value to search for the Shared Elements list. Search results are sorted by the Recently Modified value. Click Recently Modified to display a drop-down list of sorting methods. Sort Methods include:
|
4 | Shared Element List | Displays a list of element cards. Each card contains an element shared with the environment or workspaces. |
5 |
(Shared Element Settings) | Click to display a list of options. See the following sections for a detailed list of options:
|
6 | Access & Usage | Opens the Access & Usage settings modal for the shared element. |
Navigating the Module Library Elements Ellipsis Menu
In the Library Elements page, click the Modules tab to the left. Open the ![]() (ellipsis) menu to find the following settings:
(ellipsis) menu to find the following settings:
Option | Description |
|---|---|
| Lets you update the module's name, path, ID, and tags. These changes take effect everywhere you reference the module in your environment. |
| Opens your module in Express View. Express View displays your application as your end-user sees it. |
| Creates a copy of the module with all its information and settings. |
| Displays a pop-up where you control your element's shared location(s). |
Set Element Access & Usage | A drop-down where you select where to share your element:
|
Edit | To make any changes, set to
|
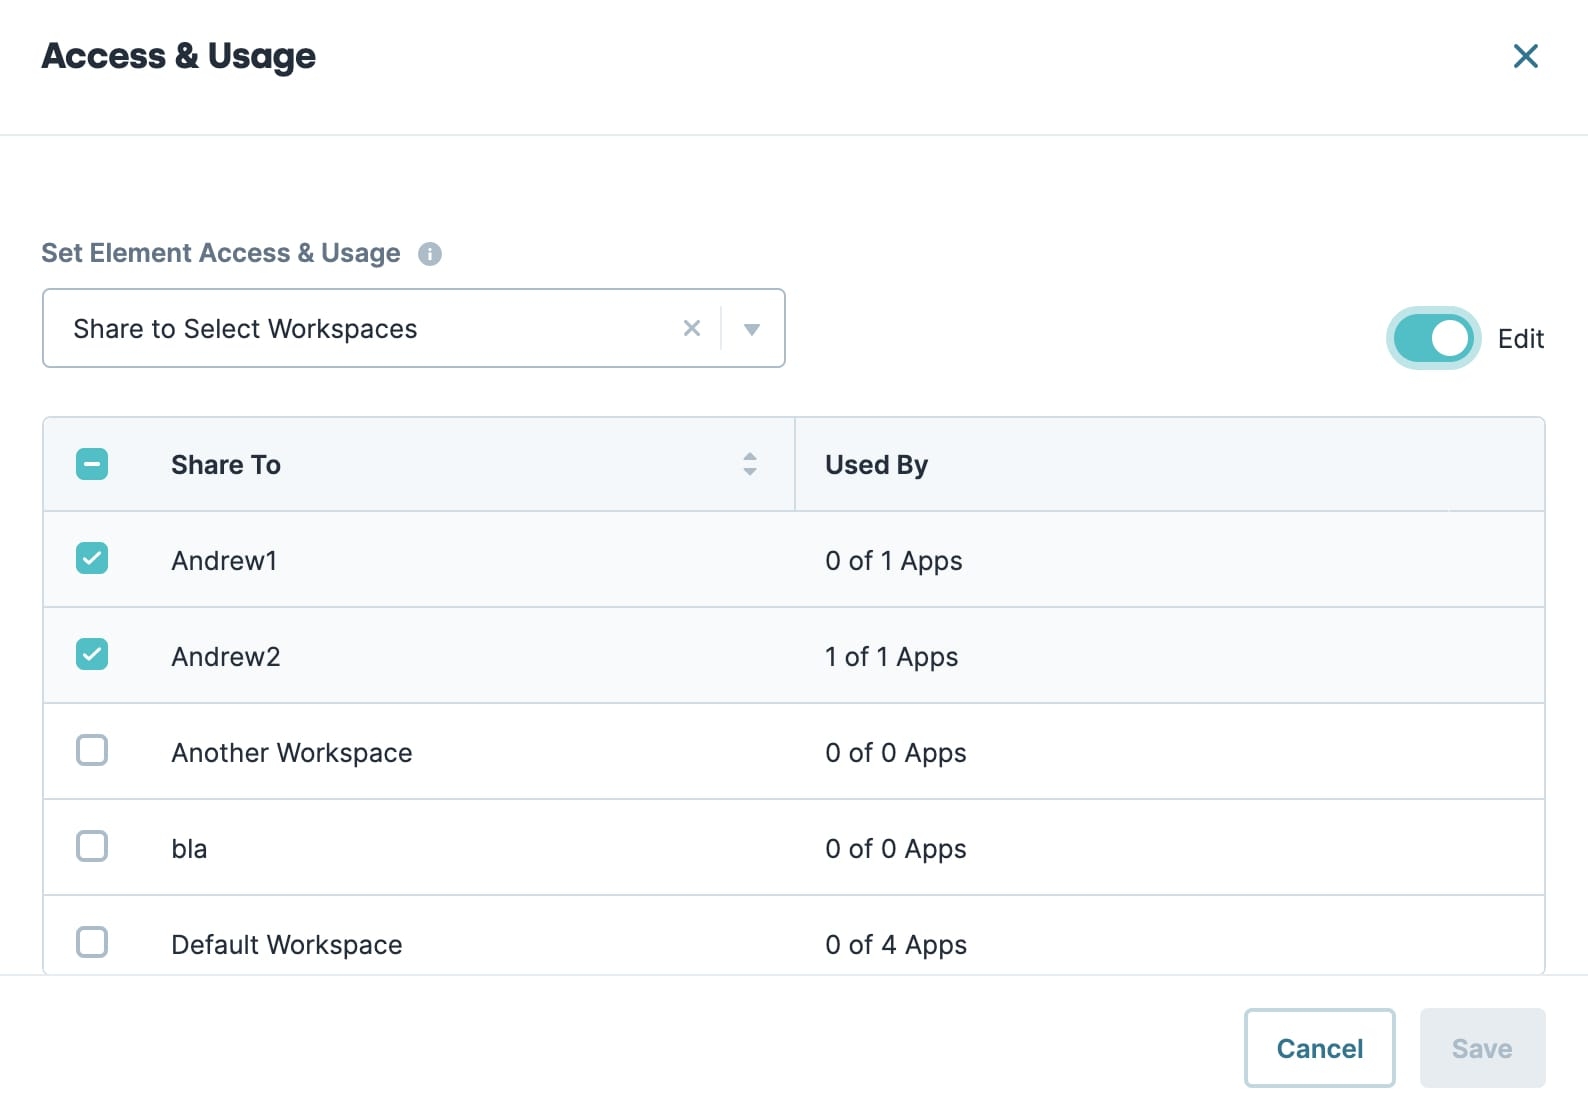
Share To | A list of all the workspaces available in your environment. If you select Share to Select Workspaces, use the checkboxes to select which workspaces you want to share your element. If you select Share to Environment, all workspaces are automatically selected. |
Used By | The number of apps in a workspace that currently use your Library Element. |
Delete | Delete a Library Element, removing it from the environment. You can only delete an element if no application uses that element. |
Navigating the Data Collections Library Elements Ellipsis Menu
In the Library Elements page, click the ![]() Data Collections tab to the left. Open the
Data Collections tab to the left. Open the ![]() (ellipsis) menu to find the following settings:
(ellipsis) menu to find the following settings:
Option | Description |
|---|---|
| Refreshes the Data Collection you're in. This is a good way to update changes to your Data Collection without refreshing the entire page. |
| Downloads your Data Collection as a .csv file. |
| Displays a pop-up modal where you control your element's shared location(s). |
Set Element Access & Usage | A drop-down where you select where to share your element:
|
Edit | A toggle to allow or disallow edits. To make any changes, set this toggle to
|
Share To | A list of all the workspaces available in your environment. If you select Share to Select Workspaces, use the checkboxes to select which workspaces you want to share your element. If you select Share to Environment, all workspaces are automatically selected. |
Used By | The number of applications in a workspace that currently use your Library Element. |
Delete | Delete a Library Element, removing it from the environment. You can only delete an element if no application uses that element. |
Creating and Sharing a New Module Element
If you don't have an existing module, you can create one from scratch in the Library. You can even share the Library Element as you create it.
To create and share a new module:
From the Library drop-down, select Library Elements.
In the top-right corner of the page, click + Create New.
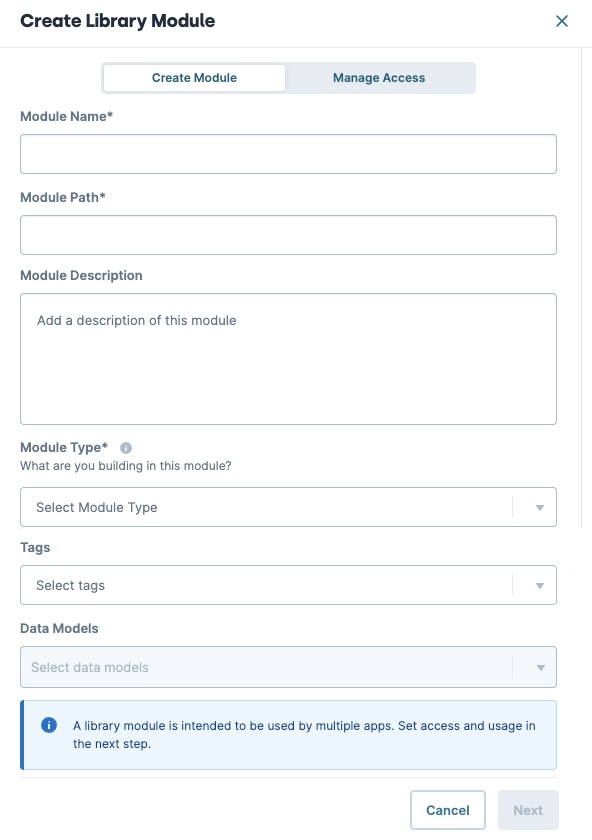
Enter a Module Name, Module Path, and Module Type. Module Description, Tags, and Data Models are optional.
Click Next.
Select where you want to share your element.
Click Create.
Now your new module displays in the Library Elements under Modules
Creating and Sharing a New Data Collection Element
Just like modules, you can also create and share new Data Collections from the Library.
To create and share a new Data Collection:
From the Library drop-down, select Library Elements.
To the left of the page, click Data Collections.
In the top-right corner of the page, click + Create New. The Create Data Collection page displays.
Configure your new Data Collection and its settings.
Close the window and return to the Data Collections page.
Refresh the page.
Now your new Data Collection displays in the Library Elements under Data Collections.
Share an Existing Element
If you know which element you want to share, it's simple to do from your workspace.
To add an element to the Library:
Open the workspace that contains your element.
From the Elements list, navigate to the element you want to add to the Library.
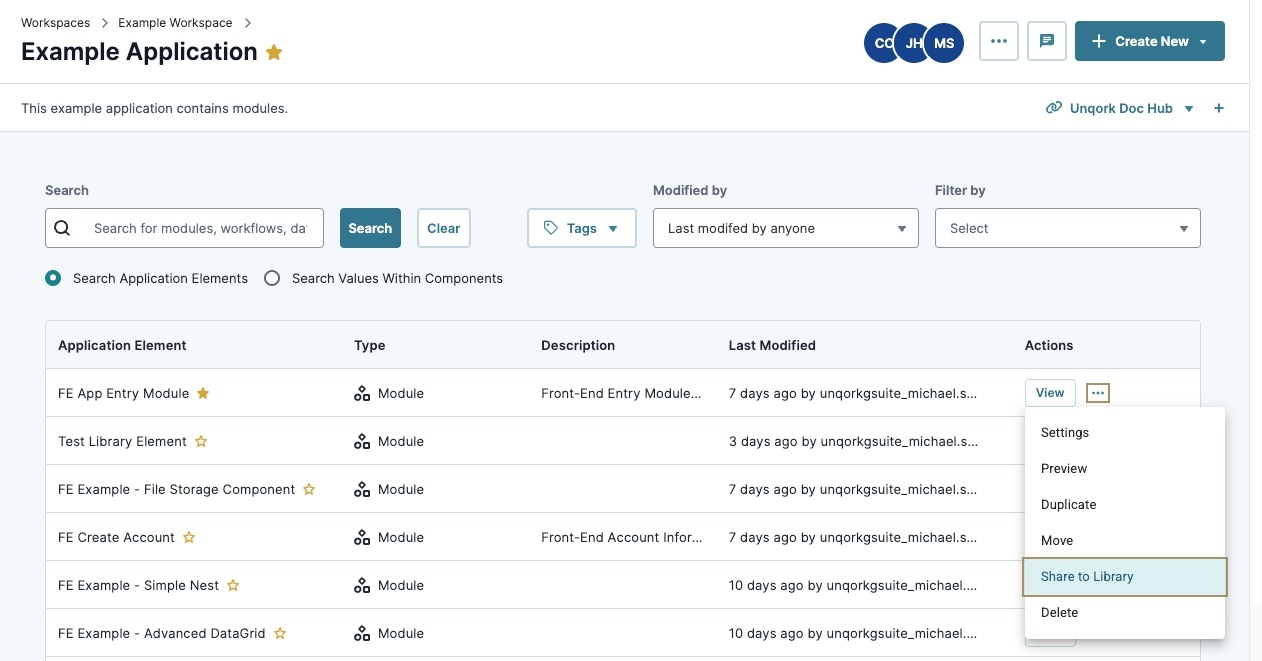
From the element tile's
.png) (ellipsis) menu, select Share to Library. The Share To Library displays.
(ellipsis) menu, select Share to Library. The Share To Library displays.Select the environment or workspaces where you want to share the element.
Click Share.
When you open the Library Elements page, your element is now in the list of Library Elements.
Sharing and Unsharing a Library Element
At any time, you can control your Library Elements at the workspace and environment level. But ensure you have the correct RBAC permission. You need the correct permission to make edits in the Access & Usage pop-up modal.
It's always important to be careful when changing or promoting Library Elements. Because you can add Library Elements to other workspaces and applications, changes can break those applications.
Sharing a Library Element
To edit an element's shared locations:
From the Library drop-down, select Library Elements.
Locate your Library Element.
In the element's tile, click Access & Usage.
Set Edit to
 (ON).
(ON).Select the workspace where you want to share your element.
Click Save.
Unsharing a Library Element
If you no longer want to share a Library Element, you can remove it from the Library. But, ensure you disconnect your Library Element from your applications before unsharing. If the element is only connected to one application, it lives there when you unshare it. If it's connected to more, you need to unshare it and choose where it should exist.
To unshare a Library Element from the Library:
From the Library drop-down, select Library Elements.
Locate the element that you want to unshare.
Click Access & Usage in the element tile.
Set Edit to
 (ON).
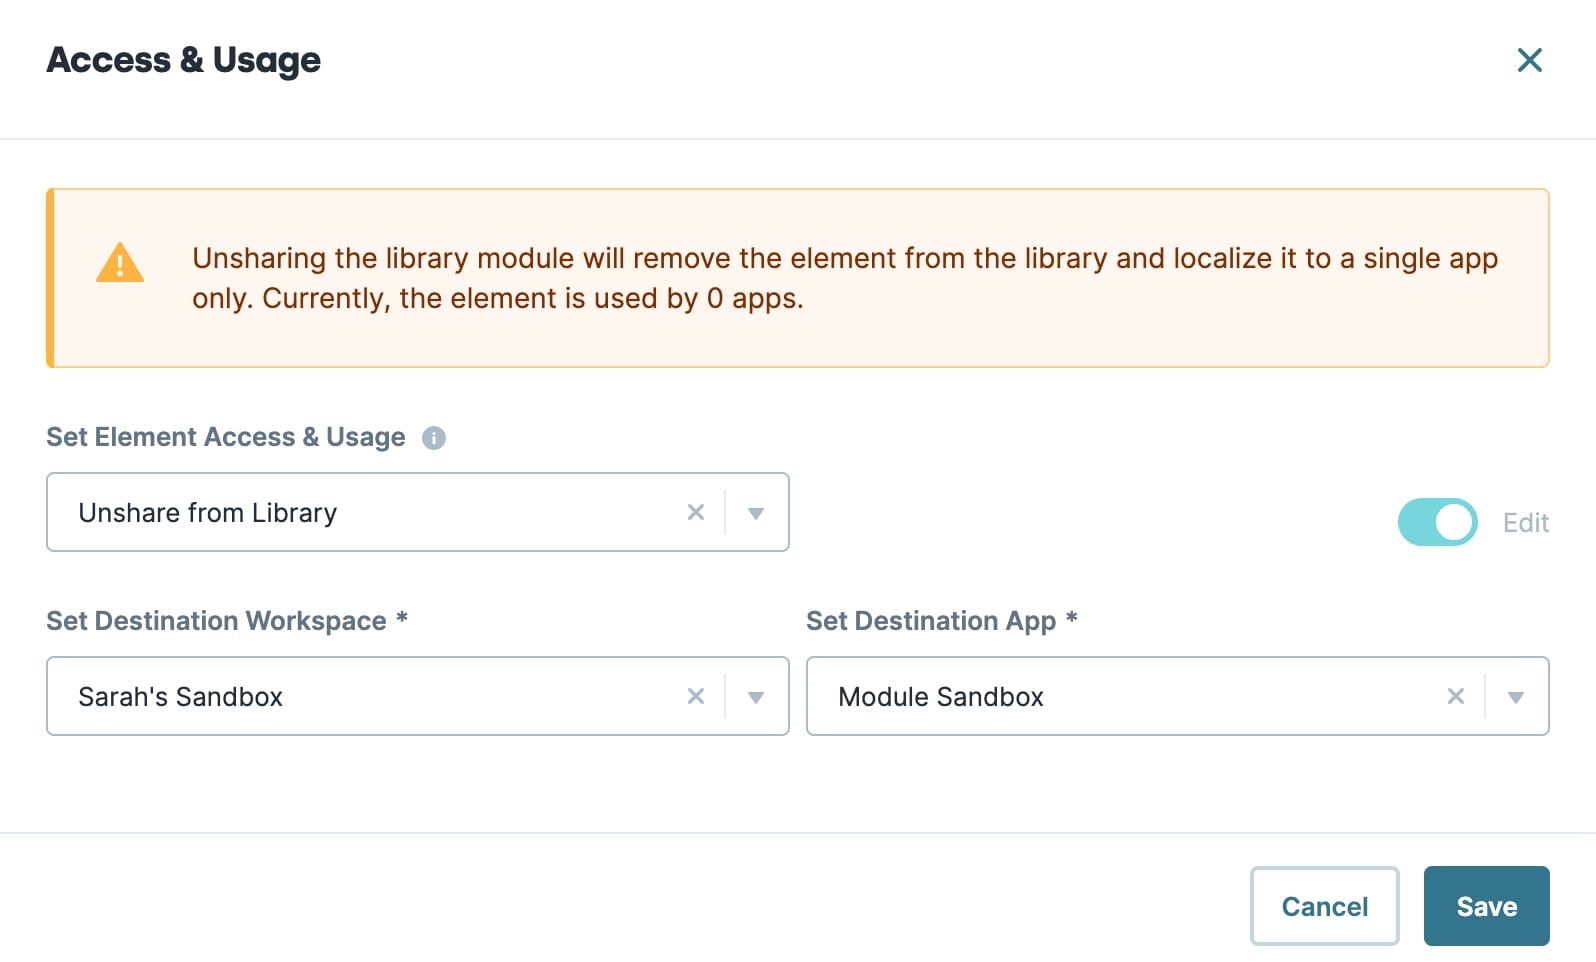
(ON).From the Set Element Access & Usage drop-down, select Unshare from Library.
From the Set Destination Workspace drop-down, select the workspace where you want the element to exist.
From the Set Destination App drop-down, select the application where you want the element to exist.
Click Save.
Deleting a Library Element
Sometimes, you might want to delete a Library Element if it becomes outdated or irrelevant. You can only delete an element if no application uses that element. Deleting a Library Element removes it from the environment.
To delete an element, unshare it from your applications. Then, follow these steps:
From the Library drop-down, select Library Elements.
Locate the element that you want to delete.
From the element tile's
.png) (ellipsis) menu, select Delete.
(ellipsis) menu, select Delete.Enter the element's full name to confirm you want to delete it.
Click Yes, Delete.
Overview
Library Elements are shared modules and Data Collections available to one or more applications in an environment. Creators assign access and usage to a shared element by specifying if it's available to the entire environment, a specific workspace or application.
Library elements are not available with versioned applications.
To learn more about Library Elements, click on the buttons below:
Accessing and Navigating the Library Element Ellipsis Menus
Accessing the Library
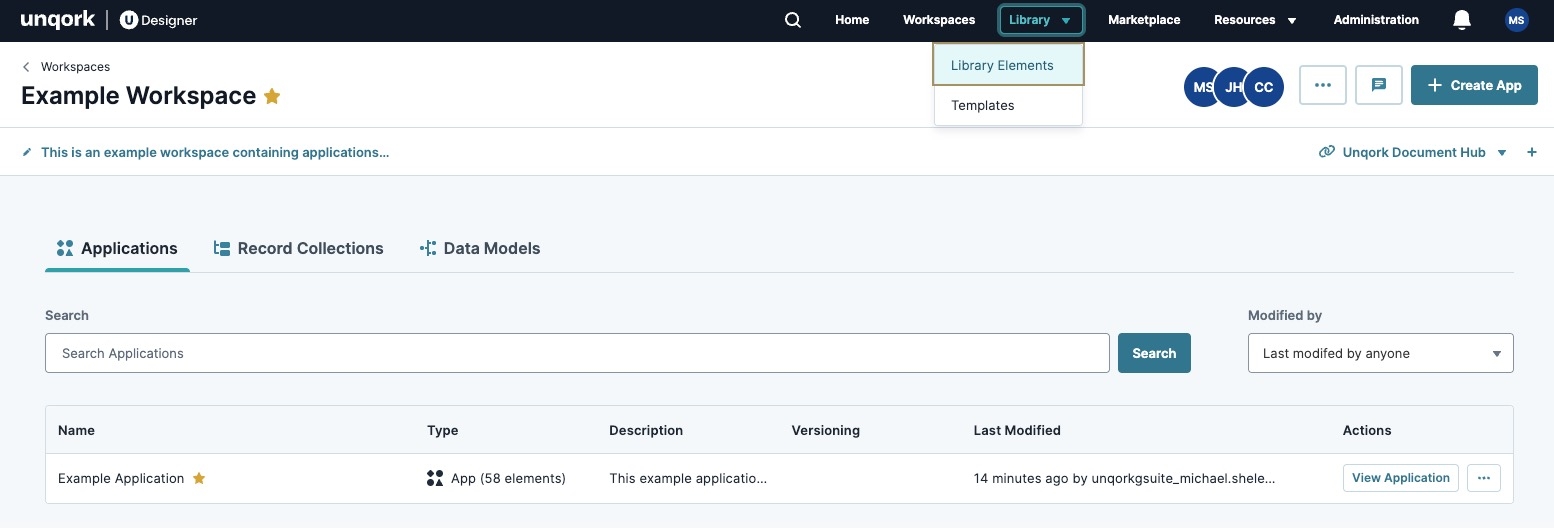
You can access the Library from any page of your Unqork environment. Click the Library link in the top menu bar and click Library Elements.
Navigating the Library
The Library Elements page displays a list of elements shared in the environment. From this page, Creators can view shared modules or data collections, and access each shared element's settings.
Library Elements have purple tiles, versus the traditional gray.
Setting | Description | |
|---|---|---|
1 | + Create New | Create a shared module or Data Collection. Learn how to create shared elements in the Creating and Sharing a New Element section. |
2 | Elements | Displays elements of the chosen type. Elements include:
|
3 | Filter Tags & Recently Modified | Click Filter Tags to display a search field. Enter a value to search for the Shared Elements list. Search results are sorted by the Recently Modified value. Click Recently Modified to display a drop-down list of sorting methods. Sort Methods include:
|
4 | Shared Element List | Displays a list of element cards. Each card contains an element shared with the environment or workspaces. |
5 | (ellipsis) (Shared Element Settings) | Click to display a list of options. See the following sections for a detailed list of options:
|
6 | Access & Usage | Opens the Access & Usage settings modal for the shared element. |
Navigating the Module Library Elements Ellipsis Menu
In the Library Elements page, click the Modules tab to the left. Open the ellipsis (···) menu to find the following settings:
Option | Description |
|---|---|
| Lets you update the module's name, path, ID, and tags. These changes take effect everywhere you reference the module in your environment. |
| Opens your module in Express View. Express View displays your application as your end-user sees it. |
| Creates a copy of the module with all its information and settings. |
| Displays a pop-up modal where you control your element's shared location(s). |
Set Element Access & Usage | A drop-down where you select where to share your element:
|
Edit | To make any changes, set to
|
Share To | A list of all the workspaces available in your environment. If you select Share to Select Workspaces, use the checkboxes to select which workspaces you want to share you element. If you select Share to Environment, all workspaces are automatically selected. |
Used By | The number of applications in a workspace that currently use your Library Element. |
Delete | Delete a Library Element, removing it from the environment. You can only delete an element if no application uses that element. |
Navigating the Data Collections Library Elements Ellipsis Menu
In the Library Elements page, click the ![]() Data Collections tab to the left. Open the ellipsis (···) menu to find the following settings:
Data Collections tab to the left. Open the ellipsis (···) menu to find the following settings:
Option | Description |
|---|---|
| Refreshes the Data Collection you're in. This is a good way to update changes to your Data Collection without refreshing the entire page. |
| Downloads your data collection as a .csv file. |
| Displays a pop-up modal where you control your element's shared location(s). |
Set Element Access & Usage | A drop-down where you select where to share your element:
|
Edit | To make any changes, set to
|
Share To | A list of all the workspaces available in your environment. If you select Share to Select Workspaces, use the checkboxes to select which workspaces you want to share you element. If you select Share to Environment, all workspaces are automatically selected. |
Used By | The number of applications in a workspace that currently use your Library Element. |
Delete | Delete a Library Element, removing it from the environment. You can only delete an element if no application uses that element. |
Creating and Sharing a New Module
If you don't have an existing module, you can create one from scratch in the Library. You can even share the Library Element as you create it.
To create and share a new module:
From the Library drop-down, select Library Elements.
To the left of the page, click Modules.
In the top-right corner of the page, click Create New.
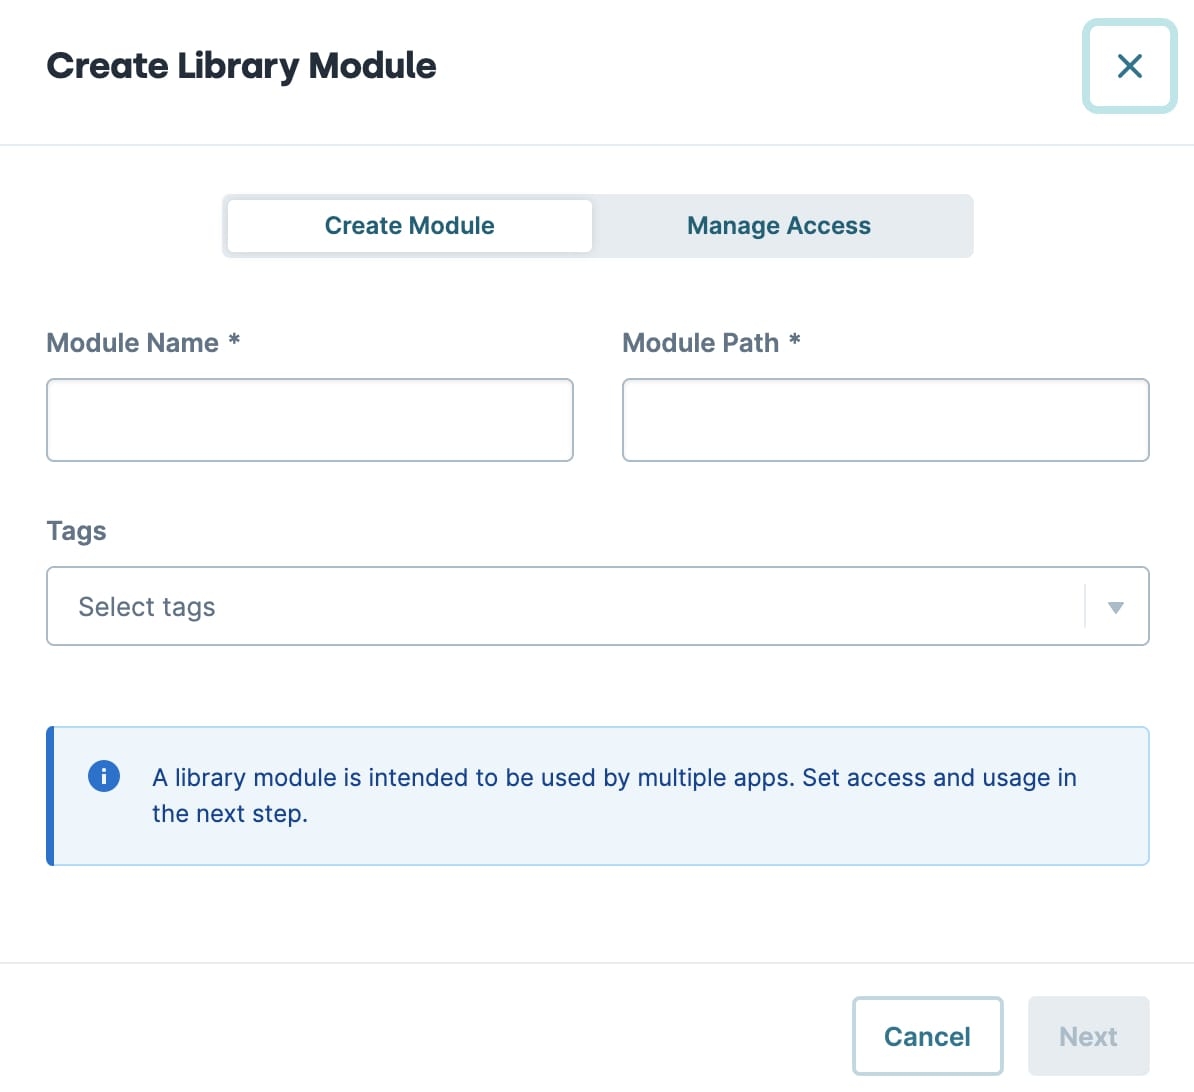
Enter a Module Name and Module Path. Tags are optional.
Click Next.
Select where you want to share your element.
Click Create.
Now your new module displays in the Library Elements under Modules.
Creating and Sharing a New Data Collection
Just like modules, you can also create and share new Data Collections from the Library.
To create and share a new Data Collection:
From the Library drop-down, select Library Elements.
To the left of the page, click
 Data Collections.
In the top-right corner of the page, click + Create New.
Configure your new Data Collection and its settings.
Close the window and return to the
 Data Collections page.
Refresh the page.
Now your new Data Collection displays in the Library Elements under Data Collections.
Adding an Existing Element to the Library
If you know which element you want to share, it's simple to do from your workspace.
To add an element to the Library:
Open the application that contains your element.
To the left of the page, select either Modules or
 Data Collections (depending on what you want to add).
From the element tile's ellipsis (···) menu, select Share to Library.
Select where you want to share your element.
Click Share.
When you open the Library Elements page, your element is now in the list of Library Elements.
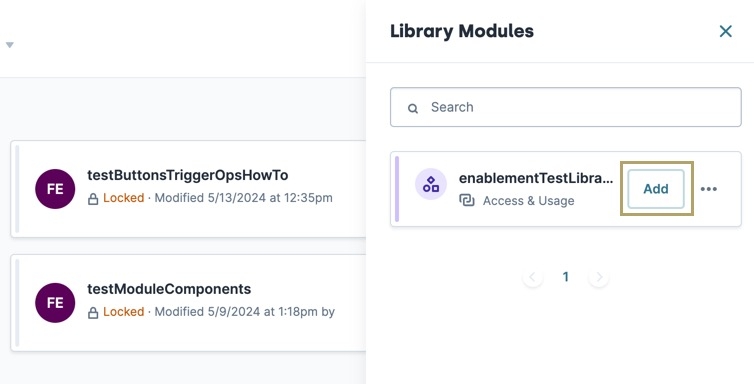
You can open the Library from your application, too. All you have to do is click the
icon in the top-right corner of the page. From there, you can quickly add elements to your Library. In the ellipsis (···) menu, you can Open in Editor, Preview, and Duplicate to App.
Sharing and Unsharing an Existing Library Element
At any time, you can control your Library Elements at the workspace and environment level. But, ensure you have the correct RBAC permission. You need the correct permission to make edits in the Access & Usage pop-up modal.
It's always important to be careful when changing or promoting Library Elements. Because you can add Library Elements to other workspaces and applications, changes can break those applications.
To edit an element's shared locations:
From the Library drop-down, select Library Elements.
Locate your Library Element.
Click Access & Usage in the element’s tile.
Set Edit to
 (ON).
(ON).Select the workspace where you want to share your element.
Click Save.
Unsharing a Library Element
If you no longer want to share a Library element, you can remove it from the Library. But, ensure you disconnect your Library Element from your applications before unsharing. If the element is only connected to one application, it lives there when you unshare it. If it's connected to more, you need to unshare it and choose where it should exist.
To unshare a Library Element from the Library:
From the Library drop-down, select Library Elements.
Locate the element that you want to unshare.
Click Access & Usage in the element tile.
Set Edit to
 (ON).
(ON).From the Set Element Access & Usage drop-down, select Unshare from Library.
From the Set Destination Workspace drop-down, select the workspace where you want the element to exist.
From the Set Destination App drop-down, select the application where you want the element to exist.
Click Save.
Deleting a Library Element
Sometimes, you might want to delete a Library Element if it becomes outdated or irrelevant. You can only delete an element if no application uses that element. Deleting a Library Element removes it from the environment.
To delete an element, unshare it from your applications. Then, follow these steps:
From the Library drop-down, select Library Elements.
Locate the element that you want to delete.
From the element tile's ellipsis (···) menu, select Delete.
Enter the element's full name to confirm you want to delete it.
Click Yes, Delete.

.png) Settings
Settings
