The Panel component creates self-contained sections or pages in modules, and acts as a storage unit for other components. You can also use Panel components to help with navigation, create pop-up modal, or display components from other modules.
Panel components are important when used in conjunction with other components. For example, the Modal setting turns the component into a pop-up modal when triggered. Panel components are necessary when configure Navigation components because the Navigation component uses them as each page of your module.
You can also add Panel components inside other Panel components, nesting them as sub-sections inside larger sections.
You'll find the Panel component in the Display & Layout group to the left of the Module Builder.
About the Configuration Window
To learn more about general component settings and those that display when a component is associated with Data Models, view our General Component Settings article.
Display Settings
Contextual Help
Setting | Description |
|---|---|
Description | An internal description of what this panel's purpose is. Does not display in Express View. |
Default State Options
Setting | Description |
|---|---|
Accordion | Allows the end-user to minimize and maximize the Panel component. A plus (+) or minus (-) symbol displays to the right of the Panel component in Express View. By default, this setting is |
Collapse Content | Setting this Collapse Content toggle to By default, this setting is |
Enable Scrollspy | Scrollspy is a jQuery plugin that lets end-users return to a specified component in Express View. When set to For Scrollspy to work correctly, you must also configure a Content component in your module. In the Content component, enter: By default, this setting is |
Vertical Offset | The number of pixels you want to offset the Scrollspy data from the top of the screen. This setting is useful when you want to take into account a fixed header on your screen. |
Disable Panel | Prevents end-users from interacting with or editing the input field in Express View. When the end-user hovers over the field, their cursor changes to alert them to the status change. By default, this setting is |
Hide Panel | Hides the Panel component and all components inside it from the end-user. Use this setting instead of hiding each component. By default, this setting is |
Display - Interaction Type
Panel
The Panel setting displays the Panel component inline with the rest of the module, and is the default setting.
Modal
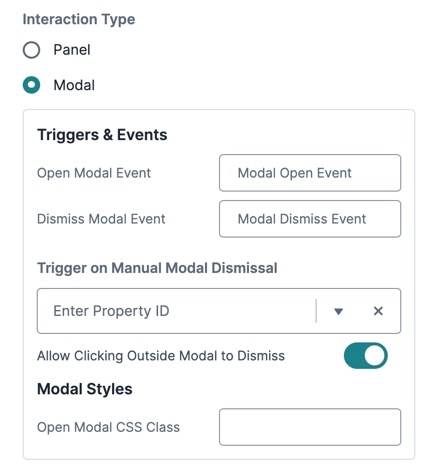
The Panel becomes a Modal when triggered by a logic component. The Panel remains hidden until triggered.
In Centauri (v1.0), modal stack on top of one another when a new one is opened. In Vega (v2.0), the most recent modal replaces the current one.
Triggers & Events
Some logic output events like
dynamicRefreshandtrigger, will not execute until the modal is opened at least once.
Setting | Description |
|---|---|
Open Modal Event | Lists the event that opens the modal. This event is triggered by components like Decisions, Initializer, or Plug-In components. |
Dismiss Modal Event | Lists the event that dismisses or closes the modal. The modal closes without saving changes made to its internal state. |
Trigger on Manual Modal Dismissal | The Property ID of the component to trigger when the Panel component's modal is manually dismissed. You can dismiss the Panel component's modal by closing it. If enabled, you can also dismiss by clicking outside of the modal. |
Allow Clicking Outside Modal to Dismiss | Allows you to click anywhere outside of the pop-up modal to close it. By default, this setting is This setting only applies to clicks. If this setting is disabled, the end-user can still use the Esc button on their keyboard to exit the modal. |
Modal Styles
Setting | Description |
|---|---|
Open Modal CSS Class | Specifies the on-open custom CSS class applied to the modal. |
Display - Imported and Dynamic Content
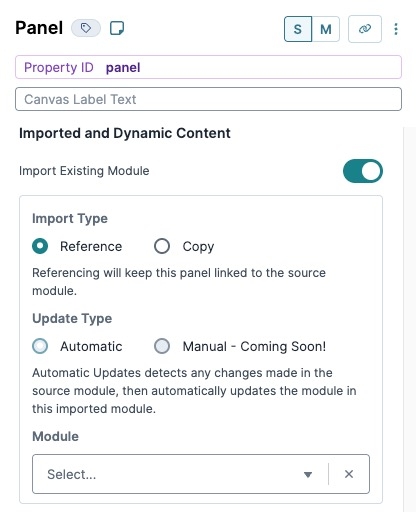
Import Existing Module
Setting | Description |
|---|---|
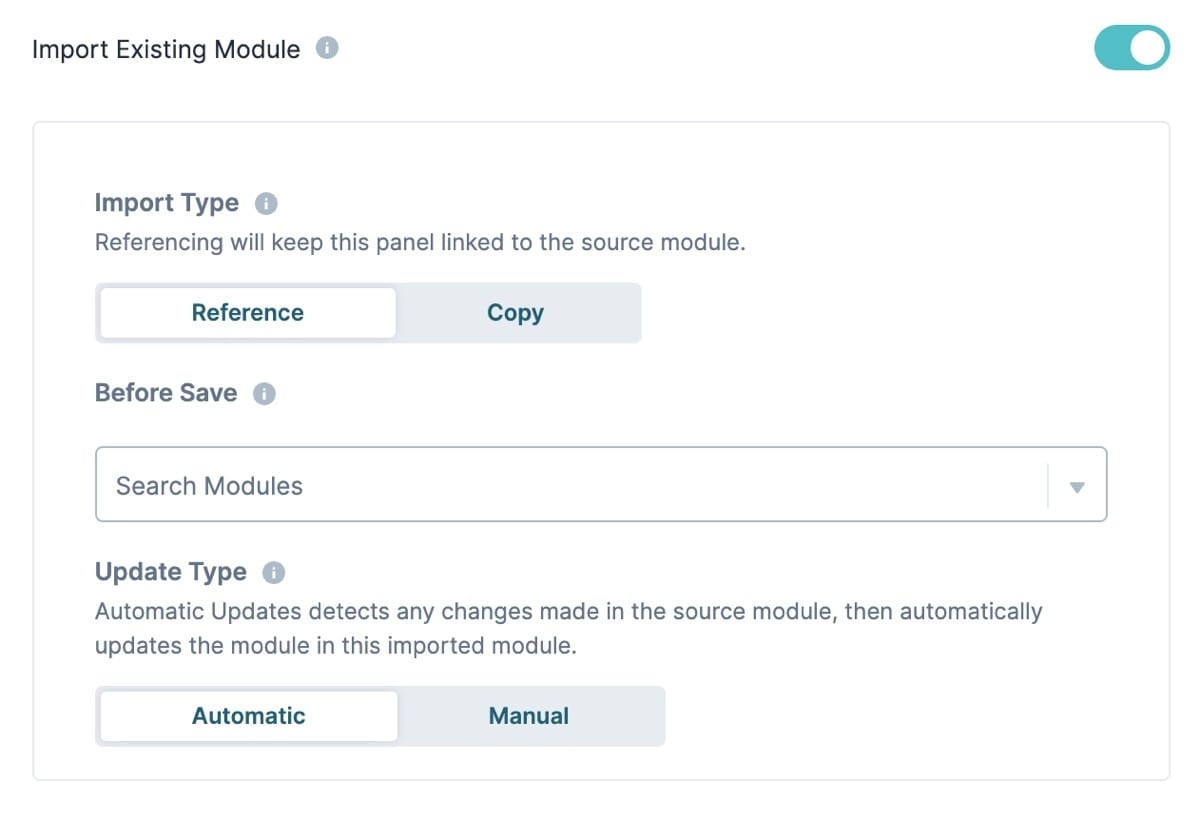
Import type | Choose between referencing or copying the imported module. |
Reference | Automatically or manually detects when changes are made to the imported module. |
Copy | Imports a copy of the specified module. Changes to the imported module are not automatically or manually updated. |
Update Type | Choose between automatically or manually refreshing the imported module when changes are detected. |
Automatic | Detects any changes made in the source module, then automatically updates the module in this imported module. |
Manual | Coming soon. |
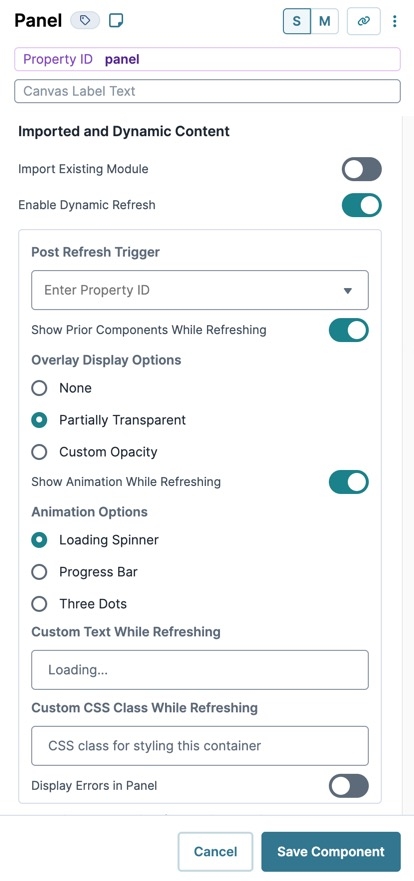
Enable Dynamic Refresh
This setting refreshes the Panel component with a dynamic set of components at run-time. Turning this setting to ![]() (ON) adds an icon to identify that this Panel component is refreshable on the Module Builder canvas. Use the
(ON) adds an icon to identify that this Panel component is refreshable on the Module Builder canvas. Use the dynamicRefresh Output Type in your logic components.
By default, this setting is ![]() (OFF). When this setting is
(OFF). When this setting is ![]() (OFF), the Panel component does not respond to dynamic refresh operations targeting it.
(OFF), the Panel component does not respond to dynamic refresh operations targeting it.
To learn more about using Dynamic Refresh, view our Dynamic Refresh article.
Setting | Description |
|---|---|
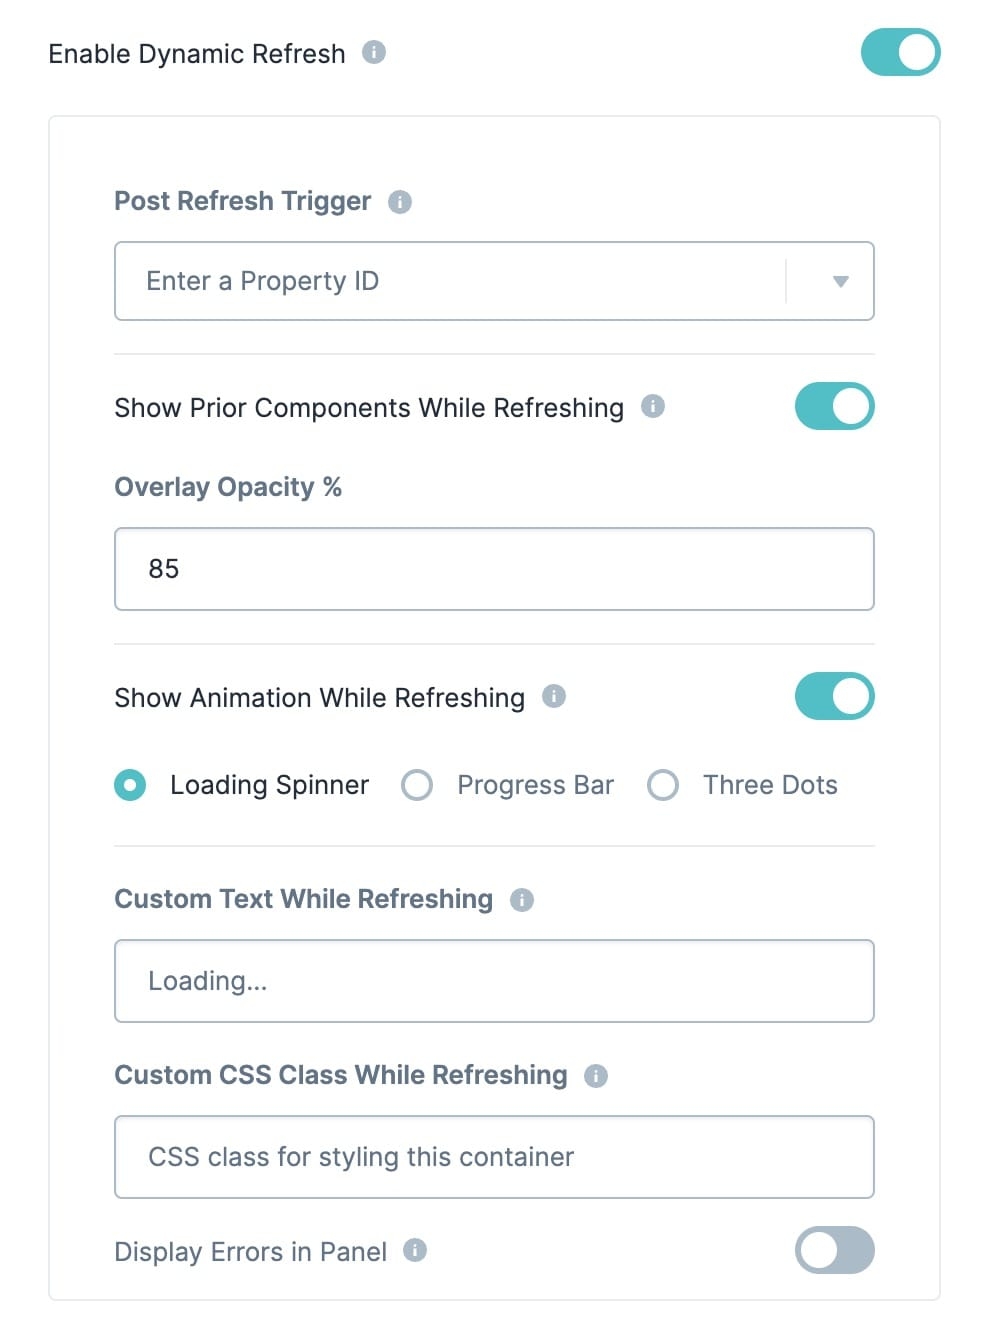
Post Refresh Trigger | The component to trigger when a dynamic refresh of the Panel component is completed. This action occurs after the incoming component(s) loads and renders.
|
Show Prior Components When Refreshing | Controls the visual appearance of prior components in this Panel component while a refresh is taking place. Prior components are kept in the DOM until incoming components are rendered. Once the refresh is complete, this appearance no longer applies. By default, this setting is |
Overlay Display Options | Choose the opaqueness (transparency) of the overlay that displays on top of components being replaced by refreshed components. The overlay disappears when the new elements refresh in. Options include:
By default, Overlay Display Options is set to Partially Transparent.
|
Show Animation While Refreshing | Displays a predefined animation in the Panel component while a refresh is taking place. Refresh operations do not indicate the percentage of completion. Once a refresh is complete, this animation no longer applies. By default, this setting is
|
Animation Options | Sets the type of animation to display when a Dynamic Refresh occurs. Options include:
|
Custom Text While Refreshing | Enter text to display in the Panel component while refreshing. Text displays underneath the animation option. Once a refresh is complete, this text no longer displays. |
Custom CSS Class While Refreshing | A unique CSS class that lets a Creator specifically style the Panel component while a refresh is taking place. Once a refresh is complete, this CSS class no longer applies.
|
Display Errors in Panel | Displays all dynamic refresh-related error messages in the Panel component and in the DevTools Console log. Doing so helps with debugging dynamic refresh configurations. By default, this setting is
|
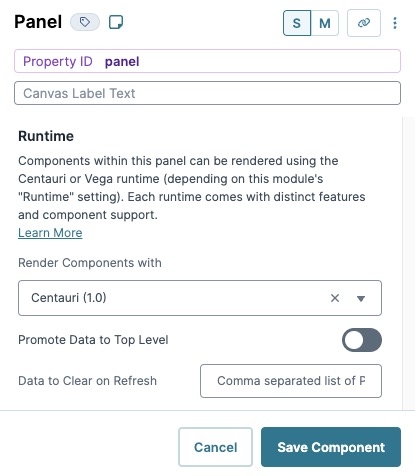
Runtime
Setting | Description |
|---|---|
Render Components With | Select which runtime to use for the Panel component. The runtime affects Module Import, Dynamic Refresh, or adding components in the Panel component. Runtimes include:
|
Promote Data to Top Level | Set to
By default, this setting is |
Data to Clear on Refresh | For components inside the Vega-enabled Panel component, enter one or multiple component Property ID values to prevent their data from importing into the module's submission data. |
Validation Settings
User Input
Setting | Description |
|---|---|
Allow Validation | Allows for the Panel component to be targeted and validated individually, instead of validating on navigation. This setting is helpful in cases where you have multiple Panel components on a page, but only trigger validations on some of them. By default, this setting is |
Advanced Settings
Additional Styling
Setting | Description |
|---|---|
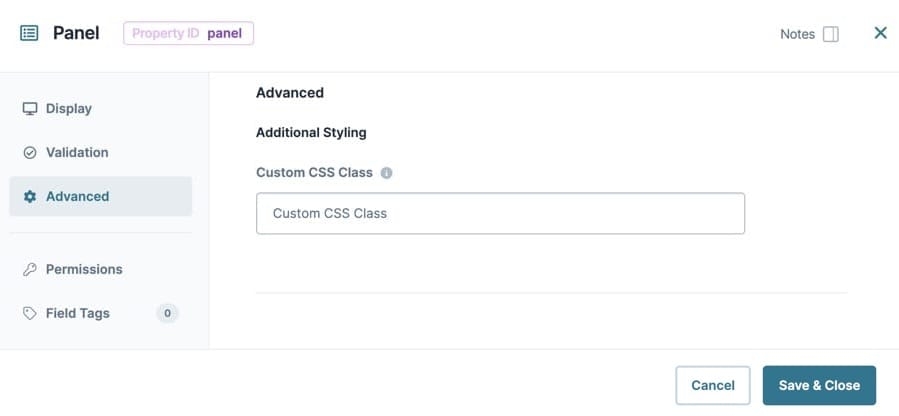
Custom CSS Class | Enter a Custom CSS Class to apply to your component. Custom CSS lets you maintain a consistent look and feel when the field or element is part of a template or multiple modules. Updated CSS styling applies to all components that reference this custom class name. |
Accessibility Settings
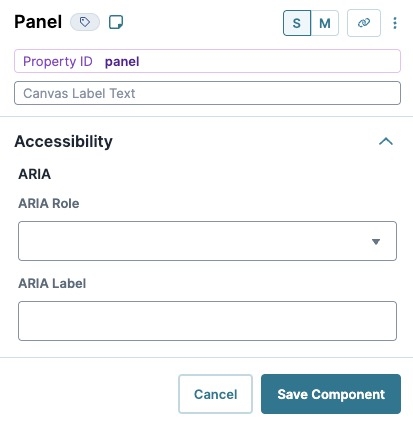
ARIA
Setting | Description |
|---|---|
Aria | Use these settings to create ARIA (Accessible Rich Internet Applications) attributes to better support end-users that require screen readers to navigate your applications. |
Aria Label | Use this field to define the component when when a screen reader arrives at it in Express View. |
Aria Role | ARIA roles provide semantic meaning to content, letting screen readers and other accessibility tools present and support interaction with an element that is consistent with end-user expectations. ARIA roles are used to describe elements that do not exist in HTML or not supported by the browser.
|
Adding a Panel Component
In this use case, you'll use Panel components to create a pop-up modal. This basic configuration will help with more complex designs. Your module will contain a single button with the label Open. When the end-user clicks the button, a modal displays the message Hello!.
These instructions assume that you have an open FEmodule saved with a title.
Configure the Panel Component
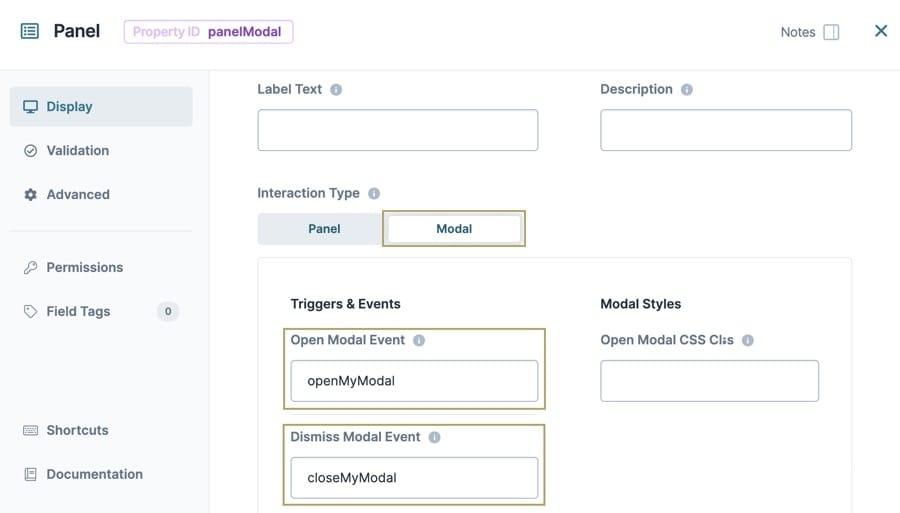
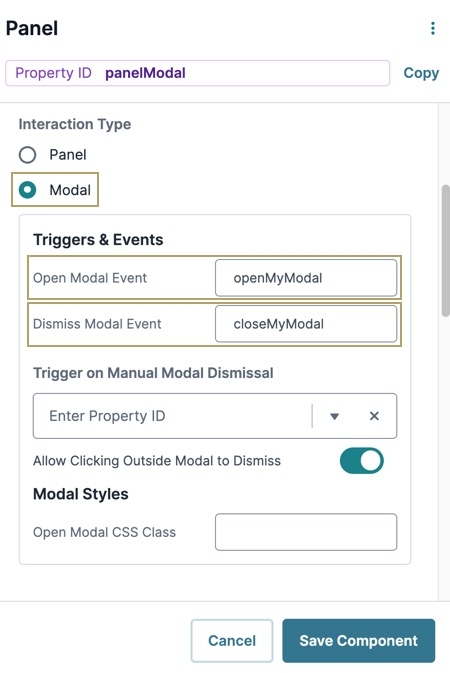
Configure the Panel component to serve as a modal. The openMyModal value is a custom value that the Decisions component uses to trigger the Panel component to open. This value can be whatever you want, as long as you keep it consistent throughout your module.
In the Module Builder, drag and drop a Panel component onto your canvas.
In the Property ID field, enter
panelModal.Set the Interaction Type to
.png) Modal.
Modal.In the Open Modal Event field, enter
openMyModal.In the Dismiss Modal Event field, enter
closeMyModal.Click Save Component.
Configure the Decisions Component
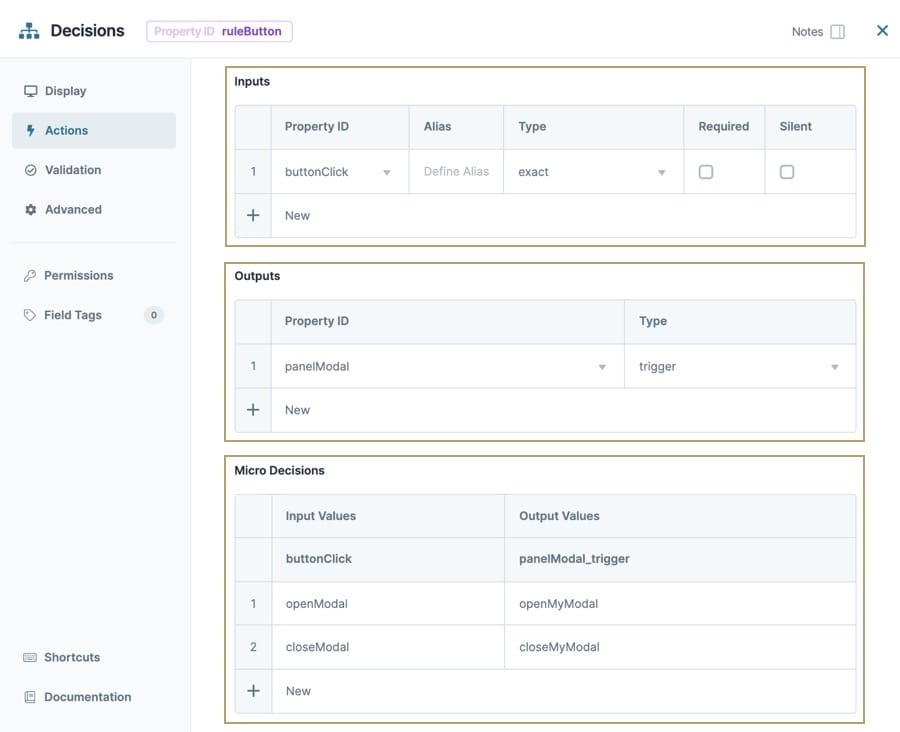
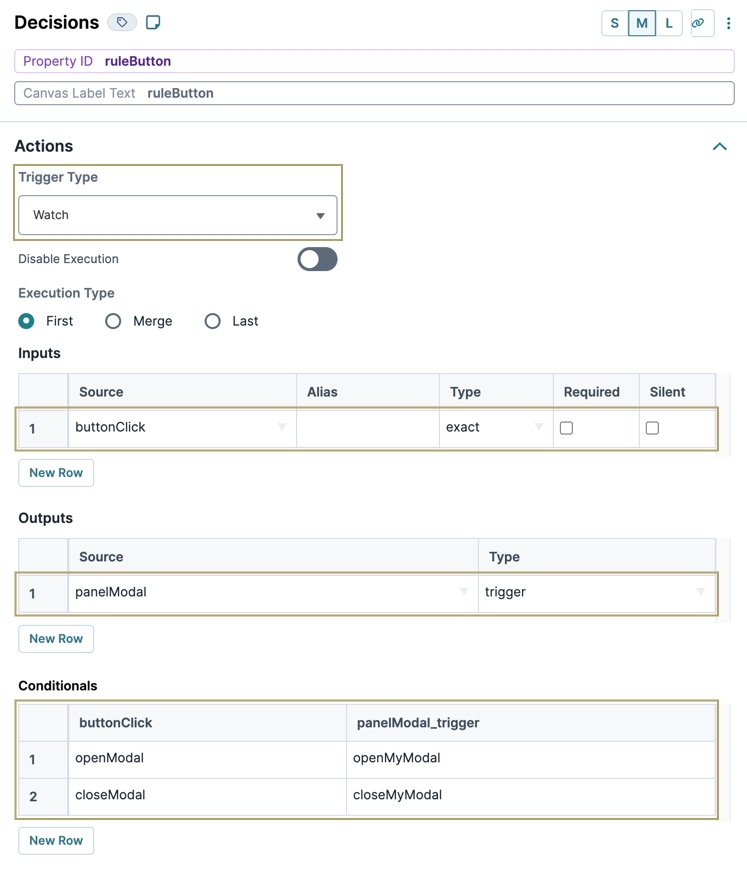
Next, add a Decisions component that triggers your modal to open. The input of buttonClick watches for any button click. Recall that this Open button's Event ID is openModal.
In the Micro Decisions table, you can see that openModal triggers openMyModal, which is the panelModal Panel component's open modal event. This action opens the modal.
Drag and drop a Decisions component onto your canvas, placing it below the panelModal Panel component.
In the Property ID field, enter
ruleButton.In the Canvas Label Text field, enter
ruleButton.From the Trigger Type drop-down, select Watch.
In the Inputs table, enter the following:
#
Source
Alias
Type
Required
Silent
1
buttonClick
exact
☐ (unchecked)
☐ (unchecked)
In the Outputs table, enter the following:
#
Source
Type
1
panelModal
trigger
Under the Conditionals table, click the New button twice.
In the Conditionals table, enter the following:
#
buttonClick
panelModal_trigger
1
openModal
openMyModal
2
closeModal
closeMyModal
Click Save Component.
Configure the btnOpen Button Component
This Button component triggers your pop-up Panel modal.
Drag and drop a Button component onto your canvas, placing it below the
ruleButtonDecisions component.In the Property ID field, enter
btnOpen.In the Label Text field, enter
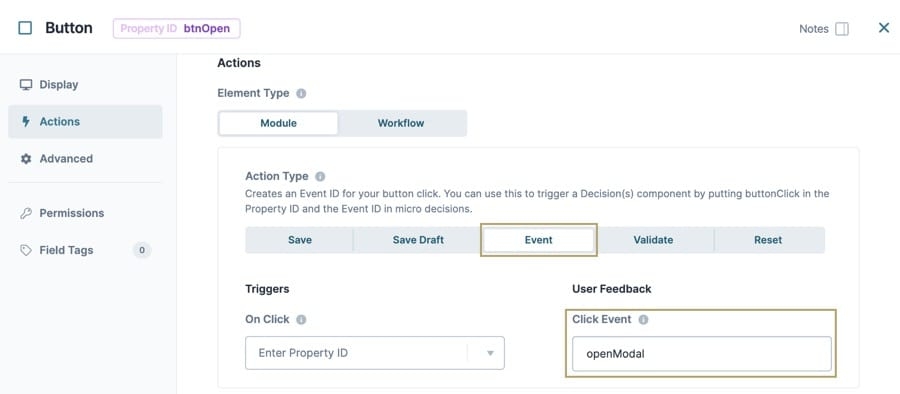
Open.Navigate to the component's Actions settings.
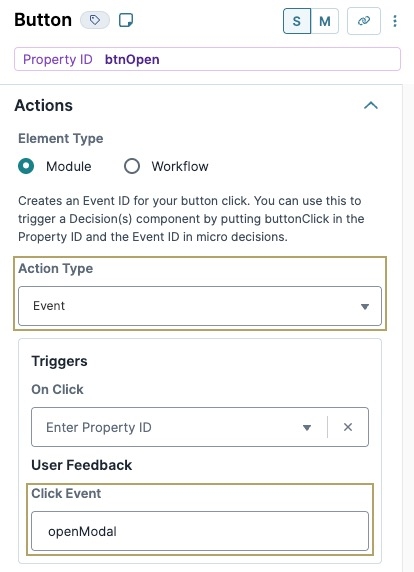
From the Action Type drop-down, select Event.
In the Click Event field, enter
openModal.The openModal Event ID is not a component. Instead, it's a value that the Decisions component uses to trigger the opening of the modal. You can customize this value however you want.
Click Save Component.
Configure the HTML Element Component
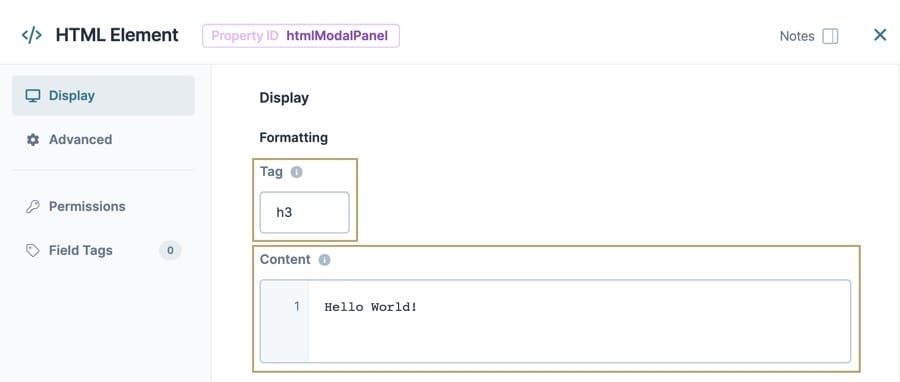
You can place any component in your pop-up modal. For this example, use a simple HTML Element component.
Drag and drop an HTML Element component onto your canvas, placing it inside the
panelModalPanel component.In the Property ID field, enter
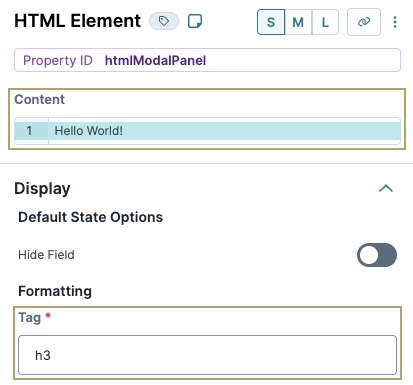
htmlModalPanel.In the Content field, enter
Hello World!.In the Tag field, enter
h3.Click Save Component.
Configure the Close Button Component
This Button component triggers your pop-up modal to close.
Drag and drop a Button component onto your canvas, placing it inside the
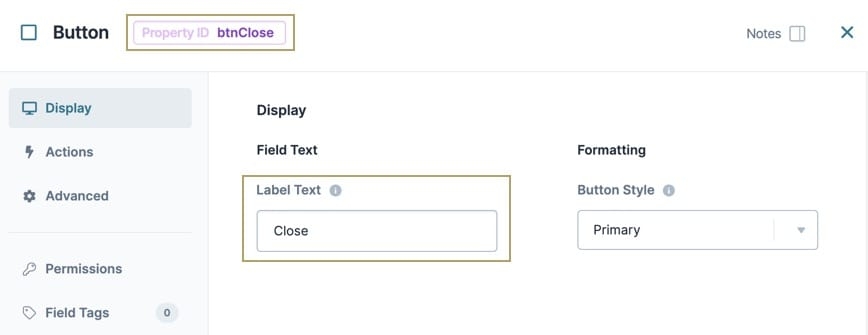
panelModalPanel component, and below thehtmlModalPanelHTML Element component.In the Property ID field, enter
btnClose.In the Label Text field, enter
Close.Navigate to the component's Actions settings.
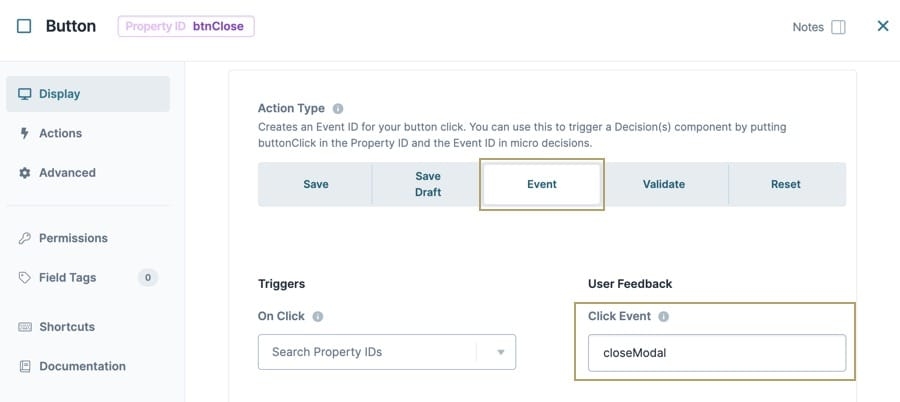
From the Action Type drop-down, select Event.
In the Click Event field, enter
closeModal.Click Save Component.
Save your module.
Preview your module in Express View. You'll see the following functionality:
The Panel component creates self-contained sections or pages in modules, and acts as a storage unit for other components. You can also use Panel components to help with navigation, create pop-up modal, or display components from other modules.
Panel components are important when used in conjunction with other components. For example, the Modal setting turns the component into a pop-up modal when triggered. Panel components are necessary when configure Navigation components because the Navigation component uses them as each page of your module.
You can also add Panel components inside other Panel components, nesting them as sub-sections inside larger sections.
You'll find the Panel component in the Display & Layout group to the left of the Module Builder.
About the Configuration Window
To learn more about general component settings and those that display when a component is associated with Data Models, view our General Component Settings article.
Display Panel
Field Text
Setting | Description |
|---|---|
Label Text | Label Text conveys what the input component is and what information it displays. Enter the purpose of the corresponding component or field. User-friendly labels make your module more accessible. Keep labels short and descriptive (a word or two) using title case. For longer entries, use sentence case. |
Contextual Help
Setting | Description |
|---|---|
Description | An internal description of what this panel's purpose is. Does not display in Express View. |
Interaction Type
Panel
The Panel setting displays the Panel component inline with the rest of the module. This is the default setting.
Modal
The Panel becomes a Modal when triggered by a logic component. The Panel remains hidden until triggered.
Triggers & Events
Setting | Description |
|---|---|
Open Modal Event | Lists the event that opens the modal. This event is triggered by components like Decisions, Initializer, or Plug-In components. |
Dismiss Modal Event | Lists the event that dismisses or closes the modal. The modal closes without saving changes made to its internal state. |
Trigger on Manual Modal Dismissal | The Property ID of the component to trigger when the Panel modal is manually dismissed. You can dismiss the Panel modal by closing it. If enabled, you can also dismiss by clicking outside of the modal. |
Allow Clicking Outside Modal to Dismiss | Allows you to click anywhere outside of the modal pop-up to close the modal. By default, this setting is This setting only applies to clicks. If this setting is disabled, the end-user can still use the Esc button on their keyboard to exit the modal. |
Modal Styles
Setting | Description |
|---|---|
Open Modal CSS Class | Specifies the on-open custom CSS class applied to the modal. |
Default State Options
Setting | Description |
|---|---|
Accordion | Allows the end-user to minimize and maximize the Panel. A plus (+) or minus (-) symbol displays to the right of the Panel. By default, this setting is |
Collapse Content | Setting this Collapse Content toggle to ON results in the end-user seeing the Panel minimized by default. The end-user has to maximize the Panel manually to see its contents. By default, this setting is |
Enable Scrollspy | Scrollspy is a jQuery plugin that allows end-users to return to a specified component in Express View. When set to For Scrollspy to work correctly, you must also configure a Content component in your module. In the Content component, enter: <div scroll-spy-link="propertyIdOfFirstComponent">Back to Top</div>. In this example, propertyIdOfFirstComponent represents the Property ID of the component at the top of your Panel. When your end-user clicks this new button in Express View, they return to the top of the Panel. By default, this setting is |
Vertical Offset | The number of pixels you want to offset the Scrollspy data from the top of the screen. This is useful when you want to take into account a fixed header on your screen. |
Disable Panel | Prevents end-users from interacting with or editing the input field in Express View. When the end-user hovers over the field, their cursor changes to alert them to the status change. By default, this setting is |
Hide Panel | Hides the Panel and all components inside from the end-user. Use this setting instead of hiding each component. By default, this setting is |
Imported and Dynamic Content
Import Existing Module
Setting | Description |
|---|---|
Import Type | Choose between referencing or copying the imported module. |
Reference | Automatically or manually detects when changes are made to the imported module. |
Before Save | Select the module that will load into the Panel component. |
Update Type | Automatic Updates detects any changes made in the source module, then automatically updates the imported module. Choose between Automatic or Manual. By default, the setting is Automatic. |
Copy | Imports a copy of the specified module. Changes to the imported module are not automatically or manually updated. |
Before Save | Select the module that will load into the Panel component. |
Enable Dynamic Refresh
This setting allows this Panel to refresh with a dynamic set of components at run-time. Turning this setting to ![]() (ON) adds an icon to identify that this panel is refreshable in the Module Builder canvas. Use the dynamicRefresh output type found in logic components.
(ON) adds an icon to identify that this panel is refreshable in the Module Builder canvas. Use the dynamicRefresh output type found in logic components.
By default, this setting is ![]() (OFF). When this setting is
(OFF). When this setting is ![]() (OFF), the Panel does not respond to dynamic refresh operations targeting it.
(OFF), the Panel does not respond to dynamic refresh operations targeting it.
To learn more about using Dynamic Refresh, view our Dynamic Refresh article.
Setting | Description |
|---|---|
Post Refresh Trigger | The component to trigger when a dynamic refresh of the Panel completes. This occurs after the incoming component(s) loads and renders.
|
Show Prior Components When Refreshing | Control the visual appearance of prior components in this Panel while a refresh is taking place. Prior components are kept in the DOM right up until incoming components are rendered. Once a refresh is complete, this appearance no longer applies. By default, this setting is |
Overlay Opacity % | Sets the opaqueness (transparency) of the overlay above components that are replaced by refreshed components. The percentage value range is 0 (fully visible) to 100 (invisible).
|
Show Animation While Refreshing | Display a pre-defined animation in this Panel while a refresh is taking place. Refresh operations are indeterminate and do not indicate the percentage (%) of completion. Once a refresh is complete, this animation no longer applies. The three options are:
By default, this setting is
|
Custom Text While Refreshing | Text to display in this Panel while refreshing. Once a refresh is complete, this text no longer applies. |
Custom CSS Class While Refreshing | A unique CSS class that lets a creator specifically style this Panel while a refresh is taking place. Once a refresh is complete, this CSS class no longer applies.
|
Display Errors in Panel | Displays any dynamic refresh-related error messages in this Panel visually, as well as in the Console log. Aids with debugging dynamic refresh configurations. By default, this setting is
|
Runtime
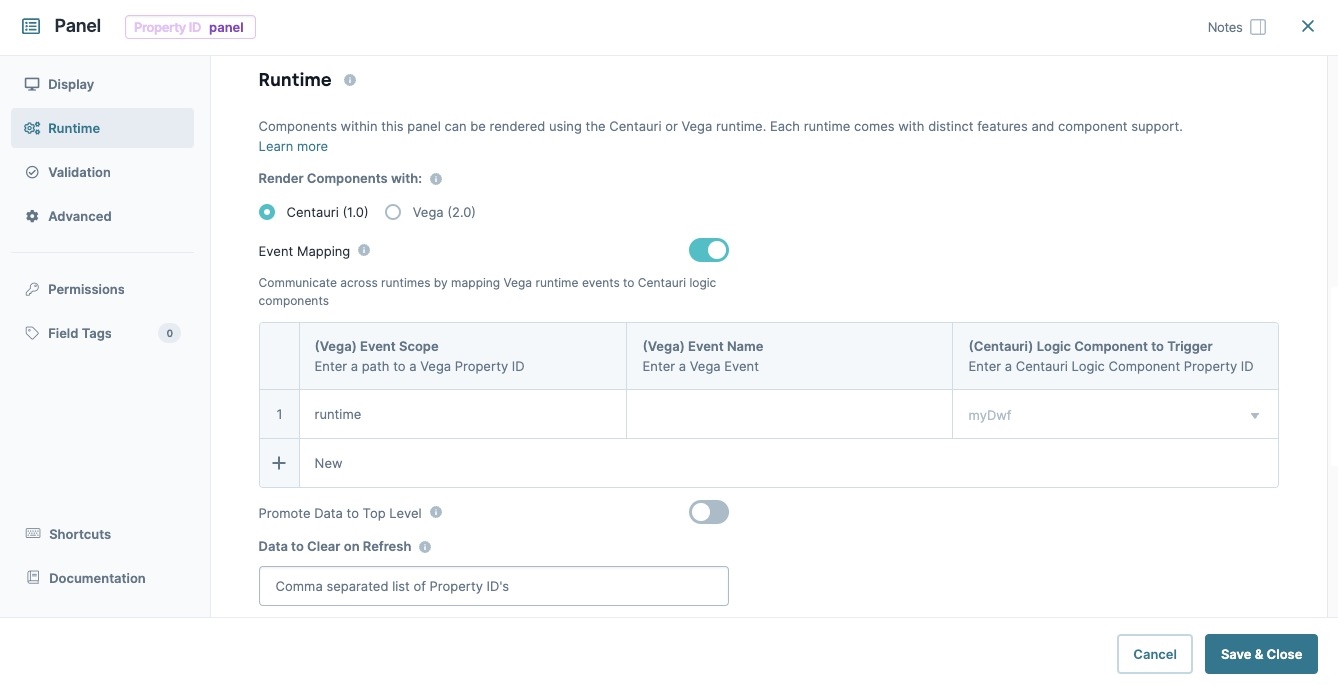
Panel components can contain components from the Centauri or Vega runtimes. By default, Panel components are set to the Centauri runtime in Centauri modules, and the vega runtime in Vega modules.
Setting | Description |
|---|---|
Render Components With | Select which runtime to use for the Panel component. The runtime affects Module Import, Dynamic Refresh, or adding components in the Panel component. Runtimes include:
|
Promote Data to Top Level | Set to
By default, this setting is |
Data to Clear on Refresh | For components inside of the Vega-enabled Panel component, enter one or multiple component Property ID values to prevent their data from importing into the module's submission data. |
Validation Panel
User Input
Setting | Description |
|---|---|
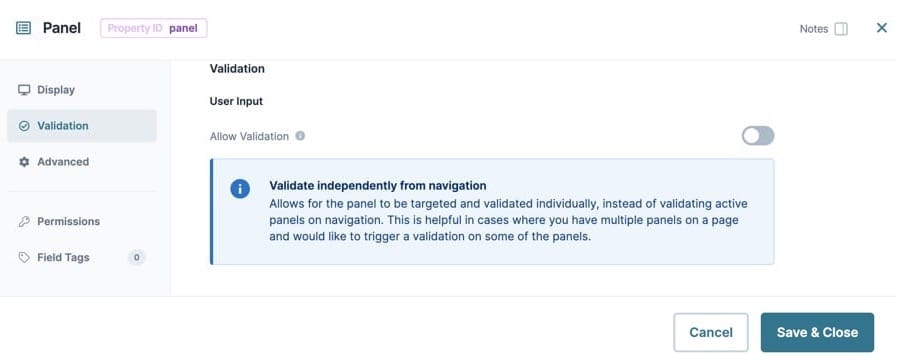
Allow Validation | Allows for the Panel to be targeted and validated individually instead of validating on navigation. This setting is helpful in cases where you have multiple Panels on a page and would like to trigger validation on some of the Panels. By default, this setting is |
Advanced Panel
Additional Styling
Setting | Description |
|---|---|
Custom CSS Class | Enter a Custom CSS Class to apply to your component. Custom CSS lets you maintain a consistent look and feel when the field or element is part of a template or multiple modules. Updated CSS styling applies to all components that reference this custom class name. |
Accessibility Panel
ARIA
Setting | Description |
|---|---|
Aria | Use these settings to create ARIA (Accessible Rich Internet Applications) attributes to better support end-users that require screen readers to navigate your applications. |
Aria Label | Use this field to define the component when when a screen reader arrives at it in Express View. |
Aria Role | ARIA roles provide semantic meaning to content, letting screen readers and other accessibility tools present and support interaction with an element that is consistent with end-user expectations. ARIA roles are used to describe elements that do not exist in HTML or are not supported by the browser.
|
To learn more about settings that display when a component is associated with Data Models, view our General Component Settings article.
Adding a Panel Component
In this use case, you'll use Panel components to create a pop-up modal. This basic configuration will help with more complex designs. Your module will contain a single button with the label Open. When the end-user clicks the button, a modal displays the message Hello!.
These instructions assume that you have an open FEmodule saved with a title.
Configure the Panel Component
Configure the Panel component to serve as a modal. The openMyModal value is a custom value that the Decisions component uses to trigger the Panel component to open. This value can be whatever you want, as long as you keep it consistent throughout your module.
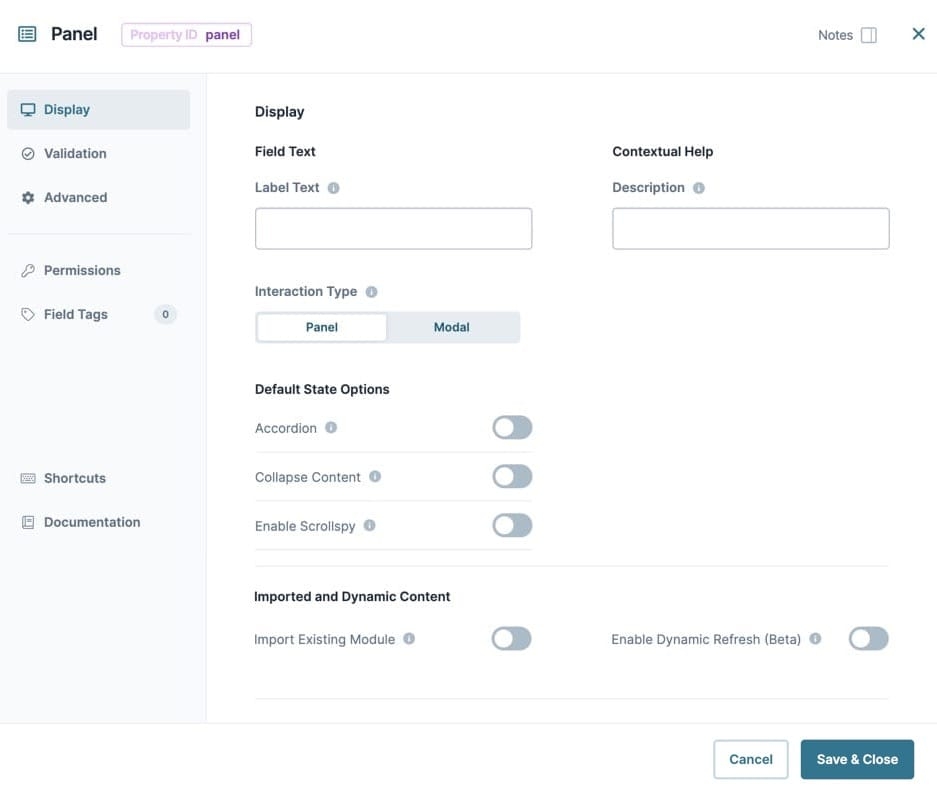
In the Module Builder, drag and drop a Panel component onto your canvas.
In the Property ID field, enter
panelModal.Set the Interaction Type as Modal.
In the Open Modal Event field, enter
openMyModal.In the Dismiss Modal Event field, enter
closeMyModal.Click Save & Close.
Configure the Decisions Component
Next, add a Decisions component that triggers your modal to open. The input of buttonClick watches for any button click. Recall that this Open button's Event ID is openModal.
In the Micro Decisions table, you can see that openModal triggers openMyModal, which is the panelModal Panel component's open modal event. This action opens the modal.
Drag and drop a Decisions component onto your canvas, placing it below the panelModal Panel component.
In the Property ID field, enter
ruleButton.In the Canvas Label Text field, enter
ruleButton.In the component's configuration menu, select Actions.
Set the Trigger Type to
.png) Watch.
Watch.In the Inputs table, enter the following:
#
Property ID
Alias
Type
Required
Silent
1
buttonClick
exact
☐ (unchecked)
☐ (unchecked)
In the Outputs table, enter the following:
#
Property ID
Type
1
panelModal
trigger
In the Micro Decisions table, enter the following:
Input Values
Output Values
buttonClick
panelModal_trigger
1
openModal
openMyModal
2
closeModal
closeMyModal
Click Save & Close.
Configure the Open Button Component
This Button component triggers your pop-up modal to open.
Drag and drop a Button component onto your canvas, placing it below the
ruleButtonDecisions component.In the Property ID field, enter
btnOpen.In the Label Text field, enter
Open.In the component's configuration menu, select Actions.
Set the Action Type to Event.
In the Click Event field, enter
openModal.The
openModalEvent ID is not a component. Instead, it's a value that the Decisions component uses to trigger the opening of the modal. You can customize this value however you want.Click Save & Close.
Configure the HTML Element Component
You can place any component in your pop-up modal. For this example, use a simple HTML Element component.
Drag and drop an HTML Element component onto your canvas, placing it inside the
panelModalPanel component.In the Property ID field, enter
htmlModalPanel.In the Tag field, enter
h3.In the Content field, enter
Hello World!.Click Save & Close.
Configure the Close Button Component
This Button component triggers your pop-up Panel modal to close.
Drag and drop a Button component onto your canvas, placing it below the
htmlModalPanelHTML Element component, inside thepanelModalPanel component.In the Property ID field, enter
btnClose.In the Label Text field, enter
Close.In the component's configuration menu, select Actions.
Set the Action Type to Event.
In the Click Event field, enter
closeModal.Click Save & Close.
Save your module.
Preview your module in Express View. You'll see the following functionality:
.jpg)
.jpg)
.jpg)
