In this article, let's look at the different ways you can test API module configurations at Unqork.
You can run a test to:
Confirm the execution sequence of your API call is correct.
Check that the expected API response is correct.
Check that specific data field responses match a specific criterion.
To set up these tests, you'll use Unqork's Testing tool. Once configured, the tests automatically run whenever the module is saved. Or, you can use the tool to manually execute them. The tool also lets you edit, delete, and monitor all your API module tests.
To learn more about the Testing tool, view our Testing Tool article.
What Is an API Test?
API tests are specifically used to test your API modules. The following table describes the different types of tests you might see:
API Test | Description |
|---|---|
Execution Sequence | This test monitors the execution sequence of your module. A successful test proves that all your components trigger in the correct order. After executing the test, an Event Log displays. This shows the components and their events at each step of the execution sequence. This is very similar to what you see from the Server Side Execution Testing page.
|
Match Response | This test compares the JSON of the expected API response against the actual API response. Both match if the test is successful. |
Validate Fields | This test lets you enter a specific data field to test. You can set up criteria for that data field and check that its response meets these criteria. Validation types include:
|
It's important to note that you can only select modules that follow Unqork's API specifications. Once you find an API module, you can set up an API test.
It's important to note that you can only select modules that follow Unqork's API specifications. Once you find an API module, you can set up an API test.
To learn more about API specification, refer to API Specification Snippet article.
Create API Tests for Multiple Modules
Let's say you created a complex application involving various API modules. It’s a best practice to set up API tests to ensure all those API calls work correctly. With the Testing tool, you can set up bulk Execution Sequence and Match Response API tests on all your API modules. These tests ensure the responses are accurate and the firing sequences are correct.
To create API tests for multiple modules:
Open the Testing tool.
Click Create Bulk API Tests.
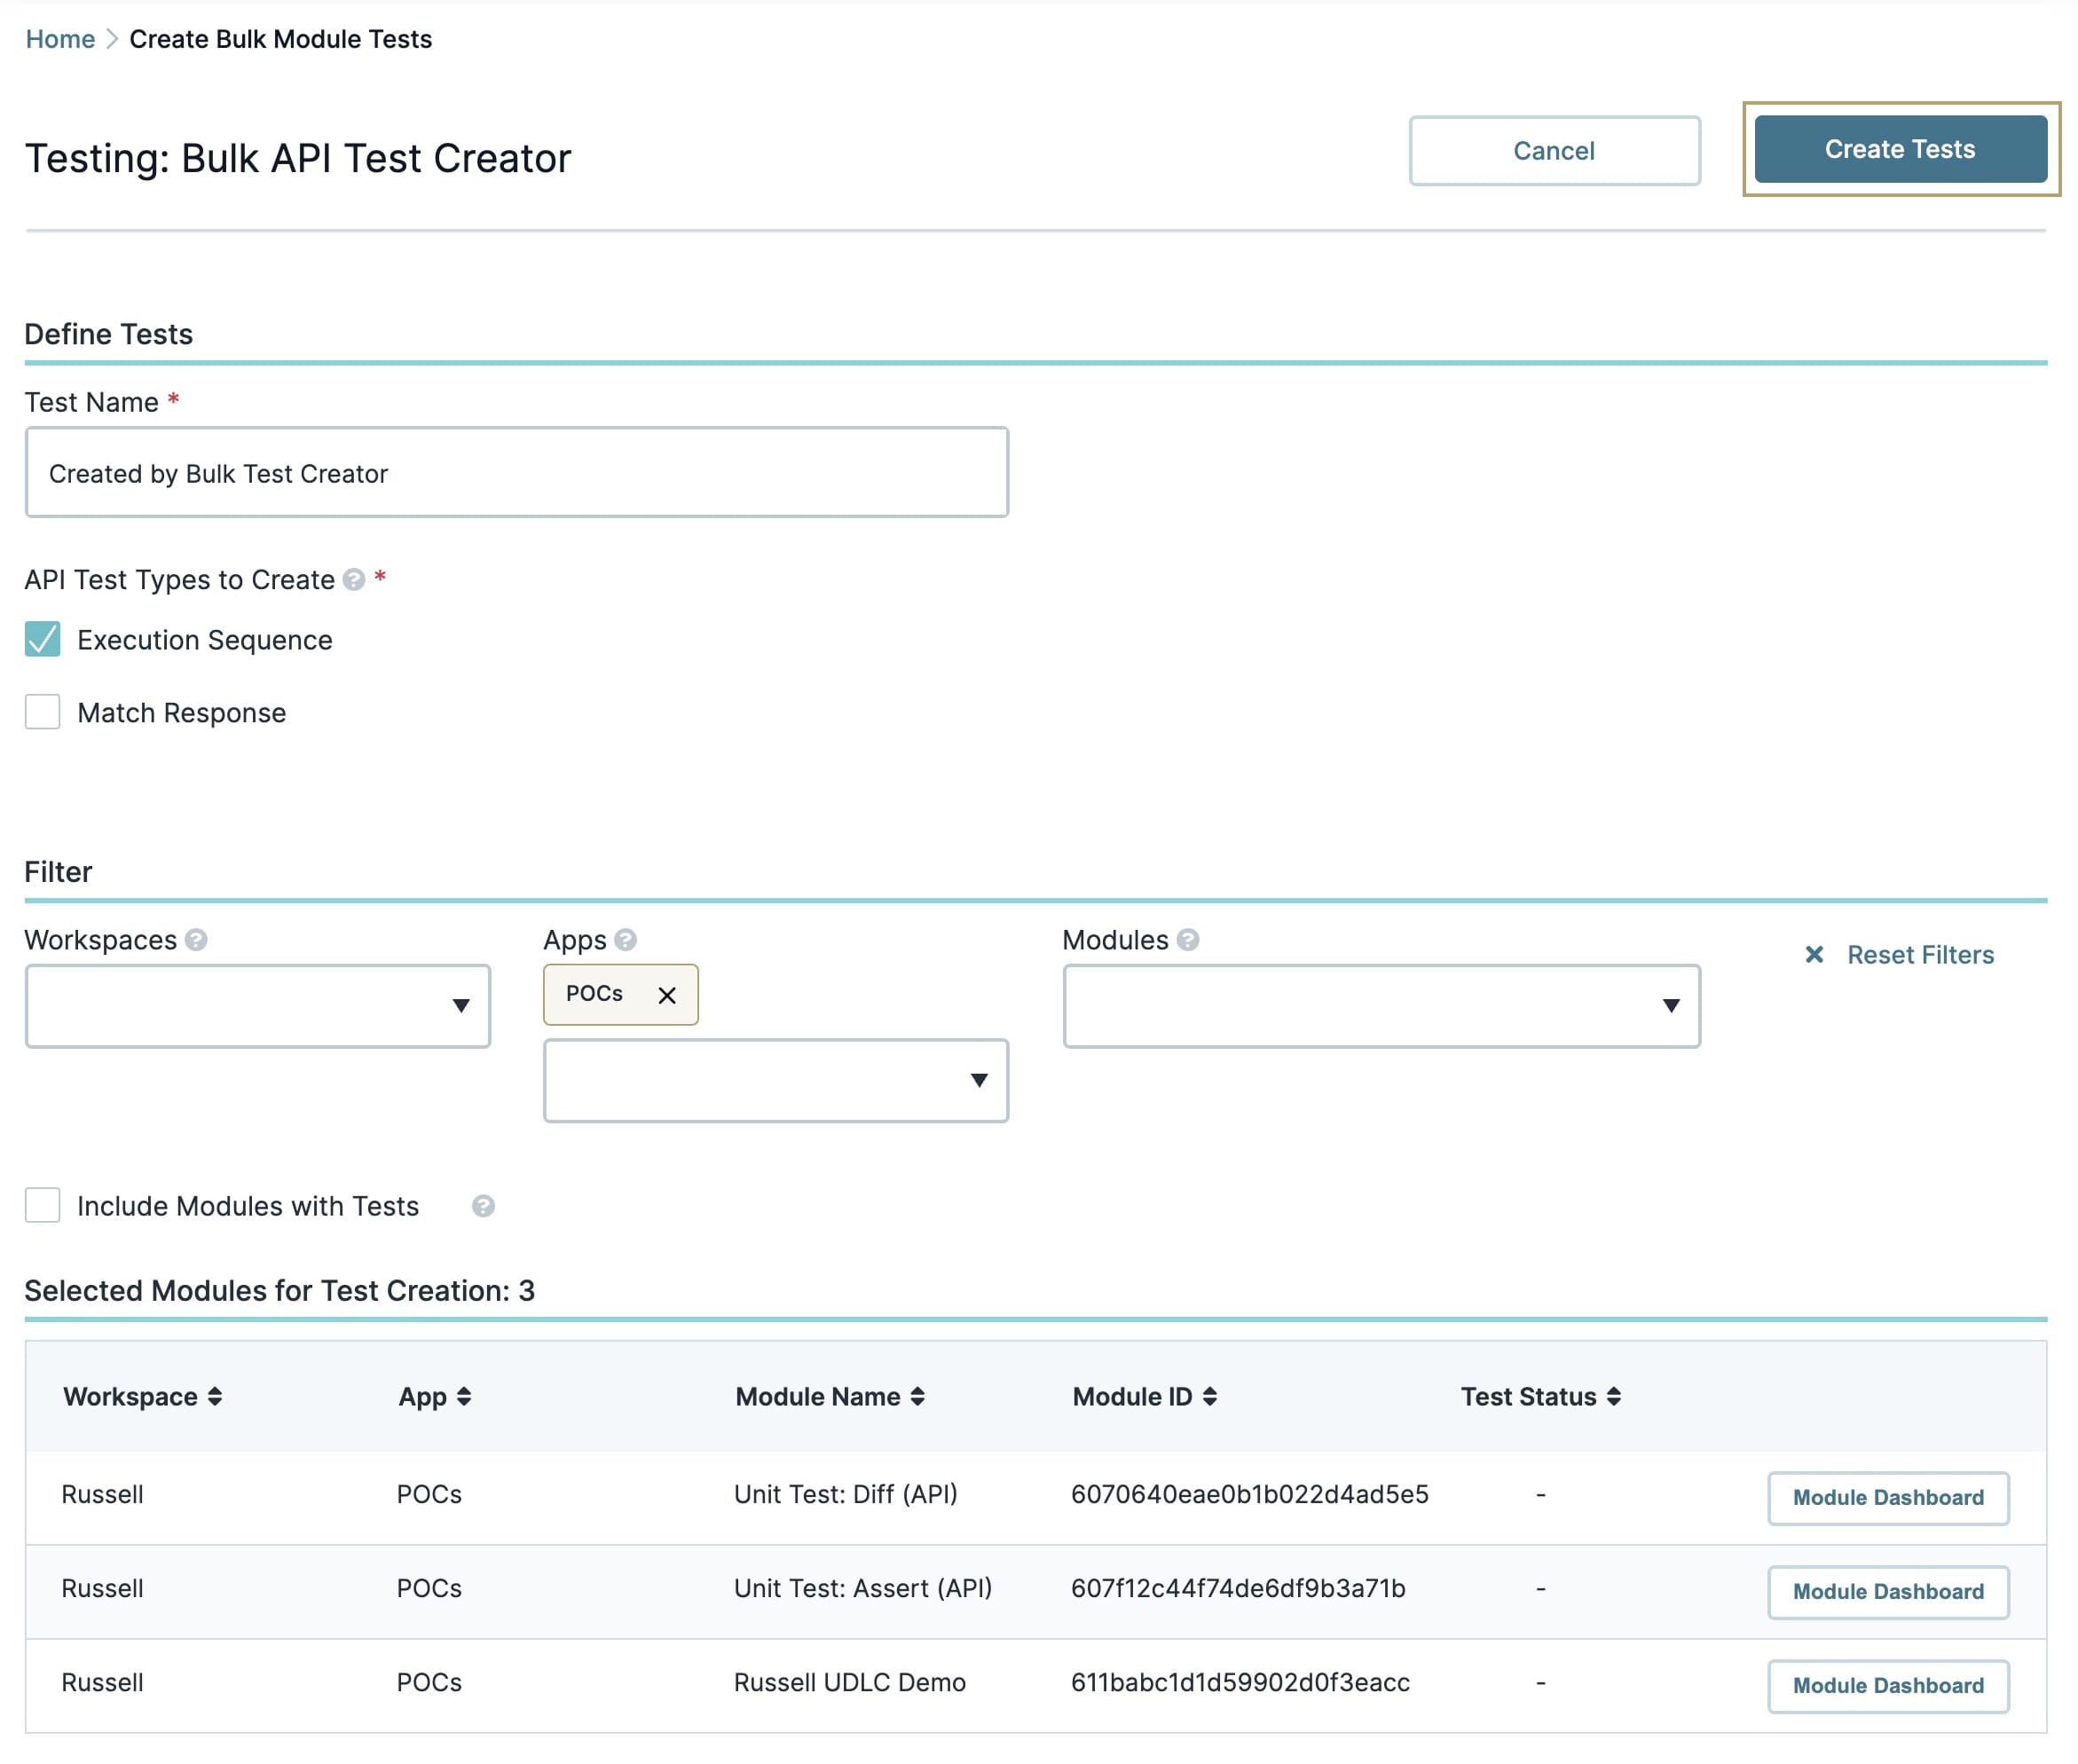
When you arrive on the Bulk API Test Creator dashboard, you'll see various test options, filters, and a table of all your environment's API modules. By default, the table only shows API modules that don't have tests. This makes it easier to find API modules that need tests.
Navigating the Bulk API Test Creator Dashboard
By default, the test name is Created by Bulk Test Creator. Click the Test Name field to rename the test. The Execution Sequence setting is also set to API Test Types to Create by default. This test is recommended for all API modules. That said, you can deselect the test and select the Match Response test instead. Or, you can select both.
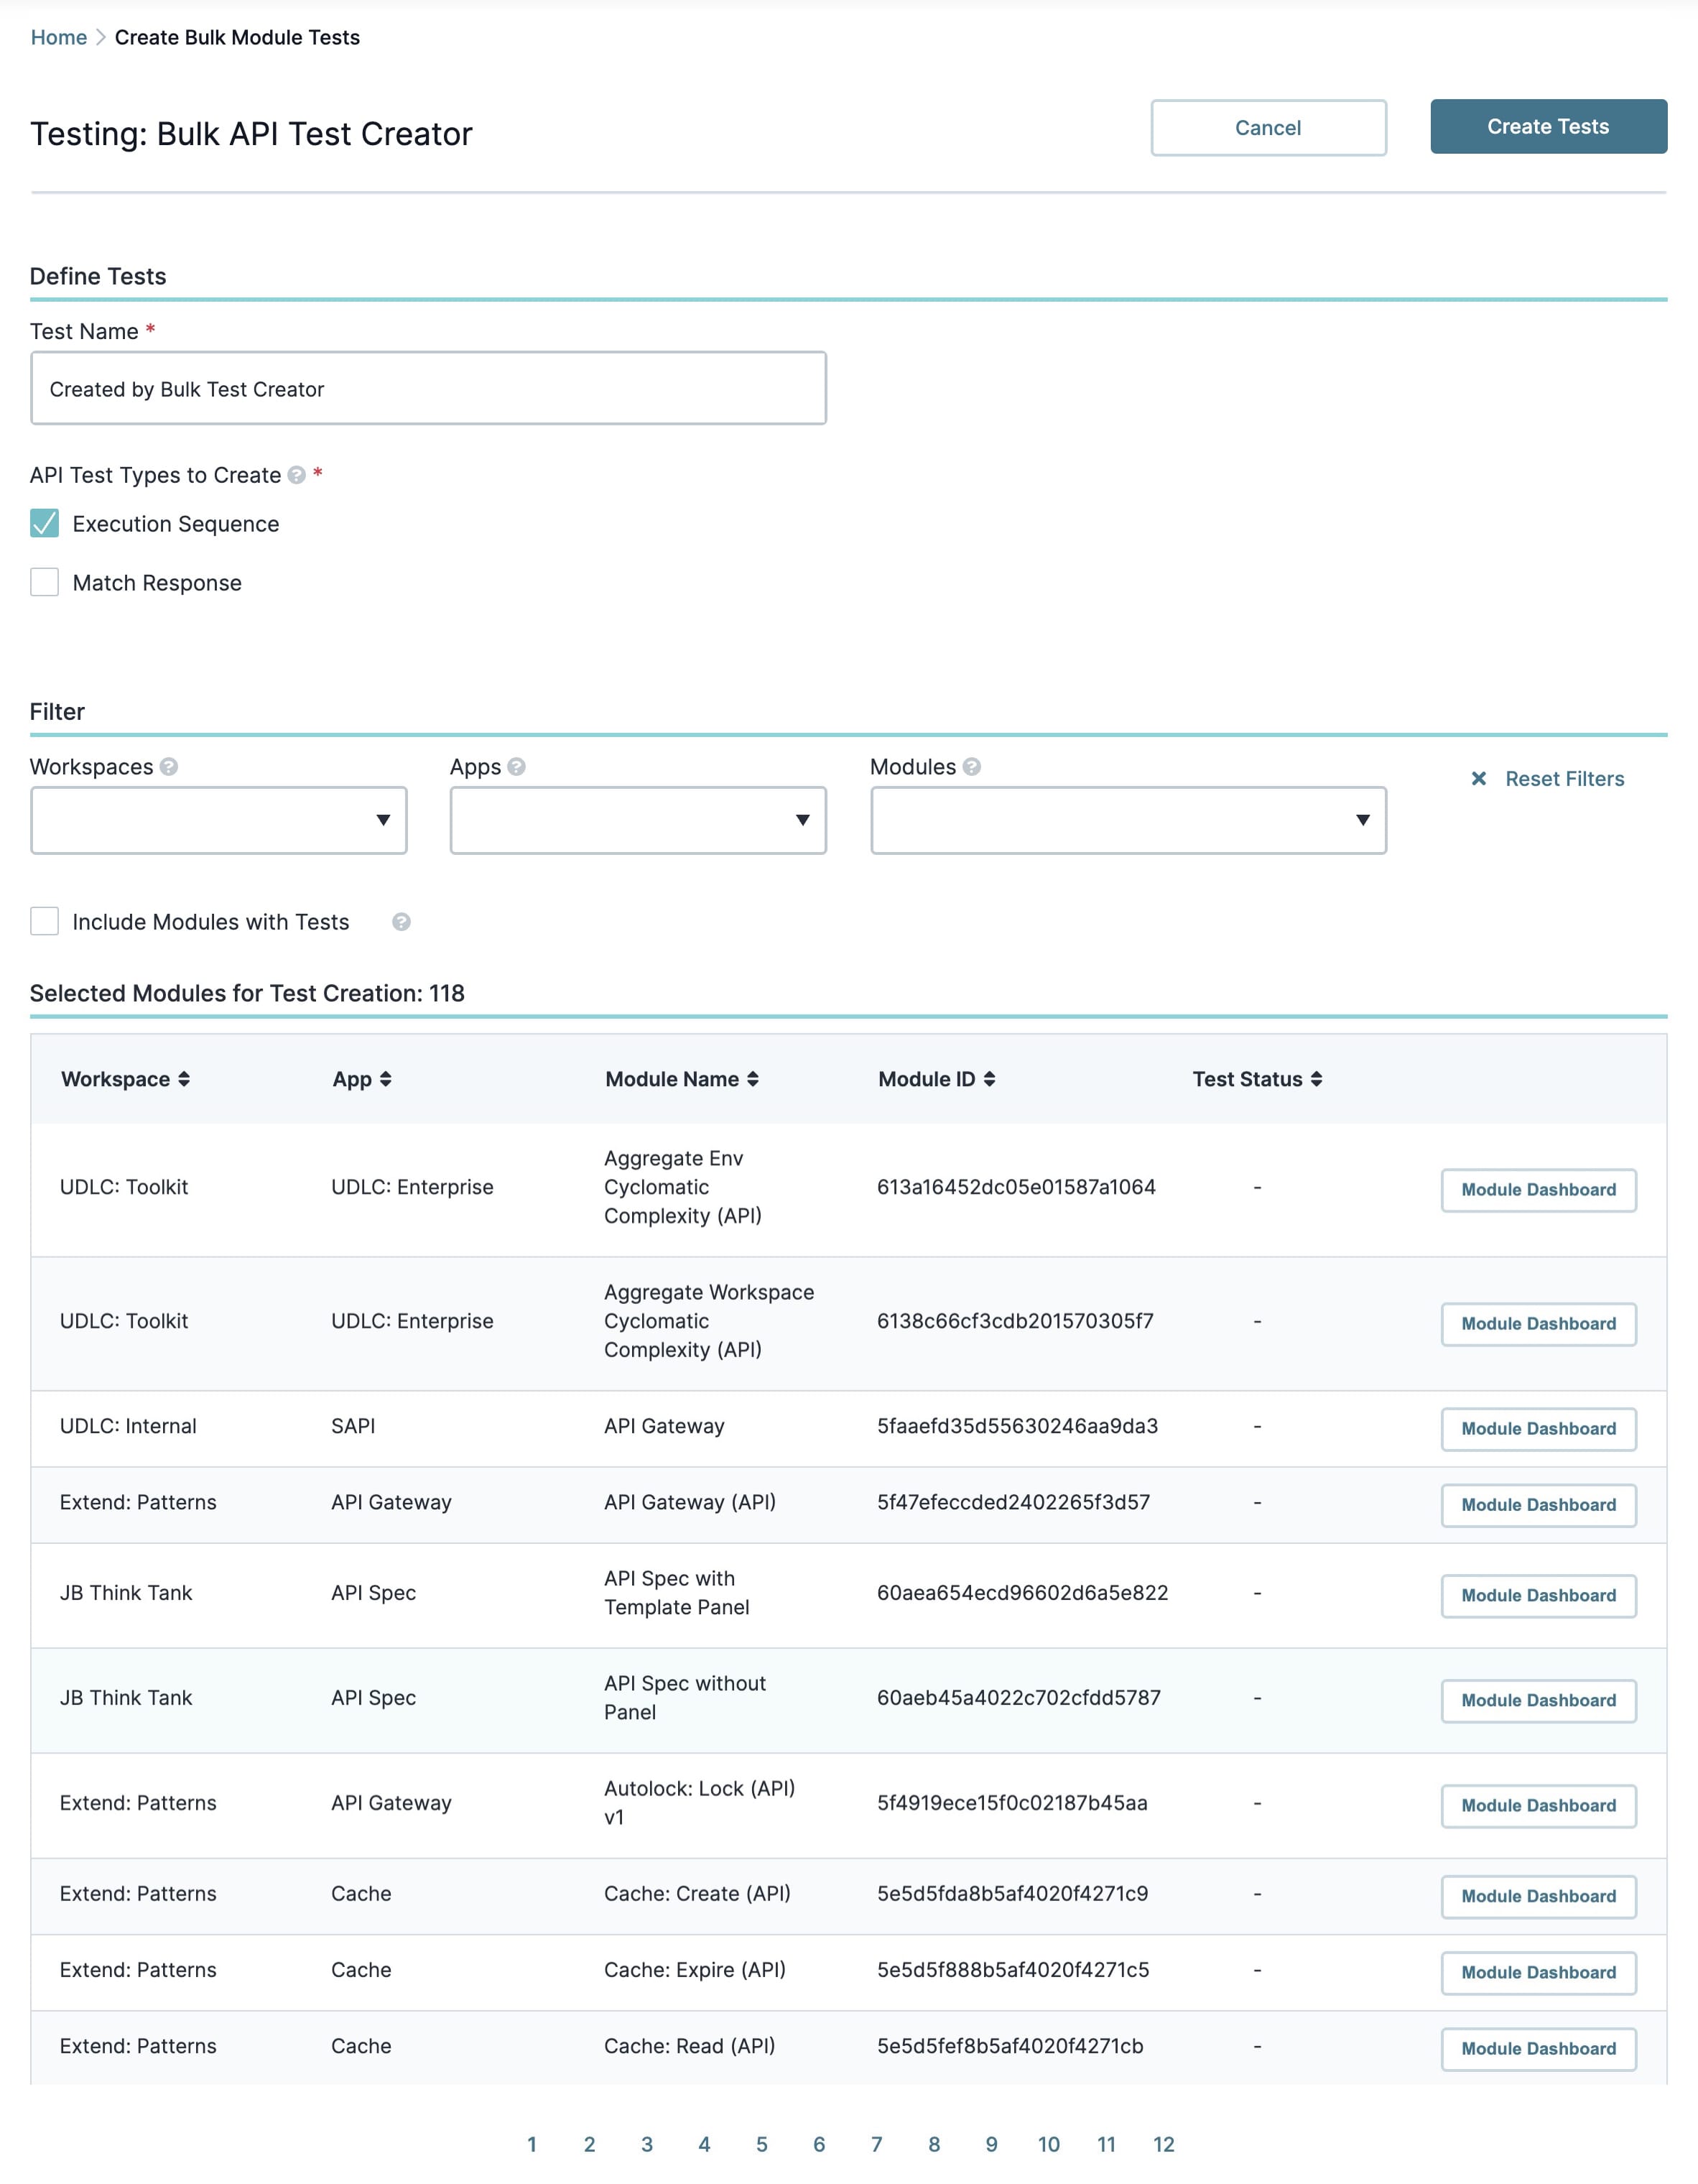
By default, every API module you see in the Selected Modules for Test Creation table is set up with your selected test(s). To run tests on specific modules, use the dashboard's filters to find them.
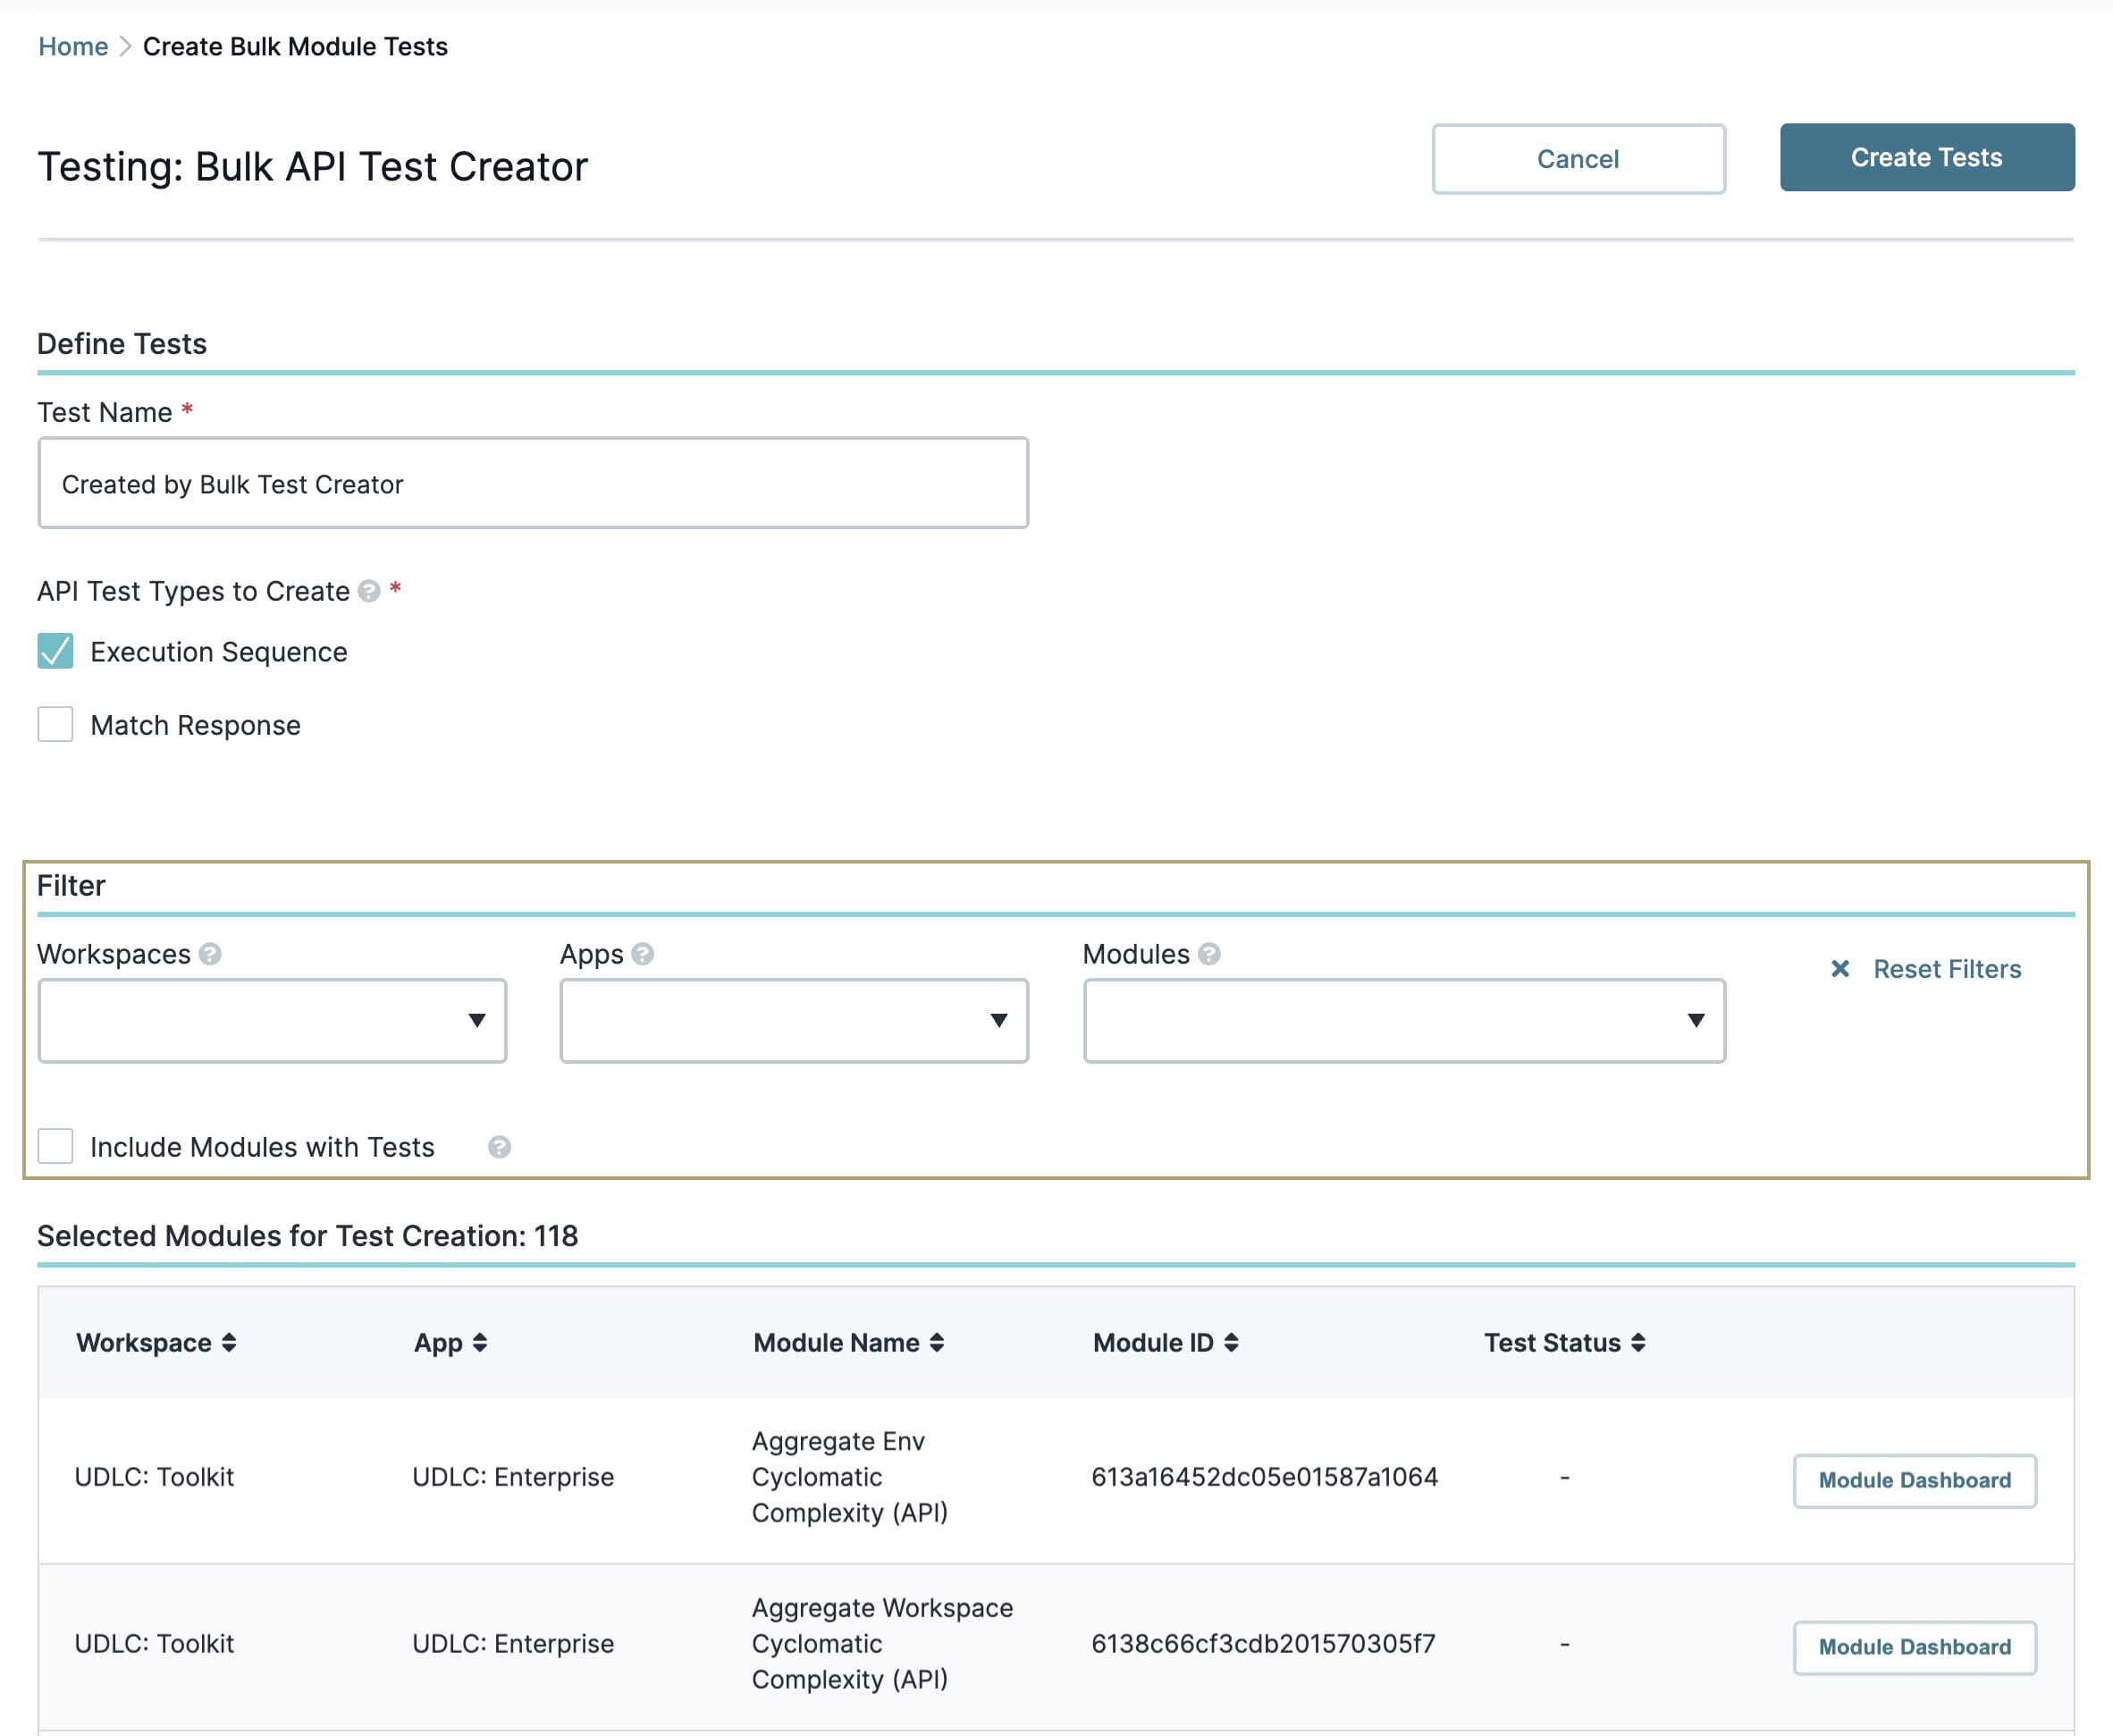
Here are the different filter options you can use:
Filter | Description |
|---|---|
Workspaces | Use this drop-down to filter API modules from one or more workspaces.
|
Apps | Use this drop-down to filter API modules from one or more applications.
|
Modules | Use this drop-down to filter for specific modules. |
Reset Filters | Click to reset the filters. |
Include Modules with Tests | Select this checkbox to see all environment API modules with tests. You'll also still see the modules that don't have tests.
|
When you filter API modules, the matching modules automatically populate the Selected Modules for Test Creation table. Tests can only be run on modules listed in this table. The table displays up to 10 modules by default. Click the pagination at the bottom of the table to see more modules.
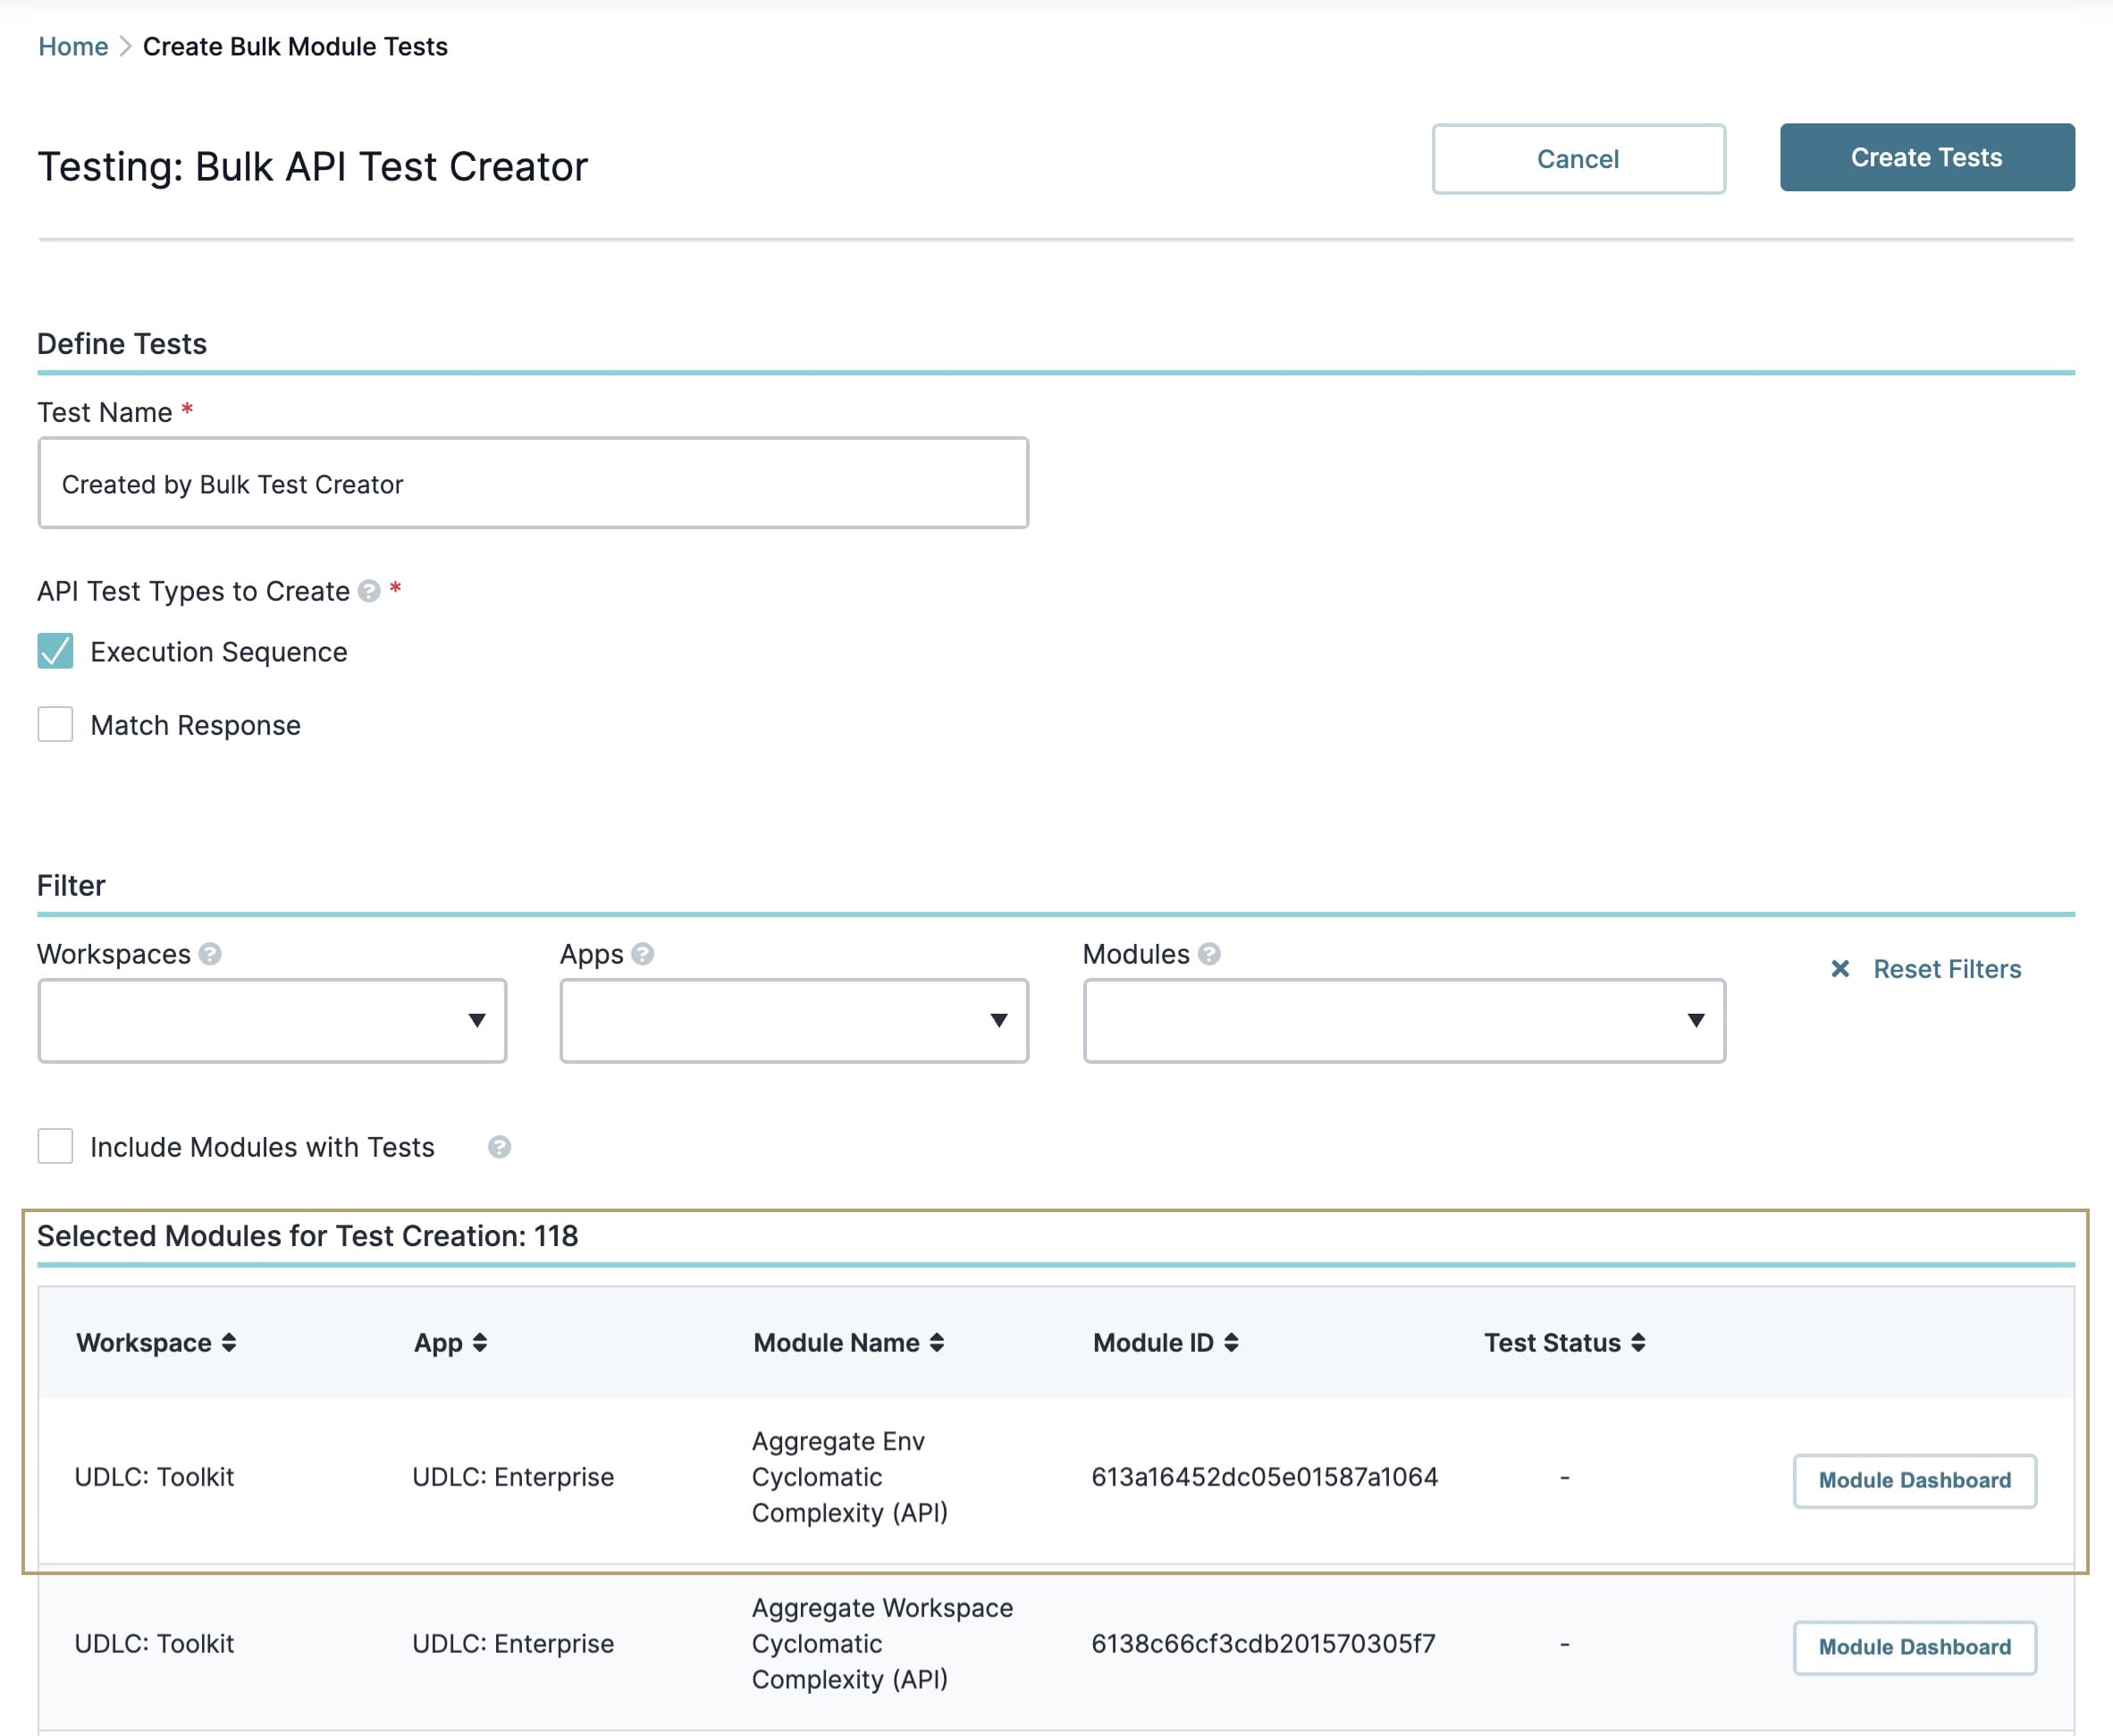
Let's take a look at the information you'll find in the table:
Attribute | Description |
|---|---|
Workspace | The workspace where your selected module exists. |
App | The application where your selected module exists. |
Module Name | The selected module's name. |
Module ID | The selected module's unique identifier. |
Test Status | Shows if the selected module has a test or not. Tested modules have a checkmark in this column. |
Module Dashboard Button | Click this button to view the selected module in the Testing Module Dashboard. |
Creating an API Test
If your API modules have service logs, the test(s) runs on the most recent one.
To create a test:
In the Test Name field, enter a test name. Or, leave it as the default value.
From the API Test Types to Create options, select one or both of the tests.
Use the dashboard's filters to find and display only the API modules you want to test.
At the top right of the page, click Create Tests.
Click OK to confirm you want to run your test(s) on those selected modules.
Click OK in the modal to return to the Bulk API Test Creator.
If an API module has service logs, a checkmark displays in the Test Status column. If no service logs exist, the Test Status displays
No Log Found. To generate service logs, return to the module and execute it. Once service logs are available, you can create tests for the module.
Create API Tests for a Single Module
To create one or more API tests for a single module:
Open the Testing tool.
Click Create Single API Test.
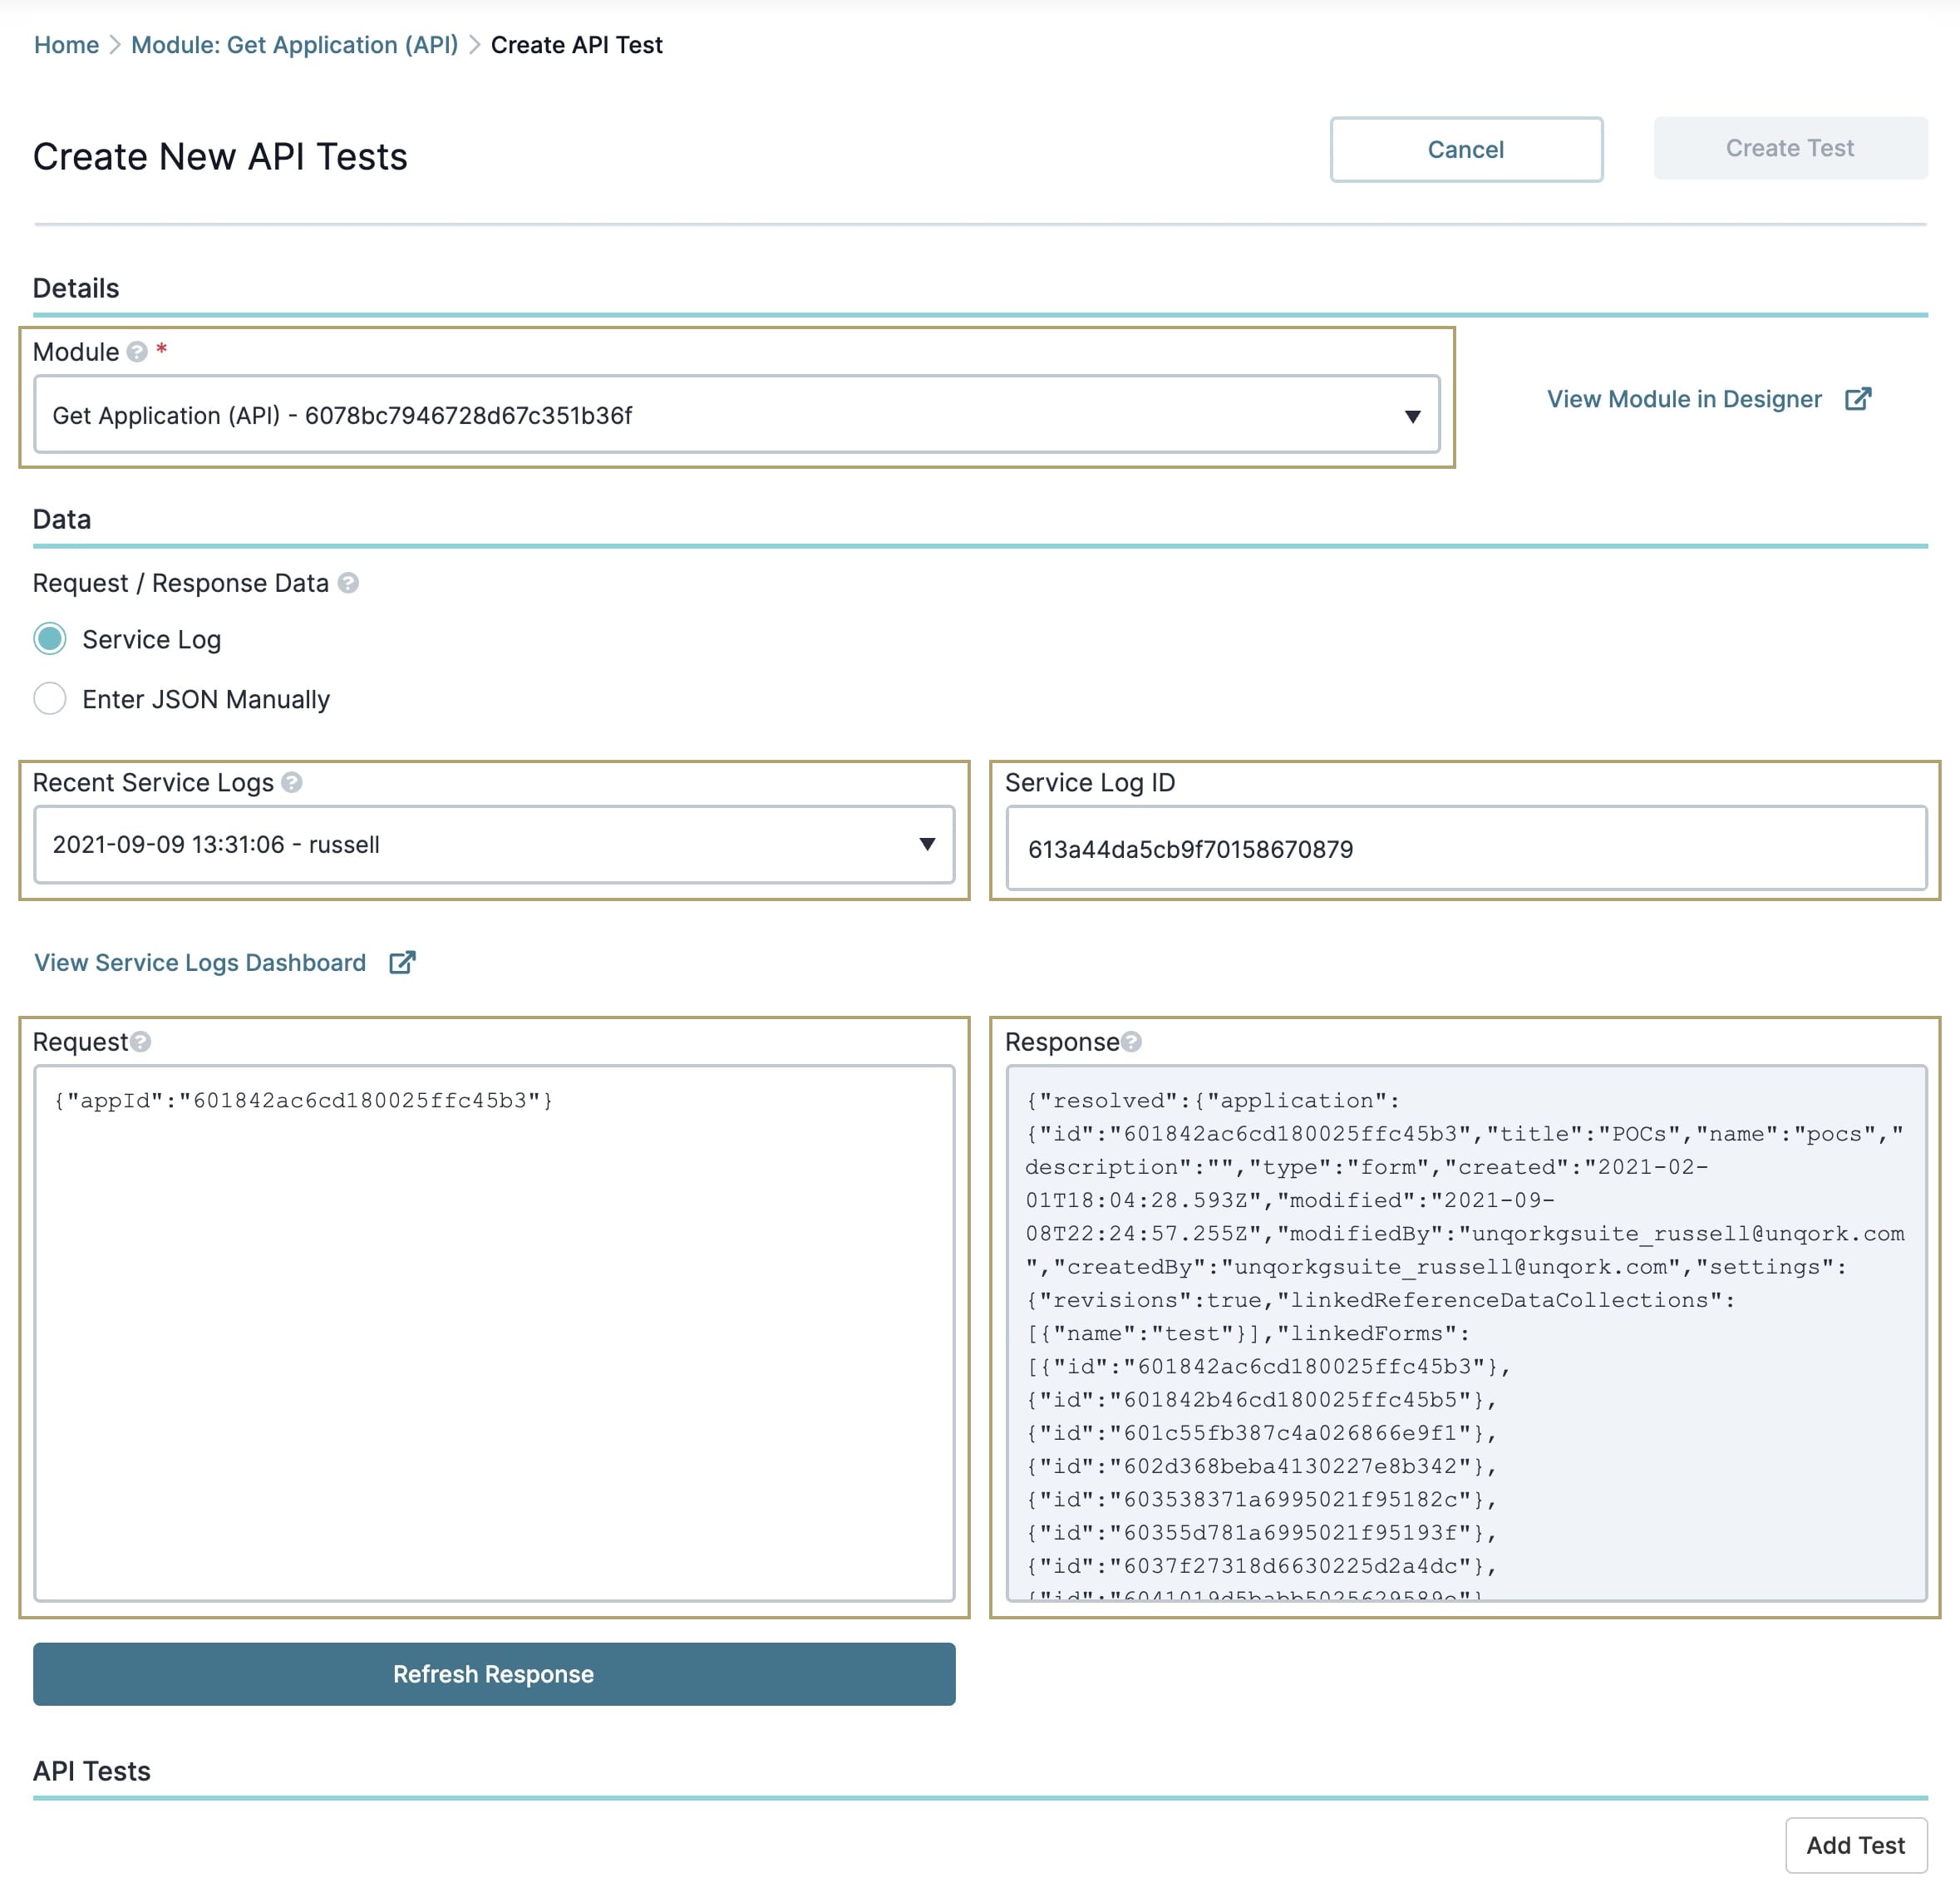
From the Module drop-down, select an API module.
To view the module in the Module Builder, click the View Module in Designer link.
Selecting Recent Service Log API Request Data
If your module has recent service logs, these details populate automatically:
The most recent service log timestamp (Recent Service Logs).
The service log ID (Service Log ID).
The log's API request (Request).
The log's API response (Response).
To look at a different service log, select it from the Recent Service Logs drop-down. Then, click the View Service Logs Dashboard link for more details about your chosen service log.
Manually Entering API Request Data
If no service logs exist, you must enter your API request manually.
After selecting a module to test:
Set Enter JSON Manually as the Request / Response Data.
This is the default setting if no service logs exist for this module.
In the Request field, enter your API request JSON.
Below the Request field, click Get Response. API response data displays in the Response field.
Creating an API Test
Now that you have an API module selected, let's create an API test.
At the bottom of the page, click Add Test.
In the Test Name field, enter a unique test name.
Select a Test Type.
Depending on the Test Type, different information displays on the page. Here are the fields you see for each test.
Test | Test Description |
|---|---|
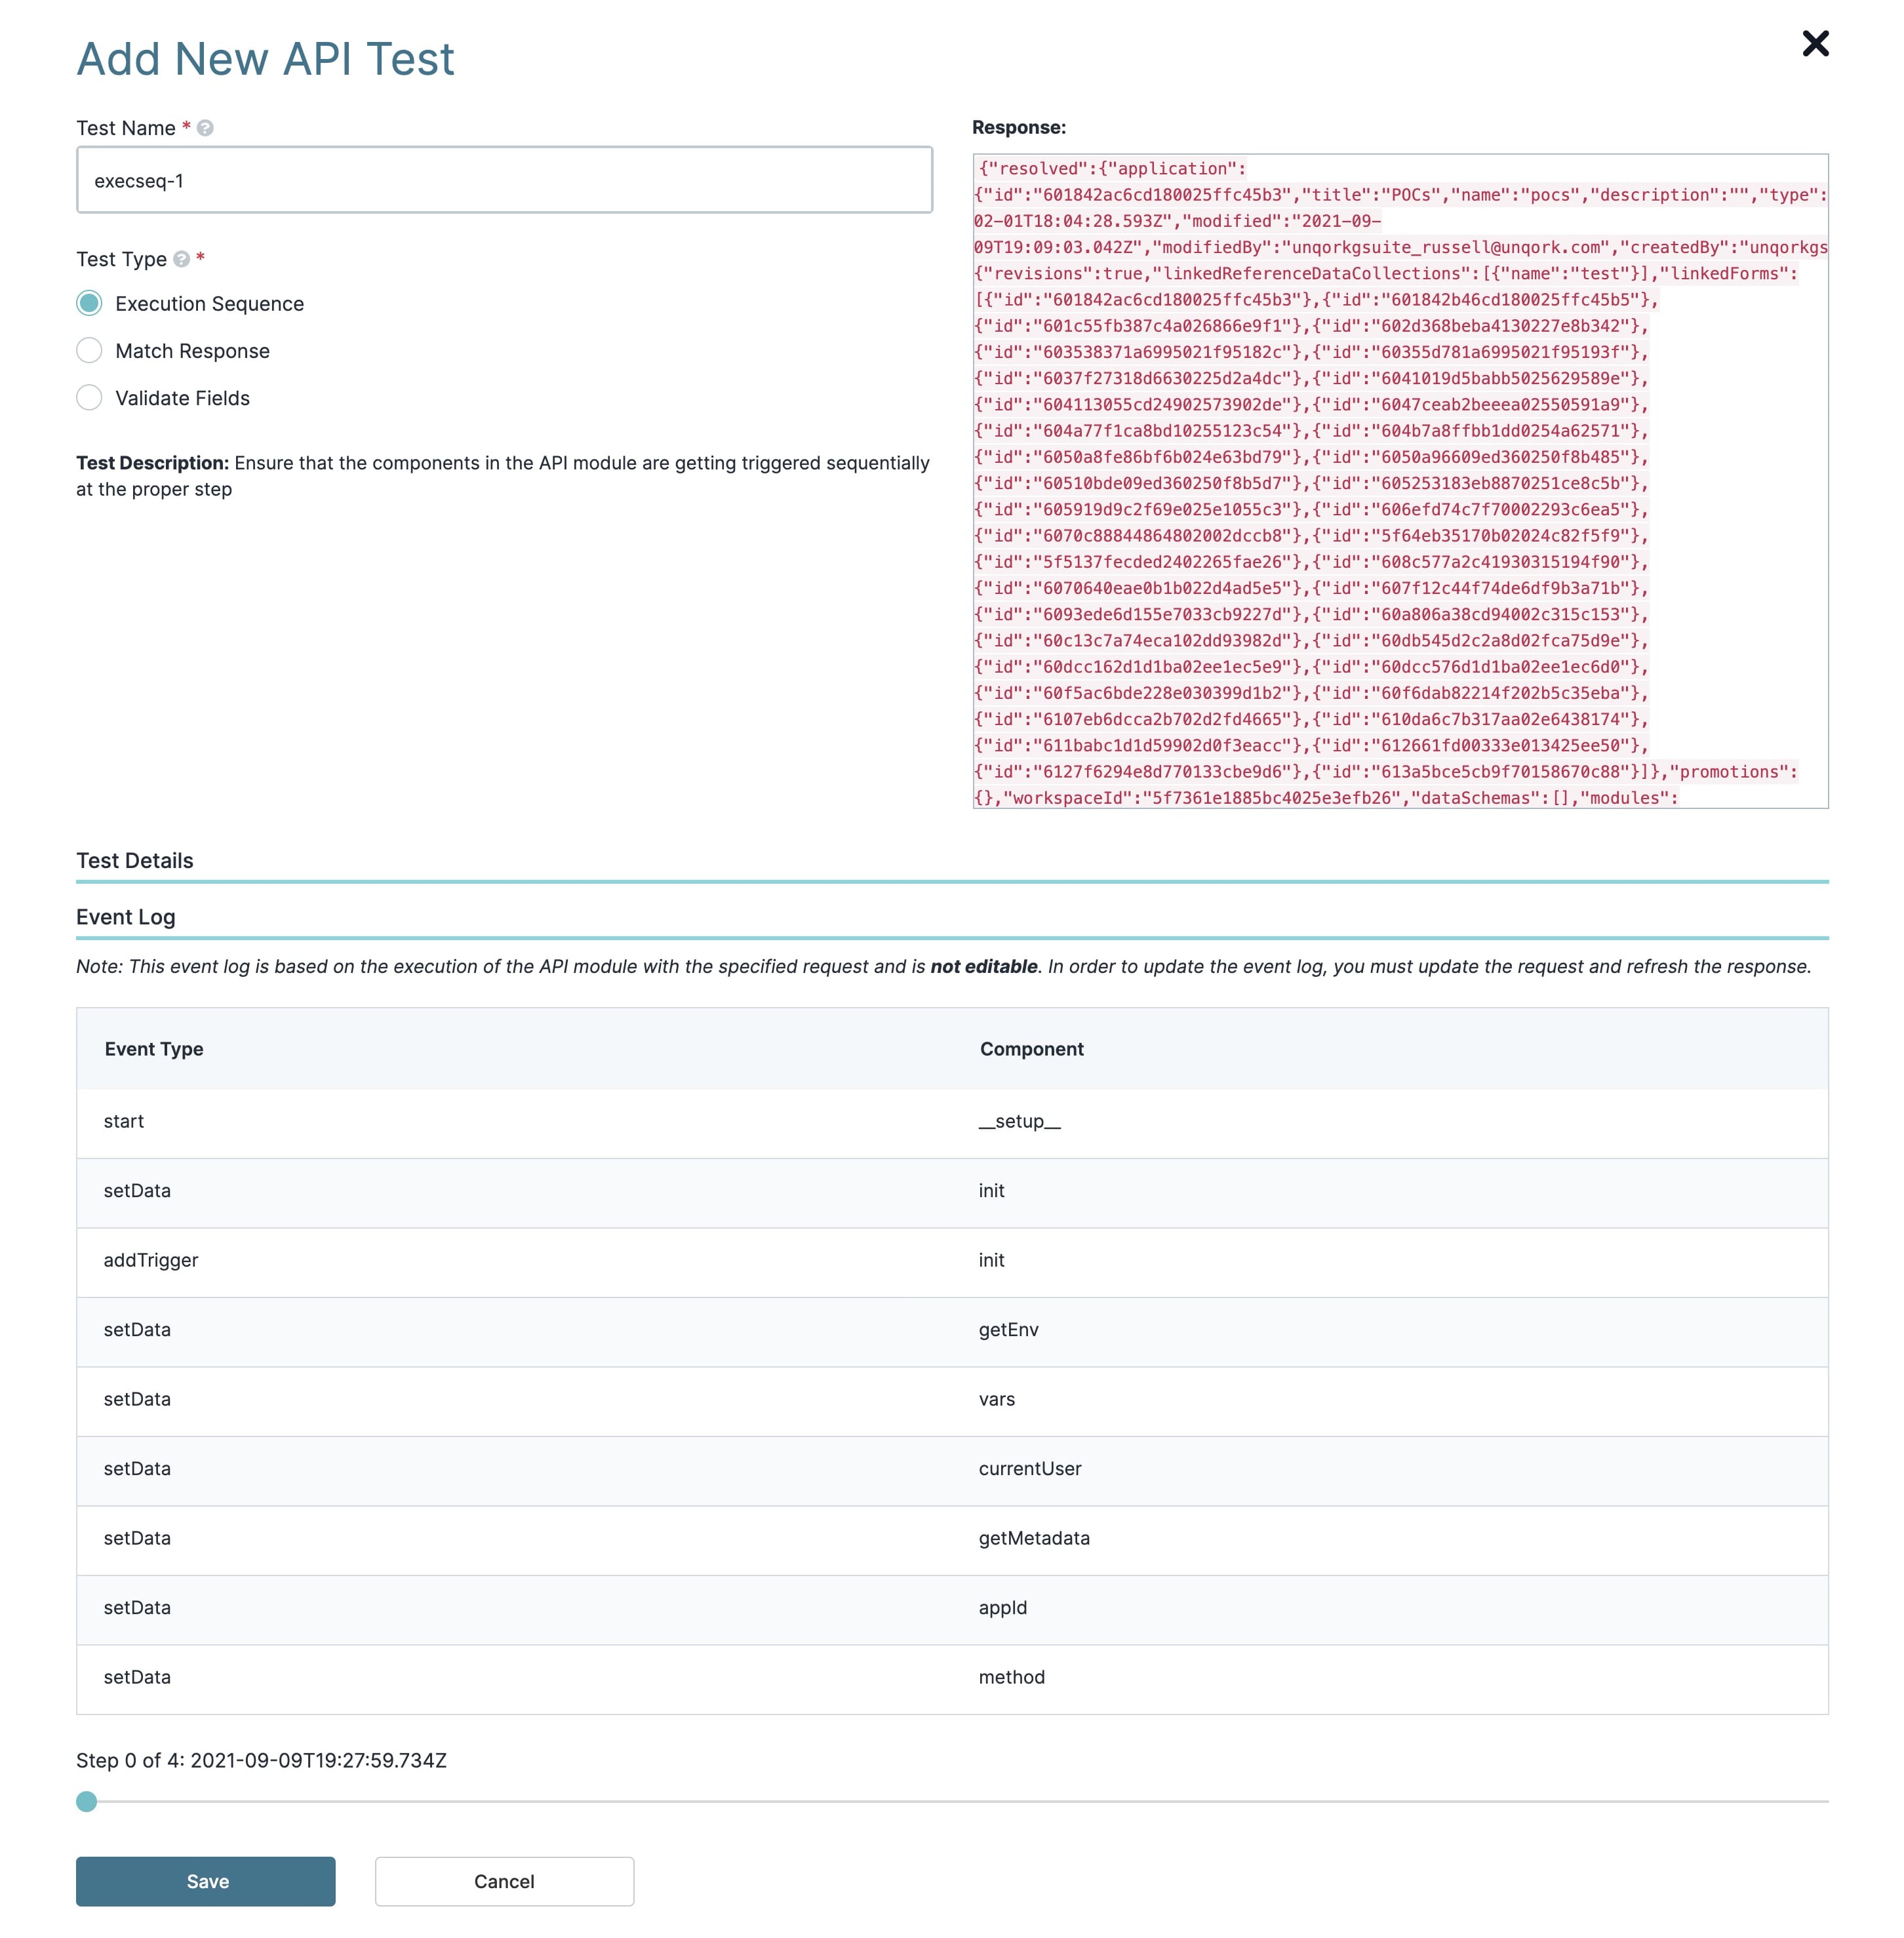
Execution Sequence | Request: The tested API request displays in the Request field. Event Log: This log displays the full sequence of your API call. It includes the components, events, and events that occurred. |
Match Response | Request: You'll see the tested API request in the Request field. Expected Response: This field displays the expected API response for your API module. |
Validate Fields | Request: You'll see the tested API request in the Request field. Test Details: The field where you enter the data and the criteria to test. |
Below is an example of what you see if you select the Execution Sequence Test Type.
Using the Validate Fields Test Type
Under Test Types, Validate Fields requires extra information. After selecting Validate Fields, you'll see the following options display:
Attribute | Description |
|---|---|
Data Field | The data field you want to test. |
Validation Type | The type of validation you want to test. The options include Exists, Size, and Value. |
Exists | Confirms the data field you entered exists somewhere in your API response. |
Size | Confirms the size of the data field you entered. For example, let's say you expect your data field to be an array of 100 rows. To confirm the array size, you'll enter 100 in the Size field. |
Value | Confirms the expected value for your data field is correct. |
Condition | This drop-down only displays if you select the Size or Value Validation Types. |
Equals | Checks if the Size or Value you entered equals the Data Field. |
Contains | Checks if the Size or Value you entered is part of the Data Field. |
Is Greater Than | Checks to see if the Data Field is greater than the Size or Value entered. |
Is Less Than | Checks to see if the Data Field is less than the Size or Value entered. |
Not Equal To | Checks if the Size or Value you entered doesn't equal the Data Field. |
Value | The size or value you want to test when you select the Size or Value Validation Type. |
+ Add Button | Click this button to set up the API test. |
To understand the Validate Fields type, let's look at how to use it:
In the Test Name field, enter a unique test name.
Select a Test Type.
In the Data Field field, enter a specific data field.
Examples of data fields could be
keyorarray.0.key.Select a Validation Type.
If you select Size:
From the Condition drop-down, select a condition.
In the Size field, enter the size of the array.
If you select Value:
From the Condition drop-down, select a condition.
In the Value field, enter the response value for your data field.
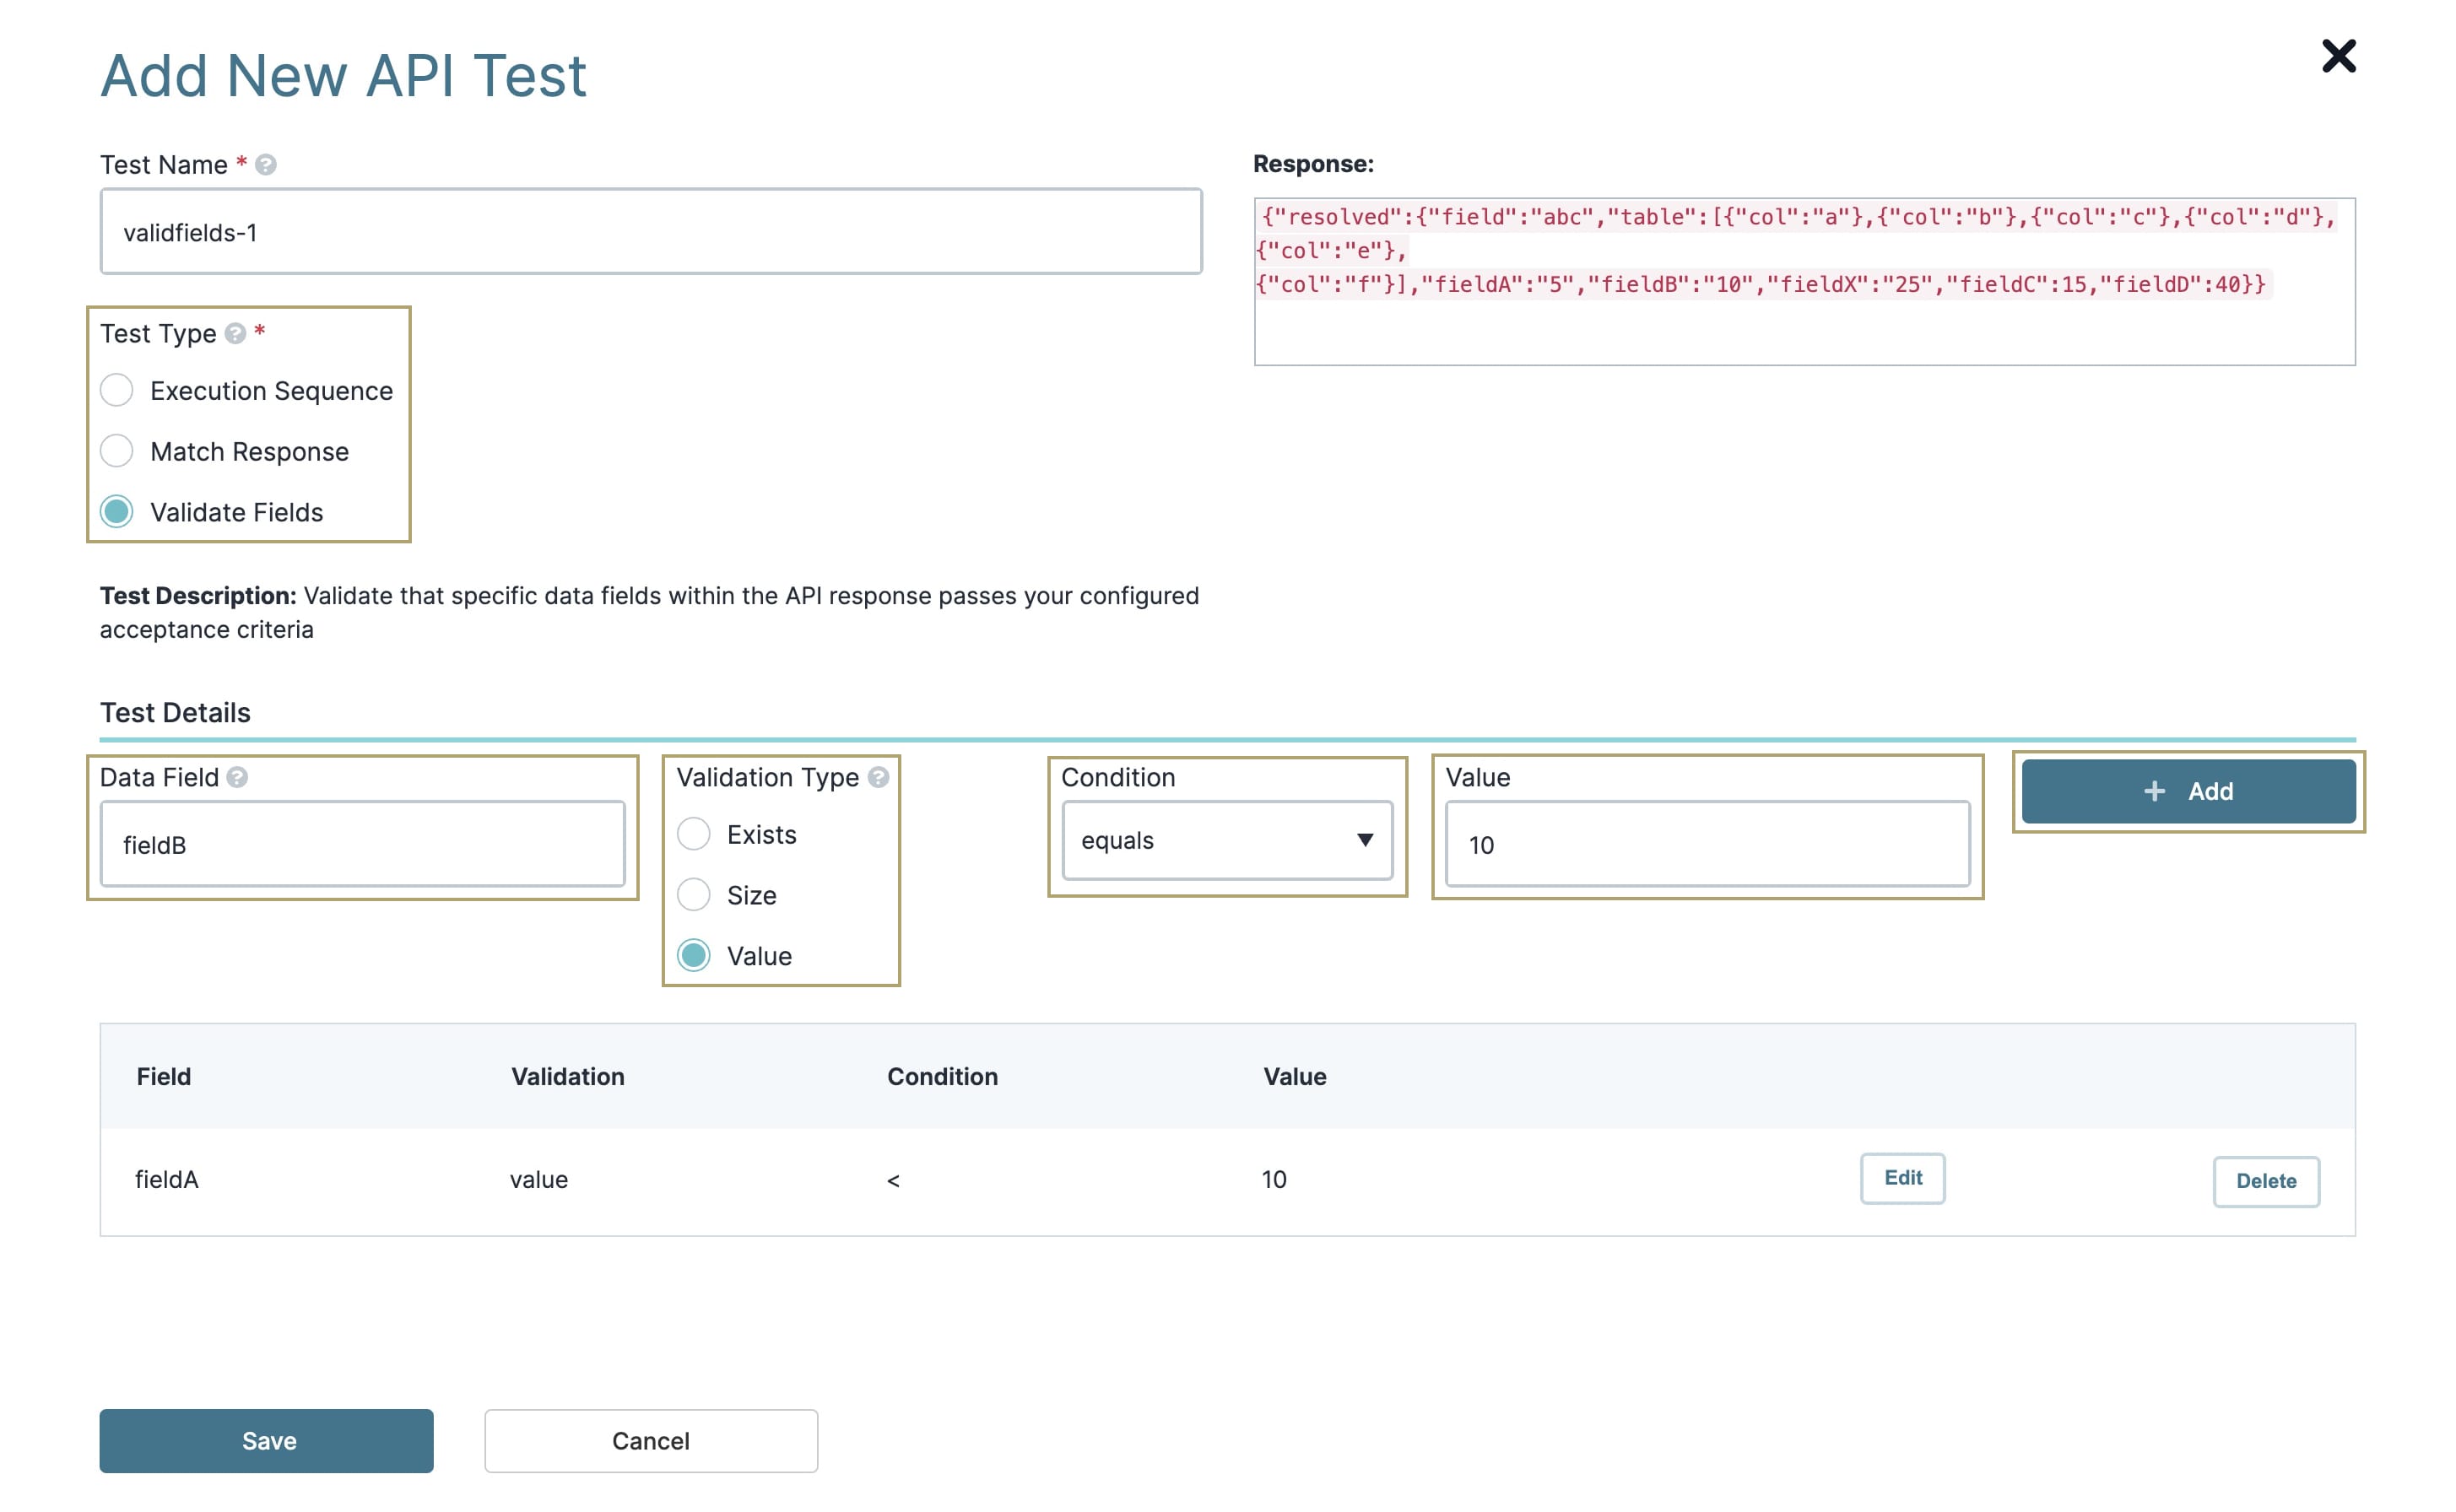
Click + Add.
Repeat these steps to add more validations. You can add as many validations as you want.
Click Save.
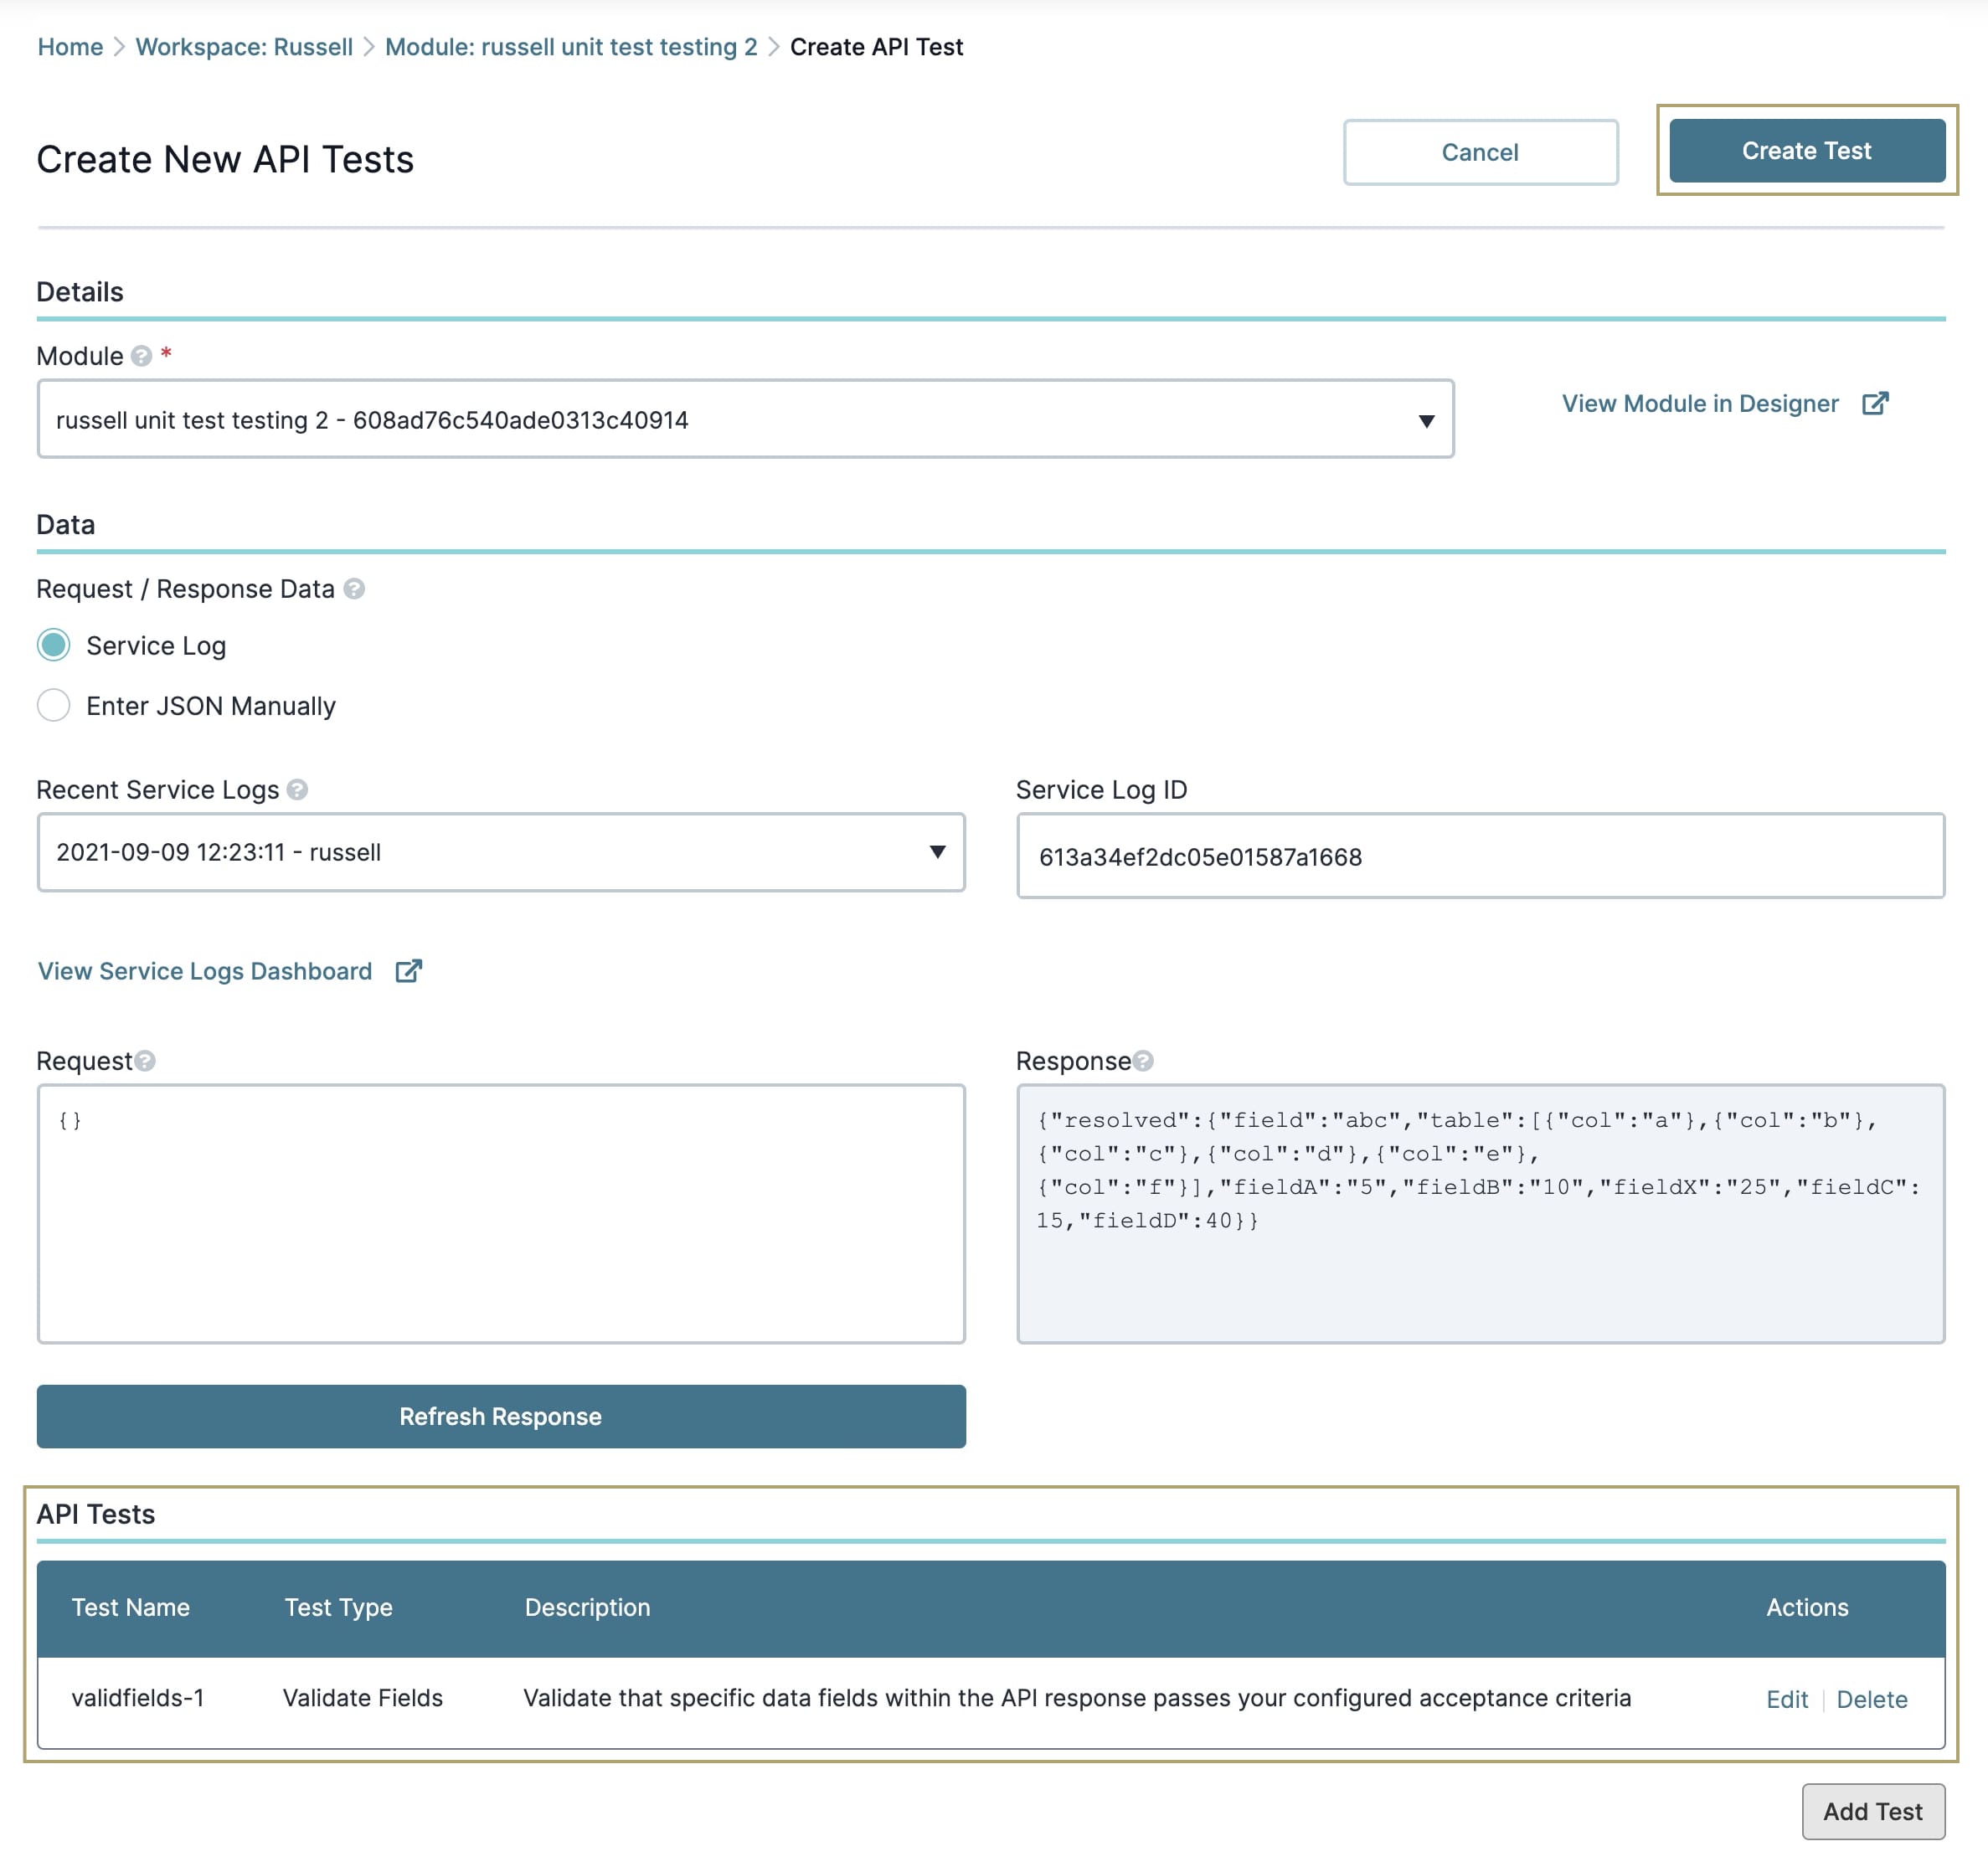
Your focus returns to the previous test page. You can see your new tests added to the bottom of the page. Click Create Test, and your tests will execute. Every time you save your module, these tests run.
Below is an example of what you might see:
