Plug-In Component
Overview
The Plug-In component connects a module to internal and external API APIs (application programming interfaces) are a set of protocols and definitions developers use to build and integrate application software. APIs act as the connective tissue between products and services. services for passing data to and from a chosen source.
To make an external API call with a Plug-In component, set up the API service in Unqork's Services Administration. Doing so requires you to reference the external service's API documentation. Once the service is set up, the API call becomes available to use with the Plug-In component.
To learn more about Services Administration, view our Services Administration article.
You'll find the Plug-In component in the Data & Event Processing group to the left of the Module Builder.
Remote Executing Your Plug-In Component
It's best practice to configure your Plug-In component to remote execute. Remote execute, or server-side execution, lets the Plug-In component execute the call outside of the browser. Running APIs in the browser is not secure. If the API call happens in the browser, malicious agents can access the data in the DevTools Console The DevTools Console helps you securely store, build, test, and deploy your software.—including accessing PII Personal Identifiable Information (PII) is any representation of information that permits the identity of an individual to whom the information applies to be reasonably inferred by either direct or indirect means. (personally identifiable information) and inject malware.
The benefits of using remote execute are:
-
Speed: Back-end services handled by a remote server ease the burden on the browser.
-
Security: No one can use the DevTools Console to access PII.
-
Debugging: Modularization provides a smaller code-base for debugging.
To learn more about the DevTools Console, view our Access Submission Data Using the DevTools Console article.
What You'll Learn
After completing this
About the Configuration Window
To learn more about general component settings and those that display when a component is associated with Data Models, view our General Component Settings article.
Display Panel
Field Text

|
Setting |
Description |
|---|---|
|
Label Text |
Label Text conveys what the input component is and what information it displays. Enter the purpose of the corresponding component or field. User-friendly labels make your module more accessible. Keep labels short and descriptive (a word or two) using title case. For longer entries, use sentence case. |
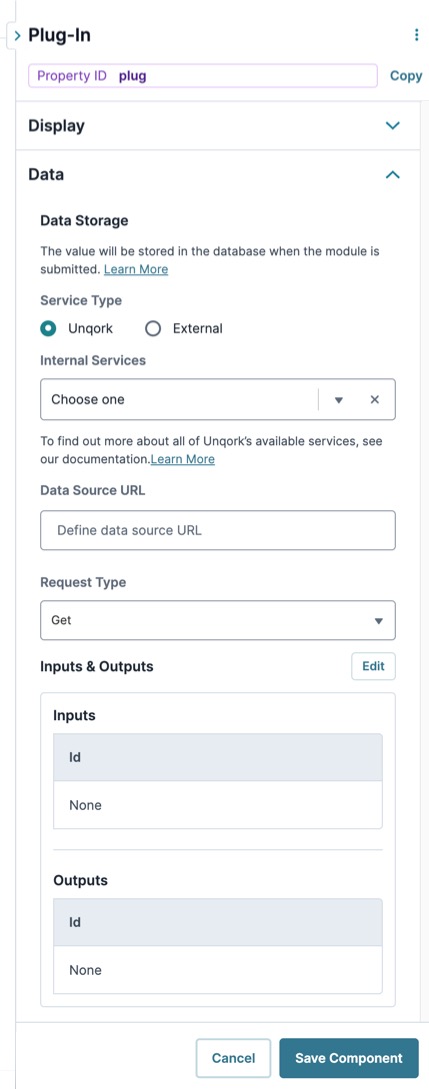
Data Panel
Data Storage
Service Type
The Plug-In component can be used for making internal Unqork API calls and external API calls.
Unqork
Selecting this option provides you with an Internal Services drop-down.
|
Setting |
Description |
|---|---|
|
Internal Services |
Shows all internal Unqork services available for use. After selecting a service, the Request Type and Data Source URL autofill. |
|
Pre-Request Transform |
This setting only displays for certain internal services. In the Pre-Request Transform drop-down, you can select a transform to perform on the submission. The transformed output creates the request body passed to the API call. |
|
Module/Workflow |
If you are making a call to a module or workflow, a Module or Workflow drop-down displays, so you can select a specific module or workflow. |
|
Data Source URL |
For an API to retrieve data, you need the API's URL information. In this field, enter the API information as obtained from the API documentation. Add additional filters at the end of the URL if you want to drill down to a specific type of data. |
External
Selecting this option provides you with an External Services drop-down.
|
Setting |
Description |
|---|---|
|
External Services |
Shows all services already configured in Services Administration. After selecting a service, the Request Type and Data Source URL autofill. |
|
Data Source URL |
For an API to retrieve data, you need the API's URL information. In this field, enter the API information as obtained from the API documentation. Add additional filters at the end of the URL if you want to drill down to a specific type of data. |
Request Type
The Request Type is automatically selected after you've completed the Service Type settings. The Plug-In component includes five Request Types.
-
Get: Retrieves and reads existing resources, like submission data.
-
Patch: Partially updates existing resources.
-
Post: Creates new resources.
-
Put: Updates existing resources.
-
Delete: Deletes resources.
If Patch, Post, or Put are selected, two new toggles display:
|
Setting |
Description |
|---|---|
|
Make a MultiPart API Call |
Multipart API calls combine one or more sets of data into a single body. Multipart requests are common for file uploads and for transferring multiple data types with a single request. Set this toggle to ON when sending a request that isn't part of the API's body. When set to (ON), the Alternative Multipart Sub-Type (Services) field displays. |
|
Alternative Multipart Sub-Type (Services) |
The Alternative Multipart Sub-Type (Services) field is only available for external APIs, but can be used to specify whether the parts of your request are related, mixed, or otherwise correlated. |
|
Promote Object/Array to Top Level |
Use this setting to call an object or array, and make it the body of the API request. When the Promote Object/Array to Top Level toggle is set to (ON), the Object/Array Key field displays. |
|
Object/Key Array |
In this field, enter the key of the object or array that you're promoting to the top level. |
Inputs Table
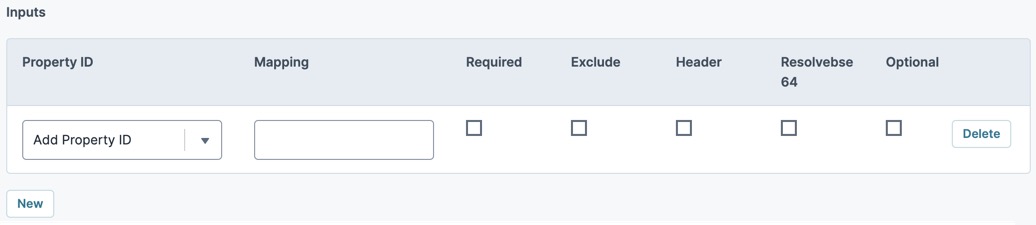
Use these fields to enter inputs as references for your logic components. These references include values you want to send as part of the API call's request header or body. For example, when getting module submission details for a dashboard, you need to enter the fields that you want to pull from the source module.
There is a 50 MB limit for all request payloads to internal services in Unqork.
|
Setting |
Description |
|---|---|
|
Property ID |
Examples of supported inputs include:
The Property ID entered must match the Property ID used in the output component. Remember, use camel case (stylized as camelCase) without spaces or punctuation. When using the Watch Trigger Type, enter all inputs the component must watch for in the Property ID column. You can use dot notation to reference values nested in a Property ID in the submission data.
|
|
Mapping |
API documentation includes mapping information. Mapping information tells your Plug-In component which data to send or retrieve from the API call. In the case of SendGrid integration, the Mapping column indicates where the Property ID values show up in the email. If you enter 'no-reply@unqork.com' in the Inputs table's Property ID and from.email in the Mapping column, your From address is no-reply@unqork.com. |
|
Required |
When |
|
Exclude |
When selected, the Plug-In component doesn't pass the field as part of your API call's request body. But, the Plug-In component can still watch for changes made to the value. |
|
Header |
When selected, the Plug-In component passes the field as part of the API call's request header. When clear, the Plug-In component passes the field as part of the request body. |
|
Resolvebase64 |
Select this setting if you're expecting a Base64 Base64 is an encoding and decoding technique used to convert binary data to an ASCII (American Standard for Information Interchange) text format. file from your API request. Selecting this setting prepares the system for the Base64 file, making it easier to convert the file. |
|
Optional |
When selected, the Plug-In component doesn't pass the field in the API call's request body if there's no value (null). By default, the Plug-In passes every Input in the request body, even if the field is empty (null). |
 (Checked), the end-user must enter a value into the field before navigating ahead or saving the
 Outputs
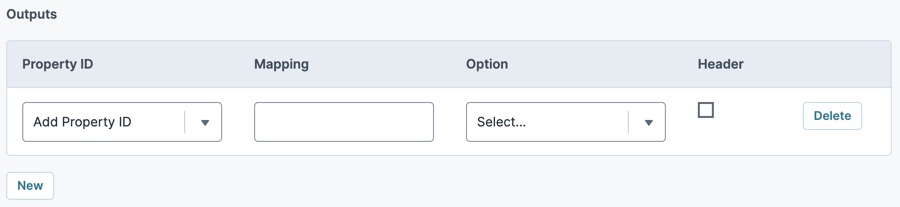
Use the Outputs table to send the data retrieved by the API call to a specific location.
|
Setting |
Description |
|---|---|
| Property ID |
For your logic component to recognize an output, you must enter the destination component's Property ID(s). The Property ID entered must match the Property ID of the component that acts as the output. Remember, use camel case A naming convention for computer programming. Use camelCase for Property IDs, for example: newUser, lastName, & rdoButton. without spaces or punctuation. |
|
Mapping |
Map Property IDs according to the API's documentation. Mapping tells your Plug-In component what to retrieve from the API call. For the Outputs table, map specific data to put into your output components. |
|
Option |
This setting offers handling methods for your outputs:
|
|
Header |
When selected, the Plug-In component looks for the output value in the response header. When clear, the Plug-In looks for the field in the response body. |
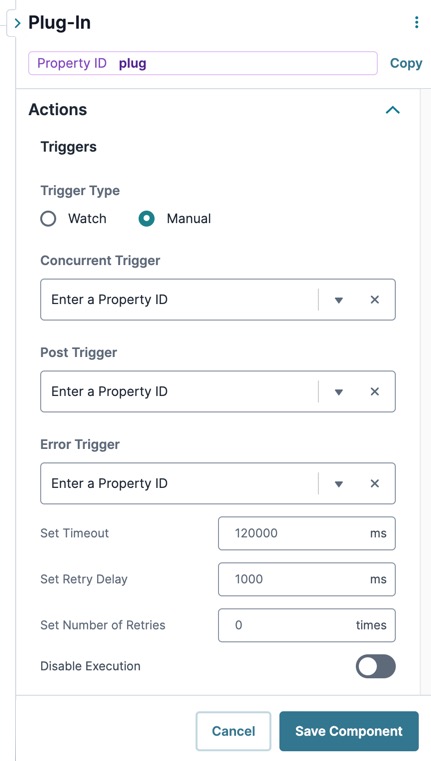
Actions Panel
Triggers
|
Setting |
Description |
|---|---|
|
Trigger Type |
This setting provides the following options:
By default, this Trigger Type is selected.
|
|
Concurrent Trigger |
Enter the Property ID of the component to trigger concurrently when the Plug-In component makes the API call. |
|
Post Trigger |
Enter the Property ID of the component to trigger after the Plug-In completes the API call. For example, triggering a component to display the data received from the Plug-In component's API call. |
|
Error Trigger |
Enter the Property ID of a component to trigger on failure of the API call. Errors can be 4xx, 5xx, and other network errors. |
|
Set Timeout |
The number of milliseconds that pass before the API call times out. If an API call doesn't respond within a reasonable time, you don't want the Plug-In component to continue to wait. Unresponsive API calls can stall your entire application. The maximum timeout is 120,000 milliseconds. |
|
Set Retry Delay |
The number of milliseconds that pass before the component tries the API call again after it failed. Waiting before retrying an API call could give the destination server time to clear the issues that caused it to be unresponsive. The maximum delay is 10,000 milliseconds. In the Centauri runtime, this setting does not trigger when the Plug-In component fails a PUT call to a remote execute. However, it will trigger when the PUT call fails in the Vega runtime. Errors can be 4xx, 5xx, and other network errors. |
|
Set Number of Retries |
The number of retries the Plug-In component makes on a failed API call. It's best practice to limit the number of retries, so a continually failing API call doesn't stall your application. Use this setting to limit the number of times the Plug-In component retries the failed API call. If the API call fails all retries, the Error Trigger fires. The maximum number of retries is 10. In the Centauri runtime, this setting does not trigger when the Plug-In component fails a PUT call to a remote execute. However, it will trigger when the PUT call fails in the Vega runtime. Errors can be 4xx, 5xx, and other network errors. |
|
Disable Execution |
If Disable Execution is set to (ON), the logic tied to this component does not execute. Use this to keep the component's settings, but disable the operations it performs. By default, this setting is set to (OFF). |
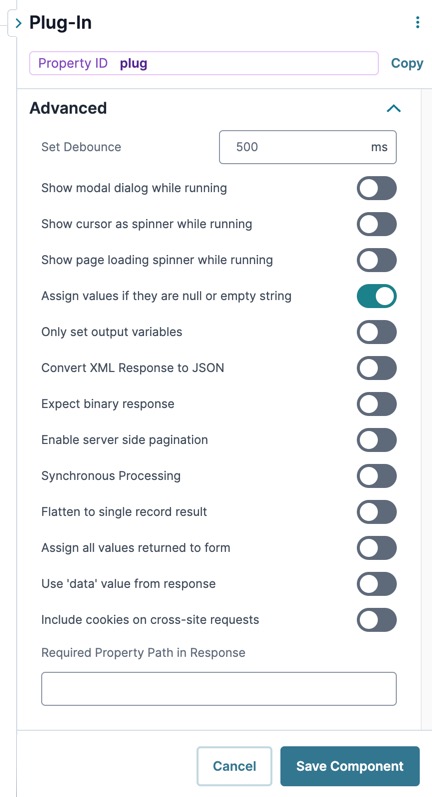
Advanced Panel
|
Setting |
Description |
|---|---|
|
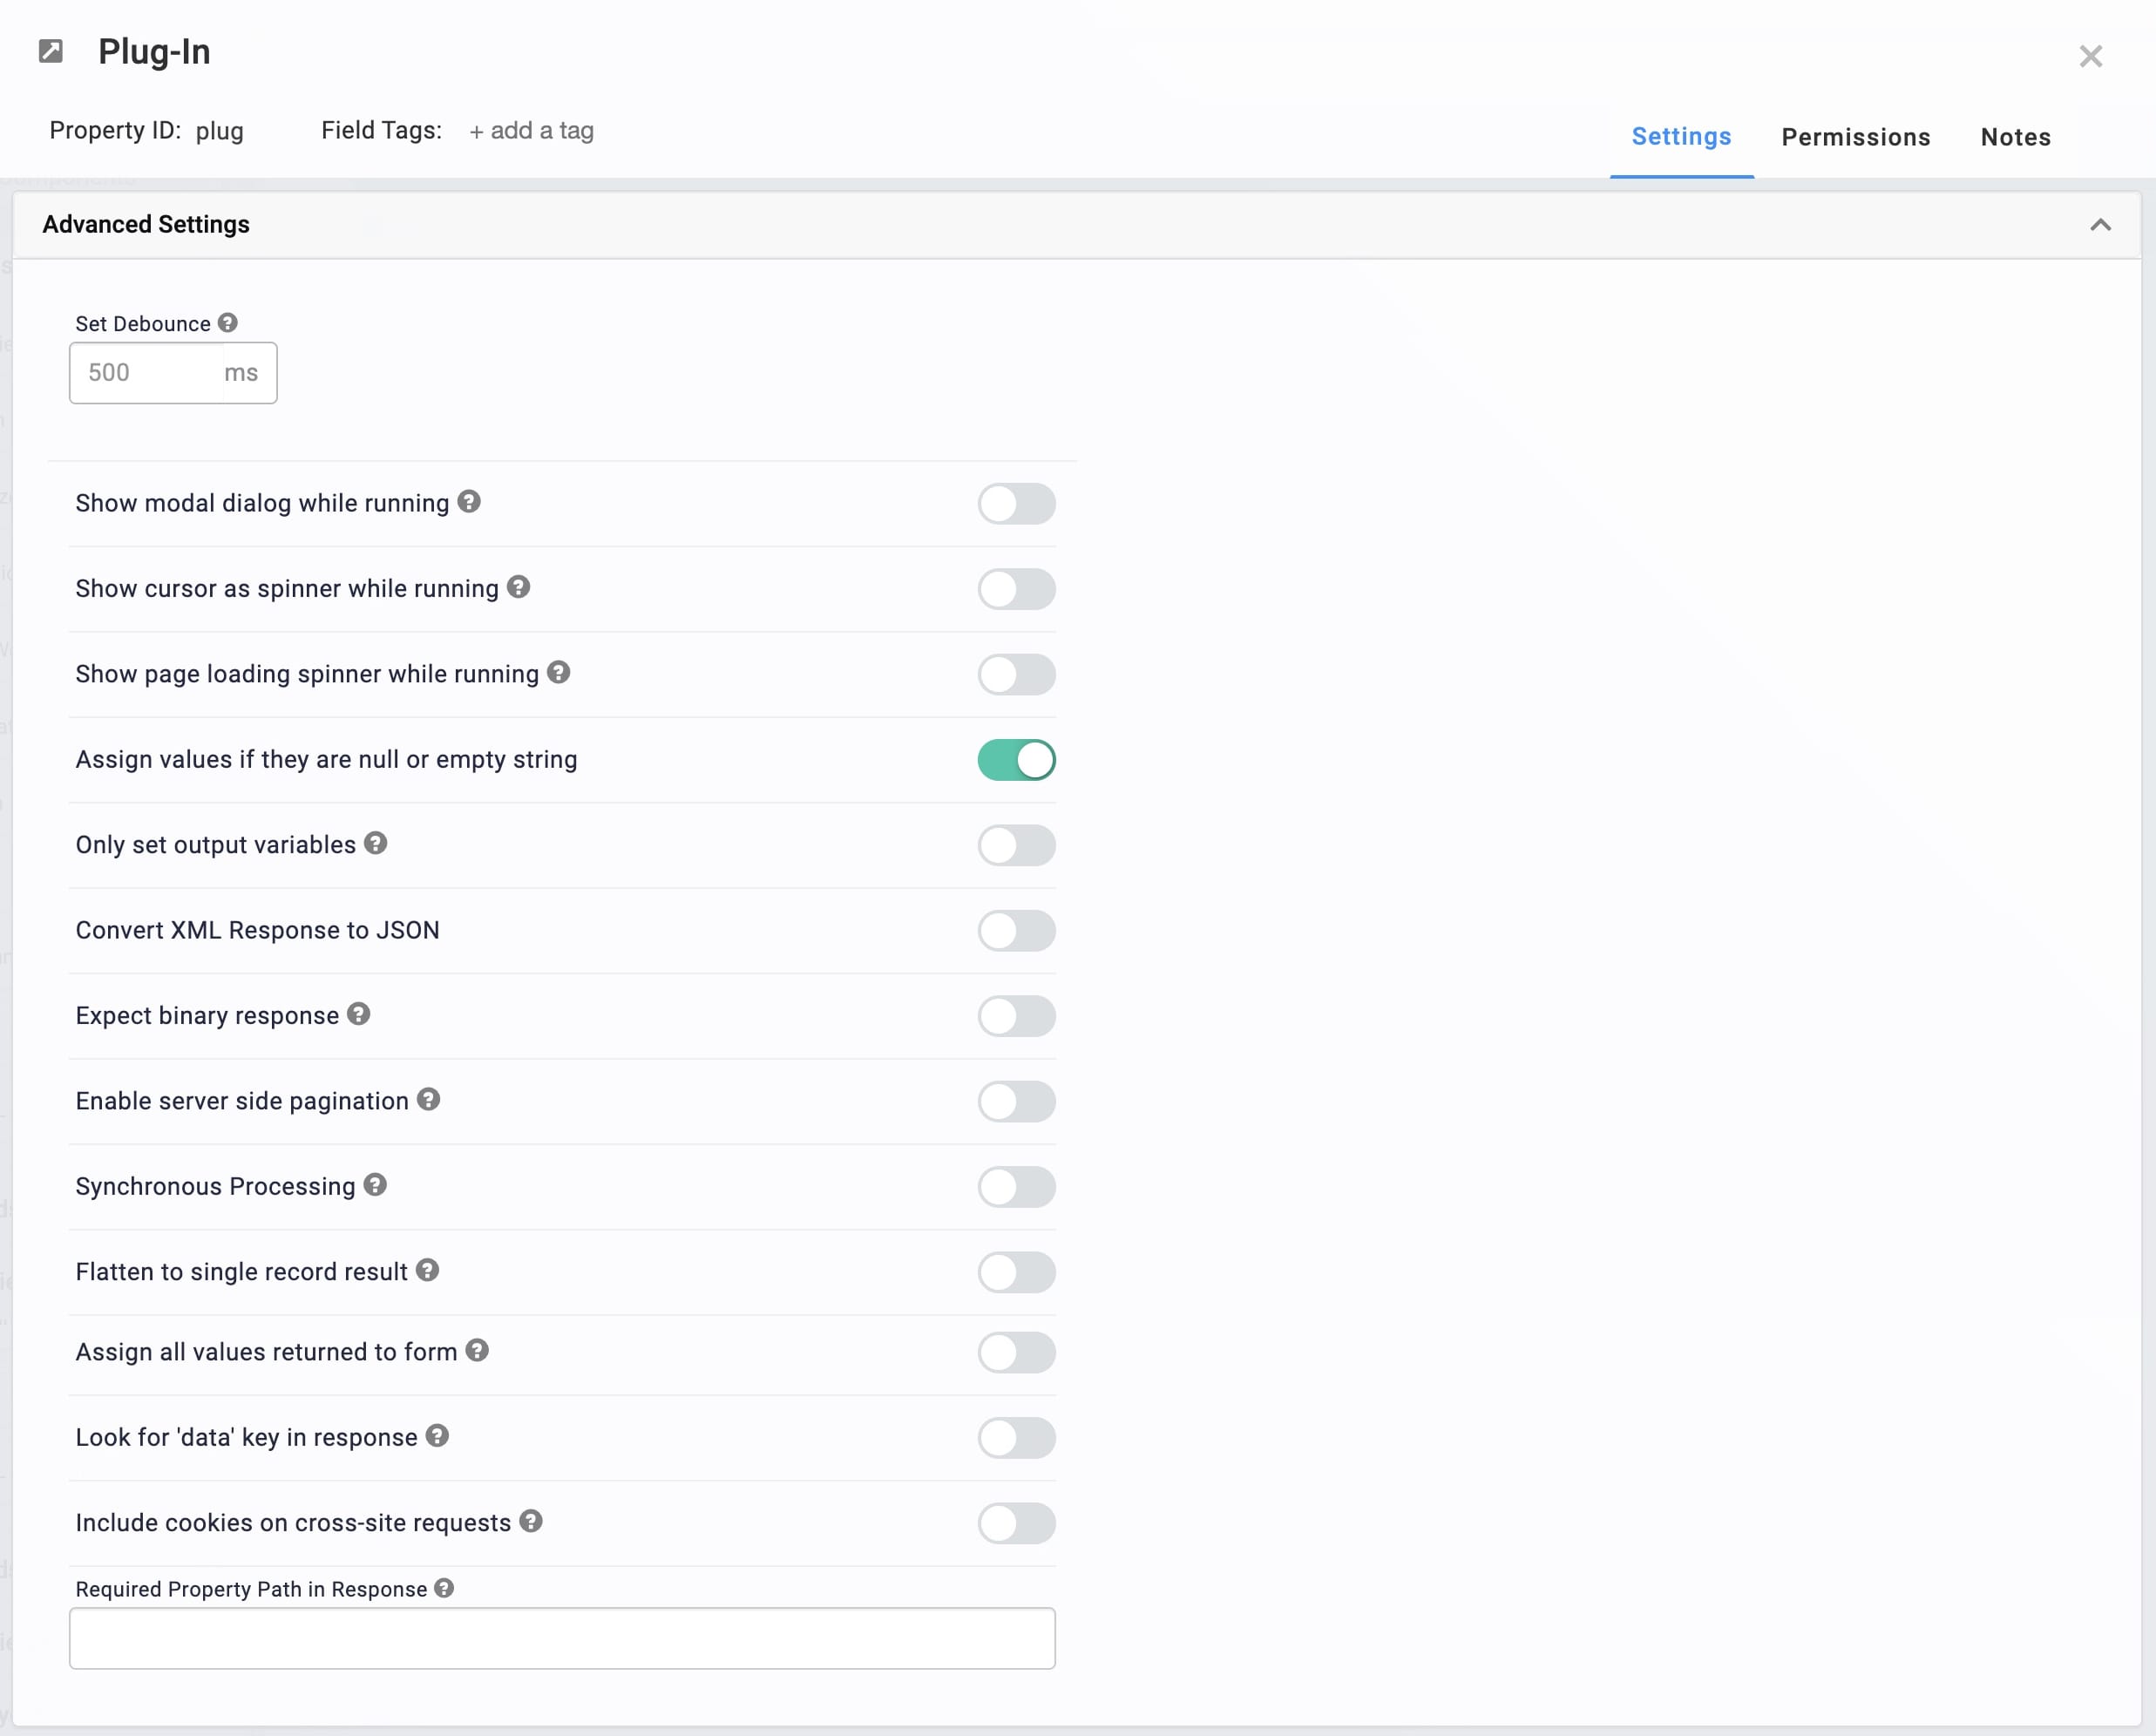
Set Debounce |
The number of milliseconds that pass before the module loads this component. This is useful if you have a large module and you load several components at the same time. 1,000 milliseconds = 1 second. |
|
Show Modal Dialog While Running |
When set to (ON), this setting creates a modal that informs the end-user that the data is processing. The following fields are optional:
By default, this toggle is set to (OFF). |
|
Show Cursor as Spinner While Running |
When set to (ON), the end-user's cursor turns into a spinner while data processes. By default, this toggle is set to (OFF). |
|
Show Page Loader Spinning While Running |
When set to (ON), the page displays a spinning icon while data processes. By default, this toggle is set to (OFF). |
|
Assign Values if They Are Null or Empty String |
If an output comes back empty, you can either have the data store as an empty value or choose not to store the data. By setting this toggle to (ON), null or empty strings store as empty values. If set to (OFF), the values don't record. By default, this toggle is set to (ON). |
|
Only Set Output Variables |
When set to (ON), the Plug-In component only returns the values set in the Output table, instead of the entire plugin object. Also, none of the Plug-In component's other information logs in the DevTools Console. When set to (OFF), the plugin object logs in the DevTools Console with all response data. By default, this toggle is set to (OFF). |
|
Convert XML Response to JSON |
Older API calls are more likely to use XML Extensible Markup Language (XML) is markup language that lets you define and store data in a shareable way. coding language. The Unqork Designer Platform reads JSON JSON (JavaScript Object Notation) is an open standard file and data interchange format. Unqork uses JSON for submission (record) data. coding language only. If you know your API call returns XML, set this toggle to (ON). When set to (ON), the system automatically converts XML to JSON. By default, this toggle is set to (OFF). |
|
Expect Binary Response |
When set to (ON), the response doesn't convert to and store as Base64 Base64 is an encoding and decoding technique used to convert binary data to an ASCII (American Standard for Information Interchange) text format.. Enable this setting when you expect the API call to return a large file, and/or want to store the response in its original file format. By default, this toggle is set to (OFF). |
|
Enable Server Side Pagination |
When set to (ON), the server sends a single page of data at a time. This helps the page load faster and prevents bloating the end-user's memory. This setting is especially useful for large data sets. By default, this toggle is set to (OFF). |
|
Synchronous Processing |
When set to (ON), this setting performs each logic action in sequential order. Use this setting to prevent executing logic actions out of order. By default, this toggle is set to (OFF). |
|
Flatten to a Single Record Value |
When set to (ON), the module flattens results into a single record value. When set to OFF, the module leaves the results unflattened into multiple values. By default, this toggle is set to (OFF). |
|
Assign All Values Returned to Module |
When set to (ON), the Plug-In component scans the module for matching values across the API call and Property IDs. Only set this toggle to (ON) when the module and the API call's data match. By default, this toggle is set to (OFF). |
|
Use "Data" Value from Response |
The Plug-In component looks for all specified output values in the data section of the response body. When set to (ON), you can remove the data. prefix from your mapping fields. For example, mapping to lastName instead of data.lastName. By default, this toggle is set to (OFF). |
|
Include Cookies on Cross-Site Requests |
When set to (ON), an application can makes cross-site access-control requests using credentials, like cookies. By default, this toggle is set to (OFF). |
|
Required Property Path in Response |
This field lets you set a required property path return value. If the path isn't present in the response body, the call results in an error. |
Adding a Plug-In Component
In this example, set up the Plug-in component's List Submissions for Dashboard API call. This call retrieves data submitted by your end-user End-users, also known as Express Users, are the individuals accessing an application through Express View. In most cases, end-users are the customers using the product. and populates it on a dashboard. To make it easier, we already created the source module your end-user uses to submit their information. You can find the prebuilt source module here: https://training.unqork.io/#/form/5eb01aa6811bf80215fd706b/edit.
If you preview this module in Express View, you see a page that collects your end-user's information. This source module includes name, email, and date of birth fields. After your end-user adds their information, they click Save. Their submission data is then stored. The List Submissions for Dashboard API call references this source module and retrieves the submission data to display in a dashboard. These instructions assume that you have an open module saved with a title.
In this configuration, you need the following components:
-
1 Initializer component
-
1 Hidden component
-
1 Plug-In component
-
1 ViewGrid component
Configure the Initializer Component
This Initializer component triggers the Plug-In component that you'll set up later.
| 1. | In the Module Builder, drag and drop an Initializer component onto your canvas. |
| 2. | In the Property ID A Property ID is the unique field ID used by Unqork to track and link components in your module. field, enter initStart. |
| 3. | In the Canvas Label Text Label Text conveys what the input component is and what information it displays. Enter the purpose of the corresponding component or field. field, enter initStart. |
| 4. | Navigate to the Initializer component's Actions settings. |
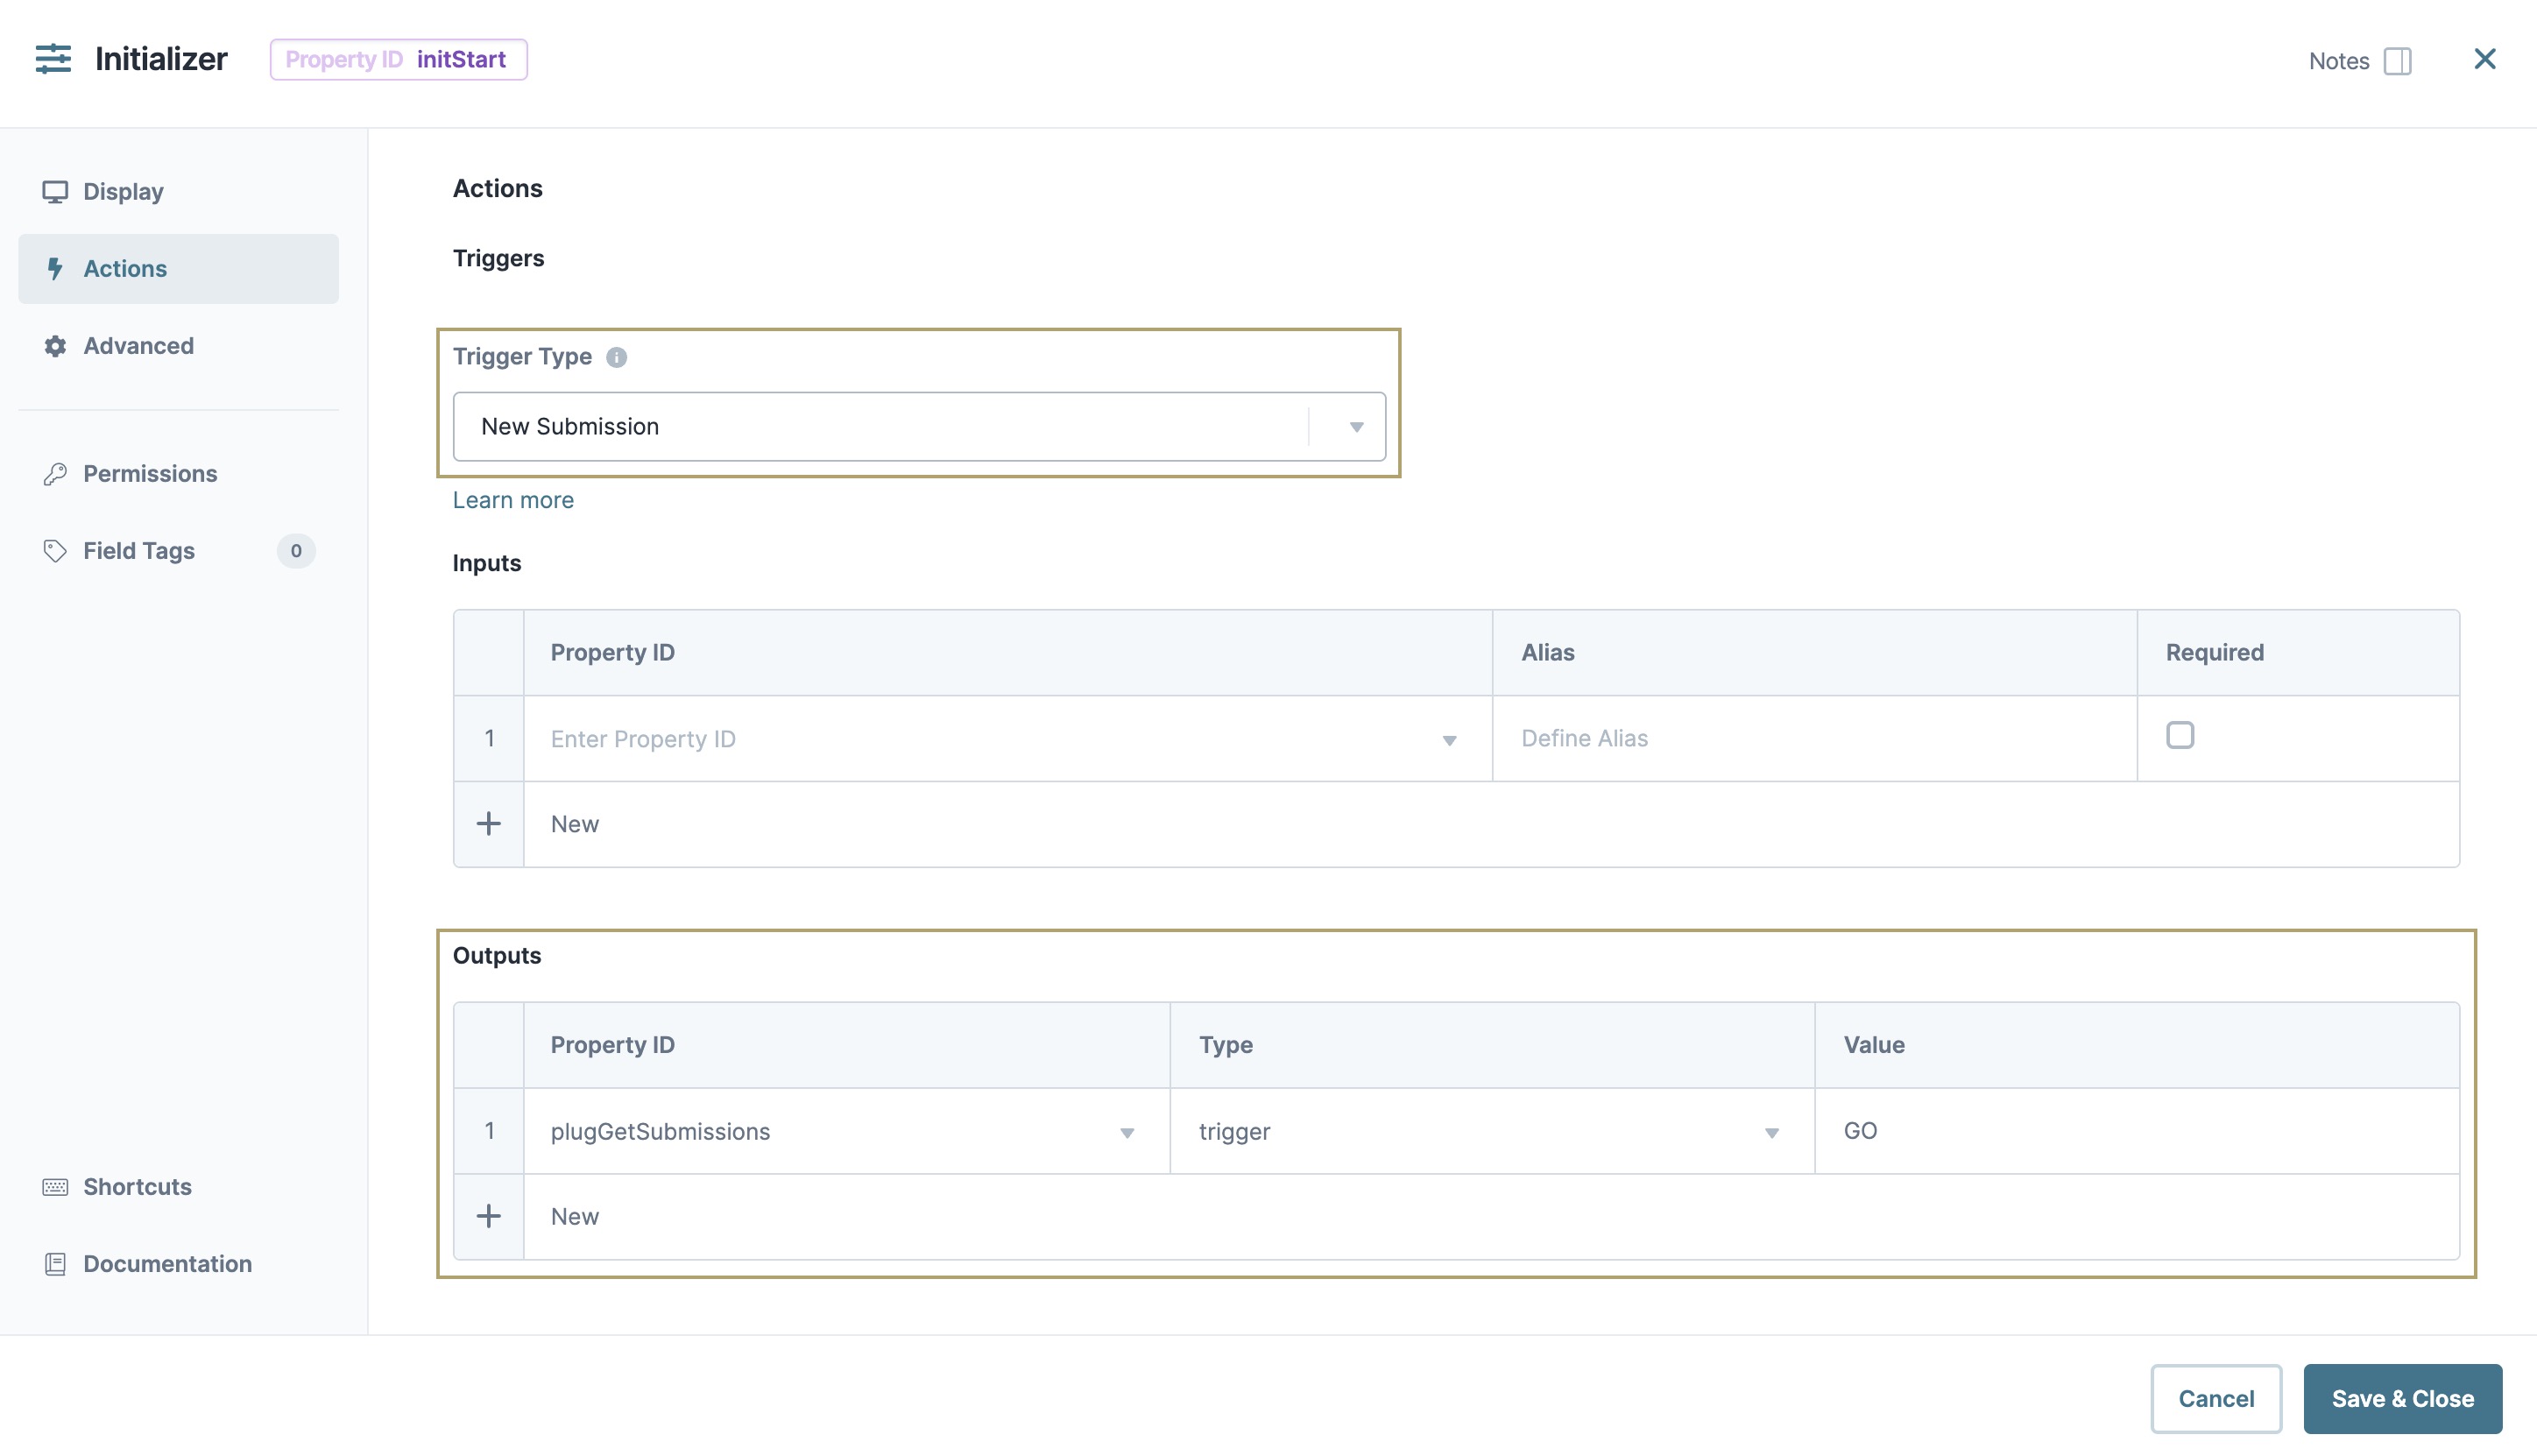
| 5. | From the Trigger Type drop-down, select New Submission. |
| 6. | Next to Inputs & Outputs, click Edit. |
| 7. | In the Outputs table, enter the following: |
|
Source |
Type |
Value |
|---|---|---|
|
plugGetSubmissions |
trigger |
GO |
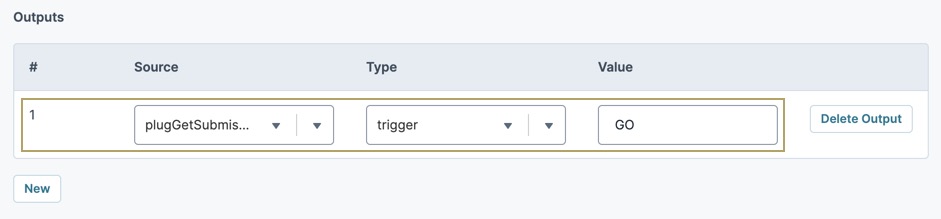
The Property ID here matches the Plug-In component you'll add in a later step.
| 8. | Click Save Component. |
Configure the Hidden Component
Next, add a Hidden component to store the module ID of your source module. If you have your own source module, you can use its module ID.
You can get the module ID from your source module’s hyperlink as follows: https://training.unqork.io/#/form/5eb01aa6811bf80215fd706b/edit. This module ID comes from the prebuilt source module.
| 1. | Drag and drop a Hidden component onto your canvas, placing it below your initStart Initializer component. |
| 2. | In the Property ID A Property ID is the unique field ID used by Unqork to track and link components in your module. field, enter moduleId. |
| 3. | In the Canvas Label Text Label Text conveys what the input component is and what information it displays. Enter the purpose of the corresponding component or field. field, enter moduleId. |
| 4. | In the Default Value field, enter 5eb01aa6811bf80215fd706b. |
| 5. | Click Save Component. |
Configure the Plug-In Component
Now, add a Plug-In component to retrieve the submissions from your source module, so you can display them in a dashboard.
| 1. | Drag and drop a Plug-In component onto your canvas, placing it below your moduleIdHidden component. |
| 2. | In the Property ID A Property ID is the unique field ID used by Unqork to track and link components in your module. field, enter plugGetSubmissions. |
| 4. | Navigate to the Plug-In component's Data settings. |
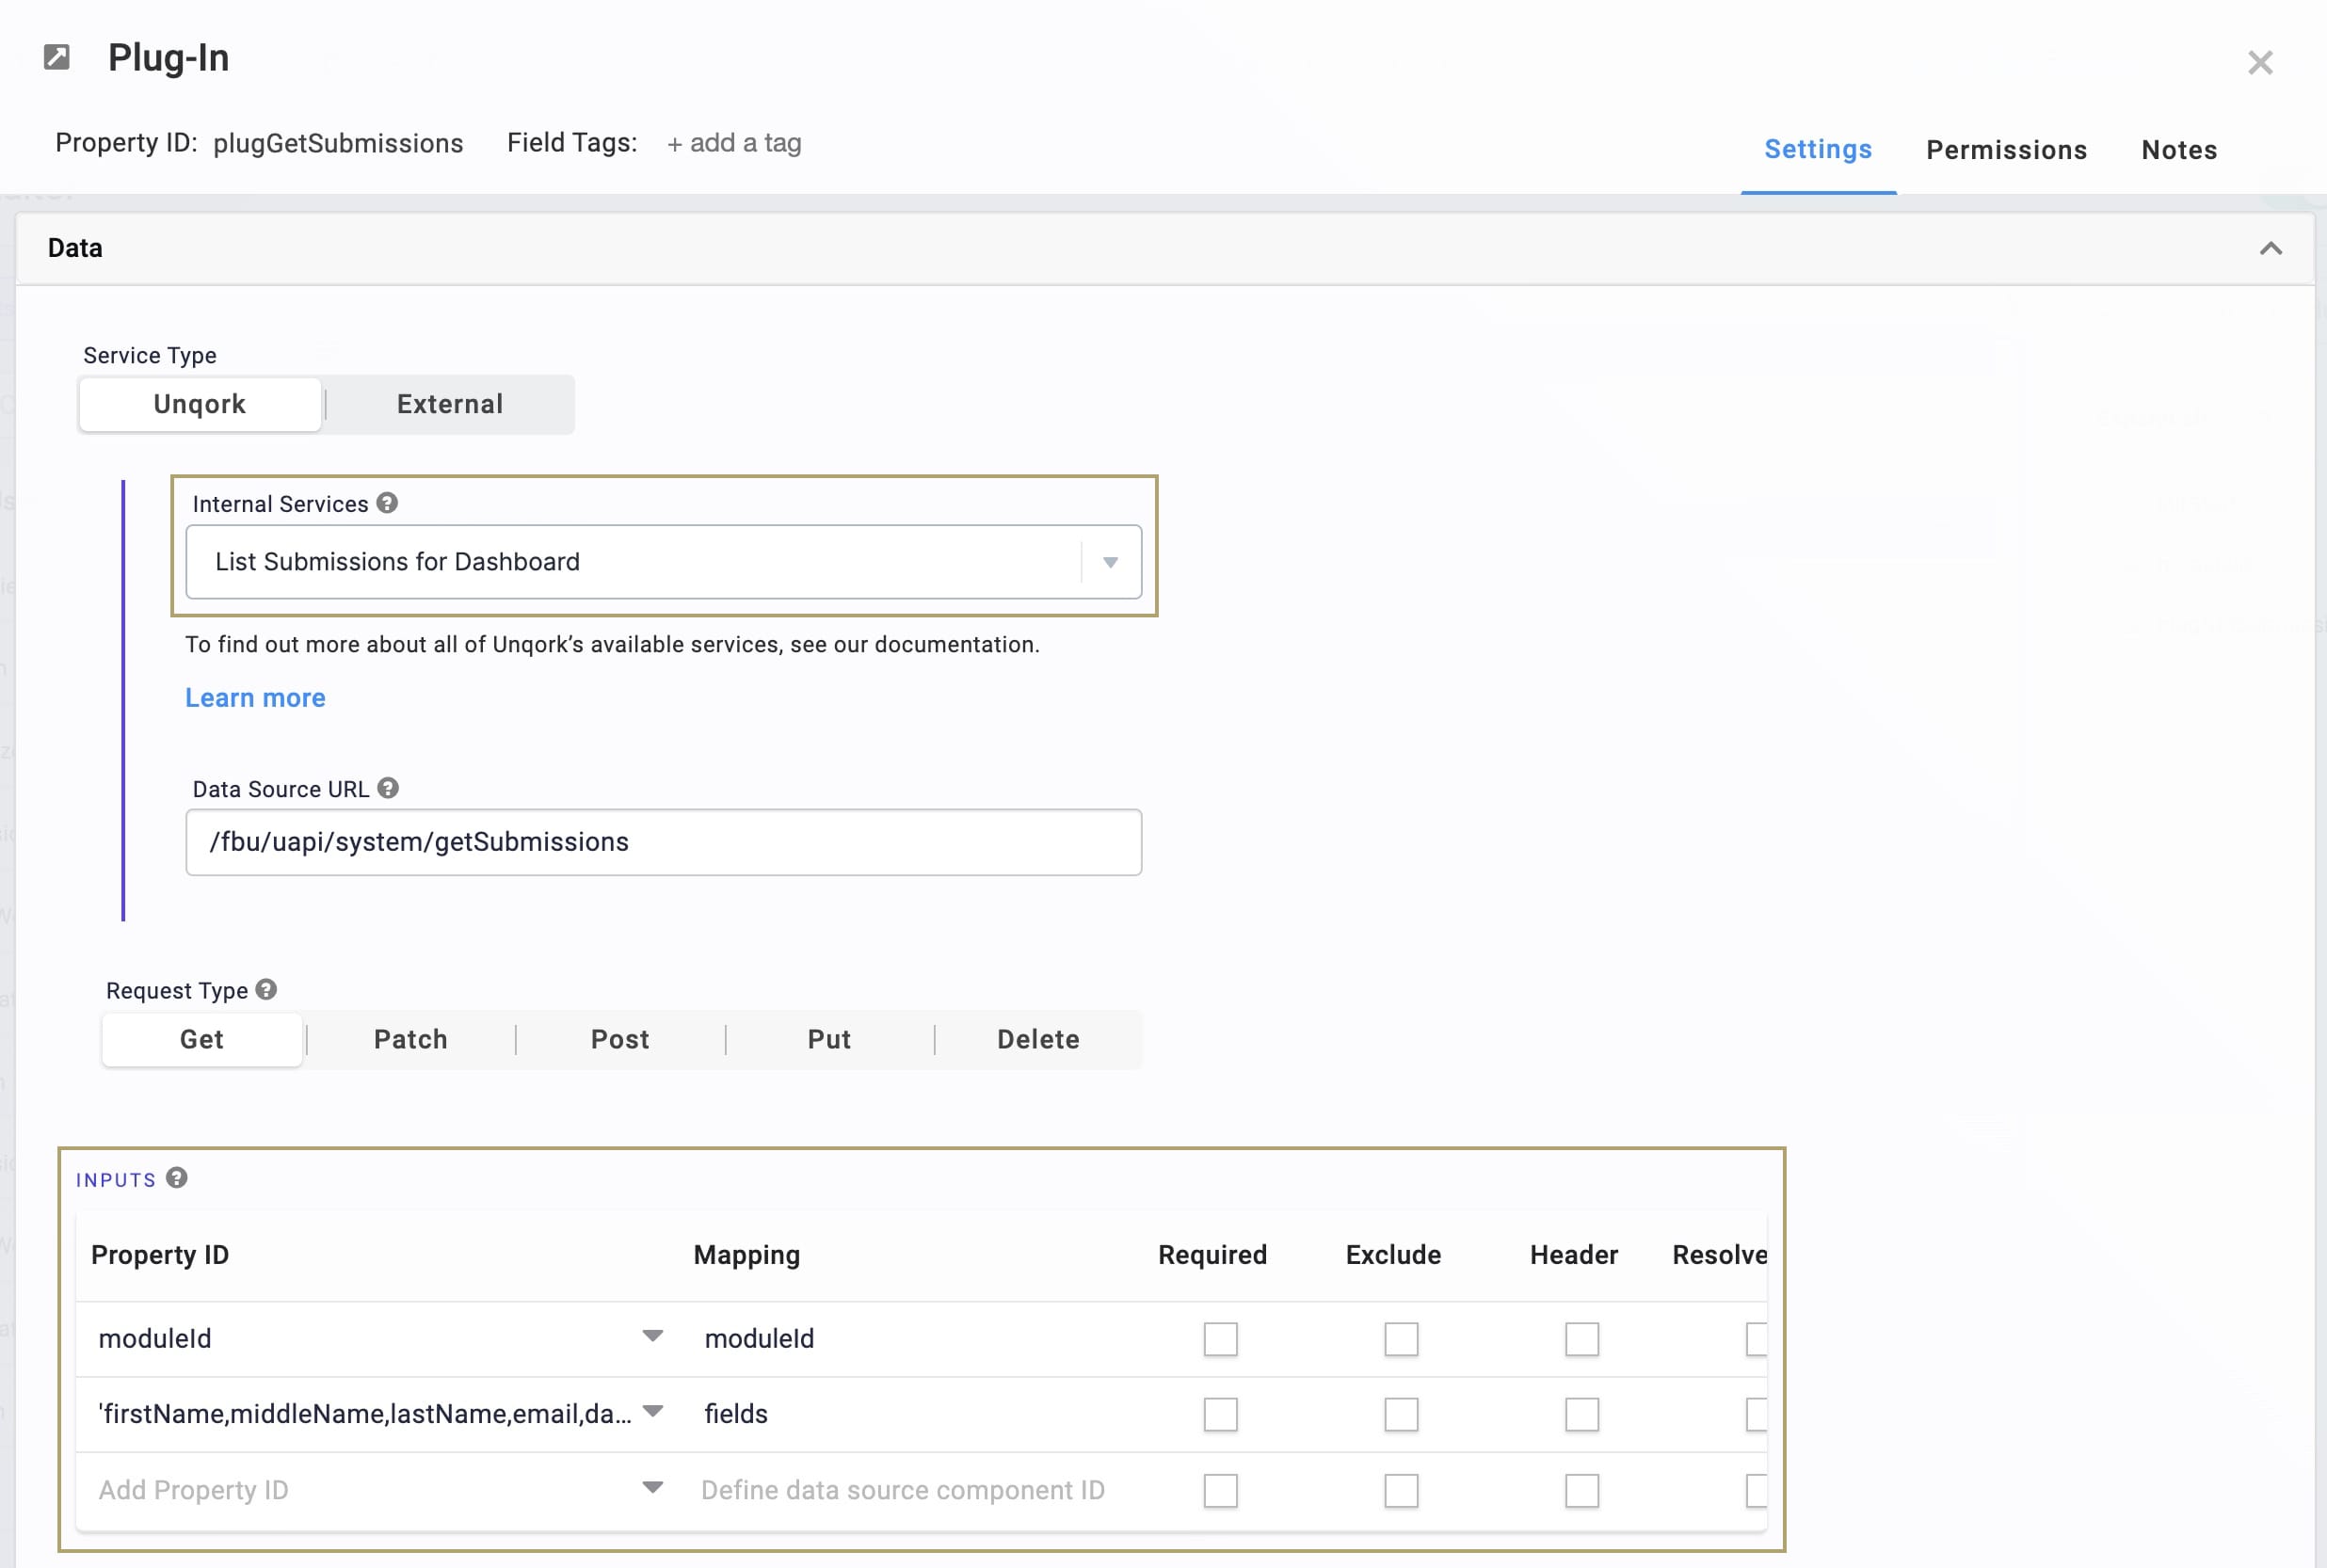
| 5. | From the Internal Services drop-down, enter or select List Submissions for Dashboard. |
| 6. | Next to Inputs & Outputs, click Edit. |
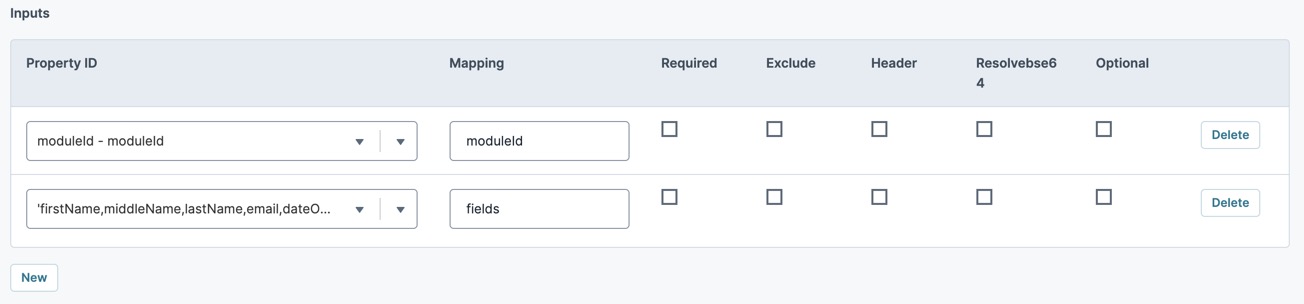
| 7. | In the Inputs table, enter the following: |
|
Property ID |
Mapping |
|---|---|
|
moduleId |
moduleId |
|
'firstName,middleName,lastName,email,dateOfBirth' |
fields |
The first row references the module ID stored in the Hidden component. The second row shows the source module fields you're retrieving to insert into the dashboard. The values entered in the Mapping column (moduleId and fields) are native values in Unqork.
| 8. | Click Save Component. |
Configure the ViewGrid Component
Next, add a  ViewGrid component to display your data in a dashboard.
| 1. | Drag and drop a ViewGrid component onto the canvas, placing it below your plugGetSubmissions Plug-In component. |
| 2. | In the Property ID A Property ID is the unique field ID used by Unqork to track and link components in your module. field, enter vgSubmissions. |
| 3. | In the Canvas Label Text Label Text conveys what the input component is and what information it displays. Enter the purpose of the corresponding component or field. field, enter Submissions. |
| 4. | Navigate to the ViewGrid component's Data settings. |
| 5. | Next to Inputs & Display & Outputs, click Edit. |
| 6. | In the Inputs table, enter the following: |
|
Source |
Required |
|---|---|
|
plugGetSubmissions |
|
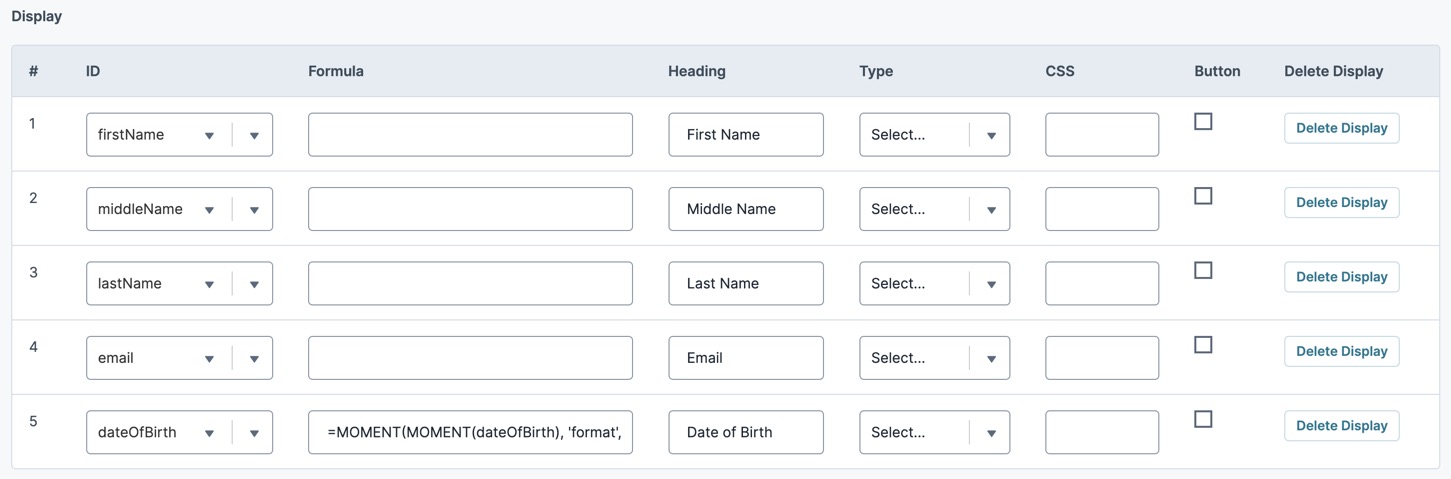
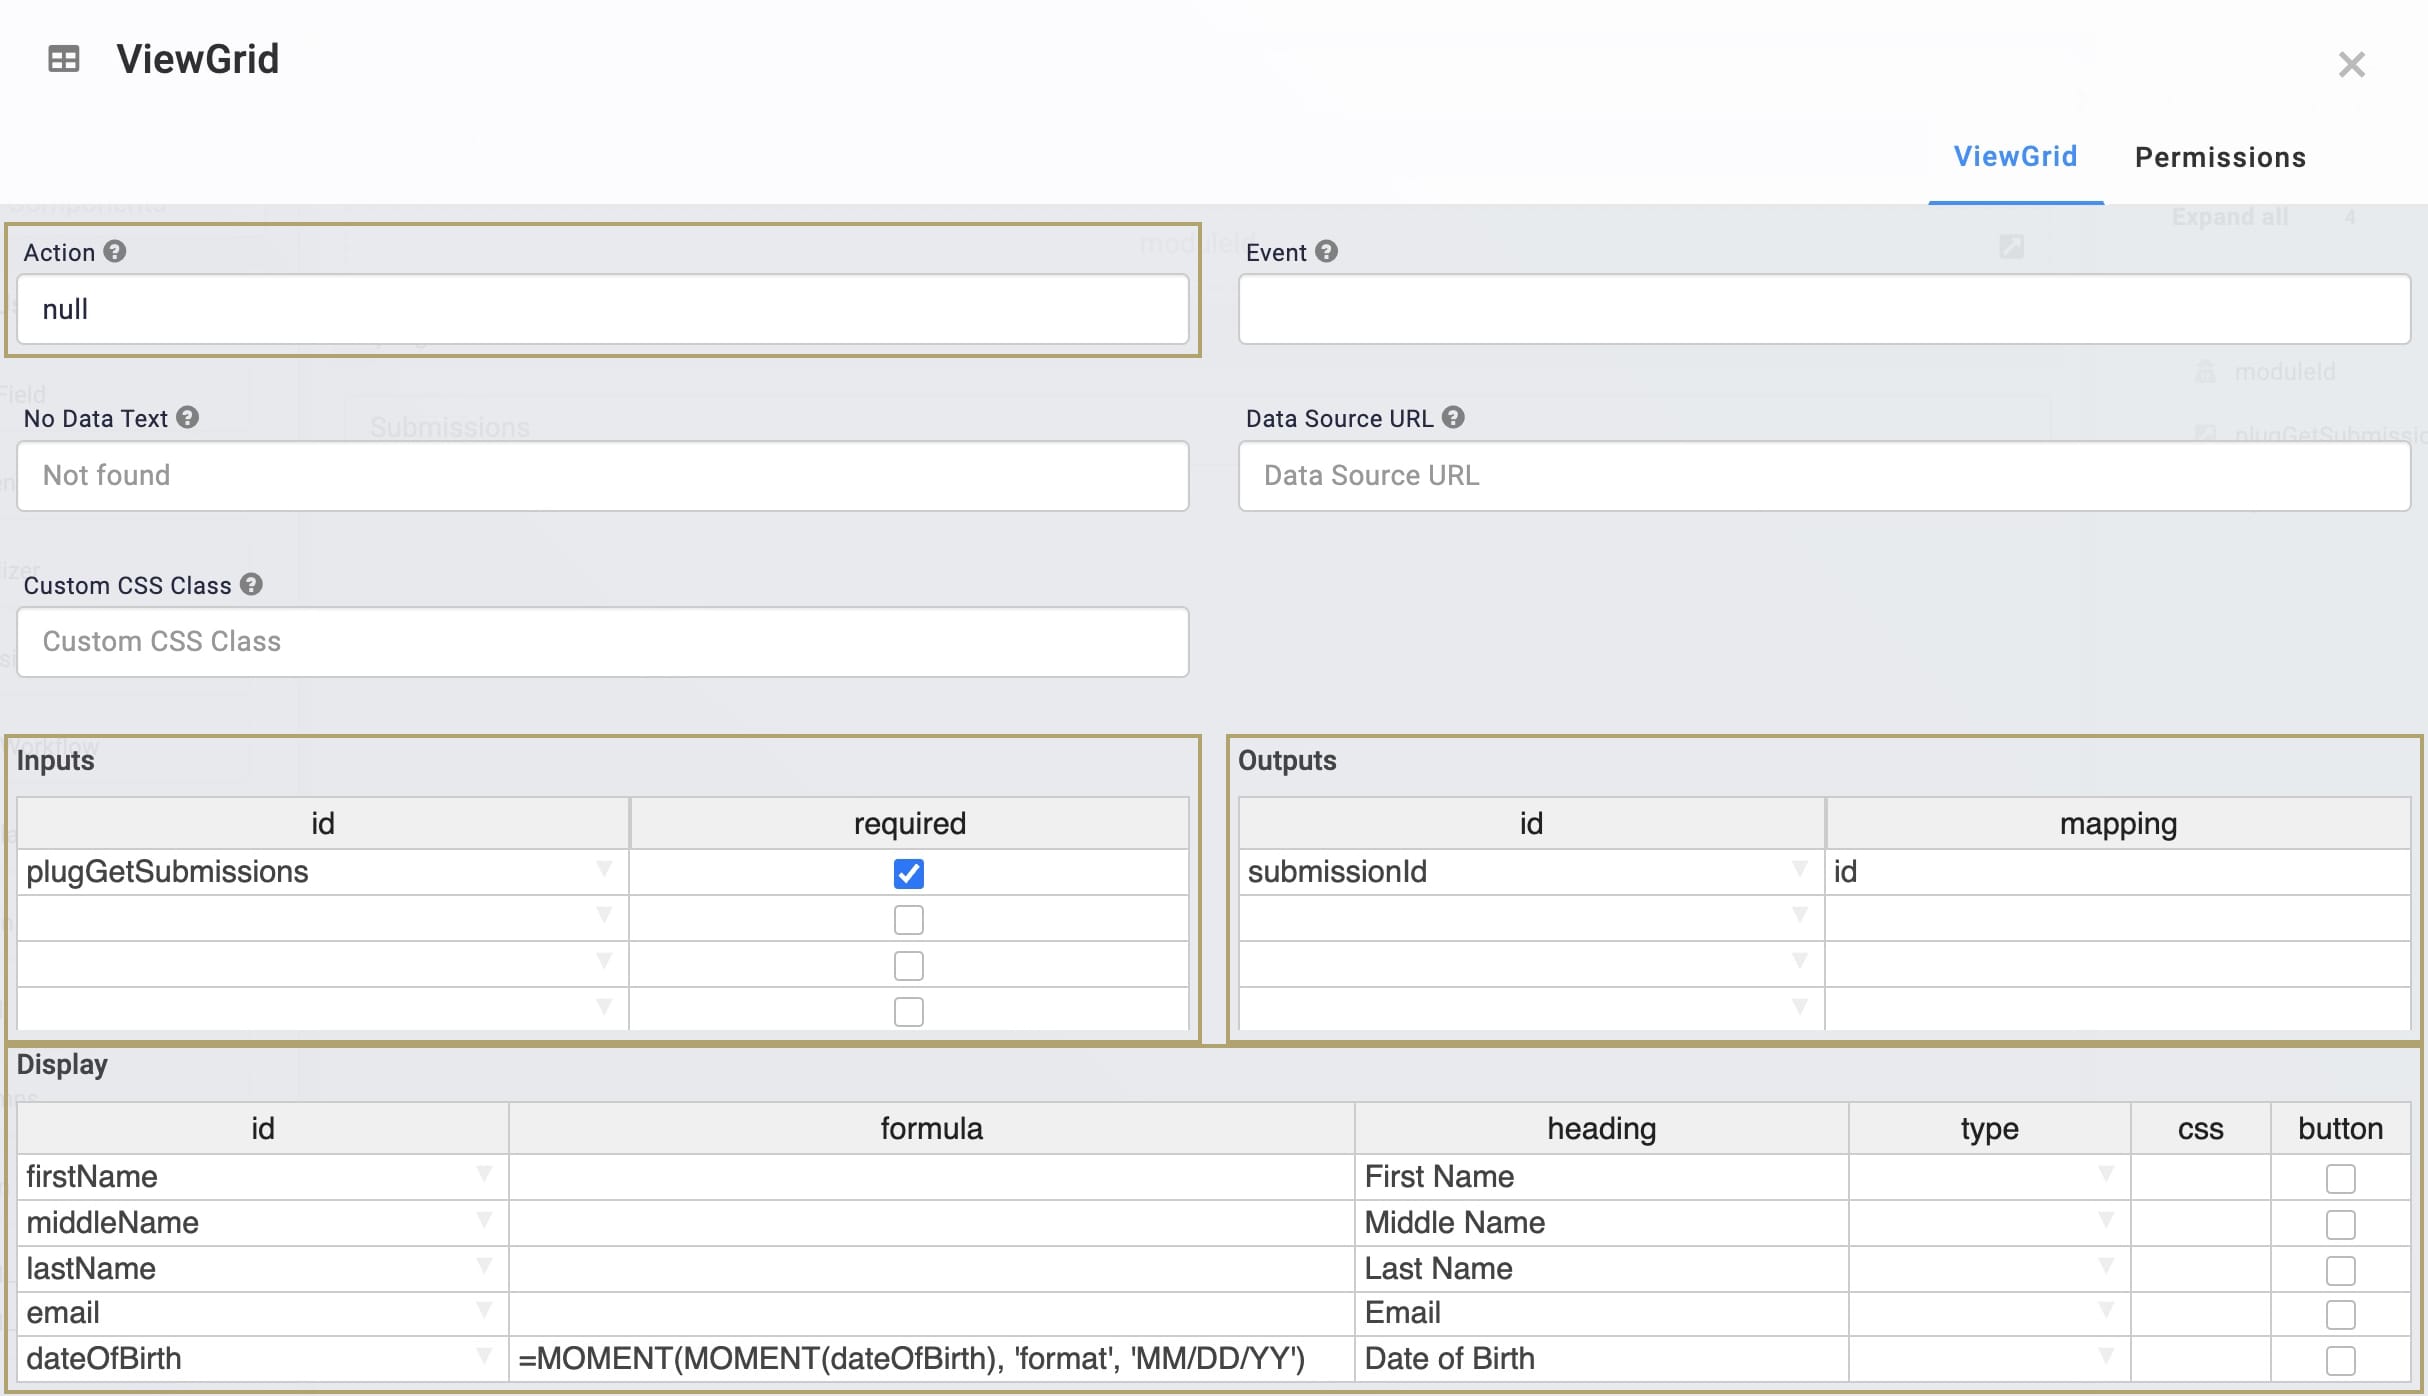
| 7. | In the Display table, enter the following: |
|
ID |
Formula |
Heading |
|---|---|---|
|
firstName |
|
First Name |
|
middleName |
|
Middle Name |
|
lastName |
|
Last Name |
|
|
|
|
|
dateOfBirth |
=MOMENT(MOMENT(dateOfBirth), 'format', 'MM/DD/YY') |
Date of Birth |
The Moment.js in the Formula column formats the dateOfBirth values as MM/DD/YY.
| 8. | In the Outputs table, enter the following: |
|
Source |
Mapping |
|---|---|
|
submissionId |
id |
| 9. | Navigate to the ViewGrid component's Actions settings. |
| 10. | In the Action field, enter null. |
| 11. | Click Save Component. |
| 12. | Save your module. |
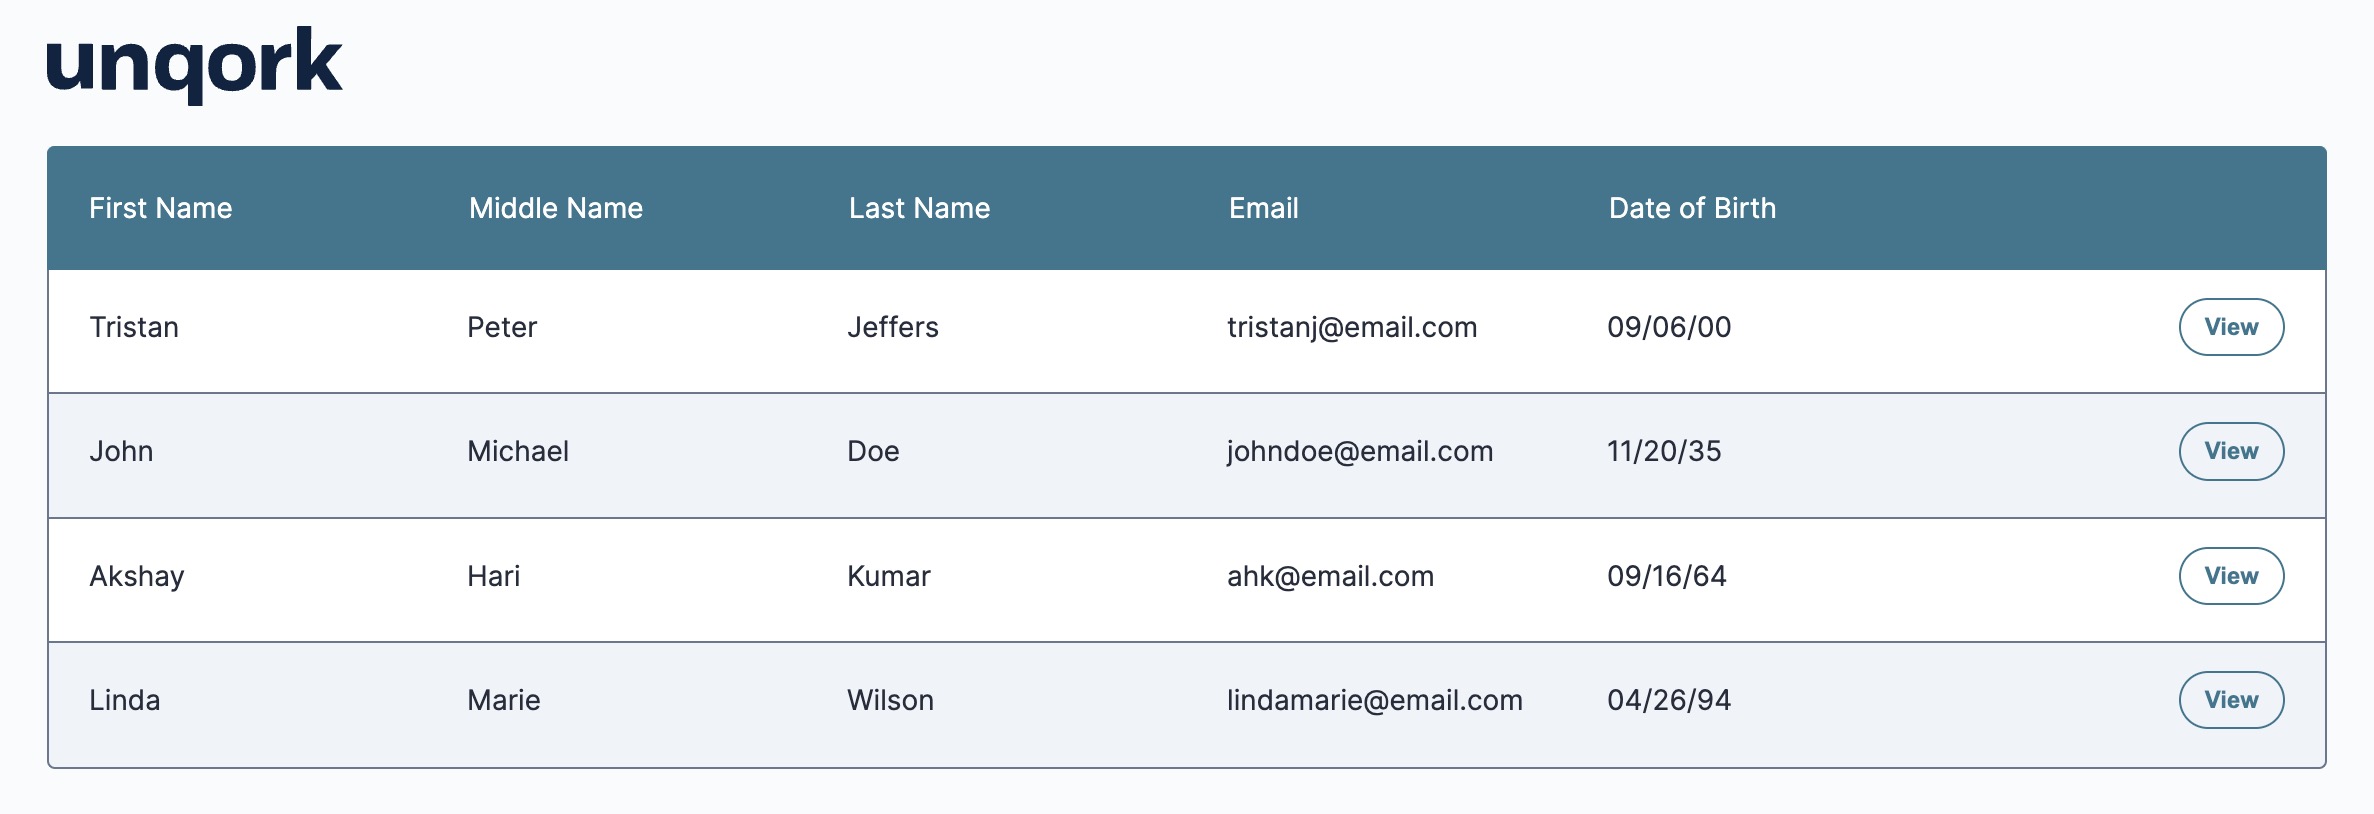
Now, Preview your module in Express View Express View is how your end-user views your application. Express View also lets you preview your applications to test your configuration and view the styling. This is also the view your end-users will see when interacting with your application. After configuring a module, click Preview in the Module Builder to interact with the module in Express View.. A dashboard displays showing the data from the source module. Using an API call, the Plug-In component retrieves the submissions from the source module and your ViewGrid component displays them. This is one of many examples of using the Plug-In component in Unqork.
The completed configuration looks like this in Express View:
Structure of a Plug-In Component's Data
Each row of the table stores as an array in the Unqork database.
Overview
The Plug-In component connects a module to internal and external API APIs (application programming interfaces) are a set of protocols and definitions developers use to build and integrate application software. APIs act as the connective tissue between products and services. services for passing data to and from a chosen source.
Common uses of the Plug-In component include:
-
Generating an email on submission of an application.
-
Populating a dashboard with application submissions.
-
Retrieving and displaying up-to-date data from an external source.
To make an external API call with a Plug-In component, you must set up the API service in Unqork's Services Administration. Doing so requires you to reference the external service's API documentation. Once you set up the service, the API call becomes available to use with your Plug-In component.
To learn more about Services Administration, view our Services Administration article.
You'll find the Plug-In component in the Data & Event Processing group to the left of the Module Builder.
Remote Executing Your Plug-In Component
It's best practice to configure your Plug-In component to remote execute. Remote execute, or server-side execution, lets the Plug-In component execute the call outside of the browser. Running APIs in the browser is not secure. If the API call happens in the browser, malicious agents can access the data in the DevTools Console The DevTools Console helps you securely store, build, test, and deploy your software.—including accessing PII Personal Identifiable Information (PII) is any representation of information that permits the identity of an individual to whom the information applies to be reasonably inferred by either direct or indirect means. (personally identifiable information) and inject malware.
The benefits of using remote execute are:
-
Speed: Back-end services handled by a remote server ease the burden on the browser.
-
Security: No one can use the DevTools Console to access PII.
-
Debugging: Modularization provides a smaller code-base for debugging.
To learn more about the DevTools Console, view our Access Submission Data Using the DevTools Console article.
What You'll Learn
After completing this
About the Configuration Window
To learn more about general component settings and those that display when a component is associated with Data Models, view our General Component Settings article.
Display Panel
|
Setting |
Description |
|---|---|
|
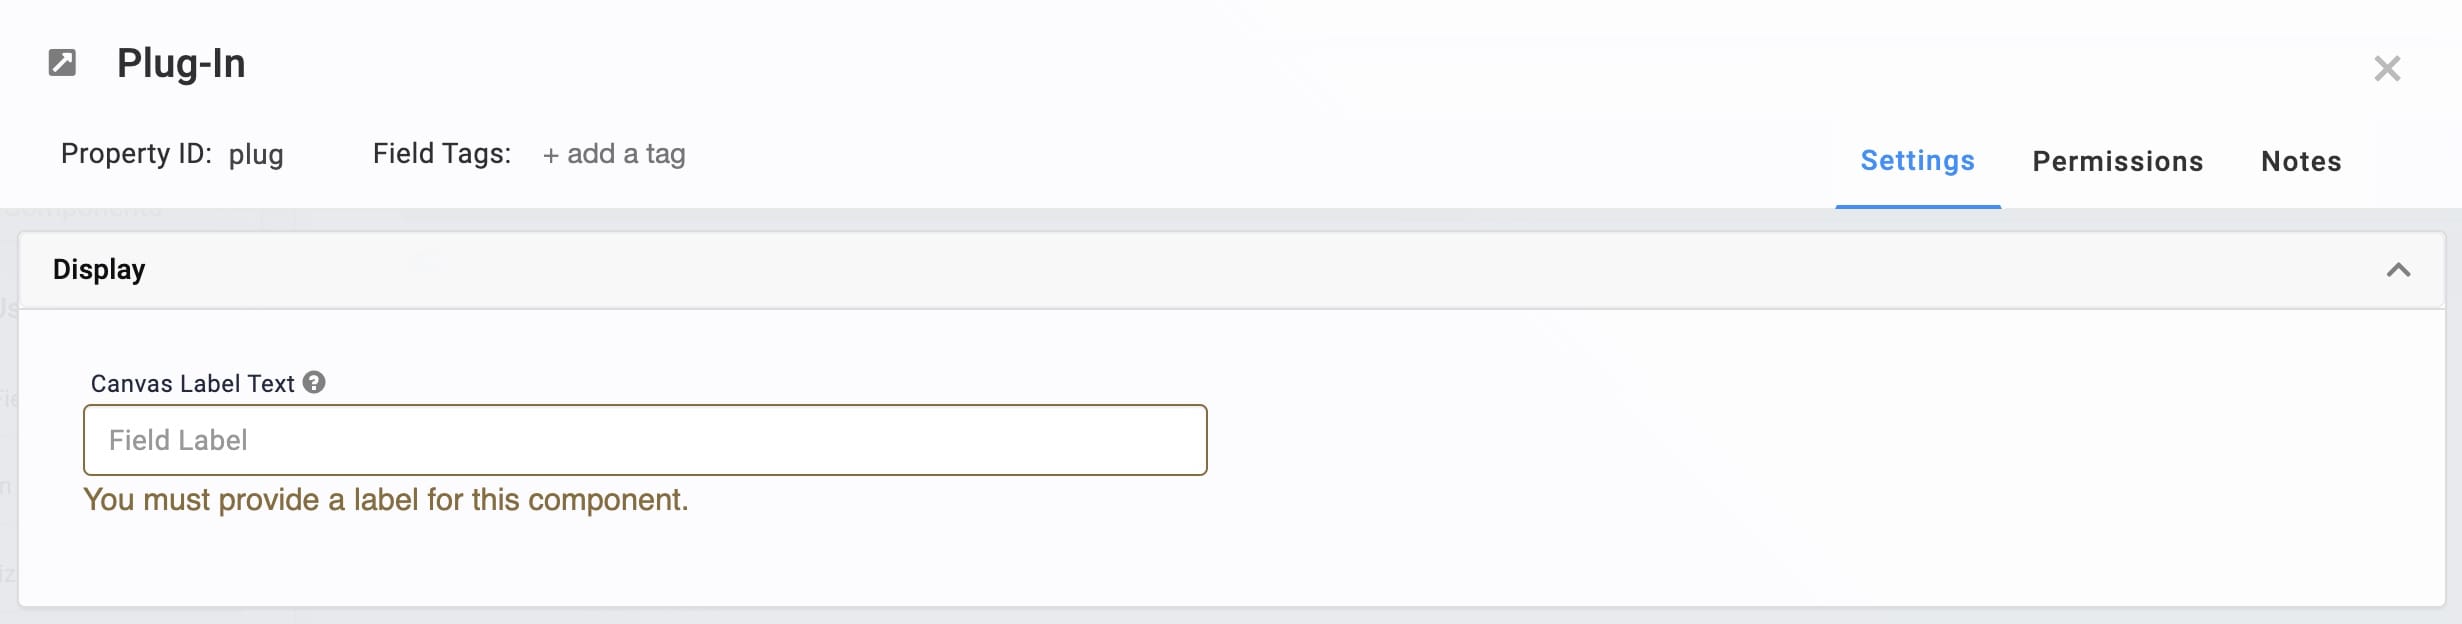
Canvas Label Text |
A component’s Label Text indicates the purpose of the corresponding field or component. For non-input components, the Label Text isn't end-user facing, and only appears in the Module Builder. User-friendly labels make your module more accessible. Keep labels short and descriptive (a word or two) using title case. For longer entries, use sentence case. |
Data Panel
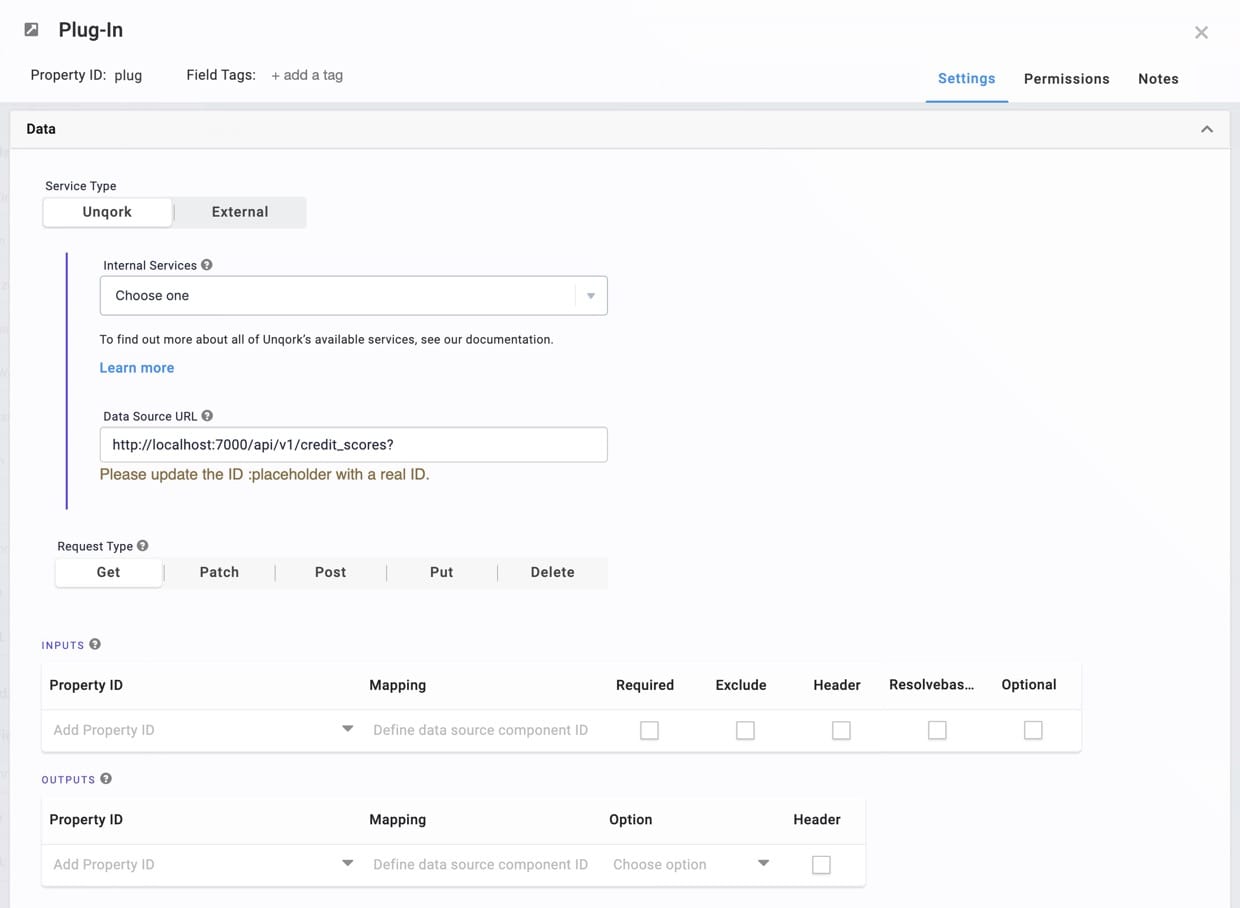
Service Type
The Plug-In component can be used for making internal Unqork API calls and external API calls.
UnqorkSelecting this option provides you with an Internal Services drop-down.
|
ExternalSelecting this option provides you with an External Services drop-down.
|
Request Type
The Request Type is automatically selected after you've completed the Service Type settings. The Plug-In component includes five Request Types.
-
Get: Retrieves and reads existing resources, like submission data.
-
Patch: Partially updates existing resources.
-
Post: Creates new resources.
-
Put: Updates existing resources.
-
Delete: Deletes resources.
If Patch, Post, or Put are selected, two new toggles display:
|
Setting |
Description |
|---|---|
|
Make a MultiPart API Call |
Multipart API calls combine one or more sets of data into a single body. Multipart requests are common for file uploads and for transferring multiple data types with a single request. Set this toggle to ON when sending a request that isn't part of the API's body. When set to (ON), the Alternative Multipart Sub-Type (Services) field displays. |
|
Alternative Multipart Sub-Type (Services) |
The Alternative Multipart Sub-Type (Services) field is only available for external APIs, but can be used to specify whether the parts of your request are related, mixed, or otherwise correlated. |
|
Promote Object/Array to Top Level |
Use this setting to call an object or array, and make it the body of the API request. When the Promote Object/Array to Top Level toggle is set to (ON), the Object/Array Key field displays. |
|
Object/Key Array |
In this field, enter the key of the object or array that you're promoting to the top level. |
Inputs Table
Use these fields to enter inputs as references for your logic components. These references include values you want to send as part of the API call's request header or body. For example, when getting module submission details for a dashboard, you need to enter the fields that you want to pull from the source module.
There is a 50 MB limit for all request payloads to internal services in Unqork.
|
Setting |
Description |
|---|---|
|
Property ID |
Examples of supported inputs include:
The Property ID entered must match the Property ID used in the output component. Remember, use camel case (stylized as camelCase) without spaces or punctuation. When using the Watch Trigger Type, enter all inputs the component must watch for in the Property ID column. You can use dot notation to reference values nested in a Property ID in the submission data.
|
|
Mapping |
API documentation includes mapping information. Mapping information tells your Plug-In component which data to send or retrieve from the API call. In the case of SendGrid integration, the Mapping column indicates where the Property ID values show up in the email. If you enter 'no-reply@unqork.com' in the Inputs table's Property ID and from.email in the Mapping column, your From address is no-reply@unqork.com. |
|
Required |
When |
|
Exclude |
When selected, the Plug-In component doesn't pass the field as part of your API call's request body. But, the Plug-In component can still watch for changes made to the value. |
|
Header |
When selected, the Plug-In component passes the field as part of the API call's request header. When clear, the Plug-In component passes the field as part of the request body. |
|
Resolvebase64 |
Select this setting if you're expecting a Base64 Base64 is an encoding and decoding technique used to convert binary data to an ASCII (American Standard for Information Interchange) text format. file from your API request. Selecting this setting prepares the system for the Base64 file, making it easier to convert the file. |
|
Optional |
When selected, the Plug-In component doesn't pass the field in the API call's request body if there's no value (null). By default, the Plug-In passes every Input in the request body, even if the field is empty (null). |
Outputs
Use the Outputs table to send the data retrieved by the API call to a specific location.
|
Setting |
Description |
|---|---|
|
Property ID |
For your logic component to recognize an output, you must enter the destination component's Property ID(s). The Property ID entered must match the Property ID of the component that acts as the output. Remember, use camel case A naming convention for computer programming. Use camelCase for Property IDs, for example: newUser, lastName, & rdoButton. without spaces or punctuation. |
|
Mapping |
Map Property IDs according to the API's documentation. Mapping tells your Plug-In component what to retrieve from the API call. For the Outputs table, map specific data to put into your output components. |
|
Option |
This setting offers handling methods for your outputs:
|
|
Header |
When selected, the Plug-In component looks for the output value in the response header. When clear, the Plug-In looks for the field in the response body. |
Actions Panel
|
Setting |
Description |
|---|---|
|
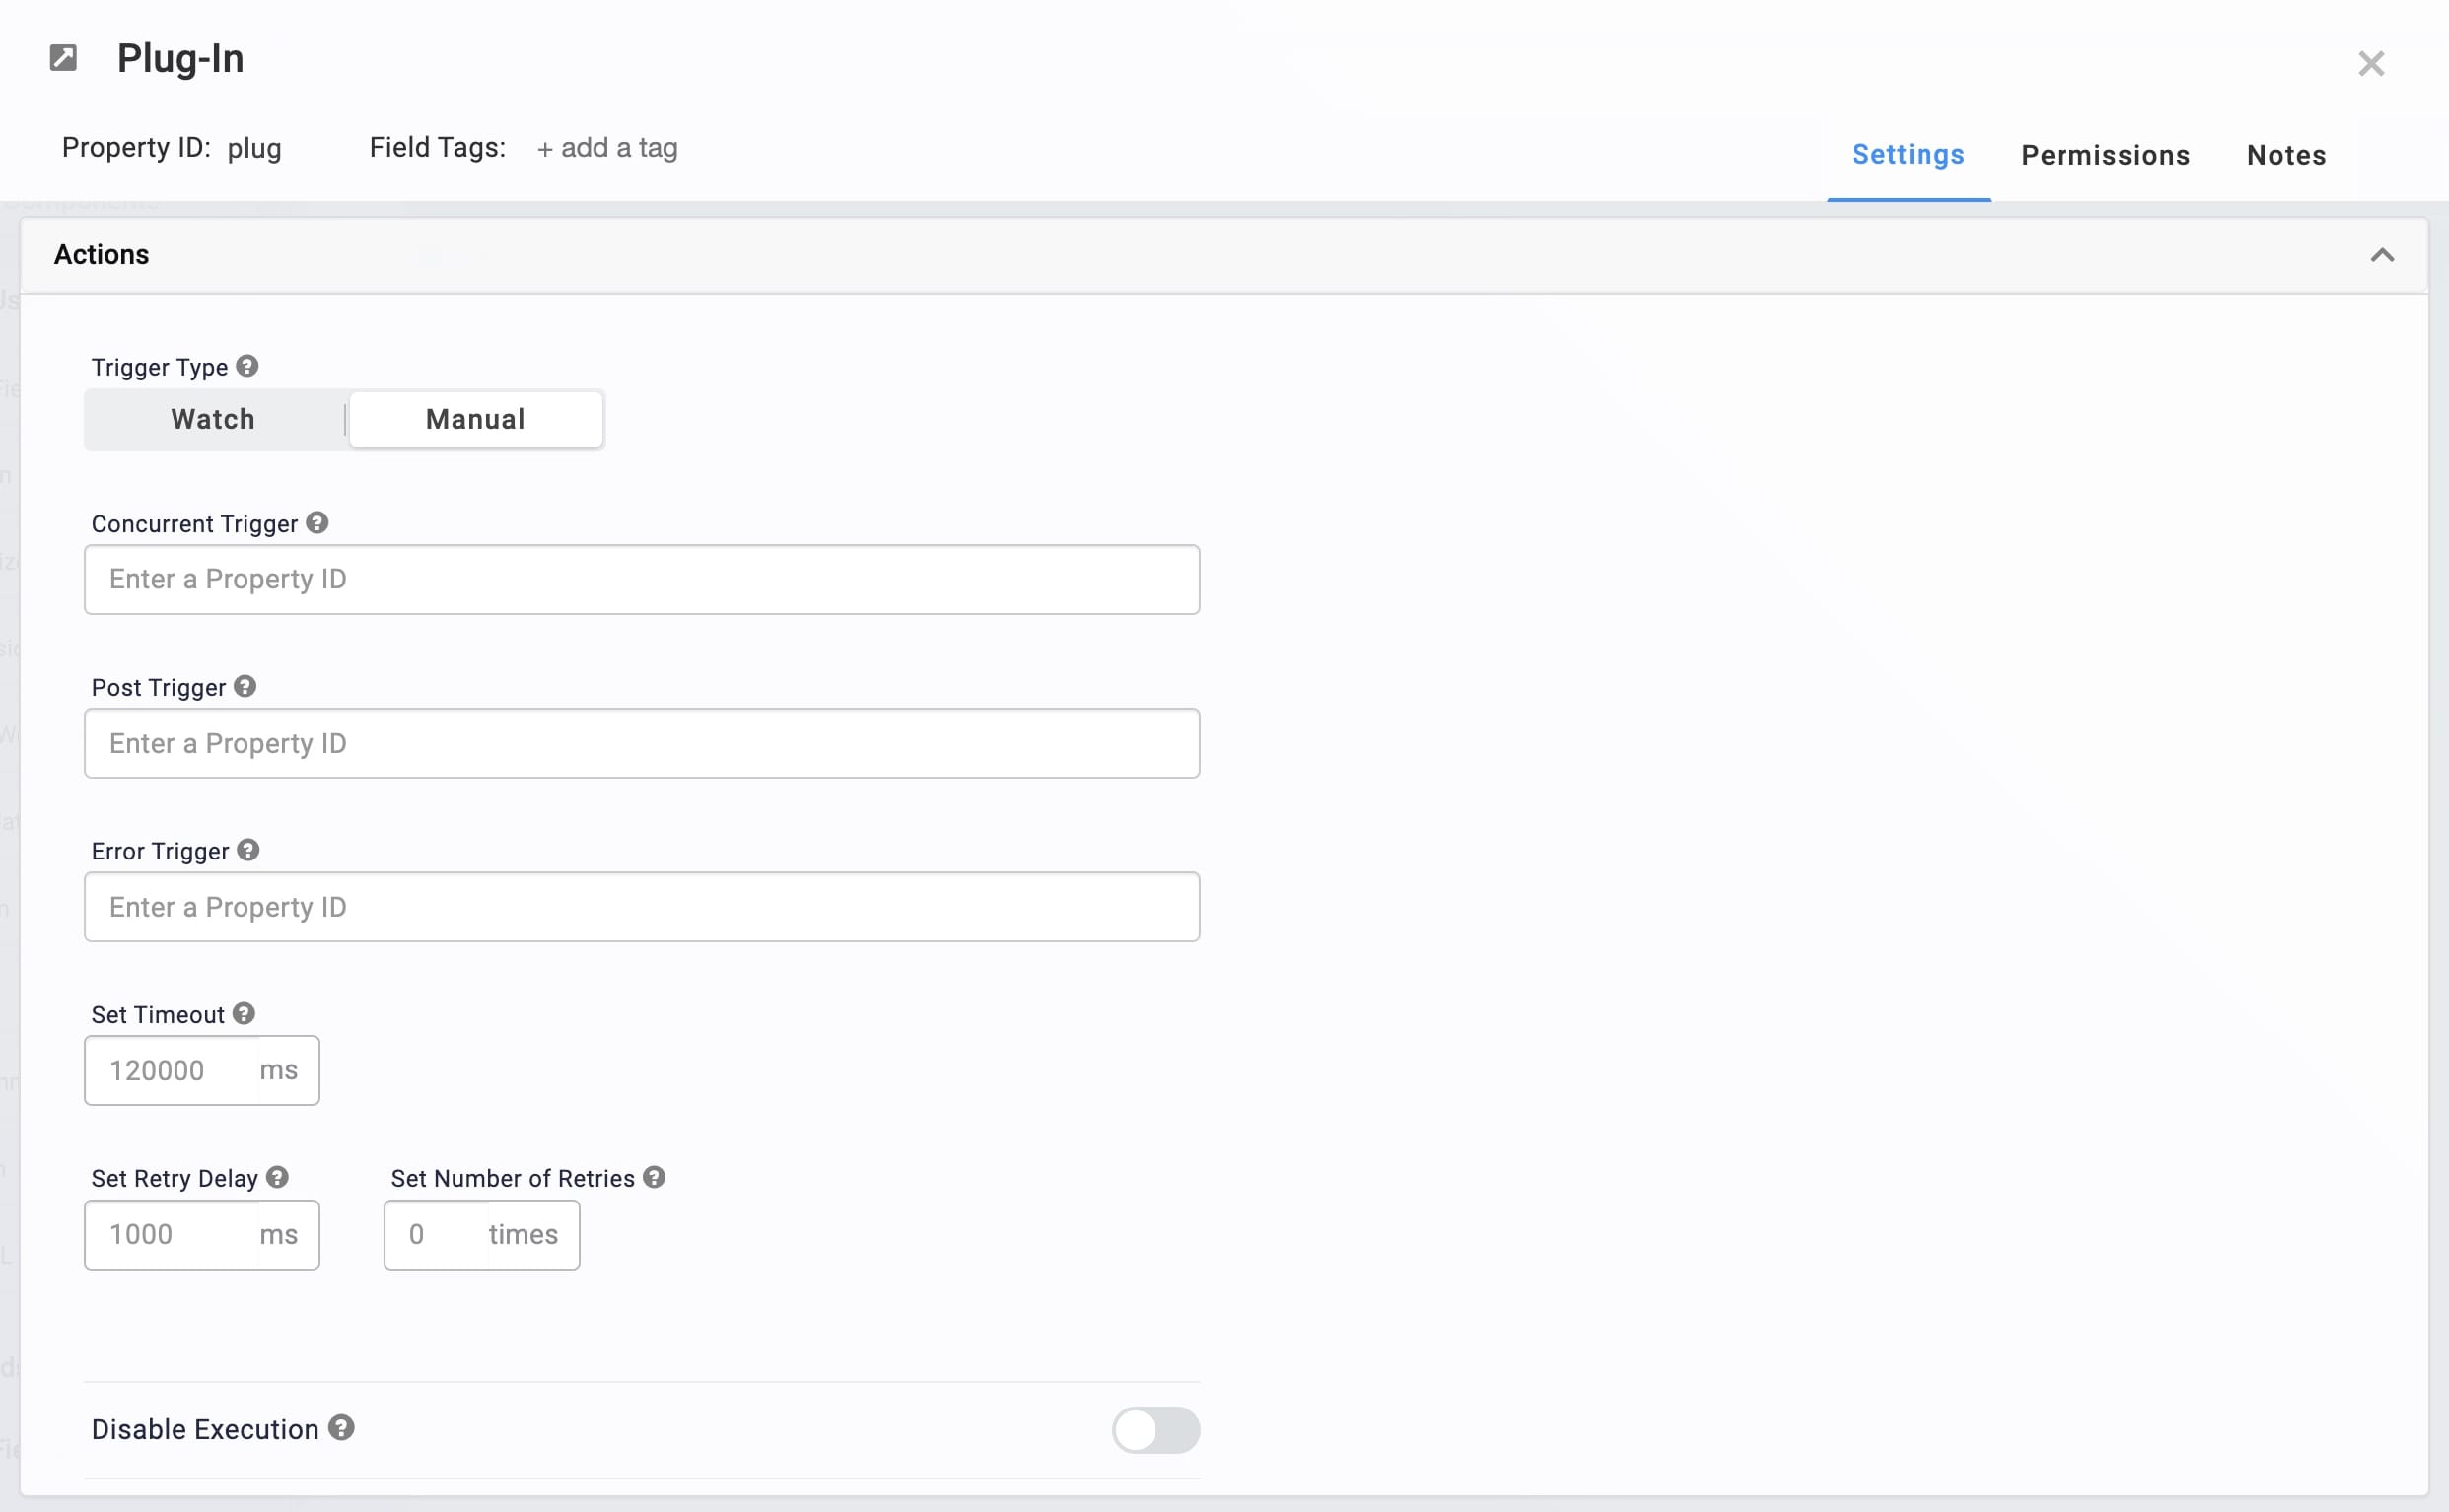
Trigger Type |
This setting provides the following options:
By default, this Trigger Type is selected.
|
|
Concurrent Trigger |
Enter the Property ID of the component to trigger concurrently when the Plug-In component makes the API call. |
|
Post Trigger |
Enter the Property ID of the component to trigger after the Plug-In completes the API call. For example, triggering a component to display the data received from the Plug-In component's API call. |
|
Error Trigger |
Enter the Property ID of a component to trigger on failure of the API call. Errors can be 4xx, 5xx, and other network errors. |
|
Set Timeout |
The number of milliseconds that pass before the API call times out. If an API call doesn't respond within a reasonable time, you don't want the Plug-In component to continue to wait. Unresponsive API calls can stall your entire application. The maximum timeout is 120,000 milliseconds. |
|
Set Retry Delay |
The number of milliseconds that pass before the component tries the API call again after it failed. Waiting before retrying an API call could give the destination server time to clear the issues that caused it to be unresponsive. The maximum delay is 10,000 milliseconds. In the Centauri runtime, this setting does not trigger when the Plug-In component fails a PUT call to a remote execute. However, it will trigger when the PUT call fails in the Vega runtime. Errors can be 4xx, 5xx, and other network errors. |
|
Set Number of Retries |
The number of retries the Plug-In component makes on a failed API call. It's best practice to limit the number of retries, so a continually failing API call doesn't stall your application. Use this setting to limit the number of times the Plug-In component retries the failed API call. If the API call fails all retries, the Error Trigger fires. The maximum number of retries is 10. In the Centauri runtime, this setting does not trigger when the Plug-In component fails a PUT call to a remote execute. However, it will trigger when the PUT call fails in the Vega runtime. Errors can be 4xx, 5xx, and other network errors. |
|
Disable Execution |
If Disable Execution is set to (ON), the logic tied to this component does not execute. Use this to keep the component's settings, but disable the operations it performs. By default, this setting is set to (OFF). |
Advanced Panel
|
Setting |
Description |
|---|---|
|
Set Debounce |
The number of milliseconds that pass before the module loads this component. This is useful if you have a large module and you load several components at the same time. 1,000 milliseconds = 1 second. |
|
Show Modal Dialog While Running |
When set to (ON), this setting creates a modal that informs the end-user that the data is processing. The following fields are optional:
By default, this toggle is set to (OFF). |
|
Show Cursor as Spinner While Running |
When set to (ON), the end-user's cursor turns into a spinner while data processes. By default, this toggle is set to (OFF). |
|
Show Page Loader Spinning While Running |
When set to (ON), the page displays a spinning icon while data processes. By default, this toggle is set to (OFF). |
|
Assign Values if They Are Null or Empty String |
If an output comes back empty, you can either have the data store as an empty value or choose not to store the data. By setting this toggle to (ON), null or empty strings store as empty values. If set to (OFF), the values don't record. By default, this toggle is set to (ON). |
|
Only Set Output Variables |
When set to (ON), the Plug-In component only returns the values set in the Output table, instead of the entire plugin object. Also, none of the Plug-In component's other information logs in the DevTools Console. When set to (OFF), the plugin object logs in the DevTools Console with all response data. By default, this toggle is set to (OFF). |
|
Convert XML Response to JSON |
Older API calls are more likely to use XML Extensible Markup Language (XML) is markup language that lets you define and store data in a shareable way. coding language. The Unqork Designer Platform reads JSON JSON (JavaScript Object Notation) is an open standard file and data interchange format. Unqork uses JSON for submission (record) data. coding language only. If you know your API call returns XML, set this toggle to (ON). When set to (ON), the system automatically converts XML to JSON. By default, this toggle is set to (OFF). |
|
Expect Binary Response |
When set to (ON), the response doesn't convert to and store as Base64 Base64 is an encoding and decoding technique used to convert binary data to an ASCII (American Standard for Information Interchange) text format.. Enable this setting when you expect the API call to return a large file, and/or want to store the response in its original file format. By default, this toggle is set to (OFF). |
|
Enable Server Side Pagination |
When set to (ON), the server sends a single page of data at a time. This helps the page load faster and prevents bloating the end-user's memory. This setting is especially useful for large data sets. By default, this toggle is set to (OFF). |
|
Flatten to a Single Record Value |
When set to (ON), the module flattens results into a single record value. When set to OFF, the module leaves the results unflattened into multiple values. By default, this toggle is set to (OFF). |
|
Assign All Values Returned to Module |
When set to (ON), the Plug-In component scans the module for matching values across the API call and Property IDs. Only set this toggle to (ON) when the module and the API call's data match. By default, this toggle is set to (OFF). |
|
Look for 'Data' Key in Response |
The Plug-In component looks for all specified output values in the data section of the response body. When set to (ON), you can remove the data. prefix from your mapping fields. For example, mapping to lastName instead of data.lastName. By default, this toggle is set to (OFF). |
|
Include Cookies on Cross-Site Requests |
When set to (ON), an application can makes cross-site access-control requests using credentials, like cookies. By default, this toggle is set to (OFF). |
|
Required Property Path in Response |
This field lets you set a required property path return value. If the path isn't present in the response body, the call results in an error. |
Adding a Plug-In Component
In this example, set up the Plug-in component's List Submissions for Dashboard API call. This call retrieves data submitted by your end-user End-users, also known as Express Users, are the individuals accessing an application through Express View. In most cases, end-users are the customers using the product. and populates it on a dashboard. To make it easier, we already created the source module your end-user uses to submit their information. You can find the prebuilt source module here: https://training.unqork.io/#/form/5eb01aa6811bf80215fd706b/edit.
If you preview this module in Express View, you see a page that collects your end-user's information. This source module includes name, email, and date of birth fields. After your end-user adds their information, they click Save. Their submission data is then stored. The List Submissions for Dashboard API call references this source module and retrieves the submission data to display in a dashboard. These instructions assume that you have an open module saved with a title.
In this configuration, you need the following components:
-
1 Initializer component
-
1 Hidden component
-
1 Plug-In component
-
1 ViewGrid component
Configure the Initializer Component
This Initializer component triggers the Plug-In component that you'll set up later.
| 1. | In the Module Builder, drag and drop an Initializer component onto your canvas. |
| 3. | To the left component's configuration window, select |
| 4. | From the Trigger Type drop-down, select New Submission. |
| 5. | In the Outputs table, enter the following: |
|
Property ID |
Required |
Value |
|---|---|---|
|
plugGetSubmissions |
trigger |
GO |
The Property ID here matches the Plug-In component you'll add in a later step.
| 6. | Click Save & Close. |
Configure the Hidden Component
Next, add a Hidden component to store the module ID of your source module. If you have your own source module, you can use its module ID.
You can get the module ID from your source module’s hyperlink as follows: https://training.unqork.io/#/form/5eb01aa6811bf80215fd706b/edit. This module ID comes from the prebuilt source module.
| 1. | Drag and drop a Hidden component onto your canvas, placing it below your Initializer component. |
| 3. | In the Default Value field, enter 5eb01aa6811bf80215fd706b. |
| 4. | Click Save & Close. |
Configure the Plug-In Component
Now, add a Plug-In component to retrieve the submissions from your source module, so you can display them in a dashboard.
| 1. | Drag and drop a Plug-In component onto your canvas, placing it below your Hidden component. |
| 2. | In the Property ID and Canvas Label Text fields, enter plugGetSubmissions. |
| 3. | From the Internal Services drop-down, select List Submissions for Dashboard. |
| 4. | In the Inputs table, enter the following: |
|
Property ID |
Mapping |
|---|---|
|
moduleId |
moduleId |
|
'firstName,middleName,lastName,email,dateOfBirth' |
fields |
The first row references the module ID stored in the Hidden component. The second row shows the source module fields you're retrieving to insert into the dashboard. The values entered in the Mapping column (moduleId and fields) are native values in Unqork.
| 5. | Click Save. |
Configure the ViewGrid Component
Next, add a ViewGrid component to display your data in a dashboard.
| 1. | Drag and drop a ViewGrid component onto the canvas, placing it below your Plug-In component. |
| 2. | In the Label field, enter Submissions. |
| 3. | In the Property Name field, enter vgSubmissions. |
| 4. | In the Action field, enter null. |
| 5. | In the Inputs table, enter the following: |
|
ID |
Required |
|---|---|
|
plugGetSubmissions |
|
| 6. | In the Outputs table, enter the following: |
|
ID |
Mapping |
|---|---|
|
submissionId |
id |
| 7. | In the Display table, enter the following: |
|
ID |
Formula |
Heading |
|---|---|---|
|
firstName |
|
First Name |
|
middleName |
|
Middle Name |
|
lastName |
|
Last Name |
|
|
|
|
|
dateOfBirth |
=MOMENT(MOMENT(dateOfBirth), 'format', 'MM/DD/YY') |
Date of Birth |
The Moment.js in the Formula column formats the dateOfBirth values as MM/DD/YY.
| 8. | Click Save. |
| 9. | Save your module. |
Now, Preview your module in Express View Express View is how your end-user views your application. Express View also lets you preview your applications to test your configuration and view the styling. This is also the view your end-users will see when interacting with your application. After configuring a module, click Preview in the Module Builder to interact with the module in Express View.. A dashboard displays showing the data from the source module. Using an API call, the Plug-In component retrieves the submissions from the source module and your ViewGrid component displays them. This is one of many examples of using the Plug-In component in Unqork.
The completed configuration looks like this in Express View:
Structure of a Plug-In Component's Data
Each row of the table stores as an array in the Unqork database.
Resources
-
Is it implied that the Data Source URL includes an http:// or https:// protocol?
-
How do you create an API query parameter for a specific API endpoint?
-
Why is a "Get Submissions" API call failing when you change roles?
