Sunset Schedule
Sunsetting is the process of gradually phasing out functionality in the Unqork Platform for new practices. The Unqork Platform balances natural growth and necessary capability adjustments over time. The decision to sunset Unqork functionality can be driven by many factors, including but not limited to, Creator community usage, security concerns, best practices guidelines, or overlaps with new and existing features.
To learn more about sunset statuses, see our Unqork Platform Sunsetting article.
Announced | Feature | Not Recommended for Use | Retired | Decommissioned |
|---|---|---|---|---|
10/12/2022 (Platform version v6.68.x) | Address (v1) Component | 11/15/2022 (Platform version v6.70.x) | 6/30/2023 (Platform version v6.78.x) | Not currently planned for Decommissioned status. |
Moving to the Address Search Component
With the release of the more robust Address Search component, the Address (v1) component is scheduled for retirement on 6/30/2023. Before that date, Creators should convert Address (v1) component configurations to the Address Search component.
To learn more about the Address Search component, see our Address Search Component article.
The following sections provide comparisons, differentiations, and frequently asked questions regarding the two versions of this component.
Component Differences
The Address Search component is different from the Address (v1) in the following ways:
When an end-user doesn't know the exact address, the Address Search component autocompletes it for them.
When customers need a more secure, efficient, and maintainable Address component experience, the Address Service component provides:
Security: All API (application programming interface) keys are stored server-side and never exposed to network logs.
Performance: API service requests execute server-side, improving overall performance.
Maintainability: All address API services are maintained and easily adjusted using Services Administration.
The Address Search component offers Creators need a more tailored, non-Google Canada Post API option.
The Canada Post API is a USPS equivalent for mailing addresses in Canada. It also includes global address listings.
High-Level Comparison
The following is a high-level comparison of the Address (v1) and Address Search components:
Feature | Address (v1) Component | Address Search Component |
|---|---|---|
Queries an address API based on the end-user's input and returns detailed information about that selection. Details include:
|
|
|
As an end-user enters an address, the component autocompletes and displays suggested addresses. |
|
|
Integrates with Services Administration to provide central management of all address services and APIs. That includes Creator RBAC permissions. |
The API key is entered directly into the configuration. |
The API key and API details are configured in Services Administration. |
Supports multiple Address Service Types and APIs. |
Only the | The |
Securely stores and executes the address APIs server-side. |
|
|
Allows end-users to override API-provided address values as needed. |
|
|
Supports standard Unqork component settings, like Hide Field, Hide Search, Read Only View, Disable User Input, Required, and so on. |
|
|
Supports On Blur and On Keypress triggers. |
|
|
Additional Technical Differences
The following are additional considerations regarding the two address components:
Submission Data Key: The Address (v1) and Address Search components store the full address as different keys in the submission data:
Address (v1) component: formatted_address
Address Search component: formatted
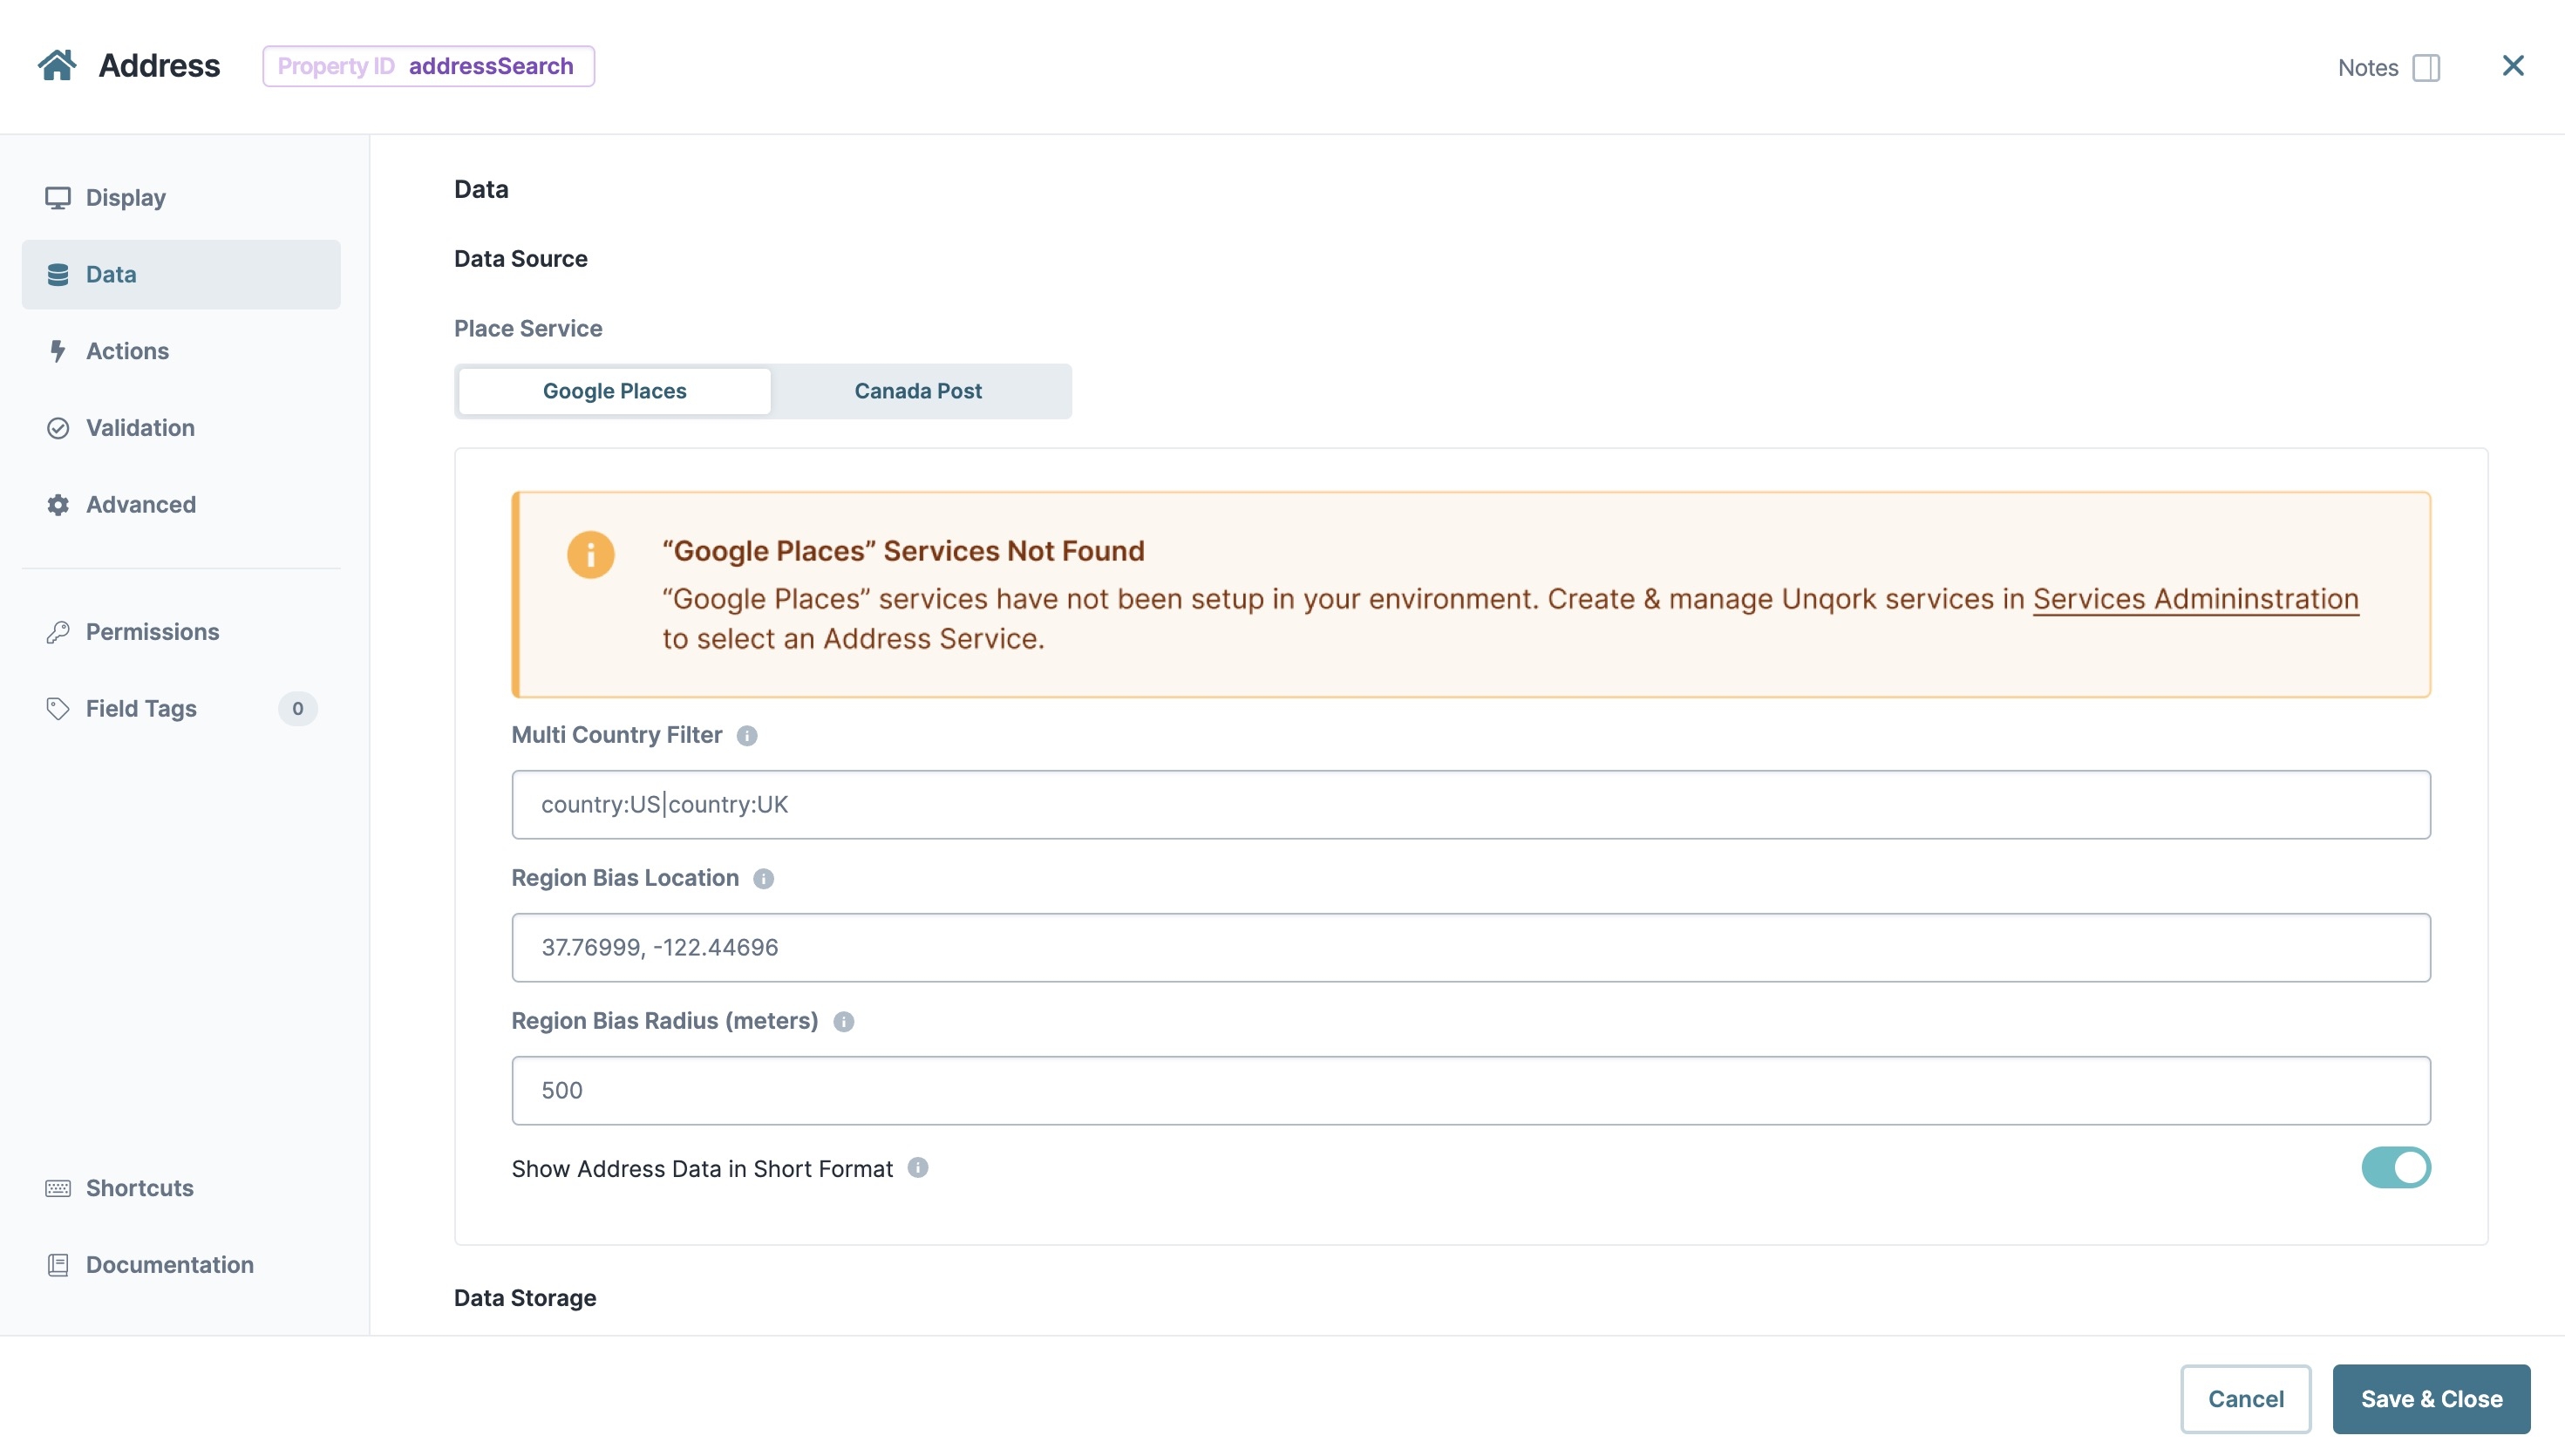
Short Format Setting: For Google Places APIs, the Address Search component uses this setting to control the address element (Street, Street 2, City, State, Zip, & Country) length in the submission data. When set to
 (ON), the component stores the address element in a shortened format. For example, "New York" stores as "NY".
Guided Configuration and Warnings: The Address Search components contains Module Builder settings warnings and Express View console warning logs. These warnings alert Creators when no address service is selected, resulting in no data being returned.
Module Builder Warning:
Express View Console Warning:
Clearable Value: The Address Search component allows end-users to clear values in Express View using the button.
Required Error Message: The Address Search component displays a component-level required error message below the component. It also has field-level required messages for Street, Street 2, City, State, Zip, and Country.
Message Output Type Support: The Address Search component supports Creator-defined custom error messages sent using the message Output Type in a logic component.
Below are the most commonly asked questions regarding the change from the Address (v1) component to the Address Search component:
Frequently Asked Questions
How do I start using the Address Search component? What configuration changes are required?
The Address Search component is available in the Secondary Fields component tray of the Module Builder. Creators using the Address (v1) component need to map their configuration settings to the corresponding settings in the Address Search component. This new component has complete feature parity and a consistent configuration experience to make the transition as simple as possible. Unqork estimates that most use cases can be reconfigured in a matter of minutes.
Creators need to set up an address service in Services Administration to complete Address Search component configuration. Creators must establish a Google Maps or Canada Post API key from their respective API providers.
To learn more about setting up your API keys, see our Enabling Address Search Using Address Services article.
The Address Search component was created to improve security, so what are the security risks when using the Address (v1) component?
The Address (v1) requires Creators to enter a Google Maps API Key directly to the component configuration. This API key is exposed in the browser as the end-user enters an address. Doing so could potentially expose sensitive information to malicious agents.
Instead, the Address Search component integrates with Unqork’s Services Administration, performing all address searches server-side and preventing API information from being exposed in the browser.
What happens to all existing Address (v1) component configurations?
Existing Address (v1) component configurations will remain untouched. You can continue to edit them in the Module Builder, and render and execute them in Express View. Because of Creator and end-user improvements with the Address Search component, Unqork will gradually phase out the Address (v1) component while ensuring configurations continue functioning as expected.
What does it mean to sunset the Address (v1) component?
Unqork will gradually phase out the Address (v1) component in favor of the recently launched Address Search component. The Address (v1) component sunset will follow a process prioritizing configuration and application stability.
Below are the following phases of the Address (v1) component sunset process:
NOT RECOMMENDED FOR USE: This status conveys that it is no longer best practice to configure with the Address (v1) component. It also suggests that there is a narrowed component support policy. We will only address high-priority (P1) bugs and security vulnerabilities.
RETIRED: This status conveys all conditions of the NOT RECOMMENDED FOR USE status. It also prevents Creators from adding new Address (v1) components to modules.
Address (v1) Component Sunset Schedule:
Sunset Announcement: Oct 12, 2022 (as part of platform version v6.68.x)
NOT RECOMMENDED FOR USE: Effective Nov 9, 2022 (as part of platform version v6.70.x)
RETIRED: Effective Jun 30, 2023 (as part of platform version v6.78.x)
How will I know where the Address (v1) is in the sunset process?
A visual badge displays the current sunset status in the Address (v1) component's settings modal:
NOT RECOMMENDED FOR USE
RETIRED
DECOMMISSIONED
A banner at the top of this article will also indicate the sunset status.
To learn more about sunset statuses, see our Unqork Platform Sunsetting article.
Why is the Address (v2) component now known as the Address Search component?
The Address Search component is a new, independent component for capturing end-user addresses. It is differentiated from Unqork's original Address component by the ability to autocomplete and provide suggested addresses as the end-user enters text. The Address Search component's name represents this distinction, along with other security, Creator-productivity, and maintainability improvements.
Overview
The Address component lets your end-user use a Google Maps-style address look-up to suggest matching addresses. When your end-user selects a suggested address, the address fields populate with the selected address data.
The component also offers flexibility with how you'll collect and use address information. Features of the Address component include:
The Google Places API returns all the information it has on each address. This is useful because you can set up the Address component to show select address fields in Express View. But, you'll still have access to all the information the Google Places API returns.
The option to overwrite suggested values returned by the Google Places API. But, the values returned by the API will still store with the submission.
The ability to disable the address lookup function. You can instead use the Address component to quickly add a set of address fields.
You'll find the Address Search component in the Secondary Fields group to the left of the Module Builder.
About the Configuration Window
To learn more about general component settings and those that display when a component is associated with Data Models, view our General Component Settings article.
Display Panel
Field Text
Setting | Description |
|---|---|
Label Text | Label Text conveys what the input component is and what information it displays. Enter the purpose of the corresponding component or field. User-friendly labels make your module more accessible. Keep labels short and descriptive (a word or two) using title case. For longer entries, use sentence case. |
Placeholder Text | A short prompt telling end-users the expected value of an input field. For example, |
Contextual Help
Setting | Description |
|---|---|
Tooltip | A short hint that displays when an end-user positions their cursor over the |
Default State Options
Setting | Description |
|---|---|
Disable User Input | When set to ON, end-users can’t interact with or edit the Express View's input field or element. When end-users hover over the field, their cursor changes to alert them to the status change. By default, the Disable User Input toggle is set to |
Read Only View | When set to ON, end-users can’t interact with or edit the Express View's input field or element. When end-users hover over the field, their cursor changes to alert them to the status change. By default, the Disable User Input toggle is set to |
Hide Field | Hides the component from displaying in Express View. By default, this setting is |
Formatting
Setting | Description |
|---|---|
Hide Search | Set to By default, this setting is |
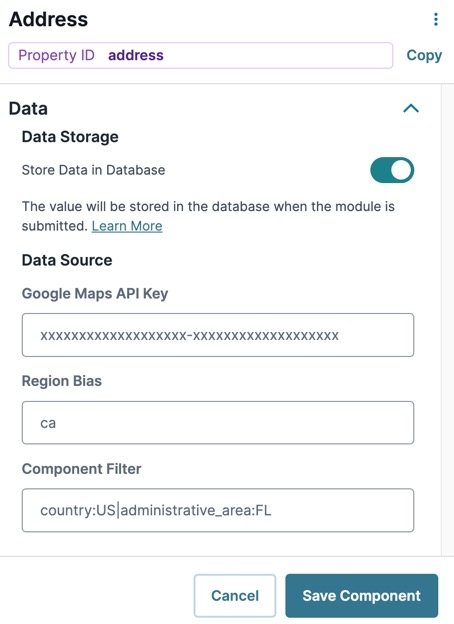
Data Panel
Data Storage
Setting | Description |
|---|---|
Store Data in Database | The Store Data in Database setting affects how data persists through your application. When set to
Set the toggle to
By default, this setting is |
Data Source
Setting | Description |
|---|---|
Google Maps API Key | Enter a Google Maps API key.
|
Region Bias | Enter the coordinates of a region. The coordinates tell the Google Places API what regional results to suggest first. For example, entering |
Component Filter | Enable to influence or restrict the values the Google Places API returns. To restrict suggested results based on country, use the following format: |
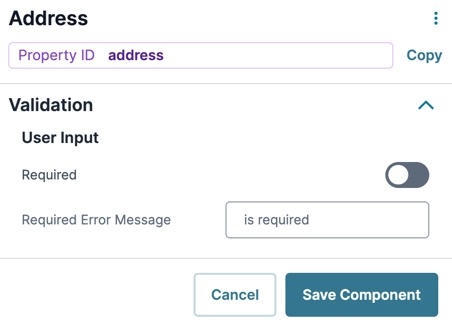
Validation Panel
User Input
Setting | Description |
|---|---|
Required | When set to By default, Required is set to |
Required Error Message | A custom error message displays below each visible and required address field. The error message displays when the end-user tries to save or submit the module without completing the required field. |
Advanced Panel
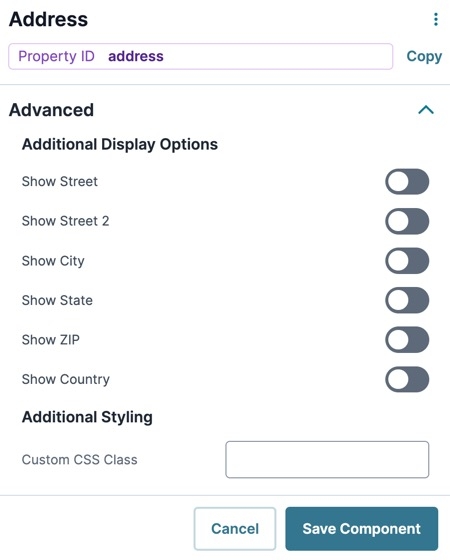
Additional Display Options
Setting | Description |
|---|---|
Show Street | Set to |
Street2 | Set to |
City | Set to |
State | Set to |
Zip | Set to |
Country | Set to |
Additional Styling
Setting | Description |
|---|---|
Custom CSS Class | Enter a Custom CSS Class to apply to your component. Custom CSS lets you maintain a consistent look and feel when the field or element is part of a template or multiple modules. Updated CSS styling applies to all components that reference this custom class name. |
Adding an Address Component
Let's configure an Address component that collects end-user addresses. Let's assume we know that your end-user lives in the United States. That way, we can avoid including the Country field in Express View. Let's also add some Placeholder text so your end-user knows to use the search field. These instructions assume that you have an open module saved with a title.
It is the customer/creator's responsibility to obtain an API key for the Google Maps service. API Keys are owned by the customer and should not be exposed to end-users.
In the Module Builder drag and drop an
.png) Address (v1) component onto your canvas.
Address (v1) component onto your canvas.In the Property ID field, enter address.
In the Label Text field, enter
Address.In the Placeholder Text field, enter
Search for your address.Navigate to the component's Advanced settings.
Set the Show Street, Show Street 2, Show City, and Show State to
 (ON).
(ON).Click Save Component.
Save your module.
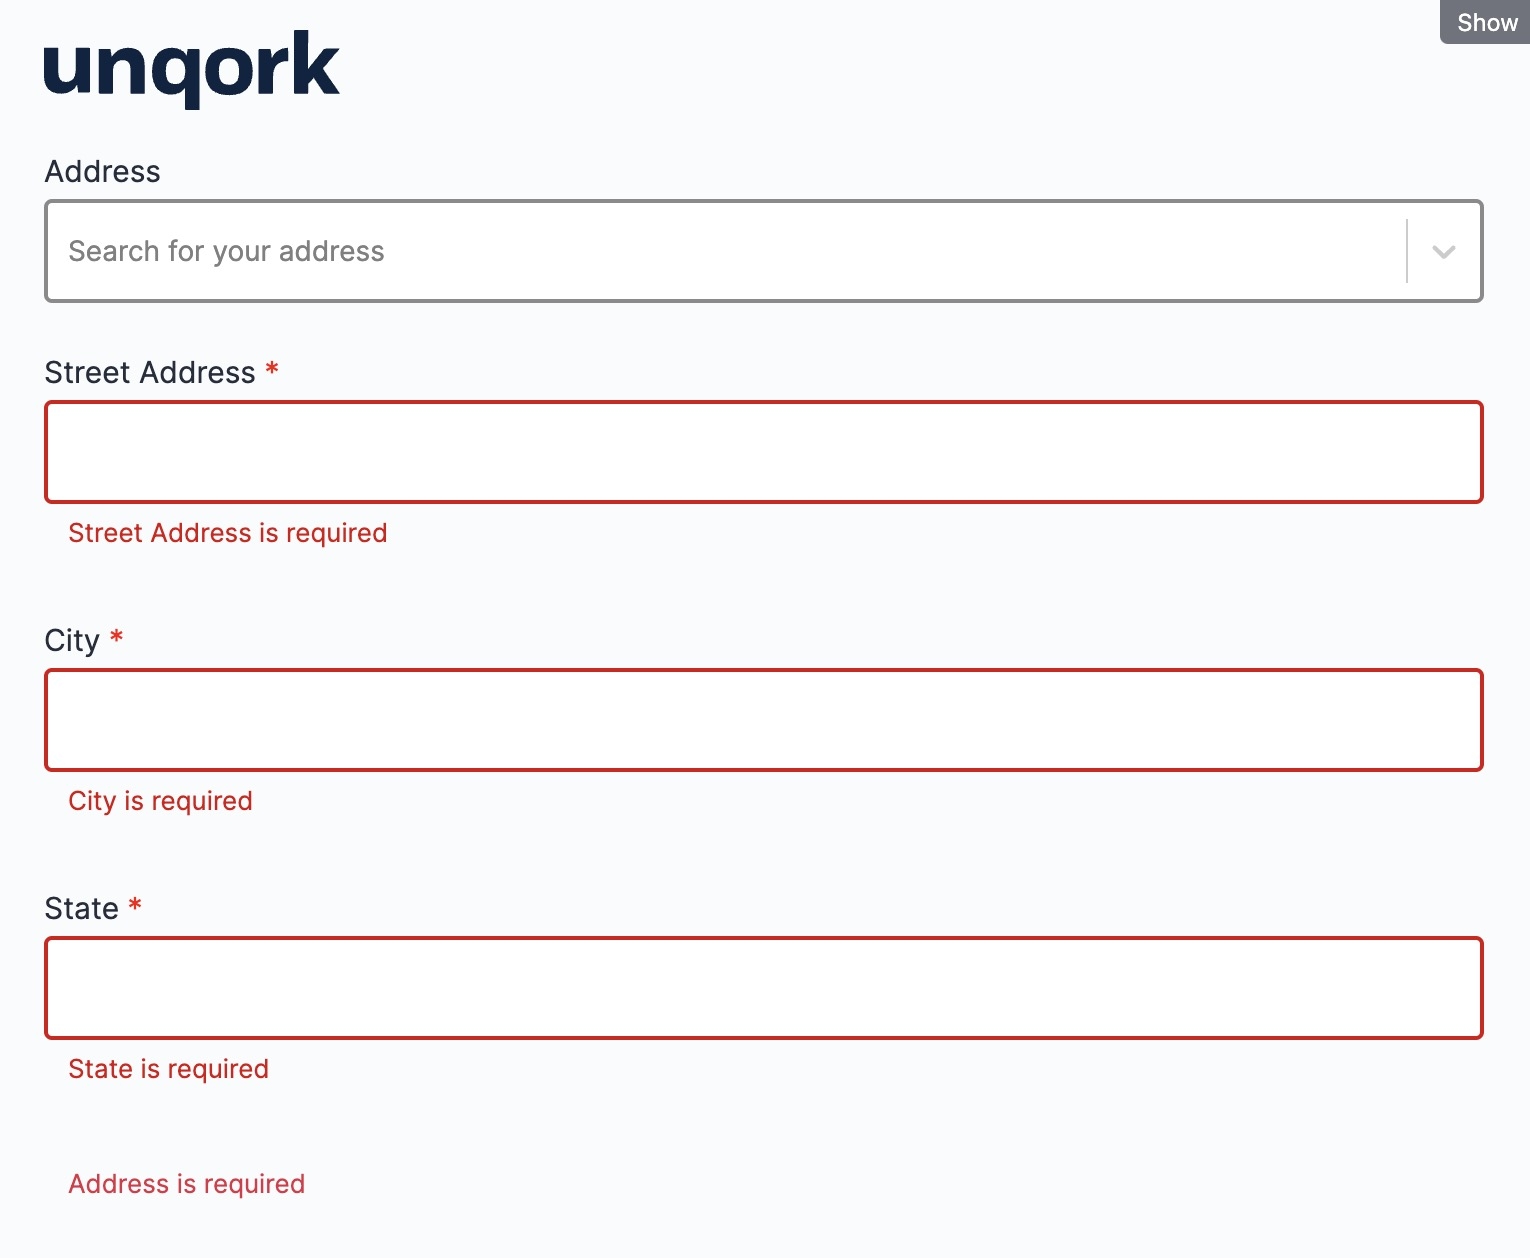
Preview your module in Express View and enter an address. Your module works as the following in Express View:
Resources
Overview
When collecting basic information about your end-user, you'll often want their address, too. Manually typing out every field of an address can be tedious and leaves room for human error. With the Address component, your end-user can use a Google Maps-style address look-up to suggest matching addresses. When your end-user selects a suggested address, the address fields will autofill. Using an Address component is quicker, more accurate, and provides a better user experience.
The component also offers flexibility with how you'll collect and use address information. Features of the Address component include:
The Google Places API returns all the information it has on each address. This is useful because you can set up the Address component to show select address fields in Express View. But, you'll still have access to all the information the Google Places API returns.
The option to overwrite suggested values returned by the Google Places API. But, the values returned by the API will still store with the submission.
The ability to disable the address lookup function. You can instead use the Address component to quickly add a set of address fields.
You'll find the Address component in the Secondary Fields group to the left of the Module Builder.
About the Configuration Window
To learn more about general component settings and those that display when a component is associated with Data Models, view our General Component Settings article.
General
Setting | Description |
|---|---|
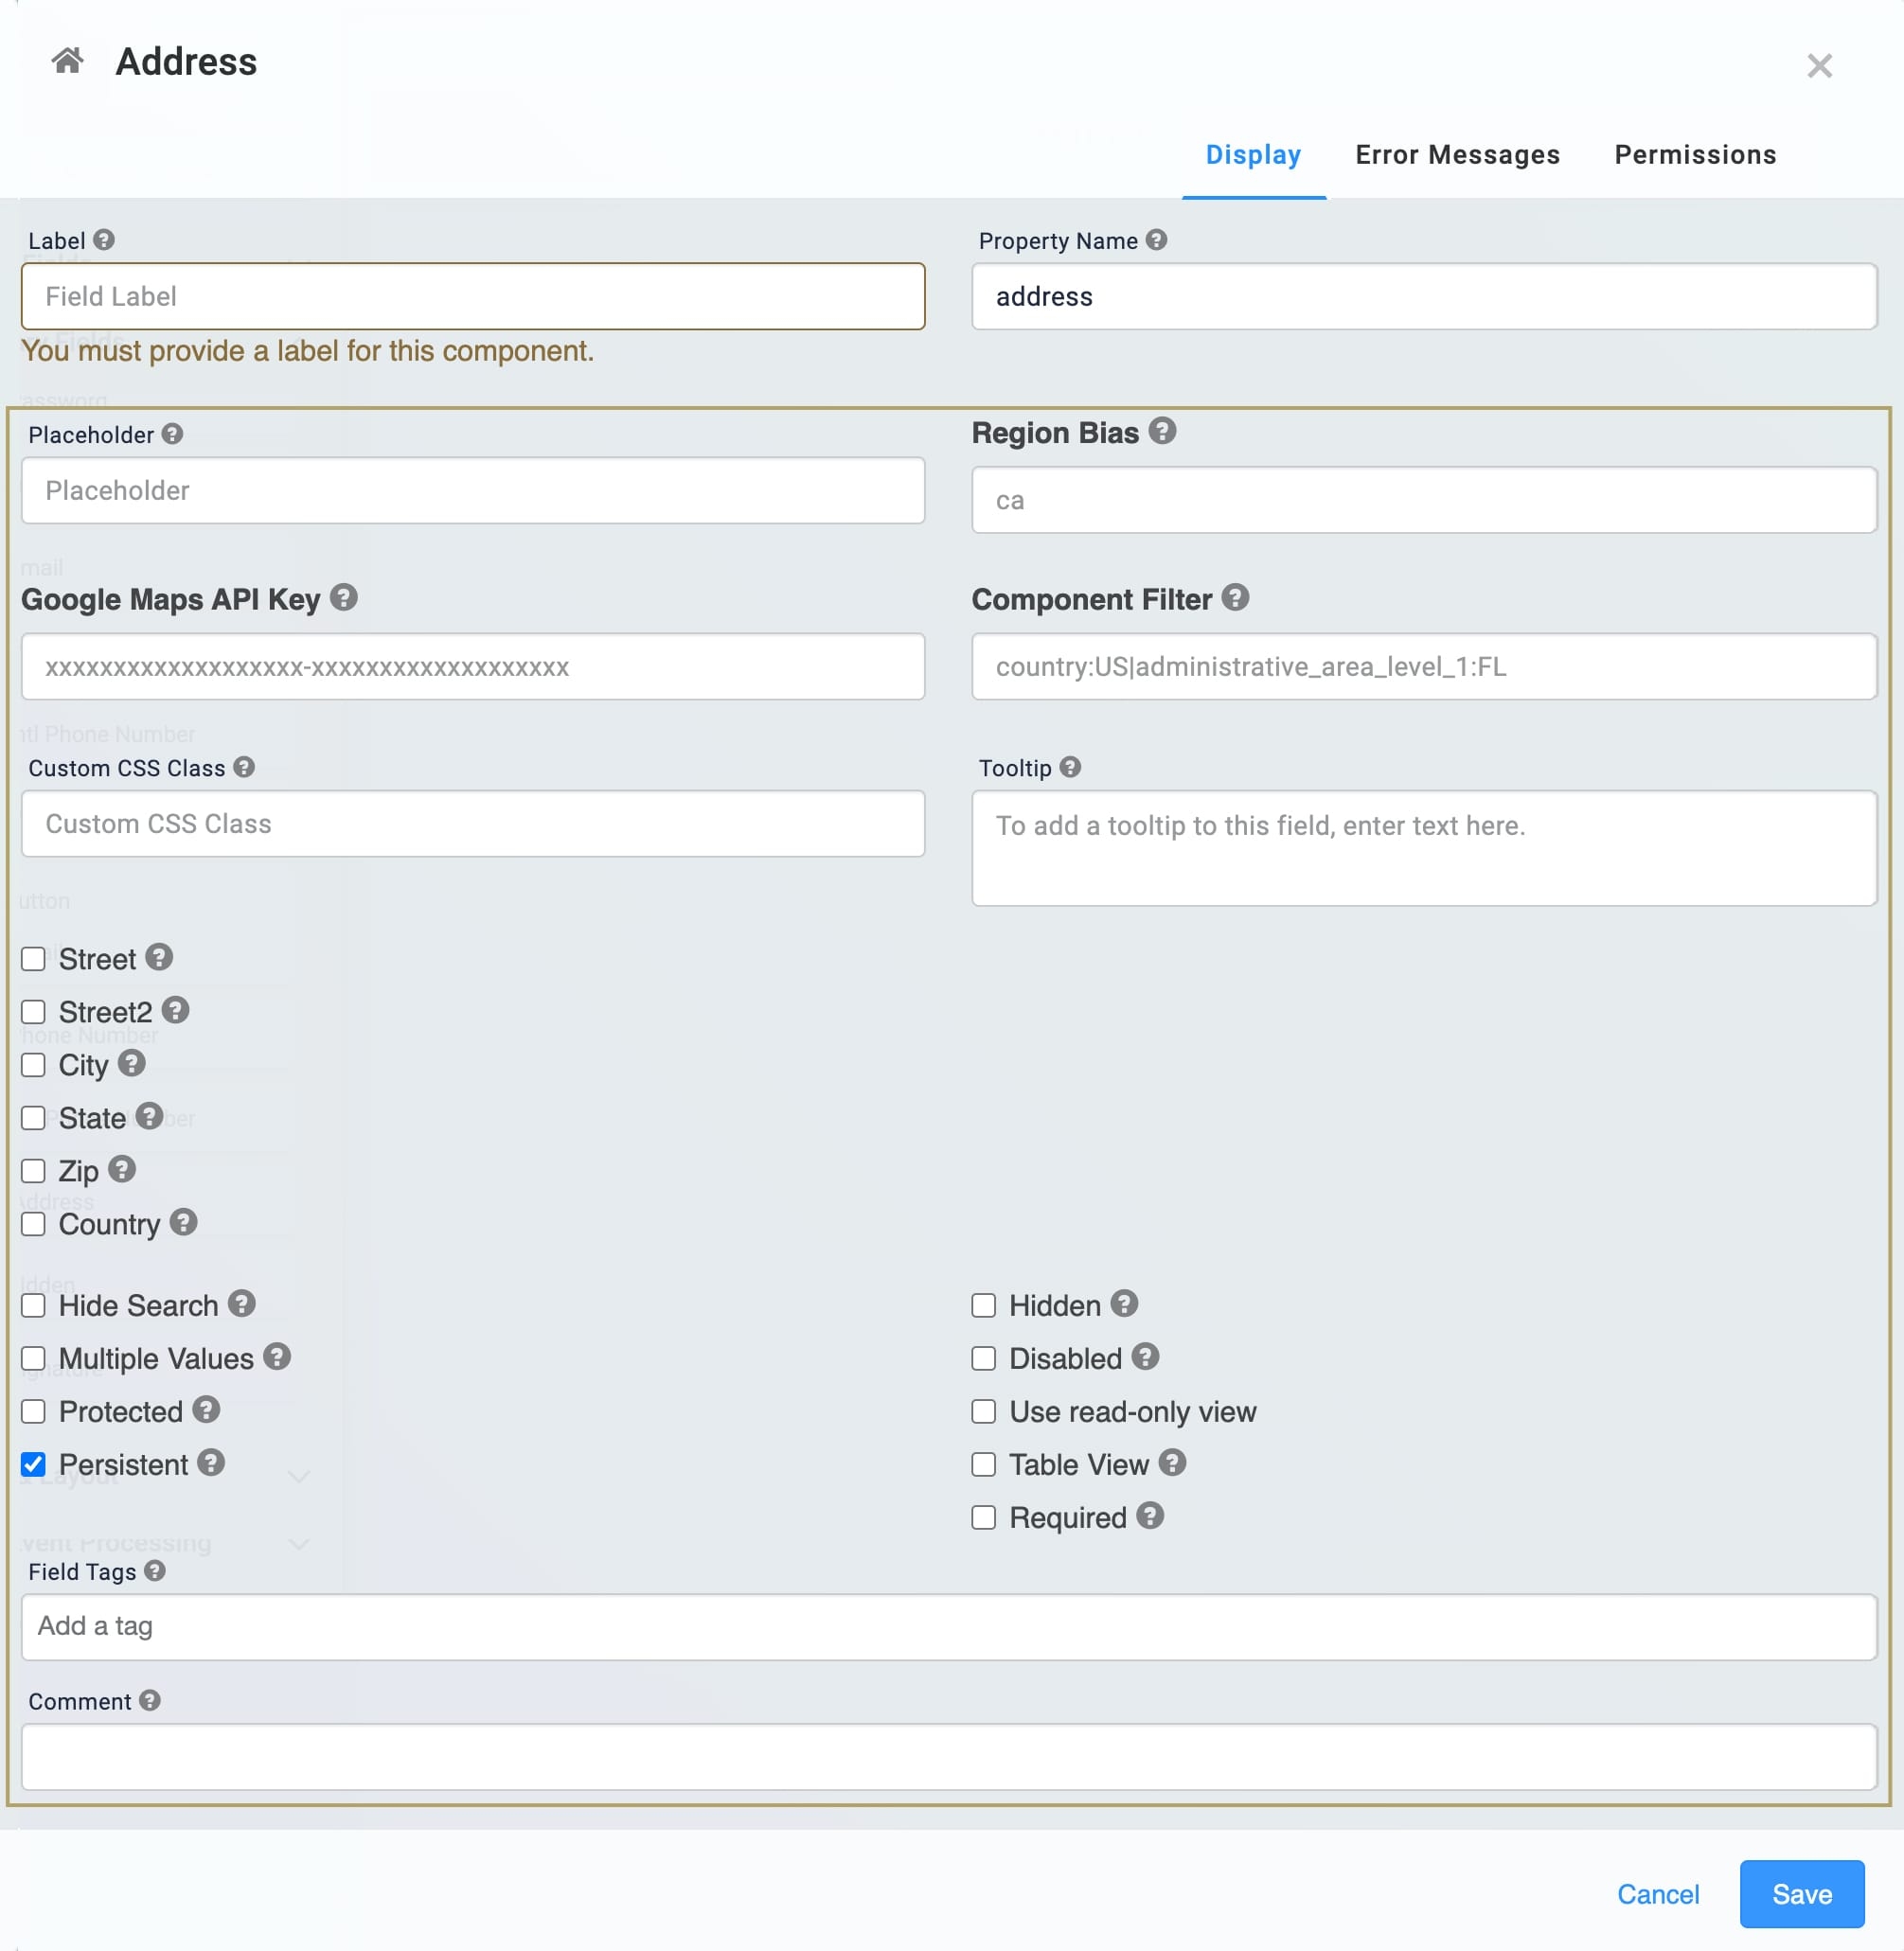
Display Tab | Selecting this tab shows all Address component configuration settings. |
Error Messages Tab | Selecting this tab shows the Required Error setting. Use this setting to enter a custom error message to appear if your end-user does not complete this field.
|
Permissions Tab | Select this tab to see the RBAC settings of the component. |
Label | Label Text conveys what the input component is and what information it displays. Enter the purpose of the corresponding component or field. User-friendly labels make your module more accessible. Keep labels short and descriptive (a word or two) using title case. For longer entries, use sentence case. |
Property Name | A Property ID (also called Property Name) is the unique field ID used by Unqork to track and link components in your module. The Property ID is how the software identifies your component. Using Property IDs lets you link components, creating logic-based configurations and API calls. Property IDs must use camel case (stylized as camelCase) without spaces or punctuation. |
Cancel | Click this button to undo any unsaved configuration changes and return to the Module Builder canvas. |
Save | Click this button to save all setting configuration changes and return to the Module Builder canvas. |
Configuration Settings
Setting | Description |
|---|---|
Placeholder | A short prompt telling end-users the expected value of an input field. For example, |
Region Bias | Enter the coordinates of a region. The coordinates tell the Google Places API what regional results to suggest first. For example, entering |
Google Maps API Key | Enter a Google Maps API key.
|
Component Filter | Enable to influence or restrict the values the Google Places API returns. To restrict suggested results based on country, use the following format: |
Custom CSS Class | Enter a Custom CSS Class to apply to your component. Custom CSS lets you maintain a consistent look and feel when the field or element is part of a template or multiple modules. Updated CSS styling applies to all components that reference this custom class name. |
Tooltip | A short hint that displays when an end-user positions their cursor over the |
Street | Set to |
Street2 | Set to |
City | Set to |
Zip | Set to |
State | Set to |
Country | Set to |
Hide Search | Set to By default, this setting is |
Clear Value When Hidden | Where the component is set to hidden, setting this toggle to |
Persistent | The Store Data in Database setting affects how data persists through your application. When set to
Set the toggle to
|
Hidden | Hides the component from displaying in Express View.By default, this setting is |
Disabled | When checked, end-users can’t interact with or edit the Express View's input field or element. When end-users hover over the field, their cursor will change to alert them to the status change. |
Use Read-Only View | When set to ON, end-users can’t interact with or edit the Express View's input field or element. When end-users hover over the field, their cursor changes to alert them to the status change. By default, the Disable User Input toggle is set to |
Required | When set to By default, Required is set to |
Field Tags | Assign components one-word labels to help organize, identify, and group the components in your application. Consider an example from the API Specification Snippet: Field Tags are applied to Hidden components in the panelRequest and panelResponse Panel components. The Field Tags identify the data type of parameters included in the API request and response. The API Docs Dashboard tool populates with information about each parameter’s data type, identified by the Field Tag. Field Tags act as a type of Property ID group and let you group components for configuration purposes. Field Tags let you target two or more components using a simple logic component. For example, add the Field Tag tagForDecision to multiple components in your module. Open the Inputs table of a Decisions component and reference the tagForDecision Field Tag as the input of the Decisions component. The output of the Decisions component then affects all components with the tagForDecision Field Tag. Save your Field Tags by pressing Enter (Return) or adding a comma after each entry. |
Comment | Enter comments about your component and its configuration. You can use this setting to keep your teammates in the loop. |
Adding an Address Component
Let's configure an Address component that collects end-user addresses. Let's assume we know that your end-user lives in the United States. That way, we can avoid including the Country field in Express View. Let's also add some Placeholder text so your end-user knows to use the search field. These instructions assume that you have an open module saved with a title.
For testing purposes, the Address component works without entering a unique Google Maps API key. In production applications, always acquire and enter a personal API key.
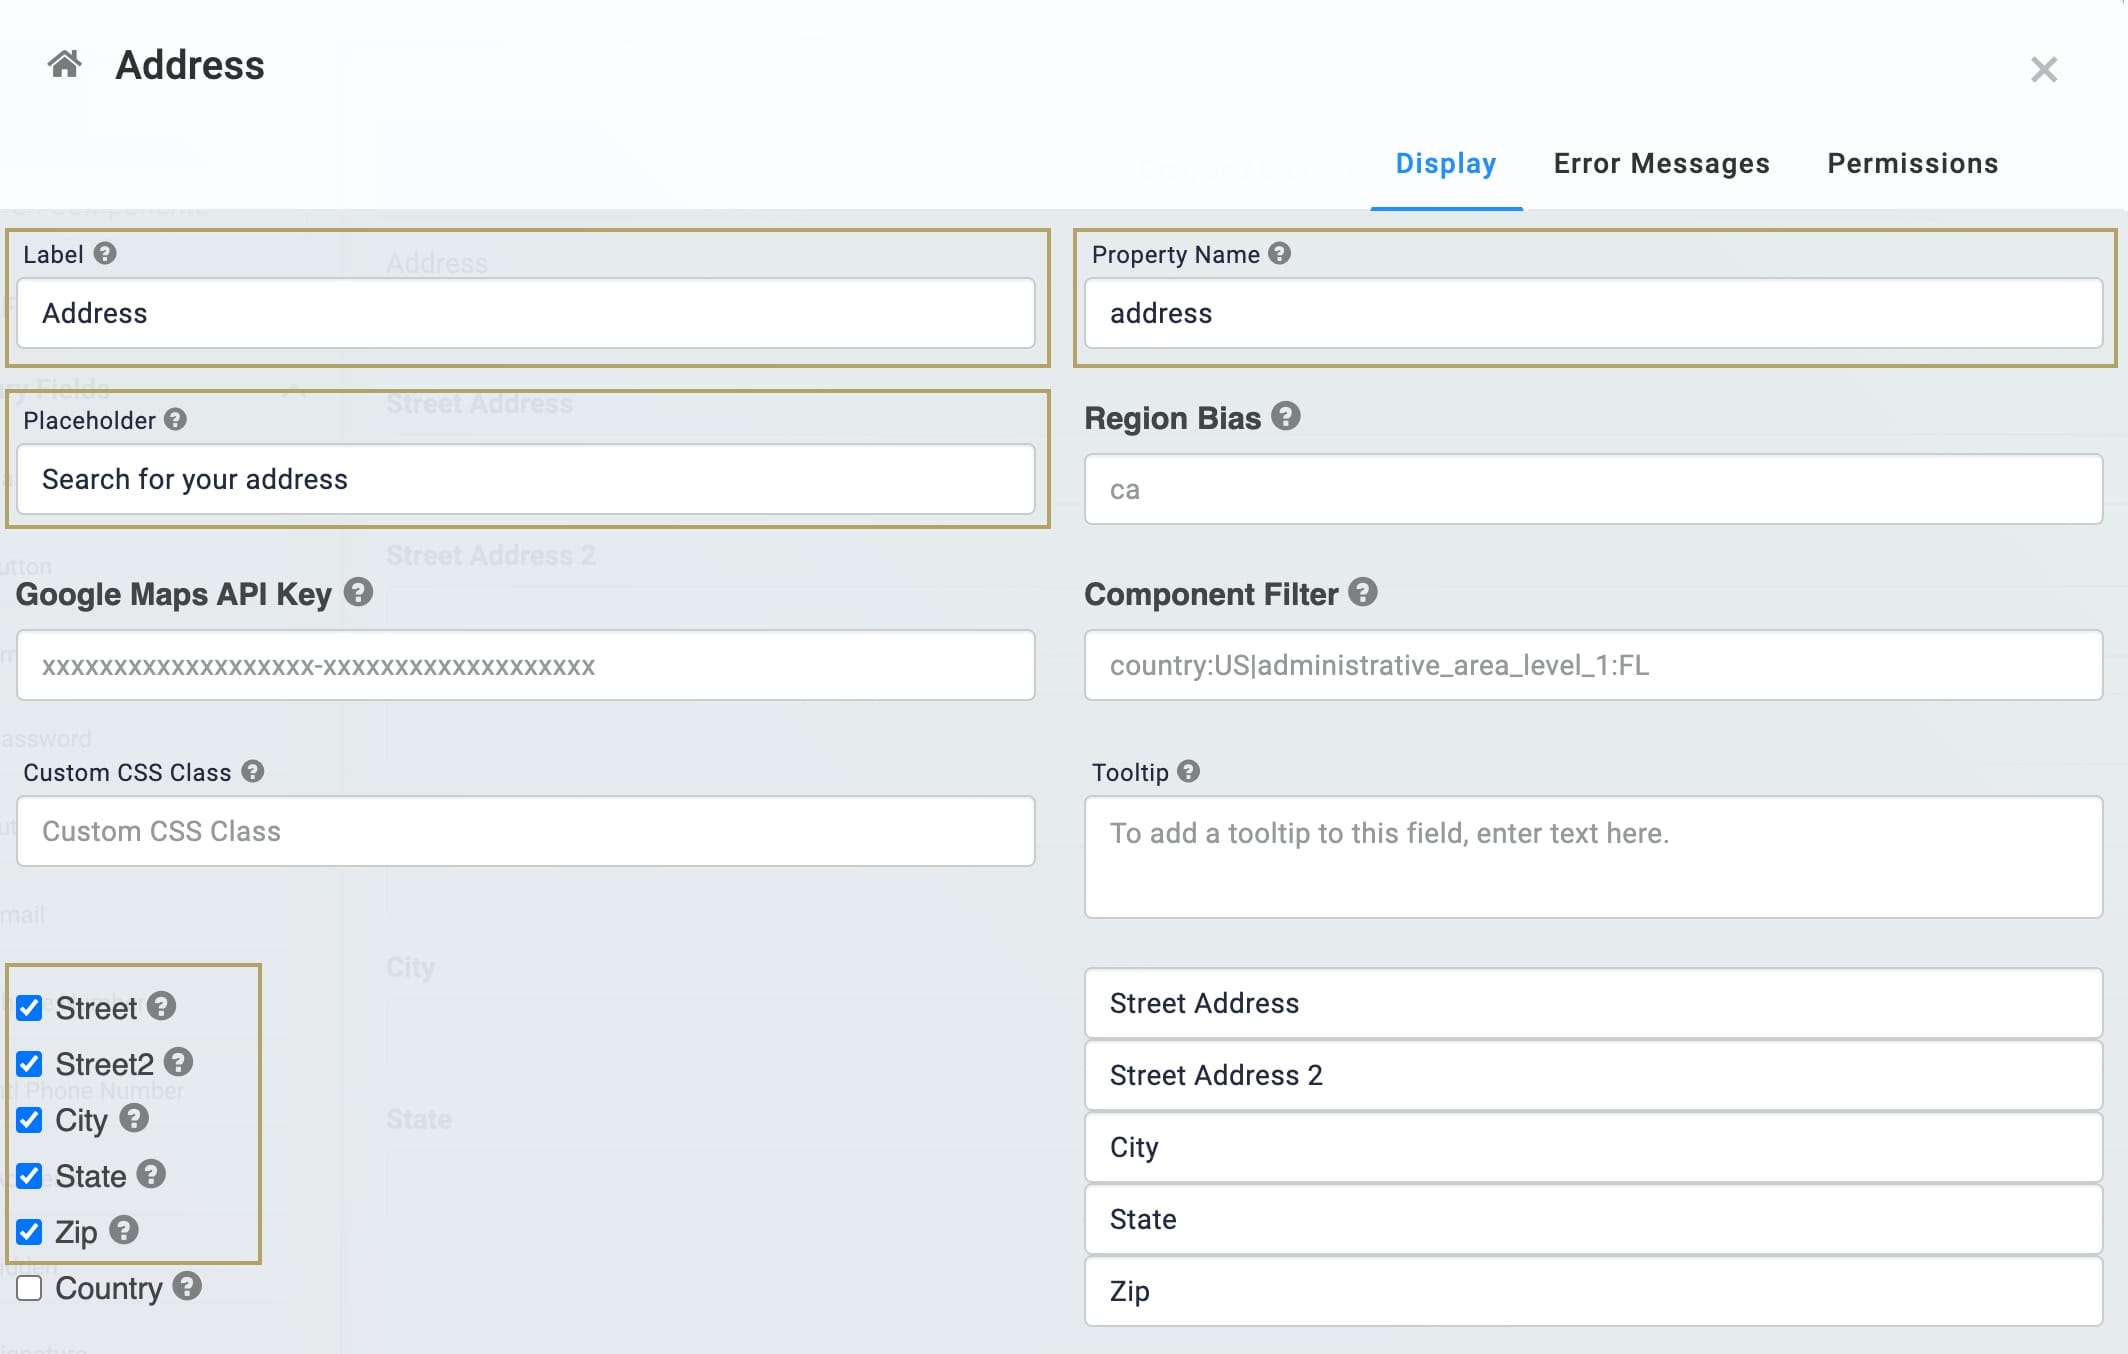
In the Module Builder, drag and drop an
.png) Address (v1) component onto your canvas.
Address (v1) component onto your canvas.In the Label field, enter
Address.In the Property Name field, enter
address.In the Placeholder field, enter
Search for your address.Select Street, Street 2, City, State, and Zip.
Click Save.
Save your module.
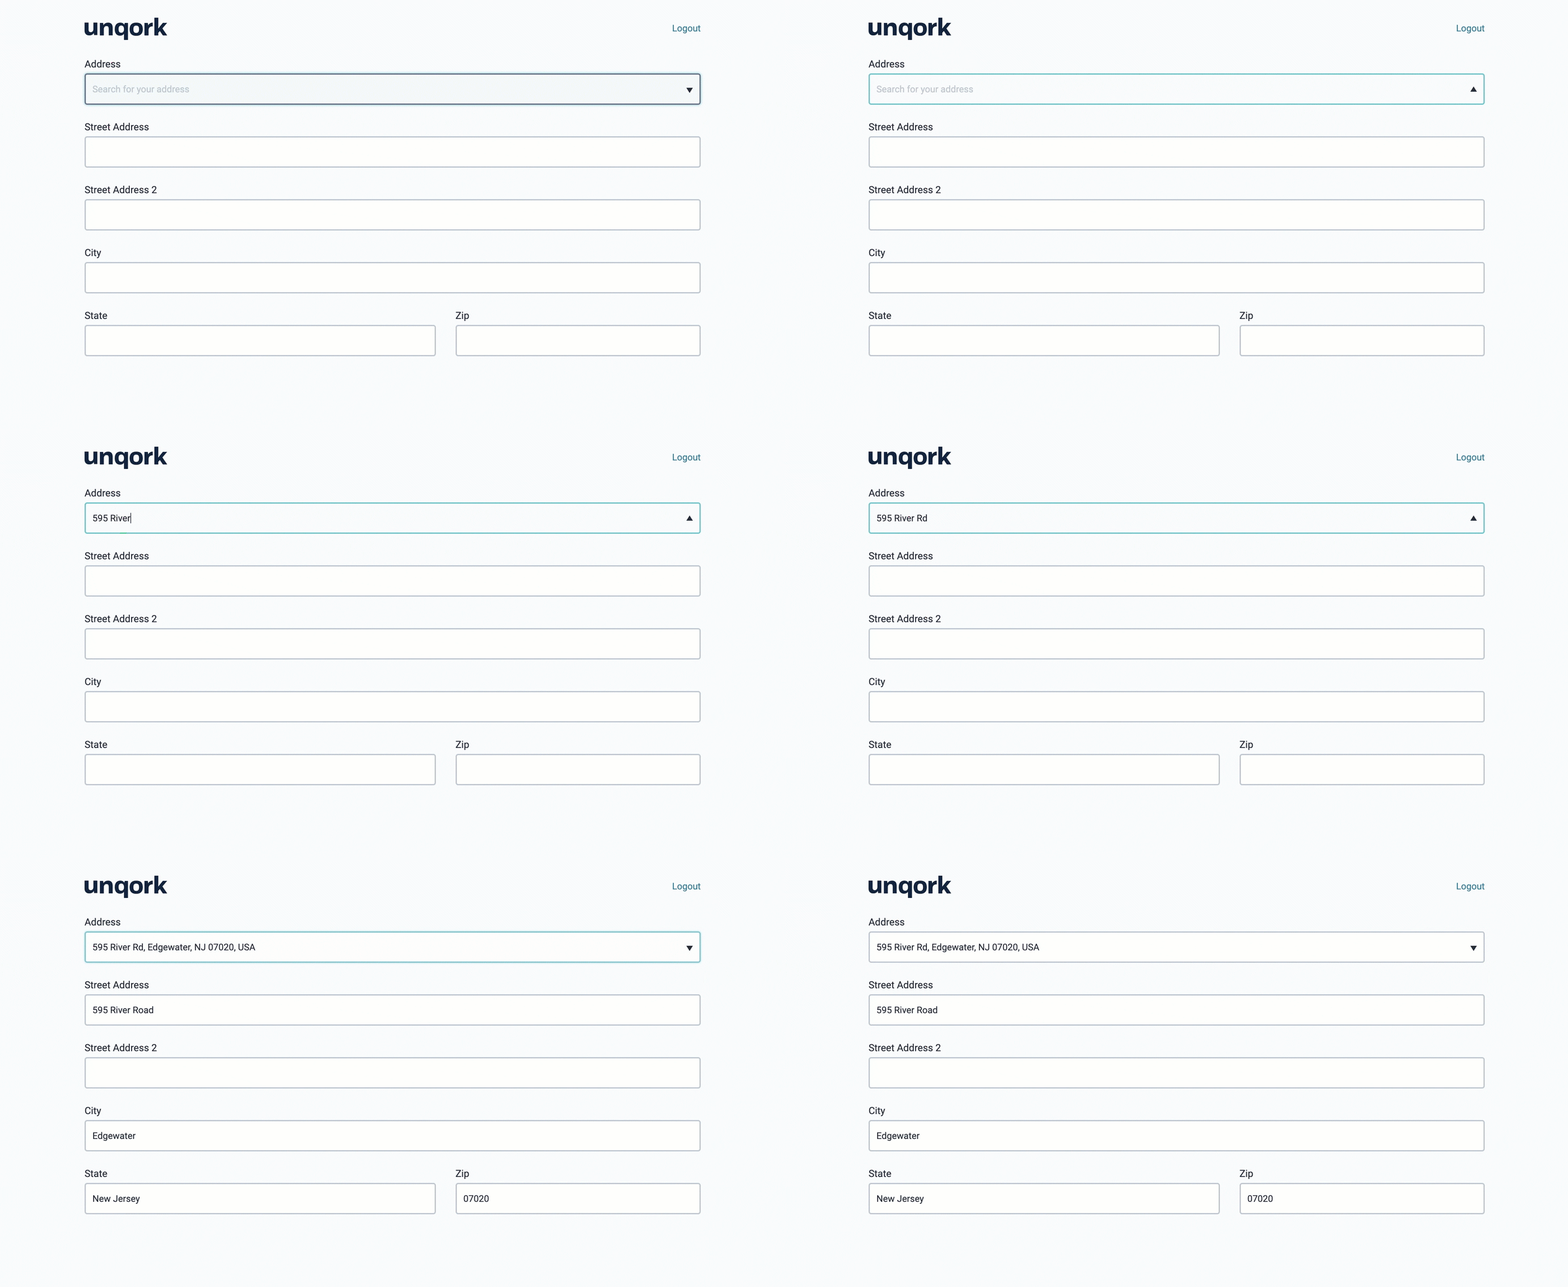
Preview your module in Express View and enter an address. Your module works as the following in Express View:





.jpg) (Tooltip) icon. Tooltips can display across more than one line.
(Tooltip) icon. Tooltips can display across more than one line.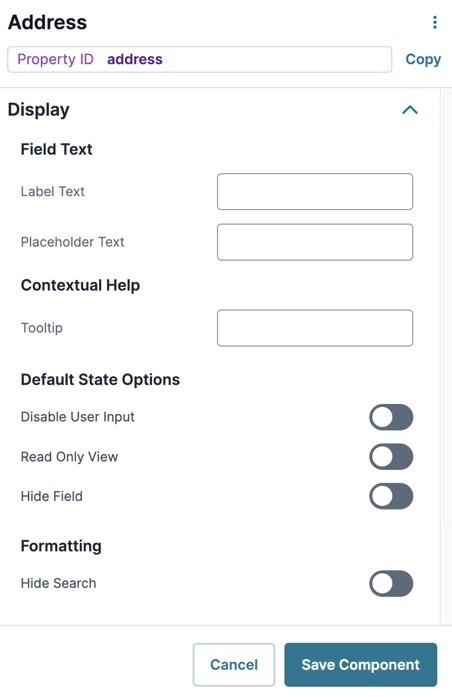
.png)

