Append Operator: Appending Tables
Overview
The Append operator is great for appending values, but its usefulness doesn't stop there. You can also use the Append operator to put 2 tables together. Let's say you've collected similar data in multiple places. Well, you can use the Append operator to put all that data together.
In this example, you'll create an application that takes 2 tables and brings them together. First, you'll configure your Data Table components to serve as your inputs. Then, you'll use a Data Workflow to append them. The appended results show the records from the first table, followed by the records from the second table.
Here's how your module will look in the Module Builder:

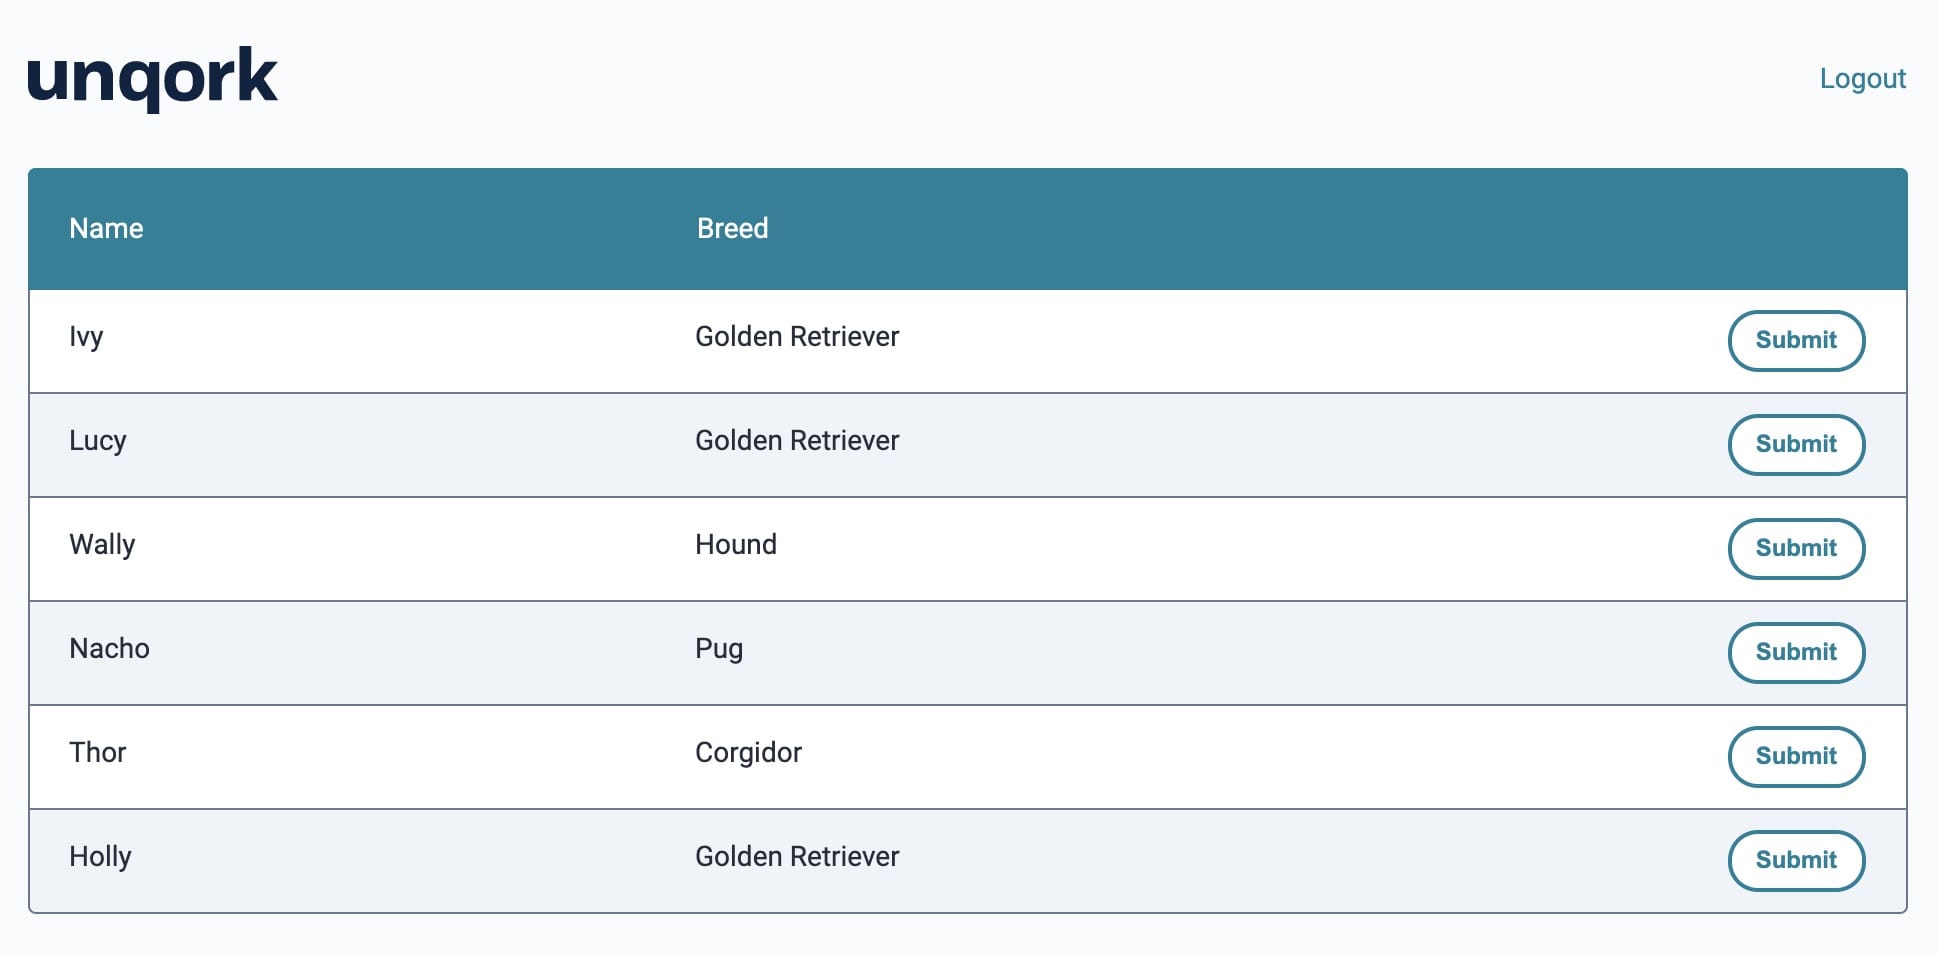
Here's how the completed use case will look in Express View:
What You'll Learn
In this article, you'll learn how to append 2 tables using an Append operator.
What You'll Need
To set up this use case, you’ll need:
-
2 Data Table components
-
1 Hidden component
-
1 ViewGrid component
-
1 Data Workflow component
To set up your Data Workflow, you'll need:
-
2 Input operators
-
1 Append operator
-
1 Output operator
These instructions assume you have a new module open, saved, and with a title.
Configuration
Configure the First Data Table Component
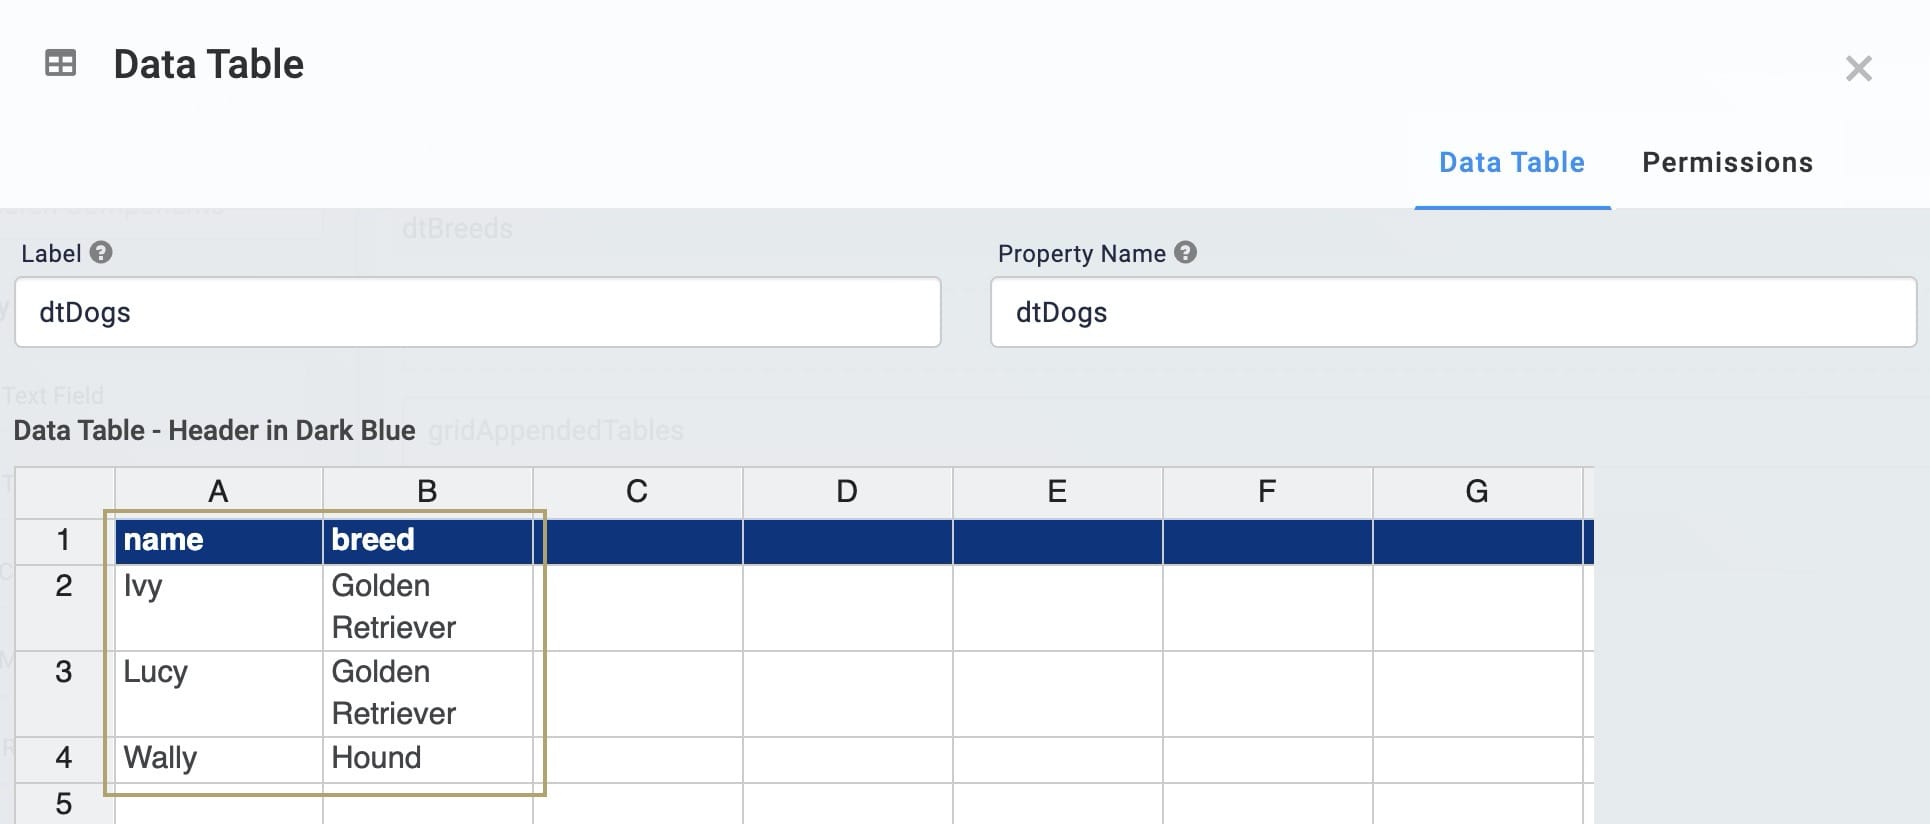
You'll start by adding your first Data Table. This will hold some of the data you'll bring into your Data Workflow. Here, you'll set up a list of dogs, storing their name and breed.
| 1. | Drag and drop a Data Table component onto your canvas. |
| 2. | Enter dtDogs in the Label and Property Name. |
| 3. | In the data table, enter the following: |
|
A |
B |
|---|---|
|
name |
breed |
|
Ivy |
Golden Retriever |
|
Lucy |
Golden Retriever |
|
Wally |
Hound |
| 4. | Click Save. |
Configure the Second Data Table Component
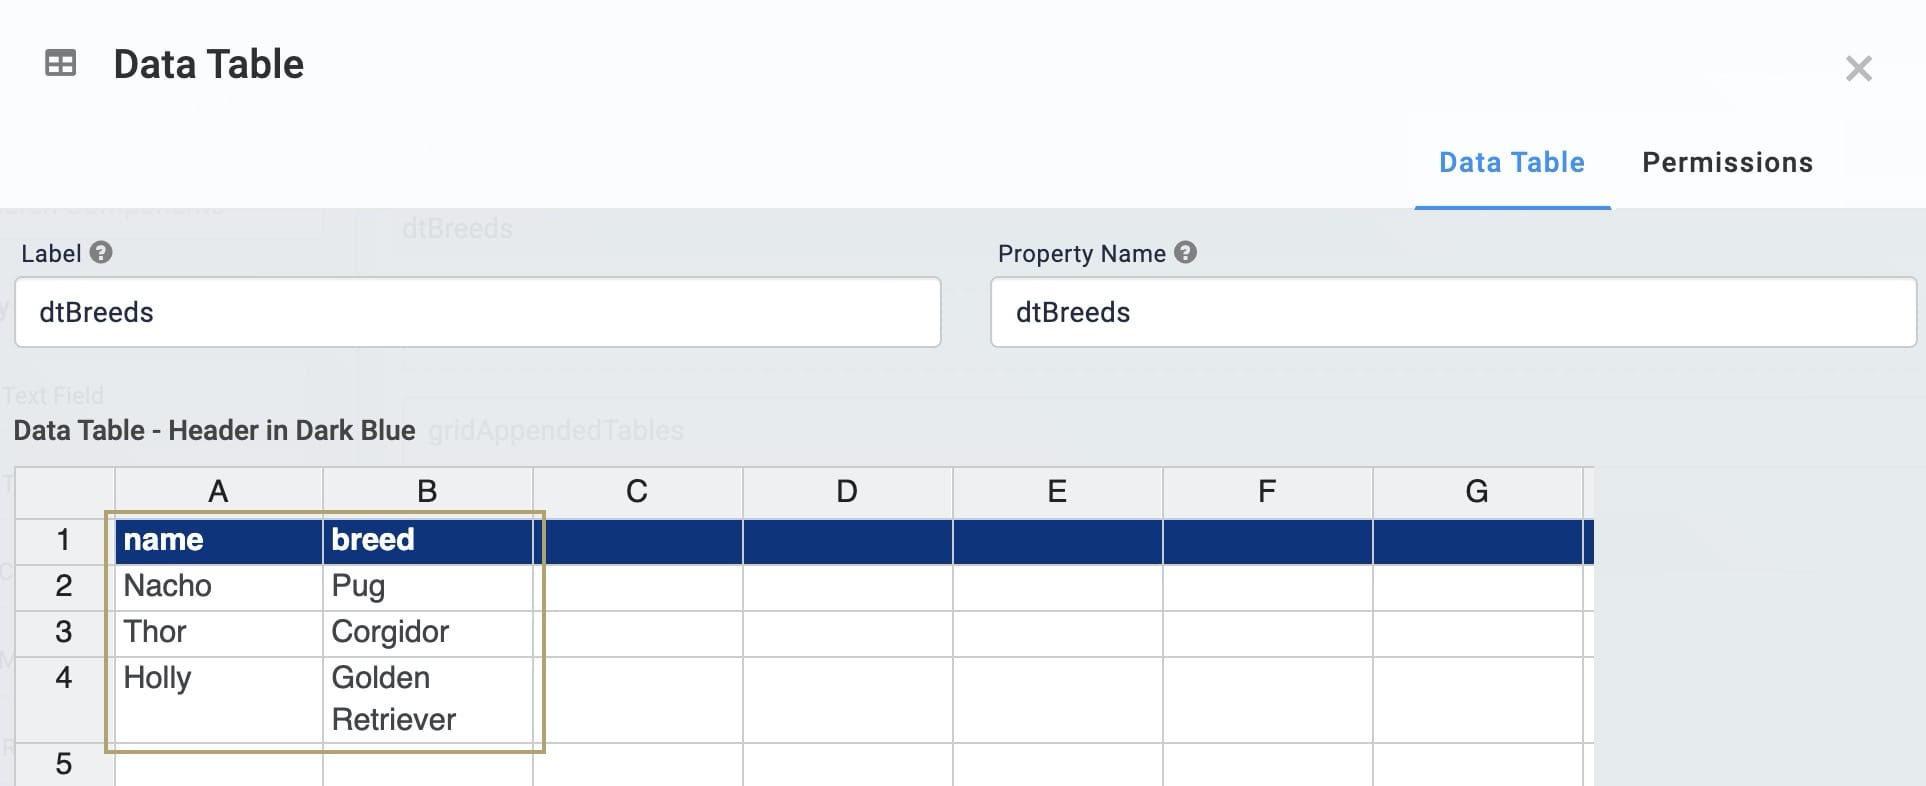
Now, you'll add your second Data Table. This will hold the rest of the data you'll bring into your Data Workflow. Here, you'll set up another list of dogs, storing their name and breed.
| 1. | Drag and drop a second Data Table component onto your canvas. |
| 2. | Enter dtBreeds in the Label and Property Name. |
| 3. | In the data table, enter the following: |
|
A |
B |
|---|---|
|
name |
breed |
|
Nacho |
Pug |
|
Thor |
Corgidor |
|
Holly |
Golden Retriever |
| 4. | Click Save. |
Configure the Hidden Component
Next, let's add a Hidden component to serve as the primary output for your Data Workflow. Later, you'll set up a ViewGrid to reference the data in this Hidden component. That ViewGrid will display your combined tables.
| 1. | Drag and drop a Hidden component onto your canvas. Place your Hidden component below your Data Tables. |
| 2. | Enter appendedTables in the Property ID and Label Text. |
| 3. | Click Save. |
Configure the ViewGrid Component
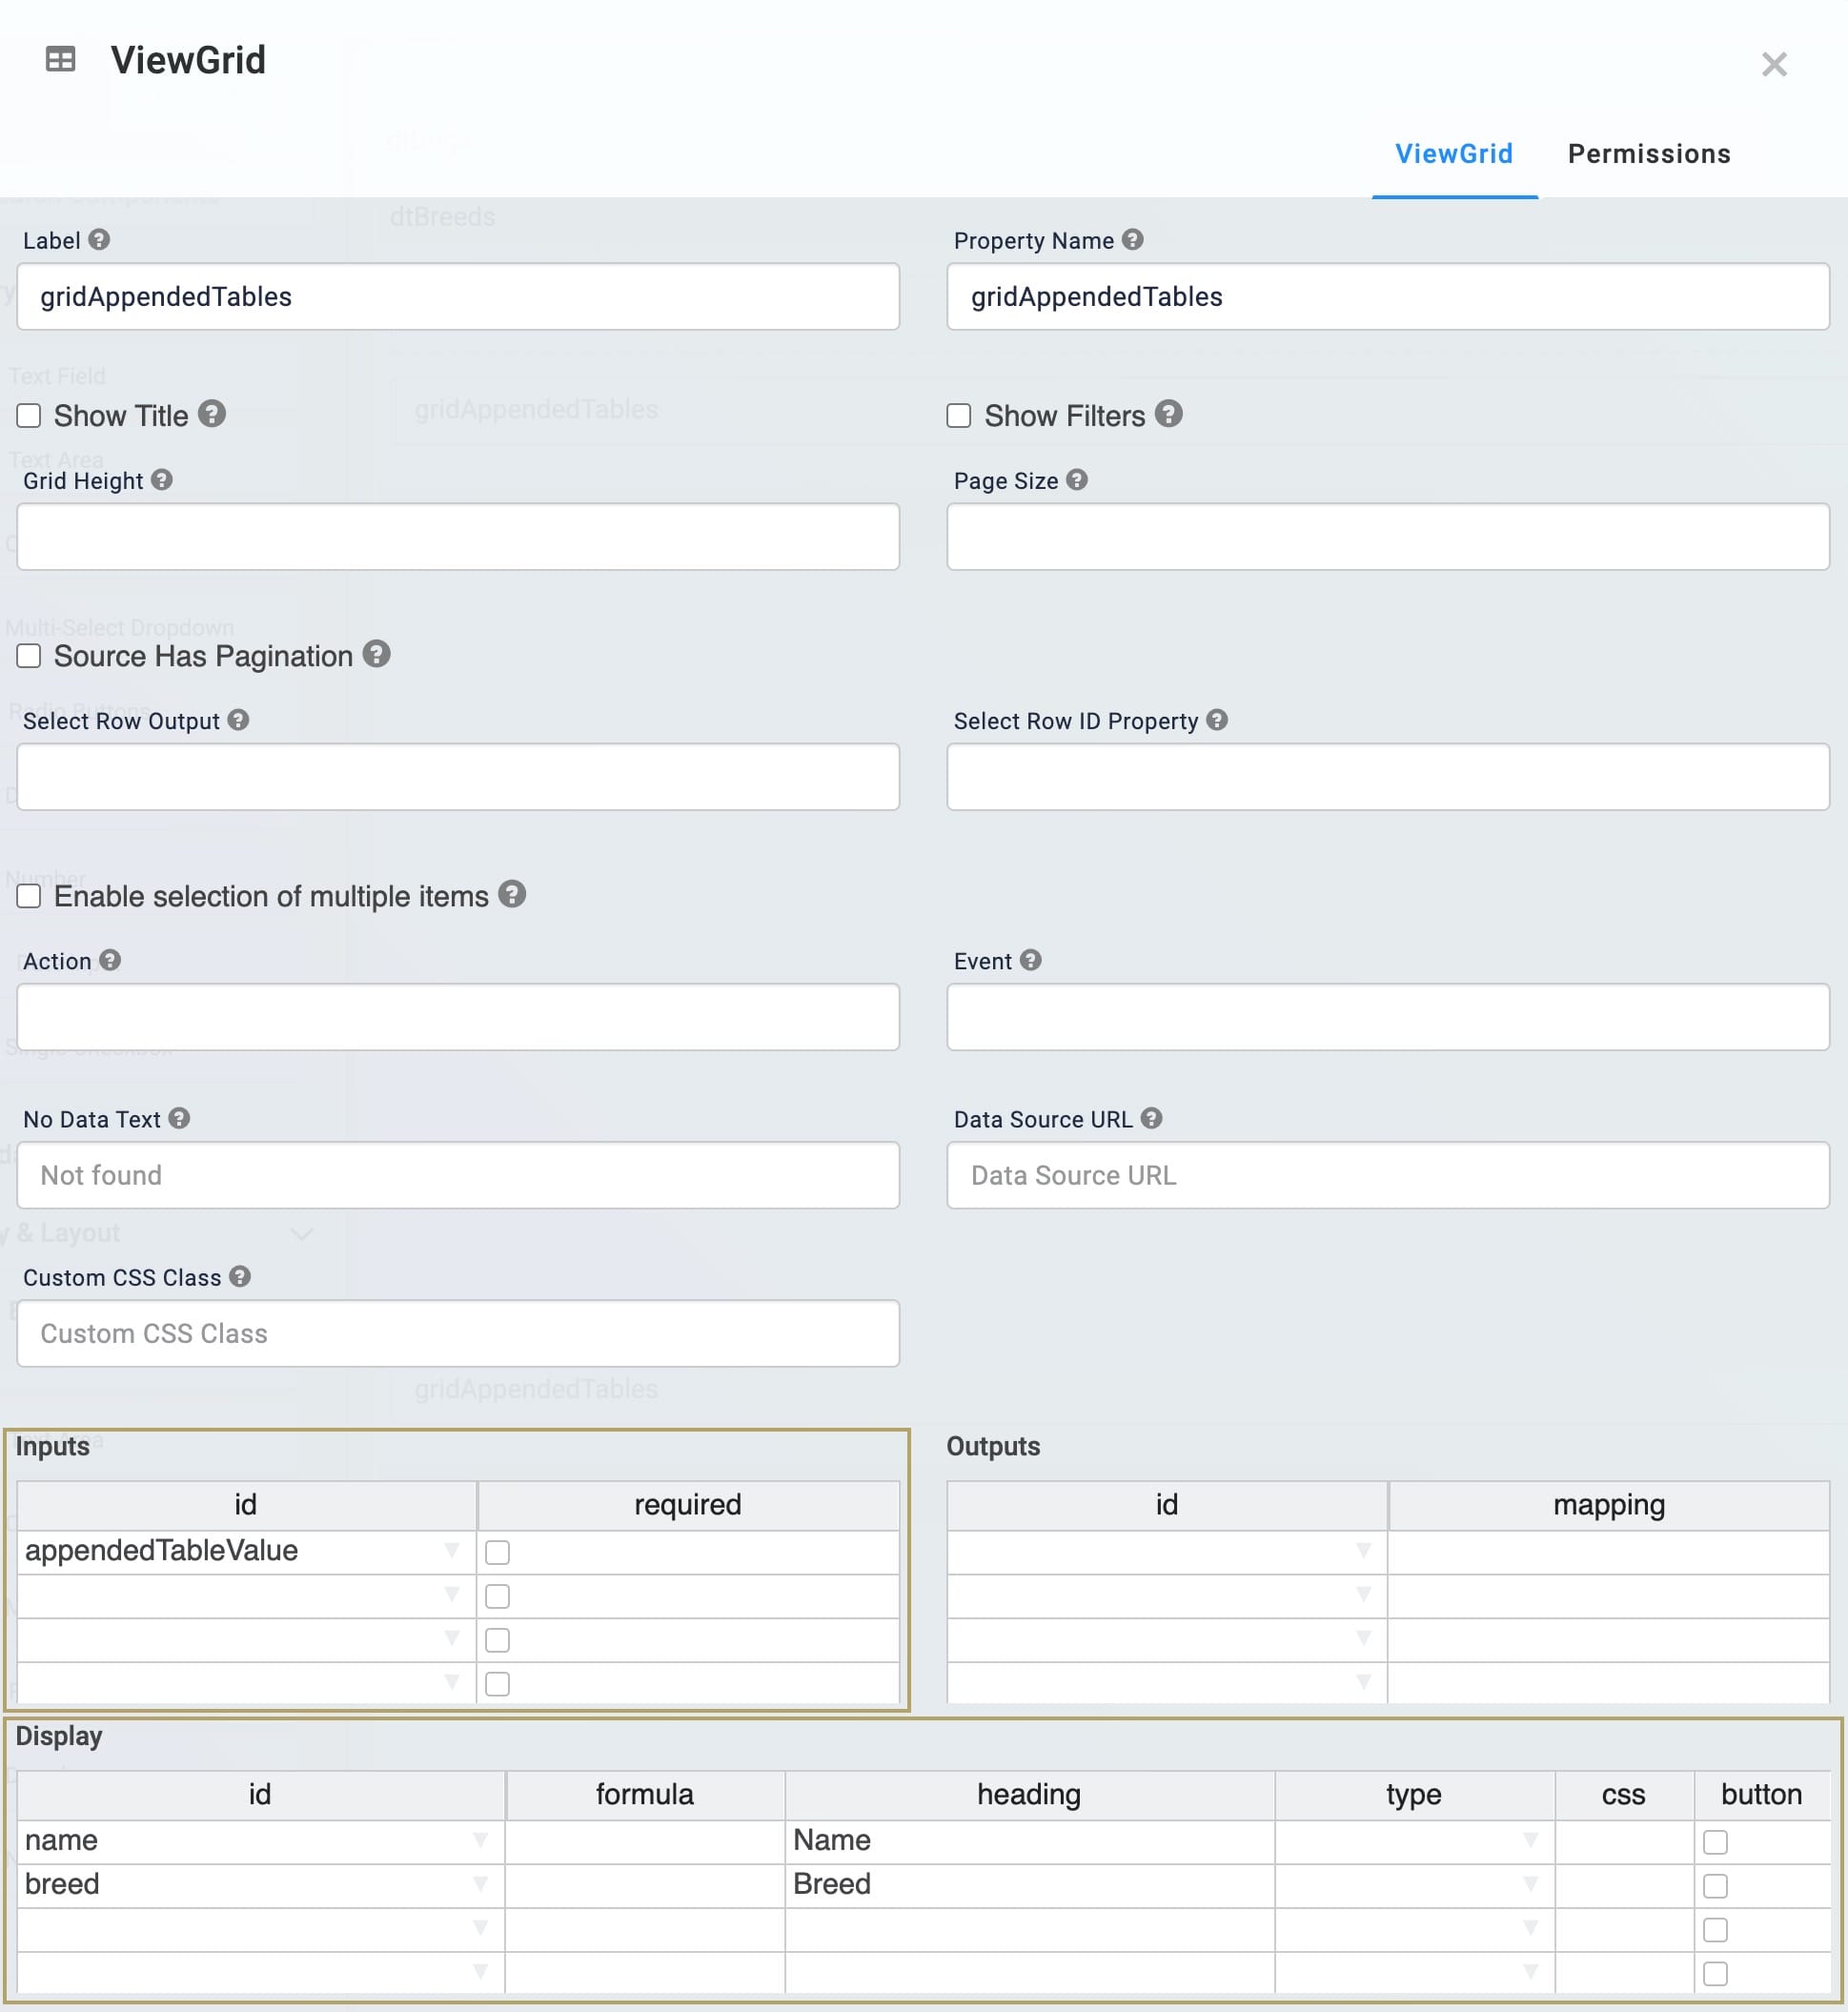
To display your combined tables, let's use a ViewGrid component. This ViewGrid references the data you have in the Hidden component you just added. Here, you'll set the same column labels as you had in your Data Tables: Name and Breed.
| 1. | Drag and drop a ViewGrid component onto your canvas. Place your ViewGrid below your Hidden component. |
| 2. | Enter gridAppendedTables in the Label and Property ID. |
| 3. | In the Inputs table, enter appendedTables in the ID. |
| 4. | In the Display table, enter the following: |
|
ID |
Formula |
Heading |
|---|---|---|
|
name |
|
Name |
|
breed |
|
Breed |
| 5. | Click Save. |
Configure the Data Workflow Component
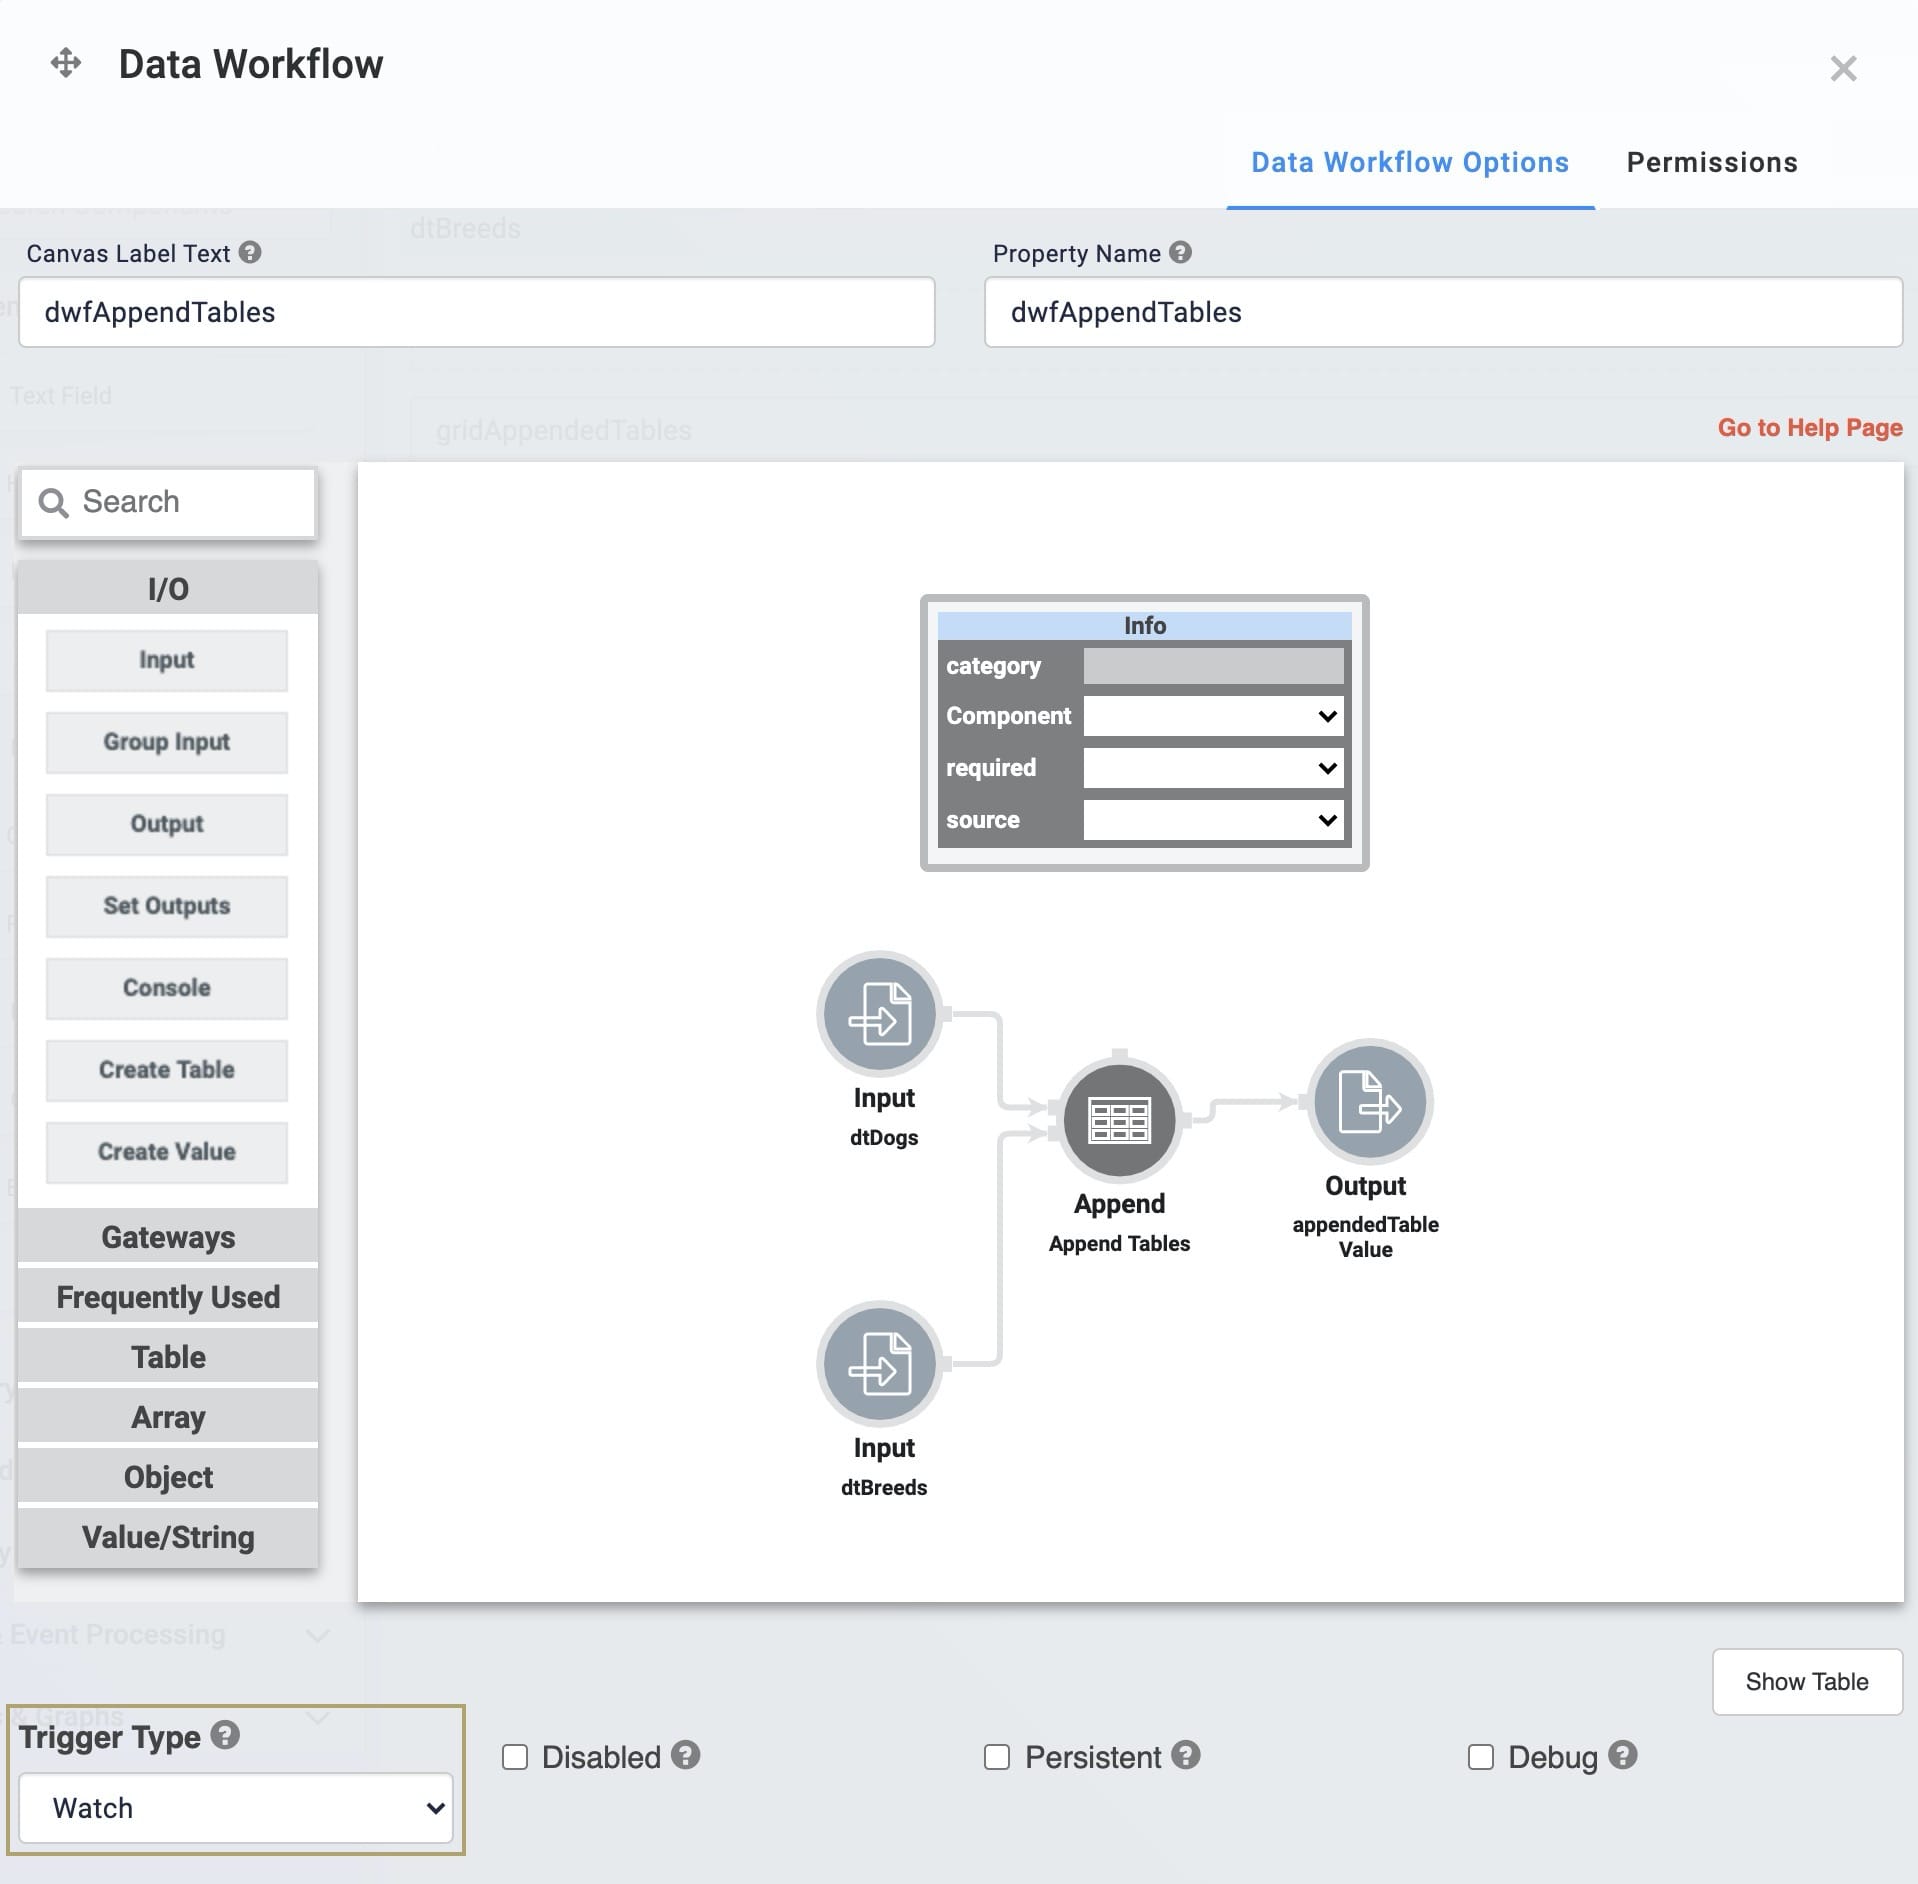
Next, you'll add your Data Workflow component. You'll bring your Data Tables into the Data Workflow using 2 Input operators. Then, you'll add an Append operator to bring both tables together. Finally, you'll send the result to your Hidden component using an Output operator.
| 1. | Drag and drop a Data Workflow component onto your canvas. Place your Data Workflow below your ViewGrid. |
| 2. | Enter dwfAppendTables in the Canvas Label Text and Property Name. |
| 3. | Select Watch from the Trigger Type drop-down. |
Configure the First Input Operator
| 1. | Drag and drop an Input operator onto your Data Workflow canvas. |
| 2. | Configure the Input operator's Info window as follows: |
|
Setting |
Value |
|---|---|
|
Category |
Input |
|
Component |
dtDogs |
|
Required |
Yes |
|
Source |
Default |
Configure the Second Input Operator
| 1. | Drag and drop an Input operator onto your Data Workflow canvas. |
| 2. | Configure the Input operator's Info window as follows: |
|
Setting |
Value |
|---|---|
|
Category |
Input |
|
Component |
dtBreeds |
|
Required |
Yes |
|
Source |
Default |
Configure the Append Operator
| 1. | Drag and drop an Append operator onto your Data Workflow canvas. |
| 2. | Configure the Append operator's Info window as follows: |
|
Setting |
Value |
|---|---|
|
Category |
Append |
|
Label |
Append Tables |
| 3. | Connect the output port (right) of the dtDogs Input operator to the upper input port (left) of the Append operator. |
| 4. | Connect the output port (right) of the dtBreeds Input operator to the lower input port (left) of the Append operator. |
Configure the Output Operator
| 1. | Drag and drop an Output operator onto your Data Workflow canvas. |
| 2. | Configure the Output operator's Info window as follows: |
|
Setting |
Value |
|---|---|
|
Category |
Output |
|
Component |
appendedTableValue |
|
Action |
value |
| 3. | Connect the output port (right) of the Append operator to the input port (left) of the Output operator. |
| 4. | Click Save. |
| 5. | Save your module. |
Now, preview your module in Express View. On your screen, you'll see your ViewGrid showing the data from both of your individual Data Tables as one. The appended results show the records from the first table, followed by the records from the second table.

Lab
You can view this complete use case here: https://training.unqork.io/#/form/5f6b868aabf886024d4df3f2/edit.

