Nest By Operator: Using Nest By and Table2Object Together
Overview
Arrays are a great way to store your data. The Nest By operator lets you create a nested array in your parent array. You can do this when you want to group information by a particular key/value pair. In a previous use case, you learned how to group rows of information by account number. Every row with the same account number value groups into a single row. For this use case, you'll go one step further. After nesting by account number, the account number key/value pair sits at the data structure's top level. But, the actual account number is still just a value in the key/accountNumber value pair. As a reminder, here’s what that looks like:

Sometimes though, you might want the account number to be the key instead of a value. Using a Table2Object operator, you'll convert your your array of objects to an object. Each object in the source array of objects becomes a key/value pair in the final object. In this case, each key will be a unique account number. And the value will be the nested array associated with that account number.
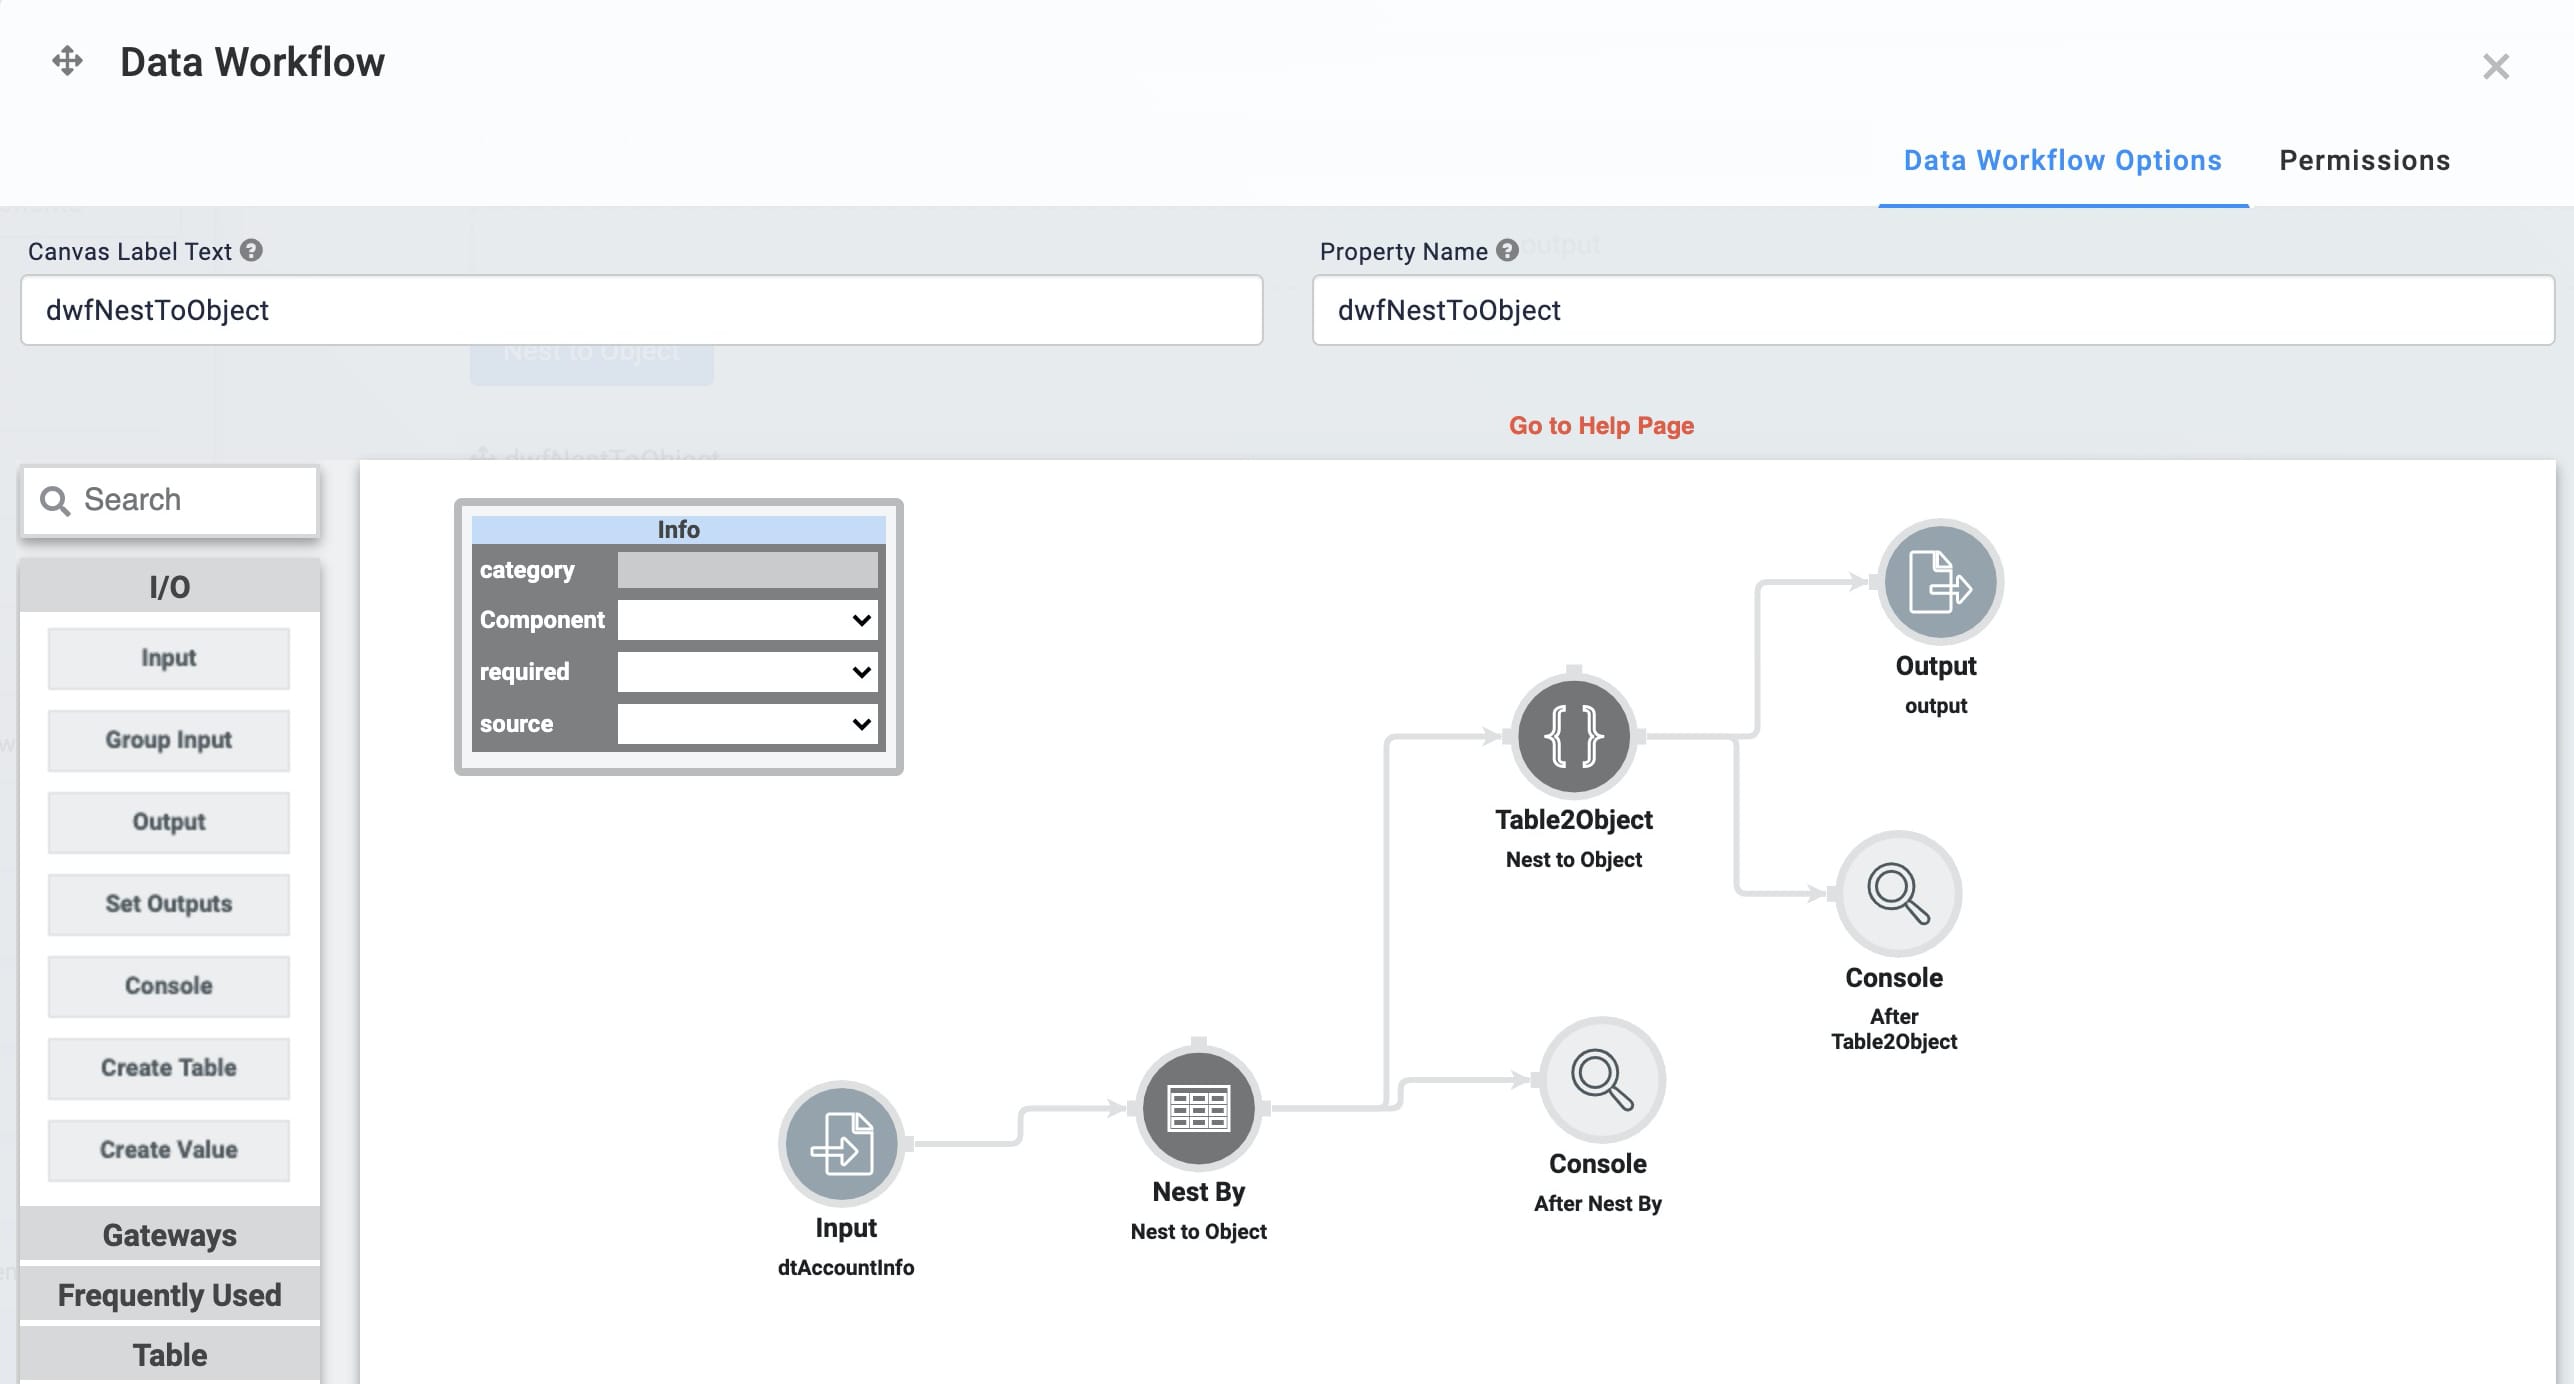
Here's how your module will look in the Module Builder:

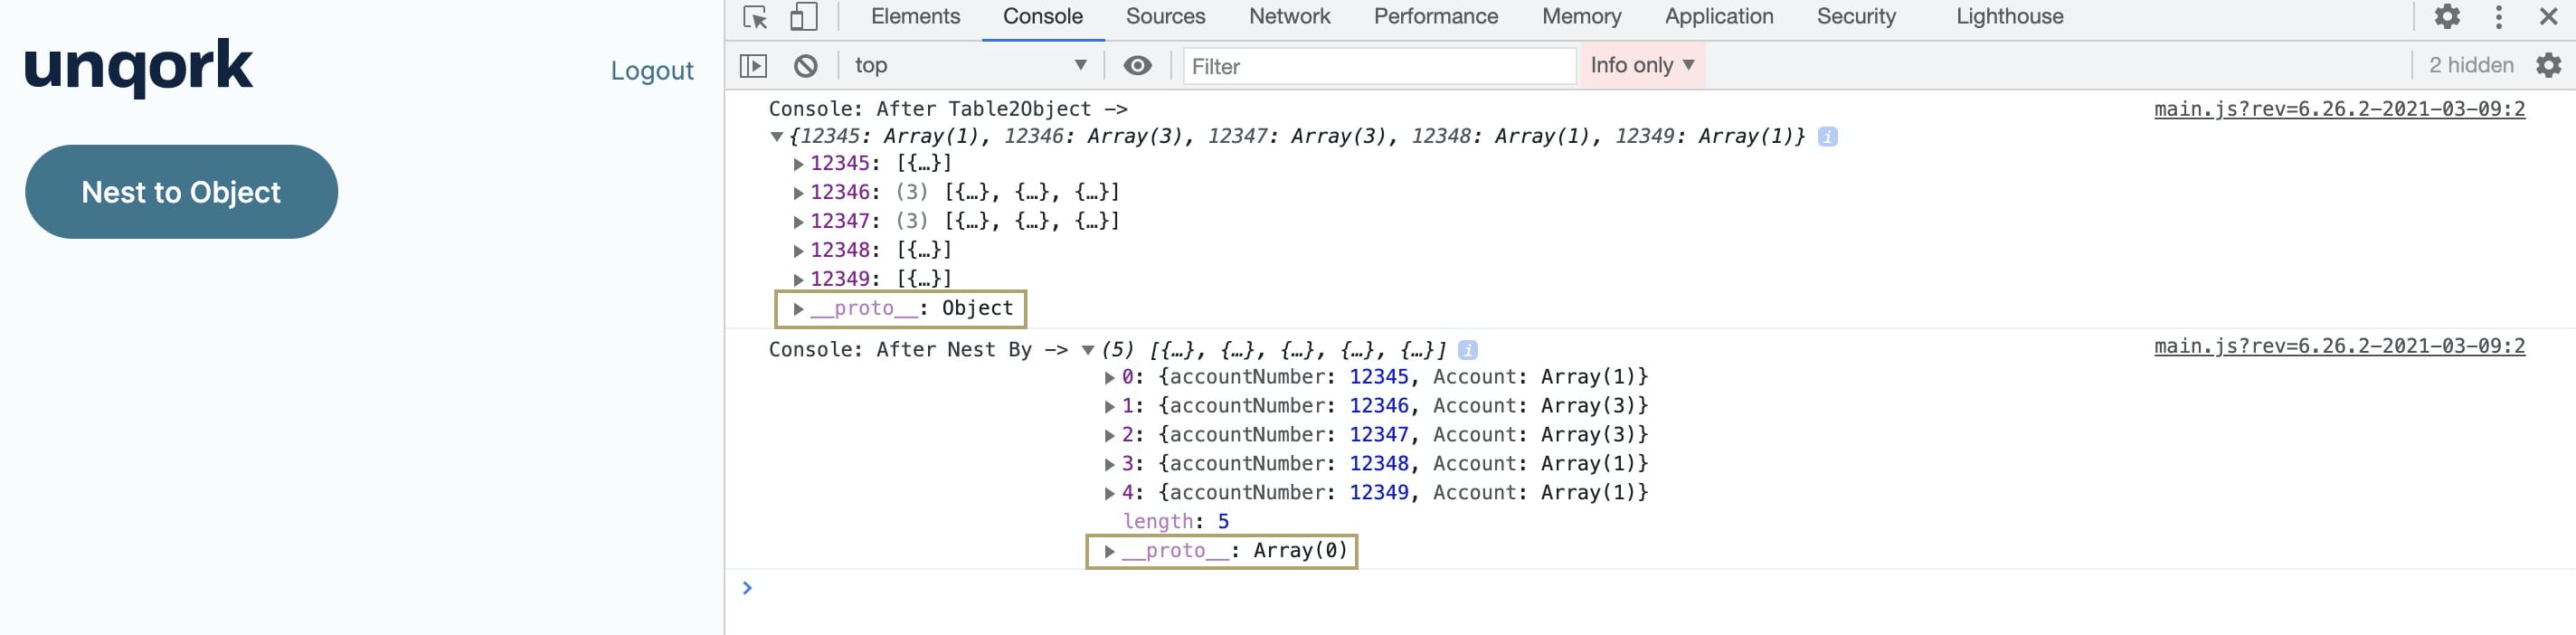
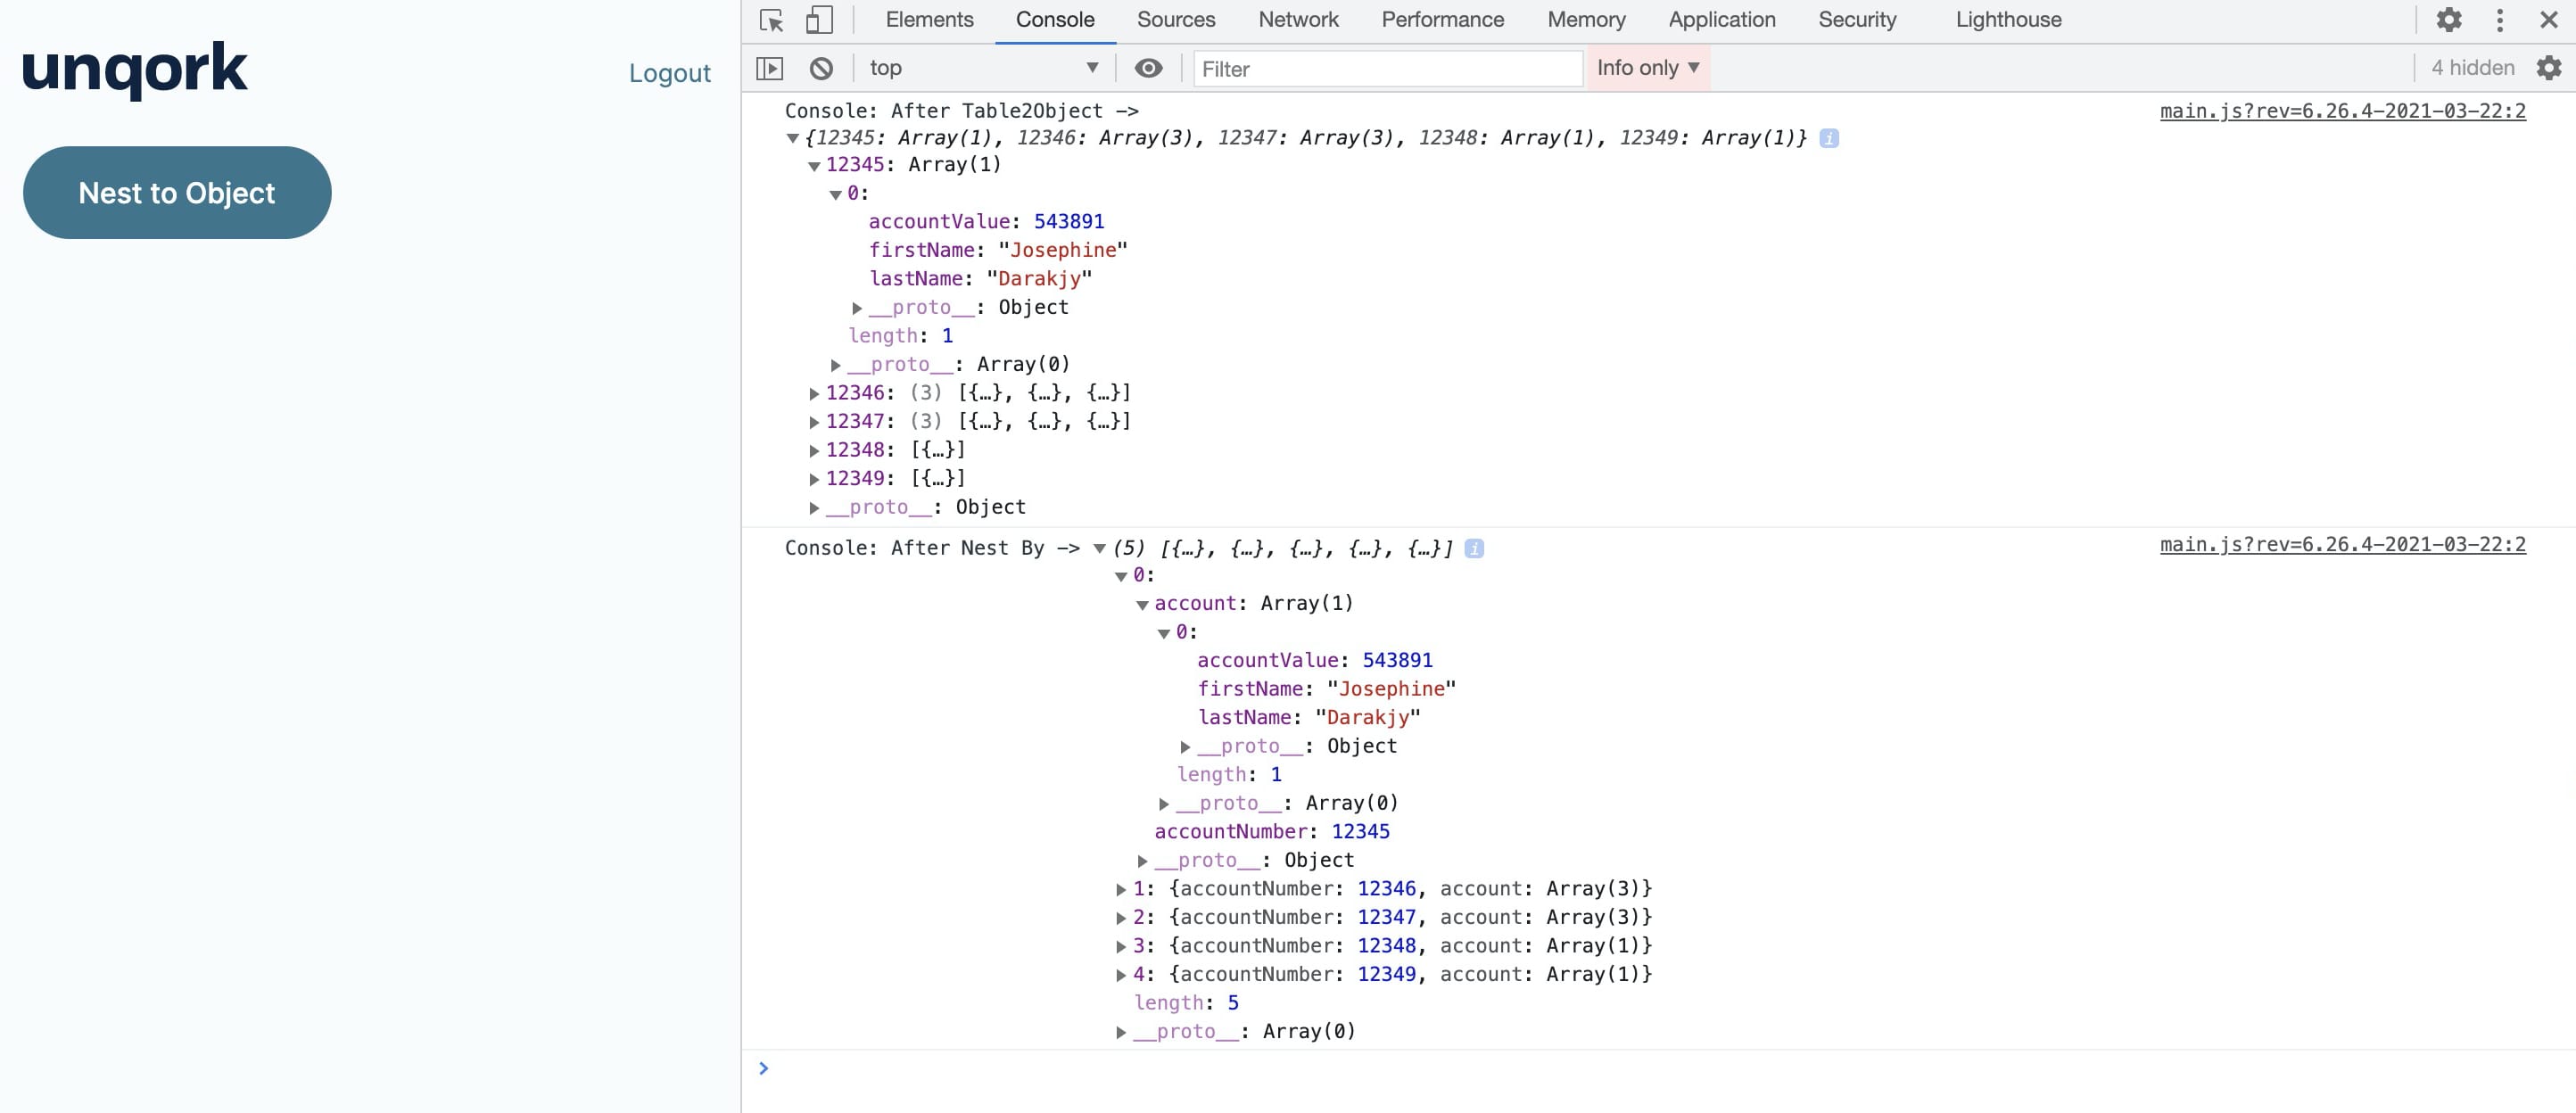
Here's how the completed use case will look in Express View, including a peek at the DevTools Console:
What You'll Learn
In this article, you'll learn how to use the Nest By operator to nest table rows into objects.
What You'll Need
To set up this use case, you’ll need:
-
1 Data Table component
-
1 Hidden component
-
1 Button component
-
1 Data Workflow component
To set up your Data Workflow, you'll need:
-
1 Input operator
-
1 Nest By operator
-
1 Table2Object operator
-
1 Output operator
-
2 Console operators
These instructions assume you have a new module open, saved, and with a title.
Configuration
Configure the Data Table Component
First, you'll set up a Data Table with a list of customers, account values, and account numbers.
| 1. | In the Module Builder, drag and drop a Data Table component onto your canvas. |
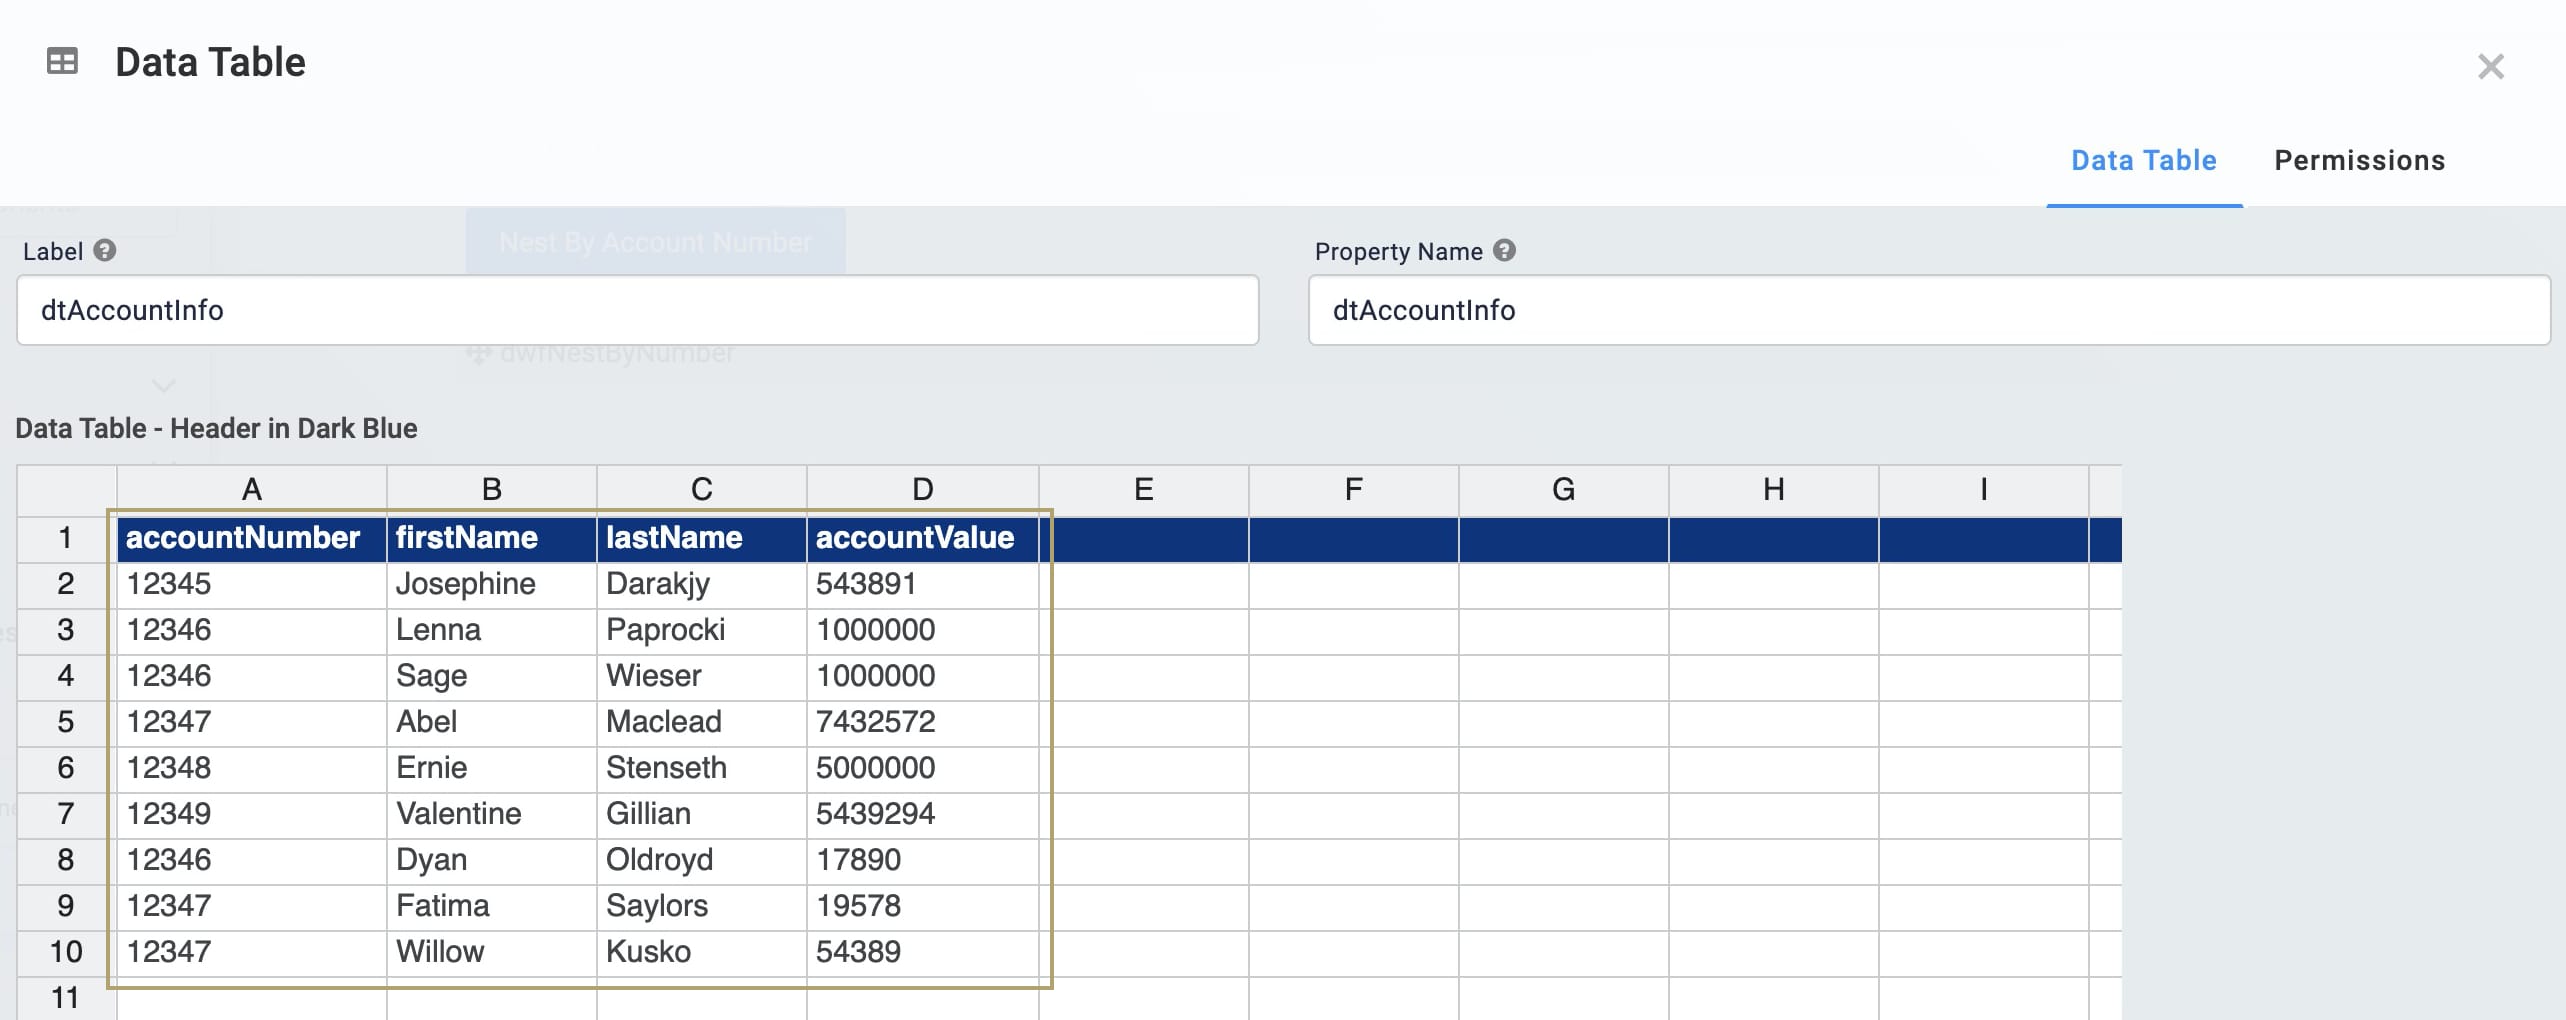
| 2. | Enter dtAccountInfo in the Label and Property Name fields. |
| 3. | In the data table, enter the following: |
|
accountNumber |
firstName | lastName | accountValue |
|---|---|---|---|
|
12345 |
Josephine |
Darakjy |
543891 |
|
12346 |
Lenna |
Paprocki |
1000000 |
|
12346 |
Sage |
Wieser |
1000000 |
|
12347 |
Abel |
Maclead |
7432572 |
|
12348 |
Ernie |
Stenseth |
5000000 |
|
12349 |
Valentine |
Gillian |
5439294 |
|
12346 |
Dyan |
Oldroyd |
17890 |
|
12347 |
Fatima |
Saylors |
19578 |
|
12347 |
Willow |
Kusko |
54389 |
You purposely added duplicate information to show the power of the Nest By operator.
| 4. | Click Save. |
Configure the Hidden Component
Now, let's add a Hidden component to store your Data Workflow's output.
| 1. | Drag and drop a Hidden component onto your canvas, placing it below your Data Table. |
| 2. | Enter output into the Property ID and Canvas Label Text fields. |
| 3. | Click Save. |
Configure the Button Component
To trigger your Data Workflow, you'll add a Button component.
| 1. | Drag and drop a Button component onto your canvas. Place your Button component below your Hidden component. |
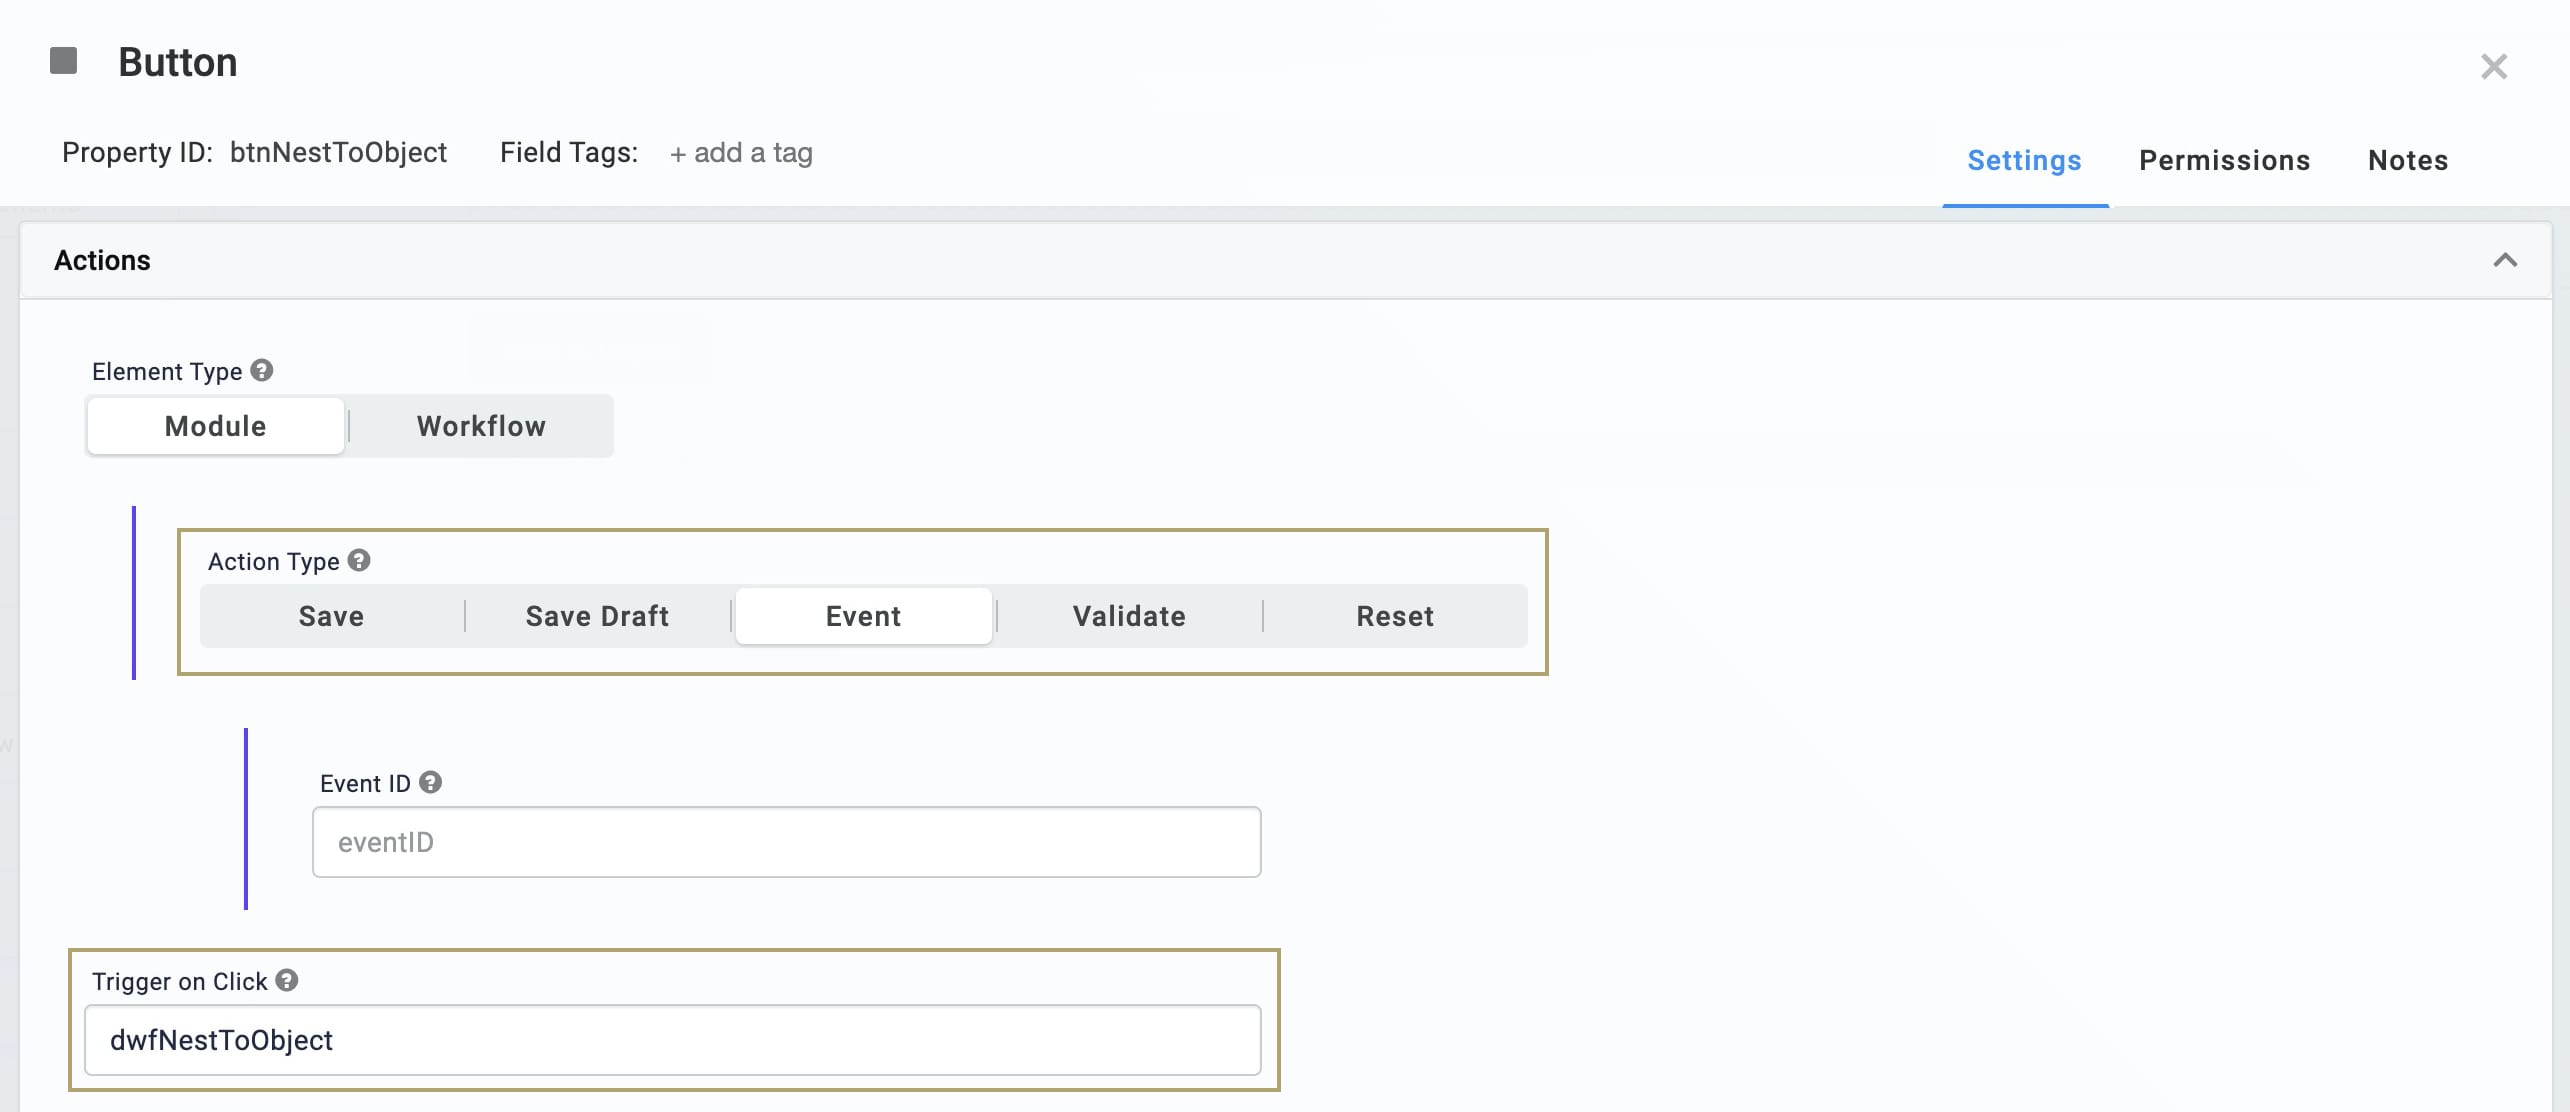
| 2. | Enter btnNestToObject in the Property ID field. |
| 3. | Enter Nest to Object in the Label Text field. |
| 4. | Select Event as the Button Action Type. |
| 5. | Enter dwfNestToObject in the Trigger on Click field. |
| 6. | Click Save. |
Configure the Data Workflow Component
| 1. | Drag and drop a Data Workflow component onto your canvas, placing it below your Button. |
| 2. | Enter dwfNestToObject in the Canvas Label Text and Property Name fields. |
Configure the Input Operator
| 1. | Drag and drop an Input operator onto your Data Workflow canvas. |
| 2. | Configure the Input operator's Info window as follows: |
| Setting | Value |
|---|---|
|
Category |
Input |
|
Component |
dtAccountInfo |
|
Required |
No |
|
Source |
Default |
Configure the Nest By Operator
| 1. | Drag and drop a Nest By operator onto your Data Workflow canvas. |
| 2. | Configure the Nest By operator's Info window as follows: |
| Setting | Value |
|---|---|
|
Category |
Nest By |
|
Label |
accountNumber |
|
Parent Keys |
accountNumber |
|
Child Name |
account |
| 3. | Connect the output port (right) of the Input operator to the input port (left) of the Nest By operator. |
Configure the Table2Object Operator
| 1. | Drag and drop a Table2Object operator onto your Data Workflow canvas. |
| 2. | Configure the Table2Object operator's Info window as follows: |
| Setting | Value |
|---|---|
|
Category |
Table2Object |
|
Label |
Nest to Object |
|
Key Column Name |
accountNumber |
|
Value Column Name |
account |
| 3. | Connect the output port (right) of the Nest By operator to the input port (left) of the Table2Object operator. |
Configure the Output Operator
| 1. | Drag and drop an Output operator onto your Data Workflow canvas. |
| 2. | Configure the Output operator's Info window as follows: |
| Setting | Value |
|---|---|
|
Category |
Output |
|
Component |
output |
|
Action |
value |
| 3. | Connect the output port (right) of the Table2Object operator to the input (left) port of the Output operator. |
Configure the First Console Operator
| 1. | Drag and drop another Console operator onto your Data Workflow canvas. |
| 2. | Configure the Console operator's Info window as follows: |
|
Setting |
Value |
|---|---|
|
Category |
Console |
|
Label |
After Nest By |
| 3. | Connect the output port (right) of the Nest By operator to the input port (left) of the After Nest By Console operator. |
| 4. | Click Save. |
Configure the Second Console Operator
| 1. | Drag and drop another Console operator onto your Data Workflow canvas. |
| 2. | Configure the Console operator's Info window as follows: |
|
Setting |
Value |
|---|---|
|
Category |
Console |
|
Label |
After Table2Object |
| 3. | Connect the output port (right) of the Table2Object operator to the input port (left) of the After Table2Object Console operator. |
| 4. | Click Save. |
| 5. | Save your module. |
Preview your module in Express View, and open the DevTools Console. Click your button, and you'll see your data grouped by account number in the After Nest By Console. In the After Table2Object Console, you'll see that each account number is now an array of objects. Expand a tab and you'll see the array(s) inside each object.
Lab
You can view this complete use case here: https://training.unqork.io/#/form/6058b2ca75657f0373bd46bf/edit.
