The Merge operator can be used to add two different tags to an array. An array is a data structure that groups elements like values, objects, or other arrays. Each element in an array is indexed by an integer, starting with [0] for the first element, [1] for the second, and so on. These indices give each element a specific position and make it easier to reference values.
Preconfiguration
Before adding tags, you must create a sample array. For example, if a customer orders a product, and you want to display the order’s status, the array should store the order’s basic information. This information could be the cost (in US dollars) and the customer’s name. This basic information can be stored in a Data Table component and processed by a Data Workflow.
These instructions assume that you have an open module saved with a title.
Configure the Data Table Component
First, use a Data Table component to store your sample array.
In the Module Builder, drag and drop a Data Table component onto your canvas.
In the Property ID and Canvas Label Text fields, enter
dtTags.In the data table, enter the following:
order
shipping
Order Status
Shipping Status
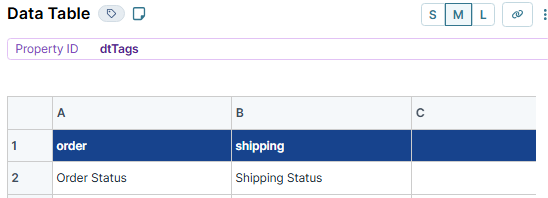
Click Save Component.
Configure the Hidden Component
Now, store your sample array in a Hidden component.
Drag and drop a Hidden component onto your canvas, placing it below the
dtTagsData Table component.In the Property ID and Label Text fields, enter
preArray.Click Save Component.
Configure the First Data Workflow Component
This Data Workflow creates your sample array and outputs it to the preArray Hidden component. The Data Workflow then combines your data table with your end-user name and product pricing.
Drag and drop a Data Workflow component onto your canvas, placing it above the
preArrayHidden component.In the Property ID and Canvas Label Text fields, enter
dwfCreateSampleArray.
Configure the Input Operator
Drag and drop an Input operator onto your Data Workflow canvas.
Configure the operator's Info window as follows:
Setting
Value
Category
Input
Component
dtTags
Required
Yes
Source
Default
Configure the First Col2Array Operator
Drag and drop a Col2Array operator onto your Data Workflow canvas.
Configure the operator’s Info window as follows:
Setting
Value
Category
Col2Array
Label
order
Drop Empty
Yes
Path
order
Default Value
Connect the output port (right) of the
dtTagsInput operator to the input port (left) of theOrderCol2Array operator.
Configure the Second Col2Array Operator
Drag and drop another Col2Array operator onto your Data Workflow canvas.
Configure the operator’s Info window as follows:
Setting
Value
Category
Col2Array
Label
shipping
Drop Empty
Yes
Path
shipping
Default Value
Connect the output port (right) of the
dtTagsInput operator to the input port (left) of theshippingCol2Array operator.
Configure the Create Table Operator
Drag and drop a Create Table operator onto your Data Workflow canvas.
Configure the operator’s Info window as follows:
Setting
Value
Category
Create Table
Label
rows
Create Index
No
Number of Rows
1
Configure the First Set Operator
Drag and drop a Set operator onto your Data Workflow canvas.
Configure the operator’s Info window as follows:
Setting
Value
category
Set
label
path1
Path
[0].tags
Value
Connect the output port (right) of the
rowsCreate Table operator to the upper input port (left) of thepath1Set operator.Connect the output port (right) of the
orderCol2Array operator to the lower input port (left) of thepath1Set operator.
Configure the Second Set Operator
Drag and drop another Set operator onto your Data Workflow canvas.
Configure the operator’s Info window as follows:
Setting
Value
Category
Set
Label
path2
Path
[0].tags
Value
Connect the output port (right) of the
rowsCreate Table operator to the upper input port (left) of thepath2Set operator.Connect the output port (right) of the
shippingCol2Array operator to the lower input port (left) of thepath2Set operator.
Configure the Append Operator
Drag and drop an Append operator onto your Data Workflow canvas.
Configure the operator’s Info window as follows:
Setting
Value
Category
Append
Label
preArray
Connect the output port (right) of the
path1Set operator to the upper input port (left) of thepreArrayAppend operator.Connect the output port (right) of the
path2Set operator to the lower input port (left) of thepreArrayAppend operator.
Configure the Create Field Operator
Drag and drop a Create Field operator onto your Data Workflow canvas.
Configure the operator’s Info window as follows:
Setting
Value
Category
Create Field
Label
customer
Do Not Sanitize Formula
.png) (unchecked)
(unchecked)Preserve Argument type
(unchecked)Field 1
firstName = "Willow"
Field 2
lastName = "Kusko"
Field 3
price = "$16.99"
Field 4
Field 5
Connect the output port (right) of the
preArrayAppend operator to the input port (left) of thecustomerCreate Field operator.
Configure the Output Operator
Drag and drop an Output operator onto your Data Workflow canvas.
Configure the operator’s Info window as follows:
Setting
Value
Category
Output
Component
preArray
Action
value
Connect the output port (right) of the
customerCreate Field operator to the input port (left) of thepreArrayOutput operator.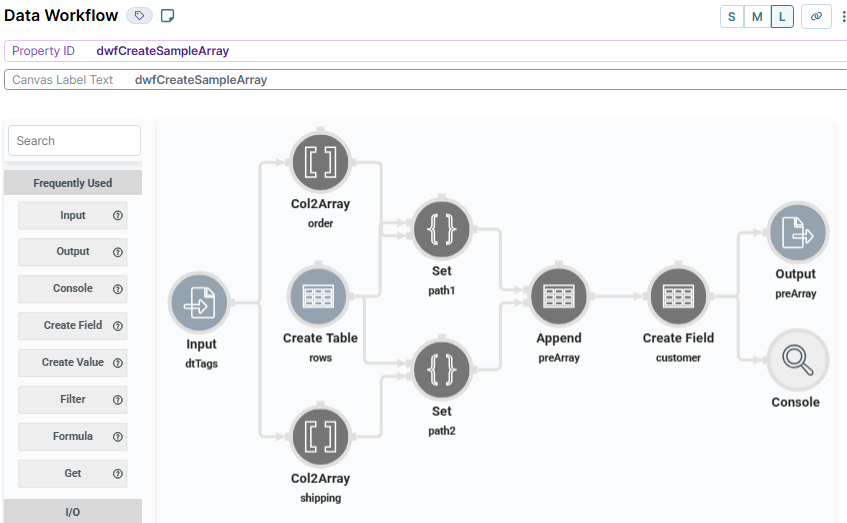
Click Save Component.
Configure the Initializer Component
Now, configure an Initializer component to trigger your Data Workflow.
Drag and drop an Initializer component onto your canvas. Place it above the
dtTagsData Table component.In the Property ID and Canvas Label Text fields, enter
initCreateArray.Select Trigger Type as New Submission.
In the Outputs table, set the following:
Property ID
Type
Value
dwfCreateSampleArray
trigger
GO
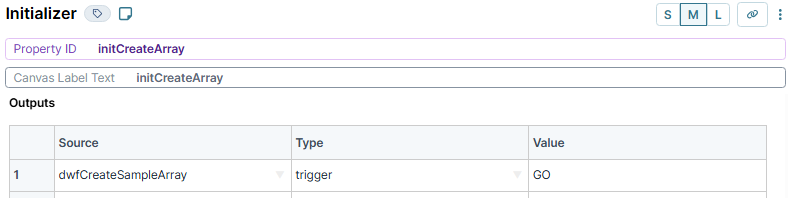
Click Save Component.
Configuration
Next, you’ll add order and shipping status information as tags. In this example, the tags include Order Status, Shipping Status, Pending, Processing, and Complete. A second Data Workflow, with a Merge operator, creates and combines these tags into the two rows of the data table.
Configure Two Text Field Components
Next, configure two Text Field components so your end-user can enter order and shipping tags into the array.
Drag and drop two Text Field components onto your canvas, placing them below the
preArrayHidden component.Enter the Property ID and Label Text as follows:
Property ID
Label Text
tagOrder
Order Status
tagShipping
Shipping Status
Click Save Component.
Configure the Second Data Workflow Component
This Data Workflow lets your end-user create any tags they choose by entering them in the tagOrder and tagShipping Text Field components. The Data Workflow merges those tags into the two rows of the dtTags Data Table component. Meaning that one tag populates with the customer's order status and the other with the shipping status. In this example, you’ll use the Merge operator’s Inner feature and set index as the Merge Key.
Drag and drop a Data Workflow component onto your canvas, placing it below the
tagShippingText Field component.In the Property ID and Canvas Label Text fields, enter
dwfAddDiffTagEveryRow.
Configure the First Input Operator
Drag and drop an Input operator onto your Data Workflow canvas.
Configure the operator's Info window as follows:
Setting
Value
Category
Input
Component
tagOrder
Required
Yes
Source
Default
Configure the Second Input Operator
Drag and drop another Input operator onto your Data Workflow canvas.
Configure the operator's Info window as follows:
Setting
Value
Category
Input
Component
tagShipping
Required
Yes
Source
Default
Configure the Third Input Operator
Drag and drop another Input operator onto your Data Workflow canvas.
Configure the operator's Info window as follows:
Setting
Value
Category
Input
Component
preArray
Required
Yes
Source
Default
Configure the Create Table Operator
Drag and drop a Create Table operator onto your Data Workflow canvas.
Configure the operator’s Info window as follows:
Setting
Value
Category
Create Table
Label
tags
Create Index
No
Number of Rows
0
Configure the First Set Operator
Drag and drop a Set operator onto your Data Workflow canvas.
Configure the operator’s Info window as follows:
Setting
Value
Category
Set
Label
createTagOrder
Path
[0].tags[0]
Value
Connect the output port (right) of the
tagsCreate Table operator to the upper input port (left) of thecreateTagOrderSet operator.Connect the output port (right) of the
tagOrderInput operator to the lower input port (left) of thecreateTagOrderSet operator.
Configure the Second Set Operator
Drag and drop another Set operator onto your Data Workflow canvas.
Configure the operator’s Info window as follows:
Setting
Value
Category
Set
Label
createTagShipping
Path
[0].tags[0]
Value
Connect the output port (right) of the
createTagOrderSet operator to the upper input port (left) of thecreateTagShippingSet operator.Connect the output port (right) of the
tagShippingInput operator to the lower input port (left) of thecreateTagShippingSet operator.
Configure the First Create Index Operator
Drag and drop a Create Index operator onto your Data Workflow canvas.
Configure the operator’s Info window as follows:
Setting
Value
Category
Create Index
Label
indexMergeTags
Index Name
index
Starting Index
0
Keys
Connect the output port (right) of the
createTagShippingSet operator to the input port (left) of theindexMergeTagsCreate Index operator.
Configure the Second Create Index Operator
Drag and drop another Create Index operator onto your Data Workflow canvas.
Configure the operator’s Info window as follows:
Setting
Value
Category
Create Index
Label
indexMergePreArray
Index Name
index
Starting Index
0
Keys
Connect the output port (right) of the
preArrayInput operator to the input port (left) of theindexMergePreArrayCreate Index operator.
Configure the Merge Operator
Drag and drop a Merge operator onto your Data Workflow canvas.
Configure the operator’s Info window as follows:
Setting
Value
Category
Merge
Label
mergeTags
Merge Type
Inner
Keep Flag
False
Renaming
Push
Rows to Keep
First
Merge Key
index
Connect the output port (right) of the
indexMergePreArrayCreate Index operator to the upper input port (left) of themergeTagsMerge operator.Connect the output port (right) of the
indexMergeTagsCreate Index operator to the lower input port (left) of themergeTagsMerge operator.
Configure the First Console Operator
Lastly, add two Console operators to watch your Data Workflow. The first monitors the tags before the mergeTags Merge operator. The second monitors the tags after the mergeTags Merge operator.
Drag and drop a Console operator onto your Data Workflow canvas.
Configure the operator’s Info window as follows:
Setting
Value
Category
Console
Label
createDifferentTagsArray
Connect the output port (right) of the
createTagShippingSet operator to the input port (left) of thecreateDifferentTagsArrayConsole operator.
Configure the Second Console Operator
Drag and drop another Console operator onto your Data Workflow canvas.
Configure the operator’s Info window as follows:
Setting
Value
Category
Console
Label
mergeDifferentTags
Connect the output port (right) of the
mergeTagsMerge operator to the input port (left) of themergeDifferentTagsConsole operator.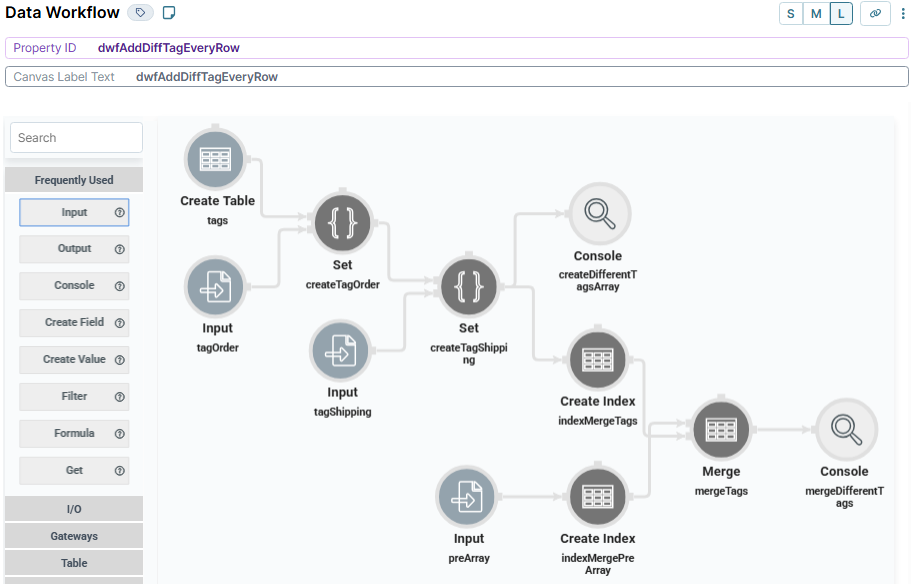
Click Save Component.
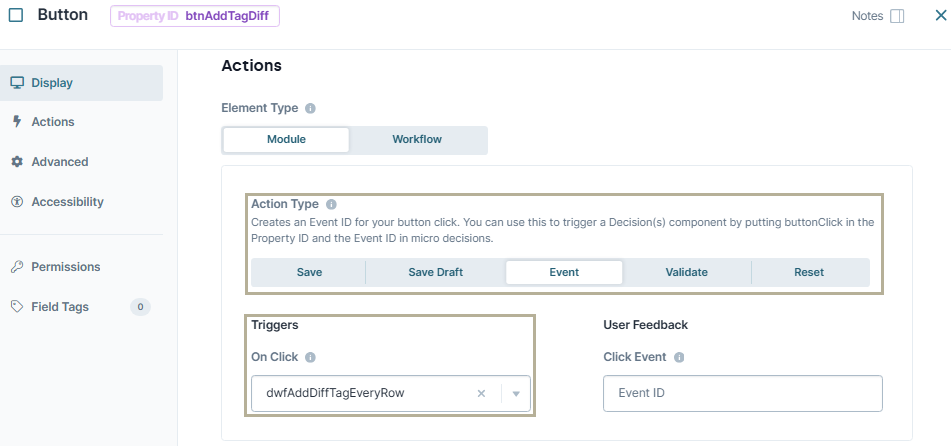
Configure the Button Component
Lastly, configure a Button component to trigger your second Data Workflow.
Drag and drop a Button component onto your canvas, placing it above your
dwfAddDiffTagEveryRowData Workflow component.In the Property ID field, enter
btnAddTagDiff.In the Label Text field, enter
Add Order Tag to Row 0 & Shipping Tag to Row 1.From the Action Type, select Event.
From the On Click field, select dwfAddDiffTagEveryRow.
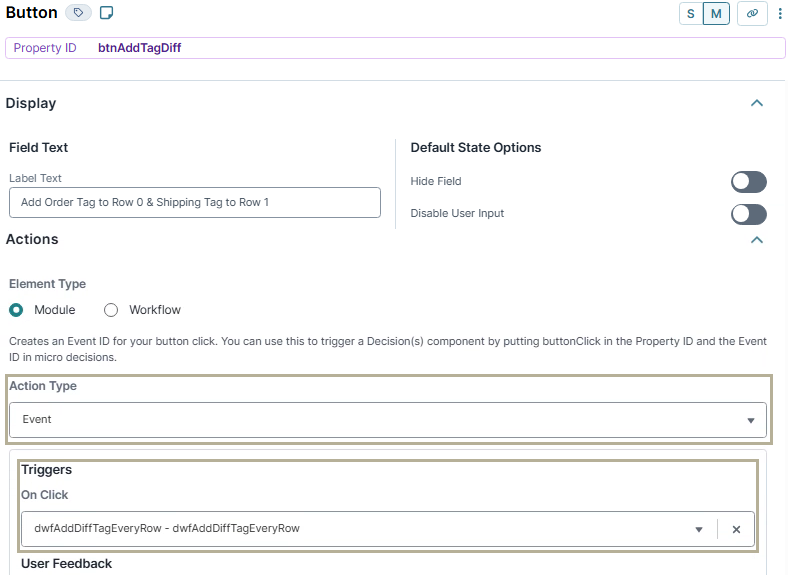
Click Save Component.
Save your module.
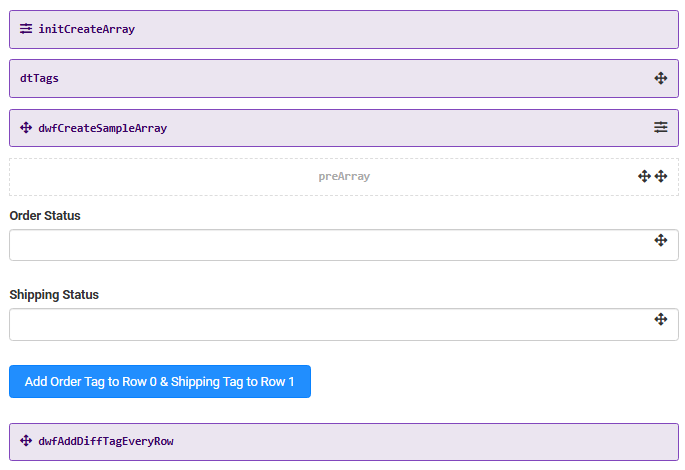
Here's how your completed example looks in the Module Builder:
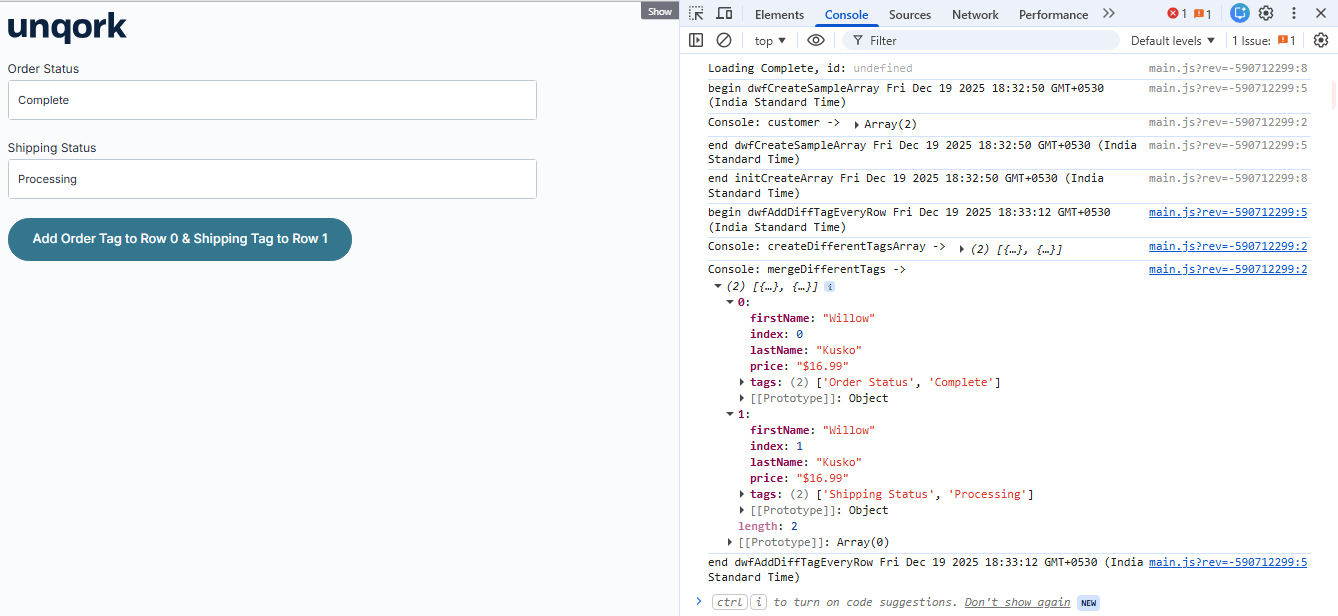
Preview your module in Express View and open the DevTools Console. In the Order Status field, enter Complete. In the Shipping Status field, enter Processing. Click the Add Order Tag to Row 0 & Shipping Tag to Row 1 button to see the result:
The Merge operator can be used to add two different tags to an array. An array is a data structure that groups elements like values, objects, or other arrays. Each element in an array is indexed by an integer, starting with [0] for the first element, [1] for the second, and so on. These indices give each element a specific position and make it easier to reference values.
Preconfiguration
Before adding tags, you must create a sample array. For example, if a customer orders a product, and you want to display the order’s status, the array should store the order’s basic information. This information could be the cost (in US dollars) and the customer’s name. This basic information can be stored in a Data Table component and processed by a Data Workflow.
These instructions assume that you have an open module saved with a title.
Configure the Data Table Component
First, use a Data Table component to store your sample array.
In the Module Builder, drag and drop a Data Table component onto your canvas.
In the Property ID and Canvas Label Text fields, enter
dtTags.In the data table, enter the following:
order
shipping
Order Status
Shipping Status
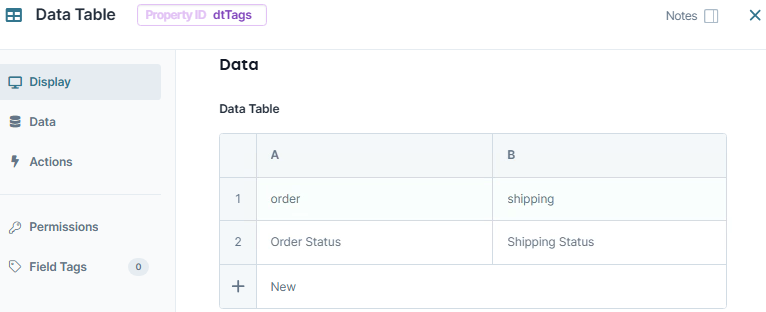
Click Save & Close.
Configure the Hidden Component
Now, store your sample array in a Hidden component.
Drag and drop a Hidden component onto your canvas, placing it below the
dtTagsData Table component.In the Property ID and Canvas Label Text fields, enter
preArray.Click Save & Close.
Configure the First Data Workflow Component
This Data Workflow creates your sample array and outputs it to the preArray Hidden component. The Data Workflow then combines your data table with your end-user name and product pricing.
Drag and drop a Data Workflow component onto your canvas, placing it above the
preArrayHidden component.In the Canvas Label Text and Property Name fields, enter
dwfCreateSampleArray.
Configure the Input Operator
Drag and drop an Input operator onto your Data Workflow canvas.
Configure the operator's Info window as follows:
Setting
Value
Category
Input
Component
dtTags
Required
Yes
Source
Default
Configure the First Col2Array Operator
Drag and drop a Col2Array operator onto your Data Workflow canvas.
Configure the first Col2Array operator’s Info window as follows:
Setting
Value
Category
Col2Array
Label
order
Drop Empty
Yes
Path
order
Default Value
Connect the output port (right) of the
dtTagsInput operator to the input port (left) of theOrderCol2Array operator.
Configure the Second Col2Array Operator
Drag and drop another Col2Array operator onto your Data Workflow canvas.
Configure the Col2Array operator’s Info window as follows:
Setting
Value
category
Col2Array
label
shipping
Drop Empty
Yes
Path
shipping
Default Value
Connect the output port (right) of the
dtTagsInput operator to the input port (left) of theshippingCol2Array operator.
Configure the Create Table Operator
Drag and drop a Create Table operator onto your Data Workflow canvas.
Configure the operator’s Info window as follows:
Setting
Value
Category
Create Table
Label
rows
Create Index
No
Number of Rows
1
Configure the First Set Operator
Drag and drop a Set operator onto your Data Workflow canvas.
Configure the operator’s Info window as follows:
Setting
Value
Category
Set
Label
path1
Path
[0].tags
Value
Connect the output port (right) of the
rowsCreate Table operator to the upper input port (left) of thepath1Set operator.Connect the output port (right) of the
orderCol2Array operator to the lower input port (left) of thepath1Set operator.
Configure the Second Set Operator
Drag and drop another Set operator onto your Data Workflow canvas.
Configure the operator’s Info window as follows:
Setting
Value
Category
Set
Label
path2
Path
[0].tags
Value
Connect the output port (right) of the
rowsCreate Table operator to the upper input port (left) of thepath2Set operator.Connect the output port (right) of the
shippingCol2Array operator to the lower input port (left) of thepath2Set operator.
Configure the Append Operator
Drag and drop an Append operator onto your Data Workflow canvas.
Configure the operator’s Info window as follows:
Setting
Value
Category
Append
Label
preArray
Connect the output port (right) of the
path1Set operator to the upper input port (left) of thepreArrayAppend operator.Connect the output port (right) of the
path2Set operator to the lower input port (left) of thepreArrayAppend operator.
Configure the Create Field Operator
Drag and drop a Create Field operator onto your Data Workflow canvas.
Configure the operator’s Info window as follows:
Setting
Value
Category
Create Field
Label
customer
Do Not Sanitize Formula
(unchecked)Preserve Argument Type
(unchecked)Field 1
firstName = "Willow"
Field 2
lastName = "Kusko"
Field 3
price = "$16.99"
Field 4
Field 5
Connect the output port (right) of the
preArrayAppend operator to the input port (left) of thecustomerCreate Field operator.
Configure the Output Operator
Drag and drop an Output operator onto your Data Workflow canvas.
Configure the operator’s Info window as follows:
Setting
Value
Category
Output
Component
preArray
Action
value
Connect the output port (right) of the
customerCreate Field operator to the input port (left) of thepreArrayOutput operator.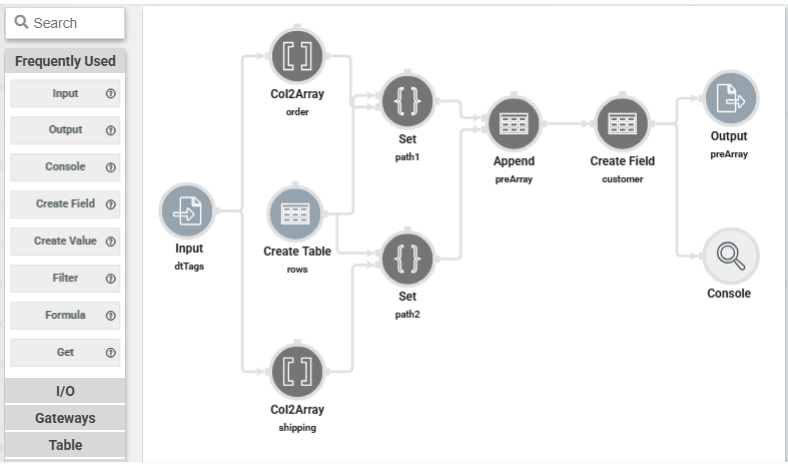
Click Save.
Configure the Initializer Component
Now, configure an Initializer component to trigger your Data Workflow.
Drag and drop an Initializer component onto your canvas, placing it above the
dtTagsData Table component.In the Property ID and Canvas Label Text fields, enter
initCreateArray.From the Trigger Type drop-down, select New Submission.
In the Outputs table, set the following:
Property ID
Type
Value
dwfCreateSampleArray
trigger
GO

Click Save & Close.
Configuration
Next, you’ll add order and shipping status information as tags. In this example, the tags include Order Status, Shipping Status, Pending, Processing, and Complete. A second Data Workflow, with a Merge operator, creates and combines these tags into the two rows of the data table.
Configure Two Text Field Components
Next, configure two Text Field components so your end-user can enter order and shipping tags into the array.
Drag and drop two Text Field components onto your canvas, placing them below the
preArrayHidden component.Enter the Property ID and Label Text as follows:
#
Property ID
Label Text
1
tagOrder
Order Status
2
tagShipping
Shipping Status
Click Save & Close.
Configure the Second Data Workflow Component
This Data Workflow lets your end-user create any tags they choose by entering them in the tagOrder and tagShipping Text Field components. The Data Workflow merges those tags into the two rows of the dtTags Data Table component. Meaning that one tag populates with the customer's order status and the other with the shipping status. In this example, you’ll use the Merge operator’s Inner feature and set index as the Merge Key.
Drag and drop a Data Workflow component onto your canvas, placing it below the
tagShippingText Field component.In the Canvas Label Text and Property Name fields, enter
dwfAddDiffTagEveryRow.
Configure the First Input Operator
Drag and drop an Input operator onto your Data Workflow canvas.
Configure the operator's Info window as follows:
Setting
Value
Category
Input
Component
tagOrder
Required
Yes
Source
Default
Configure the Second Input Operator
Drag and drop another Input operator onto your Data Workflow canvas.
Configure the operator's Info window as follows:
Setting
Value
Category
Input
Component
tagShipping
Required
Yes
Source
Default
Configure the Third Input Operator
Drag and drop another Input operator onto your Data Workflow canvas.
Configure the operator's Info window as follows:
Setting
Value
Category
Input
Component
preArray
Required
Yes
Source
Default
Configure the Create Table Operator
Drag and drop a Create Table operator onto your Data Workflow canvas.
Configure the operator’s Info window as follows:
Setting
Value
Category
Create Table
Label
tags
Create Index
No
Number of Rows
0
Configure the First Set Operator
Drag and drop a Set operator onto your Data Workflow canvas.
Configure the operator’s Info window as follows:
Setting
Value
Category
Set
Label
createTagOrder
Path
[0].tags[0]
Value
Connect the output port (right) of the
tagsCreate Table operator to the upper input port (left) of thecreateTagOrderSet operator.Connect the output port (right) of the
tagOrderInput operator to the lower input port (left) of thecreateTagOrderSet operator.
Configure the Second Set Operator
Drag and drop another Set operator onto your Data Workflow canvas.
Configure the operator’s Info window as follows:
Setting
Value
Category
Set
Label
createTagShipping
Path
[0].tags[0]
Value
Connect the output port (right) of the
createTagOrderSet operator to the upper input port (left) of thecreateTagShippingSet operator.Connect the output port (right) of the
tagShippingInput operator to the lower input port (left) of thecreateTagShippingSet operator.
Configure the First Create Index Operator
Drag and drop a Create Index operator onto your Data Workflow canvas.
Configure the operator’s Info window as follows:
Setting
Value
Category
Create Index
Label
indexMergeTags
Index Name
index
Starting Index
0
Keys
Connect the output port (right) of the
createTagShippingSet operator to the input port (left) of theindexMergeTagsCreate Index operator.
Configure the Second Create Index Operator
Drag and drop another Create Index operator onto your Data Workflow canvas.
Configure the operator’s Info window as follows:
Setting
Value
Category
Create Index
Label
indexMergePreArray
Index Name
index
Starting Index
0
Keys
Connect the output port (right) of the
preArrayInput operator to the input port (left) of theindexMergePreArrayCreate Index operator.
Configure the Merge Operator
Drag and drop a Merge operator onto your Data Workflow canvas.
Configure the operator’s Info window as follows:
Setting
Value
Category
Merge
Label
mergeTags
Merge Type
Inner
Keep Flag
False
Renaming
Push
Rows to Keep
First
Merge Key
index
Connect the output port (right) of the
indexMergePreArrayCreate Index operator to the upper input port (left) of themergeTagsMerge operator.Connect the output port (right) of the
indexMergeTagsCreate Index operator to the lower input port (left) of themergeTagsMerge operator.
Configure the First Console Operator
Lastly, add two Console operators to watch your Data Workflow. The first monitors the tags before the mergeTags Merge operator. The second monitors the tags after the mergeTags Merge operator.
Drag and drop a Console operator onto your Data Workflow canvas.
Configure the operator’s Info window as follows:
Setting
Value
Category
Console
Label
createDifferentTagsArray
Connect the output port (right) of the
createTagShippingSet operator to the input port (left) of thecreateDifferentTagsArrayConsole operator.
Configure the Second Console Operator
Drag and drop another Console operator onto your Data Workflow canvas.
Configure the operator’s Info window as follows:
Setting
Value
Category
Console
Label
mergeDifferentTags
Connect the output port (right) of the
mergeTagsMerge operator to the input port (left) of themergeDifferentTagsConsole operator.
Click Save.
Configure the Button Component
Lastly, configure a Button component to trigger your second Data Workflow.
Drag and drop a Button component onto your canvas, placing it above your
dwfAddDiffTagEveryRowData Workflow component.In the Property ID field, enter
btnAddTagDiff.In the Label Text field, enter
Add Order Tag to Row 0 & Shipping Tag to Row 1.Set the Action Type as Event.
From the On Click drop-down, select dwfAddDiffTagEveryRow.
Click Save & Close.
Save your module.
Here's how your completed example looks in the Module Builder:
Preview your module in Express View and open the DevTools Console. In the Order Status field, enter Complete. In the Shipping Status field, enter Processing. Click the Add Order Tag to Row 0 & Shipping Tag to Row 1 button to see the result: