The Create Field operator can be used with conditional expressions to add values to each row of a table based on existing data. In this example, you’ll add two key/value pairs, each with two possible values determined by conditions applied to the data.
Configuration
In this how-to guide, you’ll add rows to a data table based on an end-user's annual income.
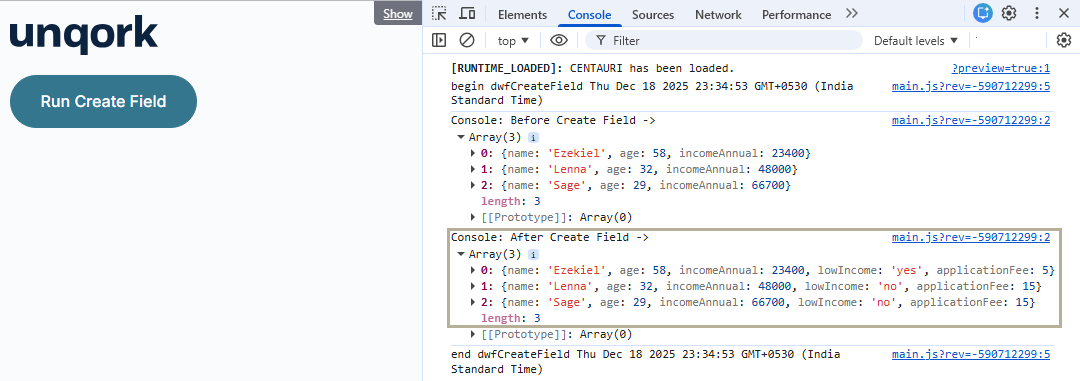
The first key/value pair you’ll use is "lowIncome" : "yes" or "lowIncome" : "no". The condition is based on the incomeAnnual field. If the annual income is less than 24,000, the pair "lowIncome":"yes" is added to the row. If the annual income is greater than or equal to 24,000, the pair "lowIncome":"no" is added instead.
Conditional logic in the Create Field operator follows the format of the Excel IF function: key=IF(condition,valueIfTrue,valueIfFalse).
For the first key/value pair, the expression is the following: lowIncome=IF(incomeAnnual<24000,”yes”,”no”).
The second key/value pair is "applicationFee" : 5 or "applicationFee" : 15. The corresponding expression is the following: applicationFee=IF(lowIncome="yes",5,15).
In this case, if the lowIncome status is "yes", the application fee is 5. If the lowIncome status is "no", the application fee is 15.
These instructions assume you have a new module open, saved, and with a title.
Configure the Data Table Component
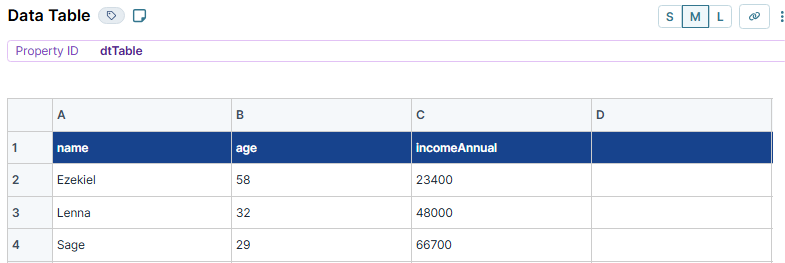
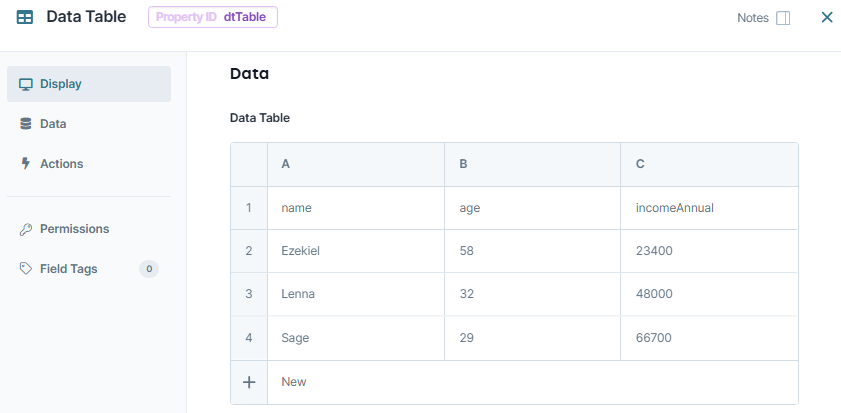
You’ll create a table using a Data Table component to add your key/value pairs. Begin by setting up a three‑row object table (array). This table will include one column named incomeAnnual. The values in this column will determine whether "yes" or "no" is assigned to the lowIncome key.
In the Module Builder, drag and drop a Data Table component onto your canvas.
In the Property ID and Label Text fields, enter
dtTable.In the data table, enter the following:
name
age
incomeAnnual
Ezekiel
58
23400
Lenna
32
48000
Sage
29
66700
Click Save Component.
Configure the Data Workflow Component
Configure the Data Workflow component to add two new key/value pairs to each row (object) in your table (array).
Drag and drop a Data Workflow component onto your canvas, placing it below the
dtTableData Table component.In the Property ID and Canvas Label Text, enter
dwfCreateField.
Configure the Input Operator
Connect your Data Table component to your Data Workflow component using an Input operator.
Drag and drop an Input operator onto your Data Workflow canvas.
Configure the operator's Info window as follows:
Setting
Value
Category
Input
Component
dtTable
Required
Yes
Source
Default
Configure the Create Field Operator
Set up the Create Field operator to add two new key/value pairs to each row (object) in your table (array).
Drag and drop a Create Field operator onto your Data Workflow canvas.
Configure the operator's Info window as follows:
Setting
Value
Category
Create Field
Label
lowIncome
Do Not Sanitize Formula
.png) (unchecked)
(unchecked)Preserve Argument Type
(unchecked)Field 1
lowIncome=IF(incomeAnnual<24000,"yes","no")
Field 2
applicationFee=IF(lowIncome="yes",5,15)
Connect the output port (right) of the
dtTableInput operator to the input port (left) of thelowIncomeCreate Field operator.
Configure the Console Operators
Next, add two Console operators to view the data before and after your Create Field operator.
You'll notice that the Create Field operator only outputs to a Console operator. When creating applications, you might also want to use a dedicated Output operator. Then, you could connect that Output operator to a Hidden component. This would let you store the final table and reference it elsewhere in your application.
Drag and drop two Console operators onto your Data Workflow canvas.
Configure the first Console operator's Info window as follows:
Setting
Value
Category
Console
Label
Before Create Field
Connect the output port (right) of the
dtTableInput operator to the input port (left) of thisBefore Create FieldConsole operator.Configure the second Console operator's Info window as follows:
Setting
Value
Category
Console
Label
After Create Field
Connect the output port (right) of the
lowIncomeCreate Field operator to the input port (left) of thisAfter Create FieldConsole operator.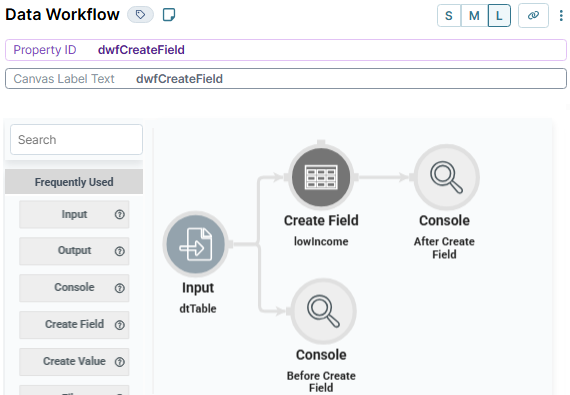
Click Save Component.
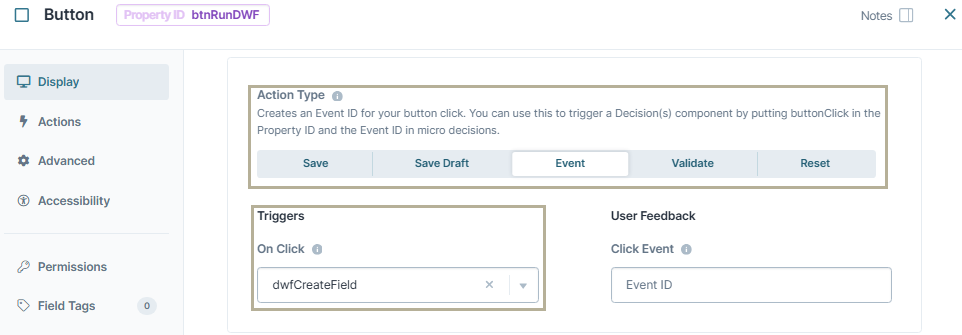
Configure the Button Component
Lastly, configure a Button component to trigger your Data Workflow.
Drag and drop a Button component onto your canvas, placing it below the
dwfCreateFieldData Workflow component.In the Property ID field, enter
btnRunDWF.In the Label Text field, enter
Run Create Field.From the Action Type drop-down, select Event.
From the On Click drop-down, select dwfCreateField.
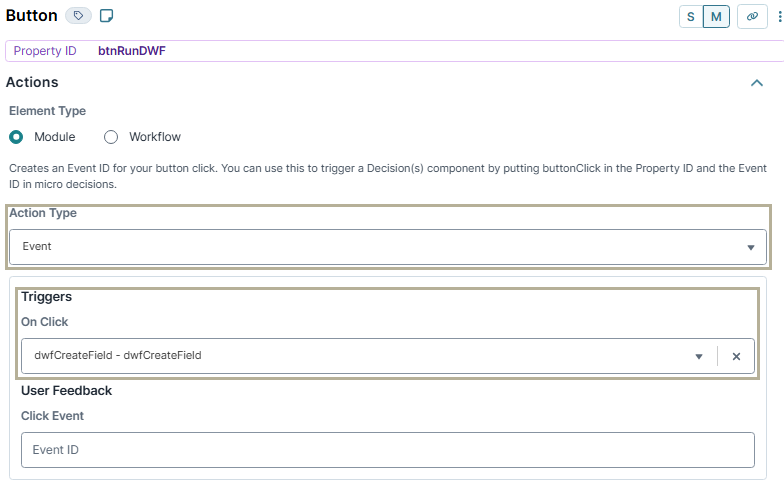
Click Save Component.
Save your module.
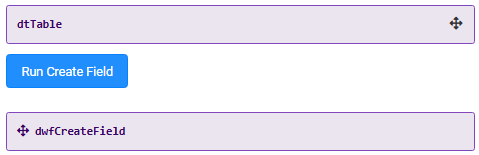
Here's how the completed example looks in the Module Builder:

Preview your module in Express View and open the DevTools Console. Click the Run Create Field button, and you’ll see that the lowIncome field was created.
The Create Field operator can be used with conditional expressions to add values to each row of a table based on existing data. In this example, you’ll add two key/value pairs, each with two possible values determined by conditions applied to the data.
Configuration
In this how-to guide, you’ll add rows to a data table based on an end-user's annual income.
The first key/value pair you’ll use is "lowIncome" : "yes" or "lowIncome" : "no". The condition is based on the incomeAnnual field. If the annual income is less than 24,000, the pair "lowIncome":"yes" is added to the row. If the annual income is greater than or equal to 24,000, the pair "lowIncome":"no" is added instead.
Conditional logic in the Create Field operator follows the format of the Excel IF function: key=IF(condition,valueIfTrue,valueIfFalse).
For the first key/value pair, the expression is the following: lowIncome=IF(incomeAnnual<24000,”yes”,”no”).
The second key/value pair is "applicationFee" : 5 or "applicationFee" : 15. The corresponding expression is the following: applicationFee=IF(lowIncome="yes",5,15).
In this case, if the lowIncome status is "yes", the application fee is 5. If the lowIncome status is "no", the application fee is 15.
These instructions assume you have a new module open, saved, and with a title.
Configure the Data Table Component
You’ll create a table using a Data Table component to add your key/value pairs. Begin by setting up a three‑row object table (array). This table will include one column named incomeAnnual. The values in this column will determine whether "yes" or "no" is assigned to the lowIncome key.
In the Module Builder, drag and drop a Data Table component onto your canvas.
In the Property ID and Canvas Label Text fields, enter
dtTable.In the data table, enter the following:
name
age
incomeAnnual
Ezekiel
58
23400
Lenna
32
48000
Sage
29
66700
Click Save & Close.
Configure the Data Workflow Component
Configure the Data Workflow component to add two new key/value pairs to each row (object) in your table (array).
Drag and drop a Data Workflow component onto your canvas, placing it below the
dtTableData Table component.In the Canvas Label Text and Property Name fields, enter
dwfCreateField.
Configure the Input Operator
Connect your Data Table component to your Data Workflow component using an Input operator.
Drag and drop an Input operator onto your Data Workflow canvas.
Configure the operator's Info window as follows:
Setting
Value
Category
Input
Component
dtTable
Required
Yes
Source
Default
Configure the Create Field Operator
Set up the Create Field operator to add two new key/value pairs to each row (object) in your table (array).
Drag and drop a Create Field operator onto your Data Workflow canvas.
Configure the operator's Info window as follows:
Setting
Value
Category
Create Field
Label
lowIncome
Do Not Sanitize Formula
(unchecked)Preserve Argument Type
(unchecked)Field 1
lowIncome=IF(incomeAnnual<24000,"yes","no")
Field 2
applicationFee=IF(lowIncome="yes",5,15)
Connect the output port (right) of the
dtTableInput operator to the input port (left) of thelowIncomeCreate Field operator.
Configure the Console Operators
Next, add two Console operators to view the data before and after your Create Field operator.
You'll notice that the Create Field operator only outputs to a Console operator. When creating applications, you might also want to use a dedicated Output operator. Then, you could connect that Output operator to a Hidden component. This would let you store the final table and reference it elsewhere in your application.
Drag and drop two Console operators onto your Data Workflow canvas.
Configure the first Console operator's Info window as follows:
Setting
Value
Category
Console
Label
Before Create Field
Connect the output port (right) of the
dtTableInput operator to the input port (left) of thisBefore Create FieldConsole operator.Configure the second Console operator's Info window as follows:
Setting
Value
Category
Console
Label
After Create Field
Connect the output port (right) of the
lowIncomeCreate Field operator to the input port (left) of thisAfter Create FieldConsole operator.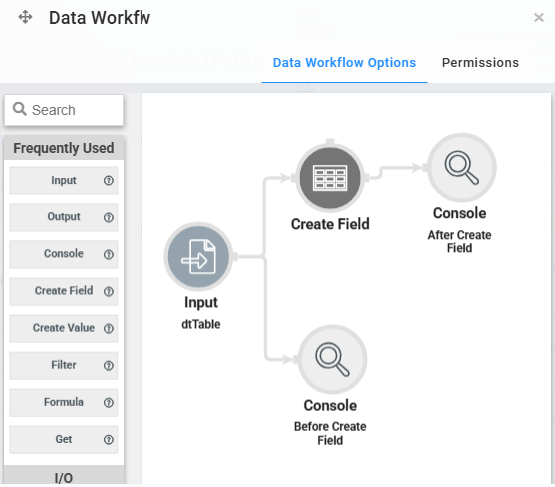
Click Save.
Configure the Button Component
Lastly, configure a Button component to trigger your Data Workflow.
Drag and drop a Button component onto your canvas, placing it below the
dwfCreateFieldData Workflow component.In the Property ID field, enter
btnRunDWF.In the Label Text field, enter
Run Create Field.Set the Action Type as Event.
From the On Click drop-down, select dwfCreateField.
Click Save & Close.
Save your module.
Here's how the completed example looks in the Module Builder:
Preview your module in Express View and open the DevTools Console. Click the Run Create Field button, and you’ll see that the lowIncome field was created.