In this how-to guide, you’ll learn how to set up a Convert Field operator to convert (cast) data to a string data type.
These instructions assume you have a new module open, saved, and with a title.
Configuration
For example, let's say you have a data set with account information. For data processing purposes, you want your Account Value data to be in the string data type. Doing so lets your data hold alphanumeric characters.
Configure the Data Table Component
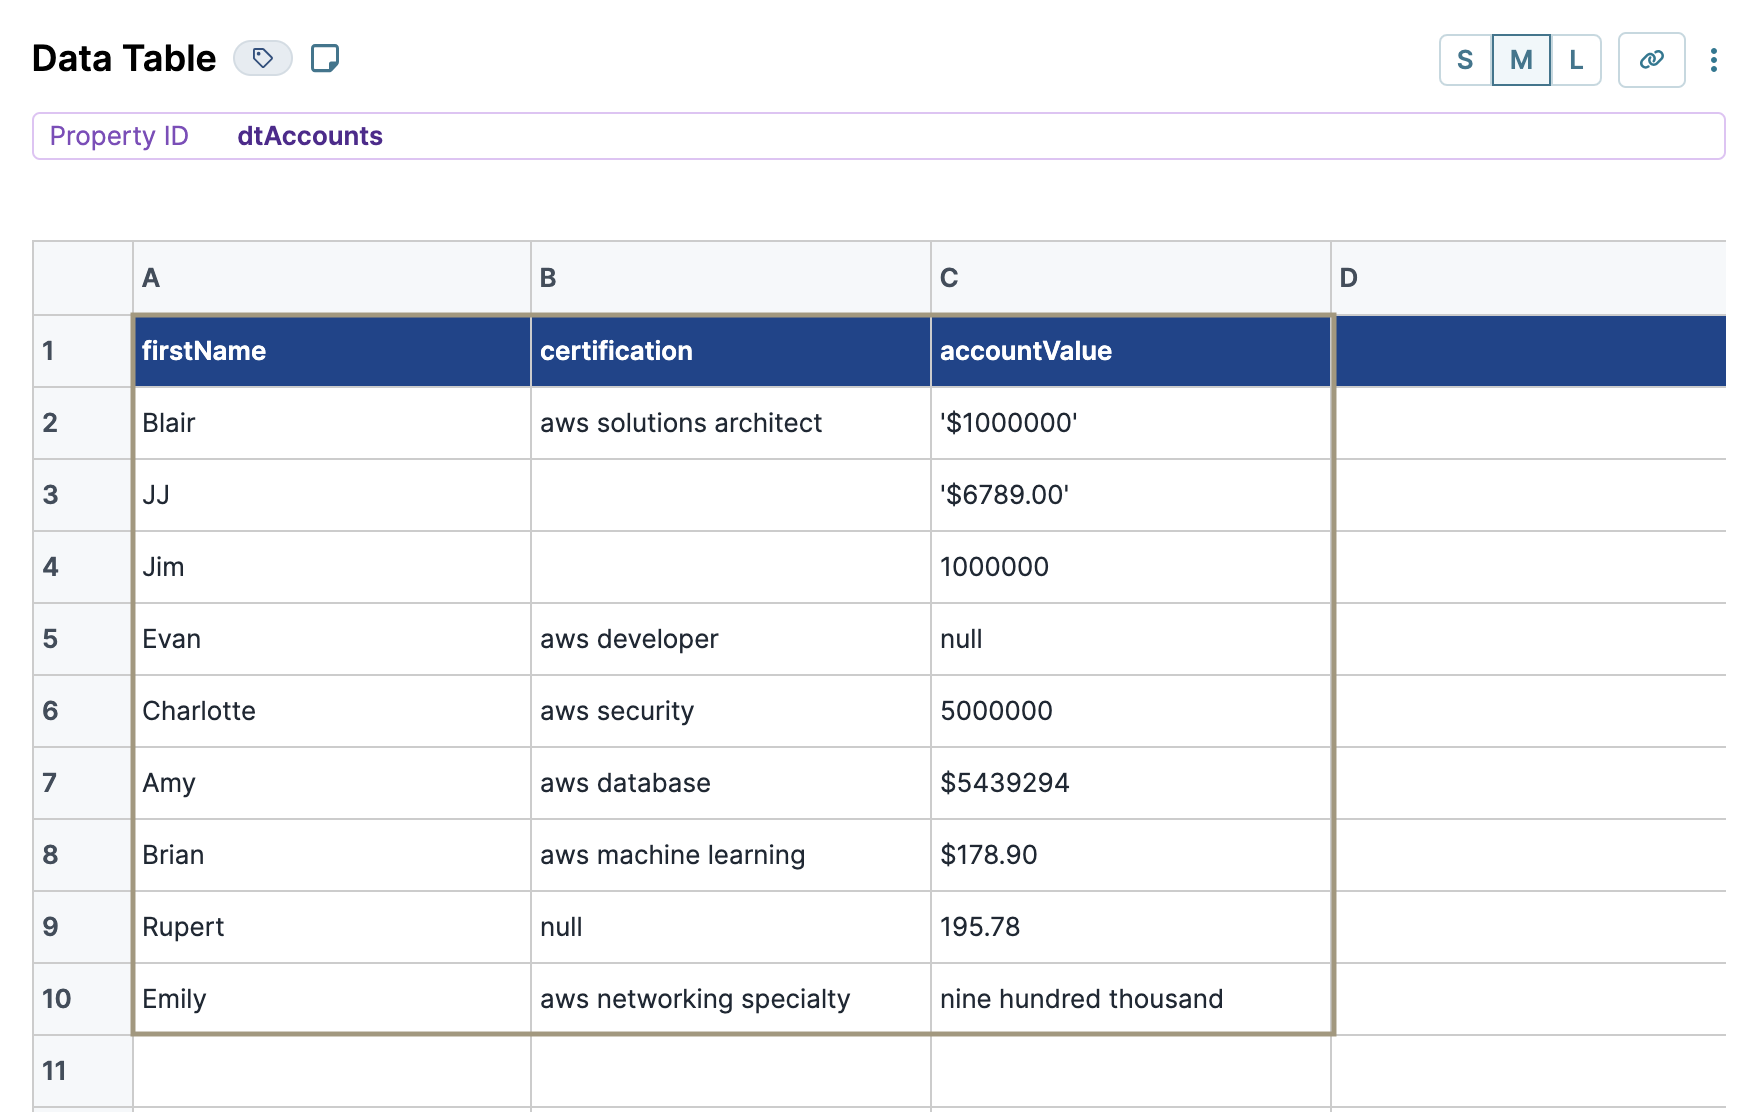
First, let's set up your account data using a Data Table component.
In the Module Builder, drag and drop a Data Table component onto your canvas.
In the Property ID field, enter
dtAccounts.In the data table, enter the following:
#
A
B
C
1
firstName
certification
accountValue
2
Blair
aws solutions architect
$1000000
3
JJ
$6789.00
4
Jim
1000000
5
Evan
aws developer
null
6
Charlotte
aws security
5000000
7
Amy
aws database
$5439294
8
Brian
aws machine learning
$178.90
9
Rupert
null
195.78
10
Emily
aws networking specialty
nine hundred thousand
Click Save Component.
Configure the Data Workflow Component
Next, let's set up your Data Workflow. You'll use an Input operator to bring in your data and use a Convert Field operator with the Cast To field set to String. You'll also include two Console operators so you can see how your data looks before and after the conversion.
Drag and drop a Data Workflow component onto your canvas, placing it below your Data Table component.
In the Property ID field, enter
dwfConvertFieldString.In the Canvas Label Text, enter
dwfConvertFieldString.
Configure the Input Operator
Drag and drop an Input operator onto your Data Workflow canvas.
Configure the operator's Info window as follows:
Setting
Value
Category
Input
Component
dtAccounts
Required
Yes
Source
Default
Configure the First Console Operator
Drag and drop a Console operator onto your Data Workflow canvas.
Configure the operator's Info window as follows:
Setting
Value
Category
Console
Label
Before
Connect the output port (right) of the
dtAccountsInput operator to the input port (left) of theBeforeConsole operator.
Configure the Convert Field Operator
Drag and drop a Convert Field operator onto your Data Workflow canvas.
Configure the operator's Info window as follows:
Setting
Value
Category
Convert To
Label
Convert accountValue to String
Cast To
String
Keys
accountValue
Connect the output port (right) of the
dtAccountsInput operator to the input port (left) of theConvert accountValue to StringConvert Field operator.
Configure the Second Console Operator
Drag and drop another Console operator onto your Data Workflow canvas.
Configure the operator's Info window as follows:
Setting
Value
Category
Console
Label
After
Connect the output port (right) of the
Convert accountValue to StringConvert Field operator to the input port (left) of theAfterConsole operator.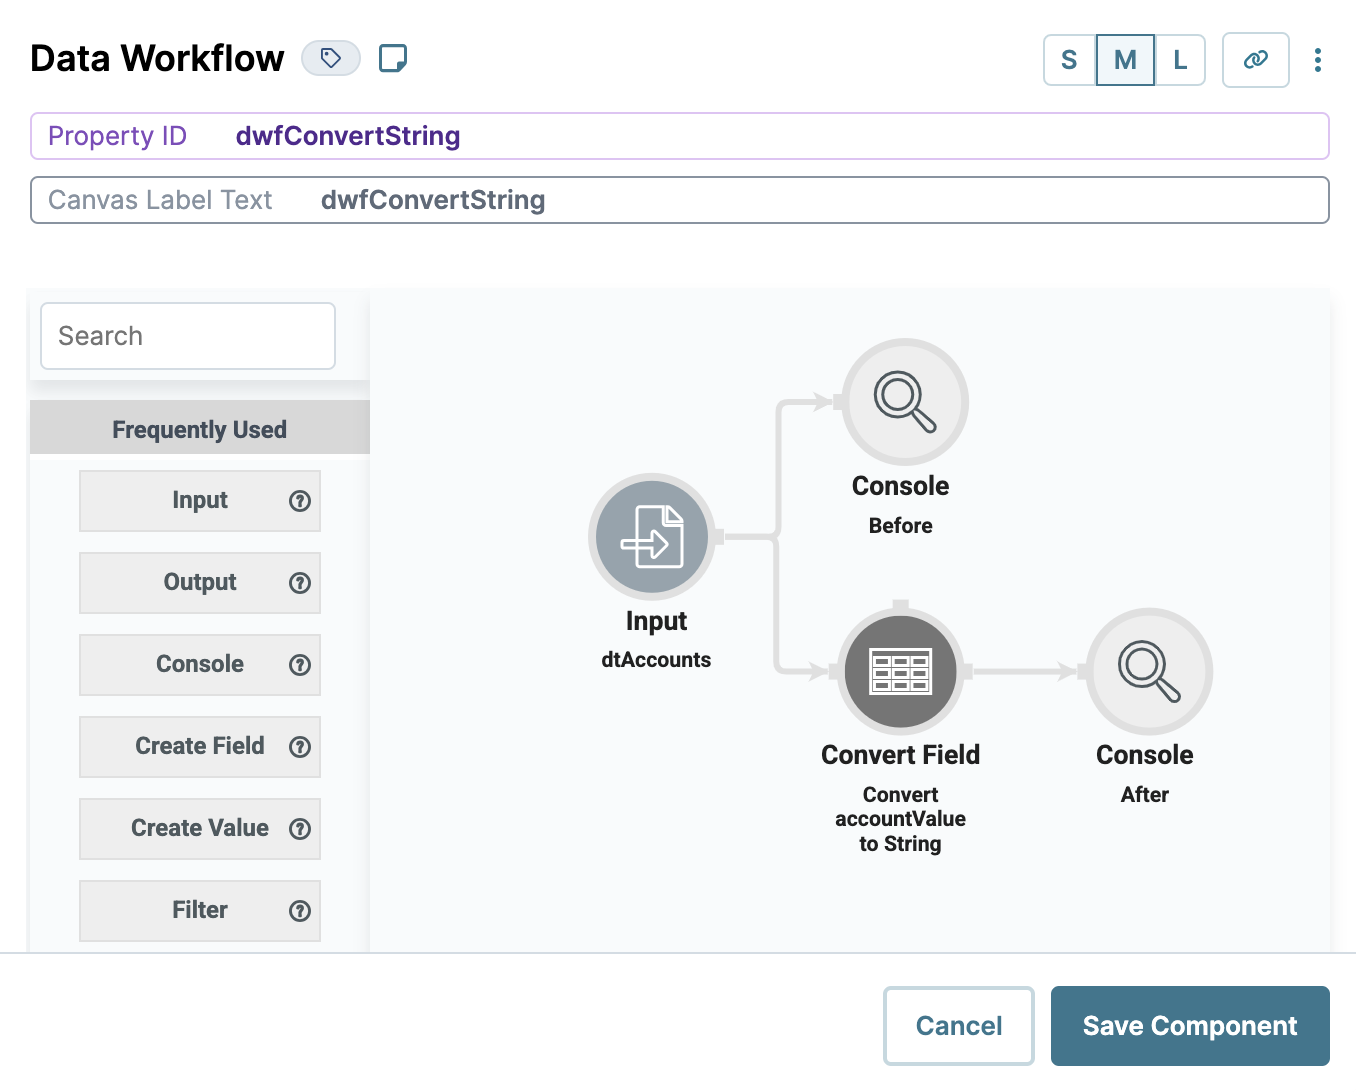
Click Save Component.
Configure the Button Component
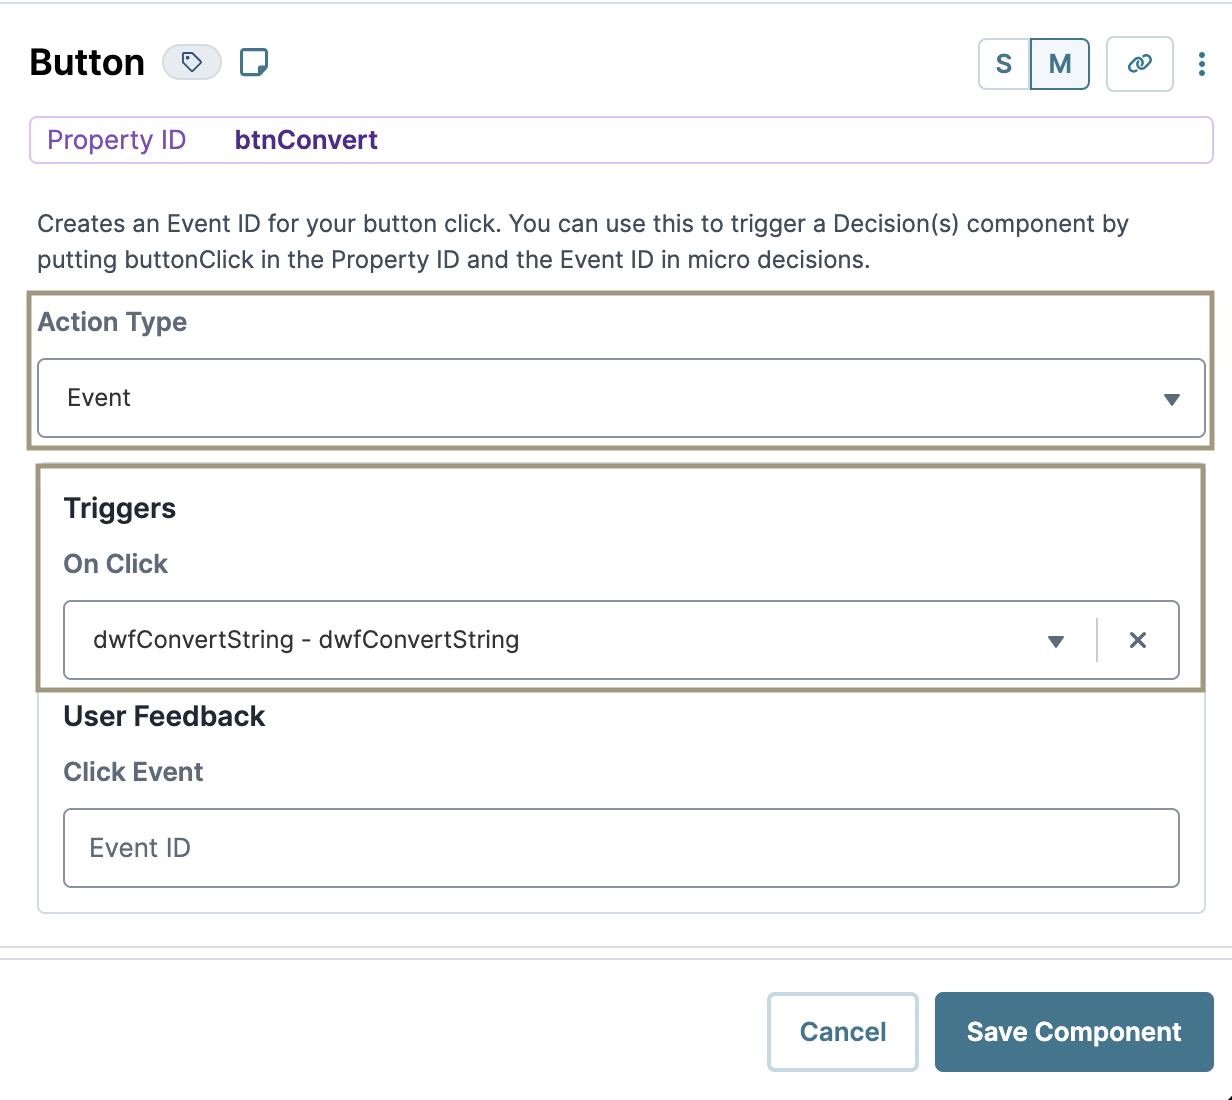
Now, let's add a Button component to trigger the entire operation.
Drag and drop a Button component onto your canvas, placing it below your Data Workflow component.
In the Property ID field, enter
btnConvert.In the Label Text, enter
Convert to String.From the Action Type drop-down, select Event.
From the On Click drop-down, select dwfConvertFieldString.
Click Save Component.
Save your module.
Here's how your module looks in the Module Builder:

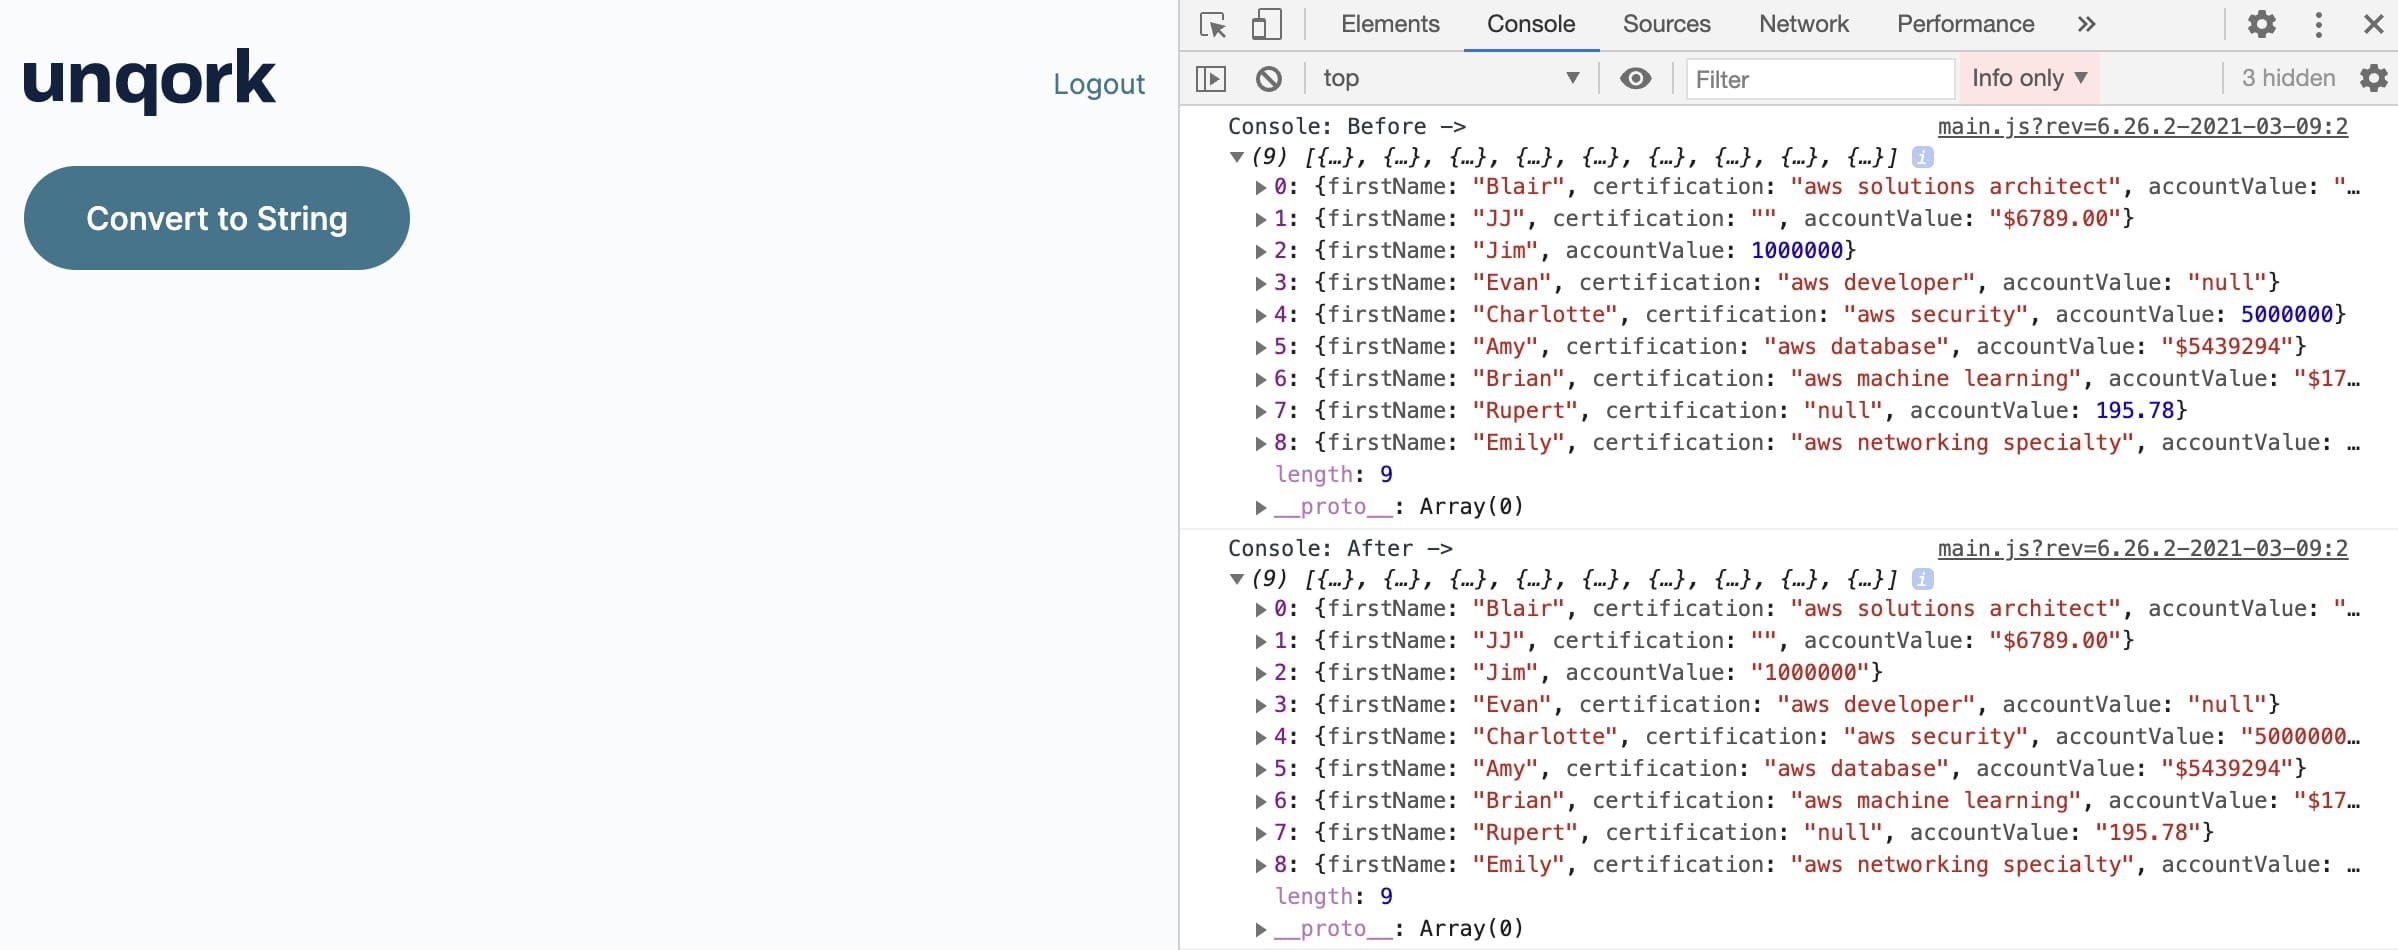
Preview your module in Express View and open the DevTools Console. Click the Convert to String button. You'll see your data both before and after the conversion. Notice that the number values in your Before Console data display in blue. In your After Console data, everything displays as red, indicating everything is stored as a string.
In this how-to guide, you’ll learn how to set up a Convert Field operator to convert (cast) data to a string data type.
These instructions assume you have a new module open, saved, and with a title.
Configuration
For example, let's say you have a data set with account information. For data processing purposes, you want your Account Value data to be in the string data type. Doing so lets your data hold alphanumeric characters.
Configure the Data Table Component
First, let's set up your account data using a Data Table component.
In the Module Builder, drag and drop a Data Table component onto your canvas.
In the Label Text and Property Name fields, enter
dtAccounts.In the data table, enter the following:
#
A
B
C
1
firstName
certification
accountValue
2
Blair
aws solutions architect
$1000000
3
JJ
$6789.00
4
Jim
1000000
5
Evan
aws developer
null
6
Charlotte
aws security
5000000
7
Amy
aws database
$5439294
8
Brian
aws machine learning
$178.90
9
Rupert
null
195.78
10
Emily
aws networking specialty
nine hundred thousand
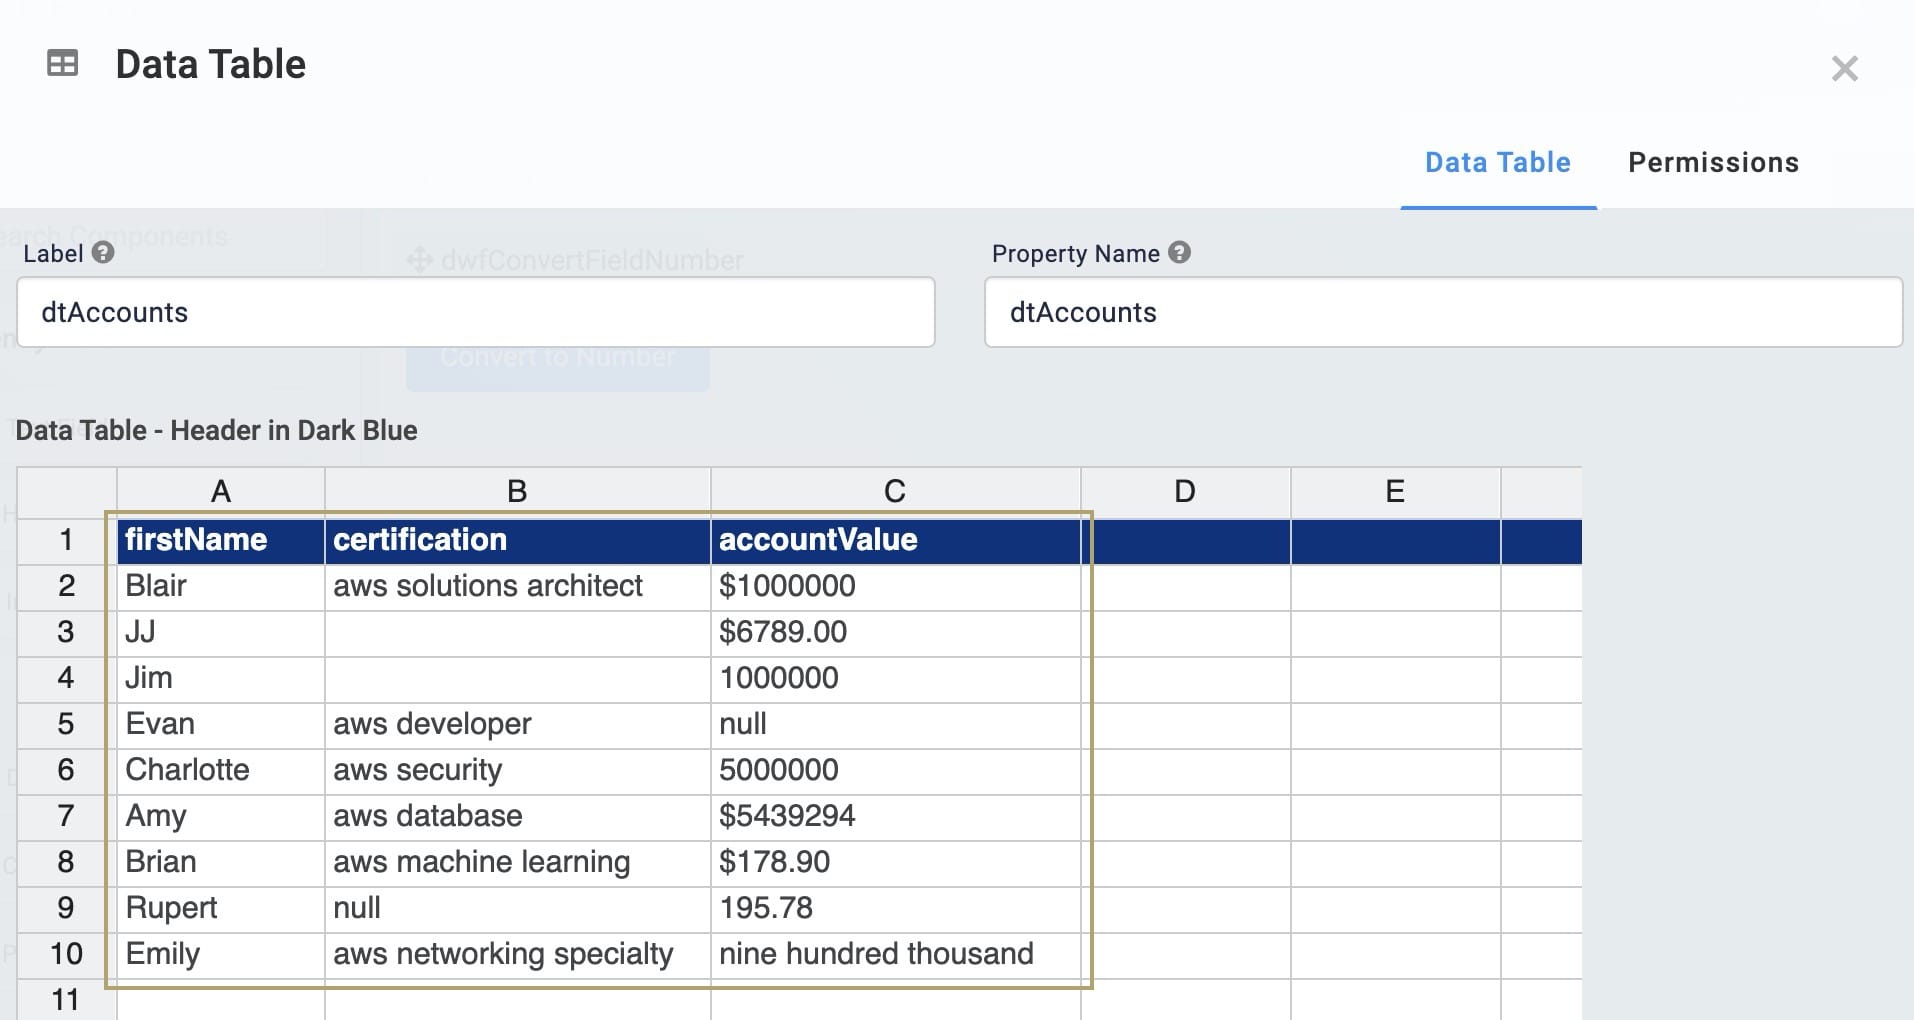
Click Save.
Configure the Data Workflow Component
Next, let's set up your Data Workflow. You'll use an Input operator to bring in your data and use a Convert Field operator with the Cast To field set to String. You'll also include two Console operators so you can see how your data looks before and after the conversion.
Drag and drop a Data Workflow component onto your canvas, placing it below your Data Table component.
In the Canvas Label Text and Property Name fields, enter
dwfConvertFieldString.
Configure the Input Operator
Drag and drop an Input operator onto your Data Workflow canvas.
Configure the operator's Info window as follows:
Setting
Value
Category
Input
Component
dtAccounts
Required
Yes
Source
Default
Configure the First Console Operator
Drag and drop a Console operator onto your Data Workflow canvas.
Configure the operator's Info window as follows:
Setting
Value
Category
Console
Label
Before
Connect the output port (right) of the
dtAccountsInput operator to the input port (left) of theBeforeConsole operator.
Configure the Convert Field Operator
Drag and drop a Convert Field operator onto your Data Workflow canvas.
Configure the operator's Info window as follows:
Setting
Value
Category
Convert To
Label
Convert accountValue to String
Cast To
String
Keys
accountValue
Connect the output port (right) of the
dtAccountsInput operator to the input port (left) of theConvert accountValue to StringConvert Field operator.
Configure the Second Console Operator
Drag and drop another Console operator onto your Data Workflow canvas.
Configure the operator's Info window as follows:
Setting
Value
Category
Console
Label
After
Connect the output port (right) of the
Convert accountValue to StringConvert Field operator to the input port (left) of theAfterConsole operator.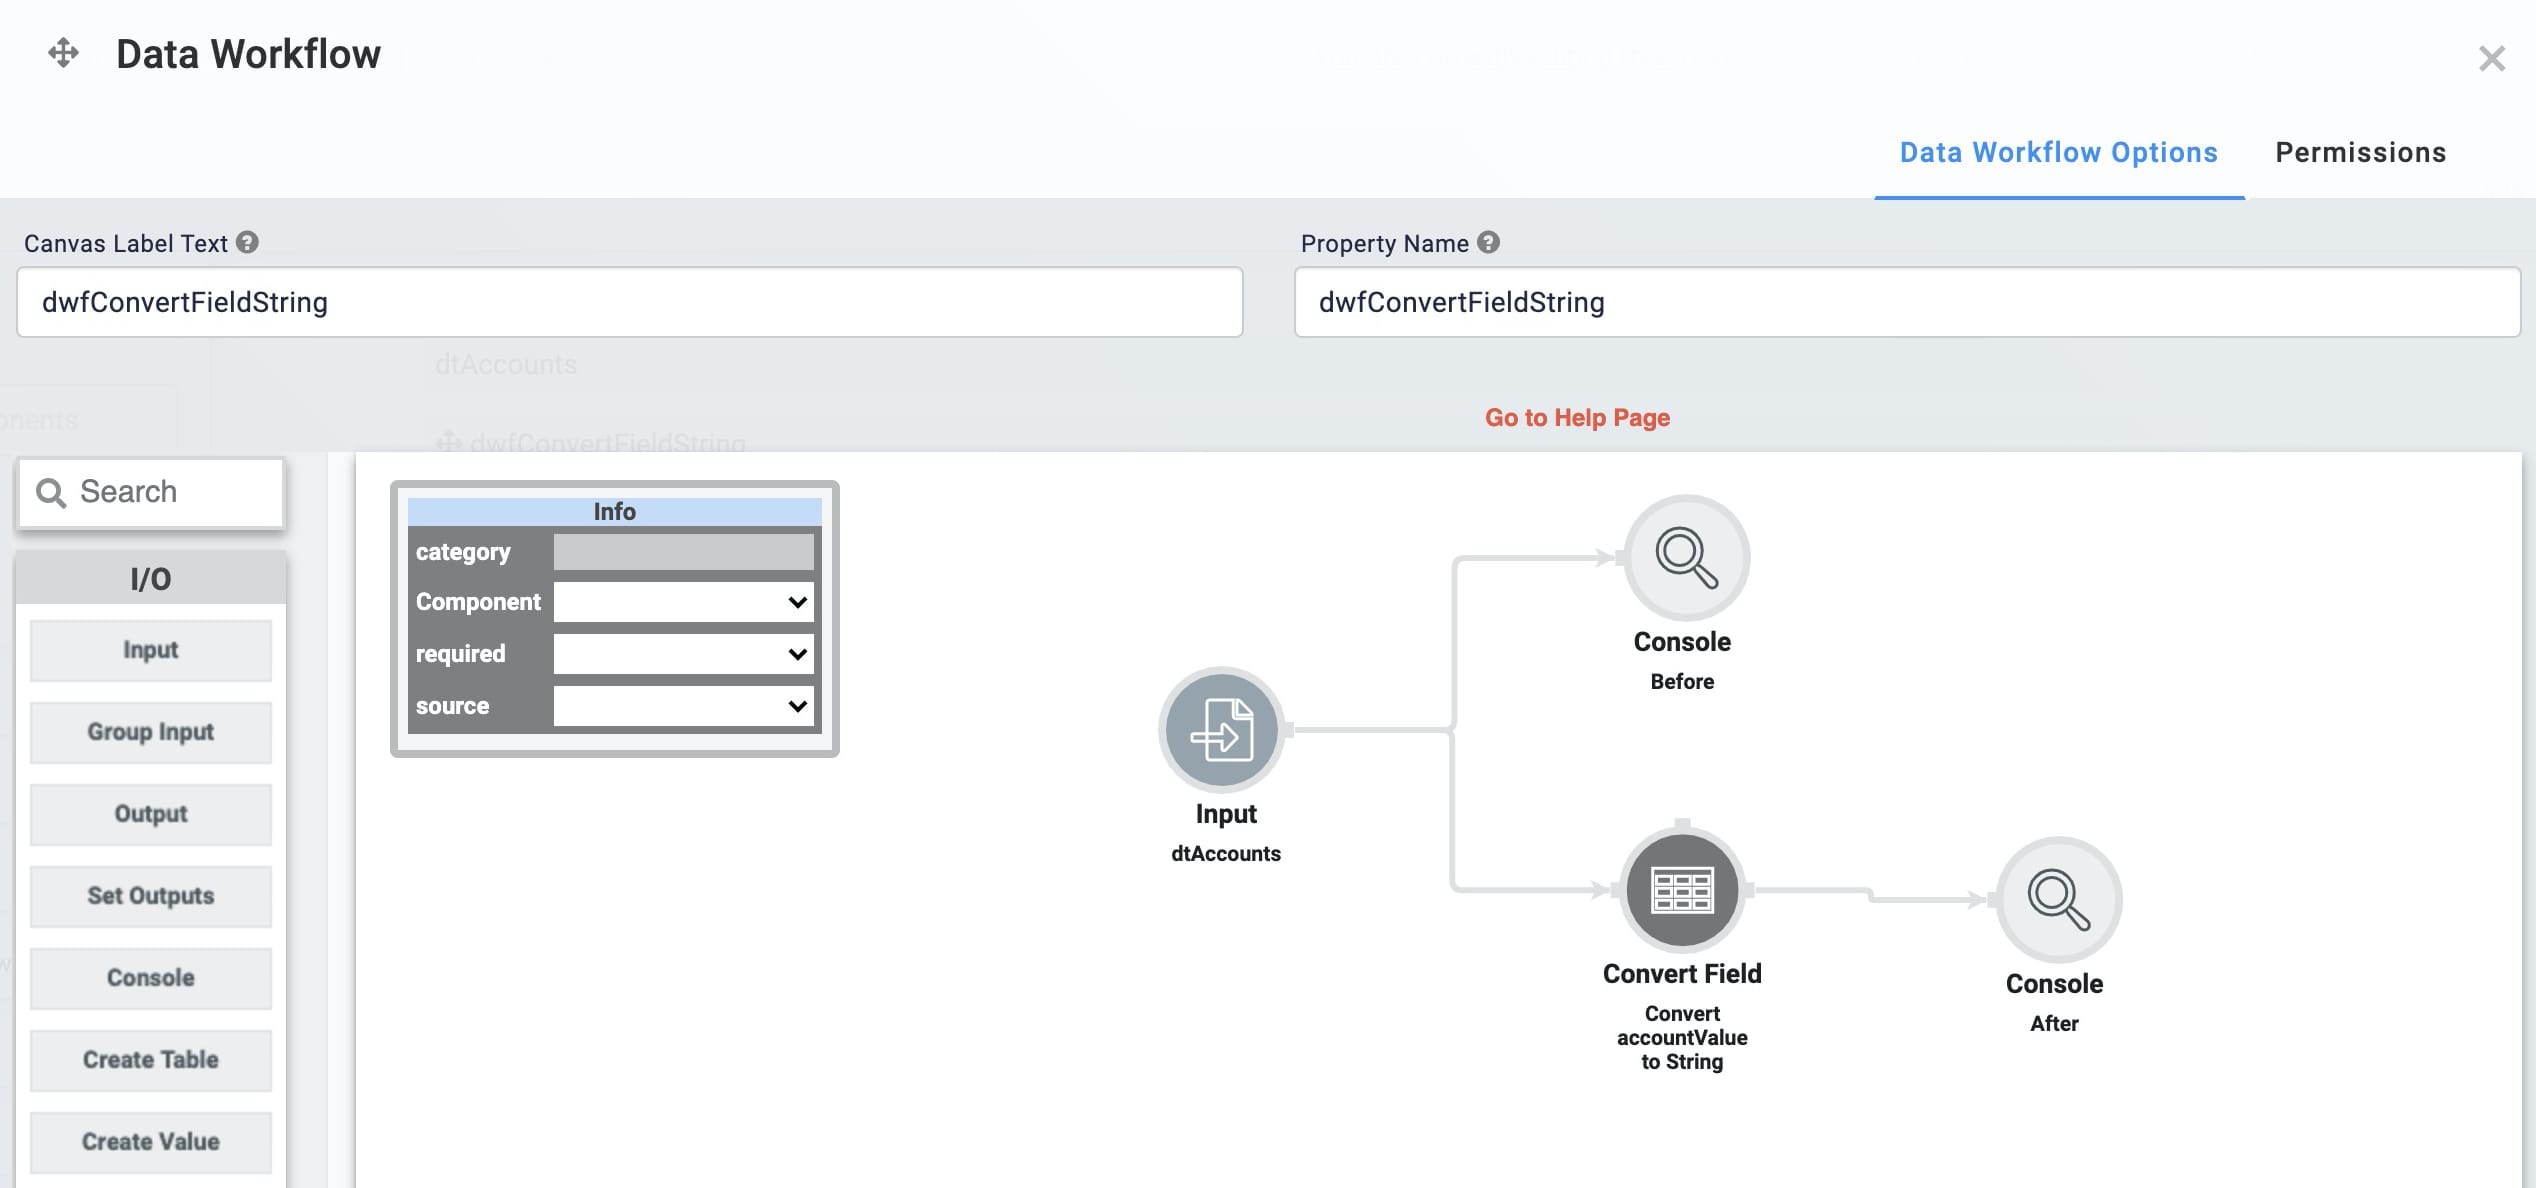
Click Save.
Configure the Button Component
Now, let's add a Button component to trigger the entire operation.
Drag and drop a Button component onto your canvas, placing it below your Data Workflow component.
In the Property ID field, enter
btnConvert.In the Label Text field, enter
Convert to String.Set the Action Type as Event.
In the Trigger on Click field, enter
dwfConvertFieldString.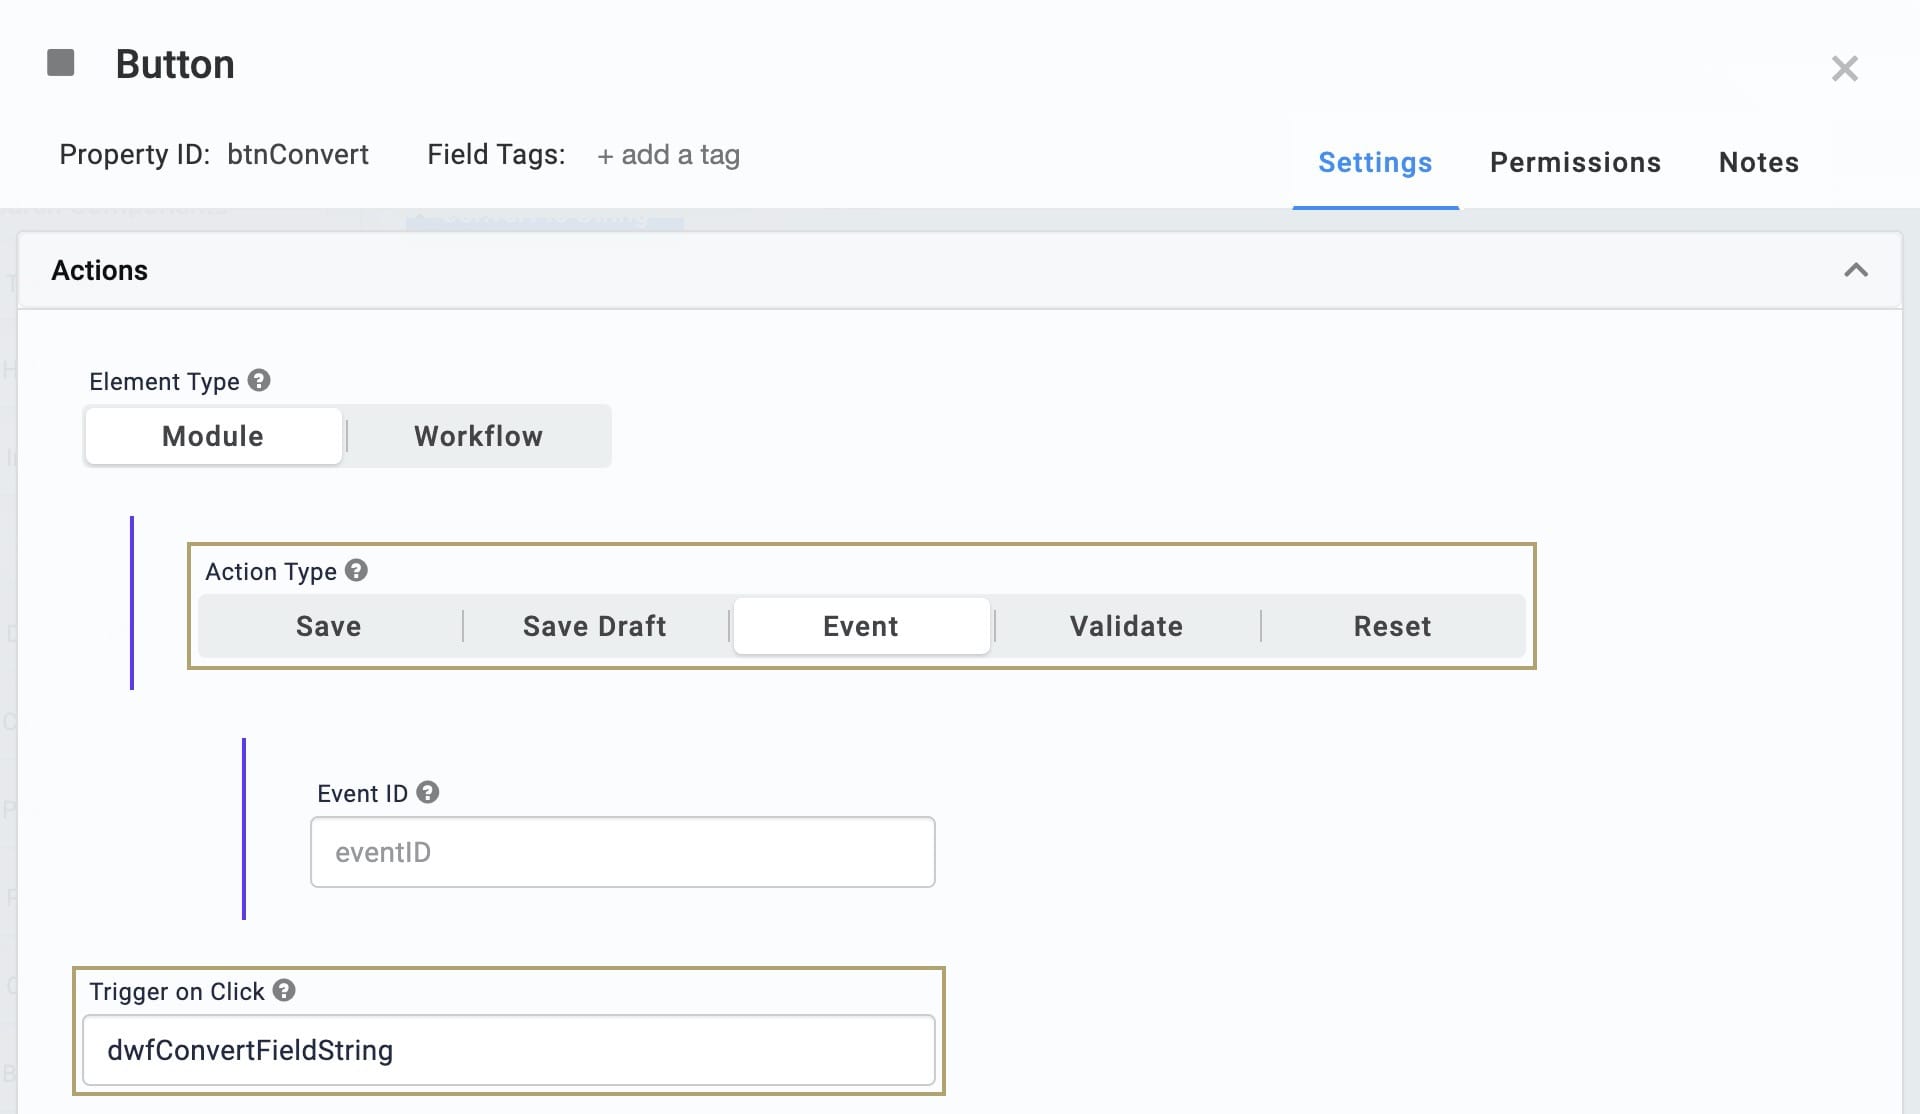
Click Save.
Save your module.
Here's how your module looks in the Module Builder:

Preview your module in Express View and open the DevTools Console. Click the Convert to String button. You'll see your data both before and after the conversion. Notice that the number values in your Before Console data display in blue. In your After Console data, everything displays as red, indicating everything is stored as a string.
.jpg)