Overview
Cross-Runtime Support enables Creators to easily adopt Unqork's new Vega runtime into their existing and future applications. With Cross-Runtime Support, Creators can create mixed applications that seamlessly switch between Centauri and Vega modules, or use a Panel component to drag and drop, import, or dynamically-refresh Vega components into Centauri modules.
Learn how to trigger, or send values between runtimes, view our How to: Configure Triggers and Values Using Cross-Runtime Support article.
How to Use Cross-Runtime Support
There are several methods available for using Cross-Runtime Support. The first method is to build new modules in Vega. Cross-Runtime Support automatically switches between Centauri and Vega runtimes as needed. Other methods use the Panel component to add, import, or dynamically refresh the Vega runtime and components into a Centauri application.
You cannot import Centauri modules and components into Vega modules.
Switch Between Runtimes by Module
Each module can run on a separate runtime. Cross-Runtime Support automatically switches between Centauri and Vega modules when using the following module-to-module navigation methods:
Using a Workflow Task node to switch between modules.
Using the Output Type of
pageto update the URL with a new module ID.Manually updating the URL with a new module ID.
The Navigation component does not use Cross-Runtime Support as it switches between Panel components instead of modules.
Configure a Panel Component to Use Vega Components
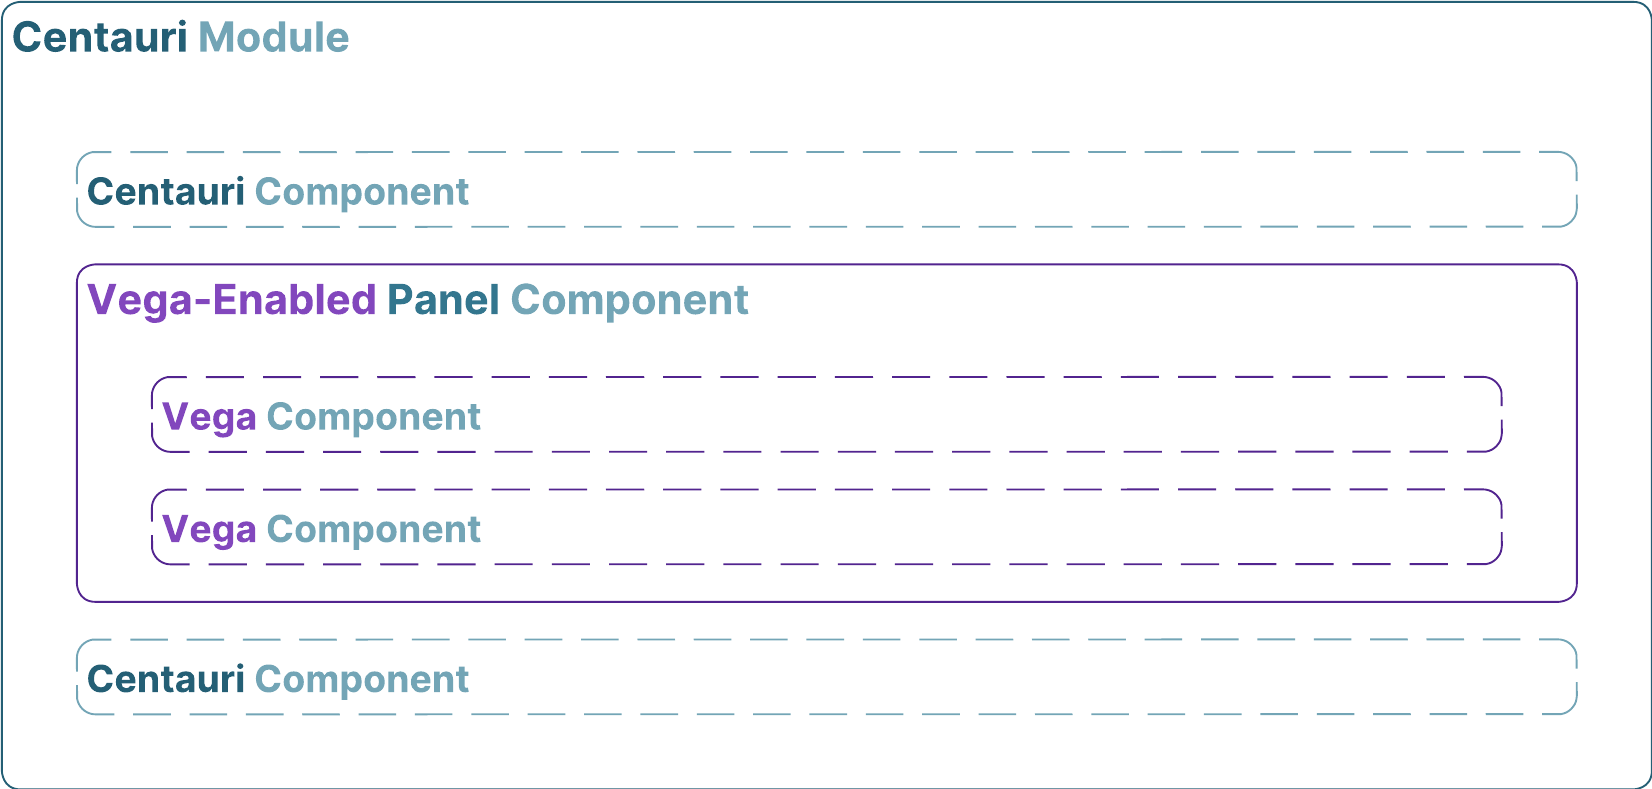
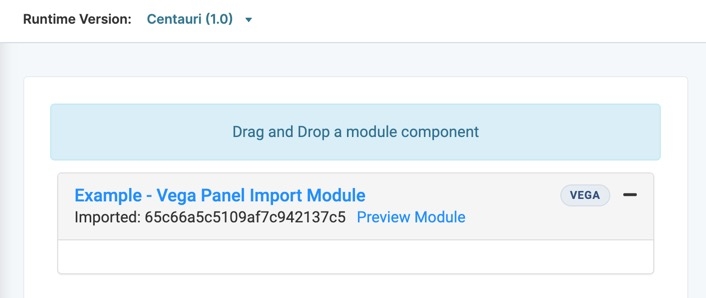
In a Centauri module, enabling the Vega runtime in a Panel component lets you drag and drop Vega components into it. Use this method when you want to build new Vega-First configurations in your existing modules. In the image below, enabling the Vega runtime in a Panel component lets Creators add Vega components to their Centauri module.
To enable the Vega runtime in a Panel component:
In the Module Builder, drag and drop a Panel component onto the canvas.
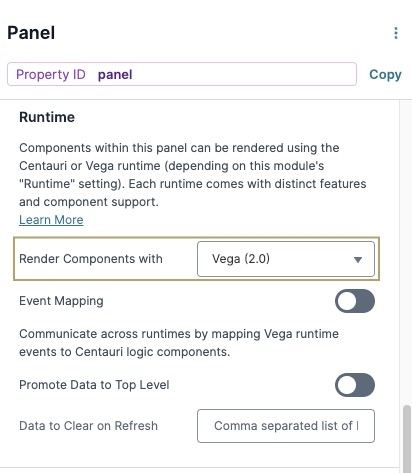
Under Runtime, set Render Components with to
Vega 2.0.Click Save Component. The Panel component on the canvas displays the VEGA badge.
From the Components tray, drag and drop Vega components into the Panel component on the canvas.
Save your module.
Configure a Panel Component to Dynamically Refresh in Vega Components
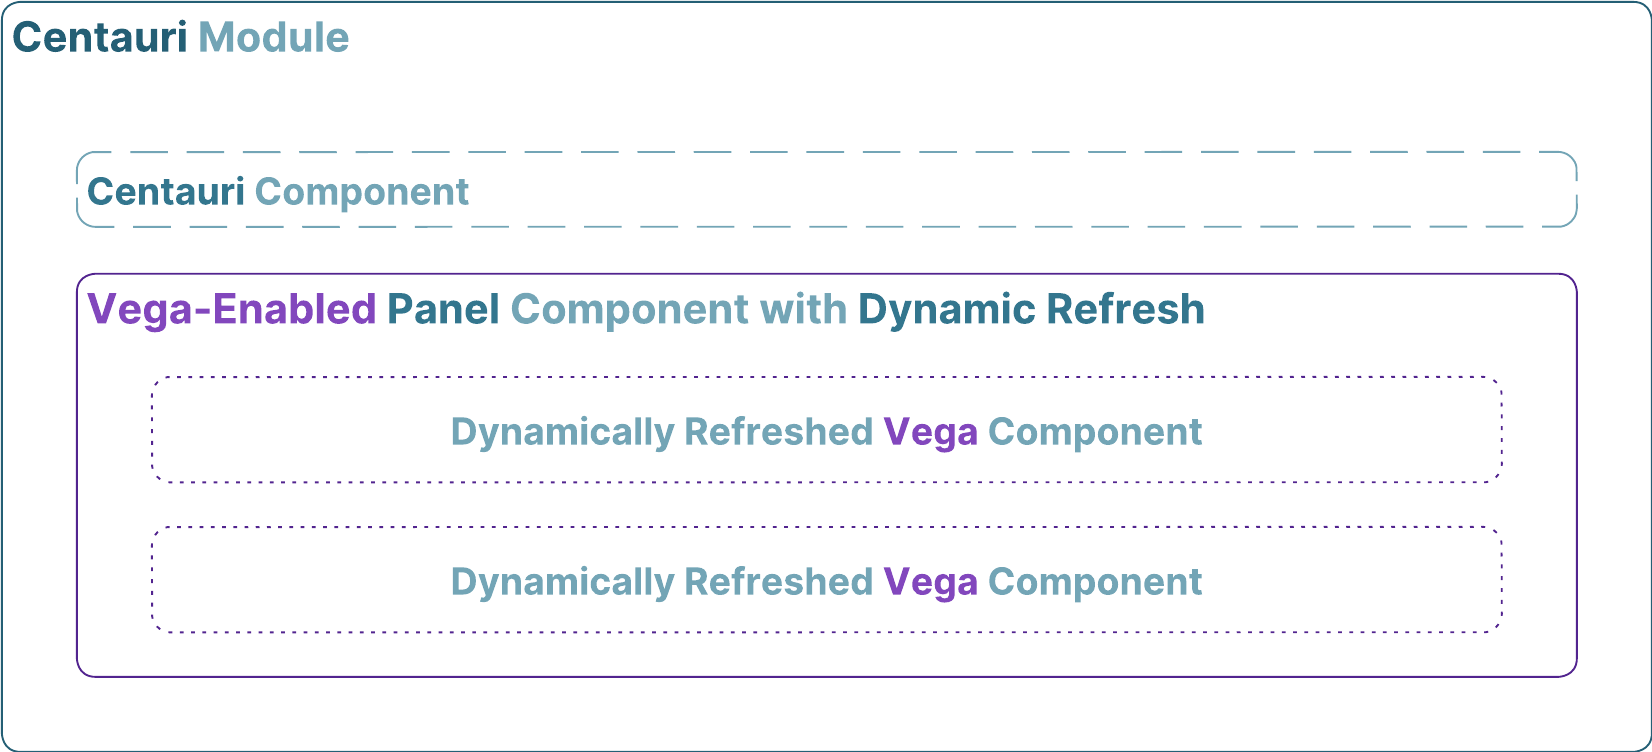
If you already have Centauri and Vega configurations, you can add Vega components to your Centauri module by dynamically refreshing them into a Vega-enabled Panel component.
To learn more about Dynamic Refresh, view our Dynamic Refresh article.
What You Need
To begin, you need a Centauri module and a Vega module containing components.
To configure the Centauri module, you need the following components:
Configure the Initializer Component
In the Module Builder, drag and drop an Initializer component onto the canvas.
In the Property ID field, enter initPanel.
In the Label Text field, enter
initPanel.Navigate to the Actions settings.
Set the Trigger Type to
New Submission.Next to Inputs & Outputs, click Edit.
In the Outputs table, enter the following:
Source
Type
Value
1
plugRefreshPanel
trigger
GO
You'll configure the plugRefreshPanel
 Plug-In component in the following steps.
Click Save Component
Configure the Plug-In Component
Drag and drop a
 Plug-In component onto your canvas, placing it below the initPanel Initializer component.
In the Property ID field, enter plugRefreshPanel.
In the Label Text field, enter
plugRefreshPanel.Under the Data panel, from the Internal Services drop-down, enter or select
Get Module Components.From the Module drop-down, enter or select the name of a Vega Module containing the components to import.
Navigate to the Actions settings.
Next to Inputs & Outputs, click Edit.
In the Outputs table, enter the following:
Property ID
Mapping
Option
Header
panelDynamicRefresh
trigger
GO
☐ (unchecked)
You'll configure the panelDynamicRefresh Panel component in the following steps.
Click Save Component
Configure the Panel Component
Drag and drop a Panel component onto the canvas.
In the Property ID field, enter panelDynamicRefresh.
In the Label Text field, enter
panelDynamicRefresh.Set Enable Dynamic Refresh to
 (ON).
(ON).Under Runtime, set Render Components with to
Vega 2.0.Click Save Component. The Panel component on the canvas displays the VEGA badge.
Your Panel component now dynamically refreshes in Vega components from another module.
Configure a Panel Component to Import a Vega Module
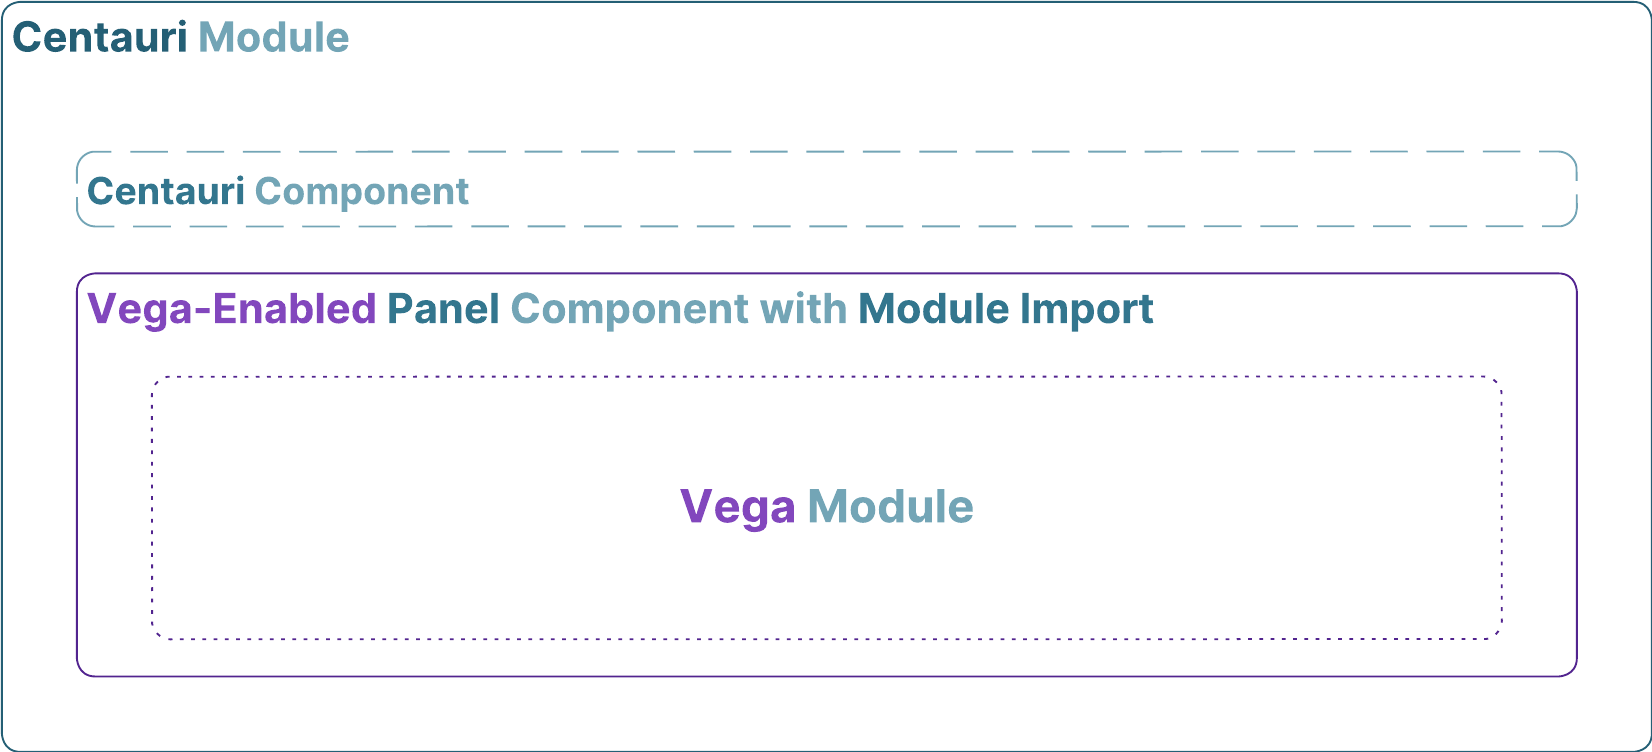
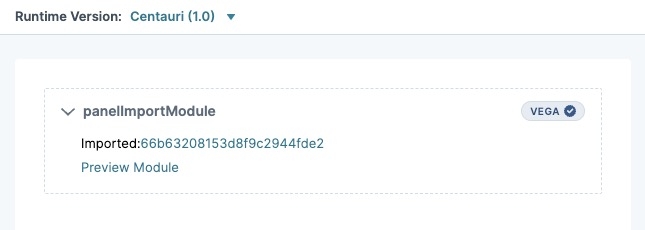
Import a Vega module into your Centauri configuration using a Vega-enabled Panel component and the Module Import function.
To import a Vega module into a Panel component:
In the Module Builder, drag and drop a Panel component onto the canvas.
Set Import Existing Module to
 (ON). The Import Module pane displays.
Under Imported and Dynamic Content, from the Module drop-down, enter or select a module name or value.
Under Runtime, set the Render Components with drop-down to
Vega (2.0).Click Save Component. The Panel component on the canvas displays the VEGA badge.
The panelDynamicRefresh Panel component now imports a Vega module into your Centauri module.
Overview
Cross-Runtime Support enables Creators to easily adopt Unqork's new Vega runtime into their existing and future applications. With Cross-Runtime Support, Creators can create mixed applications that seamlessly switch between Centauri and Vega modules, or use a Panel component to drag and drop, import, or dynamically-refresh Vega components into Centauri modules.
Learn how to trigger, or send values between runtimes, view our How to: Configure Triggers and Values Using Cross-Runtime Support article.
How to Use Cross-Runtime Support
There are several methods available for using Cross-Runtime Support. The first method is to build new modules in Vega. Cross-Runtime Support automatically switches between Centauri and Vega runtimes as needed. Other methods use the Panel component to add, import, or dynamically refresh the Vega runtime and components into a Centauri application.
You cannot import Centauri modules and components into Vega modules.
The following methods are available to optimize your Centauri application with Vega:
Switch Between Runtimes by Module
Each module can run on a separate runtime. Cross-Runtime Support automatically switches between Centauri and Vega modules when using the following module-to-module navigation methods:
Using a Workflow Task node to switch between modules.
Using the Output Type of
pageto update the URL with a new module ID.Manually updating the URL with a new module ID.
The Navigation component does not use Cross-Runtime Support as it switches between Panel components instead of modules.
Configure a Panel Component to Use Vega Components
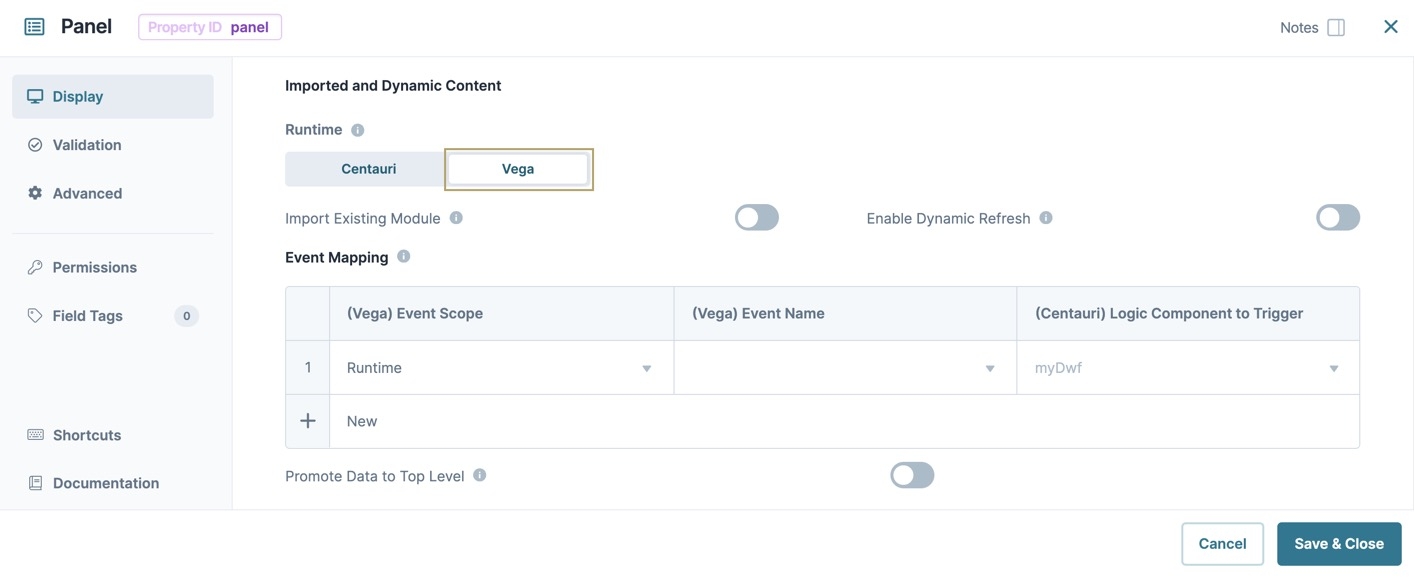
In a Centauri module, enabling the Vega runtime in a Panel component lets you drag and drop Vega components into it. Use this method when you want to build new Vega-First configurations in your existing modules. In the image below, enabling the Vega runtime in a Panel component lets Creators add Vega components to their Centauri module.
To enable the Vega runtime in a Panel component:
In the Module Builder, drag and drop a Panel component onto the canvas.
Under Imported and Dynamic Content, set Runtime to Vega.
Click Save & Close. The Panel component on the canvas displays the VEGA badge.
From the Component Tray, add components that do not display the CENTAURI badge to the Panel component.
Save your module.
Configure a Panel Component to Dynamically Refresh in Vega Components
If you already have Centauri and Vega configurations, you can add Vega components to your Centauri module by dynamically refreshing them into a Vega-enabled Panel component.
To learn more about Dynamic Refresh, view our Dynamic Refresh article.
What You Need
To begin, you need a Centauri module and a Vega module containing components.
To configure the Centauri module, you need the following components:
Configure the Initializer Component
In the Module Builder, drag and drop an Initializer component onto the canvas.
In the Property ID field, enter initPanel.
In the Label Text field, enter
initPanel.In the OUTPUTS table, enter the following:
Property ID
Type
Value
1
plugDynamicRefresh
trigger
GO
You'll configure the plugDynamicRefresh
 Plug-In component in the following steps.
Click Save & Close
Configure the Plug-In Component
Drag and drop a
 Plug-In component onto your canvas, placing it below the initPanel Initializer component.
In the Property ID field, enter plugRefreshPanel.
In the Label Text field, enter
plugRefreshPanel.Under the Data panel, from the Internal Services drop-down, enter or select
Get Module Components.From the Module drop-down, enter or select the name of a Vega module containing the components to import.
In the OUTPUTS table, enter the following
Property ID
Mapping
Option
Header
panelDynamicRefresh
trigger
GO
☐ (unchecked)
You'll configure the panelDynamicRefresh Panel component in the following steps.
Click Save & Close
Configure the Panel Component
Drag and drop a Panel component onto the canvas.
In the Property ID field, enter panelDynamicRefresh.
In the Label Text field, enter
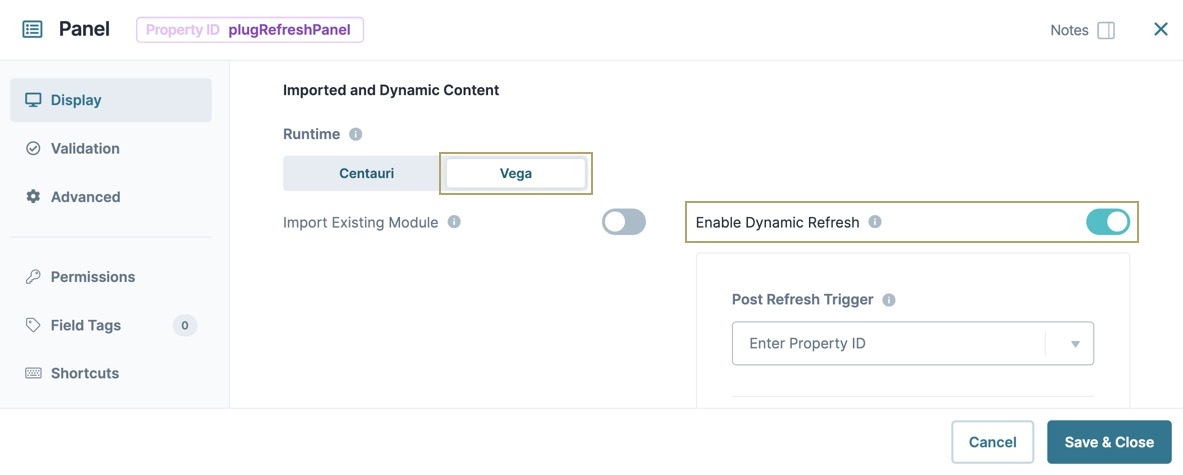
panelDynamicRefresh.Under Imported and Dynamic Content, set Runtime to Vega.
Set Enable Dynamic Refresh to
 (ON).
(ON).Click Save & Close. The Panel component on the canvas displays the VEGA badge.
Your Panel component now dynamically refreshes in Vega components from another module.
Configure a Panel Component to Import a Vega Module
Import a Vega module into your Centauri configuration using a Vega-enabled Panel component and the Module Import function.
To import a Vega module into a Panel component:
In the Module Builder, drag and drop a Panel component onto the canvas.
Under Imported and Dynamic Content, set Runtime to Vega.
Set Import Existing Module to
 (ON). The Import Module pane displays.
Under Module*, enter or select a module name or value.
Click Save & Close. The Panel component on the canvas displays the VEGA badge.
The Panel component now imports a Vega module into your Centauri module.
Best Practices
When possible, separate logic between runtimes to reduce configuration debugging and maintenance.
When you need to perform logic on component data from both runtimes, perform the logic in Centauri. Vega runtime data continously syncs with the Centauri runtime.
For existing applications, consider how much of the Vega runtime you want to implement. You can keep as much of your Centauri configuration as needed, or update your application to be Vega-First.

