In the Module Settings modal, you can view or edit module details, settings, configure workflow triggers, and assign user permissions. Adjusting your module's settings lets you make decisions about performance, event tracking, server-side execution, and browser tab display.
Once you create your module, you can enable or disable any of its settings at any time. It's important to note that these settings are module-specific. If you have a workflow that uses three modules, you must match the settings for all three modules.
Below are the different tabs available in the Module Settings modal:
Tab | Description |
|---|---|
Module Details | This tab contains the basic module information where you can configure the Module Name, Path, Description, and Type. You can also use this tab to assign tags and a Data Model to the module. |
Module Settings | This tab lets you determine how your module interacts with API calls and how each module behaves.
|
Workflow Settings | This tab includes module-specific settings that let you control how navigation impacts modules in your workflow. Use this feature to trigger logic components, like Initializer and Decisions components, when:
|
User Permissions | This tab lets you determine which users can access or modify the module. |
Accessing Module Settings
To access Module Builder Settings:
Module Details
This section explores the Module Details tab of the Module Settings modal. After making adjustments to the modal, click Save & Close.
Attribute | Description |
|---|---|
Module Name* | The name of your module. You can use this field to rename your module after you've created it.
|
Module Path* | The path of your module. You can use this field to edit your module path after you've created it. Click Copy to copy your module path.
|
Module Description | Add a module description in this field to make it easier to onboard team members or hand off projects. |
Module Type* | The type of function this module is designed for. Module types include:
|
Tags | Create or select tags for your module. Tags are optional but can help you locate specific modules in your environment. |
Data Models | Add or remove Data Models from your module. Only Data Models in your current workspace are accessible. A Data Model cannot be removed from a module if there are components bound to fields in it. |
Module Size | The size of the module configuration in the Unqork database. This field does not include the size of any Automatically Referenced Imported Modules, as they are imported on load.
|
Module Size in Express | The size of the module that loads in Express View. This field includes all Automatically Referenced Imported Modules.
|
Module Settings
This section explores the Module Settings tab of the Module Settings modal. After making adjustments to the modal, click Save & Close.
Some settings are unavailable depending on the module type you create.
Setting | Description |
|---|---|
Load Submissions With Initial Module Version | Set the Load Submissions With Initial Module Version toggle to By default, the Load Submissions With Initial Module Version toggle is set to |
Enable Stagger Load | Enable this setting to prevent hidden components from being loaded into the module until displayed. Doing so improves loading performance for larger modules containing many components that are hidden on load.
By default, the Enable Stagger Load setting is set to |
Container Components' Propagate "Disabled" to Logic Components | Enabling this setting controls whether the Disable Execution setting for logic components inside container components is set or ignored when the container component is disabled. For example, let's say you have a logic component inside a Panel component. If the Container Components' Propagate "Disabled" to Logic Components setting is set to By default, the Container Components' Propagate "Disabled" to Logic Components toggle is set to
|
Disable Default Main and Form Regions | For accessibility purposes, defining regions on a page is crucial, especially for users of screen readers. It helps them understand the page structure, identify where they are on the page, and avoid repetitive content where possible. The Unqork automatically wraps every application module with By default, this setting is set to |
Server-Side Execution (SSE or API Module)
This section explores the Server-side Execution section of the Module Settings modal. After making adjustments to the modal, click Save & Close.
Setting | Description |
|---|---|
Server-Side Execution Only | Set the Server-Side Execution Only toggle to By default, the Server-side Execution Only toggle is set to
|
Act as Super-User When Server-Side Executing | Set the Act as Super-User When Server-Side Executing toggle to
|
Express Settings
This section explores the Express Settings section of the Module Settings modal. After making adjustments to the modal, click Save & Close.
Setting | Description |
|---|---|
Enable Tracker | When set to
By default, this setting is set to |
Track User | After enabling the Enable Tracker toggle, set the Track User toggle to By default, the Track User toggle is set to |
Track Value | After enabling the Enable Tracker toggle, set the Track Value toggle to By default, the Track Value toggle is set to
|
Show Page Title | Set the Show Page Title toggle to By default, the Show Page Title toggle is set to |
Workflow Settings
This section explores the Workflow Settings tab of the Module Settings modal. After making adjustments to the modal, click Save & Close.
To learn more about workflow, view our Introduction to the Workflow Builder article.
Setting | Description |
|---|---|
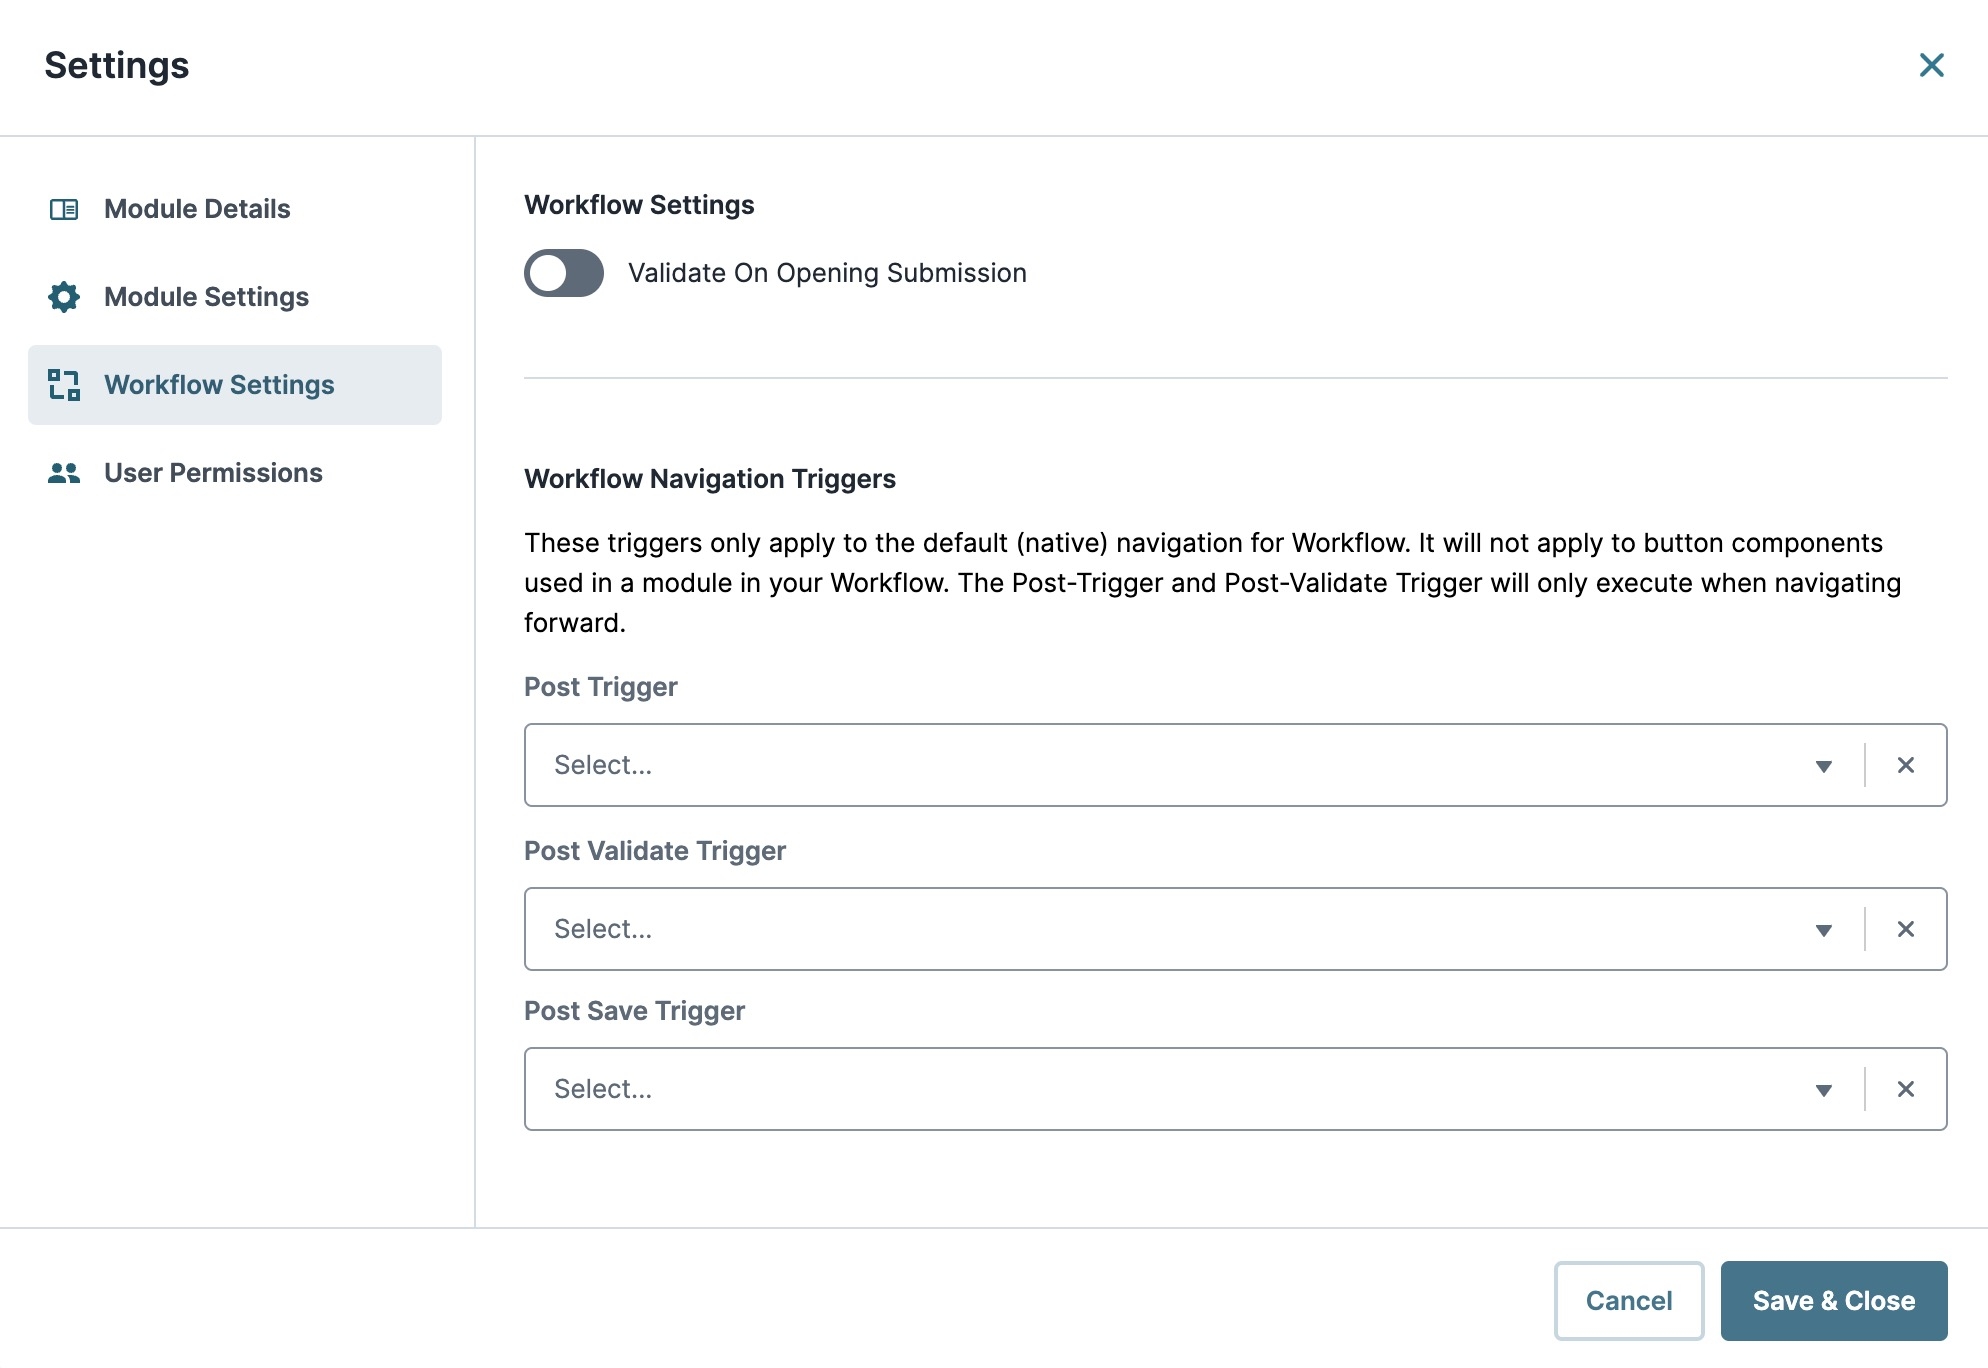
Validate on Opening Submission | When set to By default, the Validate on Opening Submission toggle is set to |
Workflow Navigation Triggers
These settings let you trigger logic components as an end-user navigates your workflow. They include the Calculator, Decisions, Initializer, Plug-In, and Data Workflow components. You can trigger any logic component in your workflow's modules. All available triggers are Post triggers. They trigger after an event occurs. For example, Post Save Trigger means the component triggers after an end-user presses Save and Exit.
After making adjustments to the modal, click Save & Close.
Attribute | Description |
|---|---|
Post Trigger | Select a logic component to trigger after the end-user clicks the workflow's Next button. |
Post Validate Trigger | Select a logic component to trigger when module fields are valid. |
Post Save Trigger | Select a logic component to trigger when module fields are valid, and the end-user clicks the workflow's |
User Permissions
This section explores the User Permissions tab of the Module Settings modal. After making adjustments to the modal, click Save & Close.
To learn more about Module User Permissions, view our Module Permissions article.
Setting | Description |
|---|---|
Customize RBAC for This Module | When set to By default, the Customize RBAC for This Module toggle is set to |
Allow Access to Anonymous Users | When set to By default, the Allow Access to Anonymous Users toggle is set to |
Module Role-Based Access Control
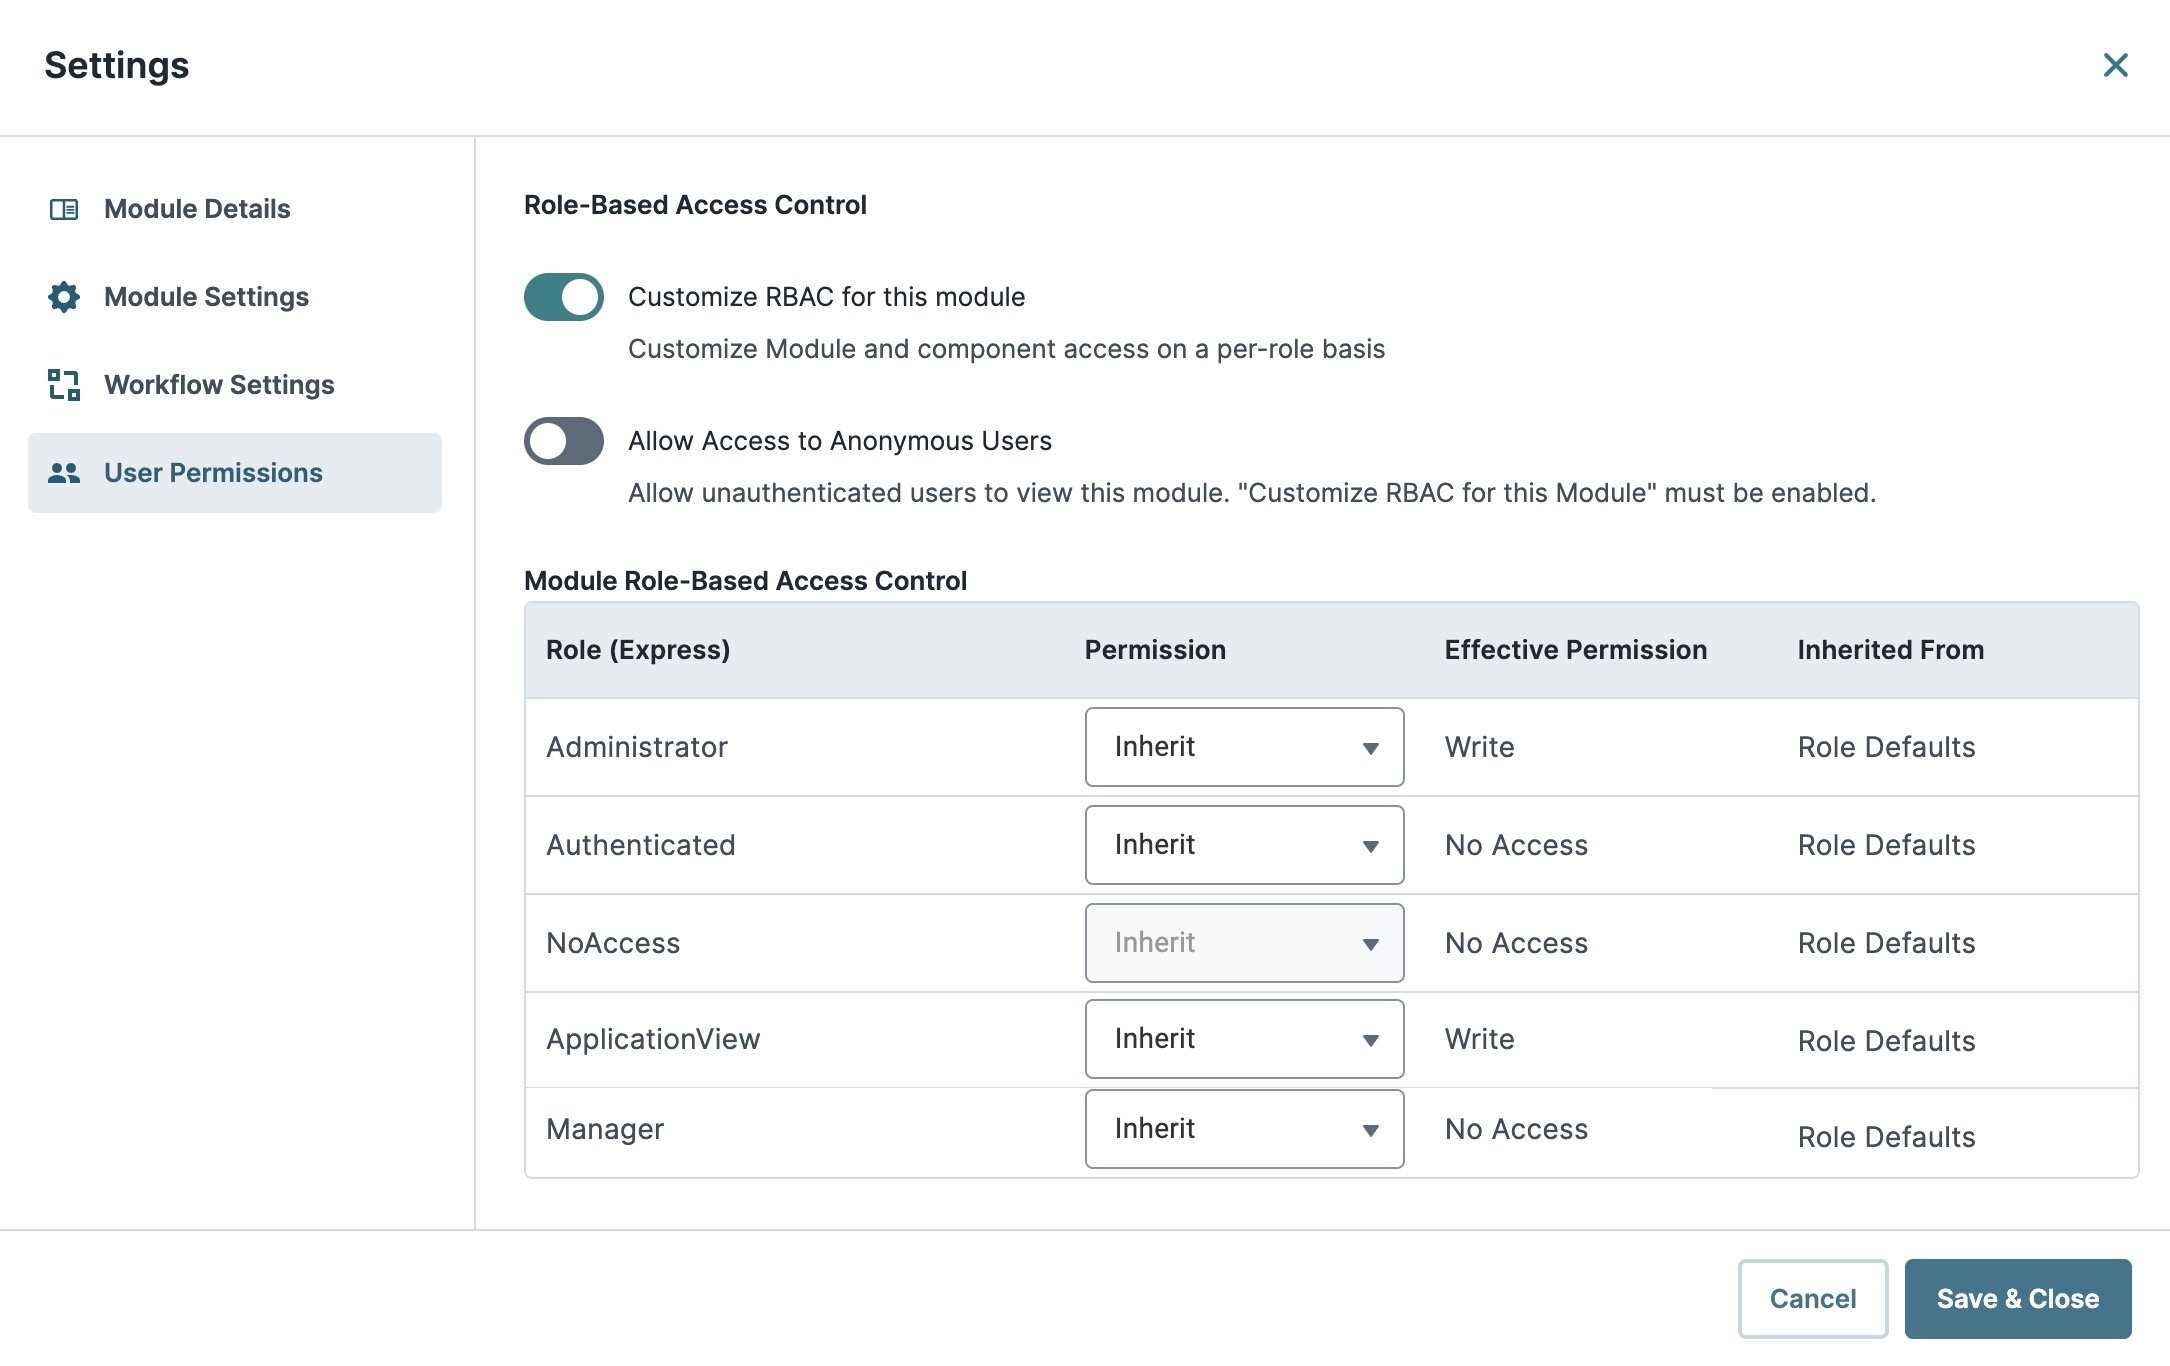
When the Customize RBAC for This Module toggle is set to ![]() (ON), you can adjust permissions for specific roles in your module. The modal displays roles and permissions in the following grid:
(ON), you can adjust permissions for specific roles in your module. The modal displays roles and permissions in the following grid:
Attribute | Description |
|---|---|
Role (Express) | The Express role. |
Permission | The permission for the corresponding Express role. Permissions include:
|
Effective Permission | Confirmation of the selected permission from the Permission drop-down. |
Inherited From | If the permission is Inherit, this column displays where the permission was inherited. |
In the Module Settings, you can choose how your module interacts with API calls and shape how each module behaves. Adjusting your module's settings lets you make decisions about:
Performance
Server-side Execution
Event tracking
Browser tab display
Once you create your module, you can enable or disable any of its settings at any time. It's important to note that these settings are module-specific. If you have a workflow that uses three modules, you must match their settings.
To learn more about customizing RBAC (role-based access control) for your module, view our Module Permissions article
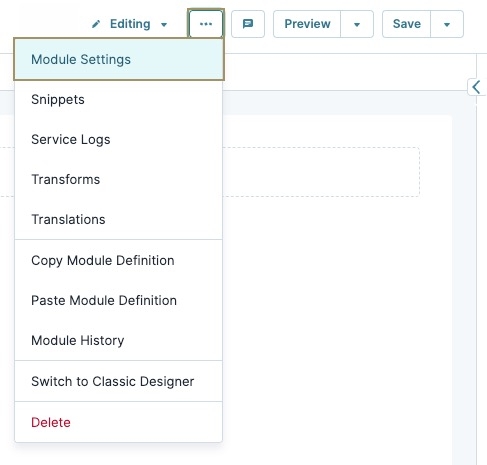
Accessing Module Settings
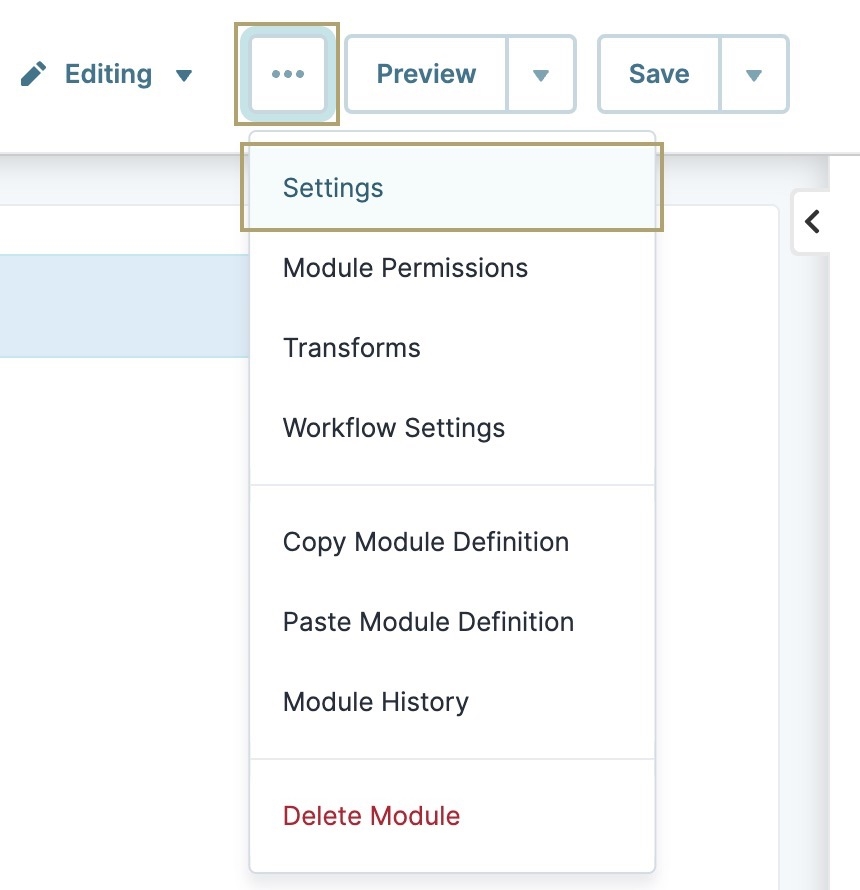
To access Module Builder Settings:
Open your module in the Module Builder.
Click the
.png) (ellipsis) button.
(ellipsis) button.Select Settings.
Module Details
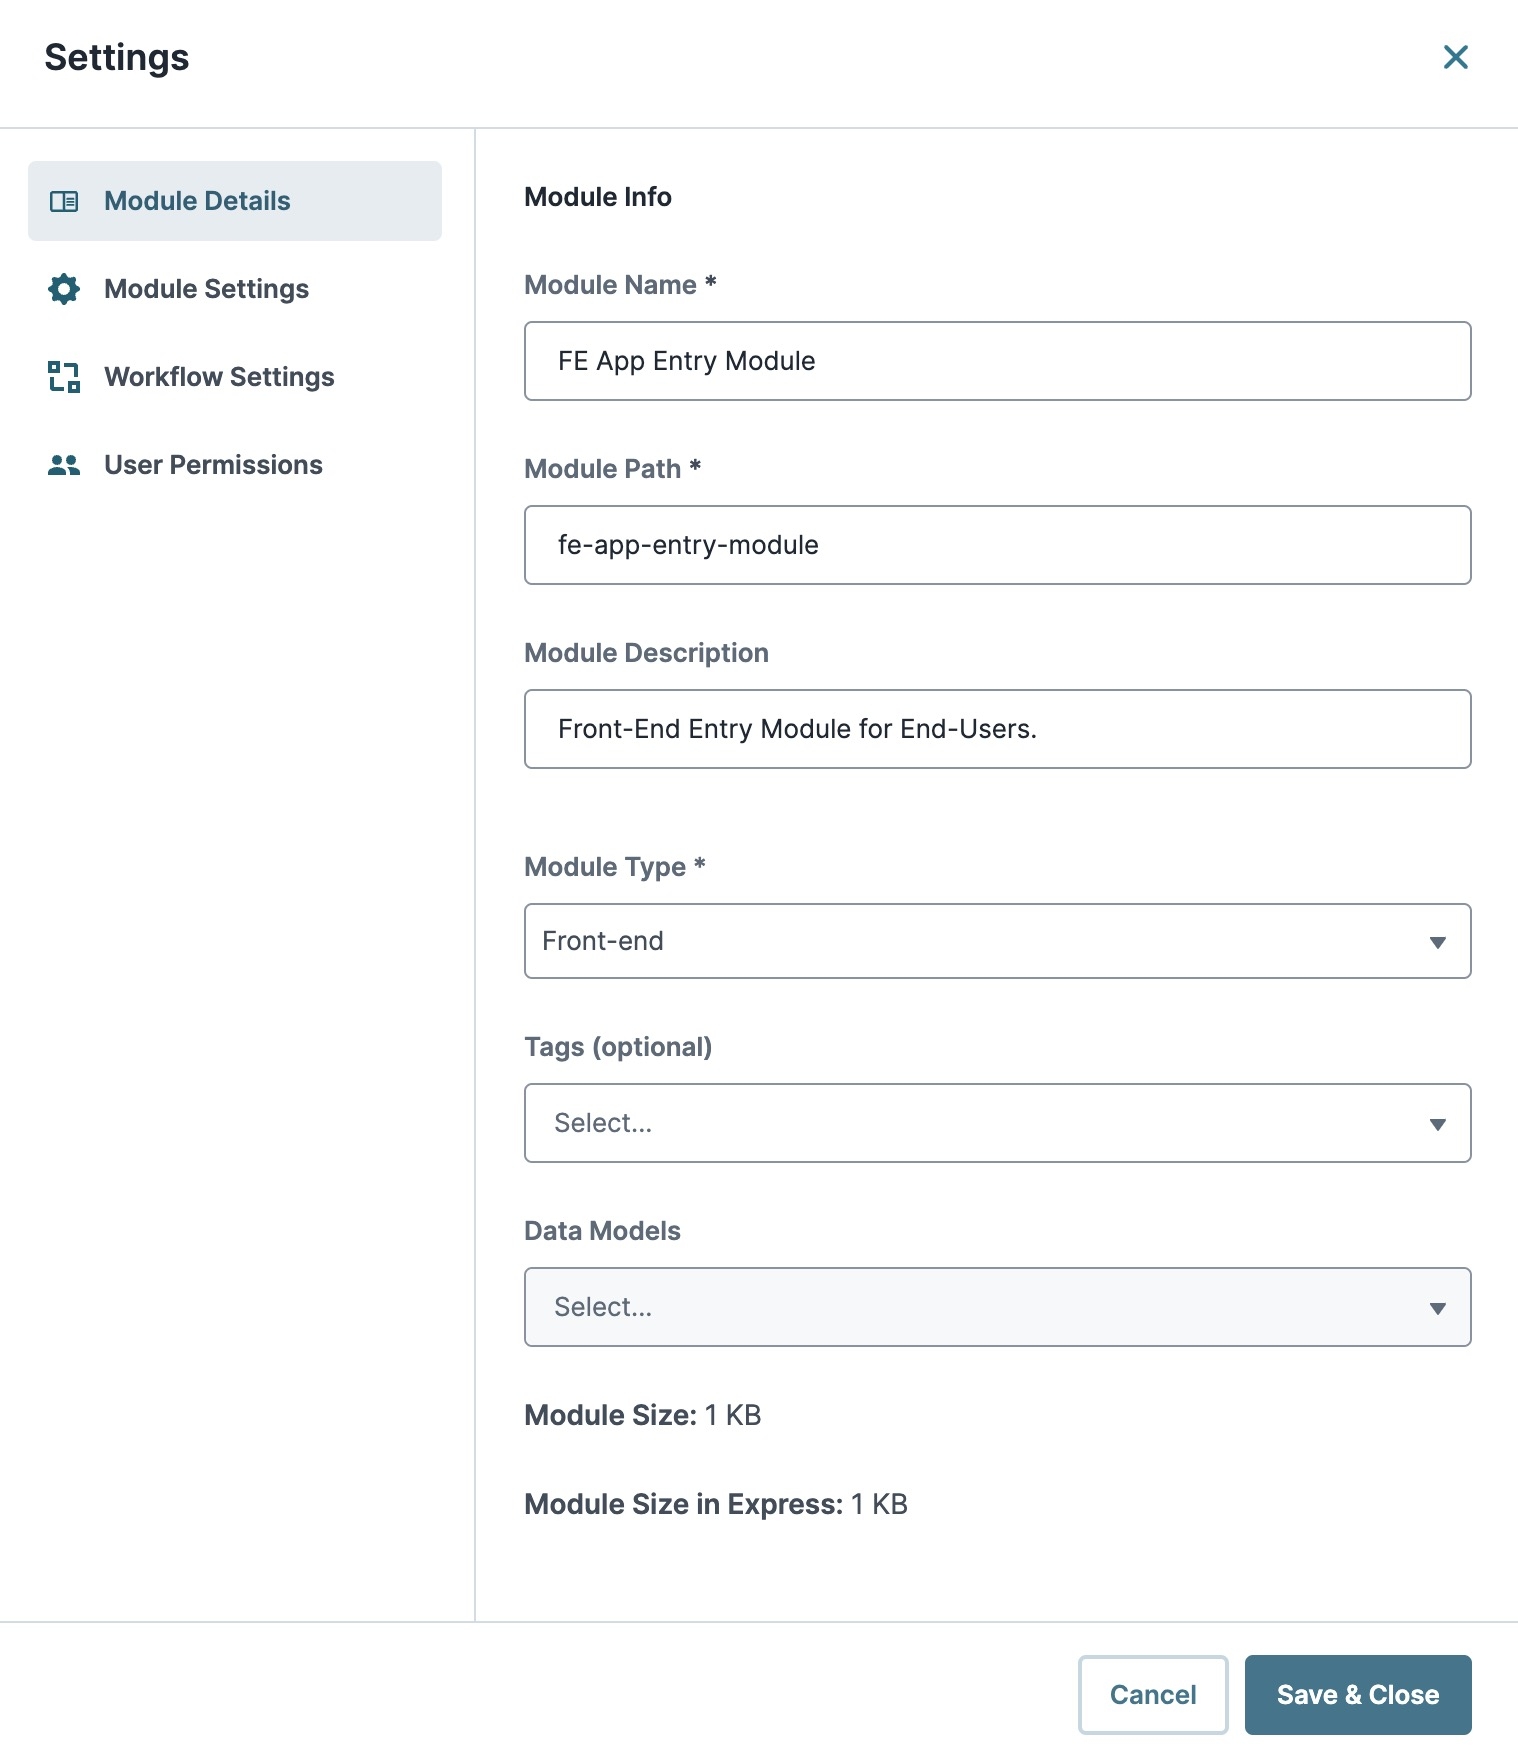
This section explores the Module Details section of the Module Settings . After making adjustments to the modal, click Save & Close.
.png)
Attribute | Description |
|---|---|
Module Name* | The name of your module. You can use this field to rename your module after you've created it.
|
Module Path* | The path of your module. You can use this field to edit your module path after you've created it. Click Copy to copy your module path.
|
Module ID | The unique identifier of your module. Click Copy to copy your module ID.
|
Module Description | Add a module description in this field to make it easier to onboard team members or hand off projects. |
Module Type* | The type of function this module is designed for. Module types include:
|
Tags | Create or select tags for your module. Tags are optional but can help you locate specific modules in your environment. |
Data Models | Add or remove Data Models from your module. Only Data Models in your current workspace are accessible. A Data Model cannot be removed from a module if there are components bound to fields in it. |
Module Size | The size of the module configuration in the Unqork database. This field does not include the size of any Automatically Referenced Imported Modules, as they are imported on load.
|
Module Size in Express | The size of the module that loads in Express View. This field includes all Automatically Referenced Imported Modules.
|
Module Settings
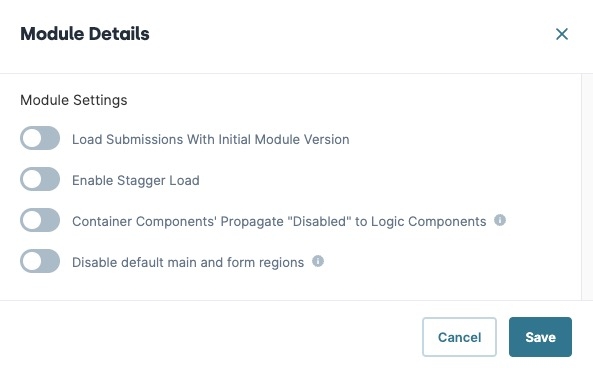
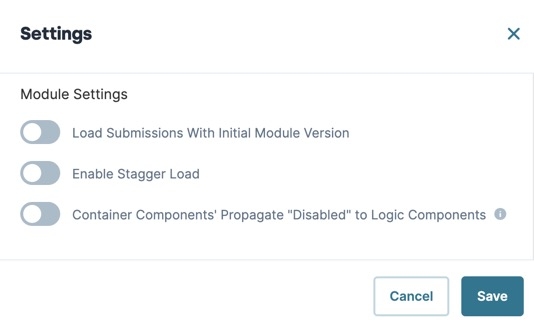
This section explores the Module Settings section of the Module Settings modal. After making adjustments to the modal, click Save.
Setting | Description |
|---|---|
Load Submissions With Initial Module Version | Set the Load Submissions With Initial Module Version toggle to By default, the Load Submissions With Initial Module Version toggle is set to |
Enable Stagger Load | Enable this setting to prevent hidden components from being loaded into the module until displayed. Doing so improves loading performance for larger modules containing many components that are hidden on load.
By default, the Enable Stagger Load setting is set to |
Container Components' Propagate "Disabled" to Logic Components | Enabling this setting controls whether the Disable Execution setting for logic components inside container components is set or ignored when the container component is disabled. For example, let's say you have a logic component inside a Panel component. If the Container Components' Propagate "Disabled" to Logic Components setting is set to By default, the Container Components' Propagate "Disabled" to Logic Components toggle is set to
|
Disable default main and form regions | For accessibility purposes, defining regions on a page is crucial, especially for users of screen readers. It helps them understand the page structure, identify where they are on the page, and avoid repetitive content where possible. The <main> region represents the primary content, so screen readers navigate to it and avoid re-reading headers and navigation. Unqork automatically wraps every application module with <main> and <form> tags to support semantic structure. But sometimes a module acts as a navigation menu or a footer, or it might contain multiple regions. Disabling the default <main> and <form> tags lets you define page regions to control the layout for screen readers. This provides more flexibility while supporting accessibility best practices. By default, this setting is set to |
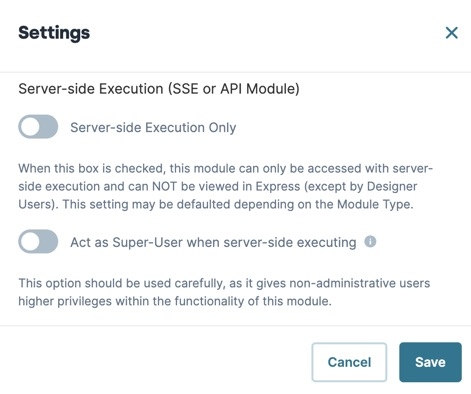
Server-Side Execution (SSE or API Module)
This section explores the Server-side Execution section of the Module Settings modal. After making adjustments to the modal, click Save.
Setting | Description |
|---|---|
Server-side Execution Only | Set the Server-Side Execution Only toggle to By default, the Server-side Execution Only toggle is set to
|
Act as Super-User When Server-Side Executing | Set the Act as Super-User When Server-Side Executing toggle to
|
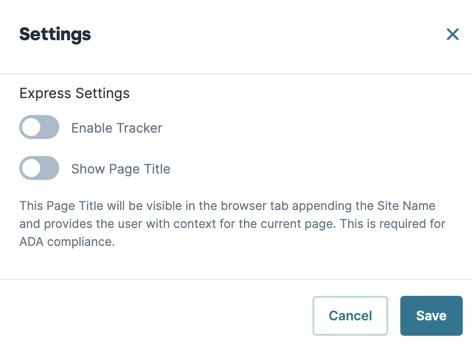
Express Settings
This section explores the Express Settings section of the Module Settings modal. After making adjustments to the modal, click Save.
Setting | Description |
|---|---|
Enable Tracker | Set the Enable Tracker toggle to You can set up a Business Intelligence (BI) Connector to access this data for analytics purposes. As an Administrator, you can also access the tracked information using the tracker endpoint: https://{NAME_OF_ENVIRONMENT}.unqork.io/fbu/uapi/tracker/submission/{SUBMISSION_ID}.
By default, the Enable Tracker toggle is set to |
Track User | After enabling the Enable Tracker toggle, set the Track User toggle to By default, the Track User toggle is set to |
Track Value | After enabling the Enable Tracker toggle, set the Track Value toggle to By default, the Track Value toggle is set to
|
Show Page Title | Set the Show Page Title toggle to By default, the Show Page Title toggle is set to |
Workflow Settings
This section explores the Workflow Settings tab of the Module Settings menu. After making adjustments to the modal, click Save.
To learn more about workflow, view our Introduction to the Workflow Builder article.
Validation
Use the Validate on Opening Submission Setting toggle to determine when your module validates data. After enabling the setting in the modal, click Save.
Setting | Description |
|---|---|
Validate on Opening Submission | When set to By default, the Validate on Opening Submission toggle is set to |
Workflow Navigation Triggers
These settings let you trigger logic components as an end-user navigates your workflow. They include the Calculator, Decisions, Initializer, Plug-In, and Data Workflow components. You can trigger any logic component in your workflow's modules. All available triggers are Post triggers. They trigger after an event occurs. For example, Post Save Trigger means the component triggers after an end-user presses Save and Exit.
Each trigger is a drop-down that lets you select logic components in your workflow's modules. After making your selections in the modal, click Save.
Setting | Description |
|---|---|
Post Trigger | Select a logic component to trigger after the end-user clicks the workflow's Next button. |
Post Validate Trigger | Select a logic component to trigger when module fields are valid. |
Post Save Trigger | Select a logic component to trigger when module fields are valid, and the end-user clicks the workflow's Save and Exit button. |
User Permissions
This section explores the User Permissions tab of the Module Settings menu. After making adjustments to the modal, click Save.
To learn more about Module User Permissions, view our Module Permissions article.
Role-Based Access Control
Using the Module Permissions , you can specify how your roles interact with your components and modules.
In the Module Permissions modal, there are two settings you can use to customize module RBAC:
Setting | Description |
|---|---|
Customize RBAC for This Module | When set to By default, the Customize RBAC for This Module toggle is set to |
Allow Access to Anonymous Users | When set to By default, the Allow Access to Anonymous Users toggle is set to |
Customizing Role Permissions
When the Customize RBAC for This Module toggle is set to ![]() (ON), you can adjust permissions for specific roles in your module. The modal displays roles and permissions in the following grid.
(ON), you can adjust permissions for specific roles in your module. The modal displays roles and permissions in the following grid.
Attribute | Description |
|---|---|
Role (Express) | The Express role. |
Permission | The permission for the corresponding Express role. Permissions include:
|
Effective Permission | Confirmation of the selected permission from the Permission drop-down. |
Inherited From | If the permission is Inherit, this column displays where the permission was inherited from. |
To make changes to role permissions:
Find the role you'd like to customize.
From the Permissions drop-down, select a permission.
Click Save to return to the Module Builder.
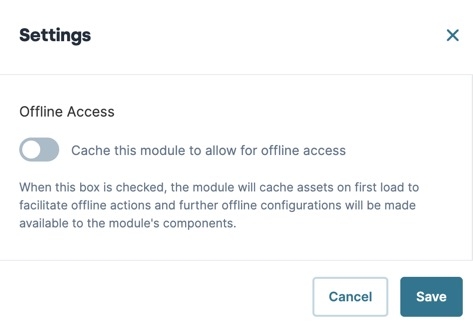
Offline Access
This feature has been sunset following the 7.10.0 release. For more information about Platform releases, view our 2024 Release Calendar.
This section explores the Offline Access section of the Module Settings modal. After making adjustments to the modal, click Save.
Setting | Description |
|---|---|
Cache this Module to Allow for Offline Access | When the Cache this Module to Allow for Offline Access toggle is By default, this setting is set to
|
.jpg)
.jpg)
.jpg)
.jpg)
