Working in Unqork, you may need to convert data from one format to another. To do that, you'll use a transform. Transforms are helpful for:
Sending data to an external service that requires a format other than what's used in Unqork (JSON).
Receiving data from an external service that only provides data in a format other than JSON.
Sending data between Unqork modules using different Property IDs for the same data.
For both sending and receiving data, you'll configure transforms in the Module Builder.
What Is a Transform?
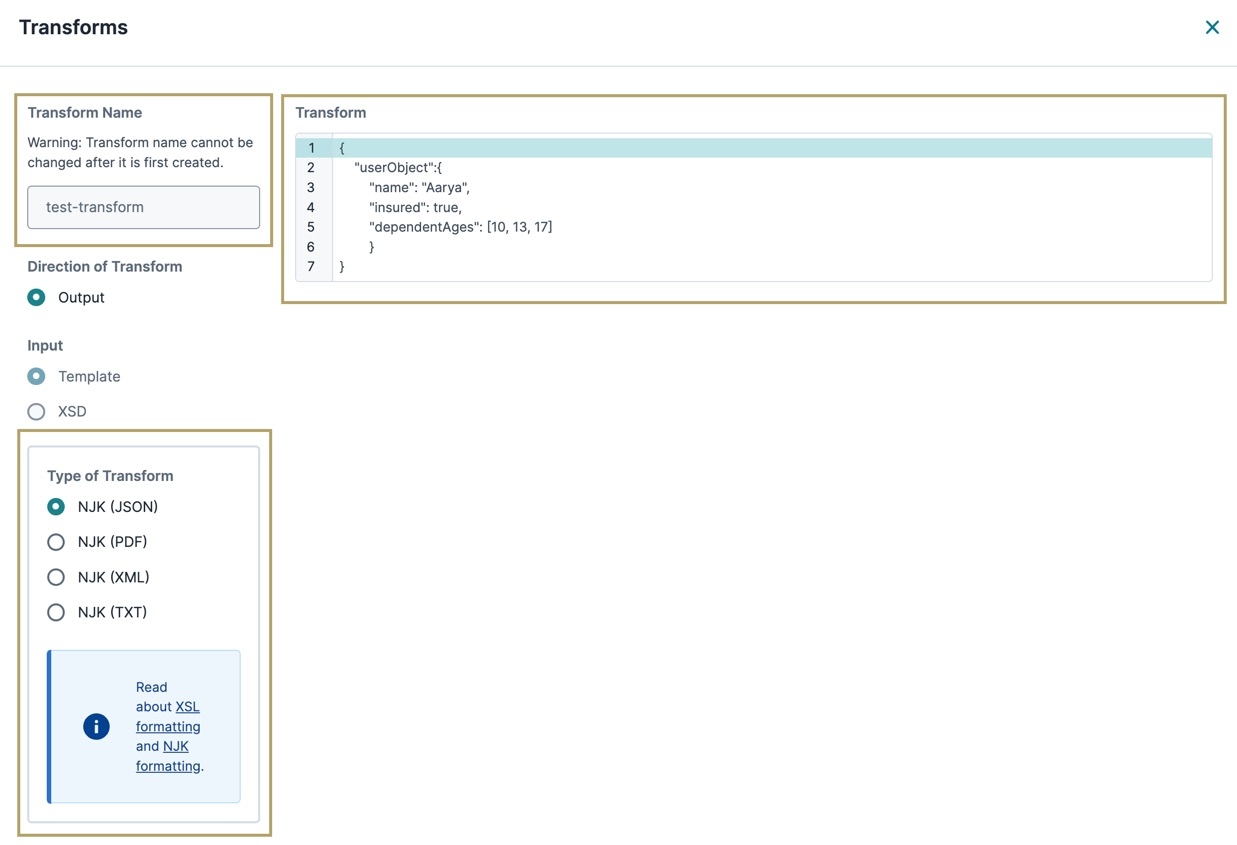
A transform is like a set of instructions you give Unqork to reformat your data. First, specify whether the data is coming in or going out of Unqork. Doing so determines the direction of the transform. Then, select the type of transform you want to perform, and choose a programming language compatible with your data's destination. For Input transforms, you can only use JSON because that is what Unqork uses. For Output transforms, you can use (where the type of language is first and the output is in parentheses):
NJK (JSON)
XSL (XML)
NJK (PDF)
NJK (XML)
NJK (TXT)
For Output transforms, confirm the format needed based on your destination.
Once a transform type is selected, you can write your transform and input any structural changes. For example, you might change Label Text or Property IDs when sending DATA between Unqork modules.
Accessing Module Transforms
You can access transforms from either the Module Builder or Workflow Builder.
To access transforms:
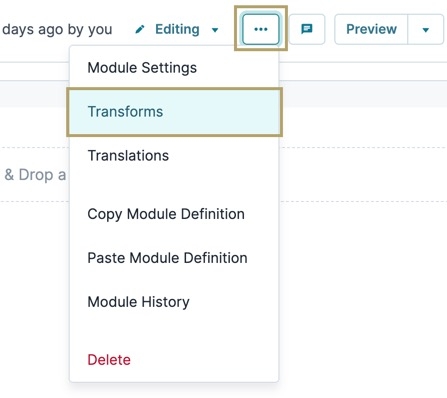
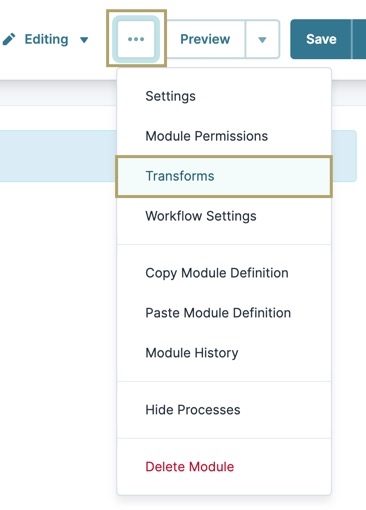
Open your module in the Module Builder.
Click the
.png) (ellipsis) button.
(ellipsis) button.Select Transforms.
Creating a Transform
The first step of working with transforms in Unqork is to create one.
To create a transform:
Click + Add New Transform.
In the Transform Name field, enter a name for your transform. Use this name to reference your transform in your module.
Once created, you cannot change the name.
Under Type of Transform, select the type of transform you want to use.
In the Transform field, enter your transform.
Click Save.
Click Back to return to the Transforms modal. Or, click X to return to the Module Builder.
Referencing a Module Transform
Now, let's reference your transform in your module using a Plug-In component. Then, configure a Button component to trigger the Plug-In component.
Configure a Plug-In Component
A Plug-In component lets you import information from your transform into your module. You'll use the component's Inputs table to reference the transform. Then, use the component's Outputs table to determine how the data is transformed.
Open the module where you created the transform.
In the Module Builder, drag and drop a
 Plug-In component onto your canvas.
In the Property ID and Canvas Label Text fields, enter
pluginExecuteTransform.Navigate to the component's Data settings.
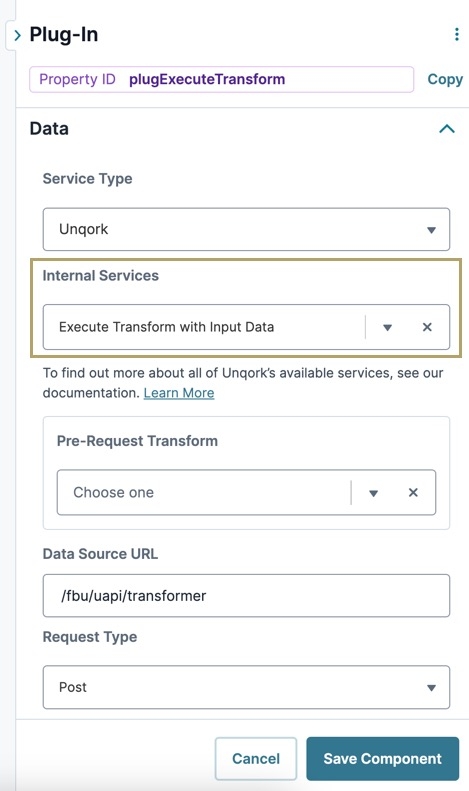
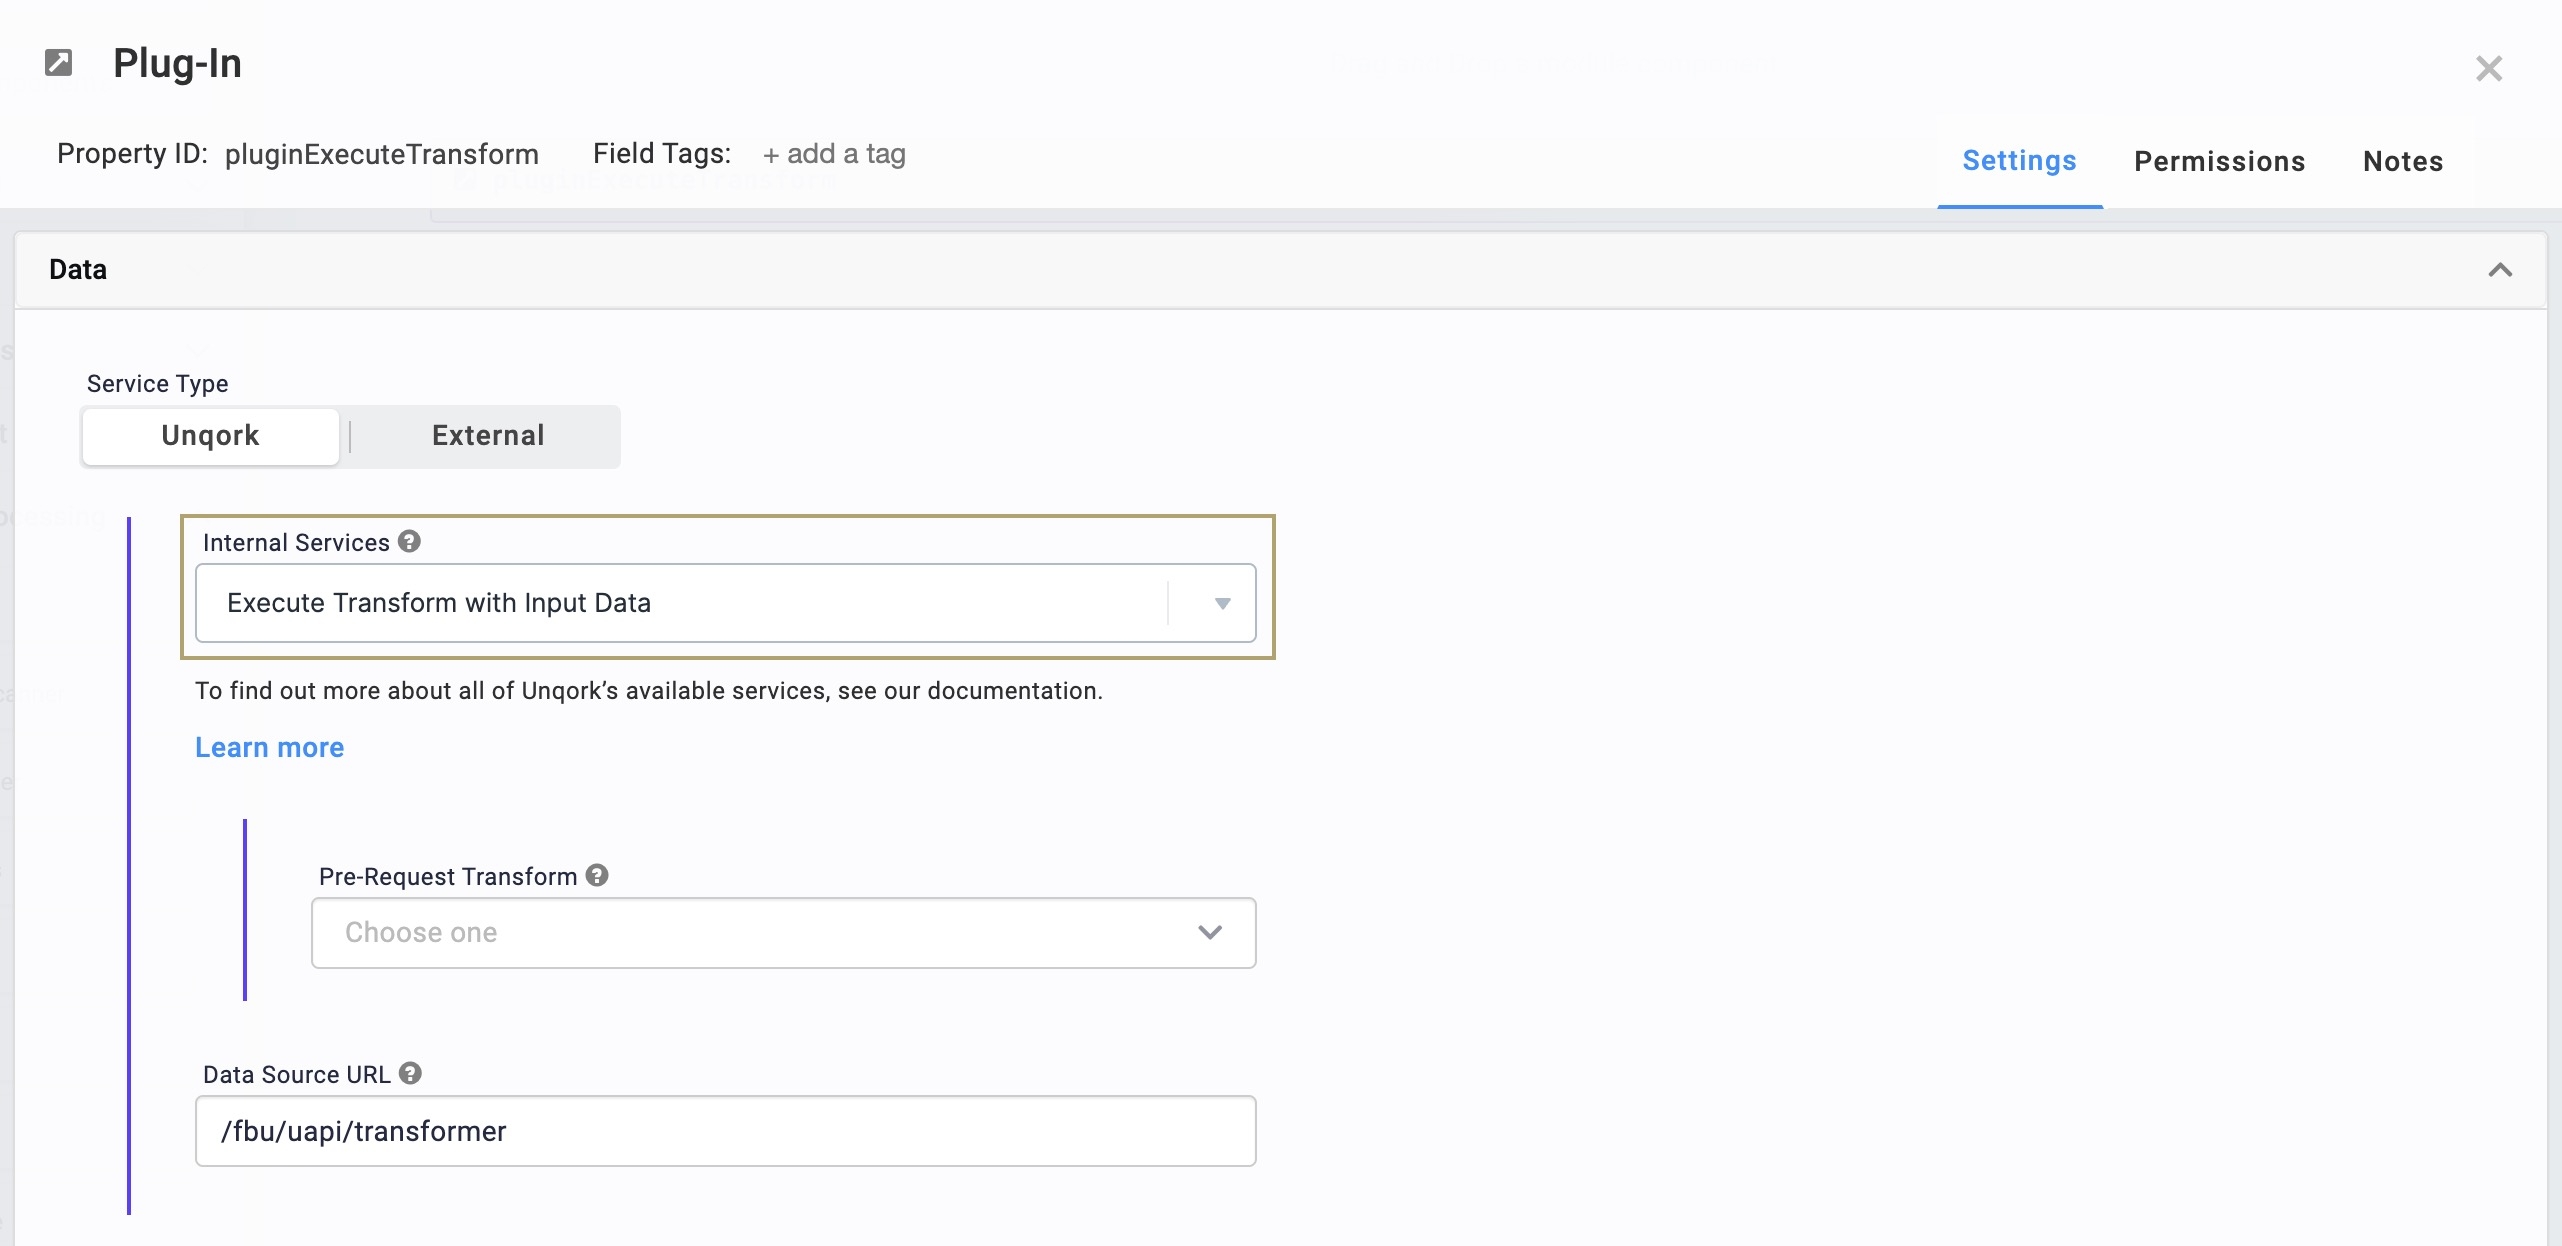
From the Internal Services drop-down, select Execute Transform with Input Data. The Data Source URL and Request Type autopopulate.
Next to Inputs & Outputs, click Edit.
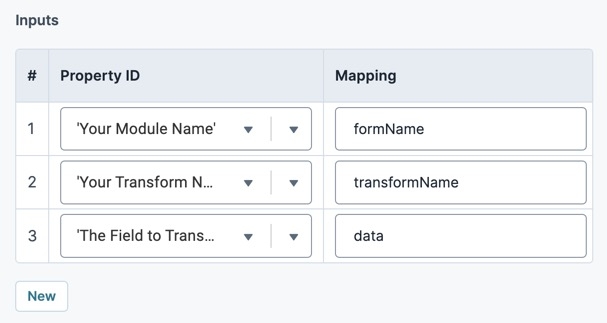
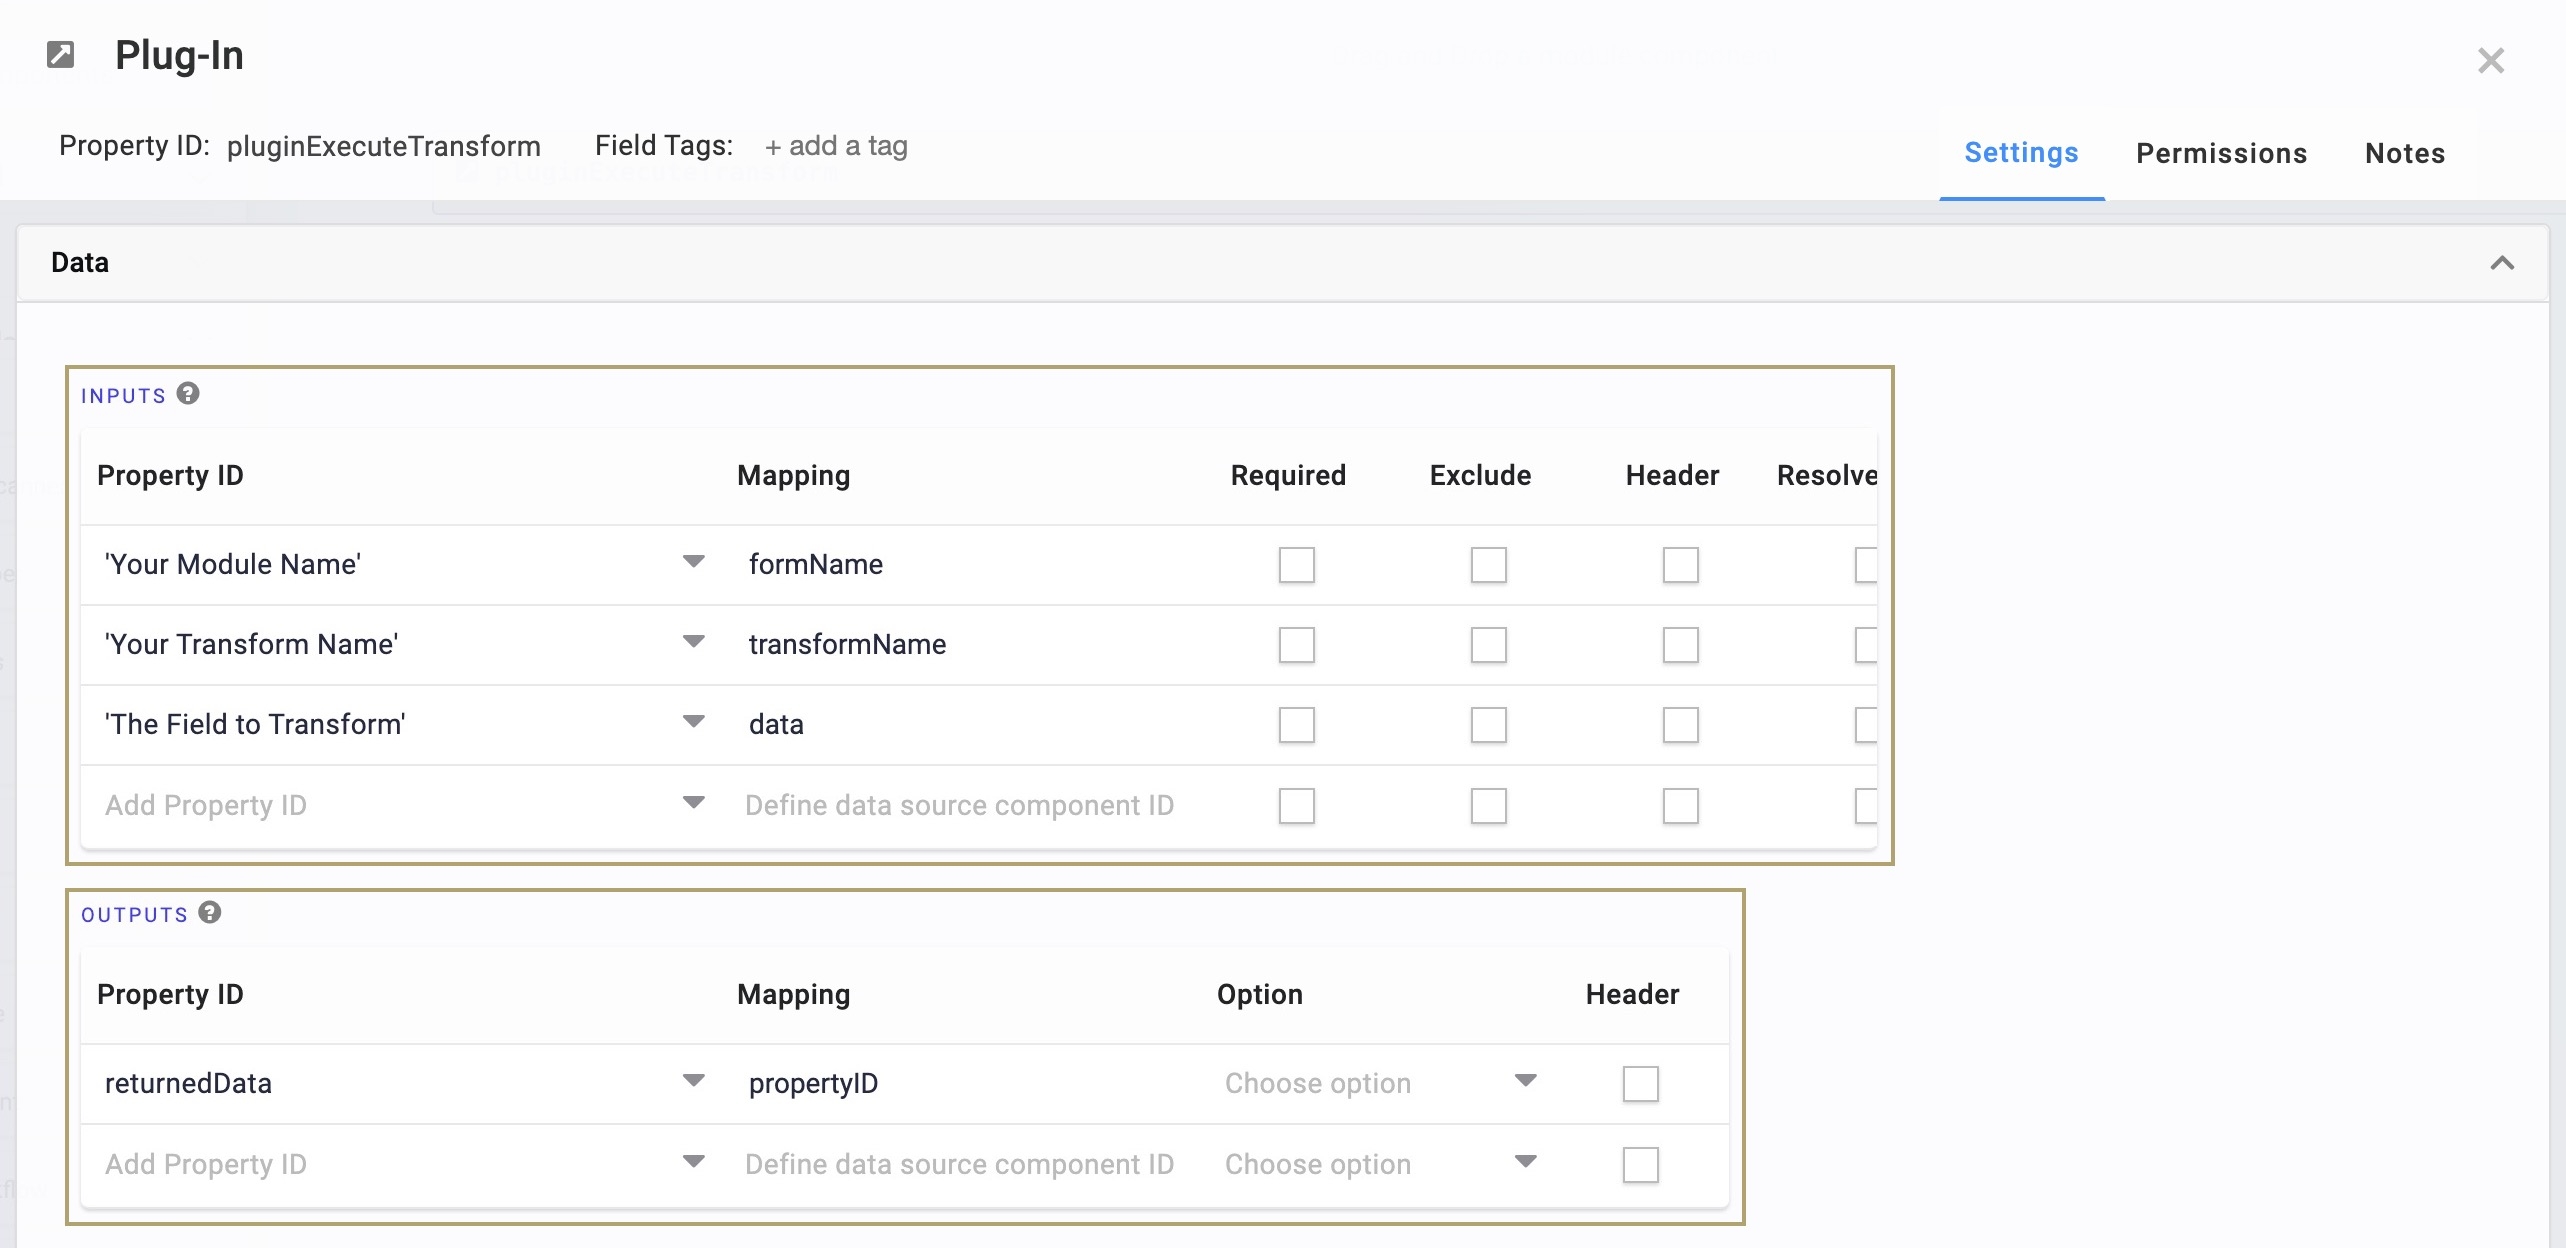
In the Inputs table, enter the following:
Property ID
Mapping
'Your Module Name'
formName
'Your Transform Name'
transformName
'The Field to Transform'
data
The Property ID column above is unique to your transform, module, and field. Repeat this step for each field you're transforming.
In the Outputs table, consider the following:
Transform Type
Mapping
Input
Map the information coming out of the transform to fields in your module. This overrides the original information.
Output
Map the information coming from the transform to where you want it to go. For example, TXT or PDF.
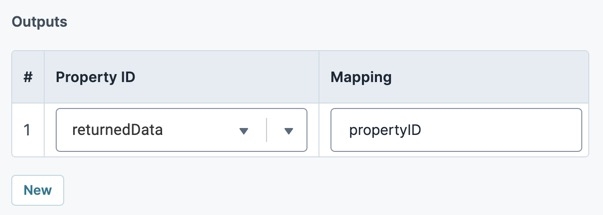
The Property ID column reads as returnedData for either transform type. The Mapping column references the Property ID of the component that'll hold your transformed data.
Click Save Component.
Configure a Button Component
Next, configure a Button component to trigger the Plug-In component.
Drag and drop a Button component onto your canvas, placing it below the pluginExecuteTransform Plug-In component
In the Property ID field, enter
btnExecuteTransform.In the Label Text field, enter
Execute Transform.Navigate to the component's Actions settings.
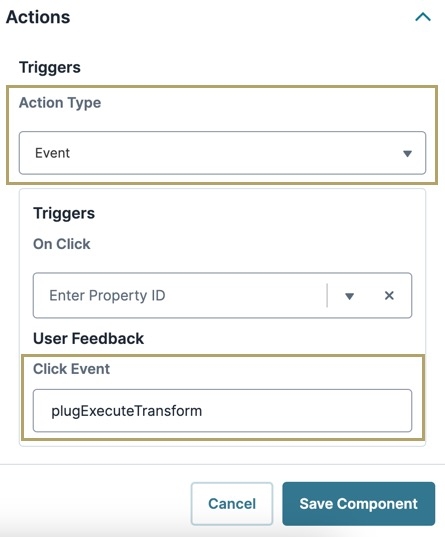
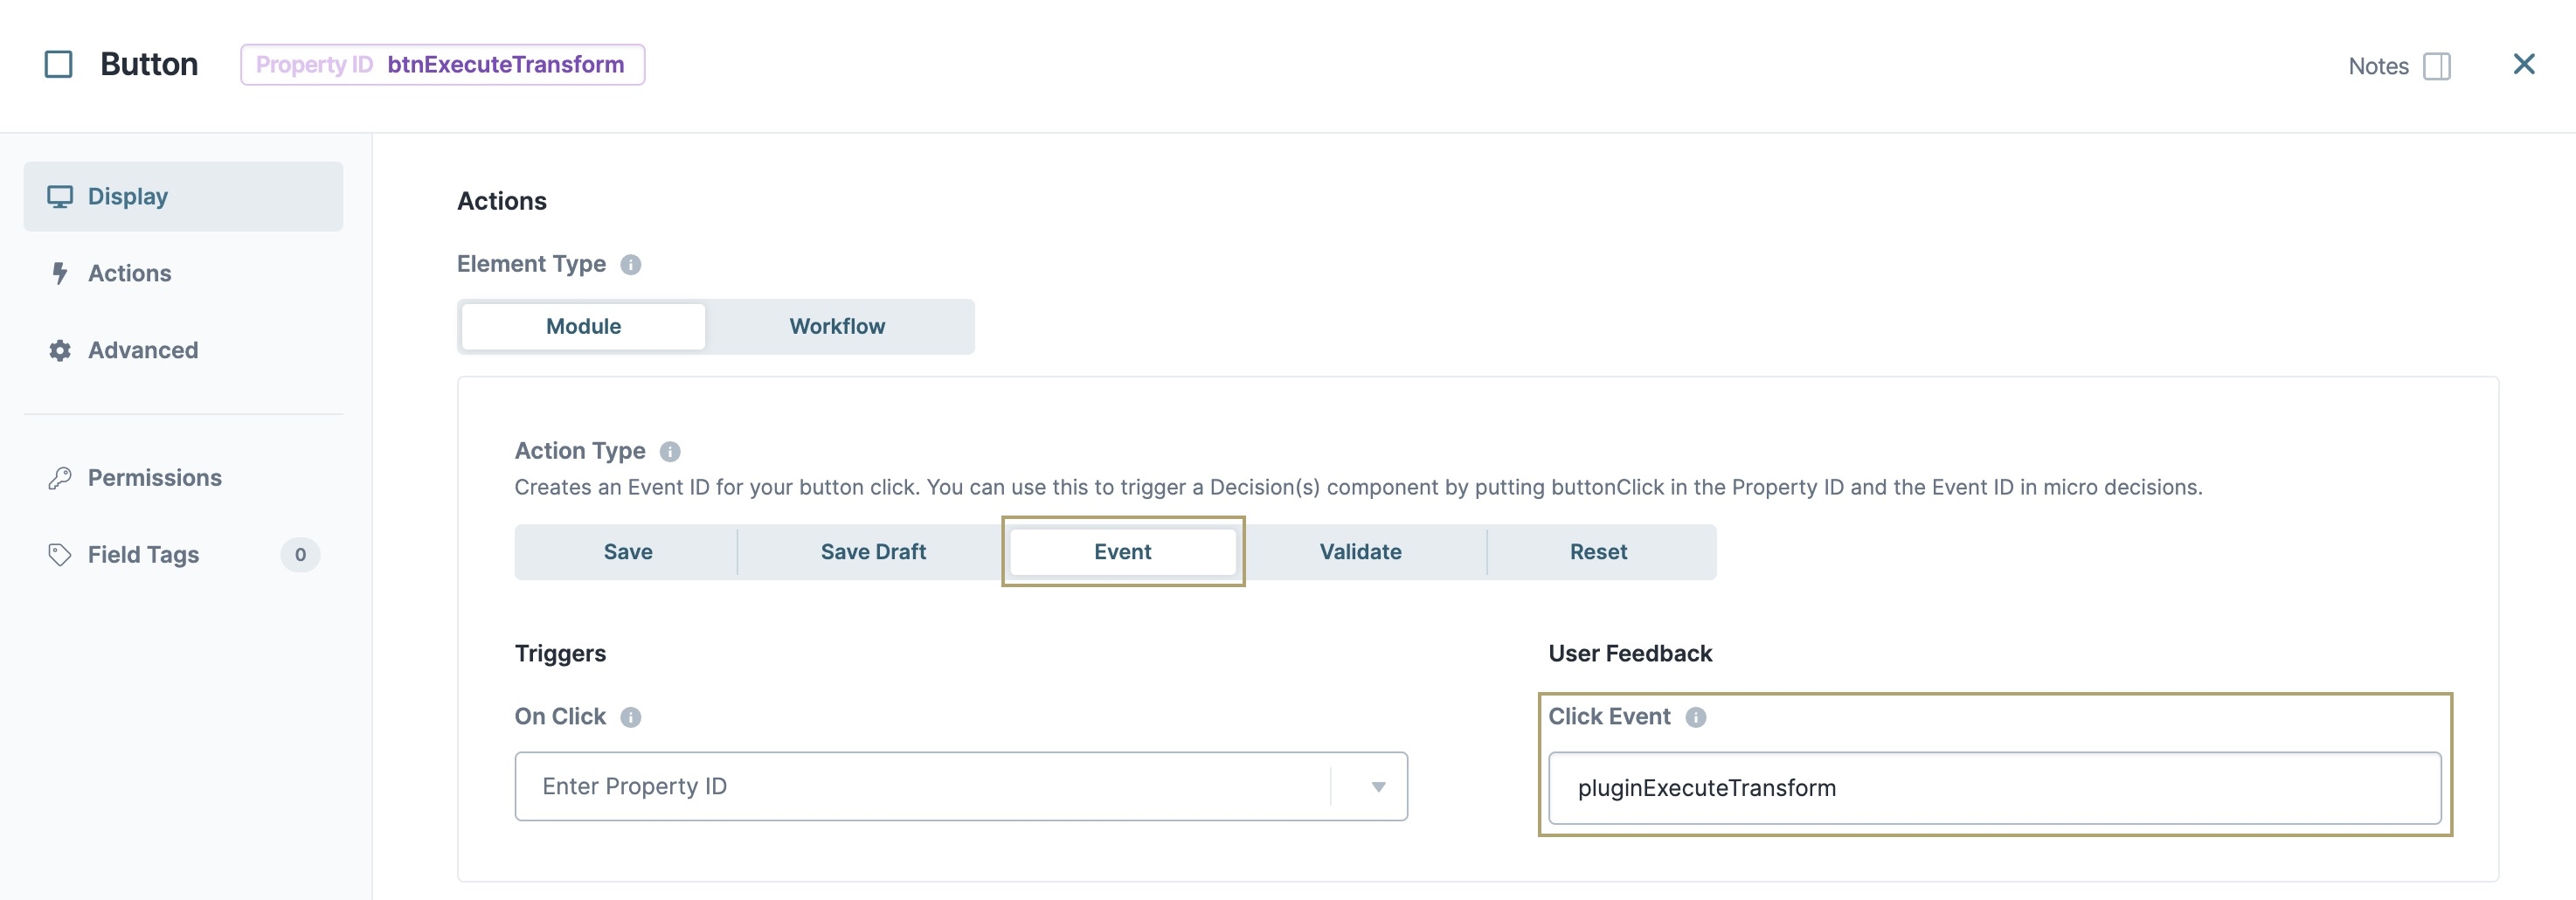
Set the Action Type to
Event.In the Click Event field, enter the Plug-In component's Property ID.
Click Save Component.
Save your module.
Using the Active Transforms Table
If you click Back after creating transforms, all your transforms display in the Active Transforms table. This table displays the following information about your transforms:
Attribute | Description |
|---|---|
Active Transforms | The name of the transform. |
Direction | The direction of the transform. |
Type | The type of transform, including the template language and the output format in parentheses:
|
Created By | The user who created the transform. |
Last Modified | The date and time the transform was created. |
Last Modified By | The user who last modified the transform. |
Actions | The available actions you can you can take on the transform. Actions include:
|
Editing a Transform
After creating and testing your transform, you can make changes to it. Once you've created a transform, you can only change how the transform functions.
To edit a transform:
Open your module in the Module Builder.
Click the
.png) (ellipsis) button.
(ellipsis) button.Select Transforms. Your transforms display in the Active Transforms table.
From the Action ▾ drop-down, click View and Edit for the transform you want to edit.
Edit your transform as necessary.
You cannot edit the transform name after creation.
Click Save Changes.
Click Back to return to the Transforms modal. Or, click X to return to the Module Builder.
Downloading a Transform
If you restore a previously deleted module, the transforms do not restore with it. To avoid having to recreate the transform, you can download it as a backup. Then, you can copy and paste it to a new transform.
It's important to note that your downloaded transform includes the transform body only. The file does not include the Unqork settings contained in it. To restore your Unqork settings, set them up as you would a new transform.
To download a transform:
Open your module in the Module Builder.
Click the
.png) (ellipsis) button.
(ellipsis) button.Select Transforms. Your transforms display in the Active Transforms table.
From the Action ▾ drop-down, click Download for the transform you want to download.
Locate the file in the downloads folder of your computer.
Deleting a Transform
If you no longer need a transform, you can delete it. Keep in mind that deleting a transform does not delete the components that reference it. You still need to delete any references to the transform from your module.
To delete a transform:
Open your module in the Module Builder.
Click the
.png) (ellipsis) button.
(ellipsis) button.Select Transforms. Your transforms display in the Active Transforms table.
From the Action ▾ drop-down, click Delete for the transform you want to remove.
At the Delete confirmation message, click OK.
Testing a Transform
To test the transform, open your module in Express View and create a submission. Next, use the submission ID in the Transforms modal.
The submission ID is the middle of the three alphanumeric codes in the Express View URL. You can see a sample submission ID bolded in the following URL: https://trainingx.unqork.io/5e13aa4616d385021040e00/5e8769e9c74b570d5e9d88bb/5e12aa4616d38502104.
If you have a large module but want to test transforms with only part of the module, create multiple transforms. Then, add the smaller transforms to a parent transform. So, you'd have one transform for part A, one transform for part B, and a parent transform.
To test your transform:
Open your module in the Module Builder.
Click the
.png) (ellipsis) button.
(ellipsis) button.Select Transforms. Your transforms display in the Active Transforms table.
From the Action ▾ drop-down, click View and Edit for the transform you want to test.
Expand the Unit Testing
.png) panel.
panel.In the Submission ID field, enter your submission ID. Submission data from the module populates the Input field.
Click Run Test. The transformed data displays in the Output field.
Working in Unqork, you may need to convert data from one format to another. To do that, you'll use a transform. Transforms are helpful for:
Sending data to an external service that requires a format other than what's used in Unqork (JSON).
Receiving data from an external service that only provides data in a format other than JSON.
Sending data between Unqork modules using different Property IDs for the same data.
For both sending and receiving data, you'll configure transforms in the Module Builder.
What Is a Transform?
A transform is like a set of instructions you give Unqork to reformat your data. First, specify whether the data is coming in or going out of Unqork. Doing so determines the direction of the transform. Then, select the type of transform you want to perform, and choose a programming language compatible with your data's destination. For Input transforms, you can only use JSON because that is what Unqork uses. For Output transforms, you can use (where the type of language is first and the output is in parentheses):
NJK (JSON)
XSL (XML)
NJK (PDF)
NJK (XML)
NJK (TXT)
For Output transforms, confirm the format needed based on your destination.
Once a transform type is selected, you can write your transform and input any structural changes. For example, you might change Label Text or Property IDs when sending data between Unqork modules.
Accessing Module Transforms
You can access transforms from either the Module Builder or Workflow Builder.
To access transforms:
Open your module in the Module Builder.
Click the
.png) (ellipsis) button.
(ellipsis) button.Select Transforms.
Creating a Transform
The first step of working with transforms in Unqork is to create one.
To create a transform:
Click + New Transform.
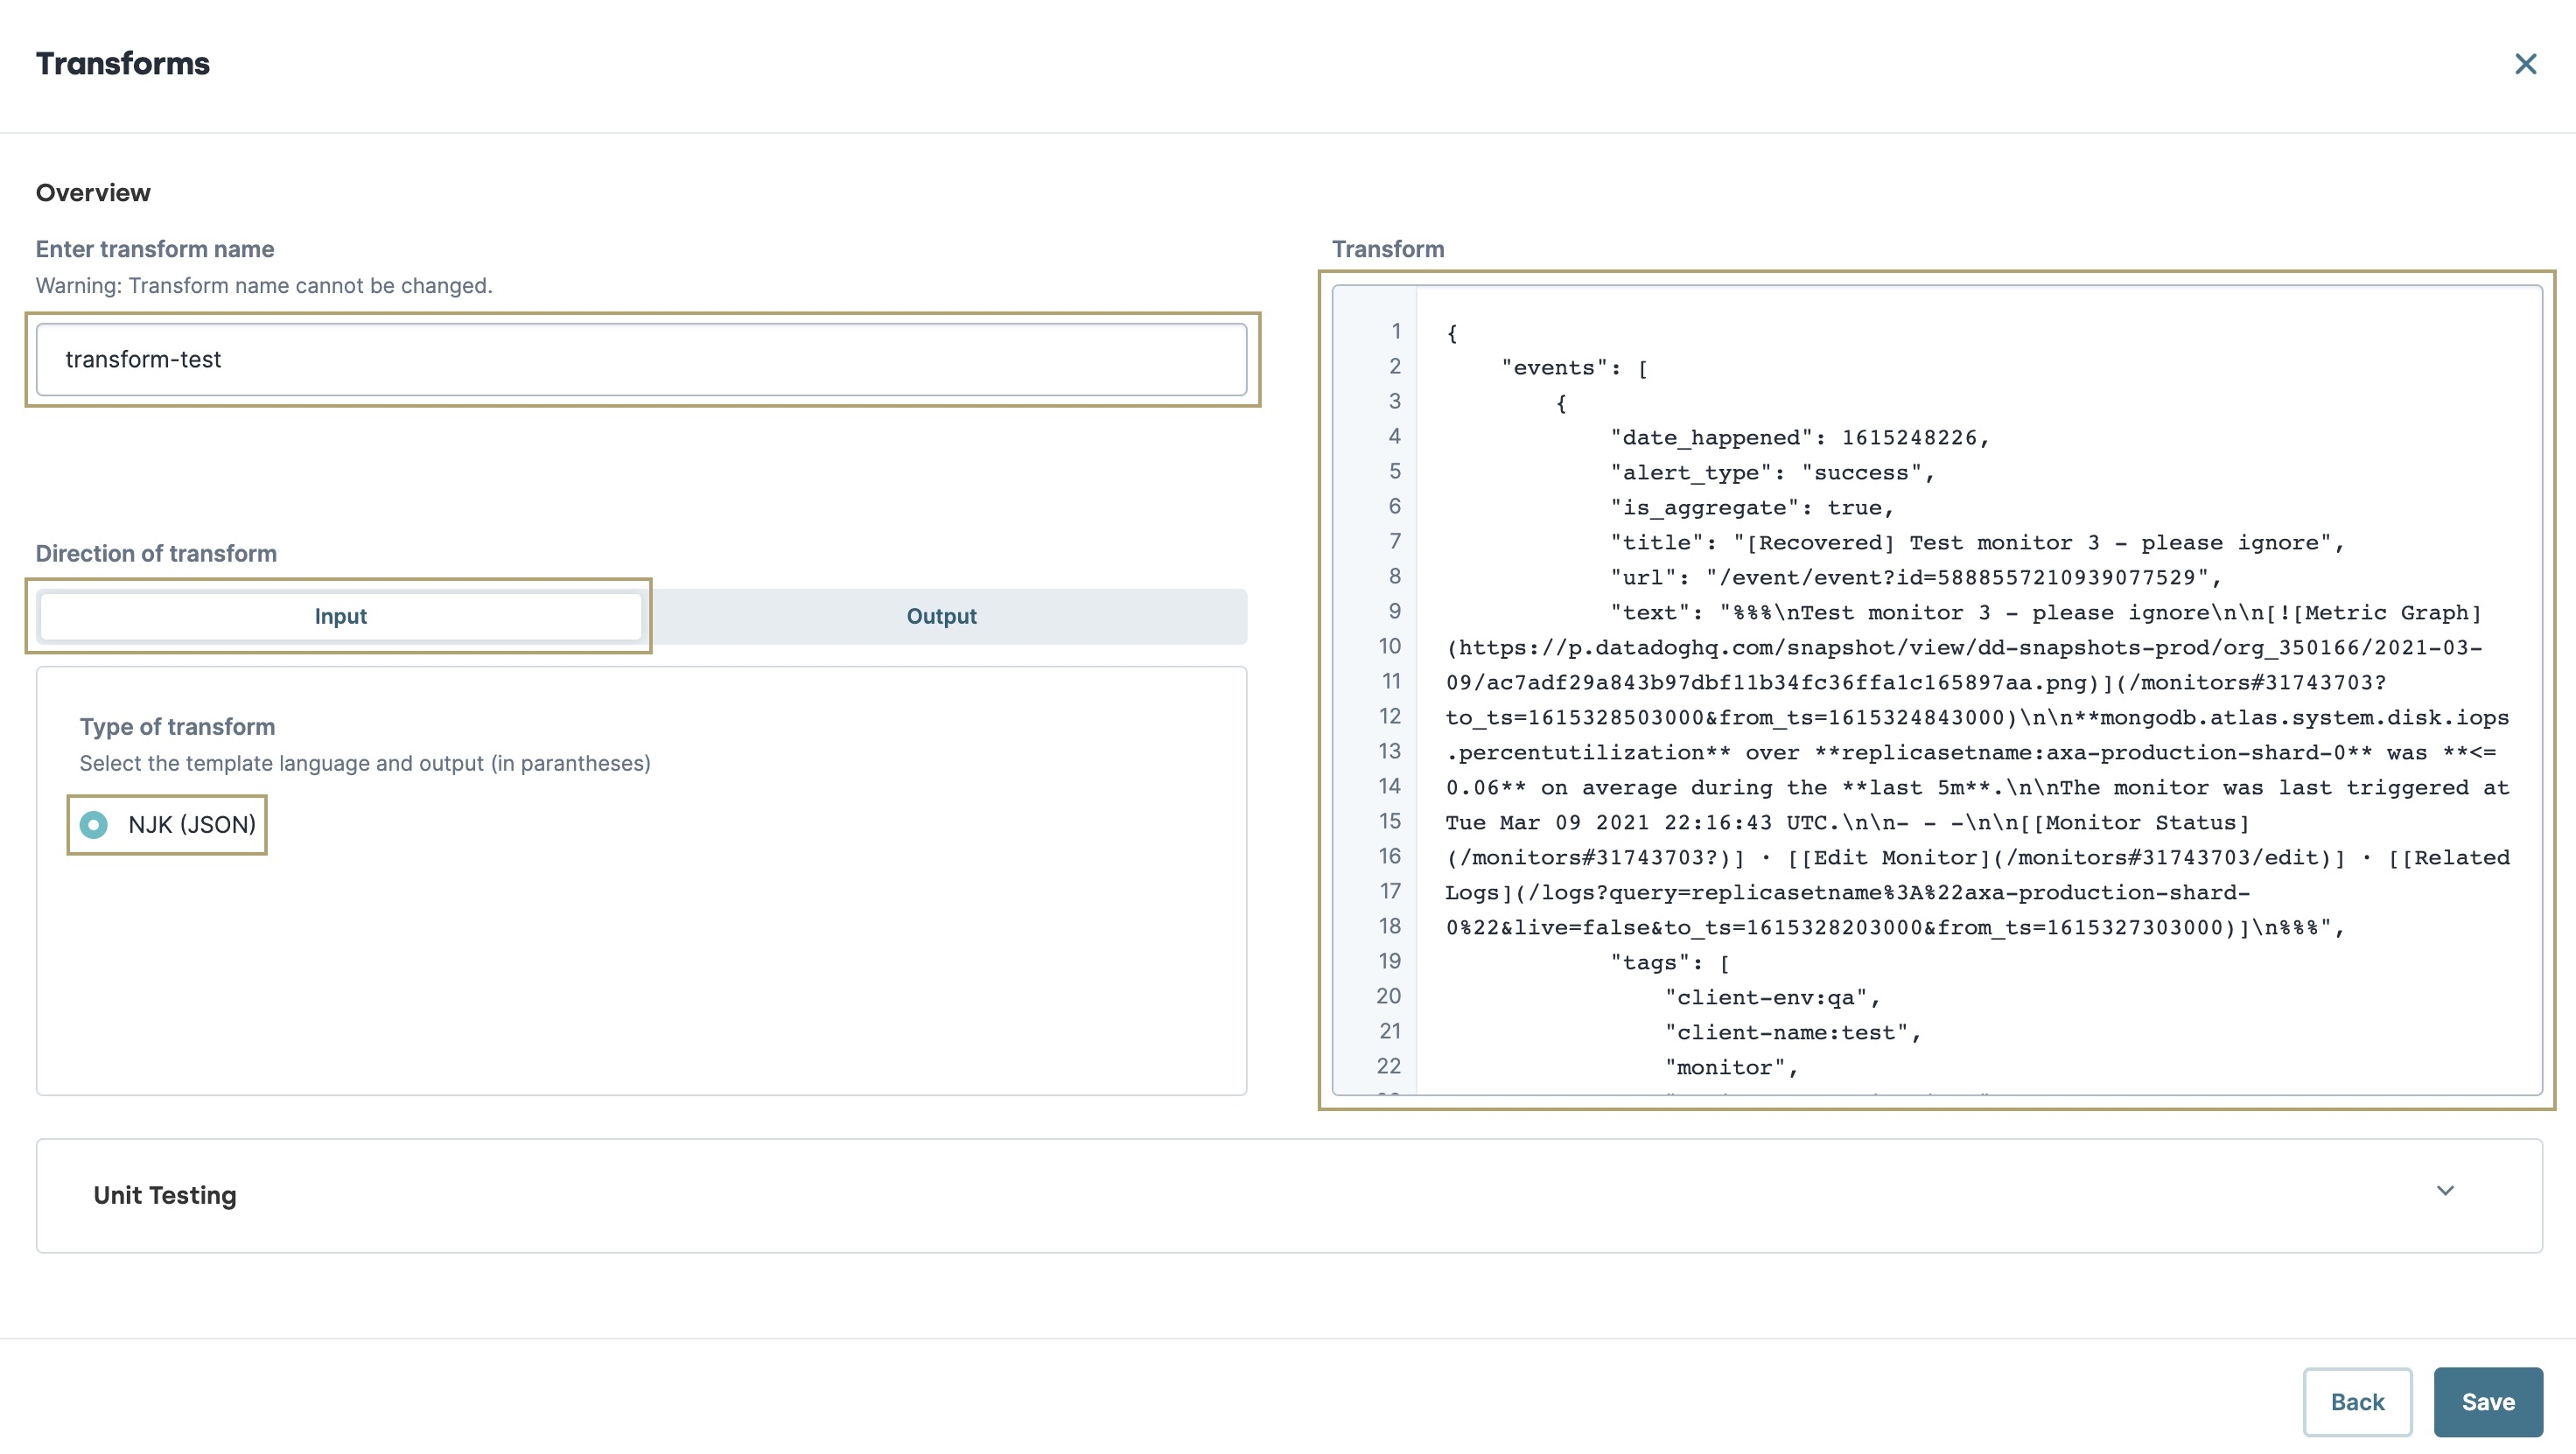
In the Enter Transform Name field, enter a name for your transform. Use this name to reference your transform in your module.
Once created, you cannot change the name.
Under Direction of Transform, select Input or Output depending on the direction of your transform.
For an Output type, click the Output tab and select the Type of Transform you want to use.
By default, the only available Input type is NJK (JSON).
In the Transform field, enter your transform.
Click Save.
Click Back to return to the Transforms modal. Or, click X to return to the Module Builder.
Referencing a Module Transform
Now, lets reference your transform in your module using a Plug-In component. Then, configure a Button component to trigger the Plug-In component.
Configure a Plug-In Component
A Plug-In component lets you import information from your transform into your module. You'll use the component's Inputs table to reference the transform. Then, use the component's Outputs table to determine how the data is transformed.
Open the module where you created the transform.
In the Module Builder, drag and drop a
 Plug-In component onto your canvas.
In the Property ID and Canvas Label Text fields, enter
pluginExecuteTransform.From the Internal Services drop-down, select Execute Transform with Input Data. The Data Source URL and Request Type autopopulate.
In the Inputs table, enter the following:
Property ID
Mapping
'Your Module Name'
formName
'Your Transform Name'
transformName
'The Field to Transform'
data
The Property ID column above is unique to your transform, module, and field. Repeat this step for each field you're transforming.
In the Outputs table, consider the following:
Transform Type
Mapping
Input
Map the information coming out of the transform to fields in your module. This overrides the original information.
Output
Map the information coming from the transform to where you want it to go. For example, TXT or a PDF.
The Property ID column reads as returnedData for either transform type. The Mapping column references the Property ID of the component that'll hold your transformed data.
Click Save.
Configure a Button Component
Next, add a Button component to trigger the Plug-In component.
Drag and drop a Button component onto your canvas, placing it below the pluginExecuteTransform
 Plug-In component.
In the Property ID field, enter btnExecuteTransform.
In the Label Text field, enter
Execute Transform.Set the Action Type to Event.
In the Click Event field, enter the Plug-In component's Property ID.
Click Save & Close.
Save your module.
Using the Active Transforms Table
If you click Back after creating transforms, all your transforms display in the Active Transforms table. This table displays the following information about your transforms:
Attribute | Description |
|---|---|
Active Transforms | The name of the transform. |
Direction | The direction of the transform. Options include Input or Output. |
Type | The type of transform, including the template language and the output format in parentheses:
|
Created By | The user who created the transform. |
Last Modified | The date and time the transform was created. |
Last Modified By | The user who last modified the transform. |
Actions | The available actions you can you can take on the transform. Actions include:
|
Editing a Transform
After creating and testing your transform, you can make changes to it. Once you've created a transform you can only change how the transform functions.
To edit a transform:
Open your module in the Module Builder.
Click the
.png) (ellipsis) button.
(ellipsis) button.Select Transforms. Your transforms display in the Active Transforms table.
From the Action ▾ drop-down, click View and Edit for the transform you want to edit.
Edit your transform as necessary.
You cannot edit the transform name after creation.
Click Save.
Click Back to return to the Transforms modal. Or, click X to return to the Module Builder.
Downloading a Transform
If you restore a previously deleted module, the transforms do not restore with it. To avoid having to recreate the transform, you can download it as a backup. Then, you can copy and paste it to a new transform.
It's important to note that your downloaded transform includes the transform body only. The file does not include the Unqork settings contained in it. To restore your Unqork settings, set them up as you would a new transform.
To download a transform:
Open your module in the Module Builder.
Click the
.png) (ellipsis) button.
(ellipsis) button.Select Transforms. Your transforms display in the Active Transforms table.
From the Action ▾ drop-down, click Download for the transform you want to download.
Locate the file in the downloads folder of your computer.
Deleting a Transform
If you no longer need a transform, you can delete it. Keep in mind that deleting a transform does not delete the components that reference it. You still need to delete any references to the transform from your module.
To delete a transform:
Open your module in the Module Builder.
Click the
.png) (ellipsis) button.
(ellipsis) button.Select Transforms. Your transforms display in the Active Transforms table.
From the Action ▾ drop-down, click Delete for the transform you want to remove.
At the Delete confirmation message, click OK.
Testing a Transform
To test the transform, open your module in Express View and create a submission. Next, use the submission ID in the Transforms modal.
The submission ID is the middle of the three alphanumeric codes in the Express View URL. You can see a sample submission ID bolded in the following URL:
https://trainingx.unqork.io/5e13aa4616d385021040e00/5e8769e9c74b570d5e9d88bb/5e12aa4616d38502104.
If you have a large module but want to test transforms with only part of the module, create multiple transforms. Then, add the smaller transforms to a parent transform. So, you'd have one transform for part A, one transform for part B, and a parent transform.
To test your transform:
Open your module in the Module Builder.
Click the
.png) (ellipsis) button.
(ellipsis) button.Select Transforms. Your transforms display in the Active Transforms table.
From the Action ▾ drop-down, click View and Edit for the transform you want to test.
Expand the Unit Testing
.png) panel.
panel.In the Submission ID field, enter your submission ID. Submission data from the module populates in the Input field.
Click Run Test. The transformed data displays in the Output field.
